
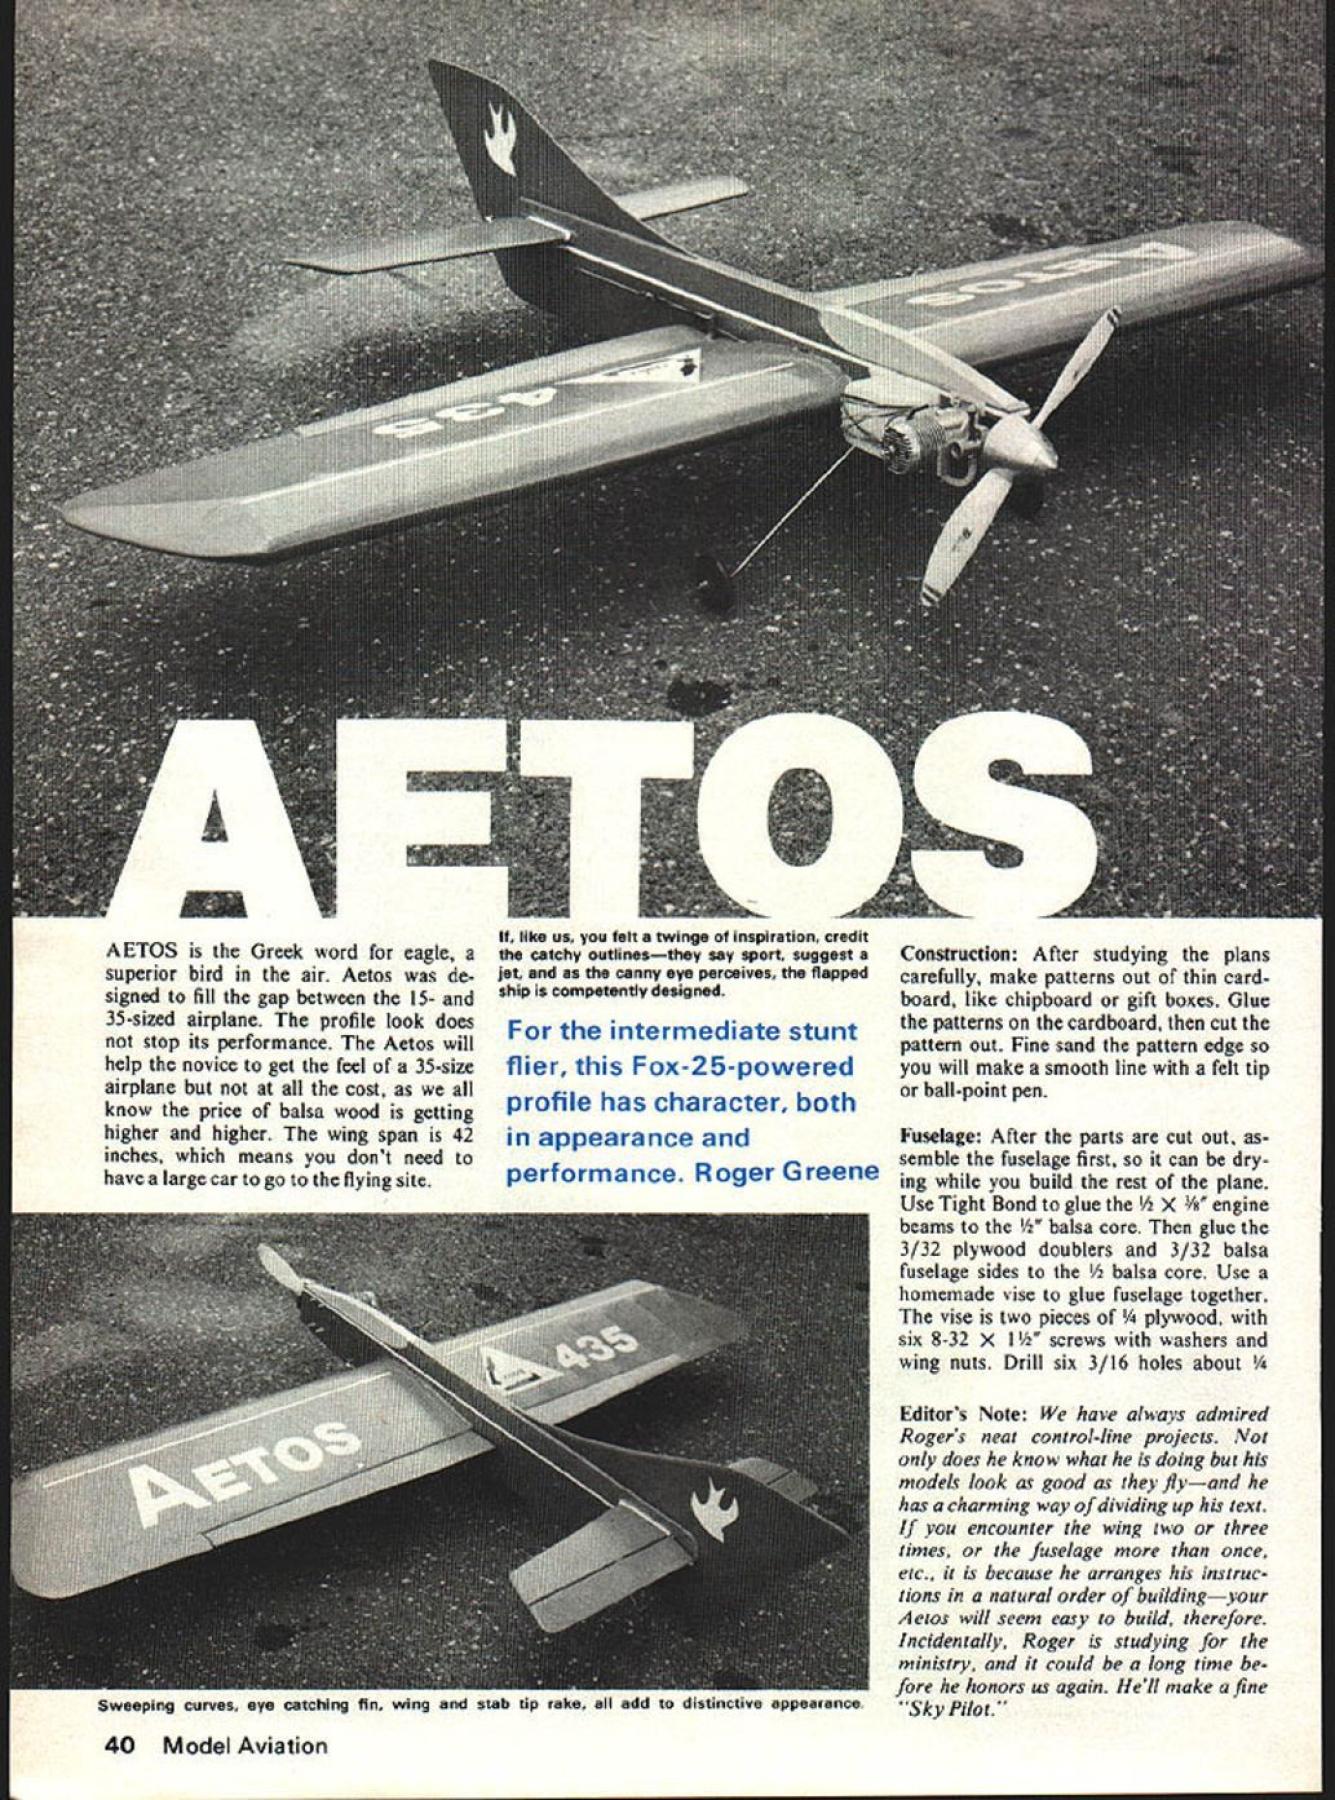
A AETOS Greek word eagle superior bird air Aetos de signed fill gap between 15- 35-sized airplane profile look does stop its performance Aetos will help novice get feel 35-size airplane cost know price balsa wood getting higher higher wing span 42 inches means dont need have large car go flying site like us felt twinge inspiration credit catchy outlinesthey say sport suggest jet canny eye perceives flapped ship competently designed intermediate stunt flier Fox-25-powered profile has character both appearance performance Roger Greene Construction After studying plans carefully make patterns out thin card board like chipboard gift boxes Glue patterns cardboard cut pattern out Fine sand pattern edge will make smooth line felt tip ball-point pen Fuselage After parts cut out semble fuselage first can dry ing build rest plane Use Tight Bond glue engine beams a core glue 3/32 plywood doublers 3/32 balsa fuselage sides a core Use homemade vise glue fuselage together vise two pieces /4 plywood six 8-32 X 1 ws washers wing nuts Drill six 3/16 holes about Editors Note have always admired Rogers neat control-line projects does know what doing models look good flyand has charming way dividing up text encounter wing two three times fuselage once etc because arranges instruc tions natural order buildingyour etos will seem easy build therefore Incidentally Roger studying ministry could long time fore honors us again Hell make afine Sky Pilot 40 Model Aviation Sweeping curves eye catching fin wing stab tip rake add distinctive appearance inch outline fuselage Slip fuselage tighten Set aside dry about 24-48 hours Wing Cut 1 inch oft trailing edge wing two 3 X 1/16 X 36 balsa sheets remaining 2 inches leading edge planking will glued leading edge triangle Use Sigment Ambroid glue must waterproof Tape wing plan bench cover wax paper Saranwrap Pin 1 X 1/16 X 36 balsa trailing edge over plan Space ribs /8 X bottom spar over plan Put top spar ribs /s X leading edge trailing pieces Check alignment glue pin trailing edge Also glue top X 1/16 X 36 trailing edge sheet Epoxy /8 bellcrank plywood mount place Set aside dry Rudder Cut glue rudder pieces gether over plan covered wax paper Saranwrap Flaps Stabilizer Elevator Draw line edge side surface center Use guide sand hinge Sand surface shape shown plan Drill insert epoxy holes push control horns align pin over plan Set aside dry Fuselage Remove vise Glue top balsa piece place align pin Wing Connect leadouts pushrod bellcrank Insert leadouts through board ribs Secure bellcrank platform bolt provided Solder nut will come off flight Moisten leading edge planking towel dry remove excess water wrap over wing pin lightly careful damage wood pins wet Glue wing tip pieces together glue end ribs planking dry glue Sigment similar Always check alignment looking trailing edge top bottom thickest part airfoil two should parallel properly aligned Set aside dry Flaps Stabilizer Elevator Cut slots receive hinges Put some petroleum jelly Vaseline hinge point hinge avoid epoxy getting hinge point epoxy hinges wing time Put epoxy slots insert hinges Make sure hinge line aligned trailing edge Rudder Sand shape shown plan Engine Installation Use four 4-40 bolts long four T nuts ensure zero-degree thrust alignment remove glow plug Cut 12-in piece of/i wire place between center cooling fins head Looking down top engine wire will give line eye ball engine zero degree thrust Mark March 1979 41 side-mounted Fox 25 what appears 2-oz Sullivan slant tankRoger didnt say Tank appears shock mounted pad eliminate foaming evidence liquid Silicon rubber beading PAMPA emblem has respect Roger son David Aetos Note Rogers PAMPA decal Typical specia interest groups PAMPA puts real meaning stuntwhy join guys white hats drill holes check make certain fit Fuselage Wing Make mark leading edge planking 3/32 inch center rib will tell fuselage will after plank center three ribs 1/16 balsa Sand shape plans being careful sand edge off canopy area flaps dry solder U-shaped piece tin bearing control horn See plan Insert flaps wing slot fuselage insert wing Epoxy flap hinges same before Epoxy wing fuselage gether aligning marks lead ing edge planking made earlier both sides fuselage Using drafting triangle square leading edge fuselage let dry Drill 3/16 dowels now use epoxy Bind 1/16 music wire tail skid wrap copper wire epoxy shown plans Install a bottom piece now glue Sigment Epoxy stabilizer fuselage Align measuring hinge line hinge line measurement should equal both sides make equal before epoxy dries also looking front plane bottom stabilizer should sitting top wing align necessary steps will insure airplane will fly properly Rudder Glue rudder fuselage Sigment Connecting Flaps Elevator Overlap pushrods elevator flaps about inch Wrap copper wire Set elevator flaps zero-degrees solder Now wrap pushrod bellcrank flap pushrod copper wire Have bellcrank neutral flaps zero-degrees solder Leadouts havent done already some people like get ahead plan wrap leadouts see plan Landing Gear Using /8 music wire bend shape plans using side front views Make four gear clips shown plan Bolt fuselage two 4-40 1long bolts Finish Fine sand airplane 400-grit sandpaper Brush three coats clear sand 400-grit sandpaper until smooth Cover wings medium grade Silkspan Brush three coats clear dope sand 400-grit sandpaper coat sand ing sealer next sand add coat clear Now time color used orange white blue Paint canopy light blue AMA numbers white rudder insignia white thin stripes blue white After plane completed let dry three daysif can brush three coats 50-50 thinner clear let dry Flying Nothing tricky about flying AETOS control surfaces move maximum 300 either side neutral very stable because stabilizer larger elevator will turn very sharply given full control am sure AETOS will give lot enjoyment giving Mine weights 26 ozs Yours could weigh less because newer finishing techniques better choice wood Happy flying 42 Model Aviation left side other details visiblelanding gear attachment lead-out guides showing bit up flap coupled down elevator Especially note indication thickness profile fuselage Roger uses simple hollow constructionlooks better quite light 1/2 BALSA_CORE S /6 RAL 5/3 Tu_ 3/32 PLYWOOD 3/32 PLYWOOD 7 rl/HxI/4 BALSA LEADING EDGE STIFFNER SAVE THIS PIECE INSTALL AFTER WING FLAPS AND FFASELAGE ARE GLUED TOGETHER 3/32 BALSA MAKE TWO 0/A TRIANGLE LEADING EDGE -F_II-4LIIF IiijIIII II IIIII IIIIII _______ _______LLL2Iii _____ II __---~1cz7IIII NI/A xI/4 SFGAS rII I/IA I/4II IICAP STRIPS I/H TIP RIBS -ZL5II'II -AEU--21L J--- M 1/16GA I/I6I/2 TRAILING EDGE STIFFNER.- 11 I/B BALSA TIPS77.LARGE CONTROL [v32][b-1-10-1-10]] TIN STOCK SOLDERD TD ________HORN BEARING_ HINGE CENTER LINE1 I ] 1/4 BALSA FLAPSI 1 E CENTER LINE-- LARGE CONTROL HORN~1/4 BALSA 2 3/lA DOWELS QZIIIQID7Yz 3/4 SPINNER 0 IWCED FOR FOX 25 1MAKE 4 TIN STRAPS CD REAM 3/4 WHEELSo J TWO WRAPS OF 1/16 MUSIC WIRECOPPER WIRE 3/32 TAIL SKID BULKHEAD C FULL-SIZE PLANS AVAILABLESEE PAGE 112 I/H BALSA RUDDER I/H MUSIC WIRE LANDING GEAR AETOS PROFILE STONY AIRPLANE FOR THE INTERMEDIATE STONY FLYER 42 SPAN 2Dto2BOZ FOG 25 ENGINE DESIGNED AND DRAWN FOR MODEL AVIATION BY ROGER GREENE I/DOZ WT k W M
Edition: Model Aviation - 1979/03
Page Numbers: 40, 41, 42, 43

Edition: Model Aviation - 1979/03
Page Numbers: 40, 41, 42, 43
A AETOS Greek word eagle superior bird air Aetos de signed fill gap between 15- 35-sized airplane profile look does stop its performance Aetos will help novice get feel 35-size airplane cost know price balsa wood getting higher higher wing span 42 inches means dont need have large car go flying site like us felt twinge inspiration credit catchy outlinesthey say sport suggest jet canny eye perceives flapped ship competently designed intermediate stunt flier Fox-25-powered profile has character both appearance performance Roger Greene Construction After studying plans carefully make patterns out thin card board like chipboard gift boxes Glue patterns cardboard cut pattern out Fine sand pattern edge will make smooth line felt tip ball-point pen Fuselage After parts cut out semble fuselage first can dry ing build rest plane Use Tight Bond glue engine beams a core glue 3/32 plywood doublers 3/32 balsa fuselage sides a core Use homemade vise glue fuselage together vise two pieces /4 plywood six 8-32 X 1 ws washers wing nuts Drill six 3/16 holes about Editors Note have always admired Rogers neat control-line projects does know what doing models look good flyand has charming way dividing up text encounter wing two three times fuselage once etc because arranges instruc tions natural order buildingyour etos will seem easy build therefore Incidentally Roger studying ministry could long time fore honors us again Hell make afine Sky Pilot 40 Model Aviation Sweeping curves eye catching fin wing stab tip rake add distinctive appearance inch outline fuselage Slip fuselage tighten Set aside dry about 24-48 hours Wing Cut 1 inch oft trailing edge wing two 3 X 1/16 X 36 balsa sheets remaining 2 inches leading edge planking will glued leading edge triangle Use Sigment Ambroid glue must waterproof Tape wing plan bench cover wax paper Saranwrap Pin 1 X 1/16 X 36 balsa trailing edge over plan Space ribs /8 X bottom spar over plan Put top spar ribs /s X leading edge trailing pieces Check alignment glue pin trailing edge Also glue top X 1/16 X 36 trailing edge sheet Epoxy /8 bellcrank plywood mount place Set aside dry Rudder Cut glue rudder pieces gether over plan covered wax paper Saranwrap Flaps Stabilizer Elevator Draw line edge side surface center Use guide sand hinge Sand surface shape shown plan Drill insert epoxy holes push control horns align pin over plan Set aside dry Fuselage Remove vise Glue top balsa piece place align pin Wing Connect leadouts pushrod bellcrank Insert leadouts through board ribs Secure bellcrank platform bolt provided Solder nut will come off flight Moisten leading edge planking towel dry remove excess water wrap over wing pin lightly careful damage wood pins wet Glue wing tip pieces together glue end ribs planking dry glue Sigment similar Always check alignment looking trailing edge top bottom thickest part airfoil two should parallel properly aligned Set aside dry Flaps Stabilizer Elevator Cut slots receive hinges Put some petroleum jelly Vaseline hinge point hinge avoid epoxy getting hinge point epoxy hinges wing time Put epoxy slots insert hinges Make sure hinge line aligned trailing edge Rudder Sand shape shown plan Engine Installation Use four 4-40 bolts long four T nuts ensure zero-degree thrust alignment remove glow plug Cut 12-in piece of/i wire place between center cooling fins head Looking down top engine wire will give line eye ball engine zero degree thrust Mark March 1979 41 side-mounted Fox 25 what appears 2-oz Sullivan slant tankRoger didnt say Tank appears shock mounted pad eliminate foaming evidence liquid Silicon rubber beading PAMPA emblem has respect Roger son David Aetos Note Rogers PAMPA decal Typical specia interest groups PAMPA puts real meaning stuntwhy join guys white hats drill holes check make certain fit Fuselage Wing Make mark leading edge planking 3/32 inch center rib will tell fuselage will after plank center three ribs 1/16 balsa Sand shape plans being careful sand edge off canopy area flaps dry solder U-shaped piece tin bearing control horn See plan Insert flaps wing slot fuselage insert wing Epoxy flap hinges same before Epoxy wing fuselage gether aligning marks lead ing edge planking made earlier both sides fuselage Using drafting triangle square leading edge fuselage let dry Drill 3/16 dowels now use epoxy Bind 1/16 music wire tail skid wrap copper wire epoxy shown plans Install a bottom piece now glue Sigment Epoxy stabilizer fuselage Align measuring hinge line hinge line measurement should equal both sides make equal before epoxy dries also looking front plane bottom stabilizer should sitting top wing align necessary steps will insure airplane will fly properly Rudder Glue rudder fuselage Sigment Connecting Flaps Elevator Overlap pushrods elevator flaps about inch Wrap copper wire Set elevator flaps zero-degrees solder Now wrap pushrod bellcrank flap pushrod copper wire Have bellcrank neutral flaps zero-degrees solder Leadouts havent done already some people like get ahead plan wrap leadouts see plan Landing Gear Using /8 music wire bend shape plans using side front views Make four gear clips shown plan Bolt fuselage two 4-40 1long bolts Finish Fine sand airplane 400-grit sandpaper Brush three coats clear sand 400-grit sandpaper until smooth Cover wings medium grade Silkspan Brush three coats clear dope sand 400-grit sandpaper coat sand ing sealer next sand add coat clear Now time color used orange white blue Paint canopy light blue AMA numbers white rudder insignia white thin stripes blue white After plane completed let dry three daysif can brush three coats 50-50 thinner clear let dry Flying Nothing tricky about flying AETOS control surfaces move maximum 300 either side neutral very stable because stabilizer larger elevator will turn very sharply given full control am sure AETOS will give lot enjoyment giving Mine weights 26 ozs Yours could weigh less because newer finishing techniques better choice wood Happy flying 42 Model Aviation left side other details visiblelanding gear attachment lead-out guides showing bit up flap coupled down elevator Especially note indication thickness profile fuselage Roger uses simple hollow constructionlooks better quite light 1/2 BALSA_CORE S /6 RAL 5/3 Tu_ 3/32 PLYWOOD 3/32 PLYWOOD 7 rl/HxI/4 BALSA LEADING EDGE STIFFNER SAVE THIS PIECE INSTALL AFTER WING FLAPS AND FFASELAGE ARE GLUED TOGETHER 3/32 BALSA MAKE TWO 0/A TRIANGLE LEADING EDGE -F_II-4LIIF IiijIIII II IIIII IIIIII _______ _______LLL2Iii _____ II __---~1cz7IIII NI/A xI/4 SFGAS rII I/IA I/4II IICAP STRIPS I/H TIP RIBS -ZL5II'II -AEU--21L J--- M 1/16GA I/I6I/2 TRAILING EDGE STIFFNER.- 11 I/B BALSA TIPS77.LARGE CONTROL [v32][b-1-10-1-10]] TIN STOCK SOLDERD TD ________HORN BEARING_ HINGE CENTER LINE1 I ] 1/4 BALSA FLAPSI 1 E CENTER LINE-- LARGE CONTROL HORN~1/4 BALSA 2 3/lA DOWELS QZIIIQID7Yz 3/4 SPINNER 0 IWCED FOR FOX 25 1MAKE 4 TIN STRAPS CD REAM 3/4 WHEELSo J TWO WRAPS OF 1/16 MUSIC WIRECOPPER WIRE 3/32 TAIL SKID BULKHEAD C FULL-SIZE PLANS AVAILABLESEE PAGE 112 I/H BALSA RUDDER I/H MUSIC WIRE LANDING GEAR AETOS PROFILE STONY AIRPLANE FOR THE INTERMEDIATE STONY FLYER 42 SPAN 2Dto2BOZ FOG 25 ENGINE DESIGNED AND DRAWN FOR MODEL AVIATION BY ROGER GREENE I/DOZ WT k W M

