
NO OCR TEXT NO OCR TEXT Read notes have construction spending some time looking over plans aim keep construc tion simple straightforward possible using common building techniques wing little tricky designing think youll serpp works Out very well constructing No particular sequence needed wing tail surfaces fuselage can worked simultaneously work area large enough Make patterns ribs elevator ribs tabs accurate jig hiiildine seem like lot work pays off straight strong light structure Cut spars same piece straight medium balsa Cut LE TE t jigs straight-grained medium balsa used Ridgeway #33 ships curve get shape spar can done drawing center line spar sheet marking depth rib station using piece end around marks pin down draw outline ball-point trueness wing depends L E T E ts being accurate careful cutting out Cut wing ribs medium/light 3/32 sheet Fit rib its slot spar trim necessary get flush fit spar Pin spar over plans using 900 triangle get setting-up straight Pin LE TE sheets inplace Check-fittheribs andtrimif necessary snug fit Glue rib place Fit LE 3/32 sheeting laying edge over center spar end over center #1 rib Trim corner 3wide T E sheet fit #1 rib Glue place pinning firmly ribs conform elliptical shape panel Fit glue other two sheets top panel let dry overnight Unpin structure turn over pinning down firmly bench time sheet leading edge between inside W2 rib tip allow installation landing gear structure later Glue 3/32 x 1 trailing edge sheeting place after fitting TE Fill area between two W2 ribs 3/32 sheet Fit aileron crank Ply mount slot cut out glue place W3 W4 ribs Glue cap strips Sheet area #7 rib tip 3/32 also center section sheet spar Glue gussets place shown plans allow panel dry well before lifting off board Unpin panel trim T E pieces flush 3/32 sheeting top bottom assemble two panels long straight surface required use inside panel door lumberyard doors reasonably inexpensive flat pins can stuck readily Lay out straight center line door about middle draw two lines 900 CL 4 inches apart draw two lines 24 inches two previous lines 900 off center line Pin root rib jigs over inside lines mark directly over CL Pin #7 jigs over outer marks line-up mark directly over CL Lay two panels jigs bottom wing up trim spar ends make good fit two panels fit jigs well spars fit pin panels firmly down jigs Check-fit dihedral brace DB 1 good epoxy place Use epoxy ply hardwood joints Glue DB 2s place Glue WP 1 WP 2 sub-ribs place Glue DB 35 place Check-fit grooved block trim needed Glue place Glue LGB place vertical grooved block Glue DBL DBT leading trailing edges Glue PP 2 WP 2s DBL Sheet center section between root ribs let dry thoroughly stabilizer vertical fin built same manner wing panels using 1/16 sheet instead 3/32 building eleva tors pin 16 L E over plans pin 3/16 TE place glue 1/16 sheet between Glue ribs onto sheet glue top 1/16 sheet place dry remove sand TE shape installing elevator joiner horn assembly pin stab bench line up elevator halves place pin down mark horn wires will go elevators Drill out relieve LE 12 Model Aviation impressive color shots show little sucn savansage iaien Dy LOfl rowe lii front ramp Victoria Regional Airport Leon long-time model designer turned photographer used Mamiya 645 80-mm f/28 lens Ektachrome 64 film low three- quarter rear view CAP appears have fairly long tail moment makes less squirrelly other scale renditions world-class aerobatic airplanes well does fly its firsttest right no trim required After perfect take-off climb out Brad put through precisely tracked roll loop snap Cuban 8 another snap spin recovery mark faultless approach no-bounce landing little epoxy place Before removing wing jigs sheet bottom section between root rib W2 leading edge dry remove wing jigs sand tip sheeting square glue 2 tip blocks place Cut ailerons light 4 sheet Tack glue place TE Vs sheet Glue railing edge place Install aileron pushrods used 1/16 music wire Cut holes rib center section crank plate Make 900 bend wire slipped crank hole Leave ends center section Later aileron servo installed center section zero servo use Du-Bro aileron ball-link joints soldered wire ailerons clamped neutral Works great Sand wing shape using large block 220 paper glued whatever commercial sander have Glue Vs sheet strip L E wide enough cover jig piece about sand leading edge wellrounded shape Epoxy PP 1 bottom trailing edge set wing aside two ways fabricate fuselage sides can lay out center line joined 3/32 sheet measuring draw outline can cut out doubler placing sheet side drawing around finish bottom tail post straight edge side cut out lay out another Glue doublers place ngle longerons shown isometric view plans Glue ght strengtheners sides ail post sides Refer top view mark triangle pieces meet carve sand taper checking angle holding fuselage sides together over top view Sand until sides conform drawing bottom straight F4 tail post Pin sides down over plans use clothes pin clamp hold tail post together Glue F4 place note fuselage can assembled using Hot Stuff-type glue sure go over joints epoxy place Unpin fuselage plans rock forward pin down F3 glue F3 place using 900 triangles keep structure square Lay out engine mount holes F2 firewall before installing put 6-32 screws throueh firewall roughed-out fuselage its distinctive cowling actually no good construction art forrrt shot blocked-out fusejage difficult build typical pattern machine nose suggests sculpture ait Shaping awaits March 1980 13 worki~.snip iue mis comes no surprise radio installation would look like something out radio manufacturers instruction manual Just neat can 5 Realisreveryaspecnamet add dasn colorful true-to- life trim instrument panel pilot earphones resu, IS something turn French license letters heighten illusion T NUTS ON 1/8 PLYWOOD PLATE 4-40 SCREWS 4 THRU 1/4 DOWELS DRILLED CLEAR BASIC BALSA BLOCK LAY UP FOR SANDING TO FUSELAGE FORM ALL 1/2 BALSA 7- / CUT LASTTO OPEN HALF COWL TRIANGULAR STOCK IN FOUR CORNERS ~5 K x I/2BALSA COWL BUMP 2 1/8 BALSA FUELTANK SUPPORT DOUBLED V8PLiWCOD PLwOOD BLOCKS1/8 BALSA FOR WING BOLTS 2PILOT DECK NOSE RING FORMER AND STIFFENER 3/8 BALSA LAMIN TO FORM NOSE RING K 8i B 40 FR MOTOR ON KRAFT ALUMINUM IVEUNT FINAL FORM OF COWL BLOCKu u EXPLODED FOR ART ONLY PLY PLATE SUPPORTS EXHAUST PIPES x BLOCK IS ADDED ONLY TO FORM ROOF OF AIR DUCT THIS BLOCK CARVED TO FORM AIR DUCT DITTO FOR ART SIDE COWL BUMP FINAL FORM DITrO NYLON WING BOLT3 MAPLE BLOCK ORCOVED UNDER FOR LGE WIRE SIG CANOPY FOF SERW TRAY O SUPPORT BLOCI LGEAR WIRE IS STRAPPED TO Pb 316 DIAWIRE STRUT HELD IN BY DUBFO STRAPS 14 Model Aviation FILLER BWCK AS NEEDED TOP TRIANGLES I/2BALSA DECK HOLLOWED CUT /4 X 5/8 BALSA TAPERED FOR LE 1/4 BALSA FAIRING 1/16 BALSA SHEET FIN BOTH SIDES/4 C GRAIN BALSA DOUBLED I/4X 5/8 BALSA FIN POST TAPERED ELEVATOR HORN ON 3/32WPEI INTO BOTH ELEVATORS14 DOWEL IN ..sjRUDDER LE FOR TAILVWHEEL WIRE if1 1/4 BALSA BLOCK 3/16 X 3/4 T E I/4X 9/16 BALSA SPARS TAPERED FOR ELEV STABIUZER 1WHEEL I/4X 1/2 L EDGE TAPERED 3/32 WIRE WITH RUDDER HORN 7 1/8 PLYWOOD BRACE 2V8SHEETSIDES OVER 1/8 DcAJBLER D-I-2 3 3/8X 3/4 MAPLE BLOCK ON LPLYVlOD FOR WNG BOLT N ZCK332 CAP STRIPS RIB BO1TOMSONLY 1/8 X 1/2 BALSA AILERON SPAR 1/4 LIGHTC-GRAIN DcUBLED FOR AILERON 7. 7 TRAILING EDGE /BOlTOM ONLY / 3/32BALSA BALSA BLOCK TIPS 1/8 SHEET BALSA LEADING EDGE DOUBLED RIB ALL HALF LAP AILERON BELLCRANK ON 1/16 PLW/cODINTO SPAR NOTCHES BALSA BLOCKS BUILD UP FAIRING 2 1/2 FOX WHEELS 1/8 BALSA FAIRINGS BOTH SIDES OF PLW~flD 3/4 BALSA TRIANGLE EACH CORNER 3/32 SHEET CROSS GRAIN ON BOTrOM 1/8 BALSA SPARWITH 5-PLY DOUBLERS AT CENTERS March 1980 15 HCAI back side Solder short piece wire screw slots epoxy firewall mount position front end Glue firewall place Glue floor place mount tank outlets Locate approximate position throttle pushrod tubing drill holes install Mark center horizontal lines Fl ply former matching lines fuselage Glue top sheet bottom ks place Sand front end square glue Fl place cowl front end made two vertical two horizontal pieces a glued front end FL Use light piece t turtle deck tack-glue place Glue er piece between sides aft stabilizer Glue bottom 3/32 sheet cross- grained Glue cockpit floor glue F5 place Set aside Glue t tips elevator stabilizer Cut pieces shape glue sides butting against Fl noting left side section drawings Fl F2 location Carve rough sand fuselage approximate shape referring right side section drawings Cut t rear top off hollow out glue back permanently Using epoxy glue FP1 FP2 pieces place Remember recess FP2 pieces Ys Glue FP3 hardwood blocks place use Sig Kwik-set has held up OK planes Check-fit wing fuselage sand out rough spots careful sand too much change incidence wing Cut out two 1/64 fillet bases sheet plywood Draw center lines fuselage front rear wing cut out center line bottom sheeting wing Pin wing place check its squareness using yardstick tail post wing tips shifting necessary Drill screw mounting holes through wing ply plates hardwood blocks fuselage tap blocks screw wing place Check-fit stabilizer cut-out sand rough spots off saddle Getting stab straight level very important want true-flying model tracks through maneuvers well take care lining up before gluing place Unbolt wing position 1/64 fillet 16 Model Aviation ASottA 3-JtOL V450PLE/N 4FCSSO03-Fez -PCS Ito SOFO SCSF tAOS00CKCOASSC 3-lIttLE FtjO%~FOCSEOSA FLOOR 103-CAROLSOtO BALSA i toO~--SCA_________________ -- 5F~-IItAt*CSU -ottCAttUC- jfrr17 eSEFAtS StoCROtoOOtA StA$WFE IbOLLOt3 tOt~AL JF2 SREFT SttFOttsmutBALSA C toTEISSTRttRS jj__ 0000C5 CAP 20 t2LO.A-FttREOto0tFBo-OkOd-RLSO SItBptStd cockpit completely finished paintea ratner eary stage builder encounters fun break construction before after shots 05 wheel pants legs finished leftcomplement plan details I-racucai wed say FULL-SIZE PLANS AVAILABLE SEE PAGE 120 540 CYBALSA MEE2 &YfSE5,SSPAR54554 PLY -Ft ES 54t--w LL&TCCWSHEET-1 T/IAACCC FOR JO SULCAG CAP 20 SAW ST LA 5 55 SA S -ALA 5 LAW SOSCASOOC OTAC TARS bases lay some Saran Wrap over wing center Section bolt wing back use angle balsa between ply fuselage sides putty fillet using finger get smooth Glass beads Sig Epoxilite whatever favorite material can used Unbolt wing Start trimming little time off canopy until fits around fuselage Carve inside top rear cockpit about 3/16 thickness smooth sandpaper Sand fuselage final smooth shape 220 grit Bolt wing back add filler pieces leading trailing edges fair fuselage smoothly Go far want dino th insiclp nfth cockpit put inside instrument panel pilot pilot seat radio required Sport Scale like some realism Glue canopy elevator has mounted before vertical fin can glued place now time fit hinge Use 9Q0 triangles gluing fin place rudder shaped hinged glued yet Fabricate tail-wheel drive rudder horn using side view isometric sketch used low-temperature silver solder job has never failed Epoxy tail wheel unit rear fuselage change can made move brass strip ton drive unit instead bottom concerned interference elevator has proven untrue will make pushrod installation easier moved top Draw center lines top bottom front blocks cowl edge firewalL Use razor saw cut cowl fuselage pried backing edge X-Acto #35 blade off used blade job use tabs epoxied permanent side fuselage inside top bottom blocks jutting Out far enough about t 4-40 blind nuts inside face Two pieces l glued top bottomtwo Continued Da2e h 1980 17 m Lu UU quite unnooox Gear recess slots holes hold-on baits show clearly form refreshing decorative scheme aircrarr aao up pleasing sight during overhead fly-by 5URERJET THE STUNNING DIFFERENCE IS THE BODY WANKS MoDE1ERS Ior overvAeI demc1tdi MassIVe supP1 es ofl waY Ar What difference body makes New SUPER JET revolutionary instant glue body like regular model cement Now joints dont have perfect R JET will fill slight errors Take look photos See SUPER JET has filled filleted purposely poor joints Try yourself good modelers excited about SUPER JET s difference SUPER 1/2 Oz 4 1/4 Oz No383 AVAILABLE IN CANADA Dave Robelen few well know yet another brilliant circle modelers made career NASA began simply logically before WW II old NACA space age converted initials NASA hit upon happy policy hiring modelers makc wind tunnel models others people like Taibi Worth Blanchard Poythress Phillips shared unique experience became involved test work exotic nature both within laboratory analysis performance future vehicles fringe- area machines develop ment flight testing strange array aircraft drop testing dynamically similar models fighters such strange configura tions like Rogallo wing Operating twilight zone models real aircraft scientific bent dual turning well toward advancement modeling forms constituted hobbyas distin guished jobs Dave himself no stranger modelings printed pages W&d frankly astounded reader builds spin tunnel such Dave describes article month wed bet youll read word tend forget among purposes defined AMA founded 1937 dissemination information technical advancement art So important functions Model ion publication scientific articles said season M4 like desert grows tiowers next five six months find two three bonus coverages issue People common denominator would please us bring personality profile~ issue within freewheeling season usually manage least such story Personalities done magazine too often tell retell stories already famous now obvious people usually turn out either glamorous manufac turers guys flying has made legendary around us remarkable people seldom hear mentioned unsung heroes self-ellacing guys skip almost un noticed remarkable achievement another II appreciate after reading Art Schmalzs long-labored-over story about Dave Gray Dave happens Du- Bro coincidence Du- Bro story nor plug firm above others simply among insiders quiet Dave Gray recognized ingenuity developments thinkers Wed love others Over span IS years weve aware ofthis exceptional quiet man pleases us bring story Modeling people much things Robelens account spin tunnel about things Schmalzs piece Dave Gray people Both have common theme achievement what modeling about will lot next issue issue after til 1980 competition reaches Its crescendo best two worlds CAP 20/Shepherd continued page 17 top two bottom over location tabs about front back dry tape cowl tightly drill 3/32 holes through middle dowel through tabs Enlarge tab holes receive blind nuts screw cowl secure blind nuts holes Remove cowl dab little epoxy blind nuts countersink holes 1/4 dowel using flat-head screws neat job wing MonoKoted rest plane given coat uncut butyrate clear dry sand smooth 220 thin some dope use light Silkspan cover entire framework Two three coats 50-50 dope sanded between coats followed coat two balsa filler coat until surface looked smooth over did colororange lightened yellow few dabs white until matches MonoKote last word keep light wing aft CAP balanced mark adding weight model can flown anything good 40 up 60 Its about size some 60-powered jobs few years back have no qualms 60 would work OK Havent checked 10 oz tank should fit available space control movements should rudder two inches side measured trailing edge rudder aileron throw /i inch up down center elevator due its large size no up down flying anything smooth concrete asphalt runway would recommend using 3/16 music wire landing gear struts instead 5/32 shown plans Research could turn up some differences some CAPs now flying Also some have different color schemes understand modified version 20 lighter horsepower want thank Bob Wischer help encouragement way through project Jerry Nelson has always out front new innovations modeling game 94 Model Aviation IRREGULA JOINT 1 I-7 Purchasing R/C Aircraft easy YOUNIQUE AT Hobby Capital keep large ready supply af Custom-Bilt RC Aircraft Kits Engines RC Units times And. thanks ta years af experience dealing people sections af US. prepare special ane-of-a-kind RC Aircraft far special one-ofa-kind RC Flyer wha demands unique laok express tastes Chances youll find custom paint finish exquisite detailed cockpit interiors glassed engine compartments real scale wheels custom grilled nose section will knock socks offi. youll probably never see another like cause Hobby Capitol expert stressed preparation goes far beyond standard checkout RC shoppers turning up increasing numbers convenient showroom because word out. outstanding buys service finest selection unique RC Aircraft anywhere its HOBBY CAPITOL Old Ignition Trode4n Buy sell old time ignition engines Box up what have send us honest appraisal could worth new proportional set have engines can also start collection welcome built-up airplanes used proportionals old time ignition engines Come trade us lop dollar paid Built Order Rons Kt stock choose Its s400OO Pipet Tri-Poce Quarter Scale 89 wingspan 42 Sq Ft detailed plans $1699 PR Send $i00 self addressed stamped envelope far detailed list Built-Up R/C Models ond 50% Sale Hobby Capitol 46 N Oak St Ventura CA 93001 Phone 805 643-7616 / 642-8465 efforts promote models look fly like full-size counterparts may finally blossom ing full bloom Las Vegas TOC thing andthe IMAC organization promoting aerobatic models have copies full scale machines CAP addition pack hopefully add pleasure others just did Glen Hazel Sig gang up Iowa doing share promote IMAC philosophy decide build CAP sashay up next year enjoy bash put benefit us modelers RC Aerobatics/Van Putte continued page 26 street front house said technique faultless beginning Eleck Rider performed perfectly Id half truthful cycle did perform perfectly technique left lot desired initially poor driving ability its advant ages Whenever lost control cycle spun out ran curb dashed under car clobbered mailbox post demonstrated durability system After two weeks hard use 13 novice drivers cycle has scuff marks acetate fairing evidence its hard life its tough first questions someone has never seen perform asks difficult keep upright answer very simple Its easy Unless driver does something upset cycle will happily drive forever straight line want turn thats different story Eleck Rider requires coordination ofthrottle steering negotiate turn tighter turn coordination required Steering accomplished turning front forlc done tilting fork front wheeVfork castered free turn direction So does cycle steer Very nicely thank extremely stable too have hit number obstructions include rocks manhole cover cracks pavement acorns jumping ramp etc very few exceptions cycle has stabilized itself motored electric motor operated servodriven rheostat throttle stick has spring return center Forward movement stick provides proportional forward speed Pulling back stick causes motor function like generator acts brake dead man throttle feature nice beginners since cycle will stop itself let go stick best place leam operate Eleck Rider large smooth area like parking lot Once driving proficiency achieved large area smaller places can tried out cycle started holding upright advancing throttle holding stable briefly acceler ates Initial operation should about R3 throttle gentle tums should attempted Sharper turns must accomplished throttling back turning cycle throttling up about halfway through turn slower cycle sharper turn can cycle will fall over gets too slow key success proper coordination throttle takes proficient RC pilot less half hour learn operate Eleck Rider Part problem RC newcomers will have deciding way move stick cycle heading toward An experienced pilot has advantage area because has already learned control airplane coming toward him Unfortunately old rule stick toward low wing doesnt help much motorcycle Am enjoying Eleck Rider Well weekday huny home work drive 30 minutes before gets dark weekends tough get chores done before taking out So far havent able racing others because first kid block have However several others way will probably racing around water-filled milk jugs local parking lot read Get case youve wondering next Pattern Problem Month will appear answer ts receive someone response request problems has very underwhelming Ron Von Puttg 12 Connie Drive Slzalimart FL 32579 Spin Tunnel Robelen continued page 24 good brands really am stuck Hot Stuff type glue truly superior Very light weight will never warp thinnest tail surface course dries immediately other brands Zap Jet etc areallfine Imsure Ijusthavenothadmuch experience Various finish techniques useful Sometimes apply coat sanding sealer Testors Hot Fuel Proof trim color am also pleased results using spray dyes use Deep-flex brand spray can found local variety store usual method construction start fuselage lightly tack glue two blocks together part vertical centerline first shape top view side view followed careful shaping 96 Model Aviation MAMMOTH SCALERS nce have available reeglete line enganeasmts alal eufflers enat 90 So 15 engines srsis OIaDRA WEBRA ar etc Wgite call far catalog emS price info Quarter Headquarters U 12321 5am raulmCaS4iI2 334,,

Edition: Model Aviation - 1980/03
Page Numbers: 10, 11, 12, 13, 14, 15, 16, 17, 94, 96
Edition: Model Aviation - 1980/03
Page Numbers: 10, 11, 12, 13, 14, 15, 16, 17, 94, 96
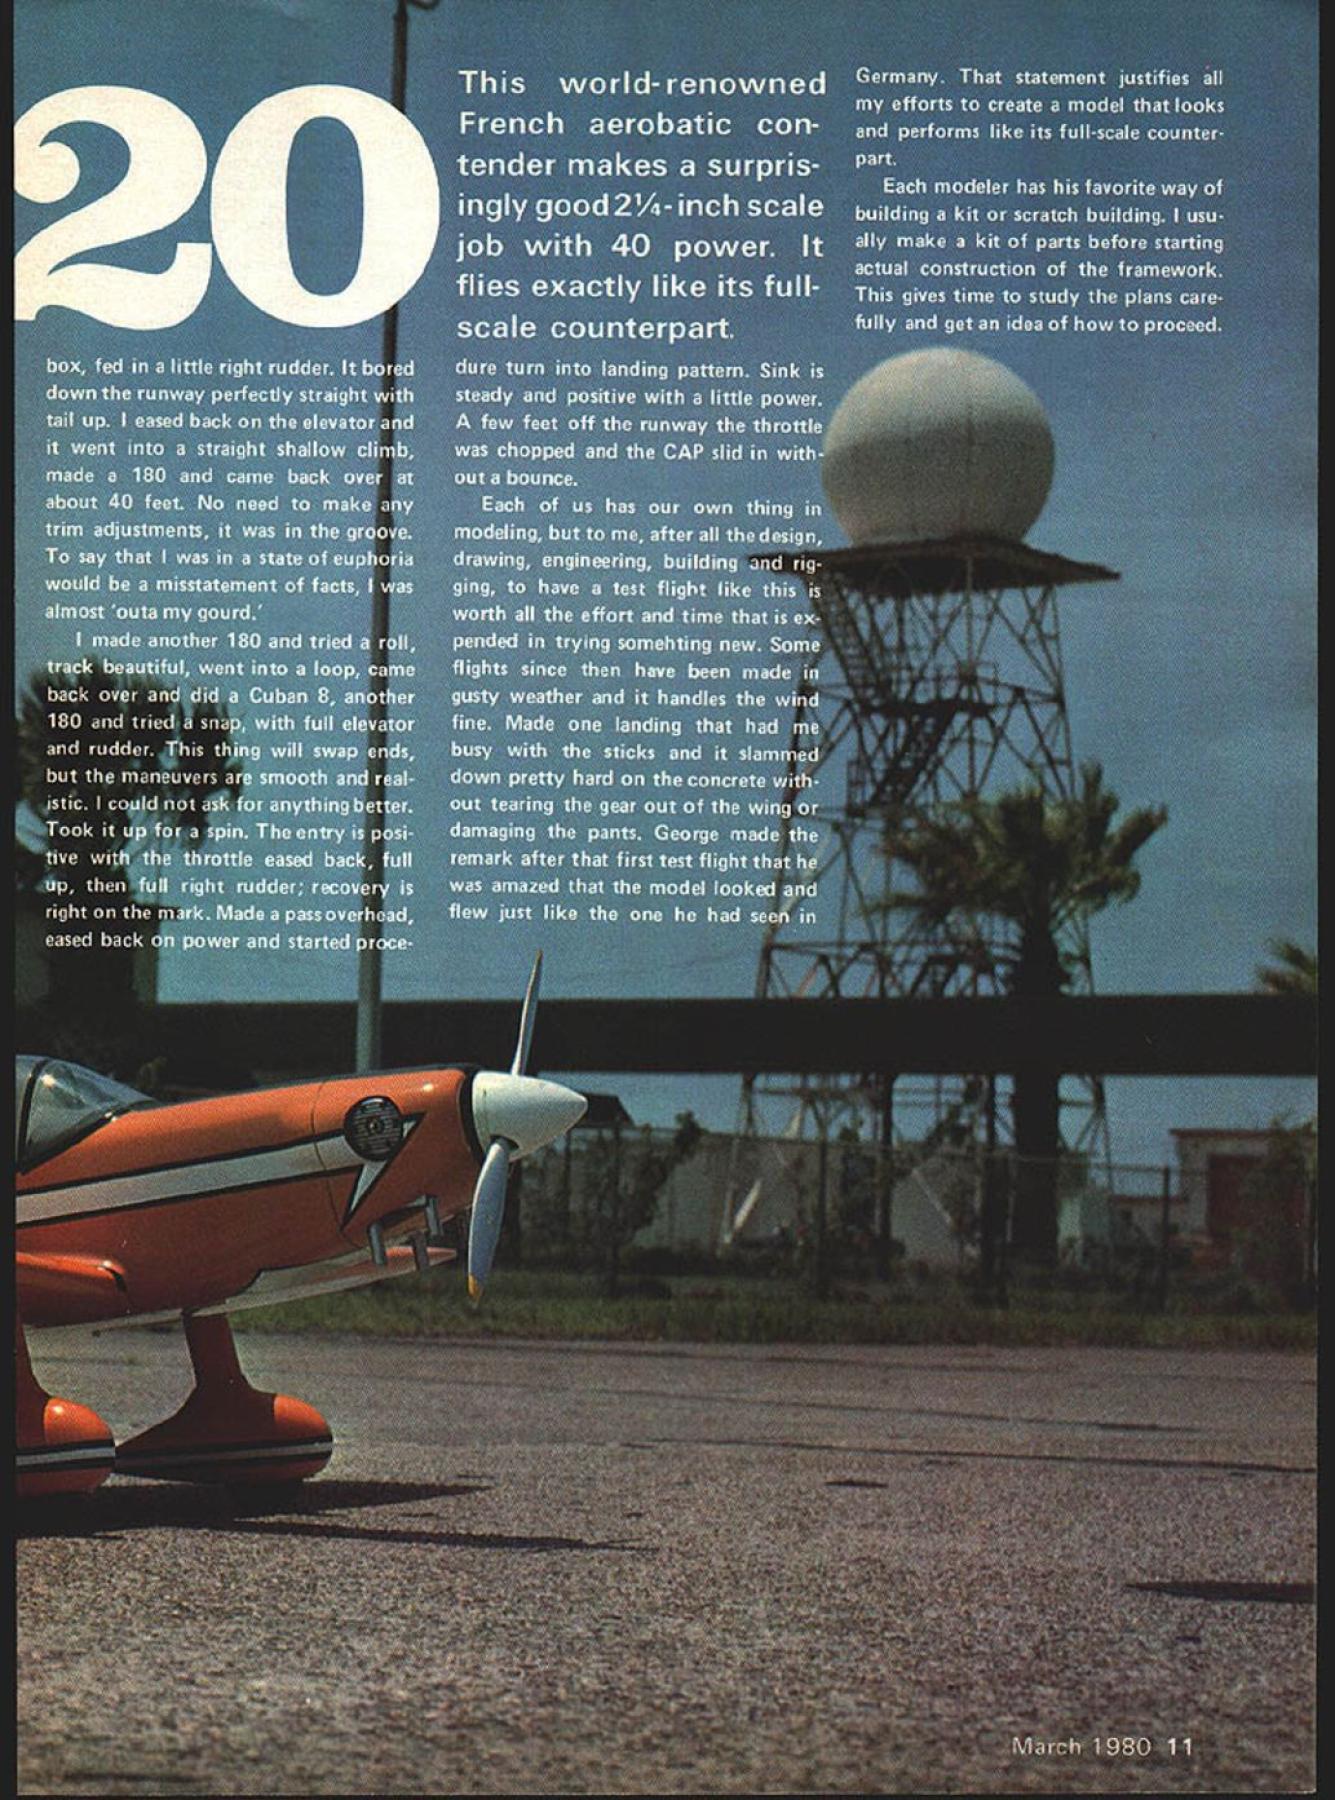
NO OCR TEXT NO OCR TEXT Read notes have construction spending some time looking over plans aim keep construc tion simple straightforward possible using common building techniques wing little tricky designing think youll serpp works Out very well constructing No particular sequence needed wing tail surfaces fuselage can worked simultaneously work area large enough Make patterns ribs elevator ribs tabs accurate jig hiiildine seem like lot work pays off straight strong light structure Cut spars same piece straight medium balsa Cut LE TE t jigs straight-grained medium balsa used Ridgeway #33 ships curve get shape spar can done drawing center line spar sheet marking depth rib station using piece end around marks pin down draw outline ball-point trueness wing depends L E T E ts being accurate careful cutting out Cut wing ribs medium/light 3/32 sheet Fit rib its slot spar trim necessary get flush fit spar Pin spar over plans using 900 triangle get setting-up straight Pin LE TE sheets inplace Check-fittheribs andtrimif necessary snug fit Glue rib place Fit LE 3/32 sheeting laying edge over center spar end over center #1 rib Trim corner 3wide T E sheet fit #1 rib Glue place pinning firmly ribs conform elliptical shape panel Fit glue other two sheets top panel let dry overnight Unpin structure turn over pinning down firmly bench time sheet leading edge between inside W2 rib tip allow installation landing gear structure later Glue 3/32 x 1 trailing edge sheeting place after fitting TE Fill area between two W2 ribs 3/32 sheet Fit aileron crank Ply mount slot cut out glue place W3 W4 ribs Glue cap strips Sheet area #7 rib tip 3/32 also center section sheet spar Glue gussets place shown plans allow panel dry well before lifting off board Unpin panel trim T E pieces flush 3/32 sheeting top bottom assemble two panels long straight surface required use inside panel door lumberyard doors reasonably inexpensive flat pins can stuck readily Lay out straight center line door about middle draw two lines 900 CL 4 inches apart draw two lines 24 inches two previous lines 900 off center line Pin root rib jigs over inside lines mark directly over CL Pin #7 jigs over outer marks line-up mark directly over CL Lay two panels jigs bottom wing up trim spar ends make good fit two panels fit jigs well spars fit pin panels firmly down jigs Check-fit dihedral brace DB 1 good epoxy place Use epoxy ply hardwood joints Glue DB 2s place Glue WP 1 WP 2 sub-ribs place Glue DB 35 place Check-fit grooved block trim needed Glue place Glue LGB place vertical grooved block Glue DBL DBT leading trailing edges Glue PP 2 WP 2s DBL Sheet center section between root ribs let dry thoroughly stabilizer vertical fin built same manner wing panels using 1/16 sheet instead 3/32 building eleva tors pin 16 L E over plans pin 3/16 TE place glue 1/16 sheet between Glue ribs onto sheet glue top 1/16 sheet place dry remove sand TE shape installing elevator joiner horn assembly pin stab bench line up elevator halves place pin down mark horn wires will go elevators Drill out relieve LE 12 Model Aviation impressive color shots show little sucn savansage iaien Dy LOfl rowe lii front ramp Victoria Regional Airport Leon long-time model designer turned photographer used Mamiya 645 80-mm f/28 lens Ektachrome 64 film low three- quarter rear view CAP appears have fairly long tail moment makes less squirrelly other scale renditions world-class aerobatic airplanes well does fly its firsttest right no trim required After perfect take-off climb out Brad put through precisely tracked roll loop snap Cuban 8 another snap spin recovery mark faultless approach no-bounce landing little epoxy place Before removing wing jigs sheet bottom section between root rib W2 leading edge dry remove wing jigs sand tip sheeting square glue 2 tip blocks place Cut ailerons light 4 sheet Tack glue place TE Vs sheet Glue railing edge place Install aileron pushrods used 1/16 music wire Cut holes rib center section crank plate Make 900 bend wire slipped crank hole Leave ends center section Later aileron servo installed center section zero servo use Du-Bro aileron ball-link joints soldered wire ailerons clamped neutral Works great Sand wing shape using large block 220 paper glued whatever commercial sander have Glue Vs sheet strip L E wide enough cover jig piece about sand leading edge wellrounded shape Epoxy PP 1 bottom trailing edge set wing aside two ways fabricate fuselage sides can lay out center line joined 3/32 sheet measuring draw outline can cut out doubler placing sheet side drawing around finish bottom tail post straight edge side cut out lay out another Glue doublers place ngle longerons shown isometric view plans Glue ght strengtheners sides ail post sides Refer top view mark triangle pieces meet carve sand taper checking angle holding fuselage sides together over top view Sand until sides conform drawing bottom straight F4 tail post Pin sides down over plans use clothes pin clamp hold tail post together Glue F4 place note fuselage can assembled using Hot Stuff-type glue sure go over joints epoxy place Unpin fuselage plans rock forward pin down F3 glue F3 place using 900 triangles keep structure square Lay out engine mount holes F2 firewall before installing put 6-32 screws throueh firewall roughed-out fuselage its distinctive cowling actually no good construction art forrrt shot blocked-out fusejage difficult build typical pattern machine nose suggests sculpture ait Shaping awaits March 1980 13 worki~.snip iue mis comes no surprise radio installation would look like something out radio manufacturers instruction manual Just neat can 5 Realisreveryaspecnamet add dasn colorful true-to- life trim instrument panel pilot earphones resu, IS something turn French license letters heighten illusion T NUTS ON 1/8 PLYWOOD PLATE 4-40 SCREWS 4 THRU 1/4 DOWELS DRILLED CLEAR BASIC BALSA BLOCK LAY UP FOR SANDING TO FUSELAGE FORM ALL 1/2 BALSA 7- / CUT LASTTO OPEN HALF COWL TRIANGULAR STOCK IN FOUR CORNERS ~5 K x I/2BALSA COWL BUMP 2 1/8 BALSA FUELTANK SUPPORT DOUBLED V8PLiWCOD PLwOOD BLOCKS1/8 BALSA FOR WING BOLTS 2PILOT DECK NOSE RING FORMER AND STIFFENER 3/8 BALSA LAMIN TO FORM NOSE RING K 8i B 40 FR MOTOR ON KRAFT ALUMINUM IVEUNT FINAL FORM OF COWL BLOCKu u EXPLODED FOR ART ONLY PLY PLATE SUPPORTS EXHAUST PIPES x BLOCK IS ADDED ONLY TO FORM ROOF OF AIR DUCT THIS BLOCK CARVED TO FORM AIR DUCT DITTO FOR ART SIDE COWL BUMP FINAL FORM DITrO NYLON WING BOLT3 MAPLE BLOCK ORCOVED UNDER FOR LGE WIRE SIG CANOPY FOF SERW TRAY O SUPPORT BLOCI LGEAR WIRE IS STRAPPED TO Pb 316 DIAWIRE STRUT HELD IN BY DUBFO STRAPS 14 Model Aviation FILLER BWCK AS NEEDED TOP TRIANGLES I/2BALSA DECK HOLLOWED CUT /4 X 5/8 BALSA TAPERED FOR LE 1/4 BALSA FAIRING 1/16 BALSA SHEET FIN BOTH SIDES/4 C GRAIN BALSA DOUBLED I/4X 5/8 BALSA FIN POST TAPERED ELEVATOR HORN ON 3/32WPEI INTO BOTH ELEVATORS14 DOWEL IN ..sjRUDDER LE FOR TAILVWHEEL WIRE if1 1/4 BALSA BLOCK 3/16 X 3/4 T E I/4X 9/16 BALSA SPARS TAPERED FOR ELEV STABIUZER 1WHEEL I/4X 1/2 L EDGE TAPERED 3/32 WIRE WITH RUDDER HORN 7 1/8 PLYWOOD BRACE 2V8SHEETSIDES OVER 1/8 DcAJBLER D-I-2 3 3/8X 3/4 MAPLE BLOCK ON LPLYVlOD FOR WNG BOLT N ZCK332 CAP STRIPS RIB BO1TOMSONLY 1/8 X 1/2 BALSA AILERON SPAR 1/4 LIGHTC-GRAIN DcUBLED FOR AILERON 7. 7 TRAILING EDGE /BOlTOM ONLY / 3/32BALSA BALSA BLOCK TIPS 1/8 SHEET BALSA LEADING EDGE DOUBLED RIB ALL HALF LAP AILERON BELLCRANK ON 1/16 PLW/cODINTO SPAR NOTCHES BALSA BLOCKS BUILD UP FAIRING 2 1/2 FOX WHEELS 1/8 BALSA FAIRINGS BOTH SIDES OF PLW~flD 3/4 BALSA TRIANGLE EACH CORNER 3/32 SHEET CROSS GRAIN ON BOTrOM 1/8 BALSA SPARWITH 5-PLY DOUBLERS AT CENTERS March 1980 15 HCAI back side Solder short piece wire screw slots epoxy firewall mount position front end Glue firewall place Glue floor place mount tank outlets Locate approximate position throttle pushrod tubing drill holes install Mark center horizontal lines Fl ply former matching lines fuselage Glue top sheet bottom ks place Sand front end square glue Fl place cowl front end made two vertical two horizontal pieces a glued front end FL Use light piece t turtle deck tack-glue place Glue er piece between sides aft stabilizer Glue bottom 3/32 sheet cross- grained Glue cockpit floor glue F5 place Set aside Glue t tips elevator stabilizer Cut pieces shape glue sides butting against Fl noting left side section drawings Fl F2 location Carve rough sand fuselage approximate shape referring right side section drawings Cut t rear top off hollow out glue back permanently Using epoxy glue FP1 FP2 pieces place Remember recess FP2 pieces Ys Glue FP3 hardwood blocks place use Sig Kwik-set has held up OK planes Check-fit wing fuselage sand out rough spots careful sand too much change incidence wing Cut out two 1/64 fillet bases sheet plywood Draw center lines fuselage front rear wing cut out center line bottom sheeting wing Pin wing place check its squareness using yardstick tail post wing tips shifting necessary Drill screw mounting holes through wing ply plates hardwood blocks fuselage tap blocks screw wing place Check-fit stabilizer cut-out sand rough spots off saddle Getting stab straight level very important want true-flying model tracks through maneuvers well take care lining up before gluing place Unbolt wing position 1/64 fillet 16 Model Aviation ASottA 3-JtOL V450PLE/N 4FCSSO03-Fez -PCS Ito SOFO SCSF tAOS00CKCOASSC 3-lIttLE FtjO%~FOCSEOSA FLOOR 103-CAROLSOtO BALSA i toO~--SCA_________________ -- 5F~-IItAt*CSU -ottCAttUC- jfrr17 eSEFAtS StoCROtoOOtA StA$WFE IbOLLOt3 tOt~AL JF2 SREFT SttFOttsmutBALSA C toTEISSTRttRS jj__ 0000C5 CAP 20 t2LO.A-FttREOto0tFBo-OkOd-RLSO SItBptStd cockpit completely finished paintea ratner eary stage builder encounters fun break construction before after shots 05 wheel pants legs finished leftcomplement plan details I-racucai wed say FULL-SIZE PLANS AVAILABLE SEE PAGE 120 540 CYBALSA MEE2 &YfSE5,SSPAR54554 PLY -Ft ES 54t--w LL&TCCWSHEET-1 T/IAACCC FOR JO SULCAG CAP 20 SAW ST LA 5 55 SA S -ALA 5 LAW SOSCASOOC OTAC TARS bases lay some Saran Wrap over wing center Section bolt wing back use angle balsa between ply fuselage sides putty fillet using finger get smooth Glass beads Sig Epoxilite whatever favorite material can used Unbolt wing Start trimming little time off canopy until fits around fuselage Carve inside top rear cockpit about 3/16 thickness smooth sandpaper Sand fuselage final smooth shape 220 grit Bolt wing back add filler pieces leading trailing edges fair fuselage smoothly Go far want dino th insiclp nfth cockpit put inside instrument panel pilot pilot seat radio required Sport Scale like some realism Glue canopy elevator has mounted before vertical fin can glued place now time fit hinge Use 9Q0 triangles gluing fin place rudder shaped hinged glued yet Fabricate tail-wheel drive rudder horn using side view isometric sketch used low-temperature silver solder job has never failed Epoxy tail wheel unit rear fuselage change can made move brass strip ton drive unit instead bottom concerned interference elevator has proven untrue will make pushrod installation easier moved top Draw center lines top bottom front blocks cowl edge firewalL Use razor saw cut cowl fuselage pried backing edge X-Acto #35 blade off used blade job use tabs epoxied permanent side fuselage inside top bottom blocks jutting Out far enough about t 4-40 blind nuts inside face Two pieces l glued top bottomtwo Continued Da2e h 1980 17 m Lu UU quite unnooox Gear recess slots holes hold-on baits show clearly form refreshing decorative scheme aircrarr aao up pleasing sight during overhead fly-by 5URERJET THE STUNNING DIFFERENCE IS THE BODY WANKS MoDE1ERS Ior overvAeI demc1tdi MassIVe supP1 es ofl waY Ar What difference body makes New SUPER JET revolutionary instant glue body like regular model cement Now joints dont have perfect R JET will fill slight errors Take look photos See SUPER JET has filled filleted purposely poor joints Try yourself good modelers excited about SUPER JET s difference SUPER 1/2 Oz 4 1/4 Oz No383 AVAILABLE IN CANADA Dave Robelen few well know yet another brilliant circle modelers made career NASA began simply logically before WW II old NACA space age converted initials NASA hit upon happy policy hiring modelers makc wind tunnel models others people like Taibi Worth Blanchard Poythress Phillips shared unique experience became involved test work exotic nature both within laboratory analysis performance future vehicles fringe- area machines develop ment flight testing strange array aircraft drop testing dynamically similar models fighters such strange configura tions like Rogallo wing Operating twilight zone models real aircraft scientific bent dual turning well toward advancement modeling forms constituted hobbyas distin guished jobs Dave himself no stranger modelings printed pages W&d frankly astounded reader builds spin tunnel such Dave describes article month wed bet youll read word tend forget among purposes defined AMA founded 1937 dissemination information technical advancement art So important functions Model ion publication scientific articles said season M4 like desert grows tiowers next five six months find two three bonus coverages issue People common denominator would please us bring personality profile~ issue within freewheeling season usually manage least such story Personalities done magazine too often tell retell stories already famous now obvious people usually turn out either glamorous manufac turers guys flying has made legendary around us remarkable people seldom hear mentioned unsung heroes self-ellacing guys skip almost un noticed remarkable achievement another II appreciate after reading Art Schmalzs long-labored-over story about Dave Gray Dave happens Du- Bro coincidence Du- Bro story nor plug firm above others simply among insiders quiet Dave Gray recognized ingenuity developments thinkers Wed love others Over span IS years weve aware ofthis exceptional quiet man pleases us bring story Modeling people much things Robelens account spin tunnel about things Schmalzs piece Dave Gray people Both have common theme achievement what modeling about will lot next issue issue after til 1980 competition reaches Its crescendo best two worlds CAP 20/Shepherd continued page 17 top two bottom over location tabs about front back dry tape cowl tightly drill 3/32 holes through middle dowel through tabs Enlarge tab holes receive blind nuts screw cowl secure blind nuts holes Remove cowl dab little epoxy blind nuts countersink holes 1/4 dowel using flat-head screws neat job wing MonoKoted rest plane given coat uncut butyrate clear dry sand smooth 220 thin some dope use light Silkspan cover entire framework Two three coats 50-50 dope sanded between coats followed coat two balsa filler coat until surface looked smooth over did colororange lightened yellow few dabs white until matches MonoKote last word keep light wing aft CAP balanced mark adding weight model can flown anything good 40 up 60 Its about size some 60-powered jobs few years back have no qualms 60 would work OK Havent checked 10 oz tank should fit available space control movements should rudder two inches side measured trailing edge rudder aileron throw /i inch up down center elevator due its large size no up down flying anything smooth concrete asphalt runway would recommend using 3/16 music wire landing gear struts instead 5/32 shown plans Research could turn up some differences some CAPs now flying Also some have different color schemes understand modified version 20 lighter horsepower want thank Bob Wischer help encouragement way through project Jerry Nelson has always out front new innovations modeling game 94 Model Aviation IRREGULA JOINT 1 I-7 Purchasing R/C Aircraft easy YOUNIQUE AT Hobby Capital keep large ready supply af Custom-Bilt RC Aircraft Kits Engines RC Units times And. thanks ta years af experience dealing people sections af US. prepare special ane-of-a-kind RC Aircraft far special one-ofa-kind RC Flyer wha demands unique laok express tastes Chances youll find custom paint finish exquisite detailed cockpit interiors glassed engine compartments real scale wheels custom grilled nose section will knock socks offi. youll probably never see another like cause Hobby Capitol expert stressed preparation goes far beyond standard checkout RC shoppers turning up increasing numbers convenient showroom because word out. outstanding buys service finest selection unique RC Aircraft anywhere its HOBBY CAPITOL Old Ignition Trode4n Buy sell old time ignition engines Box up what have send us honest appraisal could worth new proportional set have engines can also start collection welcome built-up airplanes used proportionals old time ignition engines Come trade us lop dollar paid Built Order Rons Kt stock choose Its s400OO Pipet Tri-Poce Quarter Scale 89 wingspan 42 Sq Ft detailed plans $1699 PR Send $i00 self addressed stamped envelope far detailed list Built-Up R/C Models ond 50% Sale Hobby Capitol 46 N Oak St Ventura CA 93001 Phone 805 643-7616 / 642-8465 efforts promote models look fly like full-size counterparts may finally blossom ing full bloom Las Vegas TOC thing andthe IMAC organization promoting aerobatic models have copies full scale machines CAP addition pack hopefully add pleasure others just did Glen Hazel Sig gang up Iowa doing share promote IMAC philosophy decide build CAP sashay up next year enjoy bash put benefit us modelers RC Aerobatics/Van Putte continued page 26 street front house said technique faultless beginning Eleck Rider performed perfectly Id half truthful cycle did perform perfectly technique left lot desired initially poor driving ability its advant ages Whenever lost control cycle spun out ran curb dashed under car clobbered mailbox post demonstrated durability system After two weeks hard use 13 novice drivers cycle has scuff marks acetate fairing evidence its hard life its tough first questions someone has never seen perform asks difficult keep upright answer very simple Its easy Unless driver does something upset cycle will happily drive forever straight line want turn thats different story Eleck Rider requires coordination ofthrottle steering negotiate turn tighter turn coordination required Steering accomplished turning front forlc done tilting fork front wheeVfork castered free turn direction So does cycle steer Very nicely thank extremely stable too have hit number obstructions include rocks manhole cover cracks pavement acorns jumping ramp etc very few exceptions cycle has stabilized itself motored electric motor operated servodriven rheostat throttle stick has spring return center Forward movement stick provides proportional forward speed Pulling back stick causes motor function like generator acts brake dead man throttle feature nice beginners since cycle will stop itself let go stick best place leam operate Eleck Rider large smooth area like parking lot Once driving proficiency achieved large area smaller places can tried out cycle started holding upright advancing throttle holding stable briefly acceler ates Initial operation should about R3 throttle gentle tums should attempted Sharper turns must accomplished throttling back turning cycle throttling up about halfway through turn slower cycle sharper turn can cycle will fall over gets too slow key success proper coordination throttle takes proficient RC pilot less half hour learn operate Eleck Rider Part problem RC newcomers will have deciding way move stick cycle heading toward An experienced pilot has advantage area because has already learned control airplane coming toward him Unfortunately old rule stick toward low wing doesnt help much motorcycle Am enjoying Eleck Rider Well weekday huny home work drive 30 minutes before gets dark weekends tough get chores done before taking out So far havent able racing others because first kid block have However several others way will probably racing around water-filled milk jugs local parking lot read Get case youve wondering next Pattern Problem Month will appear answer ts receive someone response request problems has very underwhelming Ron Von Puttg 12 Connie Drive Slzalimart FL 32579 Spin Tunnel Robelen continued page 24 good brands really am stuck Hot Stuff type glue truly superior Very light weight will never warp thinnest tail surface course dries immediately other brands Zap Jet etc areallfine Imsure Ijusthavenothadmuch experience Various finish techniques useful Sometimes apply coat sanding sealer Testors Hot Fuel Proof trim color am also pleased results using spray dyes use Deep-flex brand spray can found local variety store usual method construction start fuselage lightly tack glue two blocks together part vertical centerline first shape top view side view followed careful shaping 96 Model Aviation MAMMOTH SCALERS nce have available reeglete line enganeasmts alal eufflers enat 90 So 15 engines srsis OIaDRA WEBRA ar etc Wgite call far catalog emS price info Quarter Headquarters U 12321 5am raulmCaS4iI2 334,,

Edition: Model Aviation - 1980/03
Page Numbers: 10, 11, 12, 13, 14, 15, 16, 17, 94, 96
NO OCR TEXT NO OCR TEXT Read notes have construction spending some time looking over plans aim keep construc tion simple straightforward possible using common building techniques wing little tricky designing think youll serpp works Out very well constructing No particular sequence needed wing tail surfaces fuselage can worked simultaneously work area large enough Make patterns ribs elevator ribs tabs accurate jig hiiildine seem like lot work pays off straight strong light structure Cut spars same piece straight medium balsa Cut LE TE t jigs straight-grained medium balsa used Ridgeway #33 ships curve get shape spar can done drawing center line spar sheet marking depth rib station using piece end around marks pin down draw outline ball-point trueness wing depends L E T E ts being accurate careful cutting out Cut wing ribs medium/light 3/32 sheet Fit rib its slot spar trim necessary get flush fit spar Pin spar over plans using 900 triangle get setting-up straight Pin LE TE sheets inplace Check-fittheribs andtrimif necessary snug fit Glue rib place Fit LE 3/32 sheeting laying edge over center spar end over center #1 rib Trim corner 3wide T E sheet fit #1 rib Glue place pinning firmly ribs conform elliptical shape panel Fit glue other two sheets top panel let dry overnight Unpin structure turn over pinning down firmly bench time sheet leading edge between inside W2 rib tip allow installation landing gear structure later Glue 3/32 x 1 trailing edge sheeting place after fitting TE Fill area between two W2 ribs 3/32 sheet Fit aileron crank Ply mount slot cut out glue place W3 W4 ribs Glue cap strips Sheet area #7 rib tip 3/32 also center section sheet spar Glue gussets place shown plans allow panel dry well before lifting off board Unpin panel trim T E pieces flush 3/32 sheeting top bottom assemble two panels long straight surface required use inside panel door lumberyard doors reasonably inexpensive flat pins can stuck readily Lay out straight center line door about middle draw two lines 900 CL 4 inches apart draw two lines 24 inches two previous lines 900 off center line Pin root rib jigs over inside lines mark directly over CL Pin #7 jigs over outer marks line-up mark directly over CL Lay two panels jigs bottom wing up trim spar ends make good fit two panels fit jigs well spars fit pin panels firmly down jigs Check-fit dihedral brace DB 1 good epoxy place Use epoxy ply hardwood joints Glue DB 2s place Glue WP 1 WP 2 sub-ribs place Glue DB 35 place Check-fit grooved block trim needed Glue place Glue LGB place vertical grooved block Glue DBL DBT leading trailing edges Glue PP 2 WP 2s DBL Sheet center section between root ribs let dry thoroughly stabilizer vertical fin built same manner wing panels using 1/16 sheet instead 3/32 building eleva tors pin 16 L E over plans pin 3/16 TE place glue 1/16 sheet between Glue ribs onto sheet glue top 1/16 sheet place dry remove sand TE shape installing elevator joiner horn assembly pin stab bench line up elevator halves place pin down mark horn wires will go elevators Drill out relieve LE 12 Model Aviation impressive color shots show little sucn savansage iaien Dy LOfl rowe lii front ramp Victoria Regional Airport Leon long-time model designer turned photographer used Mamiya 645 80-mm f/28 lens Ektachrome 64 film low three- quarter rear view CAP appears have fairly long tail moment makes less squirrelly other scale renditions world-class aerobatic airplanes well does fly its firsttest right no trim required After perfect take-off climb out Brad put through precisely tracked roll loop snap Cuban 8 another snap spin recovery mark faultless approach no-bounce landing little epoxy place Before removing wing jigs sheet bottom section between root rib W2 leading edge dry remove wing jigs sand tip sheeting square glue 2 tip blocks place Cut ailerons light 4 sheet Tack glue place TE Vs sheet Glue railing edge place Install aileron pushrods used 1/16 music wire Cut holes rib center section crank plate Make 900 bend wire slipped crank hole Leave ends center section Later aileron servo installed center section zero servo use Du-Bro aileron ball-link joints soldered wire ailerons clamped neutral Works great Sand wing shape using large block 220 paper glued whatever commercial sander have Glue Vs sheet strip L E wide enough cover jig piece about sand leading edge wellrounded shape Epoxy PP 1 bottom trailing edge set wing aside two ways fabricate fuselage sides can lay out center line joined 3/32 sheet measuring draw outline can cut out doubler placing sheet side drawing around finish bottom tail post straight edge side cut out lay out another Glue doublers place ngle longerons shown isometric view plans Glue ght strengtheners sides ail post sides Refer top view mark triangle pieces meet carve sand taper checking angle holding fuselage sides together over top view Sand until sides conform drawing bottom straight F4 tail post Pin sides down over plans use clothes pin clamp hold tail post together Glue F4 place note fuselage can assembled using Hot Stuff-type glue sure go over joints epoxy place Unpin fuselage plans rock forward pin down F3 glue F3 place using 900 triangles keep structure square Lay out engine mount holes F2 firewall before installing put 6-32 screws throueh firewall roughed-out fuselage its distinctive cowling actually no good construction art forrrt shot blocked-out fusejage difficult build typical pattern machine nose suggests sculpture ait Shaping awaits March 1980 13 worki~.snip iue mis comes no surprise radio installation would look like something out radio manufacturers instruction manual Just neat can 5 Realisreveryaspecnamet add dasn colorful true-to- life trim instrument panel pilot earphones resu, IS something turn French license letters heighten illusion T NUTS ON 1/8 PLYWOOD PLATE 4-40 SCREWS 4 THRU 1/4 DOWELS DRILLED CLEAR BASIC BALSA BLOCK LAY UP FOR SANDING TO FUSELAGE FORM ALL 1/2 BALSA 7- / CUT LASTTO OPEN HALF COWL TRIANGULAR STOCK IN FOUR CORNERS ~5 K x I/2BALSA COWL BUMP 2 1/8 BALSA FUELTANK SUPPORT DOUBLED V8PLiWCOD PLwOOD BLOCKS1/8 BALSA FOR WING BOLTS 2PILOT DECK NOSE RING FORMER AND STIFFENER 3/8 BALSA LAMIN TO FORM NOSE RING K 8i B 40 FR MOTOR ON KRAFT ALUMINUM IVEUNT FINAL FORM OF COWL BLOCKu u EXPLODED FOR ART ONLY PLY PLATE SUPPORTS EXHAUST PIPES x BLOCK IS ADDED ONLY TO FORM ROOF OF AIR DUCT THIS BLOCK CARVED TO FORM AIR DUCT DITTO FOR ART SIDE COWL BUMP FINAL FORM DITrO NYLON WING BOLT3 MAPLE BLOCK ORCOVED UNDER FOR LGE WIRE SIG CANOPY FOF SERW TRAY O SUPPORT BLOCI LGEAR WIRE IS STRAPPED TO Pb 316 DIAWIRE STRUT HELD IN BY DUBFO STRAPS 14 Model Aviation FILLER BWCK AS NEEDED TOP TRIANGLES I/2BALSA DECK HOLLOWED CUT /4 X 5/8 BALSA TAPERED FOR LE 1/4 BALSA FAIRING 1/16 BALSA SHEET FIN BOTH SIDES/4 C GRAIN BALSA DOUBLED I/4X 5/8 BALSA FIN POST TAPERED ELEVATOR HORN ON 3/32WPEI INTO BOTH ELEVATORS14 DOWEL IN ..sjRUDDER LE FOR TAILVWHEEL WIRE if1 1/4 BALSA BLOCK 3/16 X 3/4 T E I/4X 9/16 BALSA SPARS TAPERED FOR ELEV STABIUZER 1WHEEL I/4X 1/2 L EDGE TAPERED 3/32 WIRE WITH RUDDER HORN 7 1/8 PLYWOOD BRACE 2V8SHEETSIDES OVER 1/8 DcAJBLER D-I-2 3 3/8X 3/4 MAPLE BLOCK ON LPLYVlOD FOR WNG BOLT N ZCK332 CAP STRIPS RIB BO1TOMSONLY 1/8 X 1/2 BALSA AILERON SPAR 1/4 LIGHTC-GRAIN DcUBLED FOR AILERON 7. 7 TRAILING EDGE /BOlTOM ONLY / 3/32BALSA BALSA BLOCK TIPS 1/8 SHEET BALSA LEADING EDGE DOUBLED RIB ALL HALF LAP AILERON BELLCRANK ON 1/16 PLW/cODINTO SPAR NOTCHES BALSA BLOCKS BUILD UP FAIRING 2 1/2 FOX WHEELS 1/8 BALSA FAIRINGS BOTH SIDES OF PLW~flD 3/4 BALSA TRIANGLE EACH CORNER 3/32 SHEET CROSS GRAIN ON BOTrOM 1/8 BALSA SPARWITH 5-PLY DOUBLERS AT CENTERS March 1980 15 HCAI back side Solder short piece wire screw slots epoxy firewall mount position front end Glue firewall place Glue floor place mount tank outlets Locate approximate position throttle pushrod tubing drill holes install Mark center horizontal lines Fl ply former matching lines fuselage Glue top sheet bottom ks place Sand front end square glue Fl place cowl front end made two vertical two horizontal pieces a glued front end FL Use light piece t turtle deck tack-glue place Glue er piece between sides aft stabilizer Glue bottom 3/32 sheet cross- grained Glue cockpit floor glue F5 place Set aside Glue t tips elevator stabilizer Cut pieces shape glue sides butting against Fl noting left side section drawings Fl F2 location Carve rough sand fuselage approximate shape referring right side section drawings Cut t rear top off hollow out glue back permanently Using epoxy glue FP1 FP2 pieces place Remember recess FP2 pieces Ys Glue FP3 hardwood blocks place use Sig Kwik-set has held up OK planes Check-fit wing fuselage sand out rough spots careful sand too much change incidence wing Cut out two 1/64 fillet bases sheet plywood Draw center lines fuselage front rear wing cut out center line bottom sheeting wing Pin wing place check its squareness using yardstick tail post wing tips shifting necessary Drill screw mounting holes through wing ply plates hardwood blocks fuselage tap blocks screw wing place Check-fit stabilizer cut-out sand rough spots off saddle Getting stab straight level very important want true-flying model tracks through maneuvers well take care lining up before gluing place Unbolt wing position 1/64 fillet 16 Model Aviation ASottA 3-JtOL V450PLE/N 4FCSSO03-Fez -PCS Ito SOFO SCSF tAOS00CKCOASSC 3-lIttLE FtjO%~FOCSEOSA FLOOR 103-CAROLSOtO BALSA i toO~--SCA_________________ -- 5F~-IItAt*CSU -ottCAttUC- jfrr17 eSEFAtS StoCROtoOOtA StA$WFE IbOLLOt3 tOt~AL JF2 SREFT SttFOttsmutBALSA C toTEISSTRttRS jj__ 0000C5 CAP 20 t2LO.A-FttREOto0tFBo-OkOd-RLSO SItBptStd cockpit completely finished paintea ratner eary stage builder encounters fun break construction before after shots 05 wheel pants legs finished leftcomplement plan details I-racucai wed say FULL-SIZE PLANS AVAILABLE SEE PAGE 120 540 CYBALSA MEE2 &YfSE5,SSPAR54554 PLY -Ft ES 54t--w LL&TCCWSHEET-1 T/IAACCC FOR JO SULCAG CAP 20 SAW ST LA 5 55 SA S -ALA 5 LAW SOSCASOOC OTAC TARS bases lay some Saran Wrap over wing center Section bolt wing back use angle balsa between ply fuselage sides putty fillet using finger get smooth Glass beads Sig Epoxilite whatever favorite material can used Unbolt wing Start trimming little time off canopy until fits around fuselage Carve inside top rear cockpit about 3/16 thickness smooth sandpaper Sand fuselage final smooth shape 220 grit Bolt wing back add filler pieces leading trailing edges fair fuselage smoothly Go far want dino th insiclp nfth cockpit put inside instrument panel pilot pilot seat radio required Sport Scale like some realism Glue canopy elevator has mounted before vertical fin can glued place now time fit hinge Use 9Q0 triangles gluing fin place rudder shaped hinged glued yet Fabricate tail-wheel drive rudder horn using side view isometric sketch used low-temperature silver solder job has never failed Epoxy tail wheel unit rear fuselage change can made move brass strip ton drive unit instead bottom concerned interference elevator has proven untrue will make pushrod installation easier moved top Draw center lines top bottom front blocks cowl edge firewalL Use razor saw cut cowl fuselage pried backing edge X-Acto #35 blade off used blade job use tabs epoxied permanent side fuselage inside top bottom blocks jutting Out far enough about t 4-40 blind nuts inside face Two pieces l glued top bottomtwo Continued Da2e h 1980 17 m Lu UU quite unnooox Gear recess slots holes hold-on baits show clearly form refreshing decorative scheme aircrarr aao up pleasing sight during overhead fly-by 5URERJET THE STUNNING DIFFERENCE IS THE BODY WANKS MoDE1ERS Ior overvAeI demc1tdi MassIVe supP1 es ofl waY Ar What difference body makes New SUPER JET revolutionary instant glue body like regular model cement Now joints dont have perfect R JET will fill slight errors Take look photos See SUPER JET has filled filleted purposely poor joints Try yourself good modelers excited about SUPER JET s difference SUPER 1/2 Oz 4 1/4 Oz No383 AVAILABLE IN CANADA Dave Robelen few well know yet another brilliant circle modelers made career NASA began simply logically before WW II old NACA space age converted initials NASA hit upon happy policy hiring modelers makc wind tunnel models others people like Taibi Worth Blanchard Poythress Phillips shared unique experience became involved test work exotic nature both within laboratory analysis performance future vehicles fringe- area machines develop ment flight testing strange array aircraft drop testing dynamically similar models fighters such strange configura tions like Rogallo wing Operating twilight zone models real aircraft scientific bent dual turning well toward advancement modeling forms constituted hobbyas distin guished jobs Dave himself no stranger modelings printed pages W&d frankly astounded reader builds spin tunnel such Dave describes article month wed bet youll read word tend forget among purposes defined AMA founded 1937 dissemination information technical advancement art So important functions Model ion publication scientific articles said season M4 like desert grows tiowers next five six months find two three bonus coverages issue People common denominator would please us bring personality profile~ issue within freewheeling season usually manage least such story Personalities done magazine too often tell retell stories already famous now obvious people usually turn out either glamorous manufac turers guys flying has made legendary around us remarkable people seldom hear mentioned unsung heroes self-ellacing guys skip almost un noticed remarkable achievement another II appreciate after reading Art Schmalzs long-labored-over story about Dave Gray Dave happens Du- Bro coincidence Du- Bro story nor plug firm above others simply among insiders quiet Dave Gray recognized ingenuity developments thinkers Wed love others Over span IS years weve aware ofthis exceptional quiet man pleases us bring story Modeling people much things Robelens account spin tunnel about things Schmalzs piece Dave Gray people Both have common theme achievement what modeling about will lot next issue issue after til 1980 competition reaches Its crescendo best two worlds CAP 20/Shepherd continued page 17 top two bottom over location tabs about front back dry tape cowl tightly drill 3/32 holes through middle dowel through tabs Enlarge tab holes receive blind nuts screw cowl secure blind nuts holes Remove cowl dab little epoxy blind nuts countersink holes 1/4 dowel using flat-head screws neat job wing MonoKoted rest plane given coat uncut butyrate clear dry sand smooth 220 thin some dope use light Silkspan cover entire framework Two three coats 50-50 dope sanded between coats followed coat two balsa filler coat until surface looked smooth over did colororange lightened yellow few dabs white until matches MonoKote last word keep light wing aft CAP balanced mark adding weight model can flown anything good 40 up 60 Its about size some 60-powered jobs few years back have no qualms 60 would work OK Havent checked 10 oz tank should fit available space control movements should rudder two inches side measured trailing edge rudder aileron throw /i inch up down center elevator due its large size no up down flying anything smooth concrete asphalt runway would recommend using 3/16 music wire landing gear struts instead 5/32 shown plans Research could turn up some differences some CAPs now flying Also some have different color schemes understand modified version 20 lighter horsepower want thank Bob Wischer help encouragement way through project Jerry Nelson has always out front new innovations modeling game 94 Model Aviation IRREGULA JOINT 1 I-7 Purchasing R/C Aircraft easy YOUNIQUE AT Hobby Capital keep large ready supply af Custom-Bilt RC Aircraft Kits Engines RC Units times And. thanks ta years af experience dealing people sections af US. prepare special ane-of-a-kind RC Aircraft far special one-ofa-kind RC Flyer wha demands unique laok express tastes Chances youll find custom paint finish exquisite detailed cockpit interiors glassed engine compartments real scale wheels custom grilled nose section will knock socks offi. youll probably never see another like cause Hobby Capitol expert stressed preparation goes far beyond standard checkout RC shoppers turning up increasing numbers convenient showroom because word out. outstanding buys service finest selection unique RC Aircraft anywhere its HOBBY CAPITOL Old Ignition Trode4n Buy sell old time ignition engines Box up what have send us honest appraisal could worth new proportional set have engines can also start collection welcome built-up airplanes used proportionals old time ignition engines Come trade us lop dollar paid Built Order Rons Kt stock choose Its s400OO Pipet Tri-Poce Quarter Scale 89 wingspan 42 Sq Ft detailed plans $1699 PR Send $i00 self addressed stamped envelope far detailed list Built-Up R/C Models ond 50% Sale Hobby Capitol 46 N Oak St Ventura CA 93001 Phone 805 643-7616 / 642-8465 efforts promote models look fly like full-size counterparts may finally blossom ing full bloom Las Vegas TOC thing andthe IMAC organization promoting aerobatic models have copies full scale machines CAP addition pack hopefully add pleasure others just did Glen Hazel Sig gang up Iowa doing share promote IMAC philosophy decide build CAP sashay up next year enjoy bash put benefit us modelers RC Aerobatics/Van Putte continued page 26 street front house said technique faultless beginning Eleck Rider performed perfectly Id half truthful cycle did perform perfectly technique left lot desired initially poor driving ability its advant ages Whenever lost control cycle spun out ran curb dashed under car clobbered mailbox post demonstrated durability system After two weeks hard use 13 novice drivers cycle has scuff marks acetate fairing evidence its hard life its tough first questions someone has never seen perform asks difficult keep upright answer very simple Its easy Unless driver does something upset cycle will happily drive forever straight line want turn thats different story Eleck Rider requires coordination ofthrottle steering negotiate turn tighter turn coordination required Steering accomplished turning front forlc done tilting fork front wheeVfork castered free turn direction So does cycle steer Very nicely thank extremely stable too have hit number obstructions include rocks manhole cover cracks pavement acorns jumping ramp etc very few exceptions cycle has stabilized itself motored electric motor operated servodriven rheostat throttle stick has spring return center Forward movement stick provides proportional forward speed Pulling back stick causes motor function like generator acts brake dead man throttle feature nice beginners since cycle will stop itself let go stick best place leam operate Eleck Rider large smooth area like parking lot Once driving proficiency achieved large area smaller places can tried out cycle started holding upright advancing throttle holding stable briefly acceler ates Initial operation should about R3 throttle gentle tums should attempted Sharper turns must accomplished throttling back turning cycle throttling up about halfway through turn slower cycle sharper turn can cycle will fall over gets too slow key success proper coordination throttle takes proficient RC pilot less half hour learn operate Eleck Rider Part problem RC newcomers will have deciding way move stick cycle heading toward An experienced pilot has advantage area because has already learned control airplane coming toward him Unfortunately old rule stick toward low wing doesnt help much motorcycle Am enjoying Eleck Rider Well weekday huny home work drive 30 minutes before gets dark weekends tough get chores done before taking out So far havent able racing others because first kid block have However several others way will probably racing around water-filled milk jugs local parking lot read Get case youve wondering next Pattern Problem Month will appear answer ts receive someone response request problems has very underwhelming Ron Von Puttg 12 Connie Drive Slzalimart FL 32579 Spin Tunnel Robelen continued page 24 good brands really am stuck Hot Stuff type glue truly superior Very light weight will never warp thinnest tail surface course dries immediately other brands Zap Jet etc areallfine Imsure Ijusthavenothadmuch experience Various finish techniques useful Sometimes apply coat sanding sealer Testors Hot Fuel Proof trim color am also pleased results using spray dyes use Deep-flex brand spray can found local variety store usual method construction start fuselage lightly tack glue two blocks together part vertical centerline first shape top view side view followed careful shaping 96 Model Aviation MAMMOTH SCALERS nce have available reeglete line enganeasmts alal eufflers enat 90 So 15 engines srsis OIaDRA WEBRA ar etc Wgite call far catalog emS price info Quarter Headquarters U 12321 5am raulmCaS4iI2 334,,

