
Chipmonk9Designed Britains foremost stunt flier 40-powered control-liner has long string wins performed credibly World Champs FEEL time model should see light hands other modelers appear too few semi-scale stunt models scene excluding models ala Rabe seem beyond average modeler because time commitments myself included would pass just two comments Jim Mannall six times Gold Trophy winner its first model belonging someone else have flown long time have felt happy straight off ground second John Heanen junior stunt Champion four years ago now placing regularly top fiveBeautiful could obviously said about lot models think its record over past couple years adds weight above comments plus model has modi fied number 7 both flew number 9 decided just before 1975 Nationals model flying could lighter wing loading couldnt build lighter decided build bigger thus Chipmonk Number 9 evolved root chord went up 1 inches tail increased some 20% wingspan increased 57 inches 54 giving wing area some 688 sq meant weight 54 ozs quite heavy easy build still 1275 sq per oz falls well 11-14 sq per ounce have always aimed Detroiter style wing explained some seven years ago Neil Bil lington still quickest way building wing modified D-box sec tion becomes very rigid well method can used wing design symmetrical difference being different templates required asymmetrical sections Construction First decide section wing used make template section between leading edge trailing edge point maximum chord Sketch template should least 3 deep makes easier hold thus comes less tiring wrist cutting out ribs find Detroiter style no need put ribs normal decide number ribs double add 8 tips give number ribs required usually about 70 Dont put off large number can cut out approximately half hour cut ribs usually cut two sheets 4 X 1/16 pieces length template put top other mark Sketch B A-in spaces bottom sheeting top cutting can commence Just lay template top pile commence cutting will found feel happier airplane based real ship details au thors DH add considerable realism simu lated rivetting color scheme canopy inte rior finepoints life-like landing gear struts wheels really point up 30 Model Aviation sharp knife ribs come off perfectly good enough build require no sanding etc due fact lead ing edge sheeting capping ribs cover Next take four ribs lay flat piece paper leading trailing edge have drawn section first center section second last rib bay Sketch C will give depth main spar measured between two extremities ribs 2 back leading edge main spar drawn up straight onto piece hard /s sheet Sketch D Build ing can start board has set follows 1 Draw outline board glue blocks along leading trailing edge blocks should half depth main spar CL wing minus half thickness leading edge 2 The leading trailing edge both wings cut together means block four strips line up can cut accurately Sketch E cut 1/16in slots main spar leading trailing edges use two pieces hacksaw blade teeth going opposite directions 3 We now have ingredients quick fairly light rigid cheap wing will perfectly straight providing building board Pin leading edge trailing edge pieces onto packing pieces having first glued joints used PVA throughout Next put main spar position having previously applied 1/32 ply doublers hold vertical position putting two center ribs two tip ribs top should found main spar will touch building board center should lift clear tip bring CL spar parallel board Pack po sition glue tips place between leading edge trailing edge main spar will sufficient hold wing perfectly straight being built Sketch F 4 All ribs inserted slots leading edge main spar will found increasing amount rib protrudes beyond trailing edge cut off position razor saw rib pushed trailing edge Before glue applied take piece scrap 1/16 sheet push leading edge trailing edge rib down give level sheeting Sketch G joints can glued water PVA down slightly allow soak before dry ing use fillet glue aid speed building ribs can glued time have found makes very little difference strength 5 When ribs have dried leadTEMPLATEAPPROX 3 SKETCH 1/4 GAPS ~ALUMINUM ANGLE FOR DEPTH OF CUT 8 TO SUPPORT STRIPS SKETCH B EIJ 23/4 SKETCH C 1/16 SHEET STAC KED MAX CORD AT WING CORD AT WING TIP 1SLOTS 114 DEEP SKETCH E SKETCH F FLUSH AT THIS POINT SKETCH G TAKE BELLCRANK SKETCH D 1/B SLOT TO TAKE TIP SKETCH H STRIGHT PIN MA P PIN /CAPPING STRIP LET E BLOCK April1977 31 xt~ ing edge sheeting can applied cut 4-in sheet remainder goes along trailing edge working fairly swiftly glue can applied first ribs along leading edge sheet pinned position Due lip caused lowering ribs find necessary pin rib through Sketch H Run glue along main spar work sheeting onto ribs pin main spar use large-head map pins sheet doesnt raise up pin Repeat process other wing trailing edge add center section sheet ing capping strips tip ribs tip ribs have capping strips have tips gives definite flatness rib re duces distortion tissue between ribs Top wing now complete should left 24 hours before removing board So far time taken cutting out template region three hours actual work normally spread over few evenings trim leading edge trailing edge wing has turned over mounted same blocks 6 wing removed turned through 1800 about CL repinned jig bellcrank added point also forms main center section brace epoxied rear main spar leadouts con nected bellcrank guides fixed tip undercarriage bent shape l0-swg piano swg means stand ard wire gaugeequivalent 128 wire should model required use over grass suggested least inch longer wired soft copper ply brace positioned angle bottom edge main spar uppermost edge leading edge area between ply sheeting filled soft scrap balsa fill area sand line two adjoining ribs bottom leading edge sheeting adheres whole surface same process No 4 repeated after 4-6 evenings work completed wing ready sanding shape process building De troiter-style wing including Chipmonk 9 Building rest Chipmonk fairly straightforward complica tions being removable wing fuselage built upside down plan best method obtaining symmetry Having cut out formers remembering No 5 1/32 ply both sides 1/s balsa soft fuselage sides again including 1/32 ply doublers bearers placed position plan Formers 3 4 epoxied place making sure both vertical square fuselage sides epoxied onto bearers formers making sure top sides flat onto building board Allow set cutting four longerons 1/4 stock can glued place using PVA similar tailpost glued position pulling sides meet point making sure sides align plan add former No 2 again making sure square two wing seat braces now glued position together tank bay base thickness will vary according height venturi Detroiter birdcage type wing con struction quickest way build wing thinks authorhes made Wanting lighter wing loading built larger 57-in wing yields 688 squares Gross 54 oz combination works well 32 Model Aviation 9 1 SKETCH A~A BOARD SKETCH J motor 40 shown vertical braces between longerons added before adding front rear wing mounts should pointed out drilled tapped until much later al though dural plates epoxied prior fitting front fixing doweled using hardwood wing seat sheet ing added braces followed bottom sheeting rear wing joints completely set fuselage can removed board engine bolt holes drilled aligning engine put just enough offset make sure no inset other words engine should near straight possible Bolt engine position order align former No remove before adding top block spot glued position external shape obtained Remove top block hollow out much can easily removed out endangering strength 3/16 thick ness quite thin enough engine position openings sealed block out cowling shape scrap /2 sheet sand shape satisfied shape cut cowling through exhaust stack centerline side elevation remove sand internal shape including air inlet outlet dotted lines Bend 14-swg 080 tail wheel strut shape bind ply plate epoxy bottom fuselage block out scrap wing fuselage com pleted fuselage turned upside down wing placed its recess CL wing fuselage lined up measurement taken flap end CL fuselage back measurement has same both sides Sketch four spots balsa cement used hold wing posi tion removable section added Once glue has dried hold ply plates position drill through tap out dural required thread usually use 6B4 bolt together just simple opera tion packing out scrap block sheeting obtain required profile line up tail have CL fuselage CL tail line measure hinge line hinge line obtain symmetry Check horizontal alignment times laying model flat board putting two equal-depth blocks under wings approx 6 fuselage main spar line place two similar blocks deeper parallel depth under tailplane ensures true tail wing horizontally Sketch J pushrod soldered elevator horn shape slot former No 5 allows removal wing will let pushrod come out Epoxy tail place again checking alignment abso lutely sure items square glue top block position epoxy fin mak ing sure vertical line CL fuselage model complete satisfaction add tip weight no hard fast rules about tip weight espe cially symmetrical model person ally balance model ide offside fuselage side have found seems best position weather conditions Now finish model may seem bit old hat England have recently started obtain fuel-proof dopes Provinces anyway 6 ozs 700 sq model seems difficult obtain polyurethanes epoxy paints Ill stick method Once model construction finished weigh both pieces eg wings body rub entire model 320 paper dry until absolutely smooth over dents digs etc fill now mixture balsa dust rubbed off rest model dope Weigh again see difference may ounce worth removing Once model has required finish add two coats clear dope unthinned entire model except capping strips added capping strips will tend curl up cause distor April 1977 33 finished components ready painting removable wing boon transportation Using TopFlite 11/6 wood prop likes fly rate 52 seconds lap fast 4stroke trims fly straight through reverse wing-over tion tissue Ive done Weigh parts again will surprised little weight has added Sand entire model 320 wet dry still dry roughness has removed new dents filled check weight again should little dif ference before doping Mix 30% dope 70% thinners brush clear lightweight tissue over entire body tail mixture covering make sure tissue goes over fillet round inside corner eg tail body join tissue middle fillet form butt joint overlap because shrinking effect dope will lift tissue away fil let thinners will attack dope wood will make very good adhe sion dry add another coat 30/70 allow dry completely tissue will take slightly furry appearance must rubbed down 320 use same piece because will slightly finer until completely dull over rub through tissue other stage Mix 40% dope 60% thinner mixture brush another two coats leave dry 24 hours Having coated wings two coats unthinned clear dope capping strips rubbed down original weight again use mixture 30/70 apply heavyweight clear tissue over entire wing except bottom body use lightweight Once dry give another coat 30/70 tissue over wood still capping strips method far satisfactory tissue paste quicker cheaper cleaner lighter will dry very quickly tissue can water shrunk almost immediately dry add two coats 40/60 open work wings wooden parts dry add two further coats 40/60 entire wing leave dry Back fuselage now ready rub down 400 paper dry completely matt over sure no dents etc point no re turn has reached spray mix ture 30% silver 70% thinner covers excellent base color Only very thin coat will neces sary has very good covering qualities obliterates manufacturers stamps wood grain coloring has completely dried rub down 400 dry make sure cut right through color fuselage ready its finishing color use silver apply two coats 30% silver 70% thinner fuselage ready decoration wings should now completely dry should rubbed down piece 600 dry Evo-stuck contact ce ment piece foam rubber fol lows contours wing will cut tissue careful wings ready 30% silver-70% thinner treat ment dry can rubbed down again 600 dry making sure cut tissue ribs sheeting edges now ready finishing coat again apply two coats 30% silver dope leave entire model least three days before adding decora tion coat 30/70 clear over entire model would help stop finishing color being damaged prior adding decoration slight drips dope enamel can wiped away base color being marked silver used finishing color achieve good finish must sprayed must fuel proofer because dope particles suspension brush will leave ugly lines previous coat 30% silver-70% thinner need sprayed has well rubbed down brush marks will go anyway adding trim using masking tape achieve clear line advisable run thin seal clear dope along edge tape prevent color running underneath Apply trim color well thinned whether sprayed brushed should flow out smoothly As said before last two items finishing color fuel proofer heaviest sparing because should have very good base apply need thin method finishing should add about 7 oz maximum 57-in stunt model heavy motor like Fox 40 weights 52 oz within easy strik ing distance Once model completely finished well worth making cardboard covers flying surfaces although may damaged once flying field transportation usually injurious good paintwork will dwell flying model suggest 18/2-meter Pylon stainless lines equivalent feet 60695 used flying speed 52 seconds per lap suits perfectly use Top Flite 11/6 wood fast 4stroke trim model fly straight through reverse wing over would add hope model gives much satisfaction success modeler decides build it has given during past three years cluding third first second place British Championships team place 76 World Championships 34 Model Aviation happy endingall work well worth Pet&s thoughtful type probably will discern working plans MAIN SPAR SYMMETRICAL ABOUT j VBI-IARD BALSA WITH V32PLYDOUBLERS CANOPY FROM 3 SEPARATE PIECES OF ACETATE WITH ALUMIMJM FRAME OR SELF MOLDED AROI*JD BALSA PLUG 2VECO SRNNEP COWL FROM SCRTHALF TEMPLATE OF CANOPY 4 DOWELPUSNRODI/BPLYWHEELBBSCESHOG 17ThNWHEELPAINT WORK TANKACTUAL SIZE BGASOFT COPPER- IVwojI TANK BLANK VENT jjjPLYADESGNED&DRN APEA 688SQWJS SRNr4 57 INS WENGINEBEARE\POWER 35-490JJt6 Fmi ----_ RTCAL ACING LI] 2 LJ LJLi Li WI4TAaUNEN HINGES__2TTEVBTESHEET3/B FLAPS___II7 ___________________________U 0 I2 3 45 A7 B9 FULL-SIZE PLANSAVAILABLESEE PAGE 96 4 -2OFT I/2VME ---I---I NT 6M -II _ -____ II 0 a a

Edition: Model Aviation - 1977/04
Page Numbers: 30, 31, 32, 33, 34, 35

Edition: Model Aviation - 1977/04
Page Numbers: 30, 31, 32, 33, 34, 35
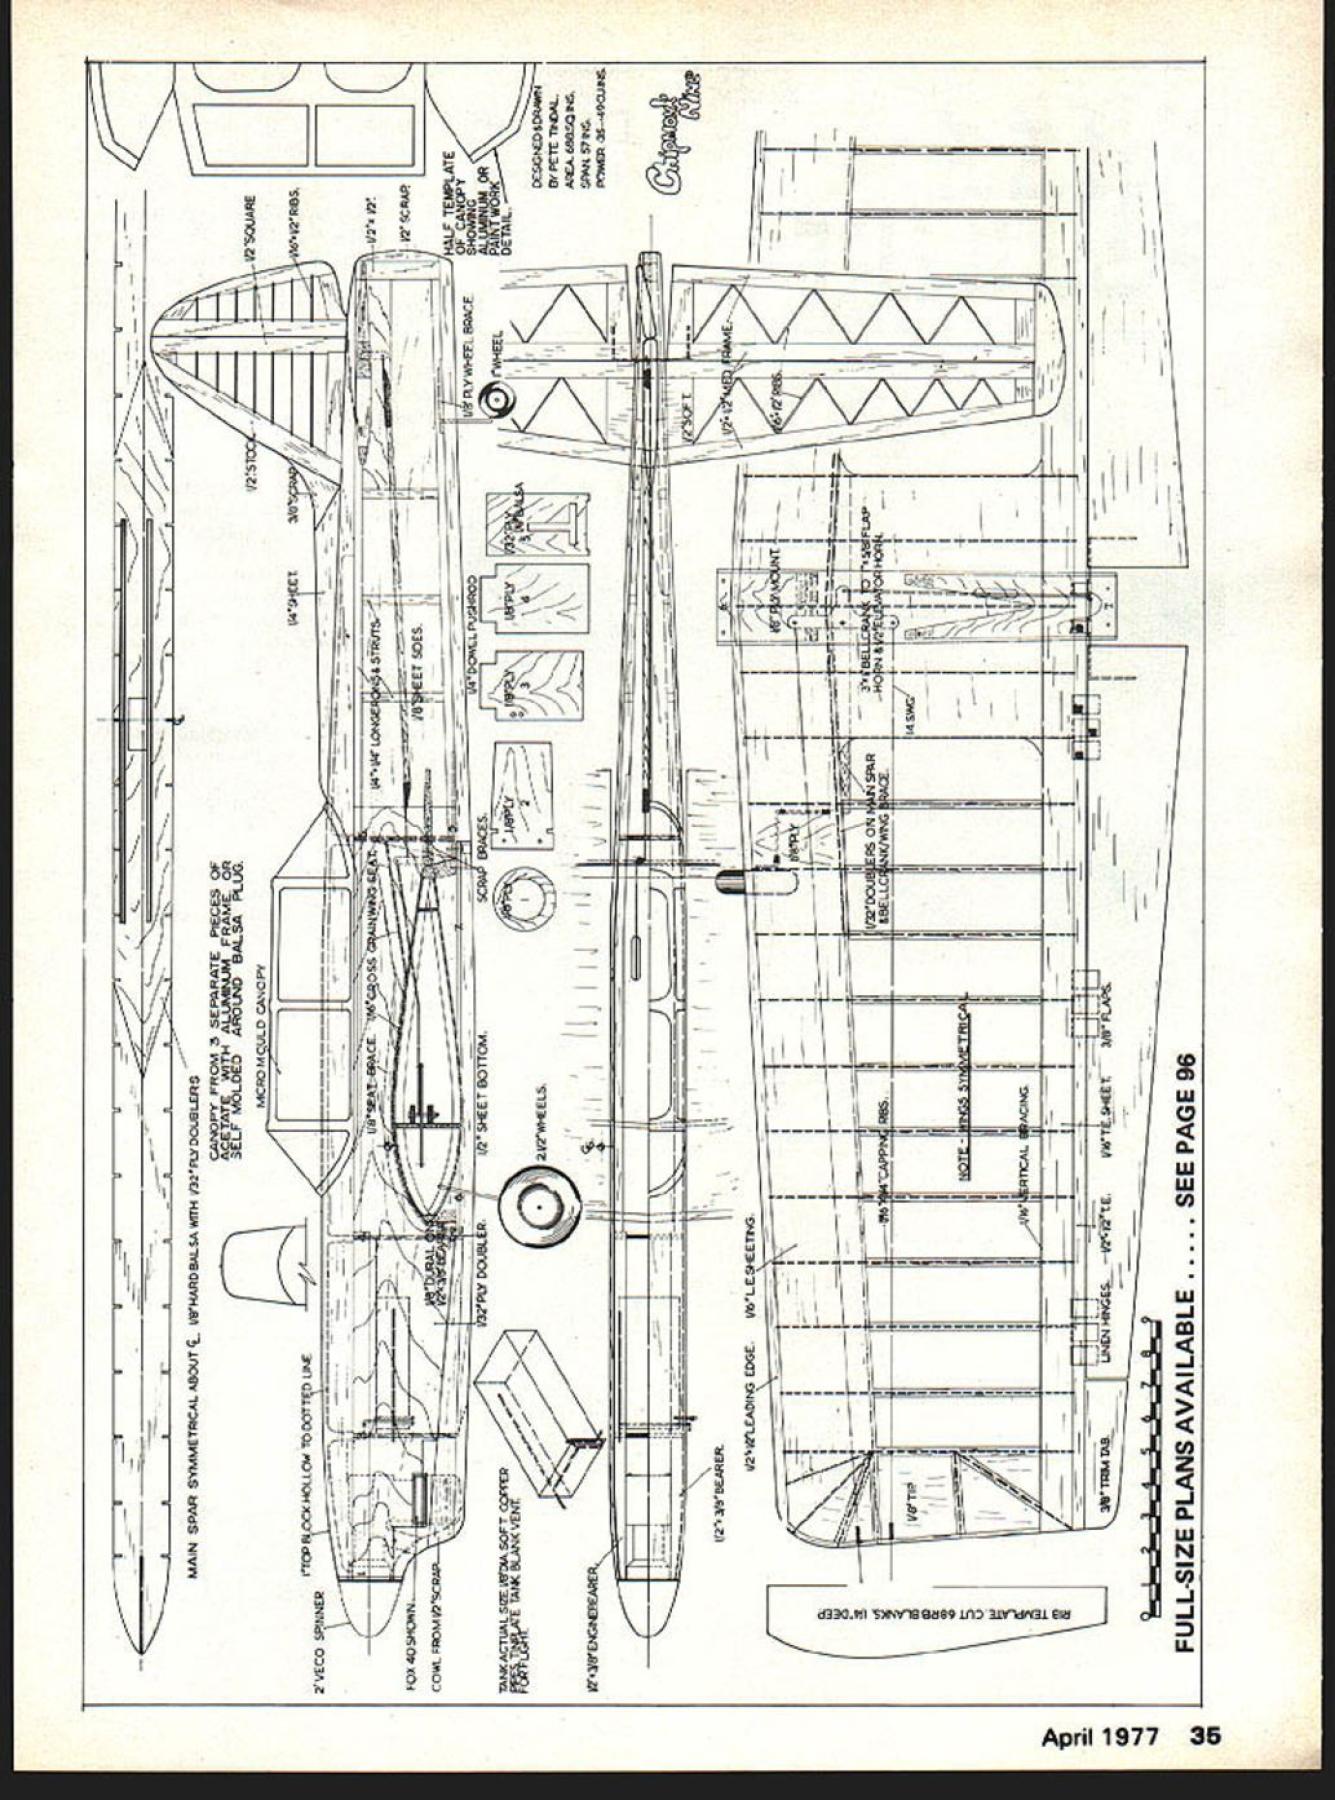
Chipmonk9Designed Britains foremost stunt flier 40-powered control-liner has long string wins performed credibly World Champs FEEL time model should see light hands other modelers appear too few semi-scale stunt models scene excluding models ala Rabe seem beyond average modeler because time commitments myself included would pass just two comments Jim Mannall six times Gold Trophy winner its first model belonging someone else have flown long time have felt happy straight off ground second John Heanen junior stunt Champion four years ago now placing regularly top fiveBeautiful could obviously said about lot models think its record over past couple years adds weight above comments plus model has modi fied number 7 both flew number 9 decided just before 1975 Nationals model flying could lighter wing loading couldnt build lighter decided build bigger thus Chipmonk Number 9 evolved root chord went up 1 inches tail increased some 20% wingspan increased 57 inches 54 giving wing area some 688 sq meant weight 54 ozs quite heavy easy build still 1275 sq per oz falls well 11-14 sq per ounce have always aimed Detroiter style wing explained some seven years ago Neil Bil lington still quickest way building wing modified D-box sec tion becomes very rigid well method can used wing design symmetrical difference being different templates required asymmetrical sections Construction First decide section wing used make template section between leading edge trailing edge point maximum chord Sketch template should least 3 deep makes easier hold thus comes less tiring wrist cutting out ribs find Detroiter style no need put ribs normal decide number ribs double add 8 tips give number ribs required usually about 70 Dont put off large number can cut out approximately half hour cut ribs usually cut two sheets 4 X 1/16 pieces length template put top other mark Sketch B A-in spaces bottom sheeting top cutting can commence Just lay template top pile commence cutting will found feel happier airplane based real ship details au thors DH add considerable realism simu lated rivetting color scheme canopy inte rior finepoints life-like landing gear struts wheels really point up 30 Model Aviation sharp knife ribs come off perfectly good enough build require no sanding etc due fact lead ing edge sheeting capping ribs cover Next take four ribs lay flat piece paper leading trailing edge have drawn section first center section second last rib bay Sketch C will give depth main spar measured between two extremities ribs 2 back leading edge main spar drawn up straight onto piece hard /s sheet Sketch D Build ing can start board has set follows 1 Draw outline board glue blocks along leading trailing edge blocks should half depth main spar CL wing minus half thickness leading edge 2 The leading trailing edge both wings cut together means block four strips line up can cut accurately Sketch E cut 1/16in slots main spar leading trailing edges use two pieces hacksaw blade teeth going opposite directions 3 We now have ingredients quick fairly light rigid cheap wing will perfectly straight providing building board Pin leading edge trailing edge pieces onto packing pieces having first glued joints used PVA throughout Next put main spar position having previously applied 1/32 ply doublers hold vertical position putting two center ribs two tip ribs top should found main spar will touch building board center should lift clear tip bring CL spar parallel board Pack po sition glue tips place between leading edge trailing edge main spar will sufficient hold wing perfectly straight being built Sketch F 4 All ribs inserted slots leading edge main spar will found increasing amount rib protrudes beyond trailing edge cut off position razor saw rib pushed trailing edge Before glue applied take piece scrap 1/16 sheet push leading edge trailing edge rib down give level sheeting Sketch G joints can glued water PVA down slightly allow soak before dry ing use fillet glue aid speed building ribs can glued time have found makes very little difference strength 5 When ribs have dried leadTEMPLATEAPPROX 3 SKETCH 1/4 GAPS ~ALUMINUM ANGLE FOR DEPTH OF CUT 8 TO SUPPORT STRIPS SKETCH B EIJ 23/4 SKETCH C 1/16 SHEET STAC KED MAX CORD AT WING CORD AT WING TIP 1SLOTS 114 DEEP SKETCH E SKETCH F FLUSH AT THIS POINT SKETCH G TAKE BELLCRANK SKETCH D 1/B SLOT TO TAKE TIP SKETCH H STRIGHT PIN MA P PIN /CAPPING STRIP LET E BLOCK April1977 31 xt~ ing edge sheeting can applied cut 4-in sheet remainder goes along trailing edge working fairly swiftly glue can applied first ribs along leading edge sheet pinned position Due lip caused lowering ribs find necessary pin rib through Sketch H Run glue along main spar work sheeting onto ribs pin main spar use large-head map pins sheet doesnt raise up pin Repeat process other wing trailing edge add center section sheet ing capping strips tip ribs tip ribs have capping strips have tips gives definite flatness rib re duces distortion tissue between ribs Top wing now complete should left 24 hours before removing board So far time taken cutting out template region three hours actual work normally spread over few evenings trim leading edge trailing edge wing has turned over mounted same blocks 6 wing removed turned through 1800 about CL repinned jig bellcrank added point also forms main center section brace epoxied rear main spar leadouts con nected bellcrank guides fixed tip undercarriage bent shape l0-swg piano swg means stand ard wire gaugeequivalent 128 wire should model required use over grass suggested least inch longer wired soft copper ply brace positioned angle bottom edge main spar uppermost edge leading edge area between ply sheeting filled soft scrap balsa fill area sand line two adjoining ribs bottom leading edge sheeting adheres whole surface same process No 4 repeated after 4-6 evenings work completed wing ready sanding shape process building De troiter-style wing including Chipmonk 9 Building rest Chipmonk fairly straightforward complica tions being removable wing fuselage built upside down plan best method obtaining symmetry Having cut out formers remembering No 5 1/32 ply both sides 1/s balsa soft fuselage sides again including 1/32 ply doublers bearers placed position plan Formers 3 4 epoxied place making sure both vertical square fuselage sides epoxied onto bearers formers making sure top sides flat onto building board Allow set cutting four longerons 1/4 stock can glued place using PVA similar tailpost glued position pulling sides meet point making sure sides align plan add former No 2 again making sure square two wing seat braces now glued position together tank bay base thickness will vary according height venturi Detroiter birdcage type wing con struction quickest way build wing thinks authorhes made Wanting lighter wing loading built larger 57-in wing yields 688 squares Gross 54 oz combination works well 32 Model Aviation 9 1 SKETCH A~A BOARD SKETCH J motor 40 shown vertical braces between longerons added before adding front rear wing mounts should pointed out drilled tapped until much later al though dural plates epoxied prior fitting front fixing doweled using hardwood wing seat sheet ing added braces followed bottom sheeting rear wing joints completely set fuselage can removed board engine bolt holes drilled aligning engine put just enough offset make sure no inset other words engine should near straight possible Bolt engine position order align former No remove before adding top block spot glued position external shape obtained Remove top block hollow out much can easily removed out endangering strength 3/16 thick ness quite thin enough engine position openings sealed block out cowling shape scrap /2 sheet sand shape satisfied shape cut cowling through exhaust stack centerline side elevation remove sand internal shape including air inlet outlet dotted lines Bend 14-swg 080 tail wheel strut shape bind ply plate epoxy bottom fuselage block out scrap wing fuselage com pleted fuselage turned upside down wing placed its recess CL wing fuselage lined up measurement taken flap end CL fuselage back measurement has same both sides Sketch four spots balsa cement used hold wing posi tion removable section added Once glue has dried hold ply plates position drill through tap out dural required thread usually use 6B4 bolt together just simple opera tion packing out scrap block sheeting obtain required profile line up tail have CL fuselage CL tail line measure hinge line hinge line obtain symmetry Check horizontal alignment times laying model flat board putting two equal-depth blocks under wings approx 6 fuselage main spar line place two similar blocks deeper parallel depth under tailplane ensures true tail wing horizontally Sketch J pushrod soldered elevator horn shape slot former No 5 allows removal wing will let pushrod come out Epoxy tail place again checking alignment abso lutely sure items square glue top block position epoxy fin mak ing sure vertical line CL fuselage model complete satisfaction add tip weight no hard fast rules about tip weight espe cially symmetrical model person ally balance model ide offside fuselage side have found seems best position weather conditions Now finish model may seem bit old hat England have recently started obtain fuel-proof dopes Provinces anyway 6 ozs 700 sq model seems difficult obtain polyurethanes epoxy paints Ill stick method Once model construction finished weigh both pieces eg wings body rub entire model 320 paper dry until absolutely smooth over dents digs etc fill now mixture balsa dust rubbed off rest model dope Weigh again see difference may ounce worth removing Once model has required finish add two coats clear dope unthinned entire model except capping strips added capping strips will tend curl up cause distor April 1977 33 finished components ready painting removable wing boon transportation Using TopFlite 11/6 wood prop likes fly rate 52 seconds lap fast 4stroke trims fly straight through reverse wing-over tion tissue Ive done Weigh parts again will surprised little weight has added Sand entire model 320 wet dry still dry roughness has removed new dents filled check weight again should little dif ference before doping Mix 30% dope 70% thinners brush clear lightweight tissue over entire body tail mixture covering make sure tissue goes over fillet round inside corner eg tail body join tissue middle fillet form butt joint overlap because shrinking effect dope will lift tissue away fil let thinners will attack dope wood will make very good adhe sion dry add another coat 30/70 allow dry completely tissue will take slightly furry appearance must rubbed down 320 use same piece because will slightly finer until completely dull over rub through tissue other stage Mix 40% dope 60% thinner mixture brush another two coats leave dry 24 hours Having coated wings two coats unthinned clear dope capping strips rubbed down original weight again use mixture 30/70 apply heavyweight clear tissue over entire wing except bottom body use lightweight Once dry give another coat 30/70 tissue over wood still capping strips method far satisfactory tissue paste quicker cheaper cleaner lighter will dry very quickly tissue can water shrunk almost immediately dry add two coats 40/60 open work wings wooden parts dry add two further coats 40/60 entire wing leave dry Back fuselage now ready rub down 400 paper dry completely matt over sure no dents etc point no re turn has reached spray mix ture 30% silver 70% thinner covers excellent base color Only very thin coat will neces sary has very good covering qualities obliterates manufacturers stamps wood grain coloring has completely dried rub down 400 dry make sure cut right through color fuselage ready its finishing color use silver apply two coats 30% silver 70% thinner fuselage ready decoration wings should now completely dry should rubbed down piece 600 dry Evo-stuck contact ce ment piece foam rubber fol lows contours wing will cut tissue careful wings ready 30% silver-70% thinner treat ment dry can rubbed down again 600 dry making sure cut tissue ribs sheeting edges now ready finishing coat again apply two coats 30% silver dope leave entire model least three days before adding decora tion coat 30/70 clear over entire model would help stop finishing color being damaged prior adding decoration slight drips dope enamel can wiped away base color being marked silver used finishing color achieve good finish must sprayed must fuel proofer because dope particles suspension brush will leave ugly lines previous coat 30% silver-70% thinner need sprayed has well rubbed down brush marks will go anyway adding trim using masking tape achieve clear line advisable run thin seal clear dope along edge tape prevent color running underneath Apply trim color well thinned whether sprayed brushed should flow out smoothly As said before last two items finishing color fuel proofer heaviest sparing because should have very good base apply need thin method finishing should add about 7 oz maximum 57-in stunt model heavy motor like Fox 40 weights 52 oz within easy strik ing distance Once model completely finished well worth making cardboard covers flying surfaces although may damaged once flying field transportation usually injurious good paintwork will dwell flying model suggest 18/2-meter Pylon stainless lines equivalent feet 60695 used flying speed 52 seconds per lap suits perfectly use Top Flite 11/6 wood fast 4stroke trim model fly straight through reverse wing over would add hope model gives much satisfaction success modeler decides build it has given during past three years cluding third first second place British Championships team place 76 World Championships 34 Model Aviation happy endingall work well worth Pet&s thoughtful type probably will discern working plans MAIN SPAR SYMMETRICAL ABOUT j VBI-IARD BALSA WITH V32PLYDOUBLERS CANOPY FROM 3 SEPARATE PIECES OF ACETATE WITH ALUMIMJM FRAME OR SELF MOLDED AROI*JD BALSA PLUG 2VECO SRNNEP COWL FROM SCRTHALF TEMPLATE OF CANOPY 4 DOWELPUSNRODI/BPLYWHEELBBSCESHOG 17ThNWHEELPAINT WORK TANKACTUAL SIZE BGASOFT COPPER- IVwojI TANK BLANK VENT jjjPLYADESGNED&DRN APEA 688SQWJS SRNr4 57 INS WENGINEBEARE\POWER 35-490JJt6 Fmi ----_ RTCAL ACING LI] 2 LJ LJLi Li WI4TAaUNEN HINGES__2TTEVBTESHEET3/B FLAPS___II7 ___________________________U 0 I2 3 45 A7 B9 FULL-SIZE PLANSAVAILABLESEE PAGE 96 4 -2OFT I/2VME ---I---I NT 6M -II _ -____ II 0 a a

Edition: Model Aviation - 1977/04
Page Numbers: 30, 31, 32, 33, 34, 35
Chipmonk9Designed Britains foremost stunt flier 40-powered control-liner has long string wins performed credibly World Champs FEEL time model should see light hands other modelers appear too few semi-scale stunt models scene excluding models ala Rabe seem beyond average modeler because time commitments myself included would pass just two comments Jim Mannall six times Gold Trophy winner its first model belonging someone else have flown long time have felt happy straight off ground second John Heanen junior stunt Champion four years ago now placing regularly top fiveBeautiful could obviously said about lot models think its record over past couple years adds weight above comments plus model has modi fied number 7 both flew number 9 decided just before 1975 Nationals model flying could lighter wing loading couldnt build lighter decided build bigger thus Chipmonk Number 9 evolved root chord went up 1 inches tail increased some 20% wingspan increased 57 inches 54 giving wing area some 688 sq meant weight 54 ozs quite heavy easy build still 1275 sq per oz falls well 11-14 sq per ounce have always aimed Detroiter style wing explained some seven years ago Neil Bil lington still quickest way building wing modified D-box sec tion becomes very rigid well method can used wing design symmetrical difference being different templates required asymmetrical sections Construction First decide section wing used make template section between leading edge trailing edge point maximum chord Sketch template should least 3 deep makes easier hold thus comes less tiring wrist cutting out ribs find Detroiter style no need put ribs normal decide number ribs double add 8 tips give number ribs required usually about 70 Dont put off large number can cut out approximately half hour cut ribs usually cut two sheets 4 X 1/16 pieces length template put top other mark Sketch B A-in spaces bottom sheeting top cutting can commence Just lay template top pile commence cutting will found feel happier airplane based real ship details au thors DH add considerable realism simu lated rivetting color scheme canopy inte rior finepoints life-like landing gear struts wheels really point up 30 Model Aviation sharp knife ribs come off perfectly good enough build require no sanding etc due fact lead ing edge sheeting capping ribs cover Next take four ribs lay flat piece paper leading trailing edge have drawn section first center section second last rib bay Sketch C will give depth main spar measured between two extremities ribs 2 back leading edge main spar drawn up straight onto piece hard /s sheet Sketch D Build ing can start board has set follows 1 Draw outline board glue blocks along leading trailing edge blocks should half depth main spar CL wing minus half thickness leading edge 2 The leading trailing edge both wings cut together means block four strips line up can cut accurately Sketch E cut 1/16in slots main spar leading trailing edges use two pieces hacksaw blade teeth going opposite directions 3 We now have ingredients quick fairly light rigid cheap wing will perfectly straight providing building board Pin leading edge trailing edge pieces onto packing pieces having first glued joints used PVA throughout Next put main spar position having previously applied 1/32 ply doublers hold vertical position putting two center ribs two tip ribs top should found main spar will touch building board center should lift clear tip bring CL spar parallel board Pack po sition glue tips place between leading edge trailing edge main spar will sufficient hold wing perfectly straight being built Sketch F 4 All ribs inserted slots leading edge main spar will found increasing amount rib protrudes beyond trailing edge cut off position razor saw rib pushed trailing edge Before glue applied take piece scrap 1/16 sheet push leading edge trailing edge rib down give level sheeting Sketch G joints can glued water PVA down slightly allow soak before dry ing use fillet glue aid speed building ribs can glued time have found makes very little difference strength 5 When ribs have dried leadTEMPLATEAPPROX 3 SKETCH 1/4 GAPS ~ALUMINUM ANGLE FOR DEPTH OF CUT 8 TO SUPPORT STRIPS SKETCH B EIJ 23/4 SKETCH C 1/16 SHEET STAC KED MAX CORD AT WING CORD AT WING TIP 1SLOTS 114 DEEP SKETCH E SKETCH F FLUSH AT THIS POINT SKETCH G TAKE BELLCRANK SKETCH D 1/B SLOT TO TAKE TIP SKETCH H STRIGHT PIN MA P PIN /CAPPING STRIP LET E BLOCK April1977 31 xt~ ing edge sheeting can applied cut 4-in sheet remainder goes along trailing edge working fairly swiftly glue can applied first ribs along leading edge sheet pinned position Due lip caused lowering ribs find necessary pin rib through Sketch H Run glue along main spar work sheeting onto ribs pin main spar use large-head map pins sheet doesnt raise up pin Repeat process other wing trailing edge add center section sheet ing capping strips tip ribs tip ribs have capping strips have tips gives definite flatness rib re duces distortion tissue between ribs Top wing now complete should left 24 hours before removing board So far time taken cutting out template region three hours actual work normally spread over few evenings trim leading edge trailing edge wing has turned over mounted same blocks 6 wing removed turned through 1800 about CL repinned jig bellcrank added point also forms main center section brace epoxied rear main spar leadouts con nected bellcrank guides fixed tip undercarriage bent shape l0-swg piano swg means stand ard wire gaugeequivalent 128 wire should model required use over grass suggested least inch longer wired soft copper ply brace positioned angle bottom edge main spar uppermost edge leading edge area between ply sheeting filled soft scrap balsa fill area sand line two adjoining ribs bottom leading edge sheeting adheres whole surface same process No 4 repeated after 4-6 evenings work completed wing ready sanding shape process building De troiter-style wing including Chipmonk 9 Building rest Chipmonk fairly straightforward complica tions being removable wing fuselage built upside down plan best method obtaining symmetry Having cut out formers remembering No 5 1/32 ply both sides 1/s balsa soft fuselage sides again including 1/32 ply doublers bearers placed position plan Formers 3 4 epoxied place making sure both vertical square fuselage sides epoxied onto bearers formers making sure top sides flat onto building board Allow set cutting four longerons 1/4 stock can glued place using PVA similar tailpost glued position pulling sides meet point making sure sides align plan add former No 2 again making sure square two wing seat braces now glued position together tank bay base thickness will vary according height venturi Detroiter birdcage type wing con struction quickest way build wing thinks authorhes made Wanting lighter wing loading built larger 57-in wing yields 688 squares Gross 54 oz combination works well 32 Model Aviation 9 1 SKETCH A~A BOARD SKETCH J motor 40 shown vertical braces between longerons added before adding front rear wing mounts should pointed out drilled tapped until much later al though dural plates epoxied prior fitting front fixing doweled using hardwood wing seat sheet ing added braces followed bottom sheeting rear wing joints completely set fuselage can removed board engine bolt holes drilled aligning engine put just enough offset make sure no inset other words engine should near straight possible Bolt engine position order align former No remove before adding top block spot glued position external shape obtained Remove top block hollow out much can easily removed out endangering strength 3/16 thick ness quite thin enough engine position openings sealed block out cowling shape scrap /2 sheet sand shape satisfied shape cut cowling through exhaust stack centerline side elevation remove sand internal shape including air inlet outlet dotted lines Bend 14-swg 080 tail wheel strut shape bind ply plate epoxy bottom fuselage block out scrap wing fuselage com pleted fuselage turned upside down wing placed its recess CL wing fuselage lined up measurement taken flap end CL fuselage back measurement has same both sides Sketch four spots balsa cement used hold wing posi tion removable section added Once glue has dried hold ply plates position drill through tap out dural required thread usually use 6B4 bolt together just simple opera tion packing out scrap block sheeting obtain required profile line up tail have CL fuselage CL tail line measure hinge line hinge line obtain symmetry Check horizontal alignment times laying model flat board putting two equal-depth blocks under wings approx 6 fuselage main spar line place two similar blocks deeper parallel depth under tailplane ensures true tail wing horizontally Sketch J pushrod soldered elevator horn shape slot former No 5 allows removal wing will let pushrod come out Epoxy tail place again checking alignment abso lutely sure items square glue top block position epoxy fin mak ing sure vertical line CL fuselage model complete satisfaction add tip weight no hard fast rules about tip weight espe cially symmetrical model person ally balance model ide offside fuselage side have found seems best position weather conditions Now finish model may seem bit old hat England have recently started obtain fuel-proof dopes Provinces anyway 6 ozs 700 sq model seems difficult obtain polyurethanes epoxy paints Ill stick method Once model construction finished weigh both pieces eg wings body rub entire model 320 paper dry until absolutely smooth over dents digs etc fill now mixture balsa dust rubbed off rest model dope Weigh again see difference may ounce worth removing Once model has required finish add two coats clear dope unthinned entire model except capping strips added capping strips will tend curl up cause distor April 1977 33 finished components ready painting removable wing boon transportation Using TopFlite 11/6 wood prop likes fly rate 52 seconds lap fast 4stroke trims fly straight through reverse wing-over tion tissue Ive done Weigh parts again will surprised little weight has added Sand entire model 320 wet dry still dry roughness has removed new dents filled check weight again should little dif ference before doping Mix 30% dope 70% thinners brush clear lightweight tissue over entire body tail mixture covering make sure tissue goes over fillet round inside corner eg tail body join tissue middle fillet form butt joint overlap because shrinking effect dope will lift tissue away fil let thinners will attack dope wood will make very good adhe sion dry add another coat 30/70 allow dry completely tissue will take slightly furry appearance must rubbed down 320 use same piece because will slightly finer until completely dull over rub through tissue other stage Mix 40% dope 60% thinner mixture brush another two coats leave dry 24 hours Having coated wings two coats unthinned clear dope capping strips rubbed down original weight again use mixture 30/70 apply heavyweight clear tissue over entire wing except bottom body use lightweight Once dry give another coat 30/70 tissue over wood still capping strips method far satisfactory tissue paste quicker cheaper cleaner lighter will dry very quickly tissue can water shrunk almost immediately dry add two coats 40/60 open work wings wooden parts dry add two further coats 40/60 entire wing leave dry Back fuselage now ready rub down 400 paper dry completely matt over sure no dents etc point no re turn has reached spray mix ture 30% silver 70% thinner covers excellent base color Only very thin coat will neces sary has very good covering qualities obliterates manufacturers stamps wood grain coloring has completely dried rub down 400 dry make sure cut right through color fuselage ready its finishing color use silver apply two coats 30% silver 70% thinner fuselage ready decoration wings should now completely dry should rubbed down piece 600 dry Evo-stuck contact ce ment piece foam rubber fol lows contours wing will cut tissue careful wings ready 30% silver-70% thinner treat ment dry can rubbed down again 600 dry making sure cut tissue ribs sheeting edges now ready finishing coat again apply two coats 30% silver dope leave entire model least three days before adding decora tion coat 30/70 clear over entire model would help stop finishing color being damaged prior adding decoration slight drips dope enamel can wiped away base color being marked silver used finishing color achieve good finish must sprayed must fuel proofer because dope particles suspension brush will leave ugly lines previous coat 30% silver-70% thinner need sprayed has well rubbed down brush marks will go anyway adding trim using masking tape achieve clear line advisable run thin seal clear dope along edge tape prevent color running underneath Apply trim color well thinned whether sprayed brushed should flow out smoothly As said before last two items finishing color fuel proofer heaviest sparing because should have very good base apply need thin method finishing should add about 7 oz maximum 57-in stunt model heavy motor like Fox 40 weights 52 oz within easy strik ing distance Once model completely finished well worth making cardboard covers flying surfaces although may damaged once flying field transportation usually injurious good paintwork will dwell flying model suggest 18/2-meter Pylon stainless lines equivalent feet 60695 used flying speed 52 seconds per lap suits perfectly use Top Flite 11/6 wood fast 4stroke trim model fly straight through reverse wing over would add hope model gives much satisfaction success modeler decides build it has given during past three years cluding third first second place British Championships team place 76 World Championships 34 Model Aviation happy endingall work well worth Pet&s thoughtful type probably will discern working plans MAIN SPAR SYMMETRICAL ABOUT j VBI-IARD BALSA WITH V32PLYDOUBLERS CANOPY FROM 3 SEPARATE PIECES OF ACETATE WITH ALUMIMJM FRAME OR SELF MOLDED AROI*JD BALSA PLUG 2VECO SRNNEP COWL FROM SCRTHALF TEMPLATE OF CANOPY 4 DOWELPUSNRODI/BPLYWHEELBBSCESHOG 17ThNWHEELPAINT WORK TANKACTUAL SIZE BGASOFT COPPER- IVwojI TANK BLANK VENT jjjPLYADESGNED&DRN APEA 688SQWJS SRNr4 57 INS WENGINEBEARE\POWER 35-490JJt6 Fmi ----_ RTCAL ACING LI] 2 LJ LJLi Li WI4TAaUNEN HINGES__2TTEVBTESHEET3/B FLAPS___II7 ___________________________U 0 I2 3 45 A7 B9 FULL-SIZE PLANSAVAILABLESEE PAGE 96 4 -2OFT I/2VME ---I---I NT 6M -II _ -____ II 0 a a

