
148 MODEL AVIATION
IN THE LAST installment of the Project Hole Shot build, we attached
molded LE caps to the foam wing core. Those are cured by now, so it’s
time to make the wing skins.
We are going to use 1/16 balsa for the wing skins. You can use thinner
wood (such as 1/32 balsa or custom-cut 3/64 balsa), but it is a bit more
difficult to work with and is not recommended for a first try at foamwing
covering. Pick out enough light balsa sheets to do the job, and
trim their edges using a sharp #11 blade-equipped hobby knife drawn
along a metal straightedge.
If you don’t already have a selection of good metal straightedges,
now is the time to visit your favorite hardware store and pick up a few.
Get one that is 48 inches long and two or three shorter ones. They will
be invaluable throughout your building career. While you are in that
department, pick up a high-quality combination square.
After you have trimmed the balsa sheets, sand the edges smooth
and square using the 24-inch-long Perma-Grit sanding bar and the
technique I described in the last column, when we sanded the edges of
the LE-cap material.
You must cut the balsa sheets to a size that will make four complete
wing skins. I do this by laying one piece of trimmed and sanded balsa
sheet against the
installed LE cap. I
tape this piece to
the cap and then
trim the ends to
extend past the end
of the foam core on
either end by
approximately 1/4
inch.
Then I lay the
second piece of
balsa skin material
against the rear
edge of the first
piece and tape and
trim it in the same
manner. This
process continues
until the entire core
is covered with the
balsa sheeting.
At the TE, I trim
the sheeting to
extend back past the
end of the foam by
3/16 inch. I tape four
complete skin sets in
this manner, and
then I join them.
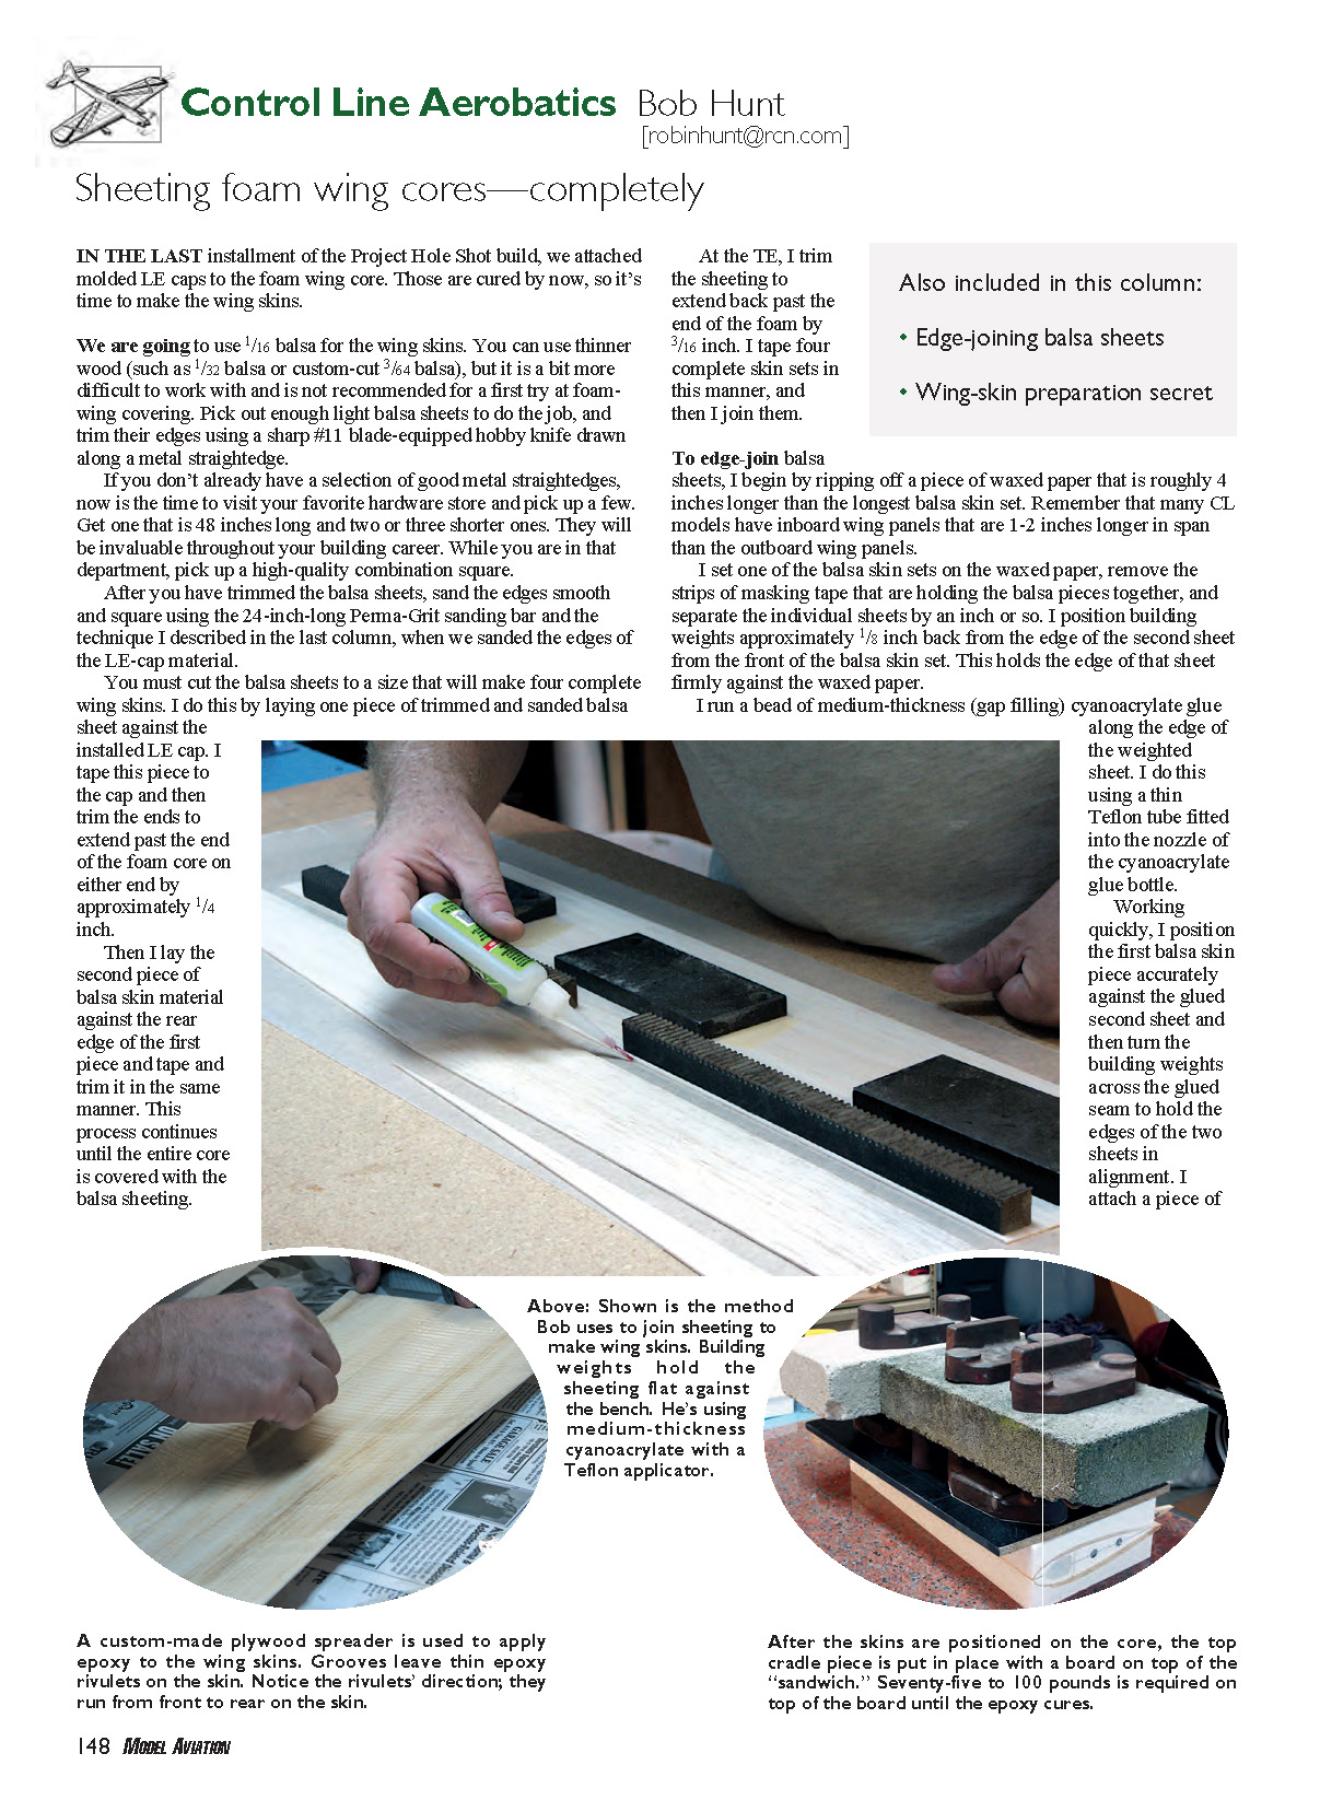
To edge-join balsa
sheets, I begin by ripping off a piece of waxed paper that is roughly 4
inches longer than the longest balsa skin set. Remember that many CL
models have inboard wing panels that are 1-2 inches longer in span
than the outboard wing panels.
I set one of the balsa skin sets on the waxed paper, remove the
strips of masking tape that are holding the balsa pieces together, and
separate the individual sheets by an inch or so. I position building
weights approximately 1/8 inch back from the edge of the second sheet
from the front of the balsa skin set. This holds the edge of that sheet
firmly against the waxed paper.
I run a bead of medium-thickness (gap filling) cyanoacrylate glue
along the edge of
the weighted
sheet. I do this
using a thin
Teflon tube fitted
into the nozzle of
the cyanoacrylate
glue bottle.
Working
quickly, I position
the first balsa skin
piece accurately
against the glued
second sheet and
then turn the
building weights
across the glued
seam to hold the
edges of the two
sheets in
alignment. I
attach a piece of
Sheeting foam wing cores—completely
[[email protected]]
Control Line Aerobatics Bob Hunt
Also included in this column:
• Edge-joining balsa sheets
• Wing-skin preparation secret
Above: Shown is the method
Bob uses to join sheeting to
make wing skins. Building
weights hold the
sheeting flat against
the bench. He’s using
medium-thickness
cyanoacrylate with a
Teflon applicator.
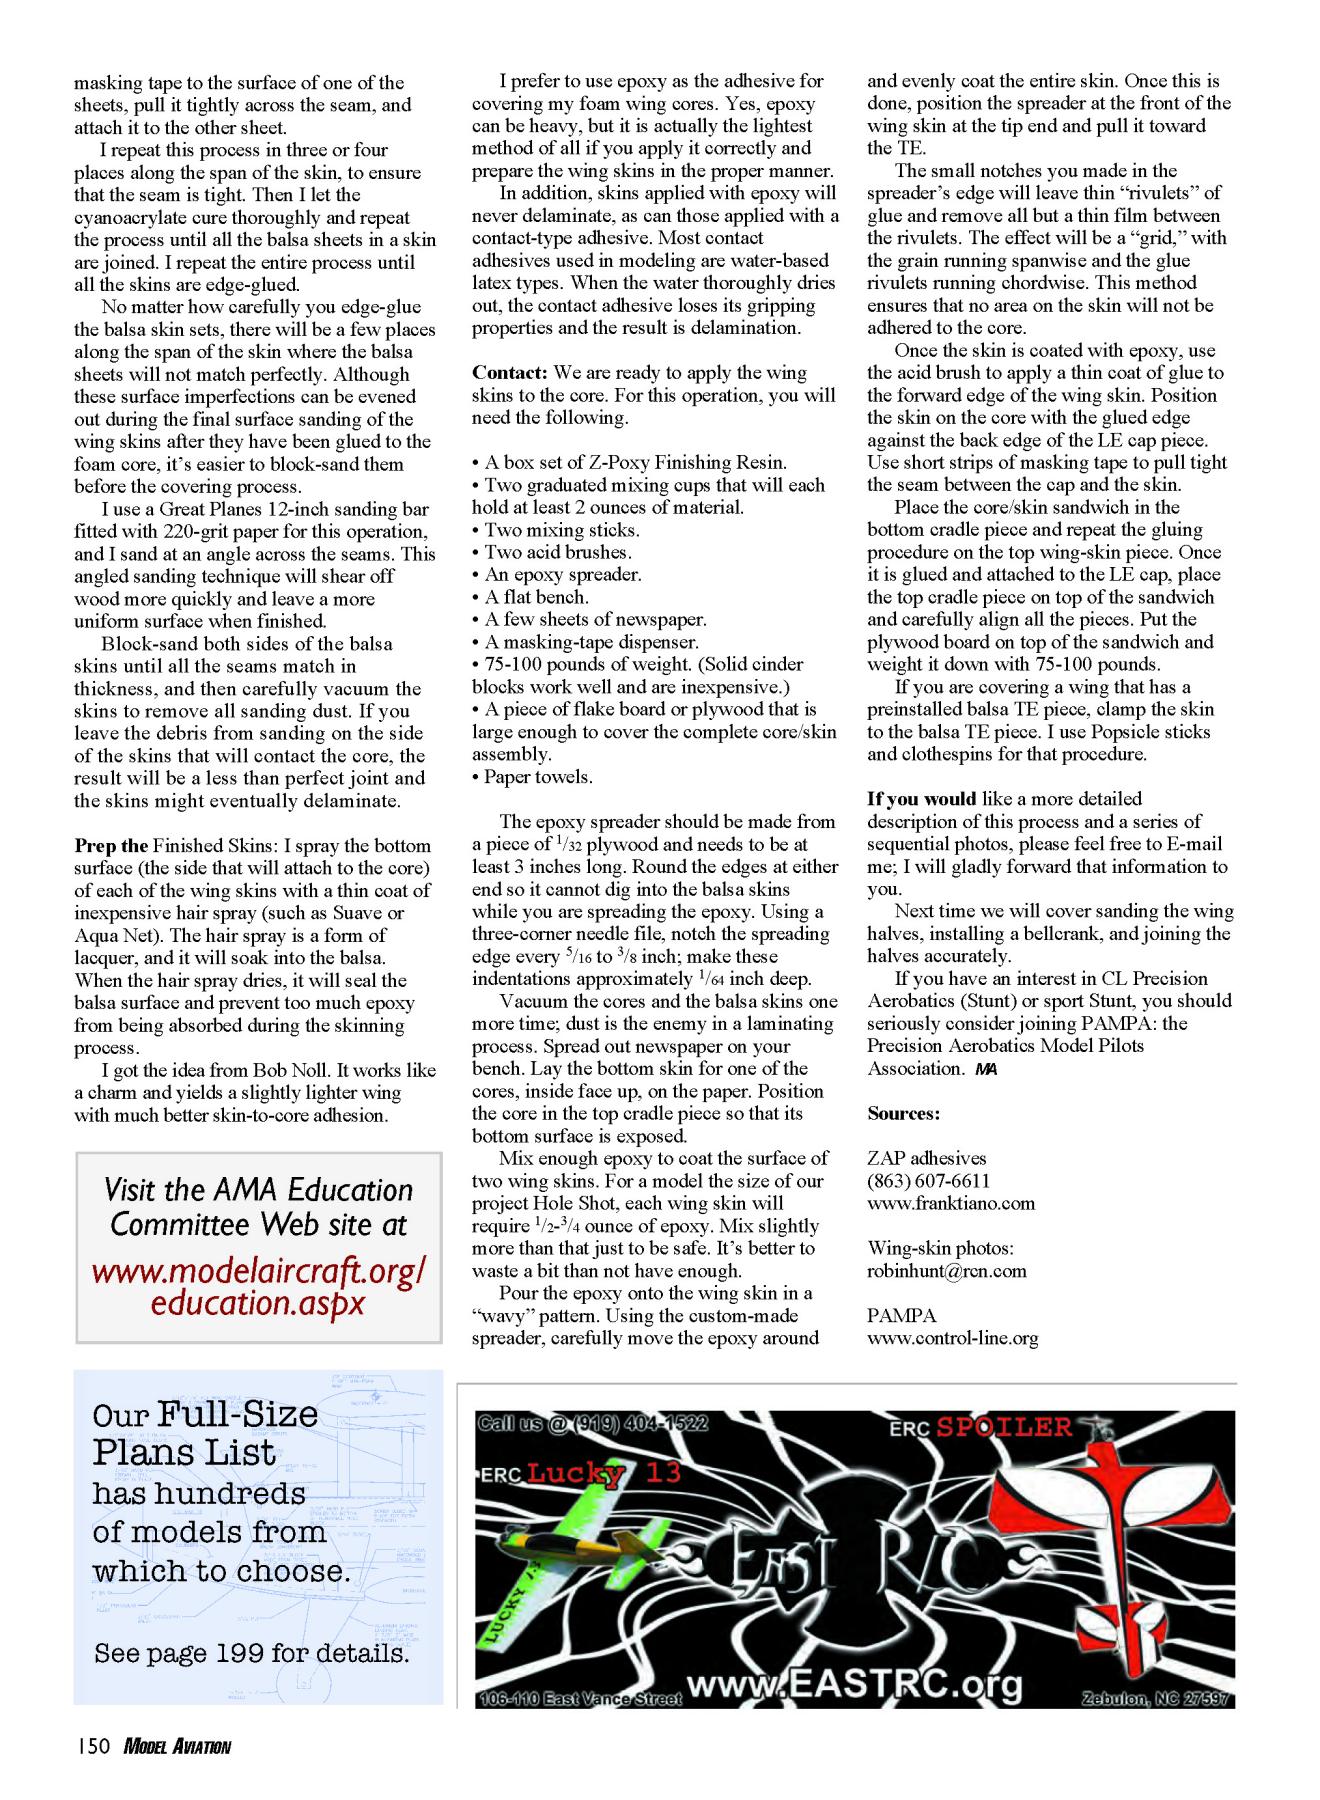
A custom-made plywood spreader is used to apply
epoxy to the wing skins. Grooves leave thin epoxy
rivulets on the skin. Notice the rivulets’ direction; they
run from front to rear on the skin.
After the skins are positioned on the core, the top
cradle piece is put in place with a board on top of the
“sandwich.” Seventy-five to 100 pounds is required on
top of the board until the epoxy cures.
01sig5.QXD 11/24/08 12:55 PM Page 148
masking tape to the surface of one of the
sheets, pull it tightly across the seam, and
attach it to the other sheet.
I repeat this process in three or four
places along the span of the skin, to ensure
that the seam is tight. Then I let the
cyanoacrylate cure thoroughly and repeat
the process until all the balsa sheets in a skin
are joined. I repeat the entire process until
all the skins are edge-glued.
No matter how carefully you edge-glue
the balsa skin sets, there will be a few places
along the span of the skin where the balsa
sheets will not match perfectly. Although
these surface imperfections can be evened
out during the final surface sanding of the
wing skins after they have been glued to the
foam core, it’s easier to block-sand them
before the covering process.
I use a Great Planes 12-inch sanding bar
fitted with 220-grit paper for this operation,
and I sand at an angle across the seams. This
angled sanding technique will shear off
wood more quickly and leave a more
uniform surface when finished.
Block-sand both sides of the balsa
skins until all the seams match in
thickness, and then carefully vacuum the
skins to remove all sanding dust. If you
leave the debris from sanding on the side
of the skins that will contact the core, the
result will be a less than perfect joint and
the skins might eventually delaminate.
Prep the Finished Skins: I spray the bottom
surface (the side that will attach to the core)
of each of the wing skins with a thin coat of
inexpensive hair spray (such as Suave or
Aqua Net). The hair spray is a form of
lacquer, and it will soak into the balsa.
When the hair spray dries, it will seal the
balsa surface and prevent too much epoxy
from being absorbed during the skinning
process.
I got the idea from Bob Noll. It works like
a charm and yields a slightly lighter wing
with much better skin-to-core adhesion.
150 MODEL AVIATION
I prefer to use epoxy as the adhesive for
covering my foam wing cores. Yes, epoxy
can be heavy, but it is actually the lightest
method of all if you apply it correctly and
prepare the wing skins in the proper manner.
In addition, skins applied with epoxy will
never delaminate, as can those applied with a
contact-type adhesive. Most contact
adhesives used in modeling are water-based
latex types. When the water thoroughly dries
out, the contact adhesive loses its gripping
properties and the result is delamination.
Contact: We are ready to apply the wing
skins to the core. For this operation, you will
need the following.
• A box set of Z-Poxy Finishing Resin.
• Two graduated mixing cups that will each
hold at least 2 ounces of material.
• Two mixing sticks.
• Two acid brushes.
• An epoxy spreader.
• A flat bench.
• A few sheets of newspaper.
• A masking-tape dispenser.
• 75-100 pounds of weight. (Solid cinder
blocks work well and are inexpensive.)
• A piece of flake board or plywood that is
large enough to cover the complete core/skin
assembly.
• Paper towels.
The epoxy spreader should be made from
a piece of 1/32 plywood and needs to be at
least 3 inches long. Round the edges at either
end so it cannot dig into the balsa skins
while you are spreading the epoxy. Using a
three-corner needle file, notch the spreading
edge every 5/16 to 3/8 inch; make these
indentations approximately 1/64 inch deep.
Vacuum the cores and the balsa skins one
more time; dust is the enemy in a laminating
process. Spread out newspaper on your
bench. Lay the bottom skin for one of the
cores, inside face up, on the paper. Position
the core in the top cradle piece so that its
bottom surface is exposed.
Mix enough epoxy to coat the surface of
two wing skins. For a model the size of our
project Hole Shot, each wing skin will
require 1/2-3/4 ounce of epoxy. Mix slightly
more than that just to be safe. It’s better to
waste a bit than not have enough.
Pour the epoxy onto the wing skin in a
“wavy” pattern. Using the custom-made
spreader, carefully move the epoxy around
and evenly coat the entire skin. Once this is
done, position the spreader at the front of the
wing skin at the tip end and pull it toward
the TE.
The small notches you made in the
spreader’s edge will leave thin “rivulets” of
glue and remove all but a thin film between
the rivulets. The effect will be a “grid,” with
the grain running spanwise and the glue
rivulets running chordwise. This method
ensures that no area on the skin will not be
adhered to the core.
Once the skin is coated with epoxy, use
the acid brush to apply a thin coat of glue to
the forward edge of the wing skin. Position
the skin on the core with the glued edge
against the back edge of the LE cap piece.
Use short strips of masking tape to pull tight
the seam between the cap and the skin.
Place the core/skin sandwich in the
bottom cradle piece and repeat the gluing
procedure on the top wing-skin piece. Once
it is glued and attached to the LE cap, place
the top cradle piece on top of the sandwich
and carefully align all the pieces. Put the
plywood board on top of the sandwich and
weight it down with 75-100 pounds.
If you are covering a wing that has a
preinstalled balsa TE piece, clamp the skin
to the balsa TE piece. I use Popsicle sticks
and clothespins for that procedure.
If you would like a more detailed
description of this process and a series of
sequential photos, please feel free to E-mail
me; I will gladly forward that information to
you.
Next time we will cover sanding the wing
halves, installing a bellcrank, and joining the
halves accurately.
If you have an interest in CL Precision
Aerobatics (Stunt) or sport Stunt, you should
seriously consider joining PAMPA: the
Precision Aerobatics Model Pilots
Association. MA
Sources:
ZAP adhesives
(863) 607-6611
www.franktiano.com
Wing-skin photos:
[email protected]
PAMPA
www.control-line.org
Edition: Model Aviation - 2009/01
Page Numbers: 148,150
Edition: Model Aviation - 2009/01
Page Numbers: 148,150
148 MODEL AVIATION
IN THE LAST installment of the Project Hole Shot build, we attached
molded LE caps to the foam wing core. Those are cured by now, so it’s
time to make the wing skins.
We are going to use 1/16 balsa for the wing skins. You can use thinner
wood (such as 1/32 balsa or custom-cut 3/64 balsa), but it is a bit more
difficult to work with and is not recommended for a first try at foamwing
covering. Pick out enough light balsa sheets to do the job, and
trim their edges using a sharp #11 blade-equipped hobby knife drawn
along a metal straightedge.
If you don’t already have a selection of good metal straightedges,
now is the time to visit your favorite hardware store and pick up a few.
Get one that is 48 inches long and two or three shorter ones. They will
be invaluable throughout your building career. While you are in that
department, pick up a high-quality combination square.
After you have trimmed the balsa sheets, sand the edges smooth
and square using the 24-inch-long Perma-Grit sanding bar and the
technique I described in the last column, when we sanded the edges of
the LE-cap material.
You must cut the balsa sheets to a size that will make four complete
wing skins. I do this by laying one piece of trimmed and sanded balsa
sheet against the
installed LE cap. I
tape this piece to
the cap and then
trim the ends to
extend past the end
of the foam core on
either end by
approximately 1/4
inch.
Then I lay the
second piece of
balsa skin material
against the rear
edge of the first
piece and tape and
trim it in the same
manner. This
process continues
until the entire core
is covered with the
balsa sheeting.
At the TE, I trim
the sheeting to
extend back past the
end of the foam by
3/16 inch. I tape four
complete skin sets in
this manner, and
then I join them.
To edge-join balsa
sheets, I begin by ripping off a piece of waxed paper that is roughly 4
inches longer than the longest balsa skin set. Remember that many CL
models have inboard wing panels that are 1-2 inches longer in span
than the outboard wing panels.
I set one of the balsa skin sets on the waxed paper, remove the
strips of masking tape that are holding the balsa pieces together, and
separate the individual sheets by an inch or so. I position building
weights approximately 1/8 inch back from the edge of the second sheet
from the front of the balsa skin set. This holds the edge of that sheet
firmly against the waxed paper.
I run a bead of medium-thickness (gap filling) cyanoacrylate glue
along the edge of
the weighted
sheet. I do this
using a thin
Teflon tube fitted
into the nozzle of
the cyanoacrylate
glue bottle.
Working
quickly, I position
the first balsa skin
piece accurately
against the glued
second sheet and
then turn the
building weights
across the glued
seam to hold the
edges of the two
sheets in
alignment. I
attach a piece of
Sheeting foam wing cores—completely
[[email protected]]
Control Line Aerobatics Bob Hunt
Also included in this column:
• Edge-joining balsa sheets
• Wing-skin preparation secret
Above: Shown is the method
Bob uses to join sheeting to
make wing skins. Building
weights hold the
sheeting flat against
the bench. He’s using
medium-thickness
cyanoacrylate with a
Teflon applicator.
A custom-made plywood spreader is used to apply
epoxy to the wing skins. Grooves leave thin epoxy
rivulets on the skin. Notice the rivulets’ direction; they
run from front to rear on the skin.
After the skins are positioned on the core, the top
cradle piece is put in place with a board on top of the
“sandwich.” Seventy-five to 100 pounds is required on
top of the board until the epoxy cures.
01sig5.QXD 11/24/08 12:55 PM Page 148
masking tape to the surface of one of the
sheets, pull it tightly across the seam, and
attach it to the other sheet.
I repeat this process in three or four
places along the span of the skin, to ensure
that the seam is tight. Then I let the
cyanoacrylate cure thoroughly and repeat
the process until all the balsa sheets in a skin
are joined. I repeat the entire process until
all the skins are edge-glued.
No matter how carefully you edge-glue
the balsa skin sets, there will be a few places
along the span of the skin where the balsa
sheets will not match perfectly. Although
these surface imperfections can be evened
out during the final surface sanding of the
wing skins after they have been glued to the
foam core, it’s easier to block-sand them
before the covering process.
I use a Great Planes 12-inch sanding bar
fitted with 220-grit paper for this operation,
and I sand at an angle across the seams. This
angled sanding technique will shear off
wood more quickly and leave a more
uniform surface when finished.
Block-sand both sides of the balsa
skins until all the seams match in
thickness, and then carefully vacuum the
skins to remove all sanding dust. If you
leave the debris from sanding on the side
of the skins that will contact the core, the
result will be a less than perfect joint and
the skins might eventually delaminate.
Prep the Finished Skins: I spray the bottom
surface (the side that will attach to the core)
of each of the wing skins with a thin coat of
inexpensive hair spray (such as Suave or
Aqua Net). The hair spray is a form of
lacquer, and it will soak into the balsa.
When the hair spray dries, it will seal the
balsa surface and prevent too much epoxy
from being absorbed during the skinning
process.
I got the idea from Bob Noll. It works like
a charm and yields a slightly lighter wing
with much better skin-to-core adhesion.
150 MODEL AVIATION
I prefer to use epoxy as the adhesive for
covering my foam wing cores. Yes, epoxy
can be heavy, but it is actually the lightest
method of all if you apply it correctly and
prepare the wing skins in the proper manner.
In addition, skins applied with epoxy will
never delaminate, as can those applied with a
contact-type adhesive. Most contact
adhesives used in modeling are water-based
latex types. When the water thoroughly dries
out, the contact adhesive loses its gripping
properties and the result is delamination.
Contact: We are ready to apply the wing
skins to the core. For this operation, you will
need the following.
• A box set of Z-Poxy Finishing Resin.
• Two graduated mixing cups that will each
hold at least 2 ounces of material.
• Two mixing sticks.
• Two acid brushes.
• An epoxy spreader.
• A flat bench.
• A few sheets of newspaper.
• A masking-tape dispenser.
• 75-100 pounds of weight. (Solid cinder
blocks work well and are inexpensive.)
• A piece of flake board or plywood that is
large enough to cover the complete core/skin
assembly.
• Paper towels.
The epoxy spreader should be made from
a piece of 1/32 plywood and needs to be at
least 3 inches long. Round the edges at either
end so it cannot dig into the balsa skins
while you are spreading the epoxy. Using a
three-corner needle file, notch the spreading
edge every 5/16 to 3/8 inch; make these
indentations approximately 1/64 inch deep.
Vacuum the cores and the balsa skins one
more time; dust is the enemy in a laminating
process. Spread out newspaper on your
bench. Lay the bottom skin for one of the
cores, inside face up, on the paper. Position
the core in the top cradle piece so that its
bottom surface is exposed.
Mix enough epoxy to coat the surface of
two wing skins. For a model the size of our
project Hole Shot, each wing skin will
require 1/2-3/4 ounce of epoxy. Mix slightly
more than that just to be safe. It’s better to
waste a bit than not have enough.
Pour the epoxy onto the wing skin in a
“wavy” pattern. Using the custom-made
spreader, carefully move the epoxy around
and evenly coat the entire skin. Once this is
done, position the spreader at the front of the
wing skin at the tip end and pull it toward
the TE.
The small notches you made in the
spreader’s edge will leave thin “rivulets” of
glue and remove all but a thin film between
the rivulets. The effect will be a “grid,” with
the grain running spanwise and the glue
rivulets running chordwise. This method
ensures that no area on the skin will not be
adhered to the core.
Once the skin is coated with epoxy, use
the acid brush to apply a thin coat of glue to
the forward edge of the wing skin. Position
the skin on the core with the glued edge
against the back edge of the LE cap piece.
Use short strips of masking tape to pull tight
the seam between the cap and the skin.
Place the core/skin sandwich in the
bottom cradle piece and repeat the gluing
procedure on the top wing-skin piece. Once
it is glued and attached to the LE cap, place
the top cradle piece on top of the sandwich
and carefully align all the pieces. Put the
plywood board on top of the sandwich and
weight it down with 75-100 pounds.
If you are covering a wing that has a
preinstalled balsa TE piece, clamp the skin
to the balsa TE piece. I use Popsicle sticks
and clothespins for that procedure.
If you would like a more detailed
description of this process and a series of
sequential photos, please feel free to E-mail
me; I will gladly forward that information to
you.
Next time we will cover sanding the wing
halves, installing a bellcrank, and joining the
halves accurately.
If you have an interest in CL Precision
Aerobatics (Stunt) or sport Stunt, you should
seriously consider joining PAMPA: the
Precision Aerobatics Model Pilots
Association. MA
Sources:
ZAP adhesives
(863) 607-6611
www.franktiano.com
Wing-skin photos:
[email protected]
PAMPA
www.control-line.org

