
52 MODEL AVIATION
I’VE BEEN BUILDING model airplanes for close to 30 years and
ducted-fan-powered models for close to 15 years, and Bob Violett
Models (BVM) has been on the scene for as far back as I can
remember. From what I can tell, the company practically invented
the sport jet. Designs such as the Sport Shark, Viper, Aggressor,
Maverick, and Bandit set the pace.
Many of you probably started flying jets via the same route and
moved on to turbine-powered jets when they became available.
Why? Reliability, mainly. Keeping a high-revving glow engine in a
ducted fan running for a full flight was a challenge.
Performancewise, a well-set-up ducted fan was comparable in
performance to the average turbine.
Some turbines are faster and some are slower. Some
turbines have high thrust-to-weight ratios. Most don’t,
especially on takeoff while carrying a full load of fuel.
So far, my experience with the electric-powered BVM
Electra Jet has proven that it is the real deal. Some of you
might be saying, I’m a jet flier; your airplane is an electric.
Sure, it is powered by a motor, but this is a jet.
The Electra Jet’s level flight speeds can exceed 150 mph,
depending on power system and setup. It has a clean, low-drag
airframe as on any jet, and it has the full complement of moving
and folding things: flaps, retracts, and gear doors.
Better than a “jet,” the BVM Electra Jet brings you an airframe
you can fly from the local field, whether it’s paved or grass. And
better still, no AMA turbine waiver is necessary.
Once you learn a few techniques that are specific to the electric
power system, you’ll find that it is capable of satisfying that need
for a quick trip to the flying field to get that speed fix. It provides a
better experience than what most jet fliers expect.
BVM sells the Electra Jet as a complete system. Bob has all the
bases covered with a quality airframe, proprietary electric-ductedfan
(EDF) system—the Electric VioFan, or EVF—matched to the
perfect motor, and ESC combination delivered fully assembled and
ready to run. Even the latest battery packs in a custom
configuration slip right in.
EDFs are powered by batteries, and batteries require charging,
so BVM has the correct chargers, balancers, power supplies,
cooling accessories, and wiring bits in stock and ready to deliver.
This last point is crucial; I’ve lost a complete flying season
while trying to piece together all the components from around
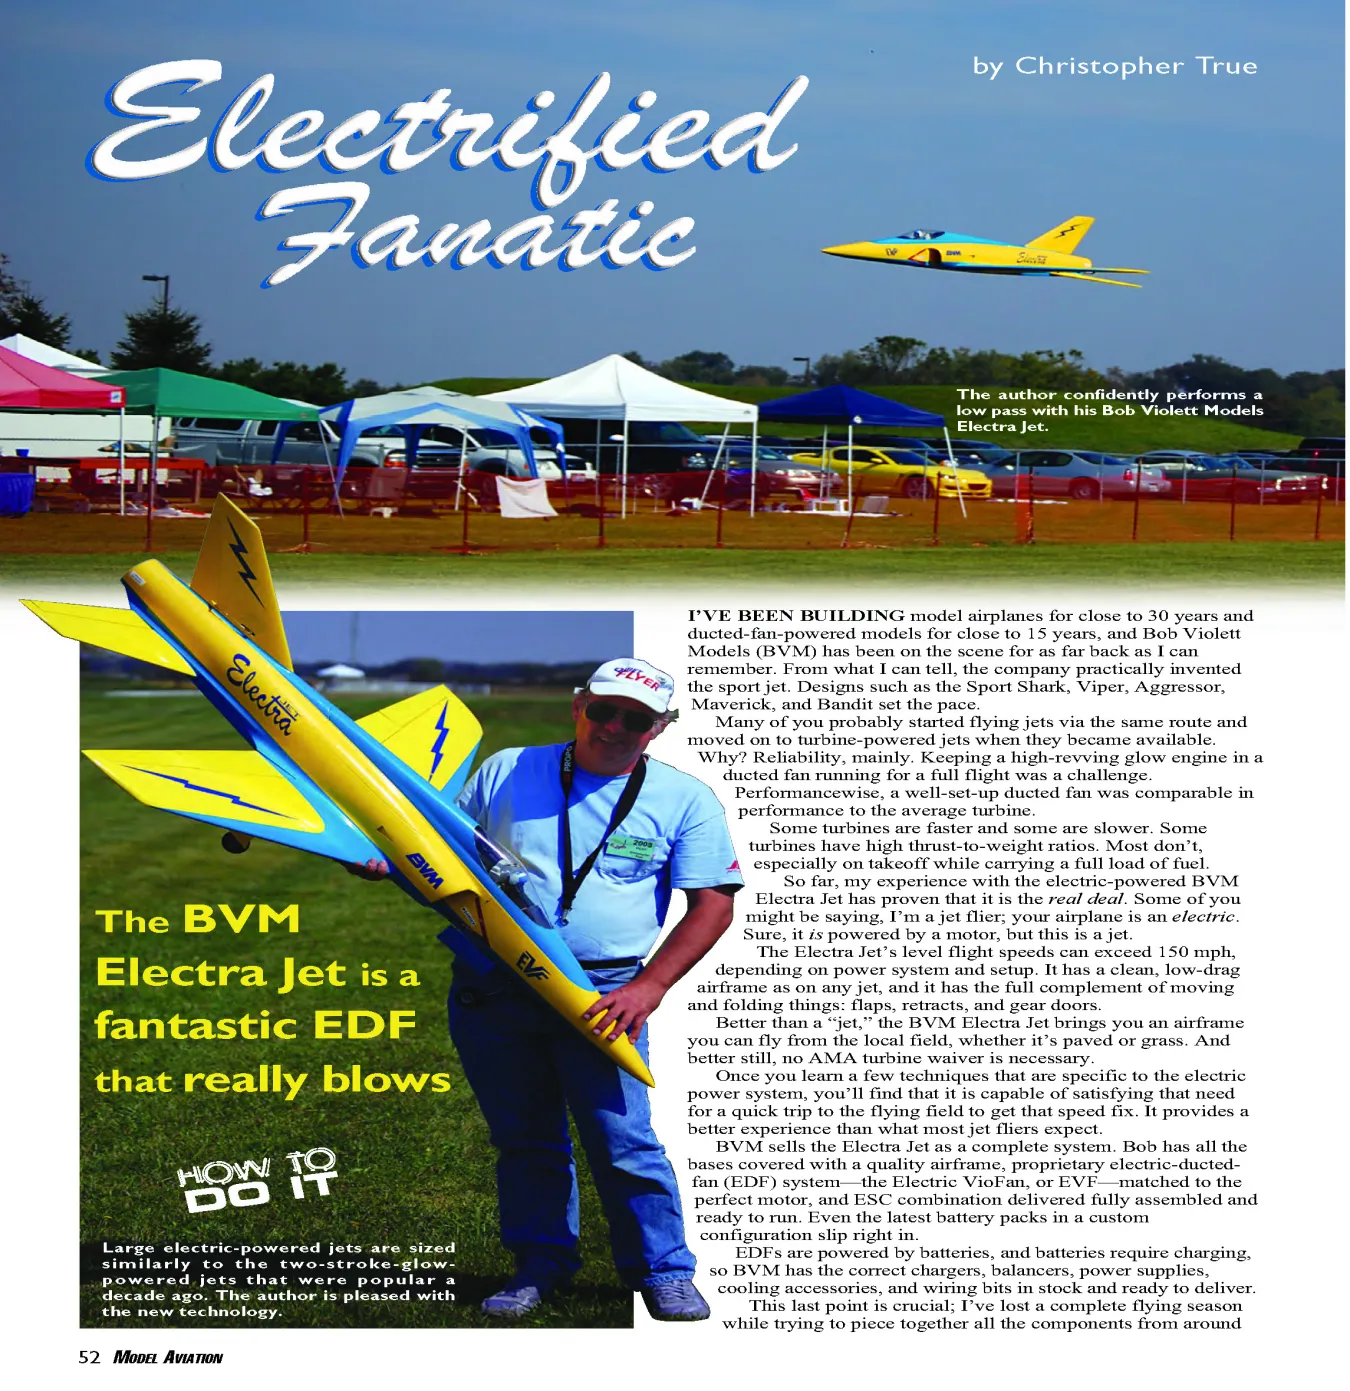
Large electric-powered jets are sized
similarly to the two-stroke-glowpowered
jets that were popular a
decade ago. The author is pleased with
the new technology.
The author confidently performs a
low pass with his Bob Violett Models
Electra Jet.
The BVM
Electra Jet is a
fantastic EDF
that really blows
Electrified
Fanatic
by Christopher True
04sig2.QXD 2/24/09 10:46 AM Page 52
A JR DS3421 servo is installed inside each wing for
the aileron, on maple blocks fitted to BVM plastic
angle brackets. A solid installation prevents the
opportunity for flutter.
BVM cooling trays consist of a purple anodized-aluminum
extrusion with attached 12-volt fan, which allows faster
battery cooling between flights on hot days.
One JR DS3421 digital servo is used per elevator half. Installing them in the
plywood mount before installation in the fuselage assures alignment.
Balsa and plywood parts required to complete the built-up flying surfaces are
laser cut. The wing sheeting is one piece and the fuselage is molded fiberglass.
The lower fuselage hatch opening is outlined with masking tape, to
prevent the gel coat from chipping, and then the hatch is removed
with a fine-tooth razor saw.
Not much in the way of structure is required to support the virtually
vibration-free fan unit. A foam block (not shown) sits between the
fan and fuselage lower skin to absorb hard-landing loads.
Static photos by the author Flight photos by Curtis Mattikow
April 2009 53
04sig2.QXD 2/24/09 9:29 AM Page 53
54 MODEL AVIATION
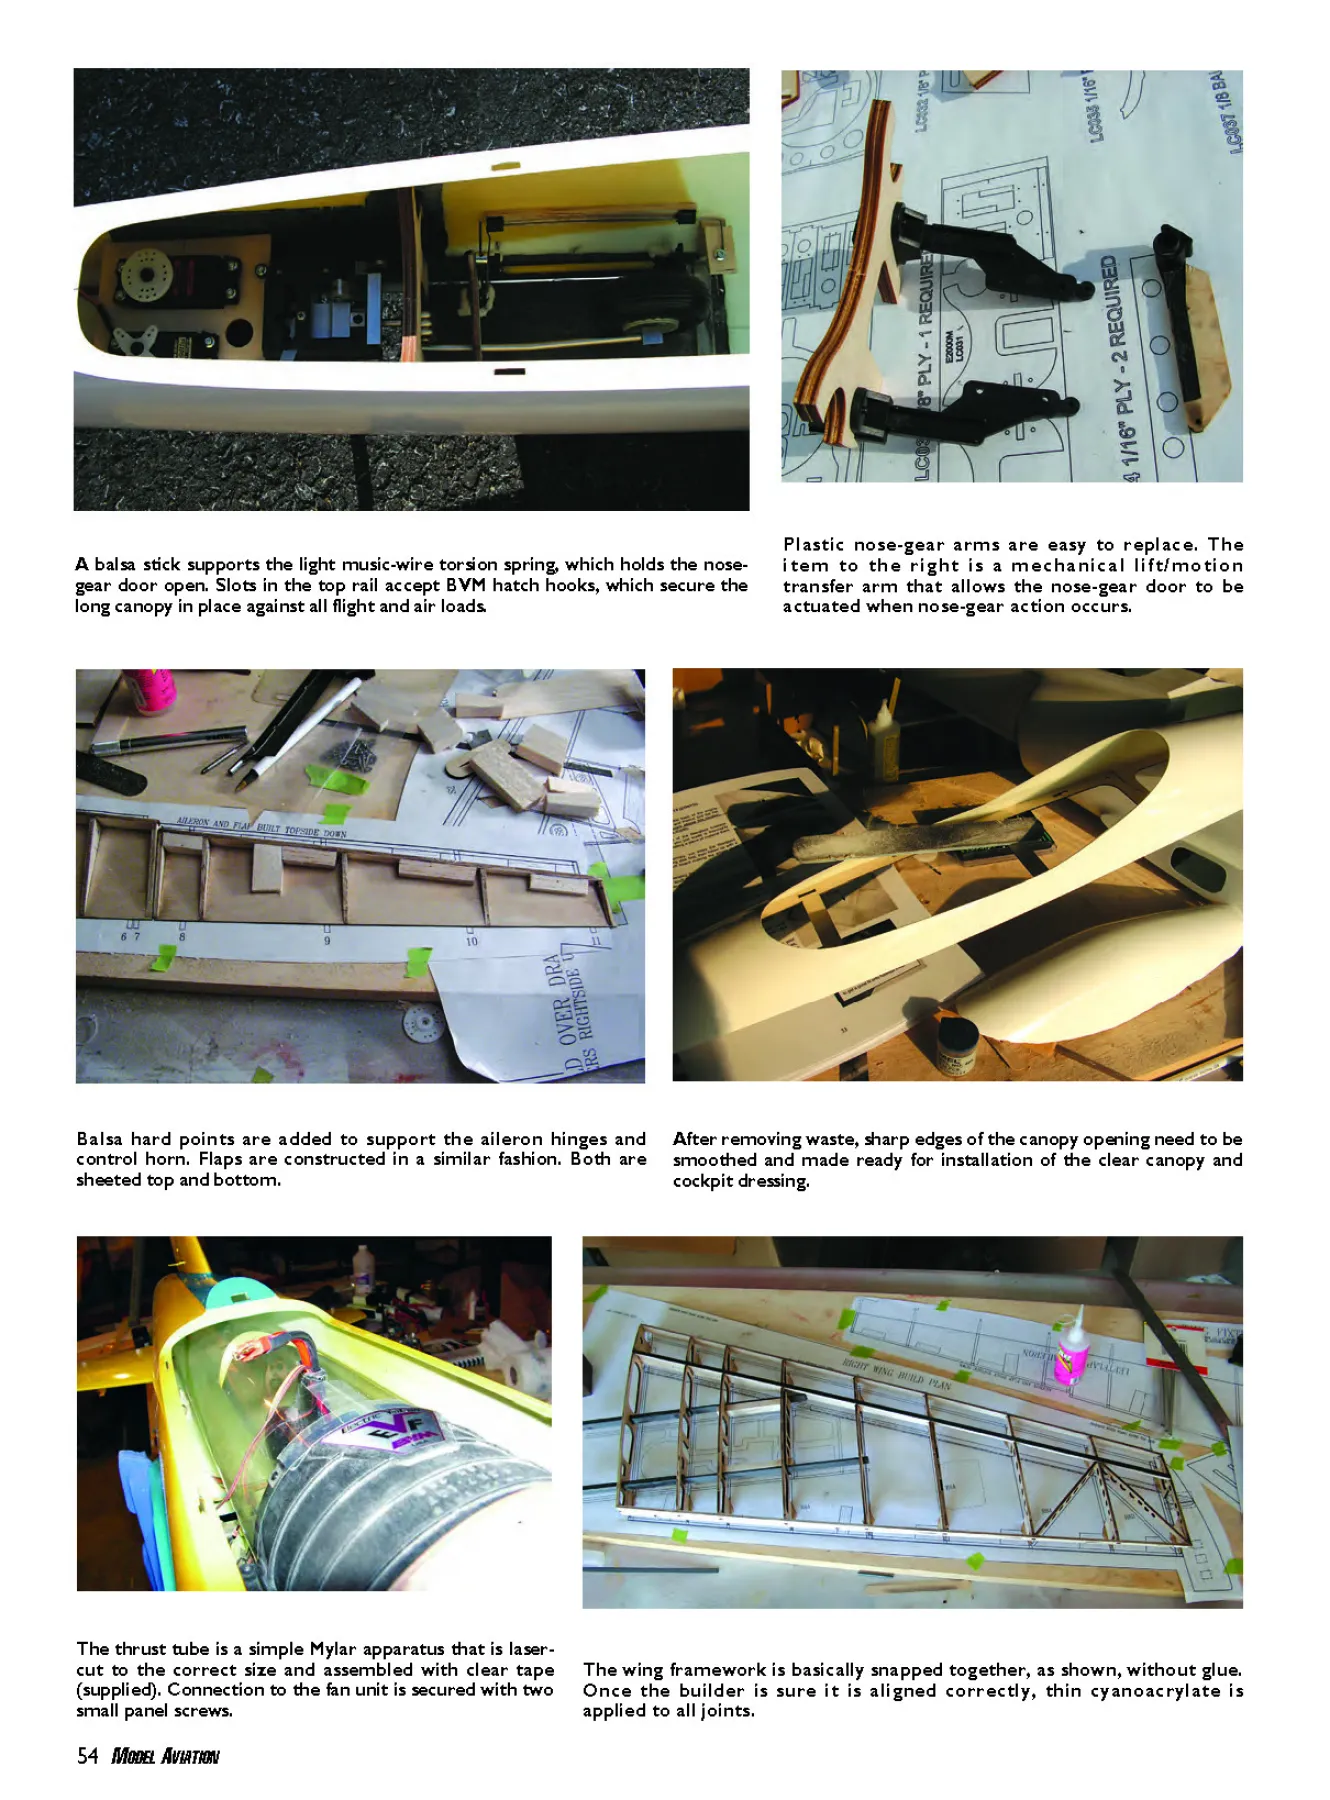
A balsa stick supports the light music-wire torsion spring, which holds the nosegear
door open. Slots in the top rail accept BVM hatch hooks, which secure the
long canopy in place against all flight and air loads.
The wing framework is basically snapped together, as shown, without glue.
Once the builder is sure it is aligned correctly, thin cyanoacrylate is
applied to all joints.
Plastic nose-gear arms are easy to replace. The
item to the right is a mechanical lift/motion
transfer arm that allows the nose-gear door to be
actuated when nose-gear action occurs.
The thrust tube is a simple Mylar apparatus that is lasercut
to the correct size and assembled with clear tape
(supplied). Connection to the fan unit is secured with two
small panel screws.
After removing waste, sharp edges of the canopy opening need to be
smoothed and made ready for installation of the clear canopy and
cockpit dressing.
Balsa hard points are added to support the aileron hinges and
control horn. Flaps are constructed in a similar fashion. Both are
sheeted top and bottom.
04sig2.QXD 2/24/09 9:58 AM Page 54
around the world that were required for a
cutting-edge power system. Knowing how
to use the new technology is also important,
and BVM supplies complete instructions for
charging and using your Li-Poly batteries.
You might find other electric-powered
jets on the market, but the large-jet-model
experience has a long and strong history
with BVM. I’ll detail my dealings with the
Electra Jet and recommend that you go to
BVM first if you’re looking for your first
large EDF. I don’t think you’ll be
disappointed. And yes, the fair prices are
every bit worth the expense.
The Electra Jet is available as a
traditional builder’s kit. It includes a superb
fiberglass fuselage that is primed in the
mold. The kit is available with two fin
styles: straight or swept. The main flying
surfaces and tail surfaces are built-up balsa,
plywood, and carbon structures. All balsa
parts are laser-cut to shape.
The wing design is a classic example of
BVM wing structure, with balsa ribs, carbon
spars, and flex plates to mount the
retractable landing gear. Certain difficult
parts, such as the fin and long fuselage
hatch, are built at the factory. The kit
includes a complete set of full-size plans
and a parts-locator guide.
As with all BVM kits, the instructions
are voluminous and cover all aspects of
construction. The manual alone is 64 pages
of text and photo illustrations. The power
system is delivered with its own instruction
book, and even the thrust tube kit merits
seven pages of photos. It is possible to make
a mistake, but the way forward is clear if
you read everything a couple times.
If all of this building is too much for
you, BVM can supply prebuilt flying
surfaces or a complete ARF that features
all-composite flying surfaces and a nice
paint job out of the box. Both options are
more expensive.
There are two choices for retracts. BVM
has updated the old mechanical servooperated
gear, or there is a new Air Blue set
of fully CNC-machined pneumatic gear.
Either works reliably; I chose the servo
actuation to make the model entirely
electric. That’s less support equipment to
haul to the field.
The Build: A full copy of the building
instructions is available on the BVM Web
site. (See the “Sources” list for the address.)
I will describe the general process and
review a few areas that took me more effort
to complete.
The wing is a built-up, fully sheeted
structure. The laser-cut ribs are provided
with rib tabs to aid in achieving a straight
airframe. In addition, everything is designed
to lock together before the glue is applied.
Two carbon spars in each wing panel are
laminated from two pieces that are bonded
to the maple flex-plate gear mounts.
Servo mounts are made from BVM
carbon-fiber-filled, injection-molded angle
brackets; hard-maple blocks; and screws
provided. The blocks are glued securely to
the structure, and the servos are covered
with a Poly Ply (thin epoxyglass board)
hatch.
The sheeting is provided as one huge
piece, cut to shape with a bit of overhang.
One side of the sheeting is sprayed with
ammonia-based window cleaner, to
encourage it to follow the curve of the wing.
Flap hinges consist of four pieces of
shaped carbon-fiber plate; one side is glued
in the main wing panel and the other side is
glued into the flap. The builder threads both
pieces with a 2-56 tap for two tiny buttonhead
machine screws, to create the pivot
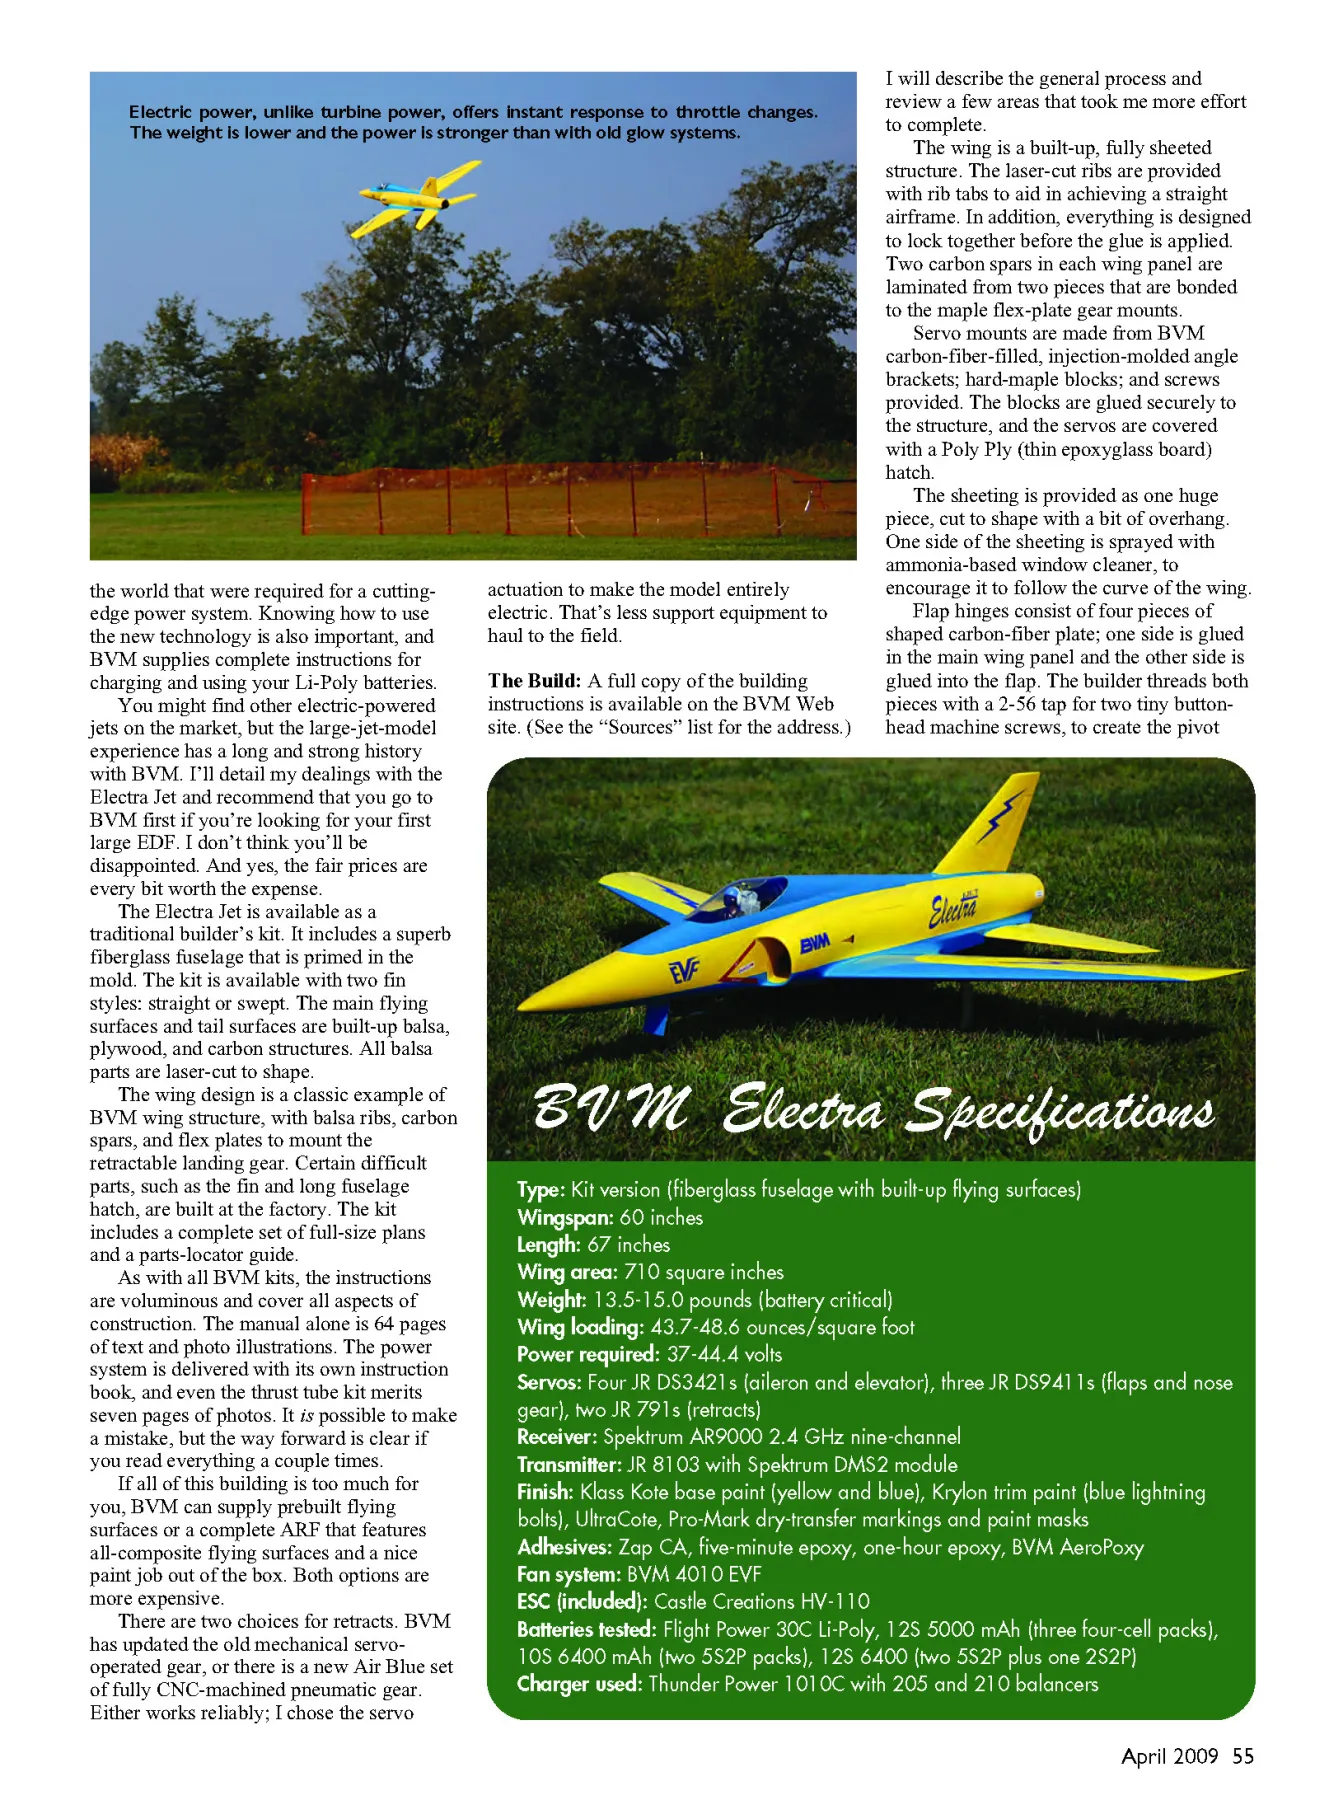
Electric power, unlike turbine power, offers instant response to throttle changes.
The weight is lower and the power is stronger than with old glow systems.
B V M Electra Specifications
Type: Kit version (fiberglass fuselage with built-up flying surfaces)
Wingspan: 60 inches
Length: 67 inches
Wing area: 710 square inches
Weight: 13.5-15.0 pounds (battery critical)
Wing loading: 43.7-48.6 ounces/square foot
Power required: 37-44.4 volts
Servos: Four JR DS3421s (aileron and elevator), three JR DS9411s (flaps and nose
gear), two JR 791s (retracts)
Receiver: Spektrum AR9000 2.4 GHz nine-channel
Transmitter: JR 8103 with Spektrum DMS2 module
Finish: Klass Kote base paint (yellow and blue), Krylon trim paint (blue lightning
bolts), UltraCote, Pro-Mark dry-transfer markings and paint masks
Adhesives: Zap CA, five-minute epoxy, one-hour epoxy, BVM AeroPoxy
Fan system: BVM 4010 EVF
ESC (included): Castle Creations HV-110
Batteries tested: Flight Power 30C Li-Poly, 12S 5000 mAh (three four-cell packs),
10S 6400 mAh (two 5S2P packs), 12S 6400 (two 5S2P plus one 2S2P)
Charger used: Thunder Power 1010C with 205 and 210 balancers
April 2009 55
04sig2.QXD 2/24/09 9:31 AM Page 55
point. A small drop of medium
cyanoacrylate under the hinge screw will
hold it securely.
The wing control-surface horns are also
specially shaped carbon plate. Neat little
die-cut alignment fixtures are supplied to
ensure that the aileron horn is installed
exactly right.
Standard fiberglass-fuselage construction
advises the builder to thoroughly sand the
fuselage’s interior for best glue adhesion.
Follow the instructions closely. The inlets fit
well with only minor filling required.
Special plastic carbon-reinforced receptacles
and dihedral braces are provided for
attaching the wings. They are removable.
The canopy and hatch are supplied with
plywood support frames preinstalled. They
fit the fuselage well—better than I normally
achieve. However, better isn’t good enough,
and the instructions go into quite a bit of
detail about how to perfect these fits by
basically lapping them into place with fine
sandpaper. It all worked out great.
The canopy needs four hooks installed,
as well as one spring-loaded BVM hatch
latch that holds the entire assembly on the
model. This retention system is slick. No
tape, no screws, no bolts. I love it!
The Electra Jet comes with a nice cockpit
kit of vacuum-formed plastic, a separate seat
back, materials to make the black-andyellow
ejection-seat pull ring, and a panel
sticker. The pilot is available as an optional
accessory.
BVM highly recommends the new
Spektrum 2.4 GHz radio technology; it is
highly resistant to radio interference given
off by the high-power EVF setup. The servo
complement is a mix of JR DS3421s on the
aileron, rudder, and elevator, and DS9411s
elsewhere.
BVM’s instructions cover the glass cloth
method of wing finishing and the PPG paint
systems. I covered my flying surfaces in
UltraCote film, since I was working in
limited facilities.
The fuselage seams required a bit of
attention with a scuff board to bring them
down smooth and a brushed spot coat of
primer to touch them up. The fuselage-totail
joints were filleted slightly with
polyester auto-body filler, and a minute
amount of the same filler fine-tuned the
wing-to-fuselage fillet fit.
I applied Klass Kote two-part epoxy
paint with a relatively inexpensive Astro
Pneumatic HVLP (high volume, low
pressure) spray gun. White primer was
applied to the areas that I had worked on;
most of the fuselage was still the out-of-themold
pristine white primer that had been
scuffed with a 3M Scotch-Brite pad.
I wet-sanded all the paint with a
combination of 1,200-, 1,500-, and 2,000-
grit paper. Then I rubbed it out with rubbing
compound followed by polishing compound.
I used 3M Fine Line Tape to mask off areas
on the wing that were to be painted blue and
then scuffed with 600-grit sandpaper. I was
also able to wet-sand and polish the paint on
the film areas.
All markings, including the lightning
bolts, were paint masks that Pro-Mark
supplied. The masks were surprisingly
affordable, at roughly $35, and simply
sticking them in place and then spraypainting
resulted in nice, clean separation
lines with no bleeds. I used a can of Krylon
spray for the markings.
Fan System and Batteries: BVM has three
basic power systems, all of which work well
in the Electra Jet. System 4010 runs on 10
cells, 5012 runs on 12 cells, and a new 5212
12-cell system uses a slightly larger and
more powerful Neu 1524 motor. All setups
work best with the Flight Power 2P 6400
mAh battery packs that provide more than
six minutes of flight.
My initial flights were with older 5000
mAh packs, but the current 6400s offer more
power and longer duration; they are what I
fly routinely now. My fan system is a 4010,
which I use on both a 10-cell set of 6400
Flight Power packs and a 12-cell set.
Flying the Electra Jet: So how did it
perform? Great, with the exception of one
small teething issue.
I set the CG a small amount nose-heavy
and made sure to program a good dose of
exponential on the aileron and elevator
function. Experience with other BVM
aircraft tells me that they are never short of
control authority at the recommended
settings, and 40% exponential is normally
the number that makes the model handle the
way I like.
After assembling the Electra Jet at the
field, I gave one retract linkage an extra turn
or two toward the tighter retract direction, to
ensure that the door was closed firmly. As I
would learn, that was a mistake!
I loaded my 12S 5000 mAh cells and
clicked the canopy into place. After taxiing
into position, I set takeoff flap and applied
full throttle. The model came off the ground
after slightly more than 100 feet, popped the
gear up, made the first turn, and then pulled
up the flaps. No trim adjustments were made
initially, but during the next circuit or two I
added roughly six clicks of up-trim—it was
slightly nose-heavy—and then two clicks of
aileron. Perfect!
As I always do during a test flight, I spent
a couple minutes flying the model around at
a moderate speed to get the feel for it. I
dropped the flaps and looked for any
required trim change; there was none, and
the slow speed at full flaps was quite
stunning.
I did a couple of fast passes after a couple
minutes, and a small gremlin did show its
face because I changed the adjustment on the
main gear. The Electra Jet came around the
corner and I went to WOT (wide-open
throttle), passing myself at warp 9, and heard
a little pop, crack sound.
I immediately came off the throttle,
slowed the aircraft to sub-light speed, and
then dropped the flaps and flew the
approach. That was the slowest jet landing
I’ve ever performed.
On touchdown, at hardly any airspeed,
one of the landing gear collapsed; no damage
was done to the airframe. I checked it out
afterward, and the crack sound I had heard
was a gear door that left the airplane. I had
adjusted the linkage too far to the retraction
side; it was pulling against the wing skin
pretty hard, and it wasn’t pushing out enough
in the extended direction.
On subsequent flights, I opened the
envelope with basic aerobatics; blazing,
high-speed passes; and flaps-down,
crawling-across-the-sky, slow-speed passes.
You can tell that there are years and years of
aerodynamic refinements behind this
airframe, because there is nothing to
criticize.
Rolls are axial as if on a string. Knife
edge shows only slight roll coupling (which
can be easily dialed out if insisted), and the
slow-speed handling is beyond reproach. If
you’ve flown a good RC Aerobatics
(Pattern) airplane, you’ll know this model;
it’s just much faster than any modern Pattern
aircraft.
The BVM Electra Jet is a superb-flying
classic sport jet. Any pilot who can handle a
fast-flying model will be delighted with it. The
complete package has been totally reliable
during the 40 flights I have on it to date.
The assembled Electra Jet just fits at an
angle in my small Saturn Vue SUV. For
longer trips with more equipment, I take
the wings off, which happens quickly. I
can break it down in less than five minutes
and assemble it in only a couple more.
The motor system is rock solid, with no
cooling needed between flights. So if you
want to get three quick flights in and have
three sets of packs, you can accomplish
that in roughly 20 minutes of field time.
I hope to have my Electra for many
years to come. If anything happened to it, I
think I’d have to get a replacement—
quickly. MA
Christopher True
[email protected]
Sources:
BVM
(407) 327-6333
www.bvmjets.com
Pro-Mark
(618) 524-2440
www.pro-mark.com
FlightPower
(828) 658-2400
www.bestrc.com/flightpower
JR Radio
(800) 338-4639
www.horizonhobby.com
Edition: Model Aviation - 2009/04
Page Numbers: 52,53,54,55,56,58

Edition: Model Aviation - 2009/04
Page Numbers: 52,53,54,55,56,58
52 MODEL AVIATION
I’VE BEEN BUILDING model airplanes for close to 30 years and
ducted-fan-powered models for close to 15 years, and Bob Violett
Models (BVM) has been on the scene for as far back as I can
remember. From what I can tell, the company practically invented
the sport jet. Designs such as the Sport Shark, Viper, Aggressor,
Maverick, and Bandit set the pace.
Many of you probably started flying jets via the same route and
moved on to turbine-powered jets when they became available.
Why? Reliability, mainly. Keeping a high-revving glow engine in a
ducted fan running for a full flight was a challenge.
Performancewise, a well-set-up ducted fan was comparable in
performance to the average turbine.
Some turbines are faster and some are slower. Some
turbines have high thrust-to-weight ratios. Most don’t,
especially on takeoff while carrying a full load of fuel.
So far, my experience with the electric-powered BVM
Electra Jet has proven that it is the real deal. Some of you
might be saying, I’m a jet flier; your airplane is an electric.
Sure, it is powered by a motor, but this is a jet.
The Electra Jet’s level flight speeds can exceed 150 mph,
depending on power system and setup. It has a clean, low-drag
airframe as on any jet, and it has the full complement of moving
and folding things: flaps, retracts, and gear doors.
Better than a “jet,” the BVM Electra Jet brings you an airframe
you can fly from the local field, whether it’s paved or grass. And
better still, no AMA turbine waiver is necessary.
Once you learn a few techniques that are specific to the electric
power system, you’ll find that it is capable of satisfying that need
for a quick trip to the flying field to get that speed fix. It provides a
better experience than what most jet fliers expect.
BVM sells the Electra Jet as a complete system. Bob has all the
bases covered with a quality airframe, proprietary electric-ductedfan
(EDF) system—the Electric VioFan, or EVF—matched to the
perfect motor, and ESC combination delivered fully assembled and
ready to run. Even the latest battery packs in a custom
configuration slip right in.
EDFs are powered by batteries, and batteries require charging,
so BVM has the correct chargers, balancers, power supplies,
cooling accessories, and wiring bits in stock and ready to deliver.
This last point is crucial; I’ve lost a complete flying season
while trying to piece together all the components from around
Large electric-powered jets are sized
similarly to the two-stroke-glowpowered
jets that were popular a
decade ago. The author is pleased with
the new technology.
The author confidently performs a
low pass with his Bob Violett Models
Electra Jet.
The BVM
Electra Jet is a
fantastic EDF
that really blows
Electrified
Fanatic
by Christopher True
04sig2.QXD 2/24/09 10:46 AM Page 52
A JR DS3421 servo is installed inside each wing for
the aileron, on maple blocks fitted to BVM plastic
angle brackets. A solid installation prevents the
opportunity for flutter.
BVM cooling trays consist of a purple anodized-aluminum
extrusion with attached 12-volt fan, which allows faster
battery cooling between flights on hot days.
One JR DS3421 digital servo is used per elevator half. Installing them in the
plywood mount before installation in the fuselage assures alignment.
Balsa and plywood parts required to complete the built-up flying surfaces are
laser cut. The wing sheeting is one piece and the fuselage is molded fiberglass.
The lower fuselage hatch opening is outlined with masking tape, to
prevent the gel coat from chipping, and then the hatch is removed
with a fine-tooth razor saw.
Not much in the way of structure is required to support the virtually
vibration-free fan unit. A foam block (not shown) sits between the
fan and fuselage lower skin to absorb hard-landing loads.
Static photos by the author Flight photos by Curtis Mattikow
April 2009 53
04sig2.QXD 2/24/09 9:29 AM Page 53
54 MODEL AVIATION
A balsa stick supports the light music-wire torsion spring, which holds the nosegear
door open. Slots in the top rail accept BVM hatch hooks, which secure the
long canopy in place against all flight and air loads.
The wing framework is basically snapped together, as shown, without glue.
Once the builder is sure it is aligned correctly, thin cyanoacrylate is
applied to all joints.
Plastic nose-gear arms are easy to replace. The
item to the right is a mechanical lift/motion
transfer arm that allows the nose-gear door to be
actuated when nose-gear action occurs.
The thrust tube is a simple Mylar apparatus that is lasercut
to the correct size and assembled with clear tape
(supplied). Connection to the fan unit is secured with two
small panel screws.
After removing waste, sharp edges of the canopy opening need to be
smoothed and made ready for installation of the clear canopy and
cockpit dressing.
Balsa hard points are added to support the aileron hinges and
control horn. Flaps are constructed in a similar fashion. Both are
sheeted top and bottom.
04sig2.QXD 2/24/09 9:58 AM Page 54
around the world that were required for a
cutting-edge power system. Knowing how
to use the new technology is also important,
and BVM supplies complete instructions for
charging and using your Li-Poly batteries.
You might find other electric-powered
jets on the market, but the large-jet-model
experience has a long and strong history
with BVM. I’ll detail my dealings with the
Electra Jet and recommend that you go to
BVM first if you’re looking for your first
large EDF. I don’t think you’ll be
disappointed. And yes, the fair prices are
every bit worth the expense.
The Electra Jet is available as a
traditional builder’s kit. It includes a superb
fiberglass fuselage that is primed in the
mold. The kit is available with two fin
styles: straight or swept. The main flying
surfaces and tail surfaces are built-up balsa,
plywood, and carbon structures. All balsa
parts are laser-cut to shape.
The wing design is a classic example of
BVM wing structure, with balsa ribs, carbon
spars, and flex plates to mount the
retractable landing gear. Certain difficult
parts, such as the fin and long fuselage
hatch, are built at the factory. The kit
includes a complete set of full-size plans
and a parts-locator guide.
As with all BVM kits, the instructions
are voluminous and cover all aspects of
construction. The manual alone is 64 pages
of text and photo illustrations. The power
system is delivered with its own instruction
book, and even the thrust tube kit merits
seven pages of photos. It is possible to make
a mistake, but the way forward is clear if
you read everything a couple times.
If all of this building is too much for
you, BVM can supply prebuilt flying
surfaces or a complete ARF that features
all-composite flying surfaces and a nice
paint job out of the box. Both options are
more expensive.
There are two choices for retracts. BVM
has updated the old mechanical servooperated
gear, or there is a new Air Blue set
of fully CNC-machined pneumatic gear.
Either works reliably; I chose the servo
actuation to make the model entirely
electric. That’s less support equipment to
haul to the field.
The Build: A full copy of the building
instructions is available on the BVM Web
site. (See the “Sources” list for the address.)
I will describe the general process and
review a few areas that took me more effort
to complete.
The wing is a built-up, fully sheeted
structure. The laser-cut ribs are provided
with rib tabs to aid in achieving a straight
airframe. In addition, everything is designed
to lock together before the glue is applied.
Two carbon spars in each wing panel are
laminated from two pieces that are bonded
to the maple flex-plate gear mounts.
Servo mounts are made from BVM
carbon-fiber-filled, injection-molded angle
brackets; hard-maple blocks; and screws
provided. The blocks are glued securely to
the structure, and the servos are covered
with a Poly Ply (thin epoxyglass board)
hatch.
The sheeting is provided as one huge
piece, cut to shape with a bit of overhang.
One side of the sheeting is sprayed with
ammonia-based window cleaner, to
encourage it to follow the curve of the wing.
Flap hinges consist of four pieces of
shaped carbon-fiber plate; one side is glued
in the main wing panel and the other side is
glued into the flap. The builder threads both
pieces with a 2-56 tap for two tiny buttonhead
machine screws, to create the pivot
Electric power, unlike turbine power, offers instant response to throttle changes.
The weight is lower and the power is stronger than with old glow systems.
B V M Electra Specifications
Type: Kit version (fiberglass fuselage with built-up flying surfaces)
Wingspan: 60 inches
Length: 67 inches
Wing area: 710 square inches
Weight: 13.5-15.0 pounds (battery critical)
Wing loading: 43.7-48.6 ounces/square foot
Power required: 37-44.4 volts
Servos: Four JR DS3421s (aileron and elevator), three JR DS9411s (flaps and nose
gear), two JR 791s (retracts)
Receiver: Spektrum AR9000 2.4 GHz nine-channel
Transmitter: JR 8103 with Spektrum DMS2 module
Finish: Klass Kote base paint (yellow and blue), Krylon trim paint (blue lightning
bolts), UltraCote, Pro-Mark dry-transfer markings and paint masks
Adhesives: Zap CA, five-minute epoxy, one-hour epoxy, BVM AeroPoxy
Fan system: BVM 4010 EVF
ESC (included): Castle Creations HV-110
Batteries tested: Flight Power 30C Li-Poly, 12S 5000 mAh (three four-cell packs),
10S 6400 mAh (two 5S2P packs), 12S 6400 (two 5S2P plus one 2S2P)
Charger used: Thunder Power 1010C with 205 and 210 balancers
April 2009 55
04sig2.QXD 2/24/09 9:31 AM Page 55
point. A small drop of medium
cyanoacrylate under the hinge screw will
hold it securely.
The wing control-surface horns are also
specially shaped carbon plate. Neat little
die-cut alignment fixtures are supplied to
ensure that the aileron horn is installed
exactly right.
Standard fiberglass-fuselage construction
advises the builder to thoroughly sand the
fuselage’s interior for best glue adhesion.
Follow the instructions closely. The inlets fit
well with only minor filling required.
Special plastic carbon-reinforced receptacles
and dihedral braces are provided for
attaching the wings. They are removable.
The canopy and hatch are supplied with
plywood support frames preinstalled. They
fit the fuselage well—better than I normally
achieve. However, better isn’t good enough,
and the instructions go into quite a bit of
detail about how to perfect these fits by
basically lapping them into place with fine
sandpaper. It all worked out great.
The canopy needs four hooks installed,
as well as one spring-loaded BVM hatch
latch that holds the entire assembly on the
model. This retention system is slick. No
tape, no screws, no bolts. I love it!
The Electra Jet comes with a nice cockpit
kit of vacuum-formed plastic, a separate seat
back, materials to make the black-andyellow
ejection-seat pull ring, and a panel
sticker. The pilot is available as an optional
accessory.
BVM highly recommends the new
Spektrum 2.4 GHz radio technology; it is
highly resistant to radio interference given
off by the high-power EVF setup. The servo
complement is a mix of JR DS3421s on the
aileron, rudder, and elevator, and DS9411s
elsewhere.
BVM’s instructions cover the glass cloth
method of wing finishing and the PPG paint
systems. I covered my flying surfaces in
UltraCote film, since I was working in
limited facilities.
The fuselage seams required a bit of
attention with a scuff board to bring them
down smooth and a brushed spot coat of
primer to touch them up. The fuselage-totail
joints were filleted slightly with
polyester auto-body filler, and a minute
amount of the same filler fine-tuned the
wing-to-fuselage fillet fit.
I applied Klass Kote two-part epoxy
paint with a relatively inexpensive Astro
Pneumatic HVLP (high volume, low
pressure) spray gun. White primer was
applied to the areas that I had worked on;
most of the fuselage was still the out-of-themold
pristine white primer that had been
scuffed with a 3M Scotch-Brite pad.
I wet-sanded all the paint with a
combination of 1,200-, 1,500-, and 2,000-
grit paper. Then I rubbed it out with rubbing
compound followed by polishing compound.
I used 3M Fine Line Tape to mask off areas
on the wing that were to be painted blue and
then scuffed with 600-grit sandpaper. I was
also able to wet-sand and polish the paint on
the film areas.
All markings, including the lightning
bolts, were paint masks that Pro-Mark
supplied. The masks were surprisingly
affordable, at roughly $35, and simply
sticking them in place and then spraypainting
resulted in nice, clean separation
lines with no bleeds. I used a can of Krylon
spray for the markings.
Fan System and Batteries: BVM has three
basic power systems, all of which work well
in the Electra Jet. System 4010 runs on 10
cells, 5012 runs on 12 cells, and a new 5212
12-cell system uses a slightly larger and
more powerful Neu 1524 motor. All setups
work best with the Flight Power 2P 6400
mAh battery packs that provide more than
six minutes of flight.
My initial flights were with older 5000
mAh packs, but the current 6400s offer more
power and longer duration; they are what I
fly routinely now. My fan system is a 4010,
which I use on both a 10-cell set of 6400
Flight Power packs and a 12-cell set.
Flying the Electra Jet: So how did it
perform? Great, with the exception of one
small teething issue.
I set the CG a small amount nose-heavy
and made sure to program a good dose of
exponential on the aileron and elevator
function. Experience with other BVM
aircraft tells me that they are never short of
control authority at the recommended
settings, and 40% exponential is normally
the number that makes the model handle the
way I like.
After assembling the Electra Jet at the
field, I gave one retract linkage an extra turn
or two toward the tighter retract direction, to
ensure that the door was closed firmly. As I
would learn, that was a mistake!
I loaded my 12S 5000 mAh cells and
clicked the canopy into place. After taxiing
into position, I set takeoff flap and applied
full throttle. The model came off the ground
after slightly more than 100 feet, popped the
gear up, made the first turn, and then pulled
up the flaps. No trim adjustments were made
initially, but during the next circuit or two I
added roughly six clicks of up-trim—it was
slightly nose-heavy—and then two clicks of
aileron. Perfect!
As I always do during a test flight, I spent
a couple minutes flying the model around at
a moderate speed to get the feel for it. I
dropped the flaps and looked for any
required trim change; there was none, and
the slow speed at full flaps was quite
stunning.
I did a couple of fast passes after a couple
minutes, and a small gremlin did show its
face because I changed the adjustment on the
main gear. The Electra Jet came around the
corner and I went to WOT (wide-open
throttle), passing myself at warp 9, and heard
a little pop, crack sound.
I immediately came off the throttle,
slowed the aircraft to sub-light speed, and
then dropped the flaps and flew the
approach. That was the slowest jet landing
I’ve ever performed.
On touchdown, at hardly any airspeed,
one of the landing gear collapsed; no damage
was done to the airframe. I checked it out
afterward, and the crack sound I had heard
was a gear door that left the airplane. I had
adjusted the linkage too far to the retraction
side; it was pulling against the wing skin
pretty hard, and it wasn’t pushing out enough
in the extended direction.
On subsequent flights, I opened the
envelope with basic aerobatics; blazing,
high-speed passes; and flaps-down,
crawling-across-the-sky, slow-speed passes.
You can tell that there are years and years of
aerodynamic refinements behind this
airframe, because there is nothing to
criticize.
Rolls are axial as if on a string. Knife
edge shows only slight roll coupling (which
can be easily dialed out if insisted), and the
slow-speed handling is beyond reproach. If
you’ve flown a good RC Aerobatics
(Pattern) airplane, you’ll know this model;
it’s just much faster than any modern Pattern
aircraft.
The BVM Electra Jet is a superb-flying
classic sport jet. Any pilot who can handle a
fast-flying model will be delighted with it. The
complete package has been totally reliable
during the 40 flights I have on it to date.
The assembled Electra Jet just fits at an
angle in my small Saturn Vue SUV. For
longer trips with more equipment, I take
the wings off, which happens quickly. I
can break it down in less than five minutes
and assemble it in only a couple more.
The motor system is rock solid, with no
cooling needed between flights. So if you
want to get three quick flights in and have
three sets of packs, you can accomplish
that in roughly 20 minutes of field time.
I hope to have my Electra for many
years to come. If anything happened to it, I
think I’d have to get a replacement—
quickly. MA
Christopher True
[email protected]
Sources:
BVM
(407) 327-6333
www.bvmjets.com
Pro-Mark
(618) 524-2440
www.pro-mark.com
FlightPower
(828) 658-2400
www.bestrc.com/flightpower
JR Radio
(800) 338-4639
www.horizonhobby.com
Edition: Model Aviation - 2009/04
Page Numbers: 52,53,54,55,56,58
52 MODEL AVIATION
I’VE BEEN BUILDING model airplanes for close to 30 years and
ducted-fan-powered models for close to 15 years, and Bob Violett
Models (BVM) has been on the scene for as far back as I can
remember. From what I can tell, the company practically invented
the sport jet. Designs such as the Sport Shark, Viper, Aggressor,
Maverick, and Bandit set the pace.
Many of you probably started flying jets via the same route and
moved on to turbine-powered jets when they became available.
Why? Reliability, mainly. Keeping a high-revving glow engine in a
ducted fan running for a full flight was a challenge.
Performancewise, a well-set-up ducted fan was comparable in
performance to the average turbine.
Some turbines are faster and some are slower. Some
turbines have high thrust-to-weight ratios. Most don’t,
especially on takeoff while carrying a full load of fuel.
So far, my experience with the electric-powered BVM
Electra Jet has proven that it is the real deal. Some of you
might be saying, I’m a jet flier; your airplane is an electric.
Sure, it is powered by a motor, but this is a jet.
The Electra Jet’s level flight speeds can exceed 150 mph,
depending on power system and setup. It has a clean, low-drag
airframe as on any jet, and it has the full complement of moving
and folding things: flaps, retracts, and gear doors.
Better than a “jet,” the BVM Electra Jet brings you an airframe
you can fly from the local field, whether it’s paved or grass. And
better still, no AMA turbine waiver is necessary.
Once you learn a few techniques that are specific to the electric
power system, you’ll find that it is capable of satisfying that need
for a quick trip to the flying field to get that speed fix. It provides a
better experience than what most jet fliers expect.
BVM sells the Electra Jet as a complete system. Bob has all the
bases covered with a quality airframe, proprietary electric-ductedfan
(EDF) system—the Electric VioFan, or EVF—matched to the
perfect motor, and ESC combination delivered fully assembled and
ready to run. Even the latest battery packs in a custom
configuration slip right in.
EDFs are powered by batteries, and batteries require charging,
so BVM has the correct chargers, balancers, power supplies,
cooling accessories, and wiring bits in stock and ready to deliver.
This last point is crucial; I’ve lost a complete flying season
while trying to piece together all the components from around
Large electric-powered jets are sized
similarly to the two-stroke-glowpowered
jets that were popular a
decade ago. The author is pleased with
the new technology.
The author confidently performs a
low pass with his Bob Violett Models
Electra Jet.
The BVM
Electra Jet is a
fantastic EDF
that really blows
Electrified
Fanatic
by Christopher True
04sig2.QXD 2/24/09 10:46 AM Page 52
A JR DS3421 servo is installed inside each wing for
the aileron, on maple blocks fitted to BVM plastic
angle brackets. A solid installation prevents the
opportunity for flutter.
BVM cooling trays consist of a purple anodized-aluminum
extrusion with attached 12-volt fan, which allows faster
battery cooling between flights on hot days.
One JR DS3421 digital servo is used per elevator half. Installing them in the
plywood mount before installation in the fuselage assures alignment.
Balsa and plywood parts required to complete the built-up flying surfaces are
laser cut. The wing sheeting is one piece and the fuselage is molded fiberglass.
The lower fuselage hatch opening is outlined with masking tape, to
prevent the gel coat from chipping, and then the hatch is removed
with a fine-tooth razor saw.
Not much in the way of structure is required to support the virtually
vibration-free fan unit. A foam block (not shown) sits between the
fan and fuselage lower skin to absorb hard-landing loads.
Static photos by the author Flight photos by Curtis Mattikow
April 2009 53
04sig2.QXD 2/24/09 9:29 AM Page 53
54 MODEL AVIATION
A balsa stick supports the light music-wire torsion spring, which holds the nosegear
door open. Slots in the top rail accept BVM hatch hooks, which secure the
long canopy in place against all flight and air loads.
The wing framework is basically snapped together, as shown, without glue.
Once the builder is sure it is aligned correctly, thin cyanoacrylate is
applied to all joints.
Plastic nose-gear arms are easy to replace. The
item to the right is a mechanical lift/motion
transfer arm that allows the nose-gear door to be
actuated when nose-gear action occurs.
The thrust tube is a simple Mylar apparatus that is lasercut
to the correct size and assembled with clear tape
(supplied). Connection to the fan unit is secured with two
small panel screws.
After removing waste, sharp edges of the canopy opening need to be
smoothed and made ready for installation of the clear canopy and
cockpit dressing.
Balsa hard points are added to support the aileron hinges and
control horn. Flaps are constructed in a similar fashion. Both are
sheeted top and bottom.
04sig2.QXD 2/24/09 9:58 AM Page 54
around the world that were required for a
cutting-edge power system. Knowing how
to use the new technology is also important,
and BVM supplies complete instructions for
charging and using your Li-Poly batteries.
You might find other electric-powered
jets on the market, but the large-jet-model
experience has a long and strong history
with BVM. I’ll detail my dealings with the
Electra Jet and recommend that you go to
BVM first if you’re looking for your first
large EDF. I don’t think you’ll be
disappointed. And yes, the fair prices are
every bit worth the expense.
The Electra Jet is available as a
traditional builder’s kit. It includes a superb
fiberglass fuselage that is primed in the
mold. The kit is available with two fin
styles: straight or swept. The main flying
surfaces and tail surfaces are built-up balsa,
plywood, and carbon structures. All balsa
parts are laser-cut to shape.
The wing design is a classic example of
BVM wing structure, with balsa ribs, carbon
spars, and flex plates to mount the
retractable landing gear. Certain difficult
parts, such as the fin and long fuselage
hatch, are built at the factory. The kit
includes a complete set of full-size plans
and a parts-locator guide.
As with all BVM kits, the instructions
are voluminous and cover all aspects of
construction. The manual alone is 64 pages
of text and photo illustrations. The power
system is delivered with its own instruction
book, and even the thrust tube kit merits
seven pages of photos. It is possible to make
a mistake, but the way forward is clear if
you read everything a couple times.
If all of this building is too much for
you, BVM can supply prebuilt flying
surfaces or a complete ARF that features
all-composite flying surfaces and a nice
paint job out of the box. Both options are
more expensive.
There are two choices for retracts. BVM
has updated the old mechanical servooperated
gear, or there is a new Air Blue set
of fully CNC-machined pneumatic gear.
Either works reliably; I chose the servo
actuation to make the model entirely
electric. That’s less support equipment to
haul to the field.
The Build: A full copy of the building
instructions is available on the BVM Web
site. (See the “Sources” list for the address.)
I will describe the general process and
review a few areas that took me more effort
to complete.
The wing is a built-up, fully sheeted
structure. The laser-cut ribs are provided
with rib tabs to aid in achieving a straight
airframe. In addition, everything is designed
to lock together before the glue is applied.
Two carbon spars in each wing panel are
laminated from two pieces that are bonded
to the maple flex-plate gear mounts.
Servo mounts are made from BVM
carbon-fiber-filled, injection-molded angle
brackets; hard-maple blocks; and screws
provided. The blocks are glued securely to
the structure, and the servos are covered
with a Poly Ply (thin epoxyglass board)
hatch.
The sheeting is provided as one huge
piece, cut to shape with a bit of overhang.
One side of the sheeting is sprayed with
ammonia-based window cleaner, to
encourage it to follow the curve of the wing.
Flap hinges consist of four pieces of
shaped carbon-fiber plate; one side is glued
in the main wing panel and the other side is
glued into the flap. The builder threads both
pieces with a 2-56 tap for two tiny buttonhead
machine screws, to create the pivot
Electric power, unlike turbine power, offers instant response to throttle changes.
The weight is lower and the power is stronger than with old glow systems.
B V M Electra Specifications
Type: Kit version (fiberglass fuselage with built-up flying surfaces)
Wingspan: 60 inches
Length: 67 inches
Wing area: 710 square inches
Weight: 13.5-15.0 pounds (battery critical)
Wing loading: 43.7-48.6 ounces/square foot
Power required: 37-44.4 volts
Servos: Four JR DS3421s (aileron and elevator), three JR DS9411s (flaps and nose
gear), two JR 791s (retracts)
Receiver: Spektrum AR9000 2.4 GHz nine-channel
Transmitter: JR 8103 with Spektrum DMS2 module
Finish: Klass Kote base paint (yellow and blue), Krylon trim paint (blue lightning
bolts), UltraCote, Pro-Mark dry-transfer markings and paint masks
Adhesives: Zap CA, five-minute epoxy, one-hour epoxy, BVM AeroPoxy
Fan system: BVM 4010 EVF
ESC (included): Castle Creations HV-110
Batteries tested: Flight Power 30C Li-Poly, 12S 5000 mAh (three four-cell packs),
10S 6400 mAh (two 5S2P packs), 12S 6400 (two 5S2P plus one 2S2P)
Charger used: Thunder Power 1010C with 205 and 210 balancers
April 2009 55
04sig2.QXD 2/24/09 9:31 AM Page 55
point. A small drop of medium
cyanoacrylate under the hinge screw will
hold it securely.
The wing control-surface horns are also
specially shaped carbon plate. Neat little
die-cut alignment fixtures are supplied to
ensure that the aileron horn is installed
exactly right.
Standard fiberglass-fuselage construction
advises the builder to thoroughly sand the
fuselage’s interior for best glue adhesion.
Follow the instructions closely. The inlets fit
well with only minor filling required.
Special plastic carbon-reinforced receptacles
and dihedral braces are provided for
attaching the wings. They are removable.
The canopy and hatch are supplied with
plywood support frames preinstalled. They
fit the fuselage well—better than I normally
achieve. However, better isn’t good enough,
and the instructions go into quite a bit of
detail about how to perfect these fits by
basically lapping them into place with fine
sandpaper. It all worked out great.
The canopy needs four hooks installed,
as well as one spring-loaded BVM hatch
latch that holds the entire assembly on the
model. This retention system is slick. No
tape, no screws, no bolts. I love it!
The Electra Jet comes with a nice cockpit
kit of vacuum-formed plastic, a separate seat
back, materials to make the black-andyellow
ejection-seat pull ring, and a panel
sticker. The pilot is available as an optional
accessory.
BVM highly recommends the new
Spektrum 2.4 GHz radio technology; it is
highly resistant to radio interference given
off by the high-power EVF setup. The servo
complement is a mix of JR DS3421s on the
aileron, rudder, and elevator, and DS9411s
elsewhere.
BVM’s instructions cover the glass cloth
method of wing finishing and the PPG paint
systems. I covered my flying surfaces in
UltraCote film, since I was working in
limited facilities.
The fuselage seams required a bit of
attention with a scuff board to bring them
down smooth and a brushed spot coat of
primer to touch them up. The fuselage-totail
joints were filleted slightly with
polyester auto-body filler, and a minute
amount of the same filler fine-tuned the
wing-to-fuselage fillet fit.
I applied Klass Kote two-part epoxy
paint with a relatively inexpensive Astro
Pneumatic HVLP (high volume, low
pressure) spray gun. White primer was
applied to the areas that I had worked on;
most of the fuselage was still the out-of-themold
pristine white primer that had been
scuffed with a 3M Scotch-Brite pad.
I wet-sanded all the paint with a
combination of 1,200-, 1,500-, and 2,000-
grit paper. Then I rubbed it out with rubbing
compound followed by polishing compound.
I used 3M Fine Line Tape to mask off areas
on the wing that were to be painted blue and
then scuffed with 600-grit sandpaper. I was
also able to wet-sand and polish the paint on
the film areas.
All markings, including the lightning
bolts, were paint masks that Pro-Mark
supplied. The masks were surprisingly
affordable, at roughly $35, and simply
sticking them in place and then spraypainting
resulted in nice, clean separation
lines with no bleeds. I used a can of Krylon
spray for the markings.
Fan System and Batteries: BVM has three
basic power systems, all of which work well
in the Electra Jet. System 4010 runs on 10
cells, 5012 runs on 12 cells, and a new 5212
12-cell system uses a slightly larger and
more powerful Neu 1524 motor. All setups
work best with the Flight Power 2P 6400
mAh battery packs that provide more than
six minutes of flight.
My initial flights were with older 5000
mAh packs, but the current 6400s offer more
power and longer duration; they are what I
fly routinely now. My fan system is a 4010,
which I use on both a 10-cell set of 6400
Flight Power packs and a 12-cell set.
Flying the Electra Jet: So how did it
perform? Great, with the exception of one
small teething issue.
I set the CG a small amount nose-heavy
and made sure to program a good dose of
exponential on the aileron and elevator
function. Experience with other BVM
aircraft tells me that they are never short of
control authority at the recommended
settings, and 40% exponential is normally
the number that makes the model handle the
way I like.
After assembling the Electra Jet at the
field, I gave one retract linkage an extra turn
or two toward the tighter retract direction, to
ensure that the door was closed firmly. As I
would learn, that was a mistake!
I loaded my 12S 5000 mAh cells and
clicked the canopy into place. After taxiing
into position, I set takeoff flap and applied
full throttle. The model came off the ground
after slightly more than 100 feet, popped the
gear up, made the first turn, and then pulled
up the flaps. No trim adjustments were made
initially, but during the next circuit or two I
added roughly six clicks of up-trim—it was
slightly nose-heavy—and then two clicks of
aileron. Perfect!
As I always do during a test flight, I spent
a couple minutes flying the model around at
a moderate speed to get the feel for it. I
dropped the flaps and looked for any
required trim change; there was none, and
the slow speed at full flaps was quite
stunning.
I did a couple of fast passes after a couple
minutes, and a small gremlin did show its
face because I changed the adjustment on the
main gear. The Electra Jet came around the
corner and I went to WOT (wide-open
throttle), passing myself at warp 9, and heard
a little pop, crack sound.
I immediately came off the throttle,
slowed the aircraft to sub-light speed, and
then dropped the flaps and flew the
approach. That was the slowest jet landing
I’ve ever performed.
On touchdown, at hardly any airspeed,
one of the landing gear collapsed; no damage
was done to the airframe. I checked it out
afterward, and the crack sound I had heard
was a gear door that left the airplane. I had
adjusted the linkage too far to the retraction
side; it was pulling against the wing skin
pretty hard, and it wasn’t pushing out enough
in the extended direction.
On subsequent flights, I opened the
envelope with basic aerobatics; blazing,
high-speed passes; and flaps-down,
crawling-across-the-sky, slow-speed passes.
You can tell that there are years and years of
aerodynamic refinements behind this
airframe, because there is nothing to
criticize.
Rolls are axial as if on a string. Knife
edge shows only slight roll coupling (which
can be easily dialed out if insisted), and the
slow-speed handling is beyond reproach. If
you’ve flown a good RC Aerobatics
(Pattern) airplane, you’ll know this model;
it’s just much faster than any modern Pattern
aircraft.
The BVM Electra Jet is a superb-flying
classic sport jet. Any pilot who can handle a
fast-flying model will be delighted with it. The
complete package has been totally reliable
during the 40 flights I have on it to date.
The assembled Electra Jet just fits at an
angle in my small Saturn Vue SUV. For
longer trips with more equipment, I take
the wings off, which happens quickly. I
can break it down in less than five minutes
and assemble it in only a couple more.
The motor system is rock solid, with no
cooling needed between flights. So if you
want to get three quick flights in and have
three sets of packs, you can accomplish
that in roughly 20 minutes of field time.
I hope to have my Electra for many
years to come. If anything happened to it, I
think I’d have to get a replacement—
quickly. MA
Christopher True
[email protected]
Sources:
BVM
(407) 327-6333
www.bvmjets.com
Pro-Mark
(618) 524-2440
www.pro-mark.com
FlightPower
(828) 658-2400
www.bestrc.com/flightpower
JR Radio
(800) 338-4639
www.horizonhobby.com

