
June 2005 59
Joe Wagner
T h e E n g i n e S h o p
212 S. Pine Ave., Ozark AL 36360
CL fliers will welcome Brodak Manufacturing’s new 1/2A engine—
and an RC version of it is coming next.
Rossi’s new RAL Micron .40 in action. The pressure tubing
connected to muffler’s underside caused difficulties.
JUDGING FROM THE ads in today’s model-airplane publications
and mail-order catalogs, it might appear that electric power dominates
the field of model-airplane propulsion. E-power is popular, all right,
but internal-combustion (IC) model engines are still very much alive.
That’s evidenced by the never-ending parade of new IC engines. At
least two have come out every month in the last couple of years. (I’ll
report on three new engines later in this column.)
Two good friends of mine have built and flown electric-powered
RC, but they’ve returned to the IC fold after one or two flying
seasons. I asked one of them about that, and he said “Electric power is
okay—but it just doesn’t have any personality!”
Thinking about that remark—and why I agree with my friend—I
decided that part of an IC engine’s “personality” is that it so often
presents us with a bit of quirky behavior (just like a human!). Getting
effective performance from ICs requires more know-how and
ingenuity than merely flipping a switch.
When I first started breaking in the new Rossi .40 I mentioned in
the previous column, its “instant friendliness” pleasantly surprised me.
From the first try it hand-started promptly and idled well. But in later
runs the Rossi became balky. I couldn’t lean it out. Each time I tried,
the engine would gradually lose speed and die.
Why? That puzzled me. Everything was the same as in my earlier
problem-free runs. Then I did notice something different: the silicone
fuel tubing connecting the muffler pressure tap to the tank held three
or four “slugs” of dark oil inside its length. That was the problem!
The Rossi’s muffler has its pressure tap on the bottom. Exhaust oil
was entering the pressure line and blocking it. And the Rossi’s large
carburetor throat area with its slender spraybar needs muffler pressure
for consistent fuel flow into it. With the 12 x 6 propeller I’d put on the
Rossi, suction fuel feed wasn’t good enough.
(As a check, I measured the carburetor throats of some of my other
RC .40 engines. Sure enough, the Rossi had the largest open area. It’s
more than 50% bigger than the Norvel RC .40’s and more than 25%
larger than my K&B .45 Sportster’s open carburetor throat area.)
The fix was simple enough. I added a new pressure tap on the top
side of the Rossi’s muffler and blocked off the lower tap. (For
inverted or side mounting, though, the stock location is just right!)
I found another easy fix for a difficulty I’d had with the RCV91-
CD engine I mentioned in the last column. That’s a truly sweetrunning
machine—but it needs a healthy carburetor prime for starting.
At first I used the traditional finger-choking technique. That
worked okay but was awkward. The radial engine-mount adapter to
which I’d bolted the RCV91 restricted access to the carburetor inlet.
Then I recalled a trick that the late, great Fred Reese taught me for
easily starting Thunder Tiger engines.
“Use muffler pressure, and block the muffler outlet with your
finger for a second or so as you begin flipping the propeller,” he said.
“The pressure pulses from the muffler will fill the fuel line and prime
the engine nicely.”
Fred was right—as usual—and that trick works just as well on my
RCVs. Contortionistic reaching below and behind the engine is no
longer necessary. And the muffler outlet is as easily reachable as
anyone could want.
New-Engine Reports: Going in alphabetical order, the Brodak .049
comes first. This little CL-power producer went through a long
development period before its Chinese manufacturer achieved the
level of performance and dependability that John Brodak requires for
products that carry his name.
Originally the plan was for an engine with interchangeable intakes:
a plain venturi for CL use and a carburetor for RC flying. That didn’t
prove to be practicable, so the new Brodak 1/2A is being made in two
versions. I have one of the CL engines and expect the RC version to
arrive anytime.
The Brodak .049 differs from earlier 1/2A power plants in at least
three ways. One is its standard glow plug rather than a moreexpensive-
to-replace glow head. This also allows a flier to use
Tiniest RC engine available—Micro-Flite version of Cox .010—
comes with most thorough documentation of any model engine.
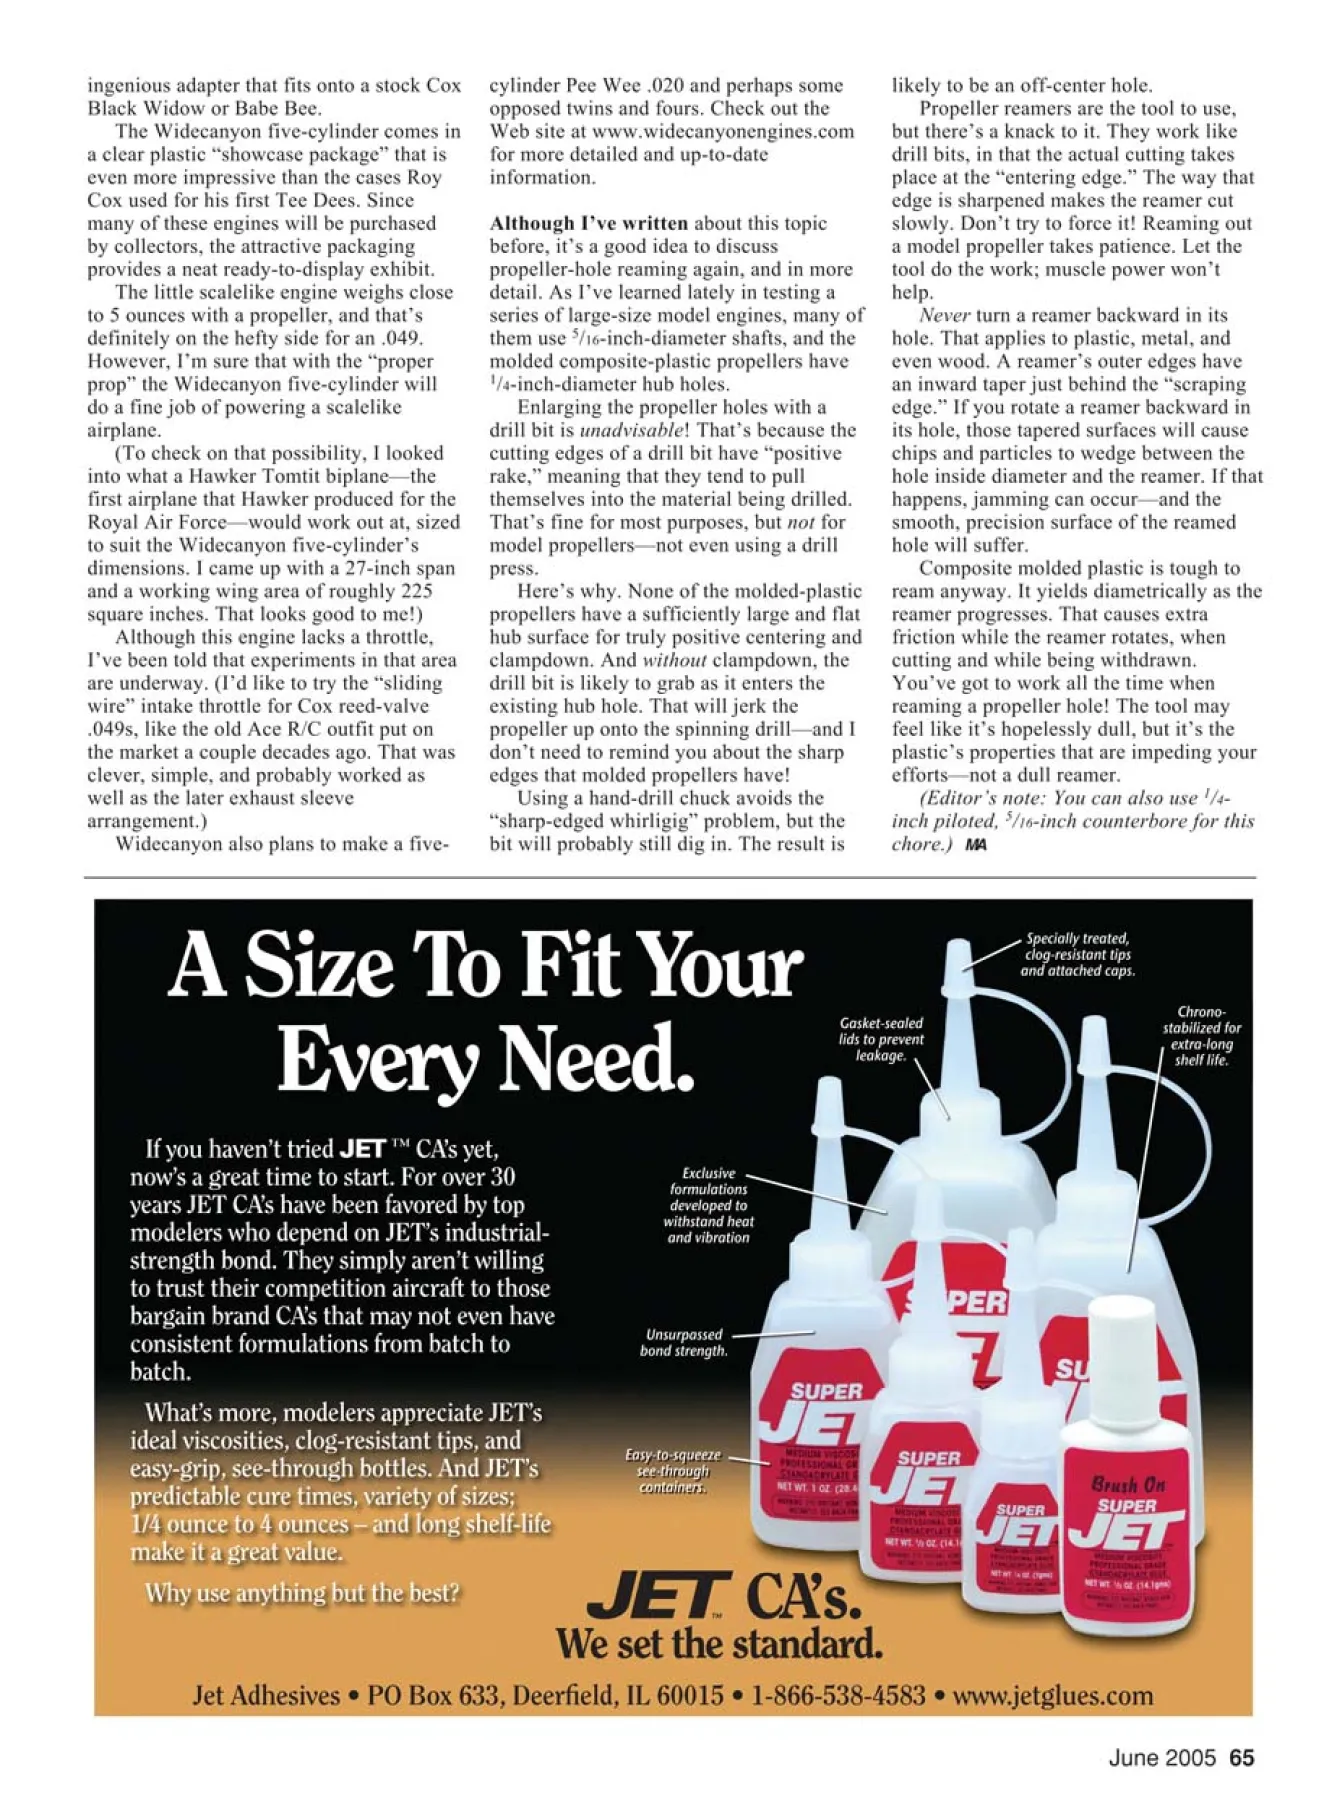
Tiny plastic shavings emphasize slow—but precise—hub-hole
enlargement process using a Great Planes propeller reamer.
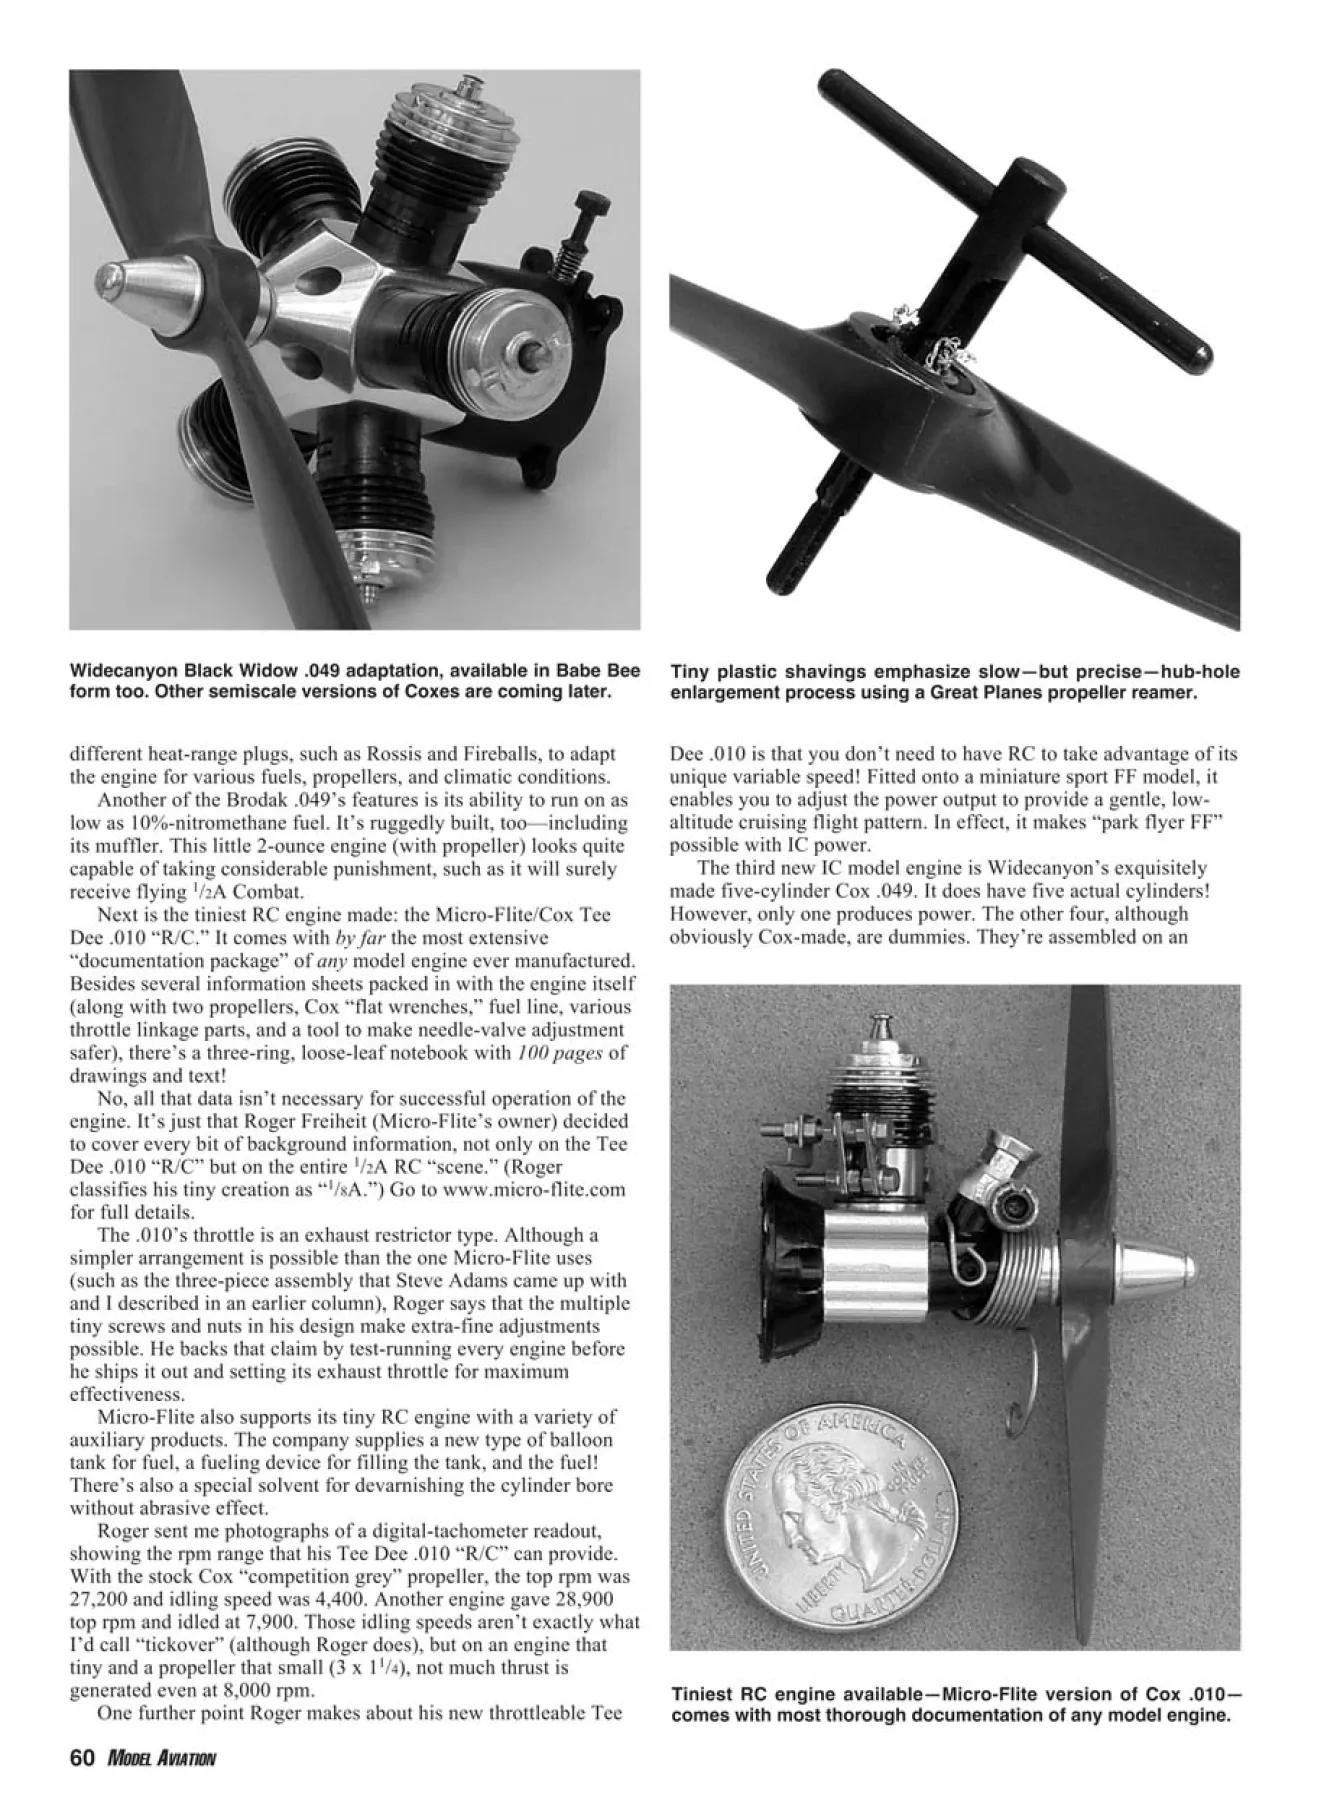
Widecanyon Black Widow .049 adaptation, available in Babe Bee
form too. Other semiscale versions of Coxes are coming later.
different heat-range plugs, such as Rossis and Fireballs, to adapt
the engine for various fuels, propellers, and climatic conditions.
Another of the Brodak .049’s features is its ability to run on as
low as 10%-nitromethane fuel. It’s ruggedly built, too—including
its muffler. This little 2-ounce engine (with propeller) looks quite
capable of taking considerable punishment, such as it will surely
receive flying 1/2A Combat.
Next is the tiniest RC engine made: the Micro-Flite/Cox Tee
Dee .010 “R/C.” It comes with by far the most extensive
“documentation package” of any model engine ever manufactured.
Besides several information sheets packed in with the engine itself
(along with two propellers, Cox “flat wrenches,” fuel line, various
throttle linkage parts, and a tool to make needle-valve adjustment
safer), there’s a three-ring, loose-leaf notebook with 100 pages of
drawings and text!
No, all that data isn’t necessary for successful operation of the
engine. It’s just that Roger Freiheit (Micro-Flite’s owner) decided
to cover every bit of background information, not only on the Tee
Dee .010 “R/C” but on the entire 1/2A RC “scene.” (Roger
classifies his tiny creation as “1/8A.”) Go to www.micro-flite.com
for full details.
The .010’s throttle is an exhaust restrictor type. Although a
simpler arrangement is possible than the one Micro-Flite uses
(such as the three-piece assembly that Steve Adams came up with
and I described in an earlier column), Roger says that the multiple
tiny screws and nuts in his design make extra-fine adjustments
possible. He backs that claim by test-running every engine before
he ships it out and setting its exhaust throttle for maximum
effectiveness.
Micro-Flite also supports its tiny RC engine with a variety of
auxiliary products. The company supplies a new type of balloon
tank for fuel, a fueling device for filling the tank, and the fuel!
There’s also a special solvent for devarnishing the cylinder bore
without abrasive effect.
Roger sent me photographs of a digital-tachometer readout,
showing the rpm range that his Tee Dee .010 “R/C” can provide.
With the stock Cox “competition grey” propeller, the top rpm was
27,200 and idling speed was 4,400. Another engine gave 28,900
top rpm and idled at 7,900. Those idling speeds aren’t exactly what
I’d call “tickover” (although Roger does), but on an engine that
tiny and a propeller that small (3 x 11/4), not much thrust is
generated even at 8,000 rpm.
One further point Roger makes about his new throttleable Tee
Dee .010 is that you don’t need to have RC to take advantage of its
unique variable speed! Fitted onto a miniature sport FF model, it
enables you to adjust the power output to provide a gentle, lowaltitude
cruising flight pattern. In effect, it makes “park flyer FF”
possible with IC power.
The third new IC model engine is Widecanyon’s exquisitely
made five-cylinder Cox .049. It does have five actual cylinders!
However, only one produces power. The other four, although
obviously Cox-made, are dummies. They’re assembled on an
ingenious adapter that fits onto a stock Cox
Black Widow or Babe Bee.
The Widecanyon five-cylinder comes in
a clear plastic “showcase package” that is
even more impressive than the cases Roy
Cox used for his first Tee Dees. Since
many of these engines will be purchased
by collectors, the attractive packaging
provides a neat ready-to-display exhibit.
The little scalelike engine weighs close
to 5 ounces with a propeller, and that’s
definitely on the hefty side for an .049.
However, I’m sure that with the “proper
prop” the Widecanyon five-cylinder will
do a fine job of powering a scalelike
airplane.
(To check on that possibility, I looked
into what a Hawker Tomtit biplane—the
first airplane that Hawker produced for the
Royal Air Force—would work out at, sized
to suit the Widecanyon five-cylinder’s
dimensions. I came up with a 27-inch span
and a working wing area of roughly 225
square inches. That looks good to me!)
Although this engine lacks a throttle,
I’ve been told that experiments in that area
are underway. (I’d like to try the “sliding
wire” intake throttle for Cox reed-valve
.049s, like the old Ace R/C outfit put on
the market a couple decades ago. That was
clever, simple, and probably worked as
well as the later exhaust sleeve
arrangement.)
Widecanyon also plans to make a fivecylinder
Pee Wee .020 and perhaps some
opposed twins and fours. Check out the
Web site at www.widecanyonengines.com
for more detailed and up-to-date
information.
Although I’ve written about this topic
before, it’s a good idea to discuss
propeller-hole reaming again, and in more
detail. As I’ve learned lately in testing a
series of large-size model engines, many of
them use 5/16-inch-diameter shafts, and the
molded composite-plastic propellers have
1/4-inch-diameter hub holes.
Enlarging the propeller holes with a
drill bit is unadvisable! That’s because the
cutting edges of a drill bit have “positive
rake,” meaning that they tend to pull
themselves into the material being drilled.
That’s fine for most purposes, but not for
model propellers—not even using a drill
press.
Here’s why. None of the molded-plastic
propellers have a sufficiently large and flat
hub surface for truly positive centering and
clampdown. And without clampdown, the
drill bit is likely to grab as it enters the
existing hub hole. That will jerk the
propeller up onto the spinning drill—and I
don’t need to remind you about the sharp
edges that molded propellers have!
Using a hand-drill chuck avoids the
“sharp-edged whirligig” problem, but the
bit will probably still dig in. The result is
likely to be an off-center hole.
Propeller reamers are the tool to use,
but there’s a knack to it. They work like
drill bits, in that the actual cutting takes
place at the “entering edge.” The way that
edge is sharpened makes the reamer cut
slowly. Don’t try to force it! Reaming out
a model propeller takes patience. Let the
tool do the work; muscle power won’t
help.
Never turn a reamer backward in its
hole. That applies to plastic, metal, and
even wood. A reamer’s outer edges have
an inward taper just behind the “scraping
edge.” If you rotate a reamer backward in
its hole, those tapered surfaces will cause
chips and particles to wedge between the
hole inside diameter and the reamer. If that
happens, jamming can occur—and the
smooth, precision surface of the reamed
hole will suffer.
Composite molded plastic is tough to
ream anyway. It yields diametrically as the
reamer progresses. That causes extra
friction while the reamer rotates, when
cutting and while being withdrawn.
You’ve got to work all the time when
reaming a propeller hole! The tool may
feel like it’s hopelessly dull, but it’s the
plastic’s properties that are impeding your
efforts—not a dull reamer.
(Editor’s note: You can also use 1/4-
inch piloted, 5/16-inch counterbore for this
chore.) MA

Edition: Model Aviation - 2005/06
Page Numbers: 59,60,65
Edition: Model Aviation - 2005/06
Page Numbers: 59,60,65
June 2005 59
Joe Wagner
T h e E n g i n e S h o p
212 S. Pine Ave., Ozark AL 36360
CL fliers will welcome Brodak Manufacturing’s new 1/2A engine—
and an RC version of it is coming next.
Rossi’s new RAL Micron .40 in action. The pressure tubing
connected to muffler’s underside caused difficulties.
JUDGING FROM THE ads in today’s model-airplane publications
and mail-order catalogs, it might appear that electric power dominates
the field of model-airplane propulsion. E-power is popular, all right,
but internal-combustion (IC) model engines are still very much alive.
That’s evidenced by the never-ending parade of new IC engines. At
least two have come out every month in the last couple of years. (I’ll
report on three new engines later in this column.)
Two good friends of mine have built and flown electric-powered
RC, but they’ve returned to the IC fold after one or two flying
seasons. I asked one of them about that, and he said “Electric power is
okay—but it just doesn’t have any personality!”
Thinking about that remark—and why I agree with my friend—I
decided that part of an IC engine’s “personality” is that it so often
presents us with a bit of quirky behavior (just like a human!). Getting
effective performance from ICs requires more know-how and
ingenuity than merely flipping a switch.
When I first started breaking in the new Rossi .40 I mentioned in
the previous column, its “instant friendliness” pleasantly surprised me.
From the first try it hand-started promptly and idled well. But in later
runs the Rossi became balky. I couldn’t lean it out. Each time I tried,
the engine would gradually lose speed and die.
Why? That puzzled me. Everything was the same as in my earlier
problem-free runs. Then I did notice something different: the silicone
fuel tubing connecting the muffler pressure tap to the tank held three
or four “slugs” of dark oil inside its length. That was the problem!
The Rossi’s muffler has its pressure tap on the bottom. Exhaust oil
was entering the pressure line and blocking it. And the Rossi’s large
carburetor throat area with its slender spraybar needs muffler pressure
for consistent fuel flow into it. With the 12 x 6 propeller I’d put on the
Rossi, suction fuel feed wasn’t good enough.
(As a check, I measured the carburetor throats of some of my other
RC .40 engines. Sure enough, the Rossi had the largest open area. It’s
more than 50% bigger than the Norvel RC .40’s and more than 25%
larger than my K&B .45 Sportster’s open carburetor throat area.)
The fix was simple enough. I added a new pressure tap on the top
side of the Rossi’s muffler and blocked off the lower tap. (For
inverted or side mounting, though, the stock location is just right!)
I found another easy fix for a difficulty I’d had with the RCV91-
CD engine I mentioned in the last column. That’s a truly sweetrunning
machine—but it needs a healthy carburetor prime for starting.
At first I used the traditional finger-choking technique. That
worked okay but was awkward. The radial engine-mount adapter to
which I’d bolted the RCV91 restricted access to the carburetor inlet.
Then I recalled a trick that the late, great Fred Reese taught me for
easily starting Thunder Tiger engines.
“Use muffler pressure, and block the muffler outlet with your
finger for a second or so as you begin flipping the propeller,” he said.
“The pressure pulses from the muffler will fill the fuel line and prime
the engine nicely.”
Fred was right—as usual—and that trick works just as well on my
RCVs. Contortionistic reaching below and behind the engine is no
longer necessary. And the muffler outlet is as easily reachable as
anyone could want.
New-Engine Reports: Going in alphabetical order, the Brodak .049
comes first. This little CL-power producer went through a long
development period before its Chinese manufacturer achieved the
level of performance and dependability that John Brodak requires for
products that carry his name.
Originally the plan was for an engine with interchangeable intakes:
a plain venturi for CL use and a carburetor for RC flying. That didn’t
prove to be practicable, so the new Brodak 1/2A is being made in two
versions. I have one of the CL engines and expect the RC version to
arrive anytime.
The Brodak .049 differs from earlier 1/2A power plants in at least
three ways. One is its standard glow plug rather than a moreexpensive-
to-replace glow head. This also allows a flier to use
Tiniest RC engine available—Micro-Flite version of Cox .010—
comes with most thorough documentation of any model engine.
Tiny plastic shavings emphasize slow—but precise—hub-hole
enlargement process using a Great Planes propeller reamer.
Widecanyon Black Widow .049 adaptation, available in Babe Bee
form too. Other semiscale versions of Coxes are coming later.
different heat-range plugs, such as Rossis and Fireballs, to adapt
the engine for various fuels, propellers, and climatic conditions.
Another of the Brodak .049’s features is its ability to run on as
low as 10%-nitromethane fuel. It’s ruggedly built, too—including
its muffler. This little 2-ounce engine (with propeller) looks quite
capable of taking considerable punishment, such as it will surely
receive flying 1/2A Combat.
Next is the tiniest RC engine made: the Micro-Flite/Cox Tee
Dee .010 “R/C.” It comes with by far the most extensive
“documentation package” of any model engine ever manufactured.
Besides several information sheets packed in with the engine itself
(along with two propellers, Cox “flat wrenches,” fuel line, various
throttle linkage parts, and a tool to make needle-valve adjustment
safer), there’s a three-ring, loose-leaf notebook with 100 pages of
drawings and text!
No, all that data isn’t necessary for successful operation of the
engine. It’s just that Roger Freiheit (Micro-Flite’s owner) decided
to cover every bit of background information, not only on the Tee
Dee .010 “R/C” but on the entire 1/2A RC “scene.” (Roger
classifies his tiny creation as “1/8A.”) Go to www.micro-flite.com
for full details.
The .010’s throttle is an exhaust restrictor type. Although a
simpler arrangement is possible than the one Micro-Flite uses
(such as the three-piece assembly that Steve Adams came up with
and I described in an earlier column), Roger says that the multiple
tiny screws and nuts in his design make extra-fine adjustments
possible. He backs that claim by test-running every engine before
he ships it out and setting its exhaust throttle for maximum
effectiveness.
Micro-Flite also supports its tiny RC engine with a variety of
auxiliary products. The company supplies a new type of balloon
tank for fuel, a fueling device for filling the tank, and the fuel!
There’s also a special solvent for devarnishing the cylinder bore
without abrasive effect.
Roger sent me photographs of a digital-tachometer readout,
showing the rpm range that his Tee Dee .010 “R/C” can provide.
With the stock Cox “competition grey” propeller, the top rpm was
27,200 and idling speed was 4,400. Another engine gave 28,900
top rpm and idled at 7,900. Those idling speeds aren’t exactly what
I’d call “tickover” (although Roger does), but on an engine that
tiny and a propeller that small (3 x 11/4), not much thrust is
generated even at 8,000 rpm.
One further point Roger makes about his new throttleable Tee
Dee .010 is that you don’t need to have RC to take advantage of its
unique variable speed! Fitted onto a miniature sport FF model, it
enables you to adjust the power output to provide a gentle, lowaltitude
cruising flight pattern. In effect, it makes “park flyer FF”
possible with IC power.
The third new IC model engine is Widecanyon’s exquisitely
made five-cylinder Cox .049. It does have five actual cylinders!
However, only one produces power. The other four, although
obviously Cox-made, are dummies. They’re assembled on an
ingenious adapter that fits onto a stock Cox
Black Widow or Babe Bee.
The Widecanyon five-cylinder comes in
a clear plastic “showcase package” that is
even more impressive than the cases Roy
Cox used for his first Tee Dees. Since
many of these engines will be purchased
by collectors, the attractive packaging
provides a neat ready-to-display exhibit.
The little scalelike engine weighs close
to 5 ounces with a propeller, and that’s
definitely on the hefty side for an .049.
However, I’m sure that with the “proper
prop” the Widecanyon five-cylinder will
do a fine job of powering a scalelike
airplane.
(To check on that possibility, I looked
into what a Hawker Tomtit biplane—the
first airplane that Hawker produced for the
Royal Air Force—would work out at, sized
to suit the Widecanyon five-cylinder’s
dimensions. I came up with a 27-inch span
and a working wing area of roughly 225
square inches. That looks good to me!)
Although this engine lacks a throttle,
I’ve been told that experiments in that area
are underway. (I’d like to try the “sliding
wire” intake throttle for Cox reed-valve
.049s, like the old Ace R/C outfit put on
the market a couple decades ago. That was
clever, simple, and probably worked as
well as the later exhaust sleeve
arrangement.)
Widecanyon also plans to make a fivecylinder
Pee Wee .020 and perhaps some
opposed twins and fours. Check out the
Web site at www.widecanyonengines.com
for more detailed and up-to-date
information.
Although I’ve written about this topic
before, it’s a good idea to discuss
propeller-hole reaming again, and in more
detail. As I’ve learned lately in testing a
series of large-size model engines, many of
them use 5/16-inch-diameter shafts, and the
molded composite-plastic propellers have
1/4-inch-diameter hub holes.
Enlarging the propeller holes with a
drill bit is unadvisable! That’s because the
cutting edges of a drill bit have “positive
rake,” meaning that they tend to pull
themselves into the material being drilled.
That’s fine for most purposes, but not for
model propellers—not even using a drill
press.
Here’s why. None of the molded-plastic
propellers have a sufficiently large and flat
hub surface for truly positive centering and
clampdown. And without clampdown, the
drill bit is likely to grab as it enters the
existing hub hole. That will jerk the
propeller up onto the spinning drill—and I
don’t need to remind you about the sharp
edges that molded propellers have!
Using a hand-drill chuck avoids the
“sharp-edged whirligig” problem, but the
bit will probably still dig in. The result is
likely to be an off-center hole.
Propeller reamers are the tool to use,
but there’s a knack to it. They work like
drill bits, in that the actual cutting takes
place at the “entering edge.” The way that
edge is sharpened makes the reamer cut
slowly. Don’t try to force it! Reaming out
a model propeller takes patience. Let the
tool do the work; muscle power won’t
help.
Never turn a reamer backward in its
hole. That applies to plastic, metal, and
even wood. A reamer’s outer edges have
an inward taper just behind the “scraping
edge.” If you rotate a reamer backward in
its hole, those tapered surfaces will cause
chips and particles to wedge between the
hole inside diameter and the reamer. If that
happens, jamming can occur—and the
smooth, precision surface of the reamed
hole will suffer.
Composite molded plastic is tough to
ream anyway. It yields diametrically as the
reamer progresses. That causes extra
friction while the reamer rotates, when
cutting and while being withdrawn.
You’ve got to work all the time when
reaming a propeller hole! The tool may
feel like it’s hopelessly dull, but it’s the
plastic’s properties that are impeding your
efforts—not a dull reamer.
(Editor’s note: You can also use 1/4-
inch piloted, 5/16-inch counterbore for this
chore.) MA

