
events, it created a virtual firestorm of protest from modelers who felt
that the rules discriminated against their favorite Dime Scale plans.
Now that things have settled down and the controversy is largely
over, the event has become quite popular.
An interesting twist is the pseudo Dime designs. These are “new”
Dime Scale models that compete along with the originals. A modeler
can draw new plans that follow Dime Scale design techniques. The
airplane being modeled must have flown before December 7, 1941,
and cannot have been previously published as Dime Scale plans.
Many of the original Dime Scale models are available as kits from
Penn Valley Hobby Center, 837 W. Main St., Lansdale PA 19446;
Web site: www.pennvalleyhobbycenter.com.
Fantasy Flyers were a feature of the Bill Barnes adventure comic
Gene Smith, 1401 N. Husband St., Stillwater OK 74075; E-mail: [email protected]
FREE FLIGHT SPORT
Joe Smith’s Fokker Peanut flies great with no dihedral.
Adjustable ailerons have washout to aid lateral stability.
David Niedzielski—the owner of Easy Built Models—holds his
Silver Lancer and Mystery Tailless aircraft.
Paul Grabski packs the winds into his Ryan Dime Scale model at
this past summer’s FAC Nats. The Ryan is a great flier.
George White holds his immaculate Sparky: a popular model in
FAC’s Old Time Rubber event. It’s a nice flier.
DIME SCALE MODELS: It amazes me how the model-airplane
designers of the 1930s could produce an airplane from a few bits of
balsa that was as easily recognizable as a full-scale airplane. Dime
Scale models have a unique niche in the history of Scale-model-aircraft
design. They have just the right blend of realism and simplicity.
When the Flying Aces Club (FAC) added Dime Scale to its list of
series of the 1930s. Heroes and villains flew these futuristic designs in
the strip. One of the most appealing airplanes was the Silver Lancer.
You can see the resemblance to the Schneider Cup racers—the fastest
aircraft of their time. The FAC has held a special event for these
designs at its Nats.
Another design from the past is the Mystery Tailless biplane, taken
from the pages of the old Flying Aces magazine. Dave Niedzielski of
Easy Built Models has produced kits for both of these airplanes. The
Mystery Tailless is eligible for Old Time Rubber and 2 Bit Scale, or
just build it for fun. David had his flying extremely well at the FAC
Nats this past summer. Cool!
Contact Easy Built Models at Box 681744, Prattville AL 36068;
Web site: www.easybuiltmodels.com.
Fokker Dr.I Peanut: Aircraft with no dihedral present a special
challenge to the FF Scale modeler. Joe Smith drew his own plans and
built a great Fokker Dr.I Peanut. He reports that it flew well from the
get-go!
His approach to the lateral-stability problem was to build 2° of
washout into every one of the triplane’s wing panels. He made the
ailerons on the upper wing adjustable with wire hinges.
Joe reports that the model had a natural left turn. He cured a slight
tendency to drop the left wing by reducing the reflex of the left aileron.
He set the three wings at the same +2° incidence. Each wingtip has just
more than 1⁄8 inch of washout, including the wire-hinged ailerons on
the upper wing.
He determined the CG by measuring the distance between two
lines. The front line was the LE of the top wing, and the other line was
the TE of the bottom wing. He placed the CG one-third of that distance
from the LE of the top wing.
Joe purchased the tissue for the covering at the craft store, and the
finish was one light coat of Pactra spray-can clear dope. For the test
flights, he used a 7-inch loop of 3⁄16-inch Sig contest rubber. Joe will be
going for longer flights with longer motors.
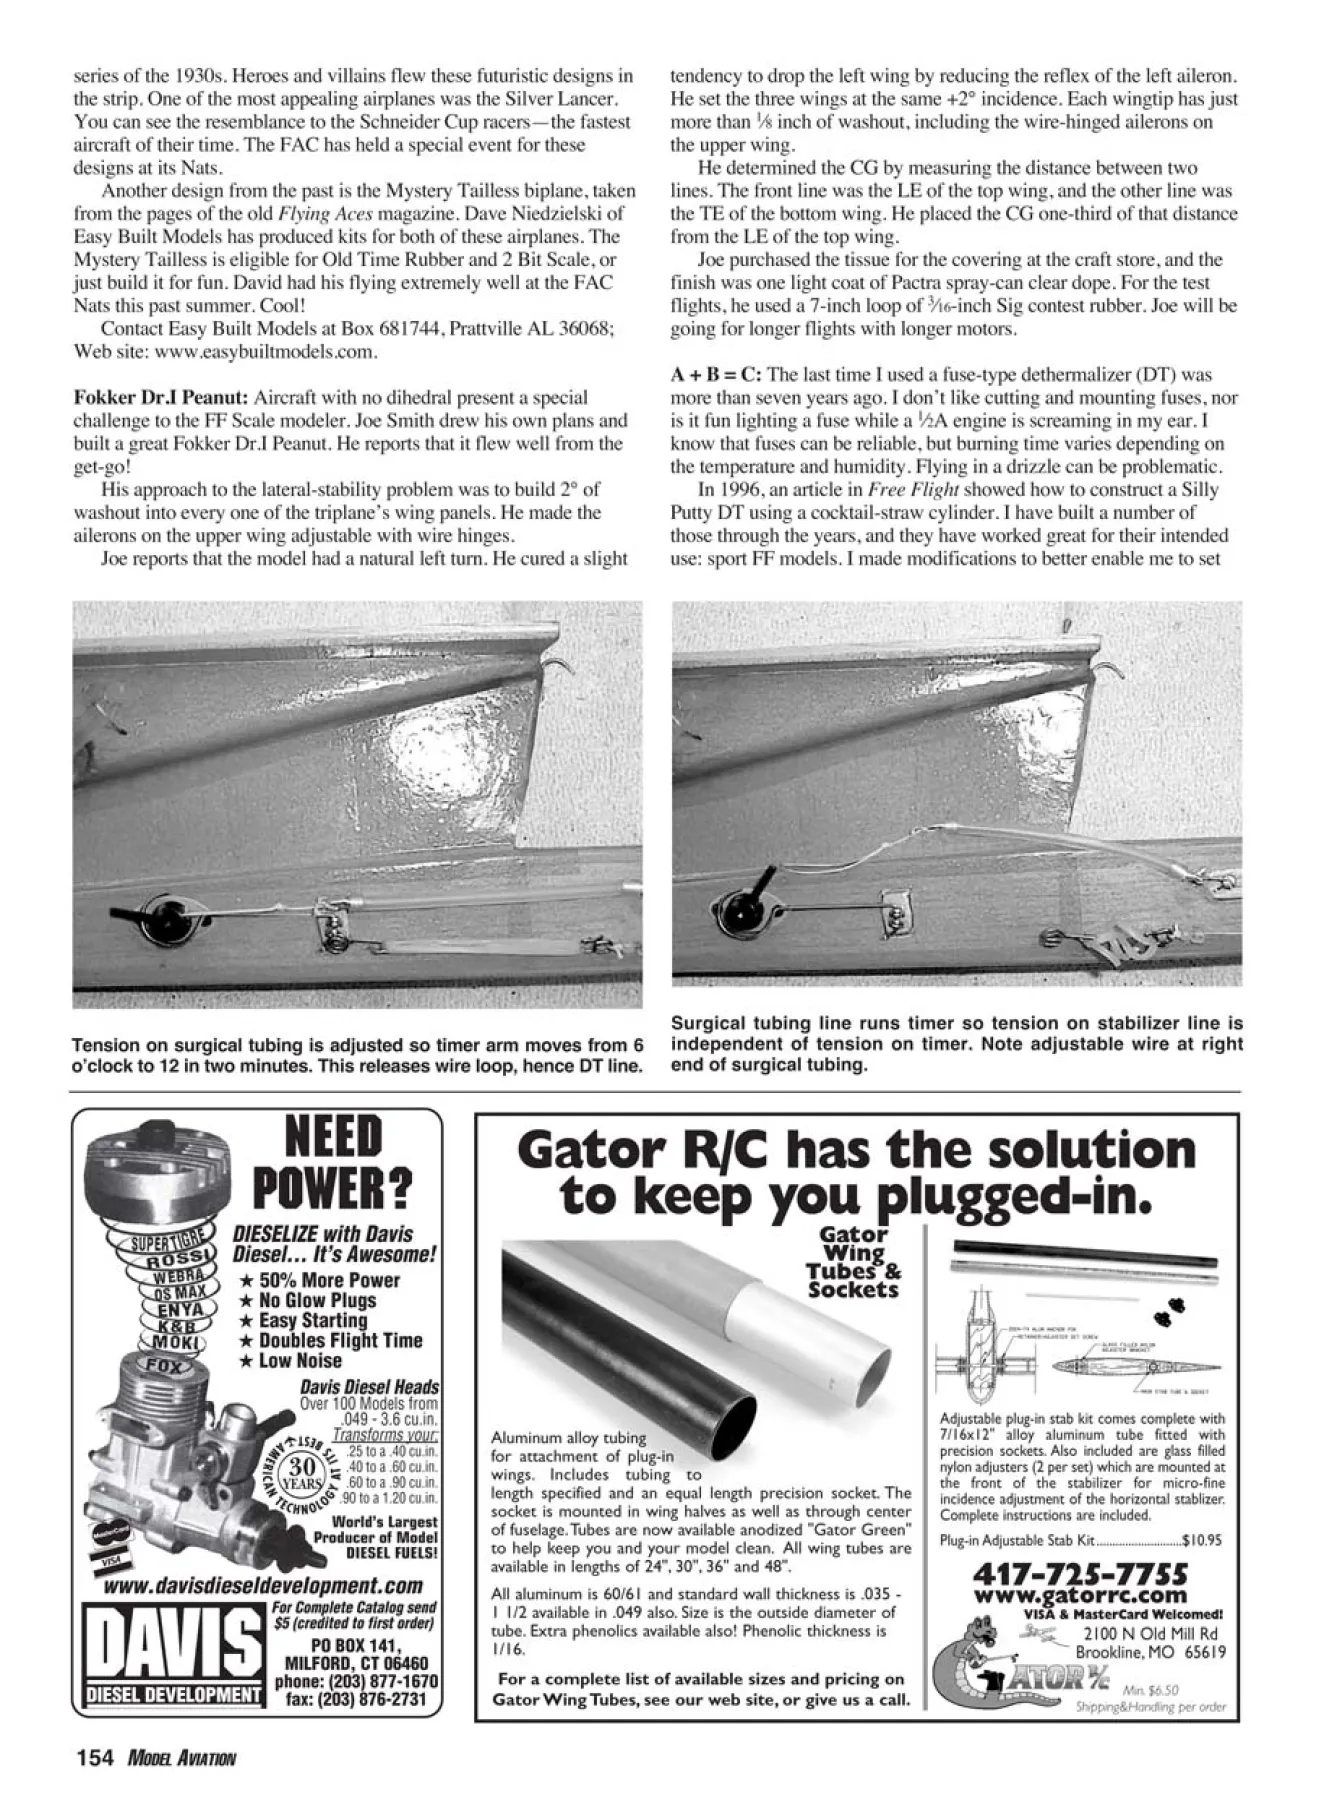
Tension on surgical tubing is adjusted so timer arm moves from 6
o’clock to 12 in two minutes. This releases wire loop, hence DT line.
Surgical tubing line runs timer so tension on stabilizer line is
independent of tension on timer. Note adjustable wire at right
end of surgical tubing.
A + B = C: The last time I used a fuse-type dethermalizer (DT) was
more than seven years ago. I don’t like cutting and mounting fuses, nor
is it fun lighting a fuse while a 1⁄2A engine is screaming in my ear. I
know that fuses can be reliable, but burning time varies depending on
the temperature and humidity. Flying in a drizzle can be problematic.
In 1996, an article in Free Flight showed how to construct a Silly
Putty DT using a cocktail-straw cylinder. I have built a number of
those through the years, and they have worked great for their intended
use: sport FF models. I made modifications to better enable me to set
the time and reset the timer more easily. I
used the DTs in rubber- and gas-powered FF
models as large as a Satellite 600.
However, the time needed to reset the
timer, the fragility of the cocktail straw, and
the time required to build the timer had me
constantly searching for a light timer that
was reliable enough to use for contest work
with small Rubber and Gas models. Larger
aircraft can carry a mechanical DT timer
without having to worry about its weight,
but that same weight can significantly
hamper a smaller model’s duration.
When the button/badge-type timers were
introduced, I thought they were the answer.
But they are best suited to small Rubber
models or Hand-Launched Gliders. The
proper tension for holding down a highperformance
1⁄2A Gas model’s stabilizer or
even the wing of a pop-up-wing-type DT on
a P-30 was high enough that it would cause
the DT to unwind too rapidly.
The other disadvantage was the elastic
thread used to rotate the timer arm. It wasn’t
strong enough for my purpose.
My current DT setup for small Gas
models incorporates two ideas gleaned from
other modelers. These allow the use of the
button/badge timers on larger models. Andy
Ringlien had an informative article about
Silly Putty DT timers in the April 2002 Free
Flight. One of his setups used a U-shaped
wire loop trapped under the arm of a
badge/button-type timer. Using this wire
loop allowed separate tension for the
stabilizer hold-down and the timer driver.
The other idea is to use surgical tubing
for the timer driver rather than using a
spring, elastic thread, or a rubber band. Jack
Dobbins came up with that concept, and it
was mentioned in Dick Miller’s electricflight
column in the September 1997 Flying
Models.
The photos with this column show my
DT setup on a 1⁄2A Gas model. The stabilizer
hold-down line hooks to the short arm of the
.032 music-wire lever. The lever’s long arm
has a 3⁄4-inch loop that is trapped under the
arm of the button timer. The lever hinges in
a length of 1⁄16-inch aluminum tubing. The
surgical tubing has an inside diameter (ID)
of 1⁄16 inch, a wall thickness of 1⁄32 inch, and
is 21⁄4 inches long.
The fixtures at each end of the surgical
tubing are 3⁄32-inch aluminum tubing
flattened at one end and drilled for the .020
wire hooks. Be sure to leave at least 1⁄8 inch
of the aluminum tubing round to accept the
surgical tubing. The elongated wire loop in
the right end of the surgical-tubing anchor
allows fine adjustment of the DT time. The
mounting plates are 1⁄32 plywood. The thread
loop is Dacron fishing line—20-pound test.
It is important that the loop in the lever
wire does not extend beyond the center pivot
of the button. Otherwise, you run the risk of
the Dacron loop sliding off the badge lever
before it releases the wire lever.
A badge-type seven-minute timer can
be easily adjusted to run two minutes
with 180° of travel or three minutes with
250° of travel. Repeatability is within
five seconds on a two-minute DT.
When I’m ready to start the engine, I set
the DT timer for two-and-a-half minutes.
After starting the engine, I check and adjust
the DT timer-arm position, trip the engine
timer, and launch.
You may want to install a pin to hold the
DT timer at two minutes until you’re ready
for launch. Just be sure to remove the pin
before launch. If you want a 15- to 20-
second DT, move the lever to a position near
the end of the loop immediately before
launch.
The BL-7 timer and 1⁄16-inch ID surgical
tubing are available from FAI Model Supply
at (570) 882-9873.
Old Magazine Scale Plans on CD: Thomas
Wilk’s latest CD, number 14, is a
compendium of FF Scale plans from 1940 to
1970. Included are 112 gas-powered
models, 168 rubber-powered models, eight
CO2-powered models, and three Jetexpowered
models.
The CD costs $10 (which includes
postage in the US). Thomas accepts checks
from a US bank. Canadian orders must add
$1.50 for Air Mail. International orders must
add $5 for Air Mail or Global Priority.
PayPal and Western Union Money Transfers
are accepted. Send to Thomas Wilk, 301 W.
Redwing St., Duluth MN 55803.
If you live in the Florida panhandle area,
check out the Thermalier newsletter
published by the Pensacola Free Flight
Team. George White is the editor.
This publication documents the club
activities and is full of building and flying
tips. The group has a fantastic flying field.
Send $10 for six issues to George at 5928
Hermitage Dr., Pensacola FL 32504.
Memories: I received a nice note from Joe
Valenta, who built the Back Porch Pusher
several years ago. He used plans from the
original article in the May 1948 Air Trails
that he purchased the month he graduated
from high school. You can see this model in
the October 2004 FF Sport column.
The Bong Eagles club in southeast
Wisconsin enjoys a variety of FF activities,
including FAC. Its members fly at the Bong
Recreational Area. The club newsletter is
$10 a year. Send a check to Joe Adams, 306
E. Kendale Dr., Oak Creek WI 53154. Surf
onto the Web site at http://users.urban
com.net/freeflight/index.html/. MA

Edition: Model Aviation - 2005/01
Page Numbers: 153,154,155
Edition: Model Aviation - 2005/01
Page Numbers: 153,154,155
events, it created a virtual firestorm of protest from modelers who felt
that the rules discriminated against their favorite Dime Scale plans.
Now that things have settled down and the controversy is largely
over, the event has become quite popular.
An interesting twist is the pseudo Dime designs. These are “new”
Dime Scale models that compete along with the originals. A modeler
can draw new plans that follow Dime Scale design techniques. The
airplane being modeled must have flown before December 7, 1941,
and cannot have been previously published as Dime Scale plans.
Many of the original Dime Scale models are available as kits from
Penn Valley Hobby Center, 837 W. Main St., Lansdale PA 19446;
Web site: www.pennvalleyhobbycenter.com.
Fantasy Flyers were a feature of the Bill Barnes adventure comic
Gene Smith, 1401 N. Husband St., Stillwater OK 74075; E-mail: [email protected]
FREE FLIGHT SPORT
Joe Smith’s Fokker Peanut flies great with no dihedral.
Adjustable ailerons have washout to aid lateral stability.
David Niedzielski—the owner of Easy Built Models—holds his
Silver Lancer and Mystery Tailless aircraft.
Paul Grabski packs the winds into his Ryan Dime Scale model at
this past summer’s FAC Nats. The Ryan is a great flier.
George White holds his immaculate Sparky: a popular model in
FAC’s Old Time Rubber event. It’s a nice flier.
DIME SCALE MODELS: It amazes me how the model-airplane
designers of the 1930s could produce an airplane from a few bits of
balsa that was as easily recognizable as a full-scale airplane. Dime
Scale models have a unique niche in the history of Scale-model-aircraft
design. They have just the right blend of realism and simplicity.
When the Flying Aces Club (FAC) added Dime Scale to its list of
series of the 1930s. Heroes and villains flew these futuristic designs in
the strip. One of the most appealing airplanes was the Silver Lancer.
You can see the resemblance to the Schneider Cup racers—the fastest
aircraft of their time. The FAC has held a special event for these
designs at its Nats.
Another design from the past is the Mystery Tailless biplane, taken
from the pages of the old Flying Aces magazine. Dave Niedzielski of
Easy Built Models has produced kits for both of these airplanes. The
Mystery Tailless is eligible for Old Time Rubber and 2 Bit Scale, or
just build it for fun. David had his flying extremely well at the FAC
Nats this past summer. Cool!
Contact Easy Built Models at Box 681744, Prattville AL 36068;
Web site: www.easybuiltmodels.com.
Fokker Dr.I Peanut: Aircraft with no dihedral present a special
challenge to the FF Scale modeler. Joe Smith drew his own plans and
built a great Fokker Dr.I Peanut. He reports that it flew well from the
get-go!
His approach to the lateral-stability problem was to build 2° of
washout into every one of the triplane’s wing panels. He made the
ailerons on the upper wing adjustable with wire hinges.
Joe reports that the model had a natural left turn. He cured a slight
tendency to drop the left wing by reducing the reflex of the left aileron.
He set the three wings at the same +2° incidence. Each wingtip has just
more than 1⁄8 inch of washout, including the wire-hinged ailerons on
the upper wing.
He determined the CG by measuring the distance between two
lines. The front line was the LE of the top wing, and the other line was
the TE of the bottom wing. He placed the CG one-third of that distance
from the LE of the top wing.
Joe purchased the tissue for the covering at the craft store, and the
finish was one light coat of Pactra spray-can clear dope. For the test
flights, he used a 7-inch loop of 3⁄16-inch Sig contest rubber. Joe will be
going for longer flights with longer motors.
Tension on surgical tubing is adjusted so timer arm moves from 6
o’clock to 12 in two minutes. This releases wire loop, hence DT line.
Surgical tubing line runs timer so tension on stabilizer line is
independent of tension on timer. Note adjustable wire at right
end of surgical tubing.
A + B = C: The last time I used a fuse-type dethermalizer (DT) was
more than seven years ago. I don’t like cutting and mounting fuses, nor
is it fun lighting a fuse while a 1⁄2A engine is screaming in my ear. I
know that fuses can be reliable, but burning time varies depending on
the temperature and humidity. Flying in a drizzle can be problematic.
In 1996, an article in Free Flight showed how to construct a Silly
Putty DT using a cocktail-straw cylinder. I have built a number of
those through the years, and they have worked great for their intended
use: sport FF models. I made modifications to better enable me to set
the time and reset the timer more easily. I
used the DTs in rubber- and gas-powered FF
models as large as a Satellite 600.
However, the time needed to reset the
timer, the fragility of the cocktail straw, and
the time required to build the timer had me
constantly searching for a light timer that
was reliable enough to use for contest work
with small Rubber and Gas models. Larger
aircraft can carry a mechanical DT timer
without having to worry about its weight,
but that same weight can significantly
hamper a smaller model’s duration.
When the button/badge-type timers were
introduced, I thought they were the answer.
But they are best suited to small Rubber
models or Hand-Launched Gliders. The
proper tension for holding down a highperformance
1⁄2A Gas model’s stabilizer or
even the wing of a pop-up-wing-type DT on
a P-30 was high enough that it would cause
the DT to unwind too rapidly.
The other disadvantage was the elastic
thread used to rotate the timer arm. It wasn’t
strong enough for my purpose.
My current DT setup for small Gas
models incorporates two ideas gleaned from
other modelers. These allow the use of the
button/badge timers on larger models. Andy
Ringlien had an informative article about
Silly Putty DT timers in the April 2002 Free
Flight. One of his setups used a U-shaped
wire loop trapped under the arm of a
badge/button-type timer. Using this wire
loop allowed separate tension for the
stabilizer hold-down and the timer driver.
The other idea is to use surgical tubing
for the timer driver rather than using a
spring, elastic thread, or a rubber band. Jack
Dobbins came up with that concept, and it
was mentioned in Dick Miller’s electricflight
column in the September 1997 Flying
Models.
The photos with this column show my
DT setup on a 1⁄2A Gas model. The stabilizer
hold-down line hooks to the short arm of the
.032 music-wire lever. The lever’s long arm
has a 3⁄4-inch loop that is trapped under the
arm of the button timer. The lever hinges in
a length of 1⁄16-inch aluminum tubing. The
surgical tubing has an inside diameter (ID)
of 1⁄16 inch, a wall thickness of 1⁄32 inch, and
is 21⁄4 inches long.
The fixtures at each end of the surgical
tubing are 3⁄32-inch aluminum tubing
flattened at one end and drilled for the .020
wire hooks. Be sure to leave at least 1⁄8 inch
of the aluminum tubing round to accept the
surgical tubing. The elongated wire loop in
the right end of the surgical-tubing anchor
allows fine adjustment of the DT time. The
mounting plates are 1⁄32 plywood. The thread
loop is Dacron fishing line—20-pound test.
It is important that the loop in the lever
wire does not extend beyond the center pivot
of the button. Otherwise, you run the risk of
the Dacron loop sliding off the badge lever
before it releases the wire lever.
A badge-type seven-minute timer can
be easily adjusted to run two minutes
with 180° of travel or three minutes with
250° of travel. Repeatability is within
five seconds on a two-minute DT.
When I’m ready to start the engine, I set
the DT timer for two-and-a-half minutes.
After starting the engine, I check and adjust
the DT timer-arm position, trip the engine
timer, and launch.
You may want to install a pin to hold the
DT timer at two minutes until you’re ready
for launch. Just be sure to remove the pin
before launch. If you want a 15- to 20-
second DT, move the lever to a position near
the end of the loop immediately before
launch.
The BL-7 timer and 1⁄16-inch ID surgical
tubing are available from FAI Model Supply
at (570) 882-9873.
Old Magazine Scale Plans on CD: Thomas
Wilk’s latest CD, number 14, is a
compendium of FF Scale plans from 1940 to
1970. Included are 112 gas-powered
models, 168 rubber-powered models, eight
CO2-powered models, and three Jetexpowered
models.
The CD costs $10 (which includes
postage in the US). Thomas accepts checks
from a US bank. Canadian orders must add
$1.50 for Air Mail. International orders must
add $5 for Air Mail or Global Priority.
PayPal and Western Union Money Transfers
are accepted. Send to Thomas Wilk, 301 W.
Redwing St., Duluth MN 55803.
If you live in the Florida panhandle area,
check out the Thermalier newsletter
published by the Pensacola Free Flight
Team. George White is the editor.
This publication documents the club
activities and is full of building and flying
tips. The group has a fantastic flying field.
Send $10 for six issues to George at 5928
Hermitage Dr., Pensacola FL 32504.
Memories: I received a nice note from Joe
Valenta, who built the Back Porch Pusher
several years ago. He used plans from the
original article in the May 1948 Air Trails
that he purchased the month he graduated
from high school. You can see this model in
the October 2004 FF Sport column.
The Bong Eagles club in southeast
Wisconsin enjoys a variety of FF activities,
including FAC. Its members fly at the Bong
Recreational Area. The club newsletter is
$10 a year. Send a check to Joe Adams, 306
E. Kendale Dr., Oak Creek WI 53154. Surf
onto the Web site at http://users.urban
com.net/freeflight/index.html/. MA

Edition: Model Aviation - 2005/01
Page Numbers: 153,154,155
events, it created a virtual firestorm of protest from modelers who felt
that the rules discriminated against their favorite Dime Scale plans.
Now that things have settled down and the controversy is largely
over, the event has become quite popular.
An interesting twist is the pseudo Dime designs. These are “new”
Dime Scale models that compete along with the originals. A modeler
can draw new plans that follow Dime Scale design techniques. The
airplane being modeled must have flown before December 7, 1941,
and cannot have been previously published as Dime Scale plans.
Many of the original Dime Scale models are available as kits from
Penn Valley Hobby Center, 837 W. Main St., Lansdale PA 19446;
Web site: www.pennvalleyhobbycenter.com.
Fantasy Flyers were a feature of the Bill Barnes adventure comic
Gene Smith, 1401 N. Husband St., Stillwater OK 74075; E-mail: [email protected]
FREE FLIGHT SPORT
Joe Smith’s Fokker Peanut flies great with no dihedral.
Adjustable ailerons have washout to aid lateral stability.
David Niedzielski—the owner of Easy Built Models—holds his
Silver Lancer and Mystery Tailless aircraft.
Paul Grabski packs the winds into his Ryan Dime Scale model at
this past summer’s FAC Nats. The Ryan is a great flier.
George White holds his immaculate Sparky: a popular model in
FAC’s Old Time Rubber event. It’s a nice flier.
DIME SCALE MODELS: It amazes me how the model-airplane
designers of the 1930s could produce an airplane from a few bits of
balsa that was as easily recognizable as a full-scale airplane. Dime
Scale models have a unique niche in the history of Scale-model-aircraft
design. They have just the right blend of realism and simplicity.
When the Flying Aces Club (FAC) added Dime Scale to its list of
series of the 1930s. Heroes and villains flew these futuristic designs in
the strip. One of the most appealing airplanes was the Silver Lancer.
You can see the resemblance to the Schneider Cup racers—the fastest
aircraft of their time. The FAC has held a special event for these
designs at its Nats.
Another design from the past is the Mystery Tailless biplane, taken
from the pages of the old Flying Aces magazine. Dave Niedzielski of
Easy Built Models has produced kits for both of these airplanes. The
Mystery Tailless is eligible for Old Time Rubber and 2 Bit Scale, or
just build it for fun. David had his flying extremely well at the FAC
Nats this past summer. Cool!
Contact Easy Built Models at Box 681744, Prattville AL 36068;
Web site: www.easybuiltmodels.com.
Fokker Dr.I Peanut: Aircraft with no dihedral present a special
challenge to the FF Scale modeler. Joe Smith drew his own plans and
built a great Fokker Dr.I Peanut. He reports that it flew well from the
get-go!
His approach to the lateral-stability problem was to build 2° of
washout into every one of the triplane’s wing panels. He made the
ailerons on the upper wing adjustable with wire hinges.
Joe reports that the model had a natural left turn. He cured a slight
tendency to drop the left wing by reducing the reflex of the left aileron.
He set the three wings at the same +2° incidence. Each wingtip has just
more than 1⁄8 inch of washout, including the wire-hinged ailerons on
the upper wing.
He determined the CG by measuring the distance between two
lines. The front line was the LE of the top wing, and the other line was
the TE of the bottom wing. He placed the CG one-third of that distance
from the LE of the top wing.
Joe purchased the tissue for the covering at the craft store, and the
finish was one light coat of Pactra spray-can clear dope. For the test
flights, he used a 7-inch loop of 3⁄16-inch Sig contest rubber. Joe will be
going for longer flights with longer motors.
Tension on surgical tubing is adjusted so timer arm moves from 6
o’clock to 12 in two minutes. This releases wire loop, hence DT line.
Surgical tubing line runs timer so tension on stabilizer line is
independent of tension on timer. Note adjustable wire at right
end of surgical tubing.
A + B = C: The last time I used a fuse-type dethermalizer (DT) was
more than seven years ago. I don’t like cutting and mounting fuses, nor
is it fun lighting a fuse while a 1⁄2A engine is screaming in my ear. I
know that fuses can be reliable, but burning time varies depending on
the temperature and humidity. Flying in a drizzle can be problematic.
In 1996, an article in Free Flight showed how to construct a Silly
Putty DT using a cocktail-straw cylinder. I have built a number of
those through the years, and they have worked great for their intended
use: sport FF models. I made modifications to better enable me to set
the time and reset the timer more easily. I
used the DTs in rubber- and gas-powered FF
models as large as a Satellite 600.
However, the time needed to reset the
timer, the fragility of the cocktail straw, and
the time required to build the timer had me
constantly searching for a light timer that
was reliable enough to use for contest work
with small Rubber and Gas models. Larger
aircraft can carry a mechanical DT timer
without having to worry about its weight,
but that same weight can significantly
hamper a smaller model’s duration.
When the button/badge-type timers were
introduced, I thought they were the answer.
But they are best suited to small Rubber
models or Hand-Launched Gliders. The
proper tension for holding down a highperformance
1⁄2A Gas model’s stabilizer or
even the wing of a pop-up-wing-type DT on
a P-30 was high enough that it would cause
the DT to unwind too rapidly.
The other disadvantage was the elastic
thread used to rotate the timer arm. It wasn’t
strong enough for my purpose.
My current DT setup for small Gas
models incorporates two ideas gleaned from
other modelers. These allow the use of the
button/badge timers on larger models. Andy
Ringlien had an informative article about
Silly Putty DT timers in the April 2002 Free
Flight. One of his setups used a U-shaped
wire loop trapped under the arm of a
badge/button-type timer. Using this wire
loop allowed separate tension for the
stabilizer hold-down and the timer driver.
The other idea is to use surgical tubing
for the timer driver rather than using a
spring, elastic thread, or a rubber band. Jack
Dobbins came up with that concept, and it
was mentioned in Dick Miller’s electricflight
column in the September 1997 Flying
Models.
The photos with this column show my
DT setup on a 1⁄2A Gas model. The stabilizer
hold-down line hooks to the short arm of the
.032 music-wire lever. The lever’s long arm
has a 3⁄4-inch loop that is trapped under the
arm of the button timer. The lever hinges in
a length of 1⁄16-inch aluminum tubing. The
surgical tubing has an inside diameter (ID)
of 1⁄16 inch, a wall thickness of 1⁄32 inch, and
is 21⁄4 inches long.
The fixtures at each end of the surgical
tubing are 3⁄32-inch aluminum tubing
flattened at one end and drilled for the .020
wire hooks. Be sure to leave at least 1⁄8 inch
of the aluminum tubing round to accept the
surgical tubing. The elongated wire loop in
the right end of the surgical-tubing anchor
allows fine adjustment of the DT time. The
mounting plates are 1⁄32 plywood. The thread
loop is Dacron fishing line—20-pound test.
It is important that the loop in the lever
wire does not extend beyond the center pivot
of the button. Otherwise, you run the risk of
the Dacron loop sliding off the badge lever
before it releases the wire lever.
A badge-type seven-minute timer can
be easily adjusted to run two minutes
with 180° of travel or three minutes with
250° of travel. Repeatability is within
five seconds on a two-minute DT.
When I’m ready to start the engine, I set
the DT timer for two-and-a-half minutes.
After starting the engine, I check and adjust
the DT timer-arm position, trip the engine
timer, and launch.
You may want to install a pin to hold the
DT timer at two minutes until you’re ready
for launch. Just be sure to remove the pin
before launch. If you want a 15- to 20-
second DT, move the lever to a position near
the end of the loop immediately before
launch.
The BL-7 timer and 1⁄16-inch ID surgical
tubing are available from FAI Model Supply
at (570) 882-9873.
Old Magazine Scale Plans on CD: Thomas
Wilk’s latest CD, number 14, is a
compendium of FF Scale plans from 1940 to
1970. Included are 112 gas-powered
models, 168 rubber-powered models, eight
CO2-powered models, and three Jetexpowered
models.
The CD costs $10 (which includes
postage in the US). Thomas accepts checks
from a US bank. Canadian orders must add
$1.50 for Air Mail. International orders must
add $5 for Air Mail or Global Priority.
PayPal and Western Union Money Transfers
are accepted. Send to Thomas Wilk, 301 W.
Redwing St., Duluth MN 55803.
If you live in the Florida panhandle area,
check out the Thermalier newsletter
published by the Pensacola Free Flight
Team. George White is the editor.
This publication documents the club
activities and is full of building and flying
tips. The group has a fantastic flying field.
Send $10 for six issues to George at 5928
Hermitage Dr., Pensacola FL 32504.
Memories: I received a nice note from Joe
Valenta, who built the Back Porch Pusher
several years ago. He used plans from the
original article in the May 1948 Air Trails
that he purchased the month he graduated
from high school. You can see this model in
the October 2004 FF Sport column.
The Bong Eagles club in southeast
Wisconsin enjoys a variety of FF activities,
including FAC. Its members fly at the Bong
Recreational Area. The club newsletter is
$10 a year. Send a check to Joe Adams, 306
E. Kendale Dr., Oak Creek WI 53154. Surf
onto the Web site at http://users.urban
com.net/freeflight/index.html/. MA

