
July 2006 53
Power
Switch:
Futaba 4EXA System
Features:
• Four-channel computerized FM
airplane radio system
• 40-segment LCD screen
• Trainer-box capability
• Low-battery alarm
• One-year limited warranty
• $149.99 street price (as tested)
Airplane Program
Features:
• Four-model memory
• Exponential for ailerons,
elevator, and rudder
• Wing mixing function for V-tail
and elevons
• Servo reversing
• Trim memory
• End Point Adjustment (EPA)
on all four channels
• Data reset
• Trainer system
Manufacturer:
Futaba
3002 N. Apollo Dr. Suite 1
Champaign IL 61822
(217) 398-8970
www.futaba-rc.com
Includes:
• Futaba 4EXA transmitter
• 9.6-volt Ni-Cd transmitter battery
• R127DF seven-channel receiver
• Ni-Cd receiver battery
• Dual-output charger
• Four S3004 servos with hardware
• Switch/charge harness
• Transmitter strap
• 9-inch servo extension
• Servo tray
• Frequency flag
THE NEW FUTABA 4EXA RC system is
unique in the sense that it has a computerdriven
(microprocessor) transmitter that is
intended for the rank beginner and the
casual sport flier. The overall system
concept is to provide basic four-channel
function control using computer technology
to provide extra control features, to be
extremely simple to operate, and, best of all,
to be inexpensive.
My primary goal in this review is to
convince you that the preceding sentence is
true. Probably the best way to describe this
Futaba 4EXA is to let you know what
features it offers and
what it doesn’t offer
(and may not even
need!).
The 4EXA
Systems: The two
basic system
offerings, as listed
on the Tower
Hobbies Web site
(www.tower
hobbies.com), are
models FUTK40
and FUTK41.
The FUTK40 is
a complete system
which includes a
computerized
transmitter
operating on 72 MHz FM, full Ni-Cd
batteries, a charger, four Futaba S3004
servos, an R127DF (which is being phased
out with the new R168DF) dual-conversion
receiver, a switch harness, an aileron
extension cable, extra servo-mounting
hardware and output arms, a frequency flag,
a neck-supporting strap, and an excellent
instruction manual.
That particular receiver and servos are of
medium to large size and weight; therefore,
they are better suited for larger RC models
starting with roughly a .20 cu. in.-
displacement glow engine or 150 watts of
electric power.
Model FUTK41
is intended for
smaller electricpowered
models,
such as typical park
flyers. It comes with
three Futaba
S3108M
microservos (which
are being replaced
with S3110s),
weighing only 0.27
ounce each, and the
Futaba R124F
ultramicro FM
receiver that weighs
only 0.3 ounce.
No receiver
battery pack or
by Bob Aberle
The airborne components include (top LR)
a four-cell battery pack, four servos,
(center) an FM dual-conversion receiver,
an aileron extension cable, and (bottom) a
switch harness. These components
together weigh 10.21 ounces.
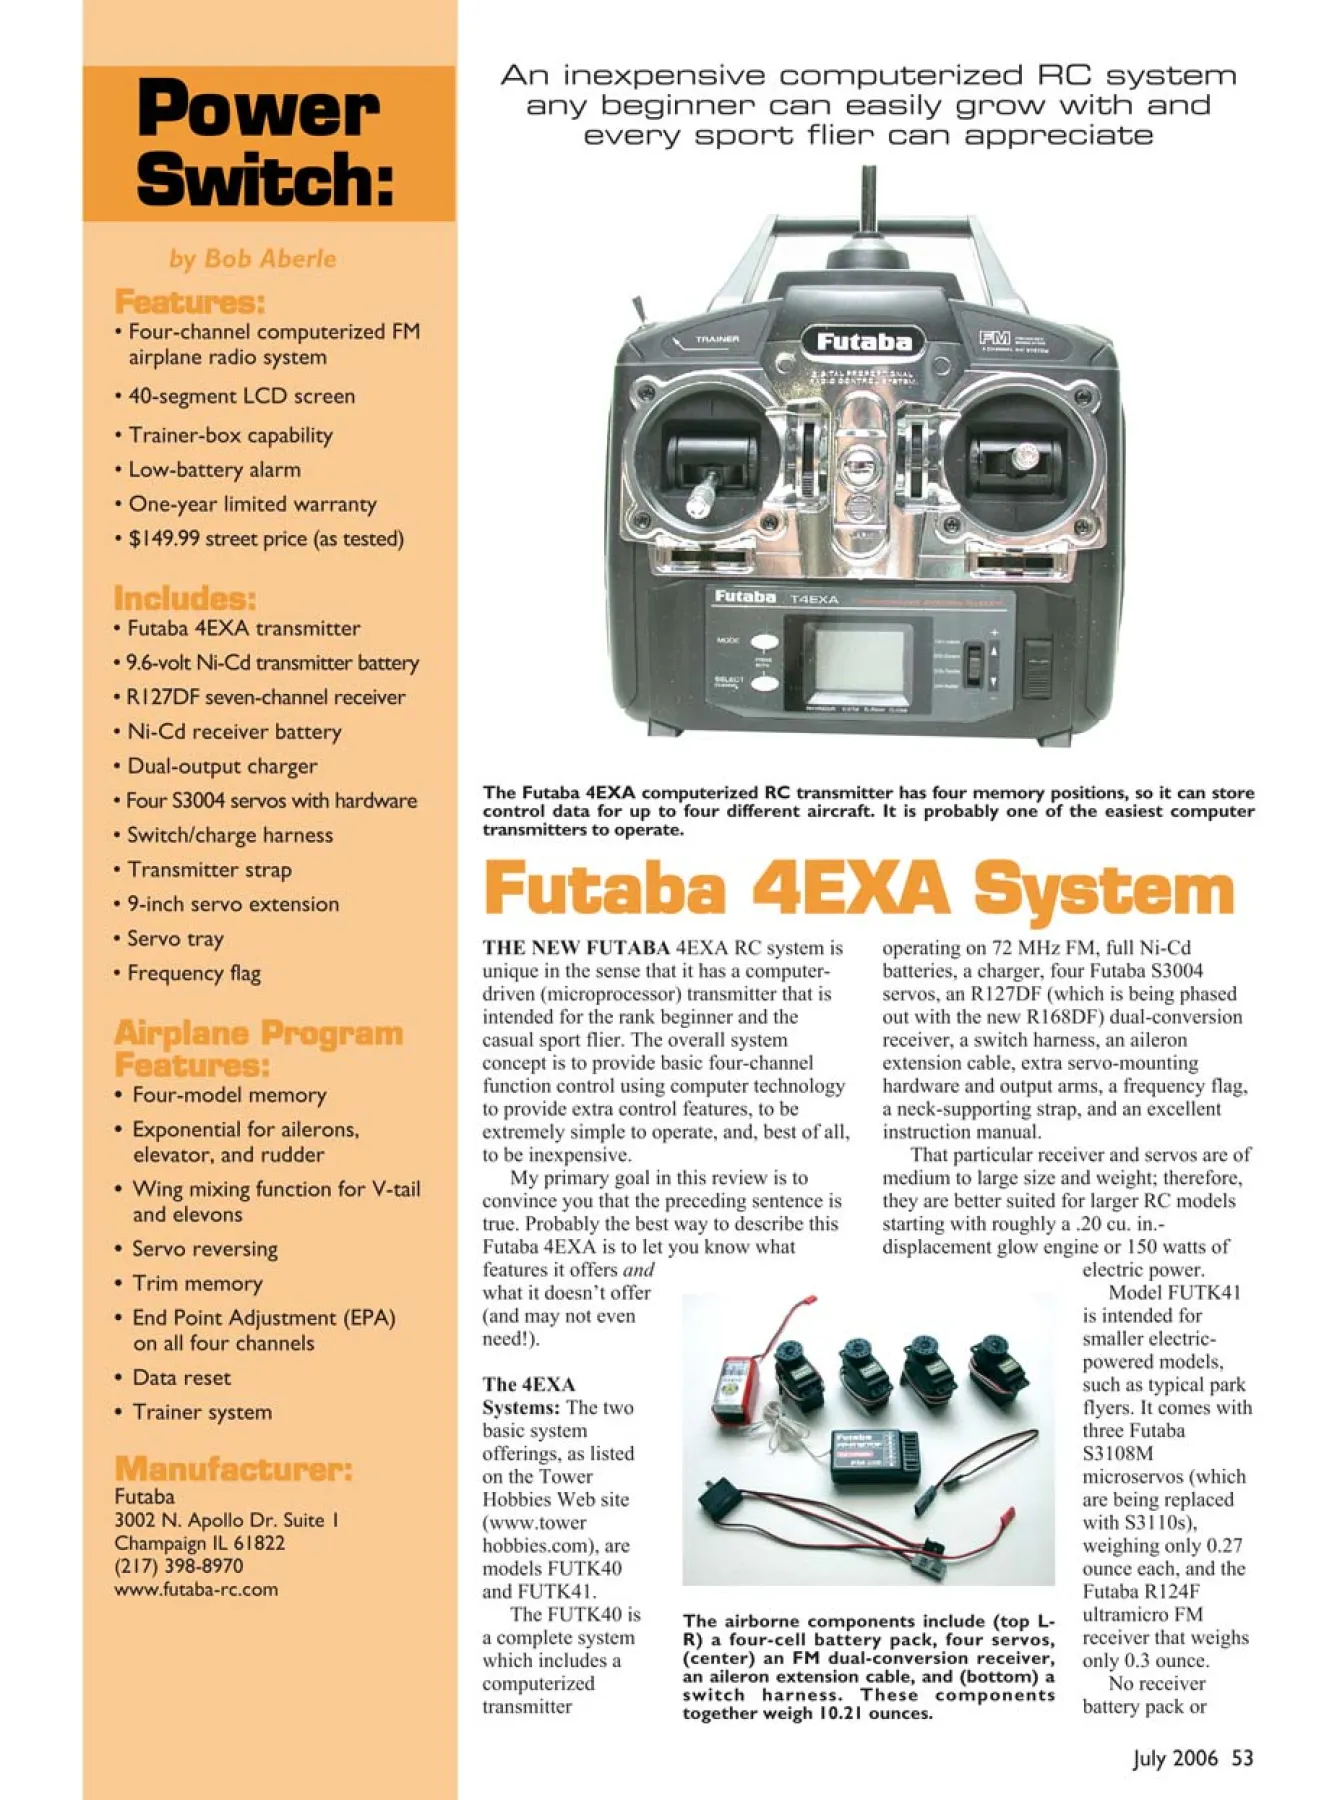
The Futaba 4EXA computerized RC transmitter has four memory positions, so it can store
control data for up to four different aircraft. It is probably one of the easiest computer
transmitters to operate.
An inexpensive computerized RC system
any beginner can easily grow with and
every sport flier can appreciate
switch harness is provided with this
particular system. The assumption is that
with electric power you would be using an
ESC to control the motor, which includes a
BEC to allow you to share battery power
with the RC system. This system is slightly
more expensive because of the higher cost of
the microservos.
There are many other optional Futaba
airborne components you can purchase later
for use with the 4EXA transmitter. With four
memory positions available, you can store
control data to operate as many as four
different models from that one transmitter.
This is something you can’t normally do
with an inexpensive system.
Specifications: The Futaba 4EXA provides
four channel control functions for aileron,
elevator, throttle, and rudder. You can fly an
RC model using all four of these functions
(we call that “full-house” control) or you can
use three of the four channel functions and
fly with rudder, elevator, and throttle control.
A new RC pilot might consider a threechannel
ARF model for a first choice, use
the full four channel functions as he or she
gains experience, and go on to more
advanced trainer aircraft. In doing this, you
buy once and grow into the system. This
makes better sense than buying several
radios, each with more and more features as
you progress in the hobby.
Each of the four channel functions has a
separate trim lever. It is the older style,
“mechanical type”—not the digital-type
trim—so you can easily determine how
much trim is being employed by just looking
at the position of the trim levers. Many of us
still favor this original trim concept over the
newer digital type.
The computer system within the
transmitter uses an LCD screen to display all
the control functions and menu items. To
keep it simple, Futaba uses only a single
menu (not two or three, which adds to the
overall complexity of operation).
The 4EXA is a single-purpose RC
system that is intended to operate only RC
models, so you don’t have to labor through
helicopter and sailplane control menus and
switches. You could actually fly a sailplane
with this system, but you would not have
advanced auxiliary functions such as flaps,
spoilers, or crow available to you.
To get into that single menu, turn on the
power and then press the “MODE” and
“SELECT” switches at the same time. The
first item to appear on the LCD screen will
indicate what model memory position has
been selected (1, 2, 3, or 4), each one of
which can accept and store control data for
as many as four aircraft.
Since you can’t name the model on the
LCD screen, for identification purposes you
better place a label on the rear of the
transmitter stating each memory position
and the name of the aircraft.
Keep pressing the MODE button to move
along to each new menu item. You can keep
scrolling through the menu items until you
come back to the starting point. The next
item is the all-important servo-reversing
feature, which is available on all four
channel functions.
The next item is EPA, which is available
on all four channel functions. This helpful
feature will let you set the exact amount of
servo control throw (or travel) on each
channel.
After that function is the Trim Memory
(TRIM-M) feature, which is also extremely
helpful. You fly your airplane and use the
trim levers to obtain straight and level flight.
Then after landing and before you turn off
the power, evoke trim memory and these
trim positions will be stored in the computer
memory for that aircraft. After doing that
you can restore the trim levers to their center
positions.
Exponential rate control is next, and it is
crucial—especially for the beginning RC
pilot. “EXPO” (as it is referred to) is
available on channel 1 aileron, channel 2
elevator, and channel 4 rudder. You can set
the expo sensitivity over a wide range (from
practically none to a full maximum).
Interestingly, the 4EXA system offers no
dual rate control. Therefore, the more
common dual-rate switches are missing. But
not to worry; expo rate takes the place of
dual rate control and can always be
available, in any degree you want, without
the need for flipping switches while flying.
The idea of expo rate control is to
desensitize the control effect around the
neutral stick position. As you deflect the
transmitter’s control stick more, you obtain
more control. This is basically the same kind
of effect you get when using dual rate
control, except that in this case you don’t
have to use a switch to make it happen.
I like that concept. Throughout the years
I have seldom employed dual rate control,
but I almost always use expo rate.
The remaining menu items include
mixing controls for both elevons and V-tail
operation. There’s also a “DATA RESET”
54 MODEL AVIATION
At the rear of the transmitter, the eight-cell pack can be easily
removed from its battery compartment for testing. Directly above
the battery is the trainer-cable jack.
A low-voltage battery alarm sounds when
the transmitter voltage reaches 8.5, and at
the same time a battery icon flashes on the
LCD screen. When that happens, you are
advised to land immediately and recharge
the battery.
With the power turned on, the generous-size LCD screen shows
helpful status information. The “1” stands for memory position
one, and the “10.6” is the transmitter voltage. The screen
menus are controlled using the MODE and SELECT push
buttons and the data input switch.
feature that will, in one step, erase all your
control inputs stored in a memory position
and restore them to their factory default
settings. This is like wiping the slate clean.
You would use it when setting up the
controls of a new aircraft.
When adding or changing any controlposition
data, there is no need to enter a
special “SAVE” command. As soon as you
turn the transmitter power off, anything you
have input is saved automatically. It will
remain in the memory until you physically
change it. That is another nice feature for the
RC beginner and something else you don’t
have to worry about.
Because this is a beginner’s radio
system, there is a provision for a training
cable. This will allow you to connect with
another Futaba transmitter using an optional
trainer cable.
With this arrangement an instructor holds
the master transmitter and the student holds
the slave transmitter. Anytime during the
training flight, the instructor can take control
of the aircraft away from the student using
the switch located on the top, left side of the
transmitter case.
When you first turn on the transmitter
power, a “normal display” will appear on the
LCD screen. It will indicate the memory
position number (in use) and the transmitter’s
battery voltage, such as “10.1 V.”
A built-in alarm will sound and a battery
icon will appear on the LCD screen when
the voltage drops to 8.5 volts. At that time
you must immediately land your aircraft and
recharge the battery or substitute a freshly
charged one.
The transmitter battery voltage is
unavailable at the charging jack on the side
of the transmitter’s case, so you can’t access
the battery through this jack for discharge
testing purposes. But you can easily open
the battery compartment and remove the
battery pack for testing purposes. The
battery connector is a common servo type
(only two of the three pins are used!) that
can easily be adapted to plug into your
battery-testing device.
Futaba has kindly posted the entire (and
excellent) instruction manual in PDF format,
which you can access from its Web site
(www.futaba-rc.com). I urge you to look it
up because it allows you to read through all
the various control features and operating
instructions. Then you can decide how easy
it is to operate and determine whether or not
the available features will satisfy your flying
requirements.
I really liked this easy-to-use RC concept. It
is perfectly suited for the rank beginner. If
you did nothing but use the servo-reversing
function to start, it would still provide
perfect control of a training type model.
Then as you progress in the hobby, you can
move up to more control features since they
are already built into the system.
You can eventually buy three more sets
of airborne components (receivers and
servos) and fly three more aircraft—from
that one transmitter. This is totally cost
effective.
This type of RC system could be used by
the beginner and then allow that person to
continue on and progress into sport flying
and then into mild aerobatics, for the fun of
it. The best part is the cost. MA
Bob Aberle
[email protected]
July 2006 55
Specifications:
4EXA transmitter:
Modulation: FM (Frequency Modulation)
Power supply: 9.6-volt Ni-Cd battery or 12-volt alkaline battery
Current drain: 250 mA
S3004 servos:
Speed: 0.23 second/60° at 4.8 volts; 0.19 second/60° at 6.0 volts
Torque: 44 ounce-inch at 4.8 volts; 57 ounce-inch at 6.0
volts
Size: 1.6-inch length, 0.8-inch width, 1.4-inch height
Weight: 1.3 ounces
Connector: “J” type with approximately 5 inches of wire
R127DF receiver (which is being phased out with the
new R168DF receiver):
Narrow band: 20 kHz
Power requirements: 4.8-6.0 volts (shared with servos)
Current drain: 10 mA
Size: 2.52-inch length, 1.39-inch width, 0.82-inch height
Edition: Model Aviation - 2006/07
Page Numbers: 53,54,55

Edition: Model Aviation - 2006/07
Page Numbers: 53,54,55
July 2006 53
Power
Switch:
Futaba 4EXA System
Features:
• Four-channel computerized FM
airplane radio system
• 40-segment LCD screen
• Trainer-box capability
• Low-battery alarm
• One-year limited warranty
• $149.99 street price (as tested)
Airplane Program
Features:
• Four-model memory
• Exponential for ailerons,
elevator, and rudder
• Wing mixing function for V-tail
and elevons
• Servo reversing
• Trim memory
• End Point Adjustment (EPA)
on all four channels
• Data reset
• Trainer system
Manufacturer:
Futaba
3002 N. Apollo Dr. Suite 1
Champaign IL 61822
(217) 398-8970
www.futaba-rc.com
Includes:
• Futaba 4EXA transmitter
• 9.6-volt Ni-Cd transmitter battery
• R127DF seven-channel receiver
• Ni-Cd receiver battery
• Dual-output charger
• Four S3004 servos with hardware
• Switch/charge harness
• Transmitter strap
• 9-inch servo extension
• Servo tray
• Frequency flag
THE NEW FUTABA 4EXA RC system is
unique in the sense that it has a computerdriven
(microprocessor) transmitter that is
intended for the rank beginner and the
casual sport flier. The overall system
concept is to provide basic four-channel
function control using computer technology
to provide extra control features, to be
extremely simple to operate, and, best of all,
to be inexpensive.
My primary goal in this review is to
convince you that the preceding sentence is
true. Probably the best way to describe this
Futaba 4EXA is to let you know what
features it offers and
what it doesn’t offer
(and may not even
need!).
The 4EXA
Systems: The two
basic system
offerings, as listed
on the Tower
Hobbies Web site
(www.tower
hobbies.com), are
models FUTK40
and FUTK41.
The FUTK40 is
a complete system
which includes a
computerized
transmitter
operating on 72 MHz FM, full Ni-Cd
batteries, a charger, four Futaba S3004
servos, an R127DF (which is being phased
out with the new R168DF) dual-conversion
receiver, a switch harness, an aileron
extension cable, extra servo-mounting
hardware and output arms, a frequency flag,
a neck-supporting strap, and an excellent
instruction manual.
That particular receiver and servos are of
medium to large size and weight; therefore,
they are better suited for larger RC models
starting with roughly a .20 cu. in.-
displacement glow engine or 150 watts of
electric power.
Model FUTK41
is intended for
smaller electricpowered
models,
such as typical park
flyers. It comes with
three Futaba
S3108M
microservos (which
are being replaced
with S3110s),
weighing only 0.27
ounce each, and the
Futaba R124F
ultramicro FM
receiver that weighs
only 0.3 ounce.
No receiver
battery pack or
by Bob Aberle
The airborne components include (top LR)
a four-cell battery pack, four servos,
(center) an FM dual-conversion receiver,
an aileron extension cable, and (bottom) a
switch harness. These components
together weigh 10.21 ounces.
The Futaba 4EXA computerized RC transmitter has four memory positions, so it can store
control data for up to four different aircraft. It is probably one of the easiest computer
transmitters to operate.
An inexpensive computerized RC system
any beginner can easily grow with and
every sport flier can appreciate
switch harness is provided with this
particular system. The assumption is that
with electric power you would be using an
ESC to control the motor, which includes a
BEC to allow you to share battery power
with the RC system. This system is slightly
more expensive because of the higher cost of
the microservos.
There are many other optional Futaba
airborne components you can purchase later
for use with the 4EXA transmitter. With four
memory positions available, you can store
control data to operate as many as four
different models from that one transmitter.
This is something you can’t normally do
with an inexpensive system.
Specifications: The Futaba 4EXA provides
four channel control functions for aileron,
elevator, throttle, and rudder. You can fly an
RC model using all four of these functions
(we call that “full-house” control) or you can
use three of the four channel functions and
fly with rudder, elevator, and throttle control.
A new RC pilot might consider a threechannel
ARF model for a first choice, use
the full four channel functions as he or she
gains experience, and go on to more
advanced trainer aircraft. In doing this, you
buy once and grow into the system. This
makes better sense than buying several
radios, each with more and more features as
you progress in the hobby.
Each of the four channel functions has a
separate trim lever. It is the older style,
“mechanical type”—not the digital-type
trim—so you can easily determine how
much trim is being employed by just looking
at the position of the trim levers. Many of us
still favor this original trim concept over the
newer digital type.
The computer system within the
transmitter uses an LCD screen to display all
the control functions and menu items. To
keep it simple, Futaba uses only a single
menu (not two or three, which adds to the
overall complexity of operation).
The 4EXA is a single-purpose RC
system that is intended to operate only RC
models, so you don’t have to labor through
helicopter and sailplane control menus and
switches. You could actually fly a sailplane
with this system, but you would not have
advanced auxiliary functions such as flaps,
spoilers, or crow available to you.
To get into that single menu, turn on the
power and then press the “MODE” and
“SELECT” switches at the same time. The
first item to appear on the LCD screen will
indicate what model memory position has
been selected (1, 2, 3, or 4), each one of
which can accept and store control data for
as many as four aircraft.
Since you can’t name the model on the
LCD screen, for identification purposes you
better place a label on the rear of the
transmitter stating each memory position
and the name of the aircraft.
Keep pressing the MODE button to move
along to each new menu item. You can keep
scrolling through the menu items until you
come back to the starting point. The next
item is the all-important servo-reversing
feature, which is available on all four
channel functions.
The next item is EPA, which is available
on all four channel functions. This helpful
feature will let you set the exact amount of
servo control throw (or travel) on each
channel.
After that function is the Trim Memory
(TRIM-M) feature, which is also extremely
helpful. You fly your airplane and use the
trim levers to obtain straight and level flight.
Then after landing and before you turn off
the power, evoke trim memory and these
trim positions will be stored in the computer
memory for that aircraft. After doing that
you can restore the trim levers to their center
positions.
Exponential rate control is next, and it is
crucial—especially for the beginning RC
pilot. “EXPO” (as it is referred to) is
available on channel 1 aileron, channel 2
elevator, and channel 4 rudder. You can set
the expo sensitivity over a wide range (from
practically none to a full maximum).
Interestingly, the 4EXA system offers no
dual rate control. Therefore, the more
common dual-rate switches are missing. But
not to worry; expo rate takes the place of
dual rate control and can always be
available, in any degree you want, without
the need for flipping switches while flying.
The idea of expo rate control is to
desensitize the control effect around the
neutral stick position. As you deflect the
transmitter’s control stick more, you obtain
more control. This is basically the same kind
of effect you get when using dual rate
control, except that in this case you don’t
have to use a switch to make it happen.
I like that concept. Throughout the years
I have seldom employed dual rate control,
but I almost always use expo rate.
The remaining menu items include
mixing controls for both elevons and V-tail
operation. There’s also a “DATA RESET”
54 MODEL AVIATION
At the rear of the transmitter, the eight-cell pack can be easily
removed from its battery compartment for testing. Directly above
the battery is the trainer-cable jack.
A low-voltage battery alarm sounds when
the transmitter voltage reaches 8.5, and at
the same time a battery icon flashes on the
LCD screen. When that happens, you are
advised to land immediately and recharge
the battery.
With the power turned on, the generous-size LCD screen shows
helpful status information. The “1” stands for memory position
one, and the “10.6” is the transmitter voltage. The screen
menus are controlled using the MODE and SELECT push
buttons and the data input switch.
feature that will, in one step, erase all your
control inputs stored in a memory position
and restore them to their factory default
settings. This is like wiping the slate clean.
You would use it when setting up the
controls of a new aircraft.
When adding or changing any controlposition
data, there is no need to enter a
special “SAVE” command. As soon as you
turn the transmitter power off, anything you
have input is saved automatically. It will
remain in the memory until you physically
change it. That is another nice feature for the
RC beginner and something else you don’t
have to worry about.
Because this is a beginner’s radio
system, there is a provision for a training
cable. This will allow you to connect with
another Futaba transmitter using an optional
trainer cable.
With this arrangement an instructor holds
the master transmitter and the student holds
the slave transmitter. Anytime during the
training flight, the instructor can take control
of the aircraft away from the student using
the switch located on the top, left side of the
transmitter case.
When you first turn on the transmitter
power, a “normal display” will appear on the
LCD screen. It will indicate the memory
position number (in use) and the transmitter’s
battery voltage, such as “10.1 V.”
A built-in alarm will sound and a battery
icon will appear on the LCD screen when
the voltage drops to 8.5 volts. At that time
you must immediately land your aircraft and
recharge the battery or substitute a freshly
charged one.
The transmitter battery voltage is
unavailable at the charging jack on the side
of the transmitter’s case, so you can’t access
the battery through this jack for discharge
testing purposes. But you can easily open
the battery compartment and remove the
battery pack for testing purposes. The
battery connector is a common servo type
(only two of the three pins are used!) that
can easily be adapted to plug into your
battery-testing device.
Futaba has kindly posted the entire (and
excellent) instruction manual in PDF format,
which you can access from its Web site
(www.futaba-rc.com). I urge you to look it
up because it allows you to read through all
the various control features and operating
instructions. Then you can decide how easy
it is to operate and determine whether or not
the available features will satisfy your flying
requirements.
I really liked this easy-to-use RC concept. It
is perfectly suited for the rank beginner. If
you did nothing but use the servo-reversing
function to start, it would still provide
perfect control of a training type model.
Then as you progress in the hobby, you can
move up to more control features since they
are already built into the system.
You can eventually buy three more sets
of airborne components (receivers and
servos) and fly three more aircraft—from
that one transmitter. This is totally cost
effective.
This type of RC system could be used by
the beginner and then allow that person to
continue on and progress into sport flying
and then into mild aerobatics, for the fun of
it. The best part is the cost. MA
Bob Aberle
[email protected]
July 2006 55
Specifications:
4EXA transmitter:
Modulation: FM (Frequency Modulation)
Power supply: 9.6-volt Ni-Cd battery or 12-volt alkaline battery
Current drain: 250 mA
S3004 servos:
Speed: 0.23 second/60° at 4.8 volts; 0.19 second/60° at 6.0 volts
Torque: 44 ounce-inch at 4.8 volts; 57 ounce-inch at 6.0
volts
Size: 1.6-inch length, 0.8-inch width, 1.4-inch height
Weight: 1.3 ounces
Connector: “J” type with approximately 5 inches of wire
R127DF receiver (which is being phased out with the
new R168DF receiver):
Narrow band: 20 kHz
Power requirements: 4.8-6.0 volts (shared with servos)
Current drain: 10 mA
Size: 2.52-inch length, 1.39-inch width, 0.82-inch height

