
AT THE END of November’s “From the Ground Up” installment, we
left the fuel tank filled and in the right place to ensure trouble-free
operation. The tank setup is good, you already know how to set the highand
low-speed needle valves, and the proper glow plug is in place. Now
you just need to get the engine started to have a great flying day—the
first of many.
Modern glow engines are so user-friendly that we only need to make
the glow plug glow and then find someway to rotate the engine to get it
started. With today’s industry and modelers’ imaginations being what
they are, there are roughly five million tools to perform each operation.
But we need someplace to house these millions of tools.
From 1970 to 1974, I housed all the field equipment I owned—a 2-
ounce turkey baster with a fuel line attached, a 1.5-volt battery with
alligator clips, a “chicken stick,” and some tools—in a brown paper bag.
However, the baster took five minutes to fuel a 16-ounce tank, the
battery was always dead, the alligator leads were constantly shorting out
against the engine’s head fins, and the chicken stick kept breaking the
wooden propellers. If everything was actually working, the bag would
rip open, spilling everything onto the ground.
I do not recommend such limited equipment to anyone, but, in truth,
it is all you actually need to get flying. Luckily there are better ways
today.
It is a good idea to find a more permanent home than a paper bag for
your field equipment, and many manufacturers offer “field boxes” such
as the ones shown. Expect a field box to be able to hold all of the tools
you will need, a gallon of fuel, a fuel pump, a glow starter, a power
panel, a 12-volt battery, and an electric engine starter.
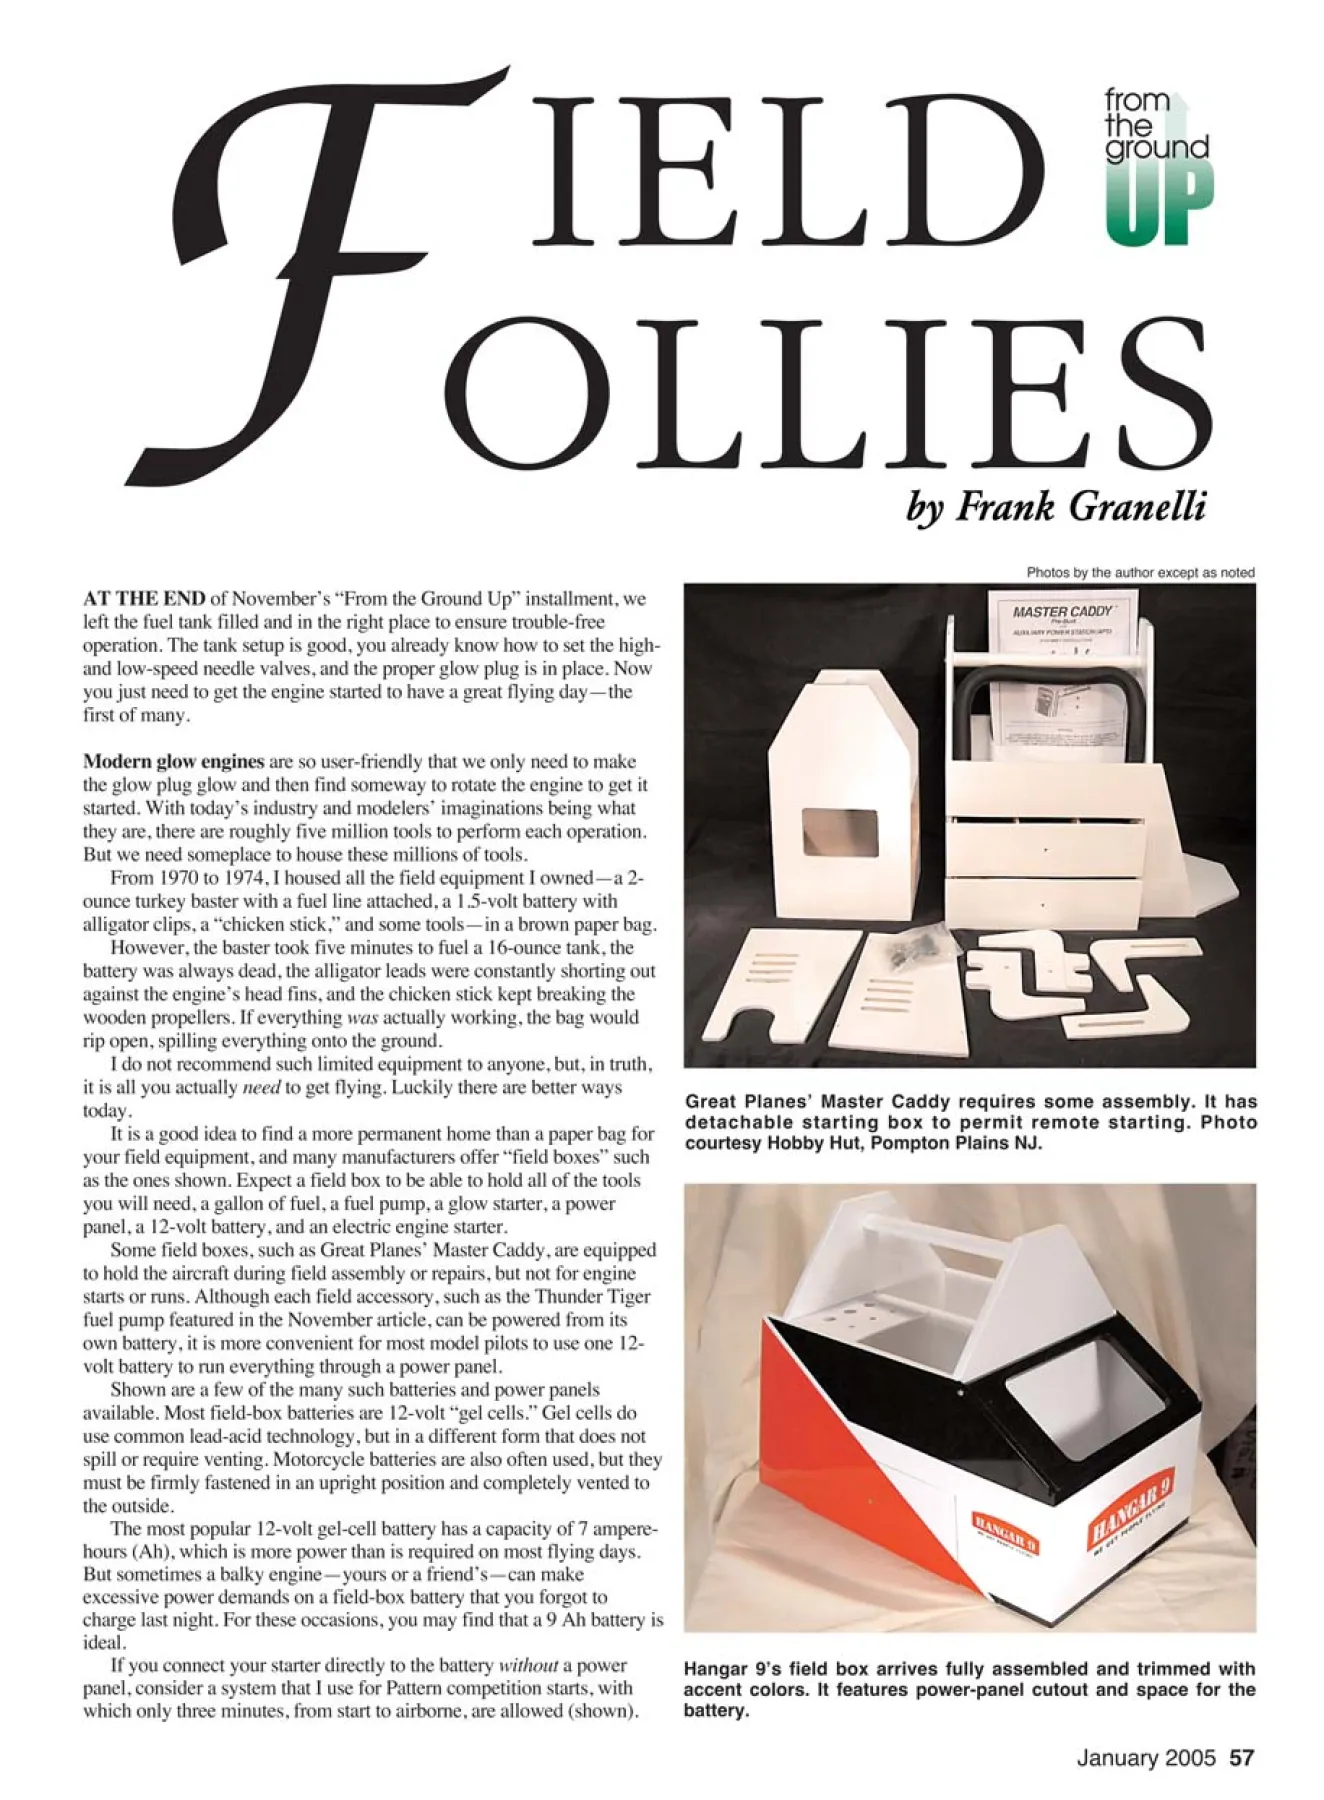
Some field boxes, such as Great Planes’ Master Caddy, are equipped
to hold the aircraft during field assembly or repairs, but not for engine
starts or runs. Although each field accessory, such as the Thunder Tiger
fuel pump featured in the November article, can be powered from its
own battery, it is more convenient for most model pilots to use one 12-
volt battery to run everything through a power panel.
Shown are a few of the many such batteries and power panels
available. Most field-box batteries are 12-volt “gel cells.” Gel cells do
use common lead-acid technology, but in a different form that does not
spill or require venting. Motorcycle batteries are also often used, but they
must be firmly fastened in an upright position and completely vented to
the outside.
The most popular 12-volt gel-cell battery has a capacity of 7 amperehours
(Ah), which is more power than is required on most flying days.
But sometimes a balky engine—yours or a friend’s—can make
excessive power demands on a field-box battery that you forgot to
charge last night. For these occasions, you may find that a 9 Ah battery is
ideal.Great Planes’ Master Caddy requires some assembly. It has
detachable starting box to permit remote starting. Photo
courtesy Hobby Hut, Pompton Plains NJ.
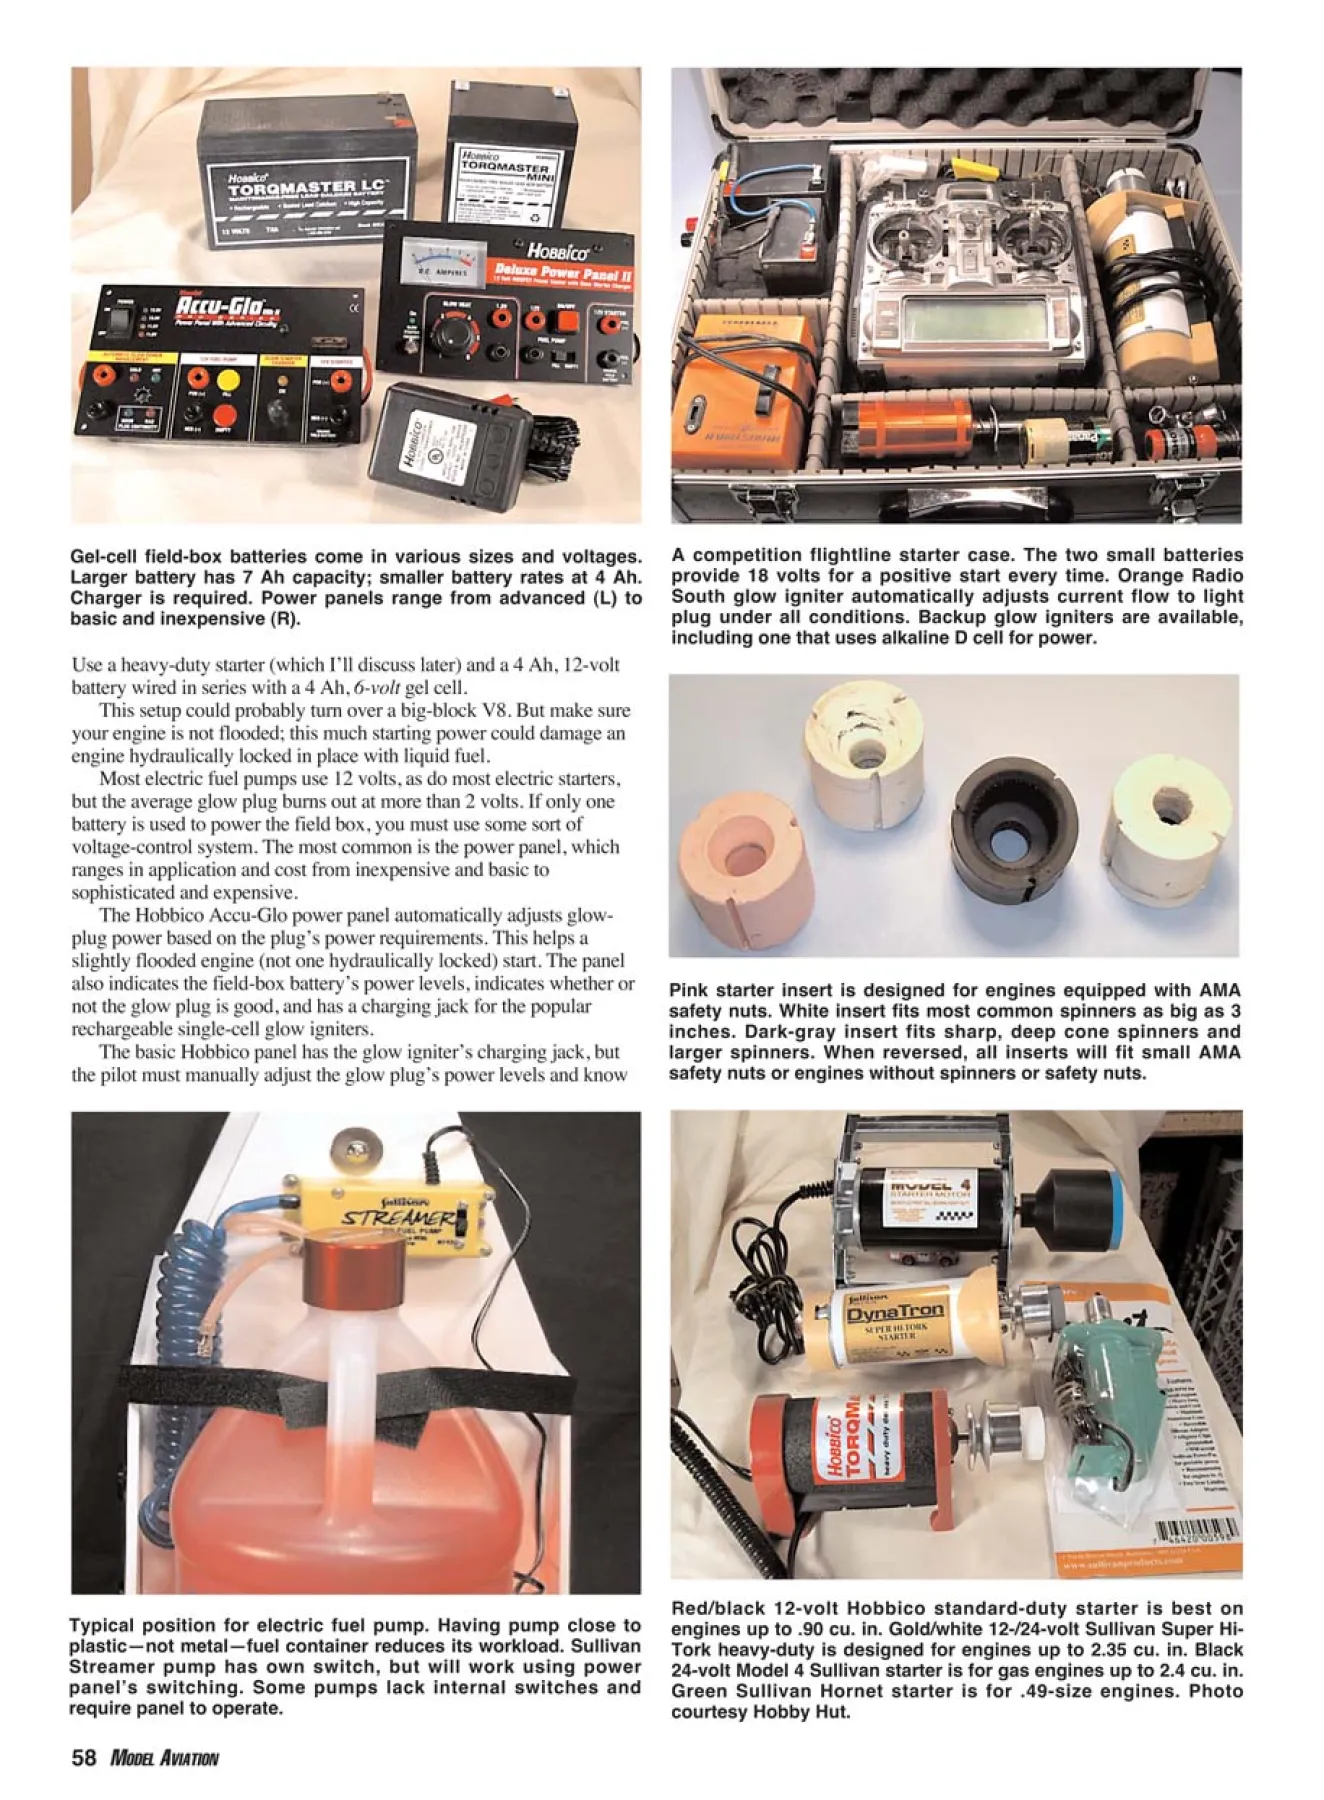
Hangar 9’s field box arrives fully assembled and trimmed with
accent colors. It features power-panel cutout and space for the
battery.
If you connect your starter directly to the battery without a power
panel, consider a system that I use for Pattern competition starts, with
which only three minutes, from start to airborne, are allowed (shown).58 MODEL AVIATION
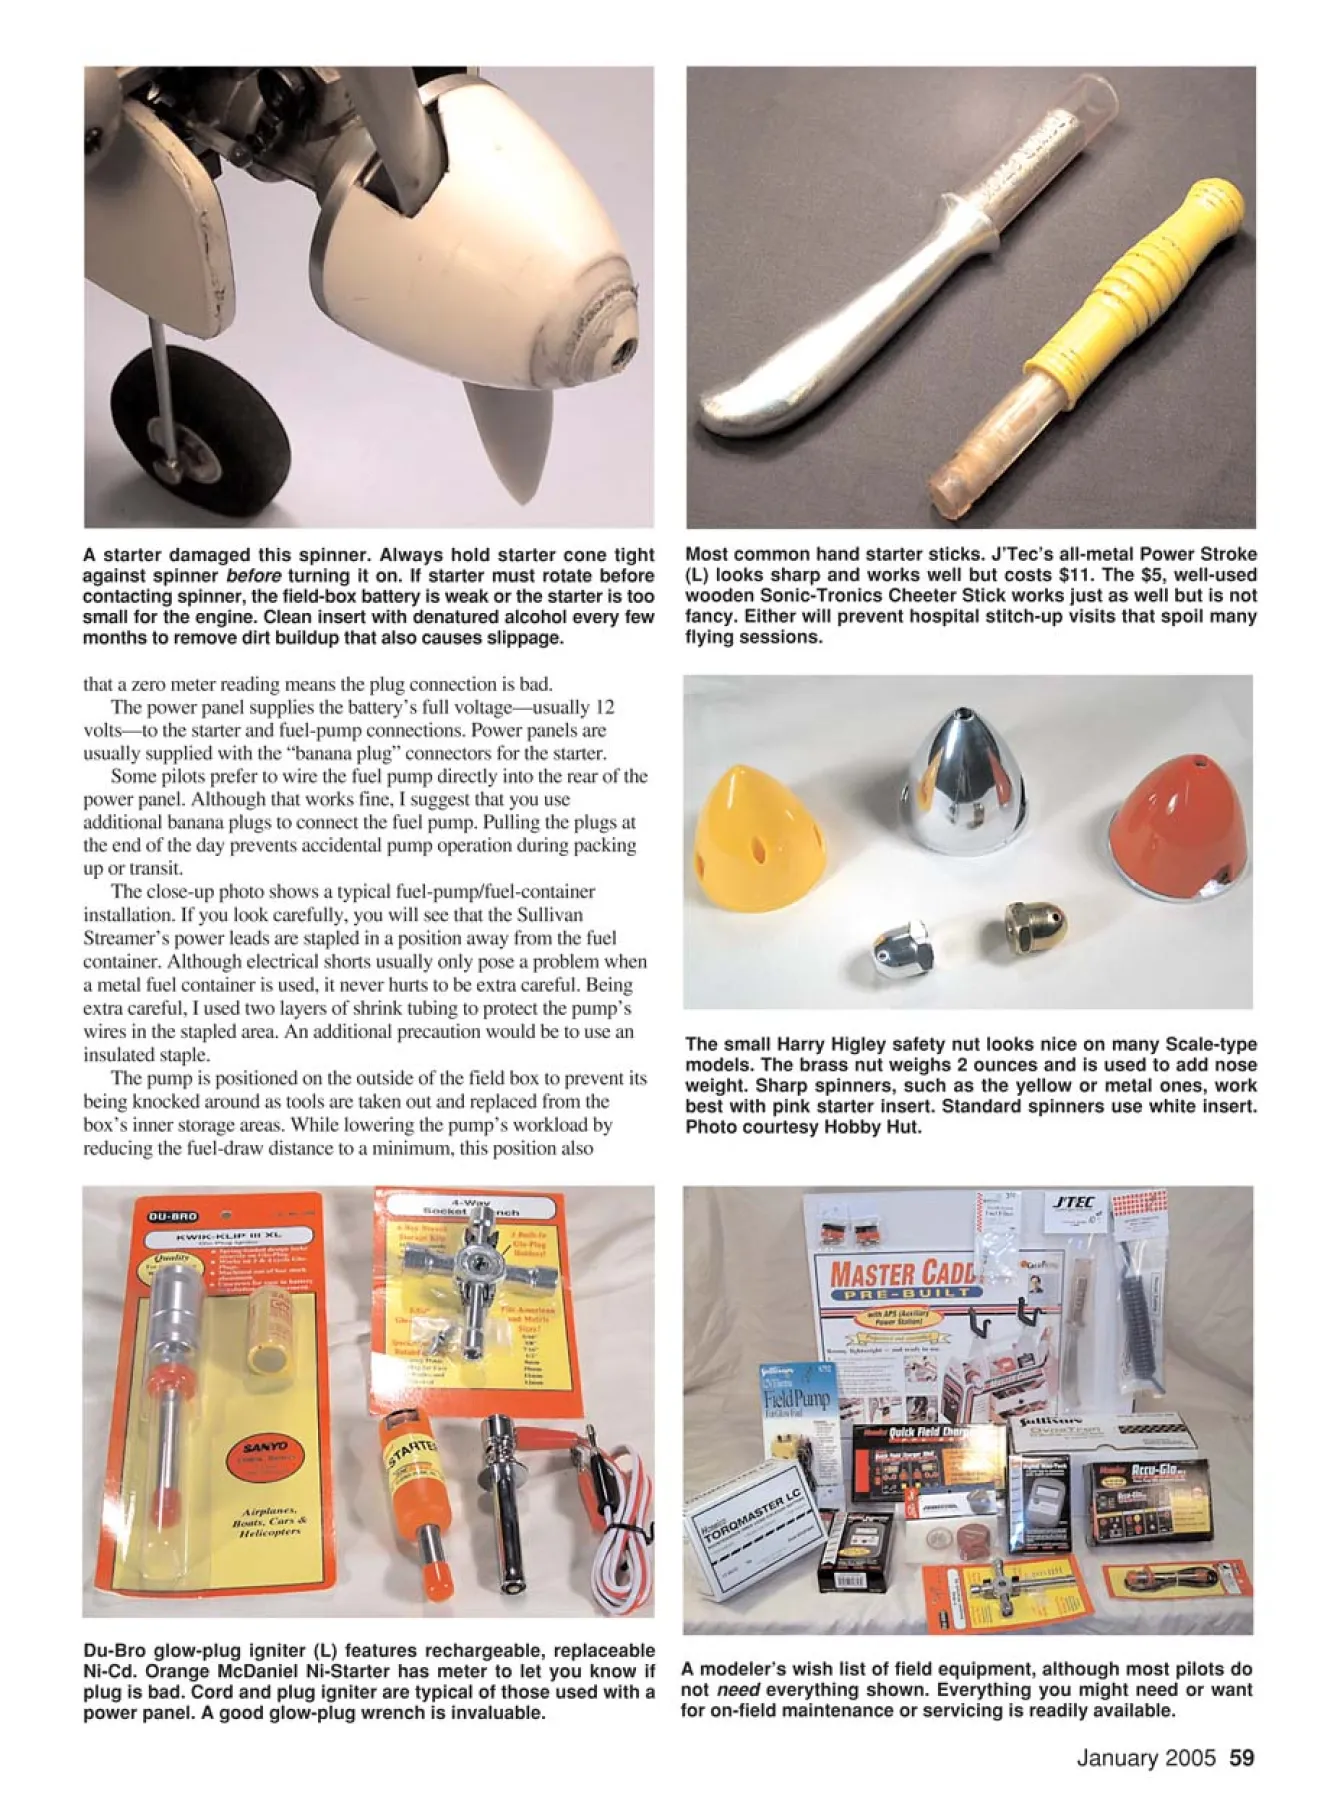
Gel-cell field-box batteries come in various sizes and voltages.
Larger battery has 7 Ah capacity; smaller battery rates at 4 Ah.
Charger is required. Power panels range from advanced (L) to
basic and inexpensive (R).
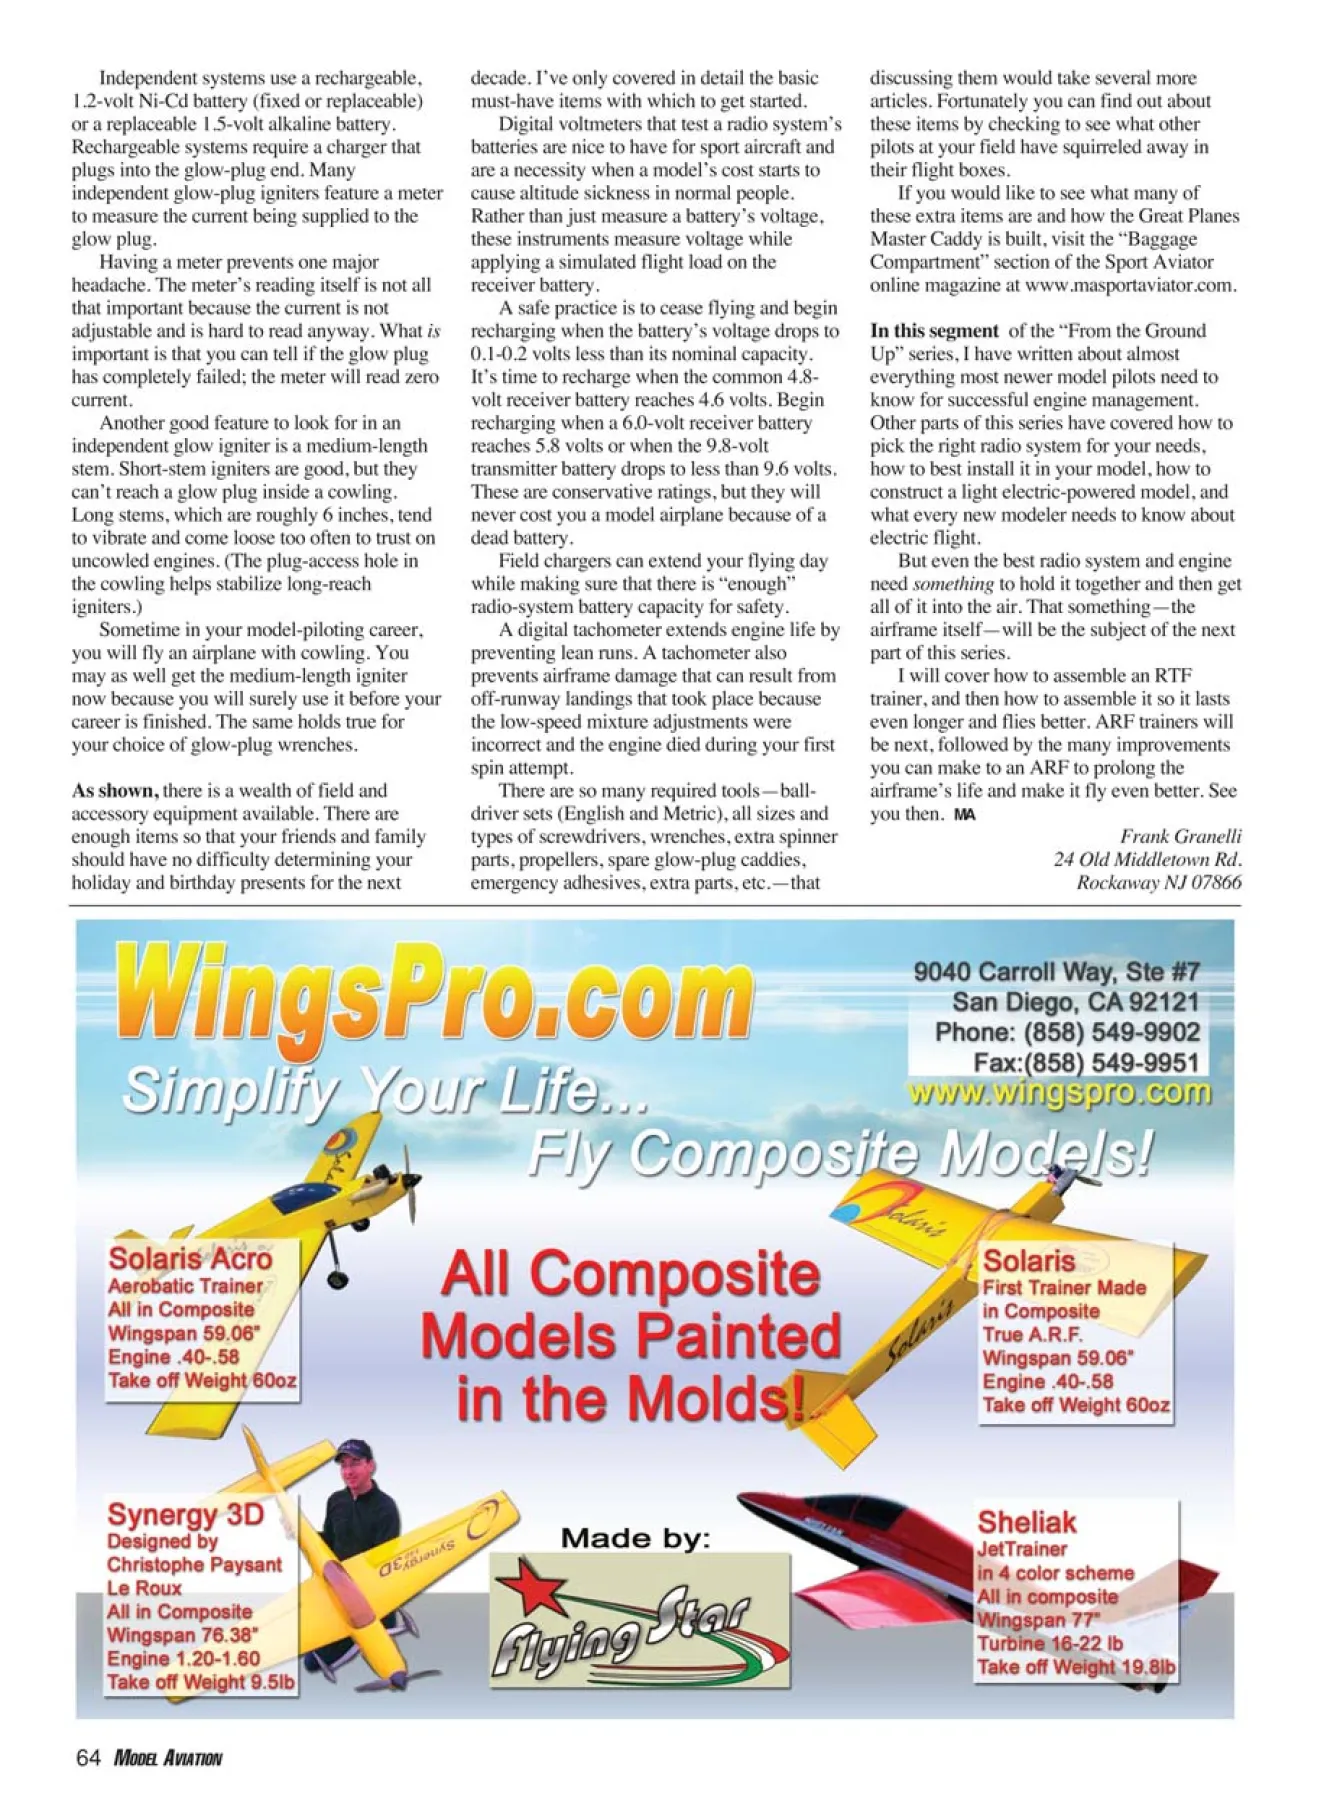
A competition flightline starter case. The two small batteries
provide 18 volts for a positive start every time. Orange Radio
South glow igniter automatically adjusts current flow to light
plug under all conditions. Backup glow igniters are available,
including one that uses alkaline D cell for power.
Red/black 12-volt Hobbico standard-duty starter is best on
engines up to .90 cu. in. Gold/white 12-/24-volt Sullivan Super Hi-
Tork heavy-duty is designed for engines up to 2.35 cu. in. Black
24-volt Model 4 Sullivan starter is for gas engines up to 2.4 cu. in.
Green Sullivan Hornet starter is for .49-size engines. Photo
courtesy Hobby Hut.
Typical position for electric fuel pump. Having pump close to
plastic—not metal—fuel container reduces its workload. Sullivan
Streamer pump has own switch, but will work using power
panel’s switching. Some pumps lack internal switches and
require panel to operate.
Pink starter insert is designed for engines equipped with AMA
safety nuts. White insert fits most common spinners as big as 3
inches. Dark-gray insert fits sharp, deep cone spinners and
larger spinners. When reversed, all inserts will fit small AMA
safety nuts or engines without spinners or safety nuts.
Use a heavy-duty starter (which I’ll discuss later) and a 4 Ah, 12-volt
battery wired in series with a 4 Ah, 6-volt gel cell.
This setup could probably turn over a big-block V8. But make sure
your engine is not flooded; this much starting power could damage an
engine hydraulically locked in place with liquid fuel.
Most electric fuel pumps use 12 volts, as do most electric starters,
but the average glow plug burns out at more than 2 volts. If only one
battery is used to power the field box, you must use some sort of
voltage-control system. The most common is the power panel, which
ranges in application and cost from inexpensive and basic to
sophisticated and expensive.
The Hobbico Accu-Glo power panel automatically adjusts glowplug
power based on the plug’s power requirements. This helps a
slightly flooded engine (not one hydraulically locked) start. The panel
also indicates the field-box battery’s power levels, indicates whether or
not the glow plug is good, and has a charging jack for the popular
rechargeable single-cell glow igniters.
The basic Hobbico panel has the glow igniter’s charging jack, but
the pilot must manually adjust the glow plug’s power levels and know
January 2005 59
The small Harry Higley AMA safety nuts meet AMA insurance
requirements and look nice on many Scale-type models. The
brass nut weighs 2 ounces and is used to add nose weight.
Sharp spinners, such as the yellow or metal ones, work best with
pink starter insert. Standard spinners use white insert. Photo
courtesy Hobby Hut.
Most common hand starter sticks. J’Tec’s all-metal Power Stroke
(L) looks sharp and works well but costs $11. The $5, well-used
wooden Sonic-Tronics Cheeter Stick works just as well but is not
fancy. Either will prevent hospital stitch-up visits that spoil many
flying sessions.
A starter damaged this spinner. Always hold starter cone tight
against spinner before turning it on. If starter must rotate before
contacting spinner, the field-box battery is weak or the starter is too
small for the engine. Clean insert with denatured alcohol every few
months to remove dirt buildup that also causes slippage.
Du-Bro glow-plug igniter (L) features rechargeable, replaceable
Ni-Cd. Orange McDaniel Ni-Starter has meter to let you know if
plug is bad. Cord and plug igniter are typical of those used with a
power panel. A good glow-plug wrench is invaluable.
A modeler’s wish list of field equipment, although most pilots do
not need everything shown. Everything you might need or want
for on-field maintenance or servicing is readily available.
that a zero meter reading means the plug connection is bad.
The power panel supplies the battery’s full voltage—usually 12
volts—to the starter and fuel-pump connections. Power panels are
usually supplied with the “banana plug” connectors for the starter.
Some pilots prefer to wire the fuel pump directly into the rear of the
power panel. Although that works fine, I suggest that you use
additional banana plugs to connect the fuel pump. Pulling the plugs at
the end of the day prevents accidental pump operation during packing
up or transit.
The close-up photo shows a typical fuel-pump/fuel-container
installation. If you look carefully, you will see that the Sullivan
Streamer’s power leads are stapled in a position away from the fuel
container. Although electrical shorts usually only pose a problem when
a metal fuel container is used, it never hurts to be extra careful. Being
extra careful, I used two layers of shrink tubing to protect the pump’s
wires in the stapled area. An additional precaution would be to use an
insulated staple.
The pump is positioned on the outside of the field box to prevent its
being knocked around as tools are taken out and replaced from the
box’s inner storage areas. While lowering the pump’s workload by
reducing the fuel-draw distance to a minimum, this position also
protects the fuel lines from cuts and nicks that
could result in leaks. Electrical shorts from the
pump itself cannot penetrate the pump’s
plastic housing.
Besides, the pump and fuel lines always
contain internal fuel, so if the pump does
somehow short internally, its position near the
fuel bottle is a moot point because the ignition
will just travel along the lines until it reaches
the bottle. Fortunately glow fuel does not
behave like gasoline.
If you plan to use gasoline, or a metal
glow-fuel container, position the fuel pump
on the other side of the box, on the internal
wall opposite the power panel. I do not
recommend either with an electric pump
anyway.
There are many types and sizes of electric
starters. A photo shows a representative
sample of the major types from several
manufacturers. Most pilots will require a 12-
volt standard-duty starter or a heavy-duty,
12-/24-volt starter. Either works great on all
trainer and “second model” engines. The
standard starter costs approximately $30, and
the heavy-duty starter is roughly $70.
One school of thought on starter choice is
that most model pilots, especially in today’s
world of larger ARFs, will someday fly a 1.20
cu. in.-size, or even larger, aircraft. It might
make sense, then, to buy a heavy-duty starter
now, because it will be required later. Having
a 12-/24-volt starter also provides the pilot
with power choices of 12, 18, or 24 volts.
There are several rubber-insert cone
shapes available for heavy-duty and standard
starters. A photo shows three different shapes
and the reverse side of one that is used to start
an engine that is not equipped with a spinner
or an AMA safety nut (not good practice).
The cones are inexpensive,
interchangeable among most brands, and
should be replaced every three to four years.
Both white inserts are nearing the ends of
their service lives—notice the cracks—and
will be replaced before next season.
As shown, there are many different
spinner shapes and sizes. A starter insert is
available to fit all of them. To answer a few
spinner questions I have received, an allplastic
spinner, such as the yellow one,
should not be used in applications
exceeding 12,000 rpm. The red, plastic
cone/metal-backplate spinner can be used in
all reasonable applications, up to 15,000
rpm, but can be damaged by a misapplied
starter. The all-metal spinner not only
resists starter damage and may be used in all
applications, but is balanced to reduce
engine wear and increase rpm.
A “chicken stick” is a manual device
you use to rotate the propeller instead of
using your fingers. It should be called the
“wise person stick” because today’s
powerful engines with more advanced
timing do considerably more hand damage
on a kickback than did the ones of old that
were made when the stick got its name.
This device uses a padded rod to protect
the propeller. As with the refueling squeeze
bulb I discussed in the last article, every
field box should have a chicken stick in case
the electric starter system fails. Each nick
on the yellow Sonic-Tronics Cheeter Stick
in the photo would have been on my hand
without it.
No matter what device is used to rotate
the propeller or how fast it rotates, it will be
a long, sad flying day if the glow plug isn’t
“lit.” Lighting the glow plug requires at
least 1.2 volts, constantly applied until the
engine runs.
There are many different types of
equipment used to “light it up.” If there is a
power panel, most pilots choose the simple
wire-and-connector system shown. This
system plugs into the power panel, provides
1.5 volts, and features adjustable current flow
depending on the glow plug’s condition.
Independent systems use a rechargeable,
1.2-volt Ni-Cd battery (fixed or replaceable)
or a replaceable 1.5-volt alkaline battery.
Rechargeable systems require a charger that
plugs into the glow-plug end. Many
independent glow-plug igniters feature a meter
to measure the current being supplied to the
glow plug.
Having a meter prevents one major
headache. The meter’s reading itself is not all
that important because the current is not
adjustable and is hard to read anyway. What is
important is that you can tell if the glow plug
has completely failed; the meter will read zero
current.
Another good feature to look for in an
independent glow igniter is a medium-length
stem. Short-stem igniters are good, but they
can’t reach a glow plug inside a cowling.
Long stems, which are roughly 6 inches, tend
to vibrate and come loose too often to trust on
uncowled engines. (The plug-access hole in
the cowling helps stabilize long-reach
igniters.)
Sometime in your model-piloting career,
you will fly an airplane with cowling. You
may as well get the medium-length igniter
now because you will surely use it before your
career is finished. The same holds true for
your choice of glow-plug wrenches.
As shown, there is a wealth of field and
accessory equipment available. There are
enough items so that your friends and family
should have no difficulty determining your
holiday and birthday presents for the next
decade. I’ve only covered in detail the basic
must-have items with which to get started.
Digital voltmeters that test a radio system’s
batteries are nice to have for sport aircraft and
are a necessity when a model’s cost starts to
cause altitude sickness in normal people.
Rather than just measure a battery’s voltage,
these instruments measure voltage while
applying a simulated flight load on the
receiver battery.
A safe practice is to cease flying and begin
recharging when the battery’s voltage drops to
0.1-0.2 volts less than its nominal capacity.
It’s time to recharge when the common 4.8-
volt receiver battery reaches 4.6 volts. Begin
recharging when a 6.0-volt receiver battery
reaches 5.8 volts or when the 9.8-volt
transmitter battery drops to less than 9.6 volts.
These are conservative ratings, but they will
never cost you a model airplane because of a
dead battery.
Field chargers can extend your flying day
while making sure that there is “enough”
radio-system battery capacity for safety.
A digital tachometer extends engine life by
preventing lean runs. A tachometer also
prevents airframe damage that can result from
off-runway landings that took place because
the low-speed mixture adjustments were
incorrect and the engine died during your first
spin attempt.
There are so many required tools—balldriver
sets (English and Metric), all sizes and
types of screwdrivers, wrenches, extra spinner
parts, propellers, spare glow-plug caddies,
emergency adhesives, extra parts, etc.—that
discussing them would take several more
articles. Fortunately you can find out about
these items by checking to see what other
pilots at your field have squirreled away in
their flight boxes.
If you would like to see what many of
these extra items are and how the Great Planes
Master Caddy is built, visit the “Baggage
Compartment” section of the Sport Aviator
online magazine at www.masportaviator.com.
In this segment of the “From the Ground
Up” series, I have written about almost
everything most newer model pilots need to
know for successful engine management.
Other parts of this series have covered how to
pick the right radio system for your needs,
how to best install it in your model, how to
construct a light electric-powered model, and
what every new modeler needs to know about
electric flight.
But even the best radio system and engine
need something to hold it together and then get
all of it into the air. That something—the
airframe itself—will be the subject of the next
part of this series.
I will cover how to assemble an RTF
trainer, and then how to assemble it so it lasts
even longer and flies better. ARF trainers will
be next, followed by the many improvements
you can make to an ARF to prolong the
airframe’s life and make it fly even better. See
you then. MA
Frank Granelli
24 Old Middletown Rd.
Rockaway NJ 07866
Edition: Model Aviation - 2005/01
Page Numbers: 57,58,59,61,64
Edition: Model Aviation - 2005/01
Page Numbers: 57,58,59,61,64
AT THE END of November’s “From the Ground Up” installment, we
left the fuel tank filled and in the right place to ensure trouble-free
operation. The tank setup is good, you already know how to set the highand
low-speed needle valves, and the proper glow plug is in place. Now
you just need to get the engine started to have a great flying day—the
first of many.
Modern glow engines are so user-friendly that we only need to make
the glow plug glow and then find someway to rotate the engine to get it
started. With today’s industry and modelers’ imaginations being what
they are, there are roughly five million tools to perform each operation.
But we need someplace to house these millions of tools.
From 1970 to 1974, I housed all the field equipment I owned—a 2-
ounce turkey baster with a fuel line attached, a 1.5-volt battery with
alligator clips, a “chicken stick,” and some tools—in a brown paper bag.
However, the baster took five minutes to fuel a 16-ounce tank, the
battery was always dead, the alligator leads were constantly shorting out
against the engine’s head fins, and the chicken stick kept breaking the
wooden propellers. If everything was actually working, the bag would
rip open, spilling everything onto the ground.
I do not recommend such limited equipment to anyone, but, in truth,
it is all you actually need to get flying. Luckily there are better ways
today.
It is a good idea to find a more permanent home than a paper bag for
your field equipment, and many manufacturers offer “field boxes” such
as the ones shown. Expect a field box to be able to hold all of the tools
you will need, a gallon of fuel, a fuel pump, a glow starter, a power
panel, a 12-volt battery, and an electric engine starter.
Some field boxes, such as Great Planes’ Master Caddy, are equipped
to hold the aircraft during field assembly or repairs, but not for engine
starts or runs. Although each field accessory, such as the Thunder Tiger
fuel pump featured in the November article, can be powered from its
own battery, it is more convenient for most model pilots to use one 12-
volt battery to run everything through a power panel.
Shown are a few of the many such batteries and power panels
available. Most field-box batteries are 12-volt “gel cells.” Gel cells do
use common lead-acid technology, but in a different form that does not
spill or require venting. Motorcycle batteries are also often used, but they
must be firmly fastened in an upright position and completely vented to
the outside.
The most popular 12-volt gel-cell battery has a capacity of 7 amperehours
(Ah), which is more power than is required on most flying days.
But sometimes a balky engine—yours or a friend’s—can make
excessive power demands on a field-box battery that you forgot to
charge last night. For these occasions, you may find that a 9 Ah battery is
ideal.Great Planes’ Master Caddy requires some assembly. It has
detachable starting box to permit remote starting. Photo
courtesy Hobby Hut, Pompton Plains NJ.
Hangar 9’s field box arrives fully assembled and trimmed with
accent colors. It features power-panel cutout and space for the
battery.
If you connect your starter directly to the battery without a power
panel, consider a system that I use for Pattern competition starts, with
which only three minutes, from start to airborne, are allowed (shown).58 MODEL AVIATION
Gel-cell field-box batteries come in various sizes and voltages.
Larger battery has 7 Ah capacity; smaller battery rates at 4 Ah.
Charger is required. Power panels range from advanced (L) to
basic and inexpensive (R).
A competition flightline starter case. The two small batteries
provide 18 volts for a positive start every time. Orange Radio
South glow igniter automatically adjusts current flow to light
plug under all conditions. Backup glow igniters are available,
including one that uses alkaline D cell for power.
Red/black 12-volt Hobbico standard-duty starter is best on
engines up to .90 cu. in. Gold/white 12-/24-volt Sullivan Super Hi-
Tork heavy-duty is designed for engines up to 2.35 cu. in. Black
24-volt Model 4 Sullivan starter is for gas engines up to 2.4 cu. in.
Green Sullivan Hornet starter is for .49-size engines. Photo
courtesy Hobby Hut.
Typical position for electric fuel pump. Having pump close to
plastic—not metal—fuel container reduces its workload. Sullivan
Streamer pump has own switch, but will work using power
panel’s switching. Some pumps lack internal switches and
require panel to operate.
Pink starter insert is designed for engines equipped with AMA
safety nuts. White insert fits most common spinners as big as 3
inches. Dark-gray insert fits sharp, deep cone spinners and
larger spinners. When reversed, all inserts will fit small AMA
safety nuts or engines without spinners or safety nuts.
Use a heavy-duty starter (which I’ll discuss later) and a 4 Ah, 12-volt
battery wired in series with a 4 Ah, 6-volt gel cell.
This setup could probably turn over a big-block V8. But make sure
your engine is not flooded; this much starting power could damage an
engine hydraulically locked in place with liquid fuel.
Most electric fuel pumps use 12 volts, as do most electric starters,
but the average glow plug burns out at more than 2 volts. If only one
battery is used to power the field box, you must use some sort of
voltage-control system. The most common is the power panel, which
ranges in application and cost from inexpensive and basic to
sophisticated and expensive.
The Hobbico Accu-Glo power panel automatically adjusts glowplug
power based on the plug’s power requirements. This helps a
slightly flooded engine (not one hydraulically locked) start. The panel
also indicates the field-box battery’s power levels, indicates whether or
not the glow plug is good, and has a charging jack for the popular
rechargeable single-cell glow igniters.
The basic Hobbico panel has the glow igniter’s charging jack, but
the pilot must manually adjust the glow plug’s power levels and know
January 2005 59
The small Harry Higley AMA safety nuts meet AMA insurance
requirements and look nice on many Scale-type models. The
brass nut weighs 2 ounces and is used to add nose weight.
Sharp spinners, such as the yellow or metal ones, work best with
pink starter insert. Standard spinners use white insert. Photo
courtesy Hobby Hut.
Most common hand starter sticks. J’Tec’s all-metal Power Stroke
(L) looks sharp and works well but costs $11. The $5, well-used
wooden Sonic-Tronics Cheeter Stick works just as well but is not
fancy. Either will prevent hospital stitch-up visits that spoil many
flying sessions.
A starter damaged this spinner. Always hold starter cone tight
against spinner before turning it on. If starter must rotate before
contacting spinner, the field-box battery is weak or the starter is too
small for the engine. Clean insert with denatured alcohol every few
months to remove dirt buildup that also causes slippage.
Du-Bro glow-plug igniter (L) features rechargeable, replaceable
Ni-Cd. Orange McDaniel Ni-Starter has meter to let you know if
plug is bad. Cord and plug igniter are typical of those used with a
power panel. A good glow-plug wrench is invaluable.
A modeler’s wish list of field equipment, although most pilots do
not need everything shown. Everything you might need or want
for on-field maintenance or servicing is readily available.
that a zero meter reading means the plug connection is bad.
The power panel supplies the battery’s full voltage—usually 12
volts—to the starter and fuel-pump connections. Power panels are
usually supplied with the “banana plug” connectors for the starter.
Some pilots prefer to wire the fuel pump directly into the rear of the
power panel. Although that works fine, I suggest that you use
additional banana plugs to connect the fuel pump. Pulling the plugs at
the end of the day prevents accidental pump operation during packing
up or transit.
The close-up photo shows a typical fuel-pump/fuel-container
installation. If you look carefully, you will see that the Sullivan
Streamer’s power leads are stapled in a position away from the fuel
container. Although electrical shorts usually only pose a problem when
a metal fuel container is used, it never hurts to be extra careful. Being
extra careful, I used two layers of shrink tubing to protect the pump’s
wires in the stapled area. An additional precaution would be to use an
insulated staple.
The pump is positioned on the outside of the field box to prevent its
being knocked around as tools are taken out and replaced from the
box’s inner storage areas. While lowering the pump’s workload by
reducing the fuel-draw distance to a minimum, this position also
protects the fuel lines from cuts and nicks that
could result in leaks. Electrical shorts from the
pump itself cannot penetrate the pump’s
plastic housing.
Besides, the pump and fuel lines always
contain internal fuel, so if the pump does
somehow short internally, its position near the
fuel bottle is a moot point because the ignition
will just travel along the lines until it reaches
the bottle. Fortunately glow fuel does not
behave like gasoline.
If you plan to use gasoline, or a metal
glow-fuel container, position the fuel pump
on the other side of the box, on the internal
wall opposite the power panel. I do not
recommend either with an electric pump
anyway.
There are many types and sizes of electric
starters. A photo shows a representative
sample of the major types from several
manufacturers. Most pilots will require a 12-
volt standard-duty starter or a heavy-duty,
12-/24-volt starter. Either works great on all
trainer and “second model” engines. The
standard starter costs approximately $30, and
the heavy-duty starter is roughly $70.
One school of thought on starter choice is
that most model pilots, especially in today’s
world of larger ARFs, will someday fly a 1.20
cu. in.-size, or even larger, aircraft. It might
make sense, then, to buy a heavy-duty starter
now, because it will be required later. Having
a 12-/24-volt starter also provides the pilot
with power choices of 12, 18, or 24 volts.
There are several rubber-insert cone
shapes available for heavy-duty and standard
starters. A photo shows three different shapes
and the reverse side of one that is used to start
an engine that is not equipped with a spinner
or an AMA safety nut (not good practice).
The cones are inexpensive,
interchangeable among most brands, and
should be replaced every three to four years.
Both white inserts are nearing the ends of
their service lives—notice the cracks—and
will be replaced before next season.
As shown, there are many different
spinner shapes and sizes. A starter insert is
available to fit all of them. To answer a few
spinner questions I have received, an allplastic
spinner, such as the yellow one,
should not be used in applications
exceeding 12,000 rpm. The red, plastic
cone/metal-backplate spinner can be used in
all reasonable applications, up to 15,000
rpm, but can be damaged by a misapplied
starter. The all-metal spinner not only
resists starter damage and may be used in all
applications, but is balanced to reduce
engine wear and increase rpm.
A “chicken stick” is a manual device
you use to rotate the propeller instead of
using your fingers. It should be called the
“wise person stick” because today’s
powerful engines with more advanced
timing do considerably more hand damage
on a kickback than did the ones of old that
were made when the stick got its name.
This device uses a padded rod to protect
the propeller. As with the refueling squeeze
bulb I discussed in the last article, every
field box should have a chicken stick in case
the electric starter system fails. Each nick
on the yellow Sonic-Tronics Cheeter Stick
in the photo would have been on my hand
without it.
No matter what device is used to rotate
the propeller or how fast it rotates, it will be
a long, sad flying day if the glow plug isn’t
“lit.” Lighting the glow plug requires at
least 1.2 volts, constantly applied until the
engine runs.
There are many different types of
equipment used to “light it up.” If there is a
power panel, most pilots choose the simple
wire-and-connector system shown. This
system plugs into the power panel, provides
1.5 volts, and features adjustable current flow
depending on the glow plug’s condition.
Independent systems use a rechargeable,
1.2-volt Ni-Cd battery (fixed or replaceable)
or a replaceable 1.5-volt alkaline battery.
Rechargeable systems require a charger that
plugs into the glow-plug end. Many
independent glow-plug igniters feature a meter
to measure the current being supplied to the
glow plug.
Having a meter prevents one major
headache. The meter’s reading itself is not all
that important because the current is not
adjustable and is hard to read anyway. What is
important is that you can tell if the glow plug
has completely failed; the meter will read zero
current.
Another good feature to look for in an
independent glow igniter is a medium-length
stem. Short-stem igniters are good, but they
can’t reach a glow plug inside a cowling.
Long stems, which are roughly 6 inches, tend
to vibrate and come loose too often to trust on
uncowled engines. (The plug-access hole in
the cowling helps stabilize long-reach
igniters.)
Sometime in your model-piloting career,
you will fly an airplane with cowling. You
may as well get the medium-length igniter
now because you will surely use it before your
career is finished. The same holds true for
your choice of glow-plug wrenches.
As shown, there is a wealth of field and
accessory equipment available. There are
enough items so that your friends and family
should have no difficulty determining your
holiday and birthday presents for the next
decade. I’ve only covered in detail the basic
must-have items with which to get started.
Digital voltmeters that test a radio system’s
batteries are nice to have for sport aircraft and
are a necessity when a model’s cost starts to
cause altitude sickness in normal people.
Rather than just measure a battery’s voltage,
these instruments measure voltage while
applying a simulated flight load on the
receiver battery.
A safe practice is to cease flying and begin
recharging when the battery’s voltage drops to
0.1-0.2 volts less than its nominal capacity.
It’s time to recharge when the common 4.8-
volt receiver battery reaches 4.6 volts. Begin
recharging when a 6.0-volt receiver battery
reaches 5.8 volts or when the 9.8-volt
transmitter battery drops to less than 9.6 volts.
These are conservative ratings, but they will
never cost you a model airplane because of a
dead battery.
Field chargers can extend your flying day
while making sure that there is “enough”
radio-system battery capacity for safety.
A digital tachometer extends engine life by
preventing lean runs. A tachometer also
prevents airframe damage that can result from
off-runway landings that took place because
the low-speed mixture adjustments were
incorrect and the engine died during your first
spin attempt.
There are so many required tools—balldriver
sets (English and Metric), all sizes and
types of screwdrivers, wrenches, extra spinner
parts, propellers, spare glow-plug caddies,
emergency adhesives, extra parts, etc.—that
discussing them would take several more
articles. Fortunately you can find out about
these items by checking to see what other
pilots at your field have squirreled away in
their flight boxes.
If you would like to see what many of
these extra items are and how the Great Planes
Master Caddy is built, visit the “Baggage
Compartment” section of the Sport Aviator
online magazine at www.masportaviator.com.
In this segment of the “From the Ground
Up” series, I have written about almost
everything most newer model pilots need to
know for successful engine management.
Other parts of this series have covered how to
pick the right radio system for your needs,
how to best install it in your model, how to
construct a light electric-powered model, and
what every new modeler needs to know about
electric flight.
But even the best radio system and engine
need something to hold it together and then get
all of it into the air. That something—the
airframe itself—will be the subject of the next
part of this series.
I will cover how to assemble an RTF
trainer, and then how to assemble it so it lasts
even longer and flies better. ARF trainers will
be next, followed by the many improvements
you can make to an ARF to prolong the
airframe’s life and make it fly even better. See
you then. MA
Frank Granelli
24 Old Middletown Rd.
Rockaway NJ 07866
Edition: Model Aviation - 2005/01
Page Numbers: 57,58,59,61,64
AT THE END of November’s “From the Ground Up” installment, we
left the fuel tank filled and in the right place to ensure trouble-free
operation. The tank setup is good, you already know how to set the highand
low-speed needle valves, and the proper glow plug is in place. Now
you just need to get the engine started to have a great flying day—the
first of many.
Modern glow engines are so user-friendly that we only need to make
the glow plug glow and then find someway to rotate the engine to get it
started. With today’s industry and modelers’ imaginations being what
they are, there are roughly five million tools to perform each operation.
But we need someplace to house these millions of tools.
From 1970 to 1974, I housed all the field equipment I owned—a 2-
ounce turkey baster with a fuel line attached, a 1.5-volt battery with
alligator clips, a “chicken stick,” and some tools—in a brown paper bag.
However, the baster took five minutes to fuel a 16-ounce tank, the
battery was always dead, the alligator leads were constantly shorting out
against the engine’s head fins, and the chicken stick kept breaking the
wooden propellers. If everything was actually working, the bag would
rip open, spilling everything onto the ground.
I do not recommend such limited equipment to anyone, but, in truth,
it is all you actually need to get flying. Luckily there are better ways
today.
It is a good idea to find a more permanent home than a paper bag for
your field equipment, and many manufacturers offer “field boxes” such
as the ones shown. Expect a field box to be able to hold all of the tools
you will need, a gallon of fuel, a fuel pump, a glow starter, a power
panel, a 12-volt battery, and an electric engine starter.
Some field boxes, such as Great Planes’ Master Caddy, are equipped
to hold the aircraft during field assembly or repairs, but not for engine
starts or runs. Although each field accessory, such as the Thunder Tiger
fuel pump featured in the November article, can be powered from its
own battery, it is more convenient for most model pilots to use one 12-
volt battery to run everything through a power panel.
Shown are a few of the many such batteries and power panels
available. Most field-box batteries are 12-volt “gel cells.” Gel cells do
use common lead-acid technology, but in a different form that does not
spill or require venting. Motorcycle batteries are also often used, but they
must be firmly fastened in an upright position and completely vented to
the outside.
The most popular 12-volt gel-cell battery has a capacity of 7 amperehours
(Ah), which is more power than is required on most flying days.
But sometimes a balky engine—yours or a friend’s—can make
excessive power demands on a field-box battery that you forgot to
charge last night. For these occasions, you may find that a 9 Ah battery is
ideal.Great Planes’ Master Caddy requires some assembly. It has
detachable starting box to permit remote starting. Photo
courtesy Hobby Hut, Pompton Plains NJ.
Hangar 9’s field box arrives fully assembled and trimmed with
accent colors. It features power-panel cutout and space for the
battery.
If you connect your starter directly to the battery without a power
panel, consider a system that I use for Pattern competition starts, with
which only three minutes, from start to airborne, are allowed (shown).58 MODEL AVIATION
Gel-cell field-box batteries come in various sizes and voltages.
Larger battery has 7 Ah capacity; smaller battery rates at 4 Ah.
Charger is required. Power panels range from advanced (L) to
basic and inexpensive (R).
A competition flightline starter case. The two small batteries
provide 18 volts for a positive start every time. Orange Radio
South glow igniter automatically adjusts current flow to light
plug under all conditions. Backup glow igniters are available,
including one that uses alkaline D cell for power.
Red/black 12-volt Hobbico standard-duty starter is best on
engines up to .90 cu. in. Gold/white 12-/24-volt Sullivan Super Hi-
Tork heavy-duty is designed for engines up to 2.35 cu. in. Black
24-volt Model 4 Sullivan starter is for gas engines up to 2.4 cu. in.
Green Sullivan Hornet starter is for .49-size engines. Photo
courtesy Hobby Hut.
Typical position for electric fuel pump. Having pump close to
plastic—not metal—fuel container reduces its workload. Sullivan
Streamer pump has own switch, but will work using power
panel’s switching. Some pumps lack internal switches and
require panel to operate.
Pink starter insert is designed for engines equipped with AMA
safety nuts. White insert fits most common spinners as big as 3
inches. Dark-gray insert fits sharp, deep cone spinners and
larger spinners. When reversed, all inserts will fit small AMA
safety nuts or engines without spinners or safety nuts.
Use a heavy-duty starter (which I’ll discuss later) and a 4 Ah, 12-volt
battery wired in series with a 4 Ah, 6-volt gel cell.
This setup could probably turn over a big-block V8. But make sure
your engine is not flooded; this much starting power could damage an
engine hydraulically locked in place with liquid fuel.
Most electric fuel pumps use 12 volts, as do most electric starters,
but the average glow plug burns out at more than 2 volts. If only one
battery is used to power the field box, you must use some sort of
voltage-control system. The most common is the power panel, which
ranges in application and cost from inexpensive and basic to
sophisticated and expensive.
The Hobbico Accu-Glo power panel automatically adjusts glowplug
power based on the plug’s power requirements. This helps a
slightly flooded engine (not one hydraulically locked) start. The panel
also indicates the field-box battery’s power levels, indicates whether or
not the glow plug is good, and has a charging jack for the popular
rechargeable single-cell glow igniters.
The basic Hobbico panel has the glow igniter’s charging jack, but
the pilot must manually adjust the glow plug’s power levels and know
January 2005 59
The small Harry Higley AMA safety nuts meet AMA insurance
requirements and look nice on many Scale-type models. The
brass nut weighs 2 ounces and is used to add nose weight.
Sharp spinners, such as the yellow or metal ones, work best with
pink starter insert. Standard spinners use white insert. Photo
courtesy Hobby Hut.
Most common hand starter sticks. J’Tec’s all-metal Power Stroke
(L) looks sharp and works well but costs $11. The $5, well-used
wooden Sonic-Tronics Cheeter Stick works just as well but is not
fancy. Either will prevent hospital stitch-up visits that spoil many
flying sessions.
A starter damaged this spinner. Always hold starter cone tight
against spinner before turning it on. If starter must rotate before
contacting spinner, the field-box battery is weak or the starter is too
small for the engine. Clean insert with denatured alcohol every few
months to remove dirt buildup that also causes slippage.
Du-Bro glow-plug igniter (L) features rechargeable, replaceable
Ni-Cd. Orange McDaniel Ni-Starter has meter to let you know if
plug is bad. Cord and plug igniter are typical of those used with a
power panel. A good glow-plug wrench is invaluable.
A modeler’s wish list of field equipment, although most pilots do
not need everything shown. Everything you might need or want
for on-field maintenance or servicing is readily available.
that a zero meter reading means the plug connection is bad.
The power panel supplies the battery’s full voltage—usually 12
volts—to the starter and fuel-pump connections. Power panels are
usually supplied with the “banana plug” connectors for the starter.
Some pilots prefer to wire the fuel pump directly into the rear of the
power panel. Although that works fine, I suggest that you use
additional banana plugs to connect the fuel pump. Pulling the plugs at
the end of the day prevents accidental pump operation during packing
up or transit.
The close-up photo shows a typical fuel-pump/fuel-container
installation. If you look carefully, you will see that the Sullivan
Streamer’s power leads are stapled in a position away from the fuel
container. Although electrical shorts usually only pose a problem when
a metal fuel container is used, it never hurts to be extra careful. Being
extra careful, I used two layers of shrink tubing to protect the pump’s
wires in the stapled area. An additional precaution would be to use an
insulated staple.
The pump is positioned on the outside of the field box to prevent its
being knocked around as tools are taken out and replaced from the
box’s inner storage areas. While lowering the pump’s workload by
reducing the fuel-draw distance to a minimum, this position also
protects the fuel lines from cuts and nicks that
could result in leaks. Electrical shorts from the
pump itself cannot penetrate the pump’s
plastic housing.
Besides, the pump and fuel lines always
contain internal fuel, so if the pump does
somehow short internally, its position near the
fuel bottle is a moot point because the ignition
will just travel along the lines until it reaches
the bottle. Fortunately glow fuel does not
behave like gasoline.
If you plan to use gasoline, or a metal
glow-fuel container, position the fuel pump
on the other side of the box, on the internal
wall opposite the power panel. I do not
recommend either with an electric pump
anyway.
There are many types and sizes of electric
starters. A photo shows a representative
sample of the major types from several
manufacturers. Most pilots will require a 12-
volt standard-duty starter or a heavy-duty,
12-/24-volt starter. Either works great on all
trainer and “second model” engines. The
standard starter costs approximately $30, and
the heavy-duty starter is roughly $70.
One school of thought on starter choice is
that most model pilots, especially in today’s
world of larger ARFs, will someday fly a 1.20
cu. in.-size, or even larger, aircraft. It might
make sense, then, to buy a heavy-duty starter
now, because it will be required later. Having
a 12-/24-volt starter also provides the pilot
with power choices of 12, 18, or 24 volts.
There are several rubber-insert cone
shapes available for heavy-duty and standard
starters. A photo shows three different shapes
and the reverse side of one that is used to start
an engine that is not equipped with a spinner
or an AMA safety nut (not good practice).
The cones are inexpensive,
interchangeable among most brands, and
should be replaced every three to four years.
Both white inserts are nearing the ends of
their service lives—notice the cracks—and
will be replaced before next season.
As shown, there are many different
spinner shapes and sizes. A starter insert is
available to fit all of them. To answer a few
spinner questions I have received, an allplastic
spinner, such as the yellow one,
should not be used in applications
exceeding 12,000 rpm. The red, plastic
cone/metal-backplate spinner can be used in
all reasonable applications, up to 15,000
rpm, but can be damaged by a misapplied
starter. The all-metal spinner not only
resists starter damage and may be used in all
applications, but is balanced to reduce
engine wear and increase rpm.
A “chicken stick” is a manual device
you use to rotate the propeller instead of
using your fingers. It should be called the
“wise person stick” because today’s
powerful engines with more advanced
timing do considerably more hand damage
on a kickback than did the ones of old that
were made when the stick got its name.
This device uses a padded rod to protect
the propeller. As with the refueling squeeze
bulb I discussed in the last article, every
field box should have a chicken stick in case
the electric starter system fails. Each nick
on the yellow Sonic-Tronics Cheeter Stick
in the photo would have been on my hand
without it.
No matter what device is used to rotate
the propeller or how fast it rotates, it will be
a long, sad flying day if the glow plug isn’t
“lit.” Lighting the glow plug requires at
least 1.2 volts, constantly applied until the
engine runs.
There are many different types of
equipment used to “light it up.” If there is a
power panel, most pilots choose the simple
wire-and-connector system shown. This
system plugs into the power panel, provides
1.5 volts, and features adjustable current flow
depending on the glow plug’s condition.
Independent systems use a rechargeable,
1.2-volt Ni-Cd battery (fixed or replaceable)
or a replaceable 1.5-volt alkaline battery.
Rechargeable systems require a charger that
plugs into the glow-plug end. Many
independent glow-plug igniters feature a meter
to measure the current being supplied to the
glow plug.
Having a meter prevents one major
headache. The meter’s reading itself is not all
that important because the current is not
adjustable and is hard to read anyway. What is
important is that you can tell if the glow plug
has completely failed; the meter will read zero
current.
Another good feature to look for in an
independent glow igniter is a medium-length
stem. Short-stem igniters are good, but they
can’t reach a glow plug inside a cowling.
Long stems, which are roughly 6 inches, tend
to vibrate and come loose too often to trust on
uncowled engines. (The plug-access hole in
the cowling helps stabilize long-reach
igniters.)
Sometime in your model-piloting career,
you will fly an airplane with cowling. You
may as well get the medium-length igniter
now because you will surely use it before your
career is finished. The same holds true for
your choice of glow-plug wrenches.
As shown, there is a wealth of field and
accessory equipment available. There are
enough items so that your friends and family
should have no difficulty determining your
holiday and birthday presents for the next
decade. I’ve only covered in detail the basic
must-have items with which to get started.
Digital voltmeters that test a radio system’s
batteries are nice to have for sport aircraft and
are a necessity when a model’s cost starts to
cause altitude sickness in normal people.
Rather than just measure a battery’s voltage,
these instruments measure voltage while
applying a simulated flight load on the
receiver battery.
A safe practice is to cease flying and begin
recharging when the battery’s voltage drops to
0.1-0.2 volts less than its nominal capacity.
It’s time to recharge when the common 4.8-
volt receiver battery reaches 4.6 volts. Begin
recharging when a 6.0-volt receiver battery
reaches 5.8 volts or when the 9.8-volt
transmitter battery drops to less than 9.6 volts.
These are conservative ratings, but they will
never cost you a model airplane because of a
dead battery.
Field chargers can extend your flying day
while making sure that there is “enough”
radio-system battery capacity for safety.
A digital tachometer extends engine life by
preventing lean runs. A tachometer also
prevents airframe damage that can result from
off-runway landings that took place because
the low-speed mixture adjustments were
incorrect and the engine died during your first
spin attempt.
There are so many required tools—balldriver
sets (English and Metric), all sizes and
types of screwdrivers, wrenches, extra spinner
parts, propellers, spare glow-plug caddies,
emergency adhesives, extra parts, etc.—that
discussing them would take several more
articles. Fortunately you can find out about
these items by checking to see what other
pilots at your field have squirreled away in
their flight boxes.
If you would like to see what many of
these extra items are and how the Great Planes
Master Caddy is built, visit the “Baggage
Compartment” section of the Sport Aviator
online magazine at www.masportaviator.com.
In this segment of the “From the Ground
Up” series, I have written about almost
everything most newer model pilots need to
know for successful engine management.
Other parts of this series have covered how to
pick the right radio system for your needs,
how to best install it in your model, how to
construct a light electric-powered model, and
what every new modeler needs to know about
electric flight.
But even the best radio system and engine
need something to hold it together and then get
all of it into the air. That something—the
airframe itself—will be the subject of the next
part of this series.
I will cover how to assemble an RTF
trainer, and then how to assemble it so it lasts
even longer and flies better. ARF trainers will
be next, followed by the many improvements
you can make to an ARF to prolong the
airframe’s life and make it fly even better. See
you then. MA
Frank Granelli
24 Old Middletown Rd.
Rockaway NJ 07866

