
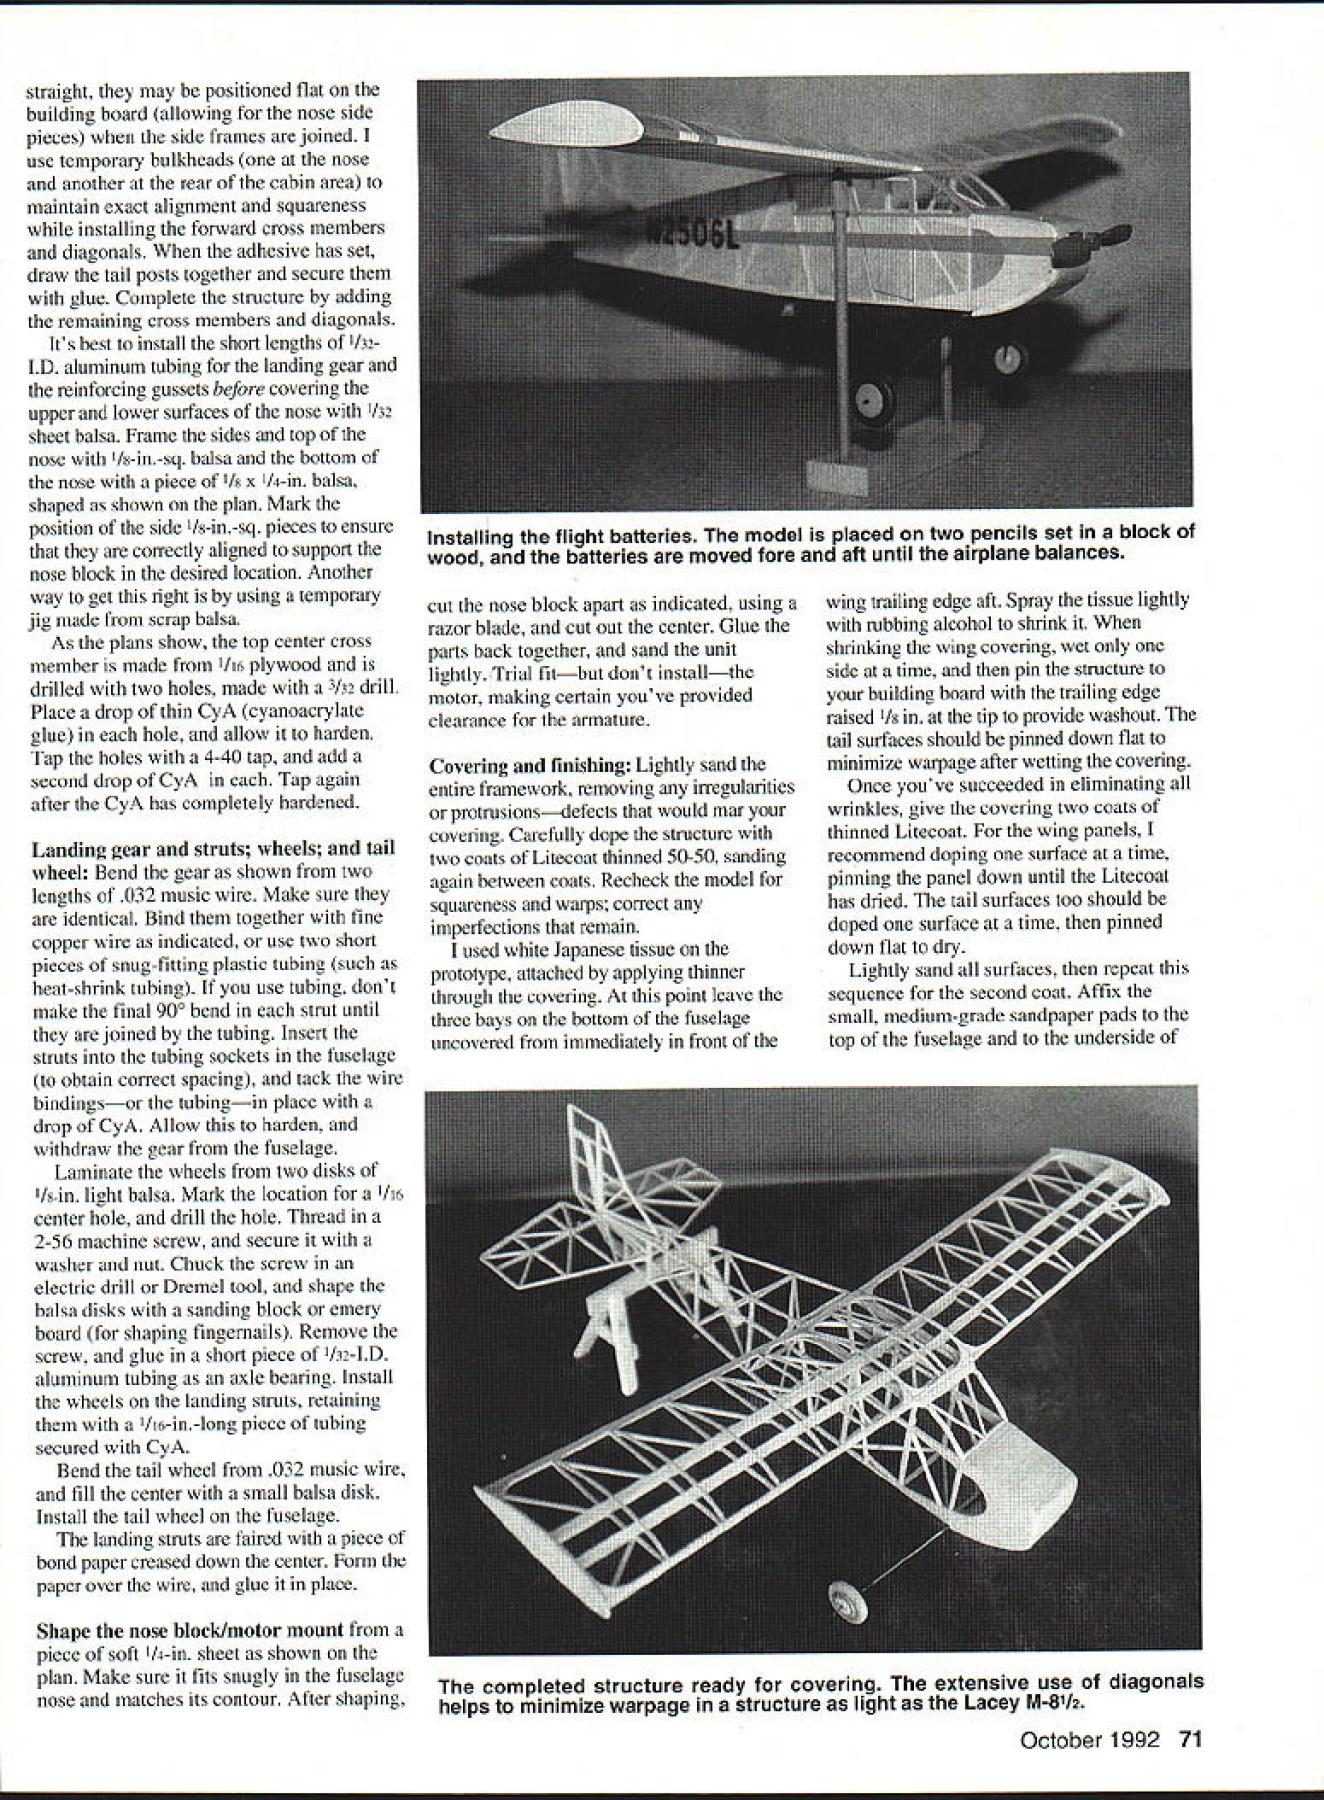
THIS DESIGN started life 14-gram Bostonian semiscale Lacey M- 10 idea metamorphosis came cousin Tom Schmitt still HiLine Ltd time told motor used HiLines Mini-6 unit available gearing HiLine motor now available Micro-4 Don Srull Tom said built flown several small models successfully using little gem motor two 50-mAh batteries entire power train weighed 20 grams Id pretty well blocked out Lacey M-10 design quick calculation showed enlarging 48-sq-in Bostonian 12 times could convert 70 sq-in mini-Electric So after quick trip local photocopy shop design time motor Construction fun flyer easy build construction conventional caveat though Light weight allimportant Choose wood very selectively use much adhesive necessary dope structures covering lightly possible Wing I generally build structure first builder can choose between sliced sheet solid ribs chose sliced ribs because thought result would lighter Now Im sure since felt necessary use auxiliary spar support front upper cap strips either case choose light hut firm quarter-grained wood 6- 8-lb density Cut spars leading edges trailing edges firm straight grained wood 8- 10-lb density Build both panels flat plan Join center section Add gussets sand wing lightly over Note wing-attach screw location boxed small rectangles 1/16 balsa prevents having chase small 4-40 screw over inside covered wing did Tail surfaces too built flat plan recommend building fin rudder unit separating after have joined soft copper wire hinges Sand tail surfaces lightly over Fuselage deviation conventional box frame constructiontwo side frames joined cross membersis two side frames dont match cabin area full-scale prototype asymmetry result passengers door being right side looking forward pilots door left Cut longerons firm straight grained wood 8- 10-lb density Somewhat lighter wood acceptable uprights cross members diagonals Note top longerons have severe bend can achieved help either ammonia jet steam Since forward lower longerons 70 Model Aviation delivered model finished Lacey M-8/ flew off board its flying ever since Big picture power train accounts two-fifths mini-Electrics 51 grams Above wing rotates storage just full-scale Lacey M-1O straight may positioned flat building board allowing nose side pieces side frames joined use temporary bulkheads nose another rear cabin area maintain exact alignment squareness installing forward cross members diagonals adhesive has set draw tail posts together secure glue Complete structure adding remaining cross members diagonals Its best install short lengths /32ID aluminum tubing landing gear reinforcing gussets before covering upper lower surfaces nose 1132 sheet balsa Frame sides top nose /8-in-sq balsa bottom nose piece 1/8 X /4-in balsa shaped shown plan Mark position side Is-in-sq pieces ensure correctly aligned support nose block desired location Another way get right using temporary jig made scrap balsa As plans show top center cross member made 1/16 plywood drilled two holes made 3/33 drill Place drop thin CyA cyanoacrylate glue hole allow harden Tap holes 4-40 tap add second drop CyA Tap again after CyA has completely hardened Landing gear struts wheels tail wheel Bend gear shown two lengths 032 music wire Make sure identical Bind together fine copper wire indicated use two short pieces snug-fitting plastic tubing such heat-shrink tubing use tubing dont make final 900 bend strut until joined tubing Insert struts tubing sockets fuselage obtain correct spacing tack wire bindingsor tubingin place drop CyA Allow harden withdraw gear fuselage Laminate wheels two disks /8-in light balsa Mark location 1/16 center hole drill hole Thread 2-56 machine screw secure washer nut Chuck screw electric drill Dremel tool shape balsa disks sanding block emery board shaping fingernails Remove screw glue short piece 1/32.ID aluminum tubing axle bearing Install wheels landing struts retaining /16-in-long piece tubing secured CyA Bend tail wheel 032 music wire fill center small balsa disk Install tail wheel fuselage landing struts faired piece bond paper creased down center Form paper over wire glue place Shape nose block/motor mount piece soft /4-in sheet shown plan Make sure fits snugly fuselage nose matches its contour After shaping cut nose block apart indicated using razor blade cut out center Glue parts back together sand unit lightly Trial fitbut dont installthe motor making certain youve provided clearance armature Covering finishing Lightly sand entire framework removing irregularities protrusionsdefects would mar covering Carefully dope structure two coats Litecoat thinned 50-50 sanding again between coats Recheck model squareness warps correct imperfections remain used white Japanese tissue prototype attached applying thinner through covering point leave three bays bottom fuselage uncovered immediately front wing trailing edge aft Spray tissue lightly rubbing alcohol shrink shrinking wing covering wet side time pin structure building board trailing edge raised /s tip provide washout tail surfaces should pinned down flat minimize warpage after wetting covering Once youve succeeded eliminating wrinkles give covering two coats thinned Litecoat wing panels recommend doping surface time pinning panel down until Litecoat has dried tail surfaces too should doped surface time pinned down flat dry Lightly sand surfaces repeat sequence second coat Affix small medium-grade sandpaper pads top fuselage underside October 1992 71 Installing flight batteries model placed two pencils set block wood batteries moved fore aft until airplane balances completed structure ready covering extensive use diagonals helps minimize warpage structure light Lacey M81I2 FULL-SIZE PLANS AVAILABLE SEE PAGE 186 --I4A4A I3AAIAG F4OIGAAAI/AL AF APABTA \~Z1 AABC wing center section shown using model cement pads prevent wing rotating under normal flight loads allowing give under impact decorated model using method devised late Walt Mooney Florists tissue available crafts stores cut patterns strips letters/numerals applied airplane thinner using same method tissue can indulge much ornamentation desired very little cost weight Control surfaces doors access panels can outlined fine-point felt marker such Sanford Sharpie Color tires black dope Make wheel disks color wish either match contrast trim color Temporarily install motor desired angle covered nose block using model cement recommended HiLine Hold nose block place cellophane tape Install stabilizer cementing spar Install fin rudder Plug landing gear Attach wing /2-in-long 4-40 nylon screw Install motor model cement recommended HiLine flight tests may have adjust thrust line later Attach propeller model now complete except batteries charging jack wiring Mark two points underside wing exactly lI8 back leading edge first outboard rib either side Take two rubber-tipped pencils same height place upright six inches apart block wood Position model pencils wing marks determine correct fore aft locations batteries slide batteries forward rearward until model balances horizontally Installation details prototype shown plan 72 Model Aviation ASIA C/IS SPAR- ________ __________ SAL L4i IiPFSIVIBG OF ACASFAM SARR00111ii TIPPIAtF SIIAr AlAS I/tWAGICUT WflI SIPS 1/14SI-ICADAJ&NBSSC/S4TIP5INDICATES 01* LOCATION 01LTERAGTE1*I/s0RIGS I1 REPSO11144FMFAQO IAA-- --------1---L7I- --- .STADILIZPR CAN STUCTIONSF00 DIADGALTAIBA LBPIPS SPAR LPJBS AG TE-I/GA 1/5 DIAGONALS-i/l10 I/SO 43/AL FLARATRJASASNLLARA I/AG PLY AFAR DOABIFA GATE AIPPAACAACE NOSFOACAX SUAPE FRANC AG SOPS CA AVOnIOU BlOAT AP OBATTAM BSfl PATIWBOP 2 RFSAVPs AIlS SAGOMPON WASNATOACS ASIA 3CPNCNIMACF0SAMSBBI 155AMI LAUCTRA APSATFEAT TAFT FAA IAAAAASFGO CAIAIGAL SET TEAT PUSS LAM CANSTRACTIAN CANABBABAS CAPRIGUTS III SQP1511 RUARBO CANABUATCAG L& 7115 I/IL SQ DIAGUAAS 05 YB- I/MA I/S BIEOAASEOIIAIA lAX PSI SPARIIILAI/3L14 LEPTI SlAt ONLY ______ RISIIYSIEIE ONLY IINPSARACA ClANS IB -rm BINDLITIC SIIABY 1/140 I/B 032 MW 5/501/iI ALUMBOTTACS CACAGI1ILTHE LACY9j 1*40100 GCABI WITh APALcINIES TA 104 LNCEC U NeAt- 030001 - S SEB4I-SCALE FAN-FLYER FAR TIlT 2R6- A--YiI TOCII USIA 4MICGO-NT MAThO OLSIANAD TIARA/N 7/RI IJISITXR Continued page 160 Left Climbing altitude lightweight fun flyer best saved days wind light Right An overhead pass still climbing Like modelers author loves see craft high aloft illuminated sun membership $30 flying membership $33 outside US See next month y M81/z Continued page 72 Note used three-pin Deans connector rather charging jack furnished HiLine because other modelsand field connectoruse Deans plug isnt necessary keep charger connected after charging Simply insert plug has two pins shorted KMI IS THE LARGEST AND BEST EQUIPPED INDEPENDENT RC SERVICE AND REPAIR CENTER IN THE USA repair major brands new older models WE ARE FACTORY AUTHORIZED WARRANTY SERVICE FOR AIRTRONICS ACE AND HITEC stock genuine factory replacement parts EXCLUSIVE SERVICE AND SALES OF RCD-KMI 6 METER RECEIVERS 1991 Gold Sticker narrowband frequency upgrades-station #21 stock crystals 1 03 different frequen cies SEND SAE FOR COMPLETE PRICE REPAIR AND PRODUCT INFORMATION CALL FOR RUSH SERVICE together establish circuit continuity will start motor flight Test-flying Select calm day area covered proverbial tall grass Remove prop glide model wind gentle firm launch Make necessary adjustments glide path shimming leading edge stabilizer up down appropriate youre satisfied glide path reinstall prop still over tall grass try first powered flightbut partial 30% charge have correct amount right thrust model may circled either direction Like cabin models though seems prefer $ 9995 8 Ch 50 53 72 75 Mhz 2-wheel gear ycle 1 7995 includes amplifier Kraft Midwest Inc 115 E Main Northville MI 48167 313/348-0085 313/348-4175 left-hand circles Gradually increase charging time making trim adjustments necessary Warning rudder very sensitive find initial right thrust downthrust incorrect remove nose block dissolve model cement thinner reposition motor youre completely satisfied thrust line permanently install motor CyA glue nose block fuselage four small dabs cement corner model came out heavier desired 50 grams faint heart craft will fly just wellmaybe better motor will run just well harm three cells So relax have fun Fly Electric cale Continued page 75 overlapped before binding Drying could done overnight microwave both thicknesses sliced through razor blade overlapped balsa will match up nicely Getting skin off form done splitting part crosswise front spar wing addition split rear peg install bulkhead rear peg reinforcement finish off model Len partially planked cockpit fuselage fourpound balsa sheet covered model JCI silver tissue made three bladed props plastic flower pot Ducted-fan FF Scale seems to stay Ferrell Papics profile Heinkel HE 178 has flying couple years two Ferrels tiny modified motors never much altitude year hes put Astro 02 extra power really gets model up Interested getting started Electric Constant testing refinements have made Electric very attractive single- multiengined Scale models flight duration can controlled length charge Ni-Cd batteries Need power Usually adding another cell will trick As long allow engine turn up dont overload too-big prop problems will practically nil Three light FF systems can replace venerable Astro 02 has off market few years VL Products 7871 Alabama No 16 Canoga Park CA 91304 catalog $1 has excellent proven geared motor Peck-Polymers PO Box 710399 Santee CA 92072 has motor famed its low power requirements Send $3 Peck-Polymers catalog 160 Model Aviation 1991 KMI MINI ULTRA AM RECEIVER KMI RETRACTS A

Edition: Model Aviation - 1992/10
Page Numbers: 70, 71, 72, 160
Edition: Model Aviation - 1992/10
Page Numbers: 70, 71, 72, 160
THIS DESIGN started life 14-gram Bostonian semiscale Lacey M- 10 idea metamorphosis came cousin Tom Schmitt still HiLine Ltd time told motor used HiLines Mini-6 unit available gearing HiLine motor now available Micro-4 Don Srull Tom said built flown several small models successfully using little gem motor two 50-mAh batteries entire power train weighed 20 grams Id pretty well blocked out Lacey M-10 design quick calculation showed enlarging 48-sq-in Bostonian 12 times could convert 70 sq-in mini-Electric So after quick trip local photocopy shop design time motor Construction fun flyer easy build construction conventional caveat though Light weight allimportant Choose wood very selectively use much adhesive necessary dope structures covering lightly possible Wing I generally build structure first builder can choose between sliced sheet solid ribs chose sliced ribs because thought result would lighter Now Im sure since felt necessary use auxiliary spar support front upper cap strips either case choose light hut firm quarter-grained wood 6- 8-lb density Cut spars leading edges trailing edges firm straight grained wood 8- 10-lb density Build both panels flat plan Join center section Add gussets sand wing lightly over Note wing-attach screw location boxed small rectangles 1/16 balsa prevents having chase small 4-40 screw over inside covered wing did Tail surfaces too built flat plan recommend building fin rudder unit separating after have joined soft copper wire hinges Sand tail surfaces lightly over Fuselage deviation conventional box frame constructiontwo side frames joined cross membersis two side frames dont match cabin area full-scale prototype asymmetry result passengers door being right side looking forward pilots door left Cut longerons firm straight grained wood 8- 10-lb density Somewhat lighter wood acceptable uprights cross members diagonals Note top longerons have severe bend can achieved help either ammonia jet steam Since forward lower longerons 70 Model Aviation delivered model finished Lacey M-8/ flew off board its flying ever since Big picture power train accounts two-fifths mini-Electrics 51 grams Above wing rotates storage just full-scale Lacey M-1O straight may positioned flat building board allowing nose side pieces side frames joined use temporary bulkheads nose another rear cabin area maintain exact alignment squareness installing forward cross members diagonals adhesive has set draw tail posts together secure glue Complete structure adding remaining cross members diagonals Its best install short lengths /32ID aluminum tubing landing gear reinforcing gussets before covering upper lower surfaces nose 1132 sheet balsa Frame sides top nose /8-in-sq balsa bottom nose piece 1/8 X /4-in balsa shaped shown plan Mark position side Is-in-sq pieces ensure correctly aligned support nose block desired location Another way get right using temporary jig made scrap balsa As plans show top center cross member made 1/16 plywood drilled two holes made 3/33 drill Place drop thin CyA cyanoacrylate glue hole allow harden Tap holes 4-40 tap add second drop CyA Tap again after CyA has completely hardened Landing gear struts wheels tail wheel Bend gear shown two lengths 032 music wire Make sure identical Bind together fine copper wire indicated use two short pieces snug-fitting plastic tubing such heat-shrink tubing use tubing dont make final 900 bend strut until joined tubing Insert struts tubing sockets fuselage obtain correct spacing tack wire bindingsor tubingin place drop CyA Allow harden withdraw gear fuselage Laminate wheels two disks /8-in light balsa Mark location 1/16 center hole drill hole Thread 2-56 machine screw secure washer nut Chuck screw electric drill Dremel tool shape balsa disks sanding block emery board shaping fingernails Remove screw glue short piece 1/32.ID aluminum tubing axle bearing Install wheels landing struts retaining /16-in-long piece tubing secured CyA Bend tail wheel 032 music wire fill center small balsa disk Install tail wheel fuselage landing struts faired piece bond paper creased down center Form paper over wire glue place Shape nose block/motor mount piece soft /4-in sheet shown plan Make sure fits snugly fuselage nose matches its contour After shaping cut nose block apart indicated using razor blade cut out center Glue parts back together sand unit lightly Trial fitbut dont installthe motor making certain youve provided clearance armature Covering finishing Lightly sand entire framework removing irregularities protrusionsdefects would mar covering Carefully dope structure two coats Litecoat thinned 50-50 sanding again between coats Recheck model squareness warps correct imperfections remain used white Japanese tissue prototype attached applying thinner through covering point leave three bays bottom fuselage uncovered immediately front wing trailing edge aft Spray tissue lightly rubbing alcohol shrink shrinking wing covering wet side time pin structure building board trailing edge raised /s tip provide washout tail surfaces should pinned down flat minimize warpage after wetting covering Once youve succeeded eliminating wrinkles give covering two coats thinned Litecoat wing panels recommend doping surface time pinning panel down until Litecoat has dried tail surfaces too should doped surface time pinned down flat dry Lightly sand surfaces repeat sequence second coat Affix small medium-grade sandpaper pads top fuselage underside October 1992 71 Installing flight batteries model placed two pencils set block wood batteries moved fore aft until airplane balances completed structure ready covering extensive use diagonals helps minimize warpage structure light Lacey M81I2 FULL-SIZE PLANS AVAILABLE SEE PAGE 186 --I4A4A I3AAIAG F4OIGAAAI/AL AF APABTA \~Z1 AABC wing center section shown using model cement pads prevent wing rotating under normal flight loads allowing give under impact decorated model using method devised late Walt Mooney Florists tissue available crafts stores cut patterns strips letters/numerals applied airplane thinner using same method tissue can indulge much ornamentation desired very little cost weight Control surfaces doors access panels can outlined fine-point felt marker such Sanford Sharpie Color tires black dope Make wheel disks color wish either match contrast trim color Temporarily install motor desired angle covered nose block using model cement recommended HiLine Hold nose block place cellophane tape Install stabilizer cementing spar Install fin rudder Plug landing gear Attach wing /2-in-long 4-40 nylon screw Install motor model cement recommended HiLine flight tests may have adjust thrust line later Attach propeller model now complete except batteries charging jack wiring Mark two points underside wing exactly lI8 back leading edge first outboard rib either side Take two rubber-tipped pencils same height place upright six inches apart block wood Position model pencils wing marks determine correct fore aft locations batteries slide batteries forward rearward until model balances horizontally Installation details prototype shown plan 72 Model Aviation ASIA C/IS SPAR- ________ __________ SAL L4i IiPFSIVIBG OF ACASFAM SARR00111ii TIPPIAtF SIIAr AlAS I/tWAGICUT WflI SIPS 1/14SI-ICADAJ&NBSSC/S4TIP5INDICATES 01* LOCATION 01LTERAGTE1*I/s0RIGS I1 REPSO11144FMFAQO IAA-- --------1---L7I- --- .STADILIZPR CAN STUCTIONSF00 DIADGALTAIBA LBPIPS SPAR LPJBS AG TE-I/GA 1/5 DIAGONALS-i/l10 I/SO 43/AL FLARATRJASASNLLARA I/AG PLY AFAR DOABIFA GATE AIPPAACAACE NOSFOACAX SUAPE FRANC AG SOPS CA AVOnIOU BlOAT AP OBATTAM BSfl PATIWBOP 2 RFSAVPs AIlS SAGOMPON WASNATOACS ASIA 3CPNCNIMACF0SAMSBBI 155AMI LAUCTRA APSATFEAT TAFT FAA IAAAAASFGO CAIAIGAL SET TEAT PUSS LAM CANSTRACTIAN CANABBABAS CAPRIGUTS III SQP1511 RUARBO CANABUATCAG L& 7115 I/IL SQ DIAGUAAS 05 YB- I/MA I/S BIEOAASEOIIAIA lAX PSI SPARIIILAI/3L14 LEPTI SlAt ONLY ______ RISIIYSIEIE ONLY IINPSARACA ClANS IB -rm BINDLITIC SIIABY 1/140 I/B 032 MW 5/501/iI ALUMBOTTACS CACAGI1ILTHE LACY9j 1*40100 GCABI WITh APALcINIES TA 104 LNCEC U NeAt- 030001 - S SEB4I-SCALE FAN-FLYER FAR TIlT 2R6- A--YiI TOCII USIA 4MICGO-NT MAThO OLSIANAD TIARA/N 7/RI IJISITXR Continued page 160 Left Climbing altitude lightweight fun flyer best saved days wind light Right An overhead pass still climbing Like modelers author loves see craft high aloft illuminated sun membership $30 flying membership $33 outside US See next month y M81/z Continued page 72 Note used three-pin Deans connector rather charging jack furnished HiLine because other modelsand field connectoruse Deans plug isnt necessary keep charger connected after charging Simply insert plug has two pins shorted KMI IS THE LARGEST AND BEST EQUIPPED INDEPENDENT RC SERVICE AND REPAIR CENTER IN THE USA repair major brands new older models WE ARE FACTORY AUTHORIZED WARRANTY SERVICE FOR AIRTRONICS ACE AND HITEC stock genuine factory replacement parts EXCLUSIVE SERVICE AND SALES OF RCD-KMI 6 METER RECEIVERS 1991 Gold Sticker narrowband frequency upgrades-station #21 stock crystals 1 03 different frequen cies SEND SAE FOR COMPLETE PRICE REPAIR AND PRODUCT INFORMATION CALL FOR RUSH SERVICE together establish circuit continuity will start motor flight Test-flying Select calm day area covered proverbial tall grass Remove prop glide model wind gentle firm launch Make necessary adjustments glide path shimming leading edge stabilizer up down appropriate youre satisfied glide path reinstall prop still over tall grass try first powered flightbut partial 30% charge have correct amount right thrust model may circled either direction Like cabin models though seems prefer $ 9995 8 Ch 50 53 72 75 Mhz 2-wheel gear ycle 1 7995 includes amplifier Kraft Midwest Inc 115 E Main Northville MI 48167 313/348-0085 313/348-4175 left-hand circles Gradually increase charging time making trim adjustments necessary Warning rudder very sensitive find initial right thrust downthrust incorrect remove nose block dissolve model cement thinner reposition motor youre completely satisfied thrust line permanently install motor CyA glue nose block fuselage four small dabs cement corner model came out heavier desired 50 grams faint heart craft will fly just wellmaybe better motor will run just well harm three cells So relax have fun Fly Electric cale Continued page 75 overlapped before binding Drying could done overnight microwave both thicknesses sliced through razor blade overlapped balsa will match up nicely Getting skin off form done splitting part crosswise front spar wing addition split rear peg install bulkhead rear peg reinforcement finish off model Len partially planked cockpit fuselage fourpound balsa sheet covered model JCI silver tissue made three bladed props plastic flower pot Ducted-fan FF Scale seems to stay Ferrell Papics profile Heinkel HE 178 has flying couple years two Ferrels tiny modified motors never much altitude year hes put Astro 02 extra power really gets model up Interested getting started Electric Constant testing refinements have made Electric very attractive single- multiengined Scale models flight duration can controlled length charge Ni-Cd batteries Need power Usually adding another cell will trick As long allow engine turn up dont overload too-big prop problems will practically nil Three light FF systems can replace venerable Astro 02 has off market few years VL Products 7871 Alabama No 16 Canoga Park CA 91304 catalog $1 has excellent proven geared motor Peck-Polymers PO Box 710399 Santee CA 92072 has motor famed its low power requirements Send $3 Peck-Polymers catalog 160 Model Aviation 1991 KMI MINI ULTRA AM RECEIVER KMI RETRACTS A

Edition: Model Aviation - 1992/10
Page Numbers: 70, 71, 72, 160
THIS DESIGN started life 14-gram Bostonian semiscale Lacey M- 10 idea metamorphosis came cousin Tom Schmitt still HiLine Ltd time told motor used HiLines Mini-6 unit available gearing HiLine motor now available Micro-4 Don Srull Tom said built flown several small models successfully using little gem motor two 50-mAh batteries entire power train weighed 20 grams Id pretty well blocked out Lacey M-10 design quick calculation showed enlarging 48-sq-in Bostonian 12 times could convert 70 sq-in mini-Electric So after quick trip local photocopy shop design time motor Construction fun flyer easy build construction conventional caveat though Light weight allimportant Choose wood very selectively use much adhesive necessary dope structures covering lightly possible Wing I generally build structure first builder can choose between sliced sheet solid ribs chose sliced ribs because thought result would lighter Now Im sure since felt necessary use auxiliary spar support front upper cap strips either case choose light hut firm quarter-grained wood 6- 8-lb density Cut spars leading edges trailing edges firm straight grained wood 8- 10-lb density Build both panels flat plan Join center section Add gussets sand wing lightly over Note wing-attach screw location boxed small rectangles 1/16 balsa prevents having chase small 4-40 screw over inside covered wing did Tail surfaces too built flat plan recommend building fin rudder unit separating after have joined soft copper wire hinges Sand tail surfaces lightly over Fuselage deviation conventional box frame constructiontwo side frames joined cross membersis two side frames dont match cabin area full-scale prototype asymmetry result passengers door being right side looking forward pilots door left Cut longerons firm straight grained wood 8- 10-lb density Somewhat lighter wood acceptable uprights cross members diagonals Note top longerons have severe bend can achieved help either ammonia jet steam Since forward lower longerons 70 Model Aviation delivered model finished Lacey M-8/ flew off board its flying ever since Big picture power train accounts two-fifths mini-Electrics 51 grams Above wing rotates storage just full-scale Lacey M-1O straight may positioned flat building board allowing nose side pieces side frames joined use temporary bulkheads nose another rear cabin area maintain exact alignment squareness installing forward cross members diagonals adhesive has set draw tail posts together secure glue Complete structure adding remaining cross members diagonals Its best install short lengths /32ID aluminum tubing landing gear reinforcing gussets before covering upper lower surfaces nose 1132 sheet balsa Frame sides top nose /8-in-sq balsa bottom nose piece 1/8 X /4-in balsa shaped shown plan Mark position side Is-in-sq pieces ensure correctly aligned support nose block desired location Another way get right using temporary jig made scrap balsa As plans show top center cross member made 1/16 plywood drilled two holes made 3/33 drill Place drop thin CyA cyanoacrylate glue hole allow harden Tap holes 4-40 tap add second drop CyA Tap again after CyA has completely hardened Landing gear struts wheels tail wheel Bend gear shown two lengths 032 music wire Make sure identical Bind together fine copper wire indicated use two short pieces snug-fitting plastic tubing such heat-shrink tubing use tubing dont make final 900 bend strut until joined tubing Insert struts tubing sockets fuselage obtain correct spacing tack wire bindingsor tubingin place drop CyA Allow harden withdraw gear fuselage Laminate wheels two disks /8-in light balsa Mark location 1/16 center hole drill hole Thread 2-56 machine screw secure washer nut Chuck screw electric drill Dremel tool shape balsa disks sanding block emery board shaping fingernails Remove screw glue short piece 1/32.ID aluminum tubing axle bearing Install wheels landing struts retaining /16-in-long piece tubing secured CyA Bend tail wheel 032 music wire fill center small balsa disk Install tail wheel fuselage landing struts faired piece bond paper creased down center Form paper over wire glue place Shape nose block/motor mount piece soft /4-in sheet shown plan Make sure fits snugly fuselage nose matches its contour After shaping cut nose block apart indicated using razor blade cut out center Glue parts back together sand unit lightly Trial fitbut dont installthe motor making certain youve provided clearance armature Covering finishing Lightly sand entire framework removing irregularities protrusionsdefects would mar covering Carefully dope structure two coats Litecoat thinned 50-50 sanding again between coats Recheck model squareness warps correct imperfections remain used white Japanese tissue prototype attached applying thinner through covering point leave three bays bottom fuselage uncovered immediately front wing trailing edge aft Spray tissue lightly rubbing alcohol shrink shrinking wing covering wet side time pin structure building board trailing edge raised /s tip provide washout tail surfaces should pinned down flat minimize warpage after wetting covering Once youve succeeded eliminating wrinkles give covering two coats thinned Litecoat wing panels recommend doping surface time pinning panel down until Litecoat has dried tail surfaces too should doped surface time pinned down flat dry Lightly sand surfaces repeat sequence second coat Affix small medium-grade sandpaper pads top fuselage underside October 1992 71 Installing flight batteries model placed two pencils set block wood batteries moved fore aft until airplane balances completed structure ready covering extensive use diagonals helps minimize warpage structure light Lacey M81I2 FULL-SIZE PLANS AVAILABLE SEE PAGE 186 --I4A4A I3AAIAG F4OIGAAAI/AL AF APABTA \~Z1 AABC wing center section shown using model cement pads prevent wing rotating under normal flight loads allowing give under impact decorated model using method devised late Walt Mooney Florists tissue available crafts stores cut patterns strips letters/numerals applied airplane thinner using same method tissue can indulge much ornamentation desired very little cost weight Control surfaces doors access panels can outlined fine-point felt marker such Sanford Sharpie Color tires black dope Make wheel disks color wish either match contrast trim color Temporarily install motor desired angle covered nose block using model cement recommended HiLine Hold nose block place cellophane tape Install stabilizer cementing spar Install fin rudder Plug landing gear Attach wing /2-in-long 4-40 nylon screw Install motor model cement recommended HiLine flight tests may have adjust thrust line later Attach propeller model now complete except batteries charging jack wiring Mark two points underside wing exactly lI8 back leading edge first outboard rib either side Take two rubber-tipped pencils same height place upright six inches apart block wood Position model pencils wing marks determine correct fore aft locations batteries slide batteries forward rearward until model balances horizontally Installation details prototype shown plan 72 Model Aviation ASIA C/IS SPAR- ________ __________ SAL L4i IiPFSIVIBG OF ACASFAM SARR00111ii TIPPIAtF SIIAr AlAS I/tWAGICUT WflI SIPS 1/14SI-ICADAJ&NBSSC/S4TIP5INDICATES 01* LOCATION 01LTERAGTE1*I/s0RIGS I1 REPSO11144FMFAQO IAA-- --------1---L7I- --- .STADILIZPR CAN STUCTIONSF00 DIADGALTAIBA LBPIPS SPAR LPJBS AG TE-I/GA 1/5 DIAGONALS-i/l10 I/SO 43/AL FLARATRJASASNLLARA I/AG PLY AFAR DOABIFA GATE AIPPAACAACE NOSFOACAX SUAPE FRANC AG SOPS CA AVOnIOU BlOAT AP OBATTAM BSfl PATIWBOP 2 RFSAVPs AIlS SAGOMPON WASNATOACS ASIA 3CPNCNIMACF0SAMSBBI 155AMI LAUCTRA APSATFEAT TAFT FAA IAAAAASFGO CAIAIGAL SET TEAT PUSS LAM CANSTRACTIAN CANABBABAS CAPRIGUTS III SQP1511 RUARBO CANABUATCAG L& 7115 I/IL SQ DIAGUAAS 05 YB- I/MA I/S BIEOAASEOIIAIA lAX PSI SPARIIILAI/3L14 LEPTI SlAt ONLY ______ RISIIYSIEIE ONLY IINPSARACA ClANS IB -rm BINDLITIC SIIABY 1/140 I/B 032 MW 5/501/iI ALUMBOTTACS CACAGI1ILTHE LACY9j 1*40100 GCABI WITh APALcINIES TA 104 LNCEC U NeAt- 030001 - S SEB4I-SCALE FAN-FLYER FAR TIlT 2R6- A--YiI TOCII USIA 4MICGO-NT MAThO OLSIANAD TIARA/N 7/RI IJISITXR Continued page 160 Left Climbing altitude lightweight fun flyer best saved days wind light Right An overhead pass still climbing Like modelers author loves see craft high aloft illuminated sun membership $30 flying membership $33 outside US See next month y M81/z Continued page 72 Note used three-pin Deans connector rather charging jack furnished HiLine because other modelsand field connectoruse Deans plug isnt necessary keep charger connected after charging Simply insert plug has two pins shorted KMI IS THE LARGEST AND BEST EQUIPPED INDEPENDENT RC SERVICE AND REPAIR CENTER IN THE USA repair major brands new older models WE ARE FACTORY AUTHORIZED WARRANTY SERVICE FOR AIRTRONICS ACE AND HITEC stock genuine factory replacement parts EXCLUSIVE SERVICE AND SALES OF RCD-KMI 6 METER RECEIVERS 1991 Gold Sticker narrowband frequency upgrades-station #21 stock crystals 1 03 different frequen cies SEND SAE FOR COMPLETE PRICE REPAIR AND PRODUCT INFORMATION CALL FOR RUSH SERVICE together establish circuit continuity will start motor flight Test-flying Select calm day area covered proverbial tall grass Remove prop glide model wind gentle firm launch Make necessary adjustments glide path shimming leading edge stabilizer up down appropriate youre satisfied glide path reinstall prop still over tall grass try first powered flightbut partial 30% charge have correct amount right thrust model may circled either direction Like cabin models though seems prefer $ 9995 8 Ch 50 53 72 75 Mhz 2-wheel gear ycle 1 7995 includes amplifier Kraft Midwest Inc 115 E Main Northville MI 48167 313/348-0085 313/348-4175 left-hand circles Gradually increase charging time making trim adjustments necessary Warning rudder very sensitive find initial right thrust downthrust incorrect remove nose block dissolve model cement thinner reposition motor youre completely satisfied thrust line permanently install motor CyA glue nose block fuselage four small dabs cement corner model came out heavier desired 50 grams faint heart craft will fly just wellmaybe better motor will run just well harm three cells So relax have fun Fly Electric cale Continued page 75 overlapped before binding Drying could done overnight microwave both thicknesses sliced through razor blade overlapped balsa will match up nicely Getting skin off form done splitting part crosswise front spar wing addition split rear peg install bulkhead rear peg reinforcement finish off model Len partially planked cockpit fuselage fourpound balsa sheet covered model JCI silver tissue made three bladed props plastic flower pot Ducted-fan FF Scale seems to stay Ferrell Papics profile Heinkel HE 178 has flying couple years two Ferrels tiny modified motors never much altitude year hes put Astro 02 extra power really gets model up Interested getting started Electric Constant testing refinements have made Electric very attractive single- multiengined Scale models flight duration can controlled length charge Ni-Cd batteries Need power Usually adding another cell will trick As long allow engine turn up dont overload too-big prop problems will practically nil Three light FF systems can replace venerable Astro 02 has off market few years VL Products 7871 Alabama No 16 Canoga Park CA 91304 catalog $1 has excellent proven geared motor Peck-Polymers PO Box 710399 Santee CA 92072 has motor famed its low power requirements Send $3 Peck-Polymers catalog 160 Model Aviation 1991 KMI MINI ULTRA AM RECEIVER KMI RETRACTS A

