
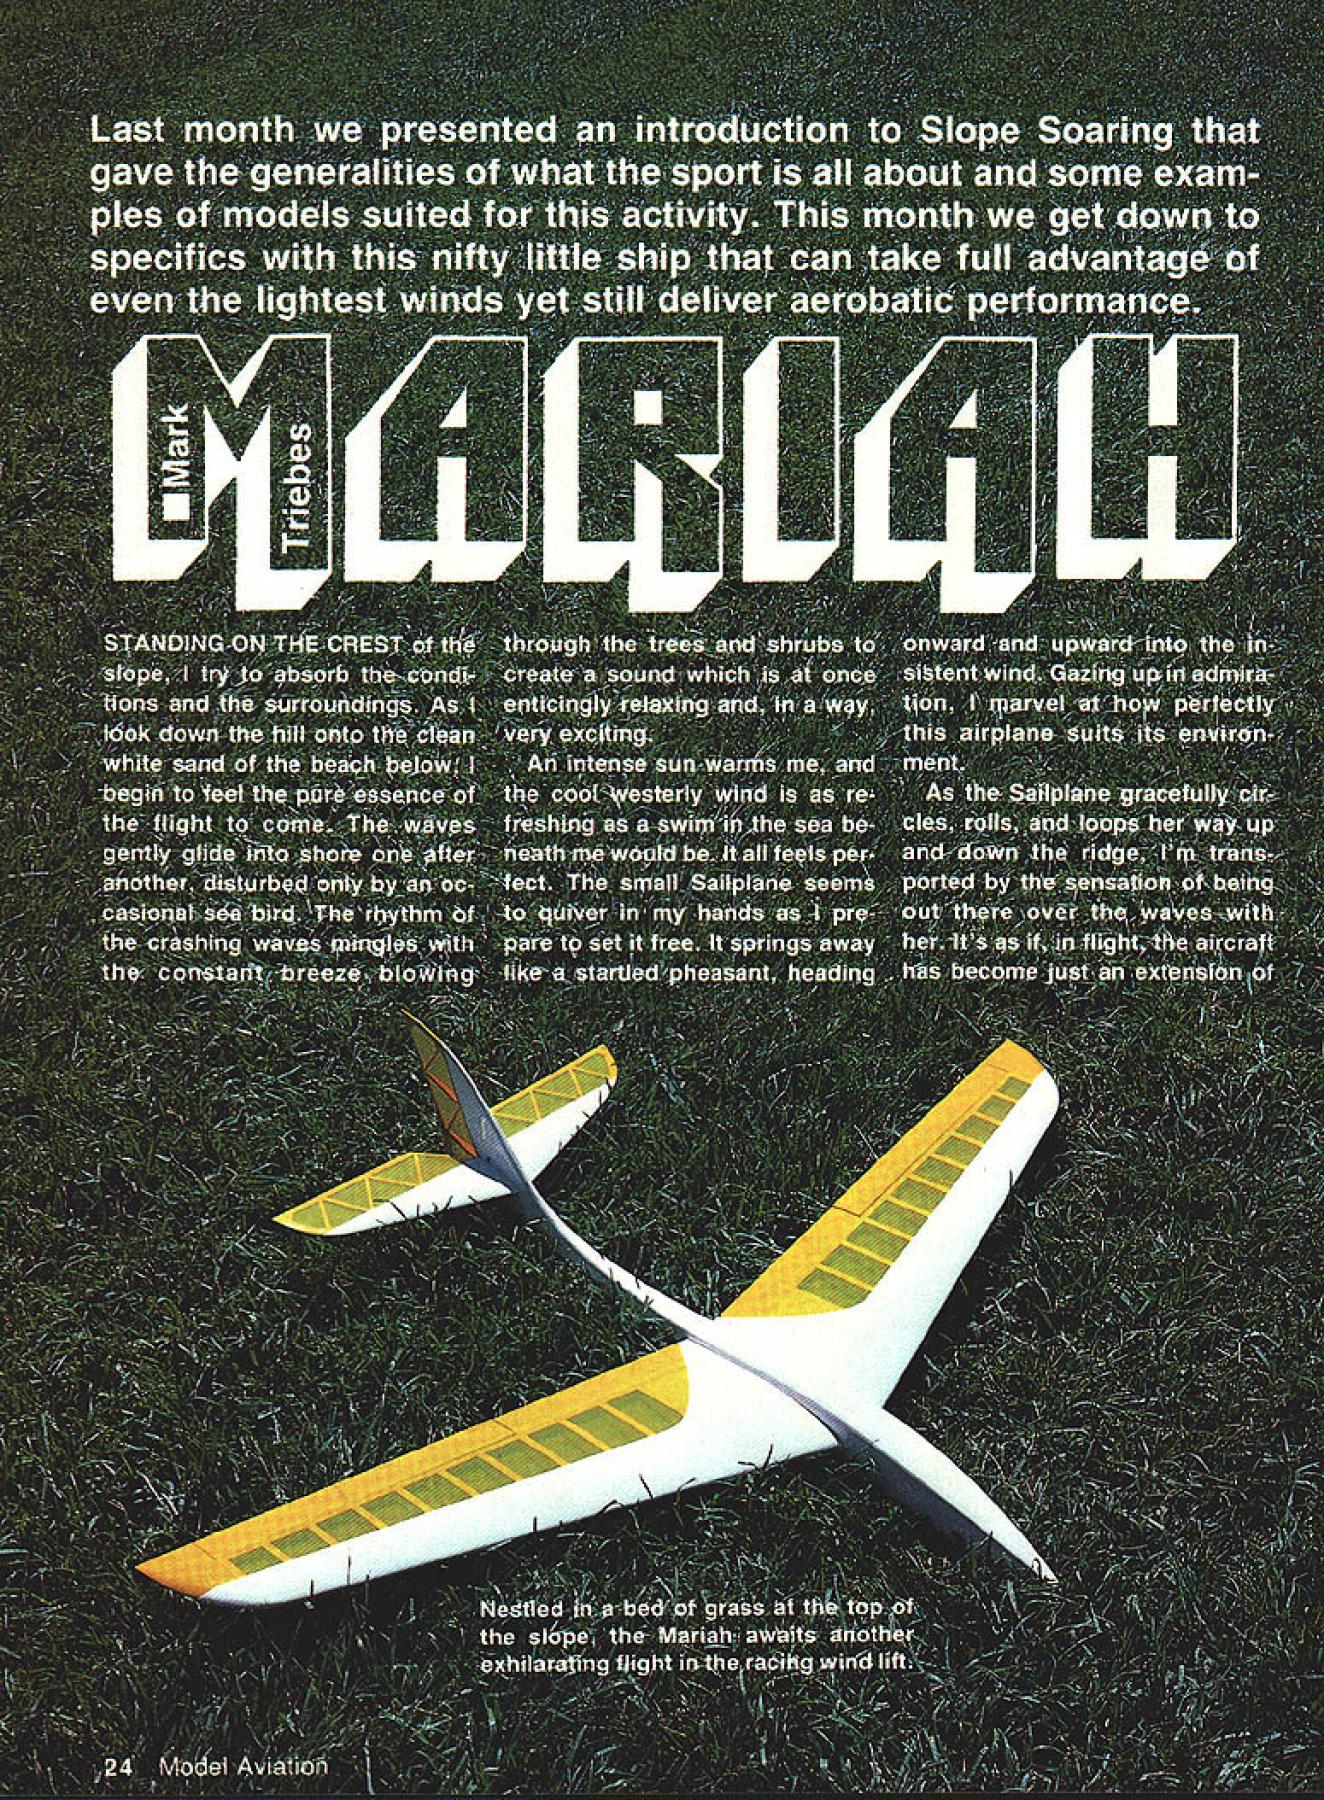
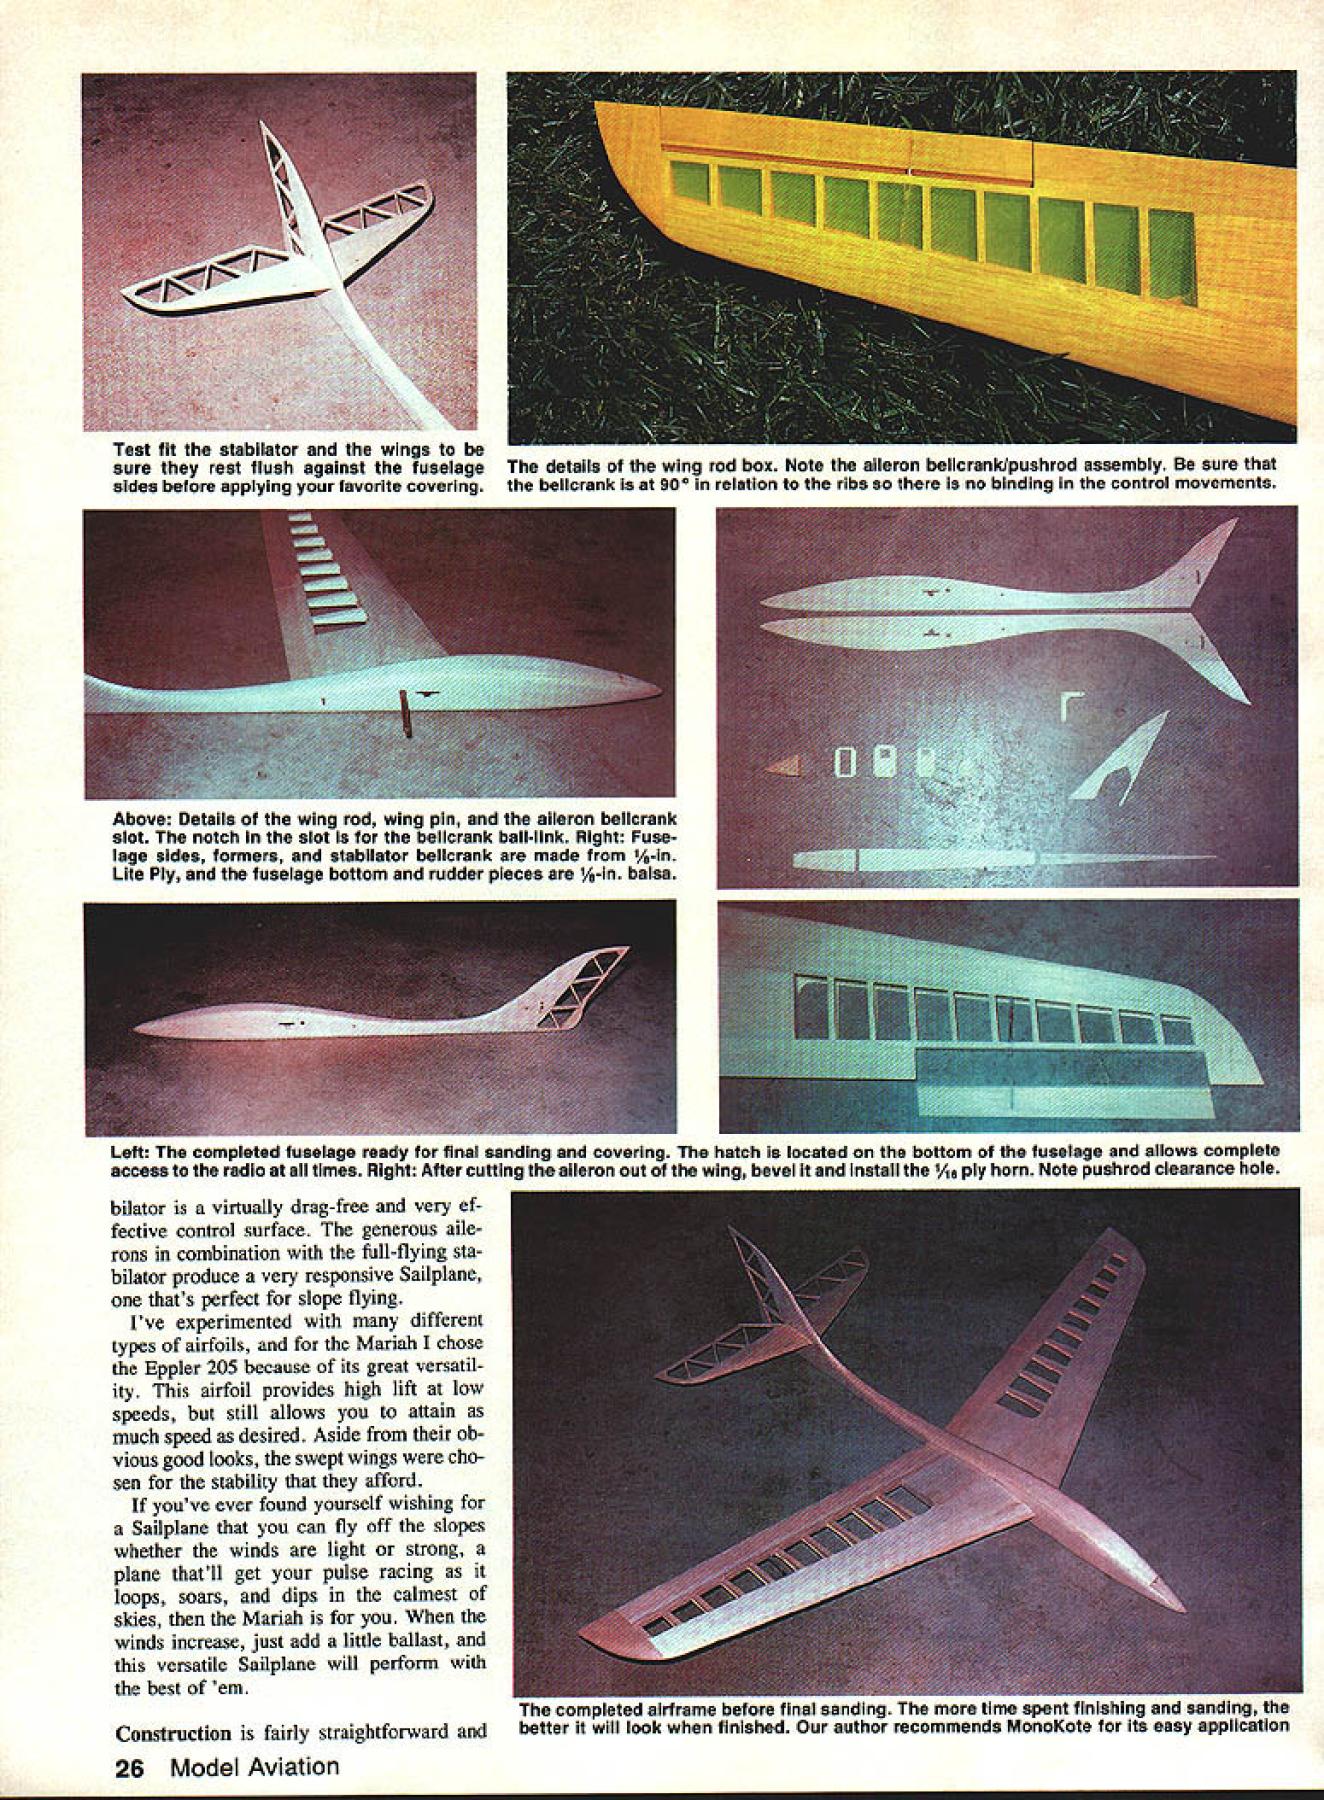
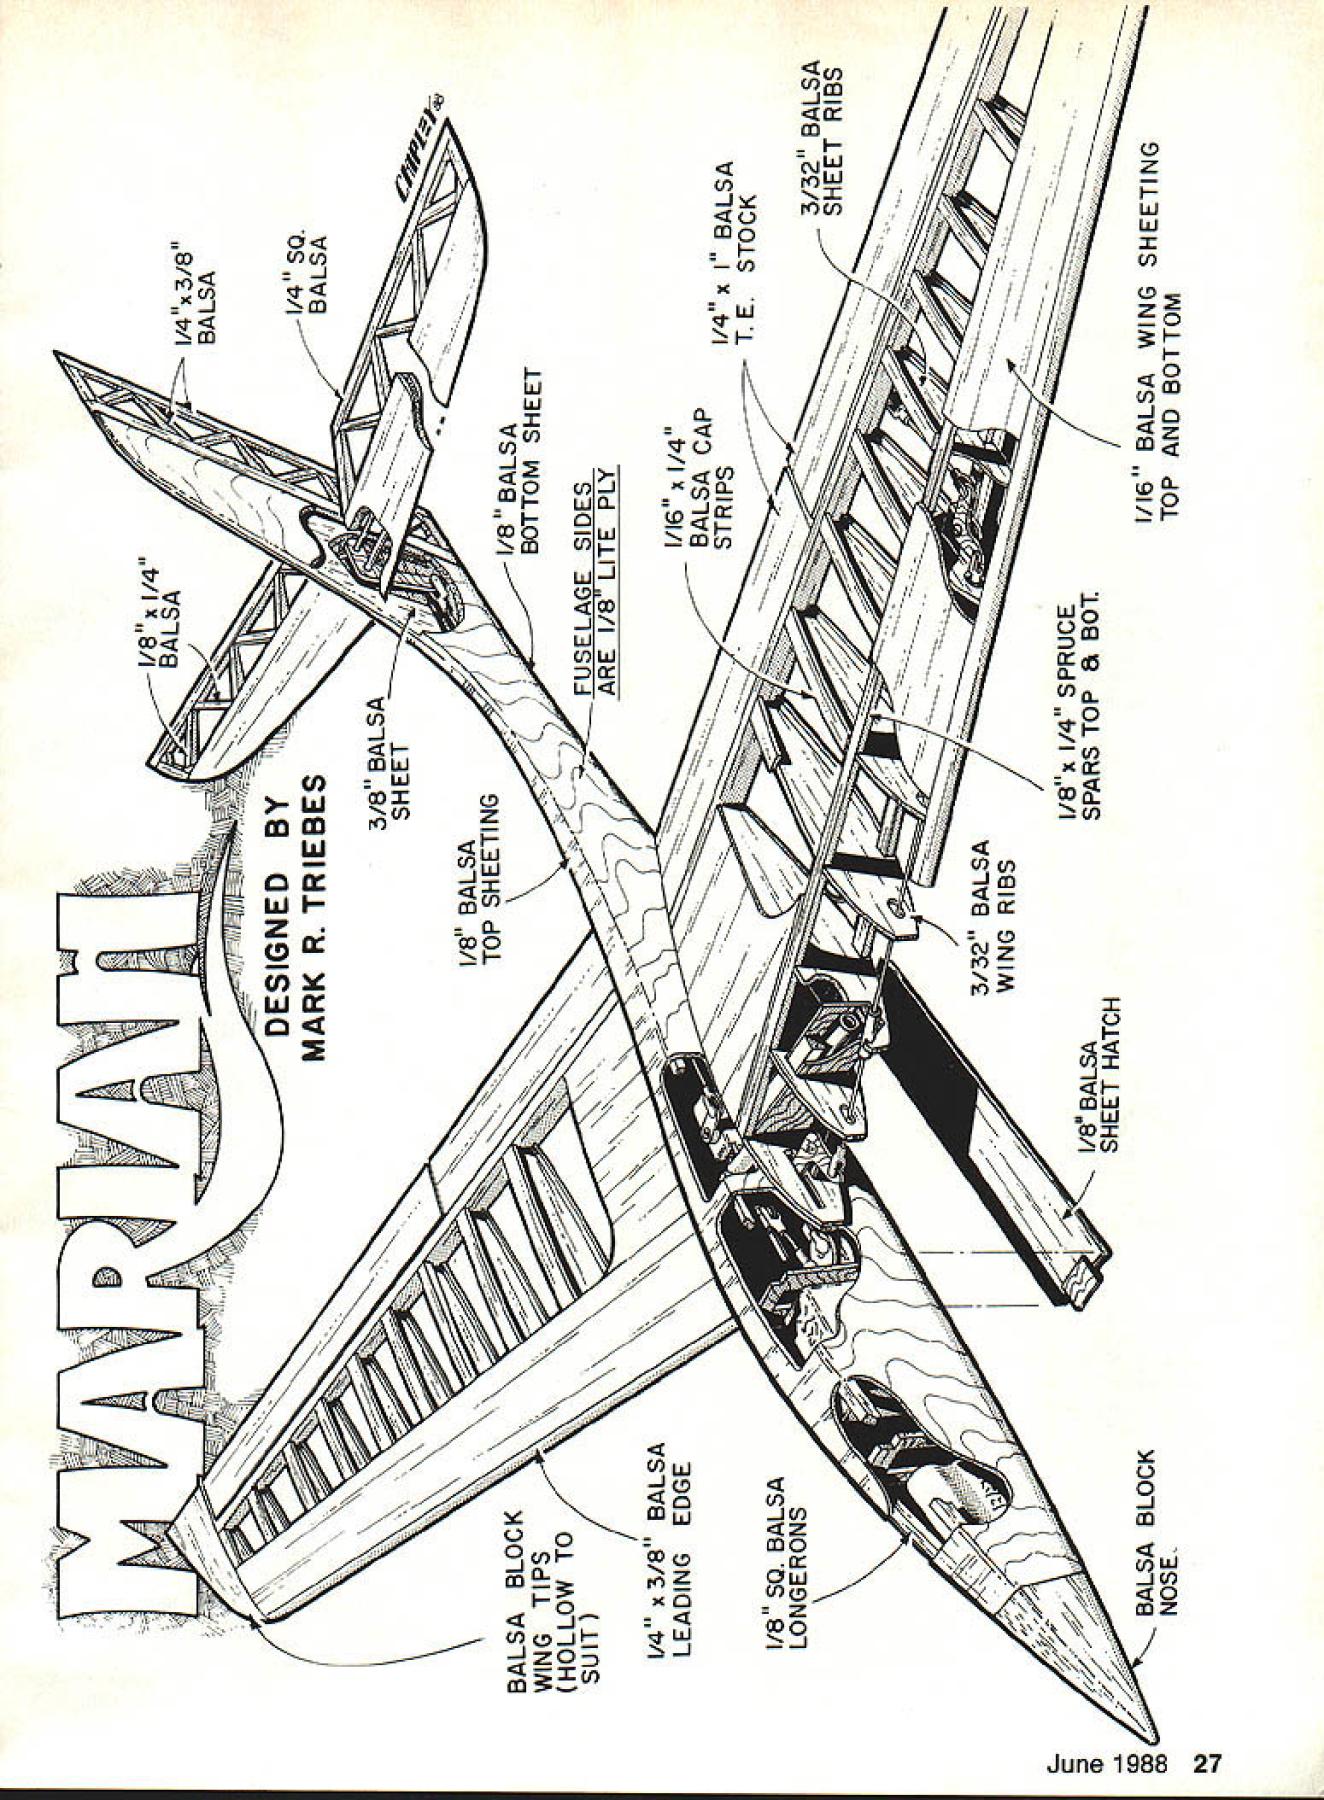
NO OCR TEXT myself What started life mere bundle sticks sheeting now seems virtu ally part Its heady illusion surrender gladly sense freedom brings like no other realize through no other act can achieve such feeling idyllic scene Ive just pictured has experienced Sailplane fliers its relatively rare detail falls perfectly place Most Sailplanes require least moderate winds der fly times have taken ship slopes oaly find have wait hour two wind really start blowingor wind never blows about five 10 knots Ive encountered both conditions occasions have either resorted flying floater flown Floaters can relatively amusing can stand much S-turning back forth What wanted some type Sail plane highly maneuverable aer obatic could also fly very light winds wanted ship fun quotient dependent gale force Obviously such plane would have be small lightweight agile Guided basic criteria eventu ally evolved design happy called Mariah wingspan approximately 40 weight coming less pound Sailplane exactly what looking Creating design would perform intended took great deal consideration shows Mariah clean smooth lines Sailplane evident angles Achieving in-flight penetration wanted called aerodynami cally clean design very low drag ailerons built no protruding con trol horns used covering gap either Mylar MonoKote reduces drag minimum Also full-flying sta June 1988 25 full-flying stabilator provides Mariah highly responsive pitch controlsome thing very much required slope flying Placed next standard-size Sailplane Mariahs small size really becomes evident span just over 40 weighing less 1 lb Mariah unique among Sailpianes Although fuselage Sailplane very small generous room todays smaller radio systems author uses standard Futaba receiver S-20 servos 225 mAh battery pack stand shown made PVC pipe foam tubing vvnen olsassemDleo aIIpIane smallest cars transporting favorite flying site use ball-links aileron belicranks servo arms en ables quick easy assembly field An aerodynamically clean design allows iah perform does minimal drag enables penetrate well wide variety wind conditions typical Slope Soaring Test f stabilator wings sure rest flush against fuselage details wing rod box Note aileron bellcranklpushrod assembly sure sides before applying favorite covering belicrank 9O relation ribs no binding control movements bilator virtually drag-free very ef fective control surface generous aile rons combination full-flying sta bilator produce very responsive Sailplane thats perfect slope flying Ive experimented different types airfoils Mariah chose Eppler 205 because its great versatil ity airfoil provides high lift low speeds still allows attain much speed desired Aside ob vious good looks swept wings cho sen stability afford youve ever found yourself wishing Sailplane can fly off slopes whether winds light strong plane thatll get pulse racing loops soars dips calmest skies Mariali winds increase just add little ballast versatile Sailplane will perform best em Construction fairly straightforward 26 Model Aviation Above Details wing rod wing pin aileron bellcrank slot notch slot belicrank ball-link Right Fuse lage sides formers stabilator belicrank made 14-in Lite Ply fuselage bottom rudder pieces %-in balsa Left completea Tuselage reaay tor sinaI sanding covering hatch located bottom fuselage allows complete access radio times Right After cutting aileron out wing bevel install IA olv horn Note pushrod clearance hole rtrame Detori sanaing ne jime 5UflI nnsnirig unu finished author recommends MonoKote its easy ein DESIGNED BYMARK R TRIEBESBALSA 3/8 BALSA TOP SHEETINGI/8BALSA BALSA BLOCK BOTTOM SHEET WING TIPS SUITFUSELAGE SIDES ARE I/8 LITE PLY 1/4 x 3/8 BALSA LEADING EDGEI/IS X 1/4 BALSA CAP STRIPS /7 5 -V K A- - BALSA BLOCK NOSE I/B SQ BALSA LONG ERONS 7 S / 3/32 BALSA WING RIBS 7 1/8 BALSA SHEET HATCH 3/32 BALSA -SHEET RIBS 1/4 x BALSA TE STOCK 2CI/8x 1/4 SPRUCE SPARS TOP B BOT 1/16 BALSA WING SHEETING TOP AND BOTTOM simple fuselage built Lite Ply balsa tail feathers con structed entirely balsa wings built up leading edge sheeting have very simple clean aileron setup Cover ing easily accomplished MonoKote builders entire project will take very little time As old hand scratch-building though Ive discovered number things Id like pass hints should help com plete Mariah rapidly efficiently possible First sure use clear plastic sheet ing such plastic wrap MonoKote back ing over plans preserves plans ensures cleanly constructed model Second choosing adhe sive use white glue such Titebond majority work good epoxy specified directions Third sure use Lite Ply fuselage sides stabilator roots inner wing ribs spruce wing spars good contest-grade balsa remainder Sailplane Fourth make sure label parts especially wing ribs fuselage form ers will no confusion dur ing construction Fifth important read article study plans before start build familiarize yourself Mariahs design construc tion sequence involved Ribs Cut plywood root rib tip rib us ing templates sand shape blanks placed between efficient method constructing ribs Cutting out time very tedious time-consuming also doesnt allow construct really true wing Any irregalarities shape airfoil will detract appearance performance finished model Making root tip templates important part procedure Us ing A-in plywood make two sets both root tip rib Take care cut sand four perfection will ensure true wing constructed ribs themselves made mediumweight %2 balsa 1-in strips Using plan guide cut strips proper lengths Remember label ribs sure make two now have two sets rib blanks proper length unshaped Lay rib blank place plans Mark location bottom spar cut out 1/8 x A-in spar notch Place ribs blanks templates spare piece spar stock Sand rib blanks proper shape can very tedious step unless use few techniques make easier First use Scotch and/or masking tape help hold ribs together much easier pins can sand right through tape necessary Second instead relying arm power entire job gin using power drill flexible sanding disk get shape close what want first technique will seem little awkward should get used rather quickiy Once youve finished power drill hand sanding ribs down final shape should take few minutes important achieve straight line across top ribs theyre viewed front rear bowing line will result mis shapen wing Remove ribs spar stock mark cut notch top spar us ing plans Drill A-in holes ribs W-2 through W-8 aileron linkage again using plans reference Wing Either two methods works equally well building wing cap strips shown plans constructing fully sheeted chose use cap strips purely grounds like finished look better because minute weight difference choice can based strictly personal preference Con struction differences between two proce dures will noted appropriate may have heard countless times its worth repeating sure make both right left wing best experienced builders have known make either two lefts two rights Cut x 1-in balsa trailing edge length securely pin place plans point sure cover plan plastic wrap MonoKote backing havent already done Cut first two x %-in balsa strips length glue trailing edge Cut second balsa strip glue trailing edge up aileron begins Spot glue drop glue 2 along length aileron youre building fully sheeted wine cut /l6 balsa bottom sheeting glue place youre using cap strip method cut root sheeting leading edge sheeting cap strips attach glue both fully sheeted cap stripped wings sure leave about / extra sheeting beyond lead ing edge begins youll sand off excess after attaching ribs top sheeting Cut in spruce spar length glue position sheeting Once dry build wing rod box Epoxy appropriate adhesive step sure fill space around wing rod scrap balsa microbal loons brass wing tube held se curely Once entire box has chance dry glue place bottom sheeting Before permanently attaching ribs sure block up leading edge sheeting will fit flush against bottom ribs piece trailing edge stock does very well Glue ribs W-1 through W-13 place Cut top spar length glue position over ribs Since aileron pushrods bellcranks need properly aligned unrestricted control movement take extra care con structing assembling adjusting I/Bx 1/4 SPRUCE SPARS TOP B BOT WING PLAN TOF 3/32 BALSAAILERON SHEET RIBSBELLCRANK P4 BALSA BLOCK WING TIPS HOLLOW To11 SUITh --I IIIi Lct II II I IIIt I/S LITE PLY BALSA GUSSETS- - 1/B 1/4 STABILATORBALSA 1/16 BALSA BALS~/ BRASS STAB SECTIOII DETAIL TUBES BALSA BLOC NOSE 1/16 PLY1/4 OD BRASS SIDESWING ROD TUBE / BALSA 8 MICRO rop VIEW BALLOON PILL VIEW/4 OD BRASS VB z 1/4 SPRUCEWING ROD TUB WING BOX DETAIL Using plan guide four pushrods two wing cut A6-in music wire proper lengths Solder threaded coupler onto end long rod install wing Solder other coupler onto other end rod Cut A-in Lite Ply size make bellcrank platforms Mount bellcranks glue both platforms place bottom sheeting Attach nylon devises end long pushrod connect bellcranks shown plans Check binding everything fits perfectly ad just pushrod root bellcrank 900 relation W-l outer bellcrank also square relation ribs Make smaller pushrod same man ner exact length pushrod will determined once aileron cut out horn has glued place Cut glue top sheeting youre using cap strips shown plan Al low entire structure dry thoroughly 28 Model Aviation Full-Size Plans Available. See Page 164 SEE TEXT S DETAILFUSELAGEI/B LITE PLY FOR WING BOX CONSTRUCTIONOUTLINEB/C MOUNT3a BALSA AILERc BELLCRANKLEADING EDGE ON I/B LITE PLYIAILERON PUSHROD MOUNT 1/16 BALSA WING SHEETING TOP AND BOTTOM INNER NYROD 1/8 BALSA GUSSETS I- A CAP /4 BALSA TE STOCKSEE TEXT FOR MAKING 3/32 BALSA WING RIBS D BRASS1/4 3/B IILATOR TUBESROOT SECTION DETAIL I/B 1/4 SPRUCE SPARS________ ______________________TOP AND BOTTOM SEE DETAIL FOR CONSTRUCTION /4 50 BALSA 1/4 OD BRASSI/B SO BALSA TUBE LONG ERONS I/B OD PLY SIDESBRASS VN FOR CLARITYSI DE VIEWTUBE F-I_F3I/B BALSA _-TOP SHEETING BATTERYRECEIVERhvoCF-4 ______ELEL SERVO I/Bx 1/4 SPRUCE I-/ SHEET HATCHWING ROD / WINGI/B zI/4 PINSPRUCE TIP SECTION DE1IL STAB HORN DETAIL ASS I/B LITEBE PLY / 1/8 BALSA BOTTOM SHEET F1F-2F3F-4 TOP VIEW FUSELA E SIDES___________________ 1/16 PLY HATCHARE I/B LITE PLY RETAINER I/B SO BALSA LONGERONS F ~ENNA F-2F-3 ALL LITE PLY STABLAIOR 7Th PUSHROD F-4oI 2 3 4 5 BALSA AILERON HORN3/B BALSAGUSSET DETAILSHEET BALSSCRAP BALSA MODEL AVIATION MARIAH 6 DESIGNED BY MARK R TRIEBES TRACING BY OE DEMARCO ALL RIONTS W3Wfl before sanding wing very careful avoid making flat spots irregularities sanding wing desired shape simplify procedure suggest make very long flat sanding block ie 24 x 4 sanding block size reduces prob ability error Sand down two x %-in strips proper airfoil shape Sand tip wing flat cut balsa wing tip proper shape glue onto wing making sure just spot glue aile ron Sand off excess sheeting lead ing edge glue x %-in balsa lead ing edge place Sand root wing flat glue A6 plywood root rib wing now ready final shaping sanding long sanding block will help achieve smooth evenly contoured result Cut out aileron per plans sand proper bevel allow con trol movement Carefully drill A-in hole wing trailing edge push rod Make control horn temporar ily slide cut made aileron Place aileron position adjust small pushrod both bellcrank ai leron neutral settings glue horn place Fuselage Cut two sides A-in Lite Ply Once again dont forget make both right left side Mark location wing stabilator bearing hole rear wire slot shown plans Us ing third root rib precisely mark drill fuselage sides Spot glue tape rib place fu selage side drill wing rod hole wing pin hole Mark location ai leron bellcrank slot remove rib fuselage side cut slot Drill stabilator bearing hole cut rear wire slot Cut x A-in longerons length glue place longerons must beveled tail fuse lage sides will fit flush together Make stabilator control horn out -in Lite Ply Drill pushrod clevis hole bearing hole rear wire hole Cut two pieces A-in-OD brass tubing %-in lengths Epoxy tubes rear wire hole epoxy dry ing insert length %2 music wire tube make sure tube perpen dicular control horn Any misalign ment control horn will result crooked and/or ill-fitting stabilator Make stabilator pushrod Cut formers F-i F-2 F-3 F-4 out A-in Lite Ply Glue formers F-2 F-4 place between two fuselage sides over top view plans sure fuselage aligned correctly Cut brass wing rod tube length June 1988 29 A-J Hornet RURSER POWERED $695 es 404 Interceptor....695 ea 74 Rghrs695 ea A-J T-Shirts ALL SIZES--795 ea Note Please add $300 0 Postage Handling lost 3 packagod nodes Add 10% poe cant addoonal nodal Am~dJUiCI AIRCRAFT COMPANY ROBox 68132 PORTLAND OR 97268 503 653-2038 Best Europe s leading manufacturer Pilots supply fully positional figures National Scale Champs dress pilots known apparel Accessaries include Helmets Goggles Sun Glasses Bobble Hats Baseball Caps Floppy Hats Bone Domes Oxygen Masks Maewests popular types WW WW II sports one-piece suit stripes colors NATO one-piece suit map pockets olive green glider pilots turtle neck sweaters floppy hat sun glasses Standard pilot tan pants simulated leather jacket fur collar baseball cap sun glasses pilots lightest ever come painted dressed ready fly 1/4 Scale Plus $500 postage handling 1 Scale irmail Have fun Ye Scale parachutist ram chute rip-stop nylon ready servos Takes standard flight pack makes Plus $10 Easy Ordering. fast deliveryPostage Handling send phone VISA MasterCard Number AH DESIGNS 31 OLD WORKSHOPS FFORDDDERWEN CL WYD UK 2YR slide place Now glue former F-3 flush against brass tube Al low dry thoroughly sure properly position A-in balsa rudder piece stabilator control horn pushrod before gluing tail sides together Glue sides together over plans sure proper alignment Make balsa nose block glue former F-i nose block place tween two sides Epoxy brass wing rod tube place Drill wing pin holes wing Cut 7A2-in music wire wing rod length plug wings Place wing fuselage align wing pin hole fuselage wing root rib Using long A-in drill slide wing rod through both wing pin holes fuselage drill / wing Repeat procedure other wing Cut A-in-OD brass wing pin tube length glue place fuselage Cut two 3/a-in tubing lengths gluing place wing Cut A-in balsa sheet ing glue place across top fuselage back former F-4 Cut length inner Nyrod tubing hold antenna Cut rear bottom sheet ing size Drill A-in hole diagonally through sheeting antenna tube exit plans show desired position hole glue sheeting place Slide antenna tube through hole hole former F-4 Use epoxy hold antenna tube place glue re mainder top sheeting Cut hatch A-in balsa Cut off end glue x A-in spruce pieces Cut hatch retainer tongue ood glue onto balsa hatch shown plans Cut length / x A-in spruce hatch retainer piece glue onto bottom fuselage along x A-in spruce piece rear end hatch Trial fit hatch sand until fit just snug hatch fits too closely point probably will fit once fuselage have covered youre satisfied fits properly spot glue hatch place Cut forward bottom sheeting /8-in balsa glue place begin sanding fuselage until after constructing attaching vertical fin Vertical fin have fully sheeted wings will probably want openframe tail section Instead construct en tire vertical fm %-in balsa sheet wont add too much weight tail both prototypes came out nose-heavy lieve have fully sheeted wings still want build open-frame vertical fin thats fine too used cap strips wings highly recommend build openframe version Using x %-in balsa stock cut length glue together fm border pieces Cut length inner structure / x %-in 30 Model Aviation 1/32 scale plastic model kits Golden Age air racers Colorful highly detailed miniatures Send $3 fully illustrated catalog other kits accessories 7 cant believe it.she let fly A-J Hornet e % Scale Tel 0745-53987 SLUCK auu i1LLi1A1 glue sure add gussets specified plan After structure has dried glue place fuselage really arent shortcuts tricks expedite sanding fuselage Just use lot old-fashioned elbow grease until fuselage has desired smooth rounded look feel finished sanding cut hatch out fuselage spot glued earlier least dozen dif ferent ways securing hatch fu selage ranging simply using Scotch tape complicated hook-and-rubberband setup recommend using some type hold-down technique keeping sim ple possible Carl Goldberg Models Inc makes angled hold-down would work very well Ill leave decision up Stabilator As vertical fin build ing stabilator open frame will probably choice have fully sheeted wings case use A-in balsa sheet rear portion stabilator Construct front portion stabila tor A-in balsa sandwiched between /16 balsa Cut two %-in balsa pieces mak ing sure exactly wide Cut two slots slots must perpendicular root Cut four pieces 1/16 balsa glue A-in piece onto 1/16 pieces Cut A-in OD brass tube pieces length epoxy place two slots Make sure cut two tubes /8 longer slots youll need extra length extend through stabilator root rib Glue another A6 piece top struc ture Pin place plan build frame structure stabilator Cut out two stabilator root ribs A-in Lite Ply Drill A-in bearing rear wire holes Glue root ribs place stabila tors After entire stabilator structure has dried sand final shape Finishing covering Once major construction completed fine-sand surfaces large sanding block some fine sandpaper ie 150-or 220-grit fuselage has sand ed smooth rounded appearance want trial fit wing stabilator sure contiguous surfaces fit flush goal keep gaps utmost min imum truly aerodynamically clean Sail plane sanding leading edge wing sure leave adequately rounded too sharp sharp leading edge doesnt bring faster speedsonly faster stalls help prevent tip stalling lead ing edge should also rounded less sharp tip root Leave tip flat bottom sand gen tle curve going W-13 edge tip Any type iron-on covering will work well Mariah suggest MonoKote used MonoKote very light weight strong just about easiest coverings put color scheme up recommend transparent color over open frame areas opaque over sheeted areas fuse lage Hinge ailerons either -in strip MonoKote clear Mylar Its good idea also cover gap bot tom side aileron strip Mono Kote Mylar sure attach strip wing aileron itself Radio installation Although very small Sailplane still generous amount room radio used stan dard Futaba receiver S-20 servos 225 mAh battery pack Mount stabilator servo far forward possible right up next wing rod tube Also mount aileron servo far forward possible tween formers F-2 F-3 Use ball links both servo arms aileron bellcranks provide plenty unrestricted con trol movement installing battery nose Sailplane first put some foam rubber pad battery pack Flying Now comes reward hard worktaking Mariah slopes letting try wings center-ofgravity CG shown plan has proven workable balance point suggest least using startContinued page 128 June 1988 33 altitude about 200 ft realized absolutely no control whatsoever model went left-hand spiral dive resulting impact macadam runway drove OS 30s crankshaft Out through rear crankcase cover turned model yellow Cover ite bag balsawood Also GI Joe pilot lost headbut lived fly again Other having stripped gears servos radio functioned flawlessly after crash So theory about loss control partially disconnected receiver battery pack stuffed rearward tempt shift CG time didnt bother tape radio connectors engine vibration took care rest disconnection So never did find out whether rearward CG shift would have improved J-3s spin entries did learn secure connectors tape fu ture models fly alone fly alone number readers sent letters commented Plane bites man story March 1988 column concerned incident modeler struck seriously injured own plane advice also Never fly alone Apparently lot out dont subscribe advice Most seem feel because no flying site wont suffer injury loss model because someone elses mistake Similarly mistake does jeopardize someone elses safety may true being hit model frequent cause injury Feeding fingers through own models prop com mon cause injury Driving car hand easy may impossible other hand being used stop flow blood Flying untested Scale models recent letter Del Rykert Batavia NY expressed con cern about numerous occasions wherein has seen modelers enter Scale contest model hadnt tested airworthiness Del asked opinion prevent such flagrant violation safety Unfortunately didnt have simple solution offer Del thinks Scale modelers reluctant test fly new model prior entering contest cause want save static judging such case suggests solution may reverse current order judging such fly first have static judging last As stated response Del dont have good feel prevalent problem Thats Im mentioning asking input Scale modelers have real safety problem untested models being flown Scale contests what solution MariahlTriebes Continued page 33 ing point may wish adjust bal ance fit own flying style come accustomed Mariah Sailplane likes fly fast smooth Mariah has full aerobatic cap abilities extremely stable aircraft speeds swept wing keeps plane highly stable during slow flight slows down very well landing need spoilers flaps said done impor tant thing have funand some exhilarating slope flying Ive experi enced has little Sailplane Mariah may best Soarer Ive ever flown shes definitely right up first rank Try yourself youre bound agree Radio Technique/Myers Continued page 36 can accurate enough find transmitters outside AMA frequency tolerances comes measuring power levels really isnt good enough installing Gold Silver stickers paragraph 322 AMA Guidelines requires spectrum analyzer used purpose think ICOM good enough reveal illegal crystal swappingand Contest Director really wants know about RC Giant Scale/de Vries Continued page 41 bewildering Some efficient othersthey convert same amount gas glow fuel power per cubic inch Thus some installations may able get away smaller engine just because efficient others its displacement range too hobby shops distributors carry available engines engine choice may depend availability cost factors other considerations proper propeller can make break spe cific engine great prop efficiency viewpoint may turn competent engine raging tiger Flight altitude included list engine choice factors primarily because its BIG amongst us Rocky Mountains Just cause fly altitudes 5000 7000 ft above sea level know going lose 20% engines power before props spun Conversely fly sea level en gine going put out its full power Since concerned scale outlines ten engine choose determined de sire keep within confines cowling best criteria lot us dont like bunch iromnongery disrupting scale lines models Hence inclined choose physically smaller engine might appropriate power-required view point Finally often consideration brand loyalty weve successful product particular manufacturer dined buy another engines Nothing wrong criterionas long favor ite manufacturer produces range power plants Andyou can choose suitable model Engine choice very personal thing can listen pronouncements experts theyre frequently right can follow rec ommendations models designerafter hes flown model specific engine size push comes shove youll have de cide engine use youll have early building sequence Itll take lot thought consideration final note may interest movers shakers AMA clubs IMAA chapters Jim Jennings Jennings Trophy Sales PO Box 1121 Hendersonville 128 Model Aviation ZIVIA Name Street Addreas City StateZip HoWW RNATIONAL INC
Edition: Model Aviation - 1988/06
Page Numbers: 24, 25, 26, 27, 28, 29, 30, 33, 128

Edition: Model Aviation - 1988/06
Page Numbers: 24, 25, 26, 27, 28, 29, 30, 33, 128
NO OCR TEXT myself What started life mere bundle sticks sheeting now seems virtu ally part Its heady illusion surrender gladly sense freedom brings like no other realize through no other act can achieve such feeling idyllic scene Ive just pictured has experienced Sailplane fliers its relatively rare detail falls perfectly place Most Sailplanes require least moderate winds der fly times have taken ship slopes oaly find have wait hour two wind really start blowingor wind never blows about five 10 knots Ive encountered both conditions occasions have either resorted flying floater flown Floaters can relatively amusing can stand much S-turning back forth What wanted some type Sail plane highly maneuverable aer obatic could also fly very light winds wanted ship fun quotient dependent gale force Obviously such plane would have be small lightweight agile Guided basic criteria eventu ally evolved design happy called Mariah wingspan approximately 40 weight coming less pound Sailplane exactly what looking Creating design would perform intended took great deal consideration shows Mariah clean smooth lines Sailplane evident angles Achieving in-flight penetration wanted called aerodynami cally clean design very low drag ailerons built no protruding con trol horns used covering gap either Mylar MonoKote reduces drag minimum Also full-flying sta June 1988 25 full-flying stabilator provides Mariah highly responsive pitch controlsome thing very much required slope flying Placed next standard-size Sailplane Mariahs small size really becomes evident span just over 40 weighing less 1 lb Mariah unique among Sailpianes Although fuselage Sailplane very small generous room todays smaller radio systems author uses standard Futaba receiver S-20 servos 225 mAh battery pack stand shown made PVC pipe foam tubing vvnen olsassemDleo aIIpIane smallest cars transporting favorite flying site use ball-links aileron belicranks servo arms en ables quick easy assembly field An aerodynamically clean design allows iah perform does minimal drag enables penetrate well wide variety wind conditions typical Slope Soaring Test f stabilator wings sure rest flush against fuselage details wing rod box Note aileron bellcranklpushrod assembly sure sides before applying favorite covering belicrank 9O relation ribs no binding control movements bilator virtually drag-free very ef fective control surface generous aile rons combination full-flying sta bilator produce very responsive Sailplane thats perfect slope flying Ive experimented different types airfoils Mariah chose Eppler 205 because its great versatil ity airfoil provides high lift low speeds still allows attain much speed desired Aside ob vious good looks swept wings cho sen stability afford youve ever found yourself wishing Sailplane can fly off slopes whether winds light strong plane thatll get pulse racing loops soars dips calmest skies Mariali winds increase just add little ballast versatile Sailplane will perform best em Construction fairly straightforward 26 Model Aviation Above Details wing rod wing pin aileron bellcrank slot notch slot belicrank ball-link Right Fuse lage sides formers stabilator belicrank made 14-in Lite Ply fuselage bottom rudder pieces %-in balsa Left completea Tuselage reaay tor sinaI sanding covering hatch located bottom fuselage allows complete access radio times Right After cutting aileron out wing bevel install IA olv horn Note pushrod clearance hole rtrame Detori sanaing ne jime 5UflI nnsnirig unu finished author recommends MonoKote its easy ein DESIGNED BYMARK R TRIEBESBALSA 3/8 BALSA TOP SHEETINGI/8BALSA BALSA BLOCK BOTTOM SHEET WING TIPS SUITFUSELAGE SIDES ARE I/8 LITE PLY 1/4 x 3/8 BALSA LEADING EDGEI/IS X 1/4 BALSA CAP STRIPS /7 5 -V K A- - BALSA BLOCK NOSE I/B SQ BALSA LONG ERONS 7 S / 3/32 BALSA WING RIBS 7 1/8 BALSA SHEET HATCH 3/32 BALSA -SHEET RIBS 1/4 x BALSA TE STOCK 2CI/8x 1/4 SPRUCE SPARS TOP B BOT 1/16 BALSA WING SHEETING TOP AND BOTTOM simple fuselage built Lite Ply balsa tail feathers con structed entirely balsa wings built up leading edge sheeting have very simple clean aileron setup Cover ing easily accomplished MonoKote builders entire project will take very little time As old hand scratch-building though Ive discovered number things Id like pass hints should help com plete Mariah rapidly efficiently possible First sure use clear plastic sheet ing such plastic wrap MonoKote back ing over plans preserves plans ensures cleanly constructed model Second choosing adhe sive use white glue such Titebond majority work good epoxy specified directions Third sure use Lite Ply fuselage sides stabilator roots inner wing ribs spruce wing spars good contest-grade balsa remainder Sailplane Fourth make sure label parts especially wing ribs fuselage form ers will no confusion dur ing construction Fifth important read article study plans before start build familiarize yourself Mariahs design construc tion sequence involved Ribs Cut plywood root rib tip rib us ing templates sand shape blanks placed between efficient method constructing ribs Cutting out time very tedious time-consuming also doesnt allow construct really true wing Any irregalarities shape airfoil will detract appearance performance finished model Making root tip templates important part procedure Us ing A-in plywood make two sets both root tip rib Take care cut sand four perfection will ensure true wing constructed ribs themselves made mediumweight %2 balsa 1-in strips Using plan guide cut strips proper lengths Remember label ribs sure make two now have two sets rib blanks proper length unshaped Lay rib blank place plans Mark location bottom spar cut out 1/8 x A-in spar notch Place ribs blanks templates spare piece spar stock Sand rib blanks proper shape can very tedious step unless use few techniques make easier First use Scotch and/or masking tape help hold ribs together much easier pins can sand right through tape necessary Second instead relying arm power entire job gin using power drill flexible sanding disk get shape close what want first technique will seem little awkward should get used rather quickiy Once youve finished power drill hand sanding ribs down final shape should take few minutes important achieve straight line across top ribs theyre viewed front rear bowing line will result mis shapen wing Remove ribs spar stock mark cut notch top spar us ing plans Drill A-in holes ribs W-2 through W-8 aileron linkage again using plans reference Wing Either two methods works equally well building wing cap strips shown plans constructing fully sheeted chose use cap strips purely grounds like finished look better because minute weight difference choice can based strictly personal preference Con struction differences between two proce dures will noted appropriate may have heard countless times its worth repeating sure make both right left wing best experienced builders have known make either two lefts two rights Cut x 1-in balsa trailing edge length securely pin place plans point sure cover plan plastic wrap MonoKote backing havent already done Cut first two x %-in balsa strips length glue trailing edge Cut second balsa strip glue trailing edge up aileron begins Spot glue drop glue 2 along length aileron youre building fully sheeted wine cut /l6 balsa bottom sheeting glue place youre using cap strip method cut root sheeting leading edge sheeting cap strips attach glue both fully sheeted cap stripped wings sure leave about / extra sheeting beyond lead ing edge begins youll sand off excess after attaching ribs top sheeting Cut in spruce spar length glue position sheeting Once dry build wing rod box Epoxy appropriate adhesive step sure fill space around wing rod scrap balsa microbal loons brass wing tube held se curely Once entire box has chance dry glue place bottom sheeting Before permanently attaching ribs sure block up leading edge sheeting will fit flush against bottom ribs piece trailing edge stock does very well Glue ribs W-1 through W-13 place Cut top spar length glue position over ribs Since aileron pushrods bellcranks need properly aligned unrestricted control movement take extra care con structing assembling adjusting I/Bx 1/4 SPRUCE SPARS TOP B BOT WING PLAN TOF 3/32 BALSAAILERON SHEET RIBSBELLCRANK P4 BALSA BLOCK WING TIPS HOLLOW To11 SUITh --I IIIi Lct II II I IIIt I/S LITE PLY BALSA GUSSETS- - 1/B 1/4 STABILATORBALSA 1/16 BALSA BALS~/ BRASS STAB SECTIOII DETAIL TUBES BALSA BLOC NOSE 1/16 PLY1/4 OD BRASS SIDESWING ROD TUBE / BALSA 8 MICRO rop VIEW BALLOON PILL VIEW/4 OD BRASS VB z 1/4 SPRUCEWING ROD TUB WING BOX DETAIL Using plan guide four pushrods two wing cut A6-in music wire proper lengths Solder threaded coupler onto end long rod install wing Solder other coupler onto other end rod Cut A-in Lite Ply size make bellcrank platforms Mount bellcranks glue both platforms place bottom sheeting Attach nylon devises end long pushrod connect bellcranks shown plans Check binding everything fits perfectly ad just pushrod root bellcrank 900 relation W-l outer bellcrank also square relation ribs Make smaller pushrod same man ner exact length pushrod will determined once aileron cut out horn has glued place Cut glue top sheeting youre using cap strips shown plan Al low entire structure dry thoroughly 28 Model Aviation Full-Size Plans Available. See Page 164 SEE TEXT S DETAILFUSELAGEI/B LITE PLY FOR WING BOX CONSTRUCTIONOUTLINEB/C MOUNT3a BALSA AILERc BELLCRANKLEADING EDGE ON I/B LITE PLYIAILERON PUSHROD MOUNT 1/16 BALSA WING SHEETING TOP AND BOTTOM INNER NYROD 1/8 BALSA GUSSETS I- A CAP /4 BALSA TE STOCKSEE TEXT FOR MAKING 3/32 BALSA WING RIBS D BRASS1/4 3/B IILATOR TUBESROOT SECTION DETAIL I/B 1/4 SPRUCE SPARS________ ______________________TOP AND BOTTOM SEE DETAIL FOR CONSTRUCTION /4 50 BALSA 1/4 OD BRASSI/B SO BALSA TUBE LONG ERONS I/B OD PLY SIDESBRASS VN FOR CLARITYSI DE VIEWTUBE F-I_F3I/B BALSA _-TOP SHEETING BATTERYRECEIVERhvoCF-4 ______ELEL SERVO I/Bx 1/4 SPRUCE I-/ SHEET HATCHWING ROD / WINGI/B zI/4 PINSPRUCE TIP SECTION DE1IL STAB HORN DETAIL ASS I/B LITEBE PLY / 1/8 BALSA BOTTOM SHEET F1F-2F3F-4 TOP VIEW FUSELA E SIDES___________________ 1/16 PLY HATCHARE I/B LITE PLY RETAINER I/B SO BALSA LONGERONS F ~ENNA F-2F-3 ALL LITE PLY STABLAIOR 7Th PUSHROD F-4oI 2 3 4 5 BALSA AILERON HORN3/B BALSAGUSSET DETAILSHEET BALSSCRAP BALSA MODEL AVIATION MARIAH 6 DESIGNED BY MARK R TRIEBES TRACING BY OE DEMARCO ALL RIONTS W3Wfl before sanding wing very careful avoid making flat spots irregularities sanding wing desired shape simplify procedure suggest make very long flat sanding block ie 24 x 4 sanding block size reduces prob ability error Sand down two x %-in strips proper airfoil shape Sand tip wing flat cut balsa wing tip proper shape glue onto wing making sure just spot glue aile ron Sand off excess sheeting lead ing edge glue x %-in balsa lead ing edge place Sand root wing flat glue A6 plywood root rib wing now ready final shaping sanding long sanding block will help achieve smooth evenly contoured result Cut out aileron per plans sand proper bevel allow con trol movement Carefully drill A-in hole wing trailing edge push rod Make control horn temporar ily slide cut made aileron Place aileron position adjust small pushrod both bellcrank ai leron neutral settings glue horn place Fuselage Cut two sides A-in Lite Ply Once again dont forget make both right left side Mark location wing stabilator bearing hole rear wire slot shown plans Us ing third root rib precisely mark drill fuselage sides Spot glue tape rib place fu selage side drill wing rod hole wing pin hole Mark location ai leron bellcrank slot remove rib fuselage side cut slot Drill stabilator bearing hole cut rear wire slot Cut x A-in longerons length glue place longerons must beveled tail fuse lage sides will fit flush together Make stabilator control horn out -in Lite Ply Drill pushrod clevis hole bearing hole rear wire hole Cut two pieces A-in-OD brass tubing %-in lengths Epoxy tubes rear wire hole epoxy dry ing insert length %2 music wire tube make sure tube perpen dicular control horn Any misalign ment control horn will result crooked and/or ill-fitting stabilator Make stabilator pushrod Cut formers F-i F-2 F-3 F-4 out A-in Lite Ply Glue formers F-2 F-4 place between two fuselage sides over top view plans sure fuselage aligned correctly Cut brass wing rod tube length June 1988 29 A-J Hornet RURSER POWERED $695 es 404 Interceptor....695 ea 74 Rghrs695 ea A-J T-Shirts ALL SIZES--795 ea Note Please add $300 0 Postage Handling lost 3 packagod nodes Add 10% poe cant addoonal nodal Am~dJUiCI AIRCRAFT COMPANY ROBox 68132 PORTLAND OR 97268 503 653-2038 Best Europe s leading manufacturer Pilots supply fully positional figures National Scale Champs dress pilots known apparel Accessaries include Helmets Goggles Sun Glasses Bobble Hats Baseball Caps Floppy Hats Bone Domes Oxygen Masks Maewests popular types WW WW II sports one-piece suit stripes colors NATO one-piece suit map pockets olive green glider pilots turtle neck sweaters floppy hat sun glasses Standard pilot tan pants simulated leather jacket fur collar baseball cap sun glasses pilots lightest ever come painted dressed ready fly 1/4 Scale Plus $500 postage handling 1 Scale irmail Have fun Ye Scale parachutist ram chute rip-stop nylon ready servos Takes standard flight pack makes Plus $10 Easy Ordering. fast deliveryPostage Handling send phone VISA MasterCard Number AH DESIGNS 31 OLD WORKSHOPS FFORDDDERWEN CL WYD UK 2YR slide place Now glue former F-3 flush against brass tube Al low dry thoroughly sure properly position A-in balsa rudder piece stabilator control horn pushrod before gluing tail sides together Glue sides together over plans sure proper alignment Make balsa nose block glue former F-i nose block place tween two sides Epoxy brass wing rod tube place Drill wing pin holes wing Cut 7A2-in music wire wing rod length plug wings Place wing fuselage align wing pin hole fuselage wing root rib Using long A-in drill slide wing rod through both wing pin holes fuselage drill / wing Repeat procedure other wing Cut A-in-OD brass wing pin tube length glue place fuselage Cut two 3/a-in tubing lengths gluing place wing Cut A-in balsa sheet ing glue place across top fuselage back former F-4 Cut length inner Nyrod tubing hold antenna Cut rear bottom sheet ing size Drill A-in hole diagonally through sheeting antenna tube exit plans show desired position hole glue sheeting place Slide antenna tube through hole hole former F-4 Use epoxy hold antenna tube place glue re mainder top sheeting Cut hatch A-in balsa Cut off end glue x A-in spruce pieces Cut hatch retainer tongue ood glue onto balsa hatch shown plans Cut length / x A-in spruce hatch retainer piece glue onto bottom fuselage along x A-in spruce piece rear end hatch Trial fit hatch sand until fit just snug hatch fits too closely point probably will fit once fuselage have covered youre satisfied fits properly spot glue hatch place Cut forward bottom sheeting /8-in balsa glue place begin sanding fuselage until after constructing attaching vertical fin Vertical fin have fully sheeted wings will probably want openframe tail section Instead construct en tire vertical fm %-in balsa sheet wont add too much weight tail both prototypes came out nose-heavy lieve have fully sheeted wings still want build open-frame vertical fin thats fine too used cap strips wings highly recommend build openframe version Using x %-in balsa stock cut length glue together fm border pieces Cut length inner structure / x %-in 30 Model Aviation 1/32 scale plastic model kits Golden Age air racers Colorful highly detailed miniatures Send $3 fully illustrated catalog other kits accessories 7 cant believe it.she let fly A-J Hornet e % Scale Tel 0745-53987 SLUCK auu i1LLi1A1 glue sure add gussets specified plan After structure has dried glue place fuselage really arent shortcuts tricks expedite sanding fuselage Just use lot old-fashioned elbow grease until fuselage has desired smooth rounded look feel finished sanding cut hatch out fuselage spot glued earlier least dozen dif ferent ways securing hatch fu selage ranging simply using Scotch tape complicated hook-and-rubberband setup recommend using some type hold-down technique keeping sim ple possible Carl Goldberg Models Inc makes angled hold-down would work very well Ill leave decision up Stabilator As vertical fin build ing stabilator open frame will probably choice have fully sheeted wings case use A-in balsa sheet rear portion stabilator Construct front portion stabila tor A-in balsa sandwiched between /16 balsa Cut two %-in balsa pieces mak ing sure exactly wide Cut two slots slots must perpendicular root Cut four pieces 1/16 balsa glue A-in piece onto 1/16 pieces Cut A-in OD brass tube pieces length epoxy place two slots Make sure cut two tubes /8 longer slots youll need extra length extend through stabilator root rib Glue another A6 piece top struc ture Pin place plan build frame structure stabilator Cut out two stabilator root ribs A-in Lite Ply Drill A-in bearing rear wire holes Glue root ribs place stabila tors After entire stabilator structure has dried sand final shape Finishing covering Once major construction completed fine-sand surfaces large sanding block some fine sandpaper ie 150-or 220-grit fuselage has sand ed smooth rounded appearance want trial fit wing stabilator sure contiguous surfaces fit flush goal keep gaps utmost min imum truly aerodynamically clean Sail plane sanding leading edge wing sure leave adequately rounded too sharp sharp leading edge doesnt bring faster speedsonly faster stalls help prevent tip stalling lead ing edge should also rounded less sharp tip root Leave tip flat bottom sand gen tle curve going W-13 edge tip Any type iron-on covering will work well Mariah suggest MonoKote used MonoKote very light weight strong just about easiest coverings put color scheme up recommend transparent color over open frame areas opaque over sheeted areas fuse lage Hinge ailerons either -in strip MonoKote clear Mylar Its good idea also cover gap bot tom side aileron strip Mono Kote Mylar sure attach strip wing aileron itself Radio installation Although very small Sailplane still generous amount room radio used stan dard Futaba receiver S-20 servos 225 mAh battery pack Mount stabilator servo far forward possible right up next wing rod tube Also mount aileron servo far forward possible tween formers F-2 F-3 Use ball links both servo arms aileron bellcranks provide plenty unrestricted con trol movement installing battery nose Sailplane first put some foam rubber pad battery pack Flying Now comes reward hard worktaking Mariah slopes letting try wings center-ofgravity CG shown plan has proven workable balance point suggest least using startContinued page 128 June 1988 33 altitude about 200 ft realized absolutely no control whatsoever model went left-hand spiral dive resulting impact macadam runway drove OS 30s crankshaft Out through rear crankcase cover turned model yellow Cover ite bag balsawood Also GI Joe pilot lost headbut lived fly again Other having stripped gears servos radio functioned flawlessly after crash So theory about loss control partially disconnected receiver battery pack stuffed rearward tempt shift CG time didnt bother tape radio connectors engine vibration took care rest disconnection So never did find out whether rearward CG shift would have improved J-3s spin entries did learn secure connectors tape fu ture models fly alone fly alone number readers sent letters commented Plane bites man story March 1988 column concerned incident modeler struck seriously injured own plane advice also Never fly alone Apparently lot out dont subscribe advice Most seem feel because no flying site wont suffer injury loss model because someone elses mistake Similarly mistake does jeopardize someone elses safety may true being hit model frequent cause injury Feeding fingers through own models prop com mon cause injury Driving car hand easy may impossible other hand being used stop flow blood Flying untested Scale models recent letter Del Rykert Batavia NY expressed con cern about numerous occasions wherein has seen modelers enter Scale contest model hadnt tested airworthiness Del asked opinion prevent such flagrant violation safety Unfortunately didnt have simple solution offer Del thinks Scale modelers reluctant test fly new model prior entering contest cause want save static judging such case suggests solution may reverse current order judging such fly first have static judging last As stated response Del dont have good feel prevalent problem Thats Im mentioning asking input Scale modelers have real safety problem untested models being flown Scale contests what solution MariahlTriebes Continued page 33 ing point may wish adjust bal ance fit own flying style come accustomed Mariah Sailplane likes fly fast smooth Mariah has full aerobatic cap abilities extremely stable aircraft speeds swept wing keeps plane highly stable during slow flight slows down very well landing need spoilers flaps said done impor tant thing have funand some exhilarating slope flying Ive experi enced has little Sailplane Mariah may best Soarer Ive ever flown shes definitely right up first rank Try yourself youre bound agree Radio Technique/Myers Continued page 36 can accurate enough find transmitters outside AMA frequency tolerances comes measuring power levels really isnt good enough installing Gold Silver stickers paragraph 322 AMA Guidelines requires spectrum analyzer used purpose think ICOM good enough reveal illegal crystal swappingand Contest Director really wants know about RC Giant Scale/de Vries Continued page 41 bewildering Some efficient othersthey convert same amount gas glow fuel power per cubic inch Thus some installations may able get away smaller engine just because efficient others its displacement range too hobby shops distributors carry available engines engine choice may depend availability cost factors other considerations proper propeller can make break spe cific engine great prop efficiency viewpoint may turn competent engine raging tiger Flight altitude included list engine choice factors primarily because its BIG amongst us Rocky Mountains Just cause fly altitudes 5000 7000 ft above sea level know going lose 20% engines power before props spun Conversely fly sea level en gine going put out its full power Since concerned scale outlines ten engine choose determined de sire keep within confines cowling best criteria lot us dont like bunch iromnongery disrupting scale lines models Hence inclined choose physically smaller engine might appropriate power-required view point Finally often consideration brand loyalty weve successful product particular manufacturer dined buy another engines Nothing wrong criterionas long favor ite manufacturer produces range power plants Andyou can choose suitable model Engine choice very personal thing can listen pronouncements experts theyre frequently right can follow rec ommendations models designerafter hes flown model specific engine size push comes shove youll have de cide engine use youll have early building sequence Itll take lot thought consideration final note may interest movers shakers AMA clubs IMAA chapters Jim Jennings Jennings Trophy Sales PO Box 1121 Hendersonville 128 Model Aviation ZIVIA Name Street Addreas City StateZip HoWW RNATIONAL INC
Edition: Model Aviation - 1988/06
Page Numbers: 24, 25, 26, 27, 28, 29, 30, 33, 128
NO OCR TEXT myself What started life mere bundle sticks sheeting now seems virtu ally part Its heady illusion surrender gladly sense freedom brings like no other realize through no other act can achieve such feeling idyllic scene Ive just pictured has experienced Sailplane fliers its relatively rare detail falls perfectly place Most Sailplanes require least moderate winds der fly times have taken ship slopes oaly find have wait hour two wind really start blowingor wind never blows about five 10 knots Ive encountered both conditions occasions have either resorted flying floater flown Floaters can relatively amusing can stand much S-turning back forth What wanted some type Sail plane highly maneuverable aer obatic could also fly very light winds wanted ship fun quotient dependent gale force Obviously such plane would have be small lightweight agile Guided basic criteria eventu ally evolved design happy called Mariah wingspan approximately 40 weight coming less pound Sailplane exactly what looking Creating design would perform intended took great deal consideration shows Mariah clean smooth lines Sailplane evident angles Achieving in-flight penetration wanted called aerodynami cally clean design very low drag ailerons built no protruding con trol horns used covering gap either Mylar MonoKote reduces drag minimum Also full-flying sta June 1988 25 full-flying stabilator provides Mariah highly responsive pitch controlsome thing very much required slope flying Placed next standard-size Sailplane Mariahs small size really becomes evident span just over 40 weighing less 1 lb Mariah unique among Sailpianes Although fuselage Sailplane very small generous room todays smaller radio systems author uses standard Futaba receiver S-20 servos 225 mAh battery pack stand shown made PVC pipe foam tubing vvnen olsassemDleo aIIpIane smallest cars transporting favorite flying site use ball-links aileron belicranks servo arms en ables quick easy assembly field An aerodynamically clean design allows iah perform does minimal drag enables penetrate well wide variety wind conditions typical Slope Soaring Test f stabilator wings sure rest flush against fuselage details wing rod box Note aileron bellcranklpushrod assembly sure sides before applying favorite covering belicrank 9O relation ribs no binding control movements bilator virtually drag-free very ef fective control surface generous aile rons combination full-flying sta bilator produce very responsive Sailplane thats perfect slope flying Ive experimented different types airfoils Mariah chose Eppler 205 because its great versatil ity airfoil provides high lift low speeds still allows attain much speed desired Aside ob vious good looks swept wings cho sen stability afford youve ever found yourself wishing Sailplane can fly off slopes whether winds light strong plane thatll get pulse racing loops soars dips calmest skies Mariali winds increase just add little ballast versatile Sailplane will perform best em Construction fairly straightforward 26 Model Aviation Above Details wing rod wing pin aileron bellcrank slot notch slot belicrank ball-link Right Fuse lage sides formers stabilator belicrank made 14-in Lite Ply fuselage bottom rudder pieces %-in balsa Left completea Tuselage reaay tor sinaI sanding covering hatch located bottom fuselage allows complete access radio times Right After cutting aileron out wing bevel install IA olv horn Note pushrod clearance hole rtrame Detori sanaing ne jime 5UflI nnsnirig unu finished author recommends MonoKote its easy ein DESIGNED BYMARK R TRIEBESBALSA 3/8 BALSA TOP SHEETINGI/8BALSA BALSA BLOCK BOTTOM SHEET WING TIPS SUITFUSELAGE SIDES ARE I/8 LITE PLY 1/4 x 3/8 BALSA LEADING EDGEI/IS X 1/4 BALSA CAP STRIPS /7 5 -V K A- - BALSA BLOCK NOSE I/B SQ BALSA LONG ERONS 7 S / 3/32 BALSA WING RIBS 7 1/8 BALSA SHEET HATCH 3/32 BALSA -SHEET RIBS 1/4 x BALSA TE STOCK 2CI/8x 1/4 SPRUCE SPARS TOP B BOT 1/16 BALSA WING SHEETING TOP AND BOTTOM simple fuselage built Lite Ply balsa tail feathers con structed entirely balsa wings built up leading edge sheeting have very simple clean aileron setup Cover ing easily accomplished MonoKote builders entire project will take very little time As old hand scratch-building though Ive discovered number things Id like pass hints should help com plete Mariah rapidly efficiently possible First sure use clear plastic sheet ing such plastic wrap MonoKote back ing over plans preserves plans ensures cleanly constructed model Second choosing adhe sive use white glue such Titebond majority work good epoxy specified directions Third sure use Lite Ply fuselage sides stabilator roots inner wing ribs spruce wing spars good contest-grade balsa remainder Sailplane Fourth make sure label parts especially wing ribs fuselage form ers will no confusion dur ing construction Fifth important read article study plans before start build familiarize yourself Mariahs design construc tion sequence involved Ribs Cut plywood root rib tip rib us ing templates sand shape blanks placed between efficient method constructing ribs Cutting out time very tedious time-consuming also doesnt allow construct really true wing Any irregalarities shape airfoil will detract appearance performance finished model Making root tip templates important part procedure Us ing A-in plywood make two sets both root tip rib Take care cut sand four perfection will ensure true wing constructed ribs themselves made mediumweight %2 balsa 1-in strips Using plan guide cut strips proper lengths Remember label ribs sure make two now have two sets rib blanks proper length unshaped Lay rib blank place plans Mark location bottom spar cut out 1/8 x A-in spar notch Place ribs blanks templates spare piece spar stock Sand rib blanks proper shape can very tedious step unless use few techniques make easier First use Scotch and/or masking tape help hold ribs together much easier pins can sand right through tape necessary Second instead relying arm power entire job gin using power drill flexible sanding disk get shape close what want first technique will seem little awkward should get used rather quickiy Once youve finished power drill hand sanding ribs down final shape should take few minutes important achieve straight line across top ribs theyre viewed front rear bowing line will result mis shapen wing Remove ribs spar stock mark cut notch top spar us ing plans Drill A-in holes ribs W-2 through W-8 aileron linkage again using plans reference Wing Either two methods works equally well building wing cap strips shown plans constructing fully sheeted chose use cap strips purely grounds like finished look better because minute weight difference choice can based strictly personal preference Con struction differences between two proce dures will noted appropriate may have heard countless times its worth repeating sure make both right left wing best experienced builders have known make either two lefts two rights Cut x 1-in balsa trailing edge length securely pin place plans point sure cover plan plastic wrap MonoKote backing havent already done Cut first two x %-in balsa strips length glue trailing edge Cut second balsa strip glue trailing edge up aileron begins Spot glue drop glue 2 along length aileron youre building fully sheeted wine cut /l6 balsa bottom sheeting glue place youre using cap strip method cut root sheeting leading edge sheeting cap strips attach glue both fully sheeted cap stripped wings sure leave about / extra sheeting beyond lead ing edge begins youll sand off excess after attaching ribs top sheeting Cut in spruce spar length glue position sheeting Once dry build wing rod box Epoxy appropriate adhesive step sure fill space around wing rod scrap balsa microbal loons brass wing tube held se curely Once entire box has chance dry glue place bottom sheeting Before permanently attaching ribs sure block up leading edge sheeting will fit flush against bottom ribs piece trailing edge stock does very well Glue ribs W-1 through W-13 place Cut top spar length glue position over ribs Since aileron pushrods bellcranks need properly aligned unrestricted control movement take extra care con structing assembling adjusting I/Bx 1/4 SPRUCE SPARS TOP B BOT WING PLAN TOF 3/32 BALSAAILERON SHEET RIBSBELLCRANK P4 BALSA BLOCK WING TIPS HOLLOW To11 SUITh --I IIIi Lct II II I IIIt I/S LITE PLY BALSA GUSSETS- - 1/B 1/4 STABILATORBALSA 1/16 BALSA BALS~/ BRASS STAB SECTIOII DETAIL TUBES BALSA BLOC NOSE 1/16 PLY1/4 OD BRASS SIDESWING ROD TUBE / BALSA 8 MICRO rop VIEW BALLOON PILL VIEW/4 OD BRASS VB z 1/4 SPRUCEWING ROD TUB WING BOX DETAIL Using plan guide four pushrods two wing cut A6-in music wire proper lengths Solder threaded coupler onto end long rod install wing Solder other coupler onto other end rod Cut A-in Lite Ply size make bellcrank platforms Mount bellcranks glue both platforms place bottom sheeting Attach nylon devises end long pushrod connect bellcranks shown plans Check binding everything fits perfectly ad just pushrod root bellcrank 900 relation W-l outer bellcrank also square relation ribs Make smaller pushrod same man ner exact length pushrod will determined once aileron cut out horn has glued place Cut glue top sheeting youre using cap strips shown plan Al low entire structure dry thoroughly 28 Model Aviation Full-Size Plans Available. See Page 164 SEE TEXT S DETAILFUSELAGEI/B LITE PLY FOR WING BOX CONSTRUCTIONOUTLINEB/C MOUNT3a BALSA AILERc BELLCRANKLEADING EDGE ON I/B LITE PLYIAILERON PUSHROD MOUNT 1/16 BALSA WING SHEETING TOP AND BOTTOM INNER NYROD 1/8 BALSA GUSSETS I- A CAP /4 BALSA TE STOCKSEE TEXT FOR MAKING 3/32 BALSA WING RIBS D BRASS1/4 3/B IILATOR TUBESROOT SECTION DETAIL I/B 1/4 SPRUCE SPARS________ ______________________TOP AND BOTTOM SEE DETAIL FOR CONSTRUCTION /4 50 BALSA 1/4 OD BRASSI/B SO BALSA TUBE LONG ERONS I/B OD PLY SIDESBRASS VN FOR CLARITYSI DE VIEWTUBE F-I_F3I/B BALSA _-TOP SHEETING BATTERYRECEIVERhvoCF-4 ______ELEL SERVO I/Bx 1/4 SPRUCE I-/ SHEET HATCHWING ROD / WINGI/B zI/4 PINSPRUCE TIP SECTION DE1IL STAB HORN DETAIL ASS I/B LITEBE PLY / 1/8 BALSA BOTTOM SHEET F1F-2F3F-4 TOP VIEW FUSELA E SIDES___________________ 1/16 PLY HATCHARE I/B LITE PLY RETAINER I/B SO BALSA LONGERONS F ~ENNA F-2F-3 ALL LITE PLY STABLAIOR 7Th PUSHROD F-4oI 2 3 4 5 BALSA AILERON HORN3/B BALSAGUSSET DETAILSHEET BALSSCRAP BALSA MODEL AVIATION MARIAH 6 DESIGNED BY MARK R TRIEBES TRACING BY OE DEMARCO ALL RIONTS W3Wfl before sanding wing very careful avoid making flat spots irregularities sanding wing desired shape simplify procedure suggest make very long flat sanding block ie 24 x 4 sanding block size reduces prob ability error Sand down two x %-in strips proper airfoil shape Sand tip wing flat cut balsa wing tip proper shape glue onto wing making sure just spot glue aile ron Sand off excess sheeting lead ing edge glue x %-in balsa lead ing edge place Sand root wing flat glue A6 plywood root rib wing now ready final shaping sanding long sanding block will help achieve smooth evenly contoured result Cut out aileron per plans sand proper bevel allow con trol movement Carefully drill A-in hole wing trailing edge push rod Make control horn temporar ily slide cut made aileron Place aileron position adjust small pushrod both bellcrank ai leron neutral settings glue horn place Fuselage Cut two sides A-in Lite Ply Once again dont forget make both right left side Mark location wing stabilator bearing hole rear wire slot shown plans Us ing third root rib precisely mark drill fuselage sides Spot glue tape rib place fu selage side drill wing rod hole wing pin hole Mark location ai leron bellcrank slot remove rib fuselage side cut slot Drill stabilator bearing hole cut rear wire slot Cut x A-in longerons length glue place longerons must beveled tail fuse lage sides will fit flush together Make stabilator control horn out -in Lite Ply Drill pushrod clevis hole bearing hole rear wire hole Cut two pieces A-in-OD brass tubing %-in lengths Epoxy tubes rear wire hole epoxy dry ing insert length %2 music wire tube make sure tube perpen dicular control horn Any misalign ment control horn will result crooked and/or ill-fitting stabilator Make stabilator pushrod Cut formers F-i F-2 F-3 F-4 out A-in Lite Ply Glue formers F-2 F-4 place between two fuselage sides over top view plans sure fuselage aligned correctly Cut brass wing rod tube length June 1988 29 A-J Hornet RURSER POWERED $695 es 404 Interceptor....695 ea 74 Rghrs695 ea A-J T-Shirts ALL SIZES--795 ea Note Please add $300 0 Postage Handling lost 3 packagod nodes Add 10% poe cant addoonal nodal Am~dJUiCI AIRCRAFT COMPANY ROBox 68132 PORTLAND OR 97268 503 653-2038 Best Europe s leading manufacturer Pilots supply fully positional figures National Scale Champs dress pilots known apparel Accessaries include Helmets Goggles Sun Glasses Bobble Hats Baseball Caps Floppy Hats Bone Domes Oxygen Masks Maewests popular types WW WW II sports one-piece suit stripes colors NATO one-piece suit map pockets olive green glider pilots turtle neck sweaters floppy hat sun glasses Standard pilot tan pants simulated leather jacket fur collar baseball cap sun glasses pilots lightest ever come painted dressed ready fly 1/4 Scale Plus $500 postage handling 1 Scale irmail Have fun Ye Scale parachutist ram chute rip-stop nylon ready servos Takes standard flight pack makes Plus $10 Easy Ordering. fast deliveryPostage Handling send phone VISA MasterCard Number AH DESIGNS 31 OLD WORKSHOPS FFORDDDERWEN CL WYD UK 2YR slide place Now glue former F-3 flush against brass tube Al low dry thoroughly sure properly position A-in balsa rudder piece stabilator control horn pushrod before gluing tail sides together Glue sides together over plans sure proper alignment Make balsa nose block glue former F-i nose block place tween two sides Epoxy brass wing rod tube place Drill wing pin holes wing Cut 7A2-in music wire wing rod length plug wings Place wing fuselage align wing pin hole fuselage wing root rib Using long A-in drill slide wing rod through both wing pin holes fuselage drill / wing Repeat procedure other wing Cut A-in-OD brass wing pin tube length glue place fuselage Cut two 3/a-in tubing lengths gluing place wing Cut A-in balsa sheet ing glue place across top fuselage back former F-4 Cut length inner Nyrod tubing hold antenna Cut rear bottom sheet ing size Drill A-in hole diagonally through sheeting antenna tube exit plans show desired position hole glue sheeting place Slide antenna tube through hole hole former F-4 Use epoxy hold antenna tube place glue re mainder top sheeting Cut hatch A-in balsa Cut off end glue x A-in spruce pieces Cut hatch retainer tongue ood glue onto balsa hatch shown plans Cut length / x A-in spruce hatch retainer piece glue onto bottom fuselage along x A-in spruce piece rear end hatch Trial fit hatch sand until fit just snug hatch fits too closely point probably will fit once fuselage have covered youre satisfied fits properly spot glue hatch place Cut forward bottom sheeting /8-in balsa glue place begin sanding fuselage until after constructing attaching vertical fin Vertical fin have fully sheeted wings will probably want openframe tail section Instead construct en tire vertical fm %-in balsa sheet wont add too much weight tail both prototypes came out nose-heavy lieve have fully sheeted wings still want build open-frame vertical fin thats fine too used cap strips wings highly recommend build openframe version Using x %-in balsa stock cut length glue together fm border pieces Cut length inner structure / x %-in 30 Model Aviation 1/32 scale plastic model kits Golden Age air racers Colorful highly detailed miniatures Send $3 fully illustrated catalog other kits accessories 7 cant believe it.she let fly A-J Hornet e % Scale Tel 0745-53987 SLUCK auu i1LLi1A1 glue sure add gussets specified plan After structure has dried glue place fuselage really arent shortcuts tricks expedite sanding fuselage Just use lot old-fashioned elbow grease until fuselage has desired smooth rounded look feel finished sanding cut hatch out fuselage spot glued earlier least dozen dif ferent ways securing hatch fu selage ranging simply using Scotch tape complicated hook-and-rubberband setup recommend using some type hold-down technique keeping sim ple possible Carl Goldberg Models Inc makes angled hold-down would work very well Ill leave decision up Stabilator As vertical fin build ing stabilator open frame will probably choice have fully sheeted wings case use A-in balsa sheet rear portion stabilator Construct front portion stabila tor A-in balsa sandwiched between /16 balsa Cut two %-in balsa pieces mak ing sure exactly wide Cut two slots slots must perpendicular root Cut four pieces 1/16 balsa glue A-in piece onto 1/16 pieces Cut A-in OD brass tube pieces length epoxy place two slots Make sure cut two tubes /8 longer slots youll need extra length extend through stabilator root rib Glue another A6 piece top struc ture Pin place plan build frame structure stabilator Cut out two stabilator root ribs A-in Lite Ply Drill A-in bearing rear wire holes Glue root ribs place stabila tors After entire stabilator structure has dried sand final shape Finishing covering Once major construction completed fine-sand surfaces large sanding block some fine sandpaper ie 150-or 220-grit fuselage has sand ed smooth rounded appearance want trial fit wing stabilator sure contiguous surfaces fit flush goal keep gaps utmost min imum truly aerodynamically clean Sail plane sanding leading edge wing sure leave adequately rounded too sharp sharp leading edge doesnt bring faster speedsonly faster stalls help prevent tip stalling lead ing edge should also rounded less sharp tip root Leave tip flat bottom sand gen tle curve going W-13 edge tip Any type iron-on covering will work well Mariah suggest MonoKote used MonoKote very light weight strong just about easiest coverings put color scheme up recommend transparent color over open frame areas opaque over sheeted areas fuse lage Hinge ailerons either -in strip MonoKote clear Mylar Its good idea also cover gap bot tom side aileron strip Mono Kote Mylar sure attach strip wing aileron itself Radio installation Although very small Sailplane still generous amount room radio used stan dard Futaba receiver S-20 servos 225 mAh battery pack Mount stabilator servo far forward possible right up next wing rod tube Also mount aileron servo far forward possible tween formers F-2 F-3 Use ball links both servo arms aileron bellcranks provide plenty unrestricted con trol movement installing battery nose Sailplane first put some foam rubber pad battery pack Flying Now comes reward hard worktaking Mariah slopes letting try wings center-ofgravity CG shown plan has proven workable balance point suggest least using startContinued page 128 June 1988 33 altitude about 200 ft realized absolutely no control whatsoever model went left-hand spiral dive resulting impact macadam runway drove OS 30s crankshaft Out through rear crankcase cover turned model yellow Cover ite bag balsawood Also GI Joe pilot lost headbut lived fly again Other having stripped gears servos radio functioned flawlessly after crash So theory about loss control partially disconnected receiver battery pack stuffed rearward tempt shift CG time didnt bother tape radio connectors engine vibration took care rest disconnection So never did find out whether rearward CG shift would have improved J-3s spin entries did learn secure connectors tape fu ture models fly alone fly alone number readers sent letters commented Plane bites man story March 1988 column concerned incident modeler struck seriously injured own plane advice also Never fly alone Apparently lot out dont subscribe advice Most seem feel because no flying site wont suffer injury loss model because someone elses mistake Similarly mistake does jeopardize someone elses safety may true being hit model frequent cause injury Feeding fingers through own models prop com mon cause injury Driving car hand easy may impossible other hand being used stop flow blood Flying untested Scale models recent letter Del Rykert Batavia NY expressed con cern about numerous occasions wherein has seen modelers enter Scale contest model hadnt tested airworthiness Del asked opinion prevent such flagrant violation safety Unfortunately didnt have simple solution offer Del thinks Scale modelers reluctant test fly new model prior entering contest cause want save static judging such case suggests solution may reverse current order judging such fly first have static judging last As stated response Del dont have good feel prevalent problem Thats Im mentioning asking input Scale modelers have real safety problem untested models being flown Scale contests what solution MariahlTriebes Continued page 33 ing point may wish adjust bal ance fit own flying style come accustomed Mariah Sailplane likes fly fast smooth Mariah has full aerobatic cap abilities extremely stable aircraft speeds swept wing keeps plane highly stable during slow flight slows down very well landing need spoilers flaps said done impor tant thing have funand some exhilarating slope flying Ive experi enced has little Sailplane Mariah may best Soarer Ive ever flown shes definitely right up first rank Try yourself youre bound agree Radio Technique/Myers Continued page 36 can accurate enough find transmitters outside AMA frequency tolerances comes measuring power levels really isnt good enough installing Gold Silver stickers paragraph 322 AMA Guidelines requires spectrum analyzer used purpose think ICOM good enough reveal illegal crystal swappingand Contest Director really wants know about RC Giant Scale/de Vries Continued page 41 bewildering Some efficient othersthey convert same amount gas glow fuel power per cubic inch Thus some installations may able get away smaller engine just because efficient others its displacement range too hobby shops distributors carry available engines engine choice may depend availability cost factors other considerations proper propeller can make break spe cific engine great prop efficiency viewpoint may turn competent engine raging tiger Flight altitude included list engine choice factors primarily because its BIG amongst us Rocky Mountains Just cause fly altitudes 5000 7000 ft above sea level know going lose 20% engines power before props spun Conversely fly sea level en gine going put out its full power Since concerned scale outlines ten engine choose determined de sire keep within confines cowling best criteria lot us dont like bunch iromnongery disrupting scale lines models Hence inclined choose physically smaller engine might appropriate power-required view point Finally often consideration brand loyalty weve successful product particular manufacturer dined buy another engines Nothing wrong criterionas long favor ite manufacturer produces range power plants Andyou can choose suitable model Engine choice very personal thing can listen pronouncements experts theyre frequently right can follow rec ommendations models designerafter hes flown model specific engine size push comes shove youll have de cide engine use youll have early building sequence Itll take lot thought consideration final note may interest movers shakers AMA clubs IMAA chapters Jim Jennings Jennings Trophy Sales PO Box 1121 Hendersonville 128 Model Aviation ZIVIA Name Street Addreas City StateZip HoWW RNATIONAL INC

