
Northrop Gamma
November 2010 51
by John Hunton
JACK NORTHROP’S early all-metal fullscale
airplanes significantly influenced future
aircraft design by pioneering the use of
stressed aluminum skin, multicellular
construction, and drag-reducing wing fillets.
Early 1930s Northrop types included the
Alpha, Gamma, DC-3, and, later, the Douglas
SBD. The fixed landing gear of the Gamma
was covered with distinctive aerodynamic
spats, and the aircraft introduced a fully
enclosed cockpit.
On June 2, 1933, Frank Hawks flew his
Gamma 2A “Sky Chief” from Los Angeles to
New York in a record 13 hours, 26 minutes,
and 15 seconds. However, perhaps the most
famous Gamma was the “Polar Star.” On
November 23, 1935, Lincoln Ellsworth and
Canadian pilot Herbert Hollick-Kenyon used
it to attempt the world’s first trans-Antarctic
flight.
The Polar Star ran out of fuel only 25
miles short of the goal. Its crew took six days
to travel the remainder of the journey on foot.
The airplane was recovered and donated to the
Smithsonian National Air and Space Museum,
where it now resides.
I chose the Gamma as a model to develop
because of its Art Deco appearance and
unique “park bench” ailerons. I am presenting
two versions of this aircraft for you: the
Texaco racer and the Ellsworth Polar explorer.
The prototype model has been flown for
several months, and it has been proven to be
an excellent performer with a wide range of
speed. It will fly very fast, yet it will slow
nicely for a gentle landing.
The historic Gamma is a fine sight to see
in the air again. The model is powered by a
Li-Poly battery and spans 42 inches. Its flying
weight will come in at slightly more than 16
ounces.
CONSTRUCTION
It is suggested to have the Gamma parts
laser cut from 1/16 medium-weight balsa, for
accuracy and ease of construction. The balsa
stringers and spars replicate metal joint lines
on the full-scale airplane to the extent
possible. Use extremely light balsa for the
empennage.
The fuselage is built in half shells over the
plans. Be sure to install the 1/16 square former
reinforcement members on the half formers.
Pin down the top and bottom longerons, and
glue the formers into place.
Install the midfuselage stringer to stabilize
the formers, and then add all other stringers.
Use soft balsa soaked in water for the most
difficult and curvy stringers. If you spray the
completed half shell with a mist of water and
let it dry before you take it up, this will help
stabilize everything.
Glue the fuselage half shells together, and
remove the top and bottom longerons where
Weather your
park with a piece
of
The prototype Northrop Gamma model was originally trimmed to replicate the Lincoln Ellsworth version. Covering in silver tissue was
light but unsatisfactory. Fillet tissue was adhered with Sig Stix-It so it would not pop up after doping.
pioneer
history
52 MODEL AVIATION
Photos by the author except as noted
The wing structure is simple. Diagonals were
put in to provide rigidity during the sanding
process. A nickel in the right wingtip is an
effective antitorque device. A mini-Pico
servo has been installed.
The fuselage is built in half shells. Then those
are mated, creating a nice, light framework.
Some stringers in the wing-fillet area take
on difficult curves; use light balsa soaked in
water to install those.
A partially completed frame sits on the
bench amid construction clutter. The
Gamma is starting to take shape! The
completed model should weigh slightly
more than 16 ounces.
Above: Stringers
and spars are spaced to approximate the skin
panels and rivet seams of the first all-metal
airplane, which Jack Northrop designed. Have
the radio-equipment locations worked out
before covering the structure.
Right: There is something beautiful about
the framework of an uncovered model airplane, with its
exquisite delicateness and the repetitive patterns of ribs and stringers.
indicated (in the cabin and wing root areas).
Install the spar joiners in the wing roots.
Sand the fuselage with the sandpaper
wrapped over a small plastic bottle to get into
the curved places. Assemble the motor mount
to suit your particular power plant.
To build outer wing panels, place the main
spar on the plans and add all of the ribs,
noting that the inner rib is slanted slightly.
(See the rib-slant template.) Install the top
spar to stabilize the ribs.
Add the LE and TE and then all of the
remaining top spars. Take up the wing panel,
and install the remaining bottom spars. Sand
the wings with fine paper on a lightweight
block; be careful not to deform the airfoils.
To build the scalelike three-dimensional
empennage, pin down the main spar, add the
ribs and LE, add the top spars, and then take
the assembly up and add the bottom spars.
Assembling the built-up tailplanes to the
fuselage is facilitated by installing the fin,
with its king post, into the fuselage and then
attaching each stabilizer half to the king post
and fuselage side. You might want to cover
parts of the rear fuselage before installing the
tailplanes.
Covering and Finish: Install all RC gear,
servos, motor mount, and battery chute before
you cover the fuselage. I removed a portion of
the wing center-section to allow me to put in
the servos and receiver. Then I covered the
area with a patch for access after the Gamma
is covered.
Cover the model with lightweight tissue.
To conceal the difficult wing-fillet area, use
small pieces of covering material or even
bond paper for best results. Using silver tissue
has proven to be difficult, so I suggest that
you employ white tissue and dope or spray it
silver.
Choose your desired decal trim from the
plans. You can get water-slide decal sheets
from McGonigal Paper & Graphics in clear or
white that can be produced on an ink-jet
printer. Use clear decal sheets for this project.
One crucial aspect of rigging the
completed model is to set up the park-bench
ailerons parallel to the bottom surface of the
wing. One might think that they should be
parallel to the top of the wing, but they do not
work at all in that configuration. I know from
experience.
Because this airplane requires coordinated
rudder to turn properly, it might be best to
couple aileron and rudder actions with either
the servos or the transmitter. Rig the elevators
and ailerons to move approximately 20° and
the rudder to move 30° to each side.
Add any ballast necessary to make the
Gamma balance where indicated. Steam out
warps.
Test-run the motor for the simulated
duration of a full flight and check for
overheating of the wires or power
components. I recommend taping a nickel
under the right wingtip for at least the first
flights; that will neutralize any torque effects.
(Contact me if you want to know why.)
I recommend an AXI 2208/34 motor with
a 1320 mAh, three-cell Li-Poly battery. I cut
an 8 x 3 GWS propeller to 7 inches in
diameter, to the profile shown on the plans.
This works well, but a 7 x 4 will do okay too.
Flying:Models this size seldom do well
landing on or taking off from grass. However,
One of the great things about the
growing trend of electric power is our
newfound ability to build practical and
good-flying scale models. This design recreates
a classic airplane that had a
bearing on aircraft design for many
years.
Wikipedia on the Internet provided
me with quoted information and supplies
references to more information about the
Northrop Gamma. MA
John Hunton
[email protected]
November 2010 53
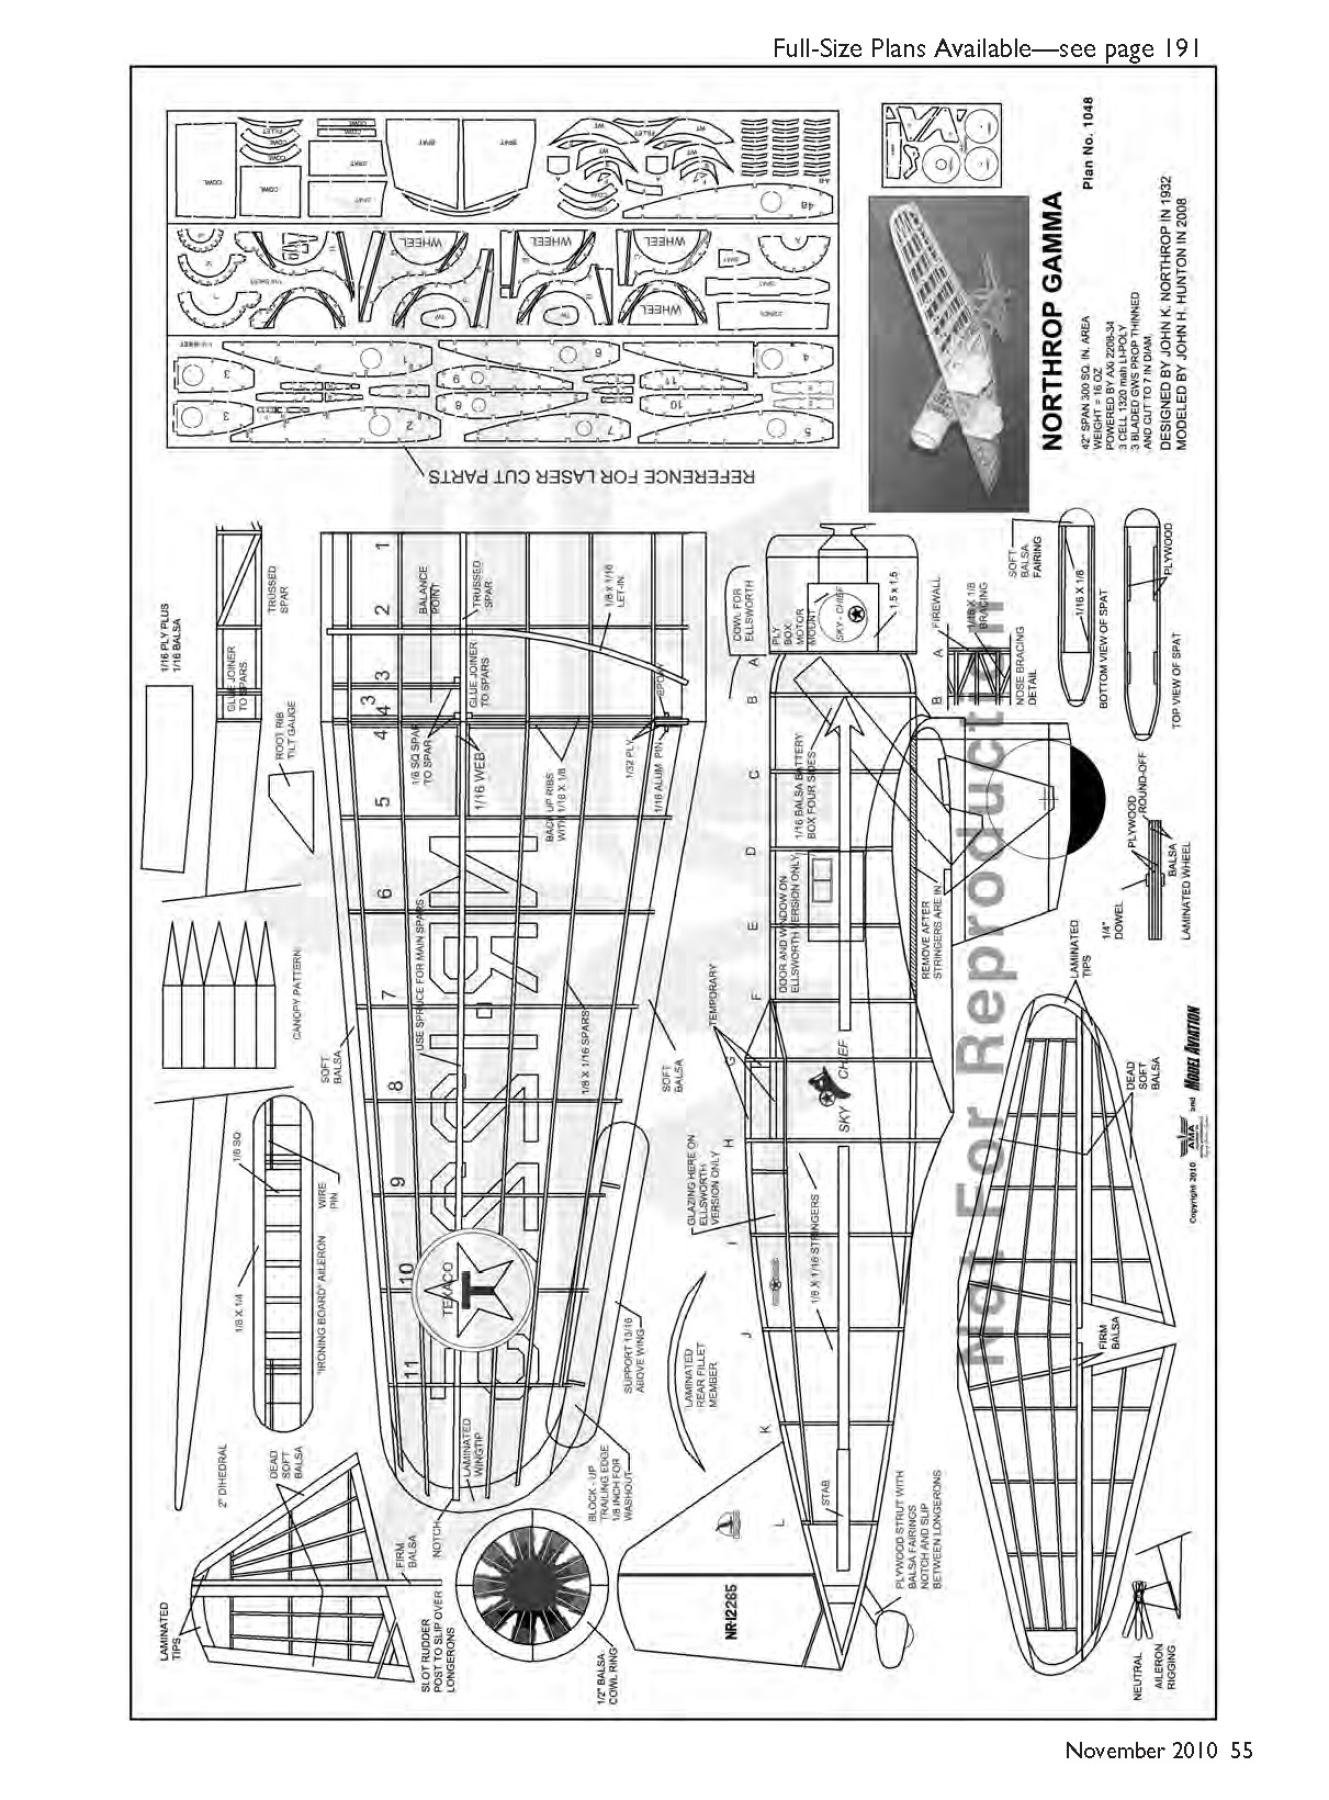
Models this size seldom do a good job of landing or taking off
from grass, but the version with skis seems to land better on
grass than the wheeled version.
The battery compartment is a sloped box, accessible from the
bottom of the fuselage. Notice the on/off power switch. Do not
transport this model with the Li-Poly battery installed.
the version with skis seems to land on grass
better than the wheeled version does.
If powered with the recommended motor
and battery, the Gamma should weigh close
to 16 ounces. It is a “skyrocket,” so do not
hesitate to launch it at a healthy upward
angle—20° or so—and full power for the first
flight.
The airplane will climb quickly away
from the dangerous ground, and then you can
sort it out and trim it. A silver model will
blend into the sky quickly, so keep it
relatively close until you are familiar with its
unique shape.
Throttle back and try some stalls to build
your confidence with this aircraft’s excellent
slow-flight characteristics. Then you will be
prepared to land it at a slow velocity.
Sources:
McGonigal Paper & Graphics
(215) 679-8163
www.mcgpaper.com
AXi motors, GWS propellers:
Hobby Lobby
(866) 512-1444
www.hobby-lobby.com
Wikipedia
www.wikipedia.org
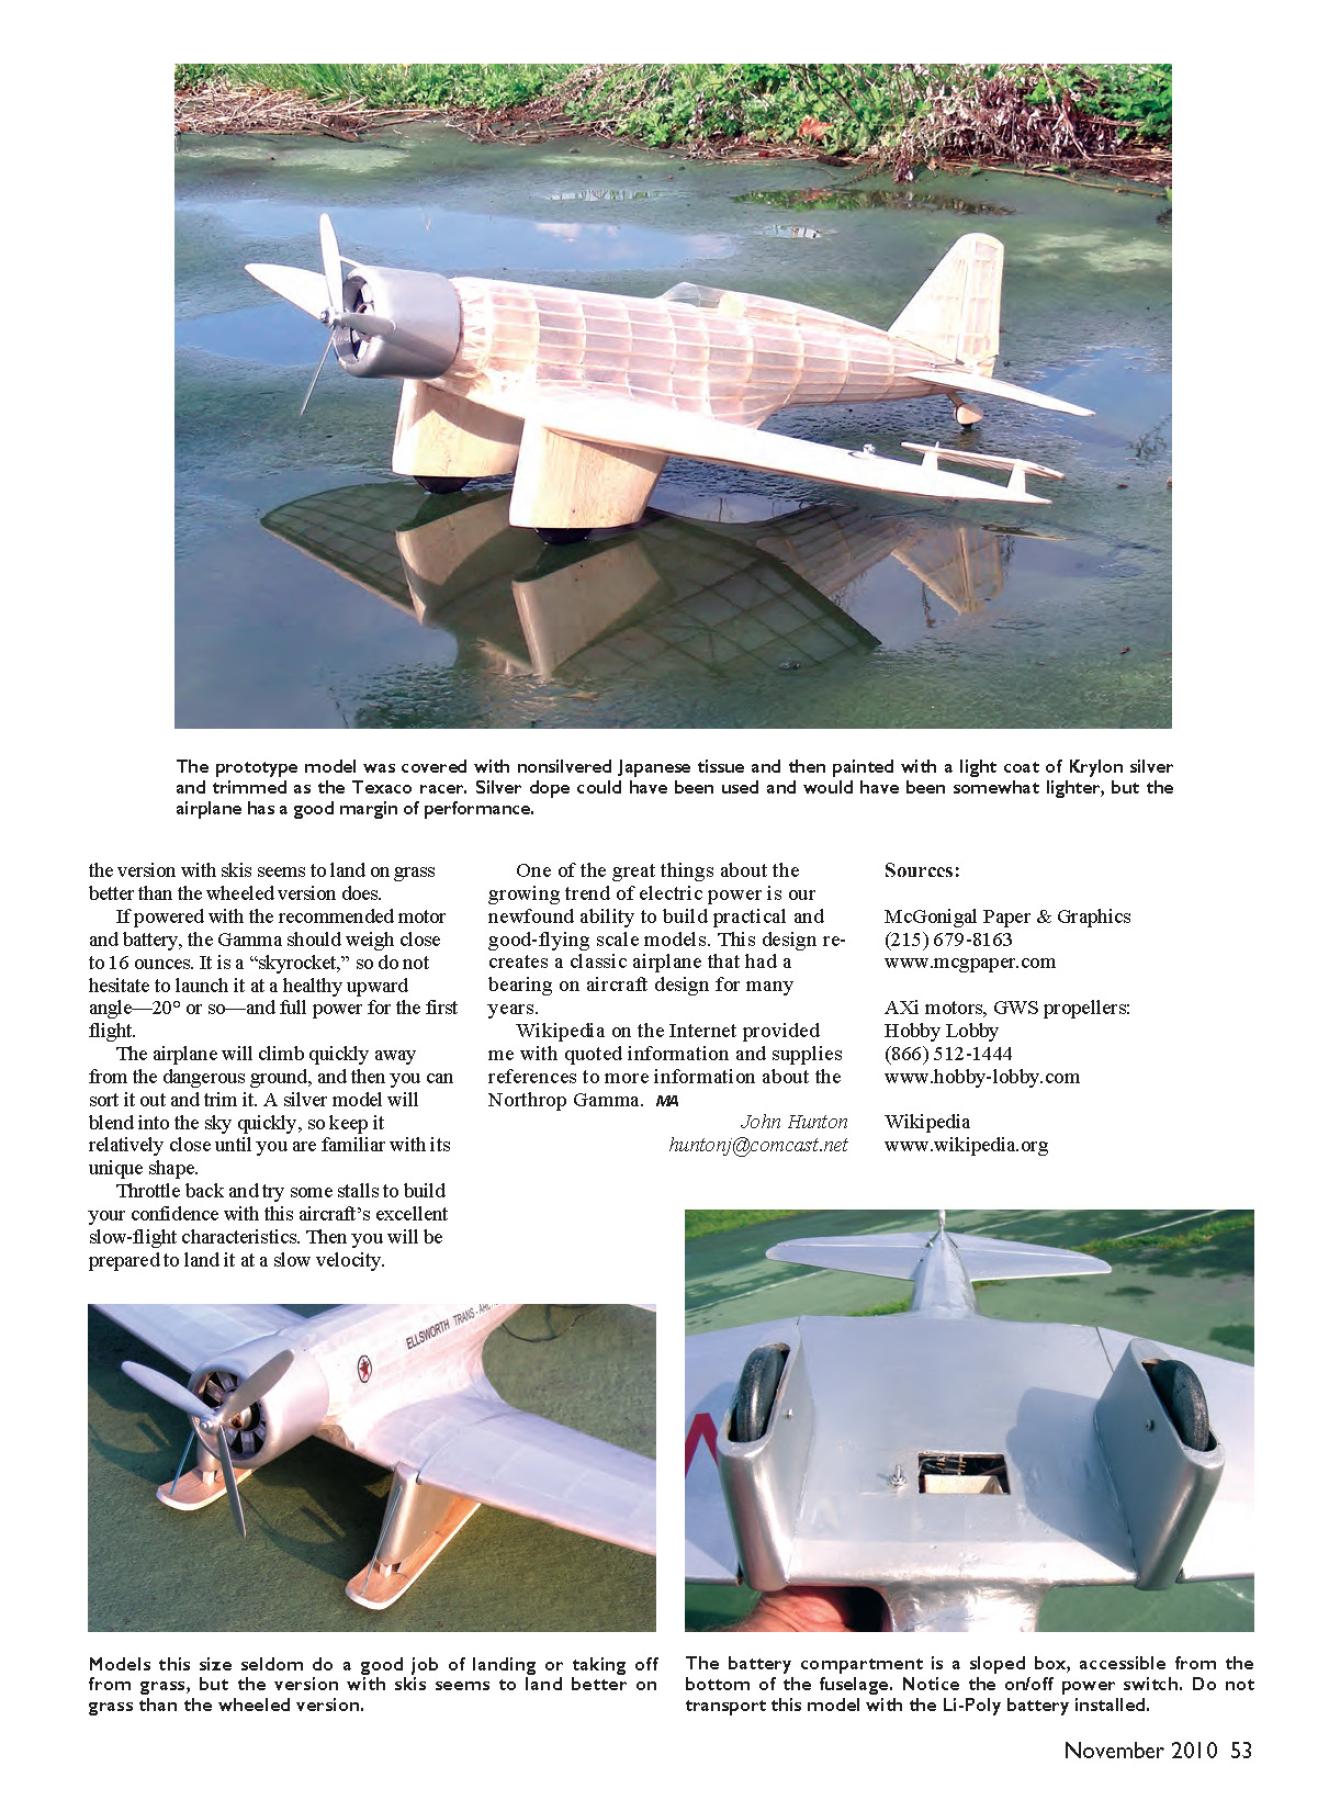
The prototype model was covered with nonsilvered Japanese tissue and then painted with a light coat of Krylon silver
and trimmed as the Texaco racer. Silver dope could have been used and would have been somewhat lighter, but the
airplane has a good margin of performance.
54 MODEL AVIATION
Left: “Park bench” ailerons and aft-located cockpit make this a
classic airplane to model. Roll control is adequate for
performing scalelike flight. Rudder in turns is required.
Don Srull hand-launches the Gamma during early tests. Pat Daily photo.
Below left: The Gamma flies off on another mission, this time
with the Ellsworth finish, complete with skis. The 42-inch-span
model flies excellently and has a wide range of available speeds,
as did the full-scale aircraft. It’s fast like a racer, yet nice and
slow for landings. Stall characteristics are outstanding.
Below: Choose your model’s decal trim from the plans. You
can get water-slide decal sheets from McGonigal Paper in clear
or white that can be printed on an ink-jet printer. Use clear
decal sheet for this project.
Northrop Gamma
Type: RC semiscale park flyer
Skill level: Intermediate builder
and pilot
Wingspan: 42 inches
Wing area: 300 square inches
Length: 24.25 inches
Weight: 16 ounces
Power: AXI 2208/34 outrunner;
three-cell, 1320 mAh Li-Poly
Construction: Balsa
Finish: Tissue or similar
Propeller: 8 x 3 three-blade
GWS, trimmed to 7 inches in
diameter
11sig2_00MSTRPG.QXD 9/23/10 12:28 PM Page 54

Edition: Model Aviation - 2010/11
Page Numbers: 51,52,53,54,55,56

Edition: Model Aviation - 2010/11
Page Numbers: 51,52,53,54,55,56
Northrop Gamma
November 2010 51
by John Hunton
JACK NORTHROP’S early all-metal fullscale
airplanes significantly influenced future
aircraft design by pioneering the use of
stressed aluminum skin, multicellular
construction, and drag-reducing wing fillets.
Early 1930s Northrop types included the
Alpha, Gamma, DC-3, and, later, the Douglas
SBD. The fixed landing gear of the Gamma
was covered with distinctive aerodynamic
spats, and the aircraft introduced a fully
enclosed cockpit.
On June 2, 1933, Frank Hawks flew his
Gamma 2A “Sky Chief” from Los Angeles to
New York in a record 13 hours, 26 minutes,
and 15 seconds. However, perhaps the most
famous Gamma was the “Polar Star.” On
November 23, 1935, Lincoln Ellsworth and
Canadian pilot Herbert Hollick-Kenyon used
it to attempt the world’s first trans-Antarctic
flight.
The Polar Star ran out of fuel only 25
miles short of the goal. Its crew took six days
to travel the remainder of the journey on foot.
The airplane was recovered and donated to the
Smithsonian National Air and Space Museum,
where it now resides.
I chose the Gamma as a model to develop
because of its Art Deco appearance and
unique “park bench” ailerons. I am presenting
two versions of this aircraft for you: the
Texaco racer and the Ellsworth Polar explorer.
The prototype model has been flown for
several months, and it has been proven to be
an excellent performer with a wide range of
speed. It will fly very fast, yet it will slow
nicely for a gentle landing.
The historic Gamma is a fine sight to see
in the air again. The model is powered by a
Li-Poly battery and spans 42 inches. Its flying
weight will come in at slightly more than 16
ounces.
CONSTRUCTION
It is suggested to have the Gamma parts
laser cut from 1/16 medium-weight balsa, for
accuracy and ease of construction. The balsa
stringers and spars replicate metal joint lines
on the full-scale airplane to the extent
possible. Use extremely light balsa for the
empennage.
The fuselage is built in half shells over the
plans. Be sure to install the 1/16 square former
reinforcement members on the half formers.
Pin down the top and bottom longerons, and
glue the formers into place.
Install the midfuselage stringer to stabilize
the formers, and then add all other stringers.
Use soft balsa soaked in water for the most
difficult and curvy stringers. If you spray the
completed half shell with a mist of water and
let it dry before you take it up, this will help
stabilize everything.
Glue the fuselage half shells together, and
remove the top and bottom longerons where
Weather your
park with a piece
of
The prototype Northrop Gamma model was originally trimmed to replicate the Lincoln Ellsworth version. Covering in silver tissue was
light but unsatisfactory. Fillet tissue was adhered with Sig Stix-It so it would not pop up after doping.
pioneer
history
52 MODEL AVIATION
Photos by the author except as noted
The wing structure is simple. Diagonals were
put in to provide rigidity during the sanding
process. A nickel in the right wingtip is an
effective antitorque device. A mini-Pico
servo has been installed.
The fuselage is built in half shells. Then those
are mated, creating a nice, light framework.
Some stringers in the wing-fillet area take
on difficult curves; use light balsa soaked in
water to install those.
A partially completed frame sits on the
bench amid construction clutter. The
Gamma is starting to take shape! The
completed model should weigh slightly
more than 16 ounces.
Above: Stringers
and spars are spaced to approximate the skin
panels and rivet seams of the first all-metal
airplane, which Jack Northrop designed. Have
the radio-equipment locations worked out
before covering the structure.
Right: There is something beautiful about
the framework of an uncovered model airplane, with its
exquisite delicateness and the repetitive patterns of ribs and stringers.
indicated (in the cabin and wing root areas).
Install the spar joiners in the wing roots.
Sand the fuselage with the sandpaper
wrapped over a small plastic bottle to get into
the curved places. Assemble the motor mount
to suit your particular power plant.
To build outer wing panels, place the main
spar on the plans and add all of the ribs,
noting that the inner rib is slanted slightly.
(See the rib-slant template.) Install the top
spar to stabilize the ribs.
Add the LE and TE and then all of the
remaining top spars. Take up the wing panel,
and install the remaining bottom spars. Sand
the wings with fine paper on a lightweight
block; be careful not to deform the airfoils.
To build the scalelike three-dimensional
empennage, pin down the main spar, add the
ribs and LE, add the top spars, and then take
the assembly up and add the bottom spars.
Assembling the built-up tailplanes to the
fuselage is facilitated by installing the fin,
with its king post, into the fuselage and then
attaching each stabilizer half to the king post
and fuselage side. You might want to cover
parts of the rear fuselage before installing the
tailplanes.
Covering and Finish: Install all RC gear,
servos, motor mount, and battery chute before
you cover the fuselage. I removed a portion of
the wing center-section to allow me to put in
the servos and receiver. Then I covered the
area with a patch for access after the Gamma
is covered.
Cover the model with lightweight tissue.
To conceal the difficult wing-fillet area, use
small pieces of covering material or even
bond paper for best results. Using silver tissue
has proven to be difficult, so I suggest that
you employ white tissue and dope or spray it
silver.
Choose your desired decal trim from the
plans. You can get water-slide decal sheets
from McGonigal Paper & Graphics in clear or
white that can be produced on an ink-jet
printer. Use clear decal sheets for this project.
One crucial aspect of rigging the
completed model is to set up the park-bench
ailerons parallel to the bottom surface of the
wing. One might think that they should be
parallel to the top of the wing, but they do not
work at all in that configuration. I know from
experience.
Because this airplane requires coordinated
rudder to turn properly, it might be best to
couple aileron and rudder actions with either
the servos or the transmitter. Rig the elevators
and ailerons to move approximately 20° and
the rudder to move 30° to each side.
Add any ballast necessary to make the
Gamma balance where indicated. Steam out
warps.
Test-run the motor for the simulated
duration of a full flight and check for
overheating of the wires or power
components. I recommend taping a nickel
under the right wingtip for at least the first
flights; that will neutralize any torque effects.
(Contact me if you want to know why.)
I recommend an AXI 2208/34 motor with
a 1320 mAh, three-cell Li-Poly battery. I cut
an 8 x 3 GWS propeller to 7 inches in
diameter, to the profile shown on the plans.
This works well, but a 7 x 4 will do okay too.
Flying:Models this size seldom do well
landing on or taking off from grass. However,
One of the great things about the
growing trend of electric power is our
newfound ability to build practical and
good-flying scale models. This design recreates
a classic airplane that had a
bearing on aircraft design for many
years.
Wikipedia on the Internet provided
me with quoted information and supplies
references to more information about the
Northrop Gamma. MA
John Hunton
[email protected]
November 2010 53
Models this size seldom do a good job of landing or taking off
from grass, but the version with skis seems to land better on
grass than the wheeled version.
The battery compartment is a sloped box, accessible from the
bottom of the fuselage. Notice the on/off power switch. Do not
transport this model with the Li-Poly battery installed.
the version with skis seems to land on grass
better than the wheeled version does.
If powered with the recommended motor
and battery, the Gamma should weigh close
to 16 ounces. It is a “skyrocket,” so do not
hesitate to launch it at a healthy upward
angle—20° or so—and full power for the first
flight.
The airplane will climb quickly away
from the dangerous ground, and then you can
sort it out and trim it. A silver model will
blend into the sky quickly, so keep it
relatively close until you are familiar with its
unique shape.
Throttle back and try some stalls to build
your confidence with this aircraft’s excellent
slow-flight characteristics. Then you will be
prepared to land it at a slow velocity.
Sources:
McGonigal Paper & Graphics
(215) 679-8163
www.mcgpaper.com
AXi motors, GWS propellers:
Hobby Lobby
(866) 512-1444
www.hobby-lobby.com
Wikipedia
www.wikipedia.org
The prototype model was covered with nonsilvered Japanese tissue and then painted with a light coat of Krylon silver
and trimmed as the Texaco racer. Silver dope could have been used and would have been somewhat lighter, but the
airplane has a good margin of performance.
54 MODEL AVIATION
Left: “Park bench” ailerons and aft-located cockpit make this a
classic airplane to model. Roll control is adequate for
performing scalelike flight. Rudder in turns is required.
Don Srull hand-launches the Gamma during early tests. Pat Daily photo.
Below left: The Gamma flies off on another mission, this time
with the Ellsworth finish, complete with skis. The 42-inch-span
model flies excellently and has a wide range of available speeds,
as did the full-scale aircraft. It’s fast like a racer, yet nice and
slow for landings. Stall characteristics are outstanding.
Below: Choose your model’s decal trim from the plans. You
can get water-slide decal sheets from McGonigal Paper in clear
or white that can be printed on an ink-jet printer. Use clear
decal sheet for this project.
Northrop Gamma
Type: RC semiscale park flyer
Skill level: Intermediate builder
and pilot
Wingspan: 42 inches
Wing area: 300 square inches
Length: 24.25 inches
Weight: 16 ounces
Power: AXI 2208/34 outrunner;
three-cell, 1320 mAh Li-Poly
Construction: Balsa
Finish: Tissue or similar
Propeller: 8 x 3 three-blade
GWS, trimmed to 7 inches in
diameter
11sig2_00MSTRPG.QXD 9/23/10 12:28 PM Page 54

