
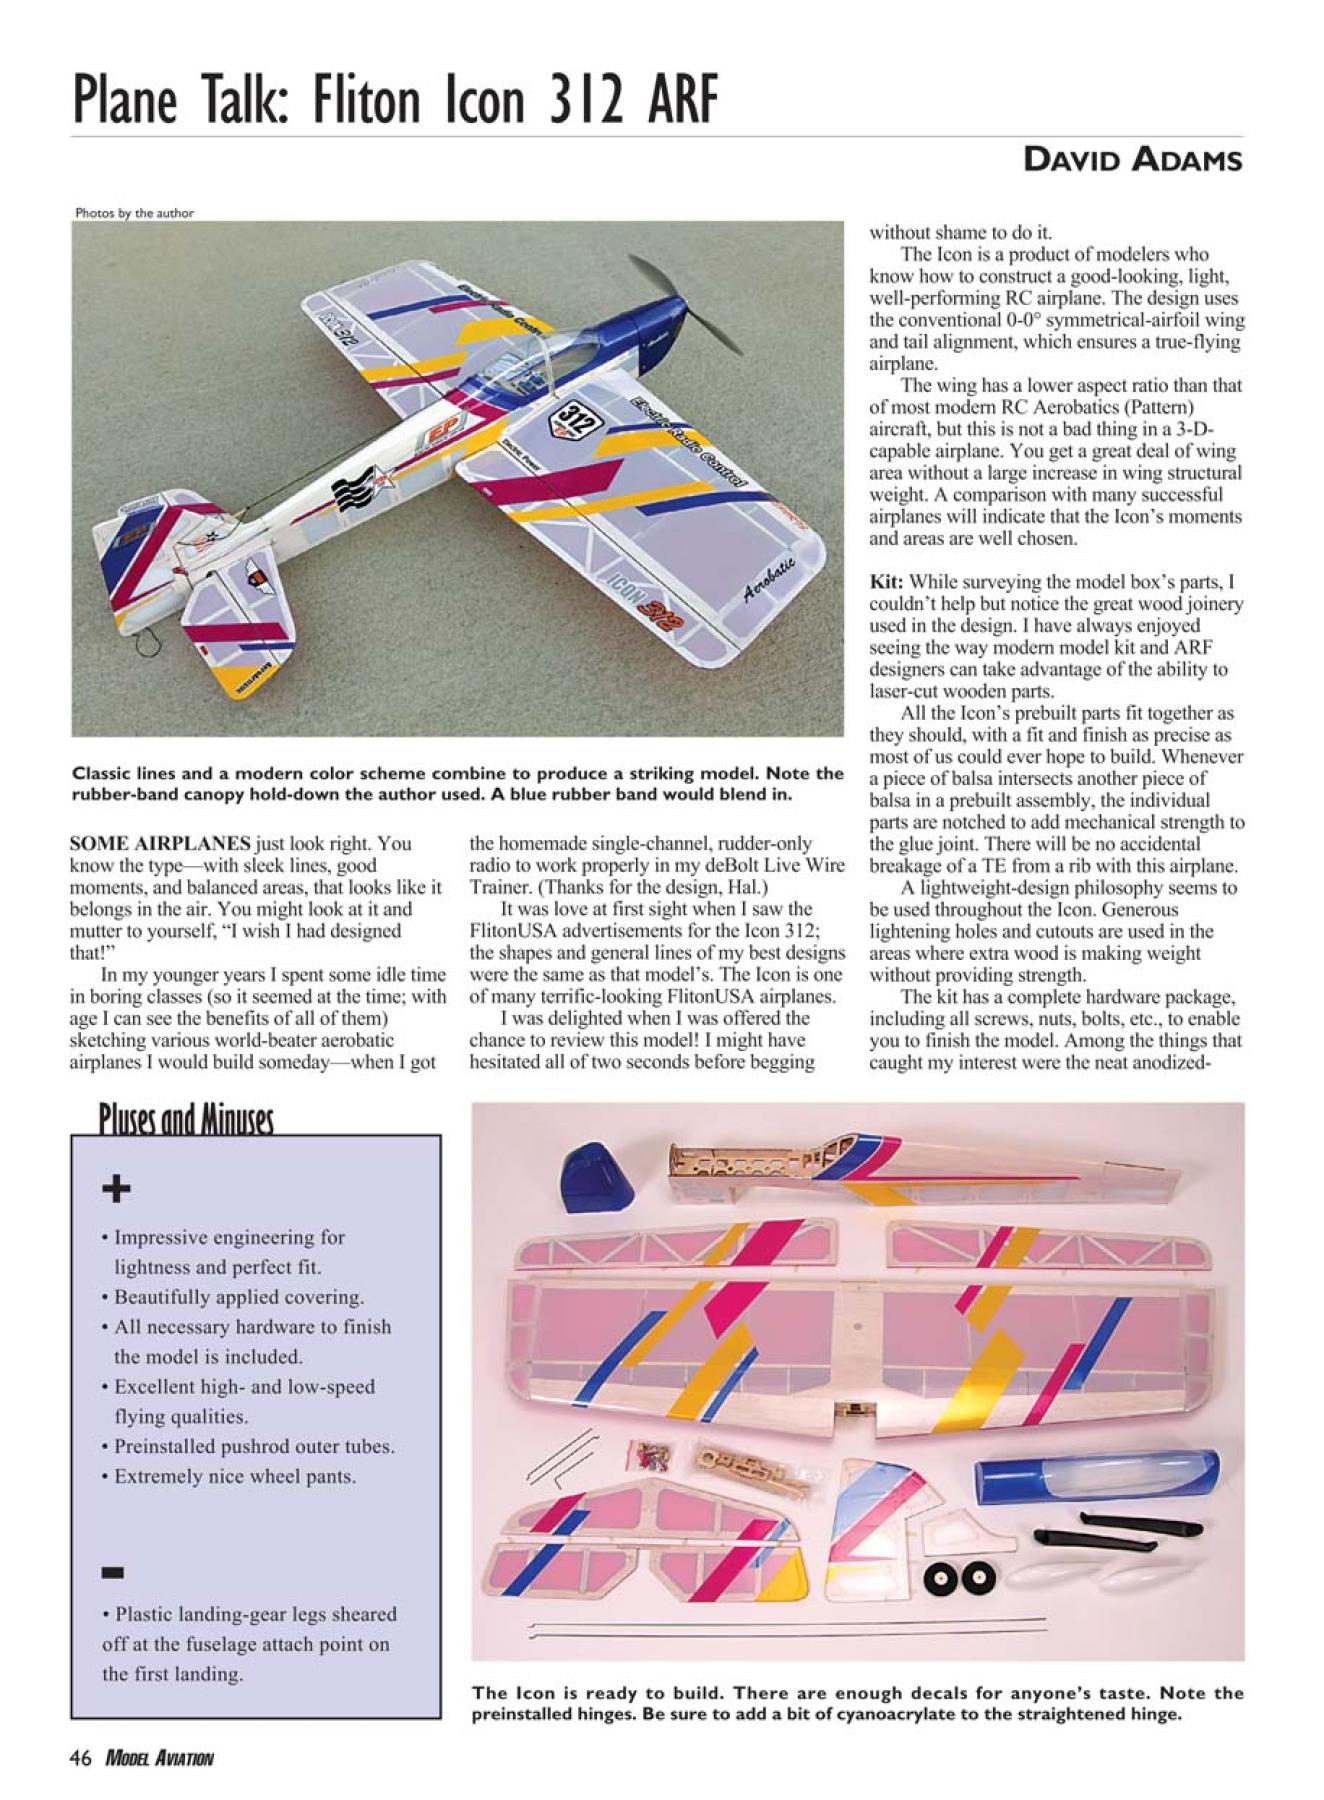
Classic lines and a modern color scheme combine to produce a striking model. Note the
rubber-band canopy hold-down the author used. A blue rubber band would blend in.
SOME AIRPLANES just look right. You
know the type—with sleek lines, good
moments, and balanced areas, that looks like it
belongs in the air. You might look at it and
mutter to yourself, “I wish I had designed
that!”
In my younger years I spent some idle time
in boring classes (so it seemed at the time; with
age I can see the benefits of all of them)
sketching various world-beater aerobatic
airplanes I would build someday—when I got
the homemade single-channel, rudder-only
radio to work properly in my deBolt Live Wire
Trainer. (Thanks for the design, Hal.)
It was love at first sight when I saw the
FlitonUSA advertisements for the Icon 312;
the shapes and general lines of my best designs
were the same as that model’s. The Icon is one
of many terrific-looking FlitonUSA airplanes.
I was delighted when I was offered the
chance to review this model! I might have
hesitated all of two seconds before begging
without shame to do it.
The Icon is a product of modelers who
know how to construct a good-looking, light,
well-performing RC airplane. The design uses
the conventional 0-0° symmetrical-airfoil wing
and tail alignment, which ensures a true-flying
airplane.
The wing has a lower aspect ratio than that
of most modern RC Aerobatics (Pattern)
aircraft, but this is not a bad thing in a 3-Dcapable
airplane. You get a great deal of wing
area without a large increase in wing structural
weight. A comparison with many successful
airplanes will indicate that the Icon’s moments
and areas are well chosen.
Kit: While surveying the model box’s parts, I
couldn’t help but notice the great wood joinery
used in the design. I have always enjoyed
seeing the way modern model kit and ARF
designers can take advantage of the ability to
laser-cut wooden parts.
All the Icon’s prebuilt parts fit together as
they should, with a fit and finish as precise as
most of us could ever hope to build. Whenever
a piece of balsa intersects another piece of
balsa in a prebuilt assembly, the individual
parts are notched to add mechanical strength to
the glue joint. There will be no accidental
breakage of a TE from a rib with this airplane.
A lightweight-design philosophy seems to
be used throughout the Icon. Generous
lightening holes and cutouts are used in the
areas where extra wood is making weight
without providing strength.
The kit has a complete hardware package,
including all screws, nuts, bolts, etc., to enable
you to finish the model. Among the things that
caught my interest were the neat anodized-February 2006 47
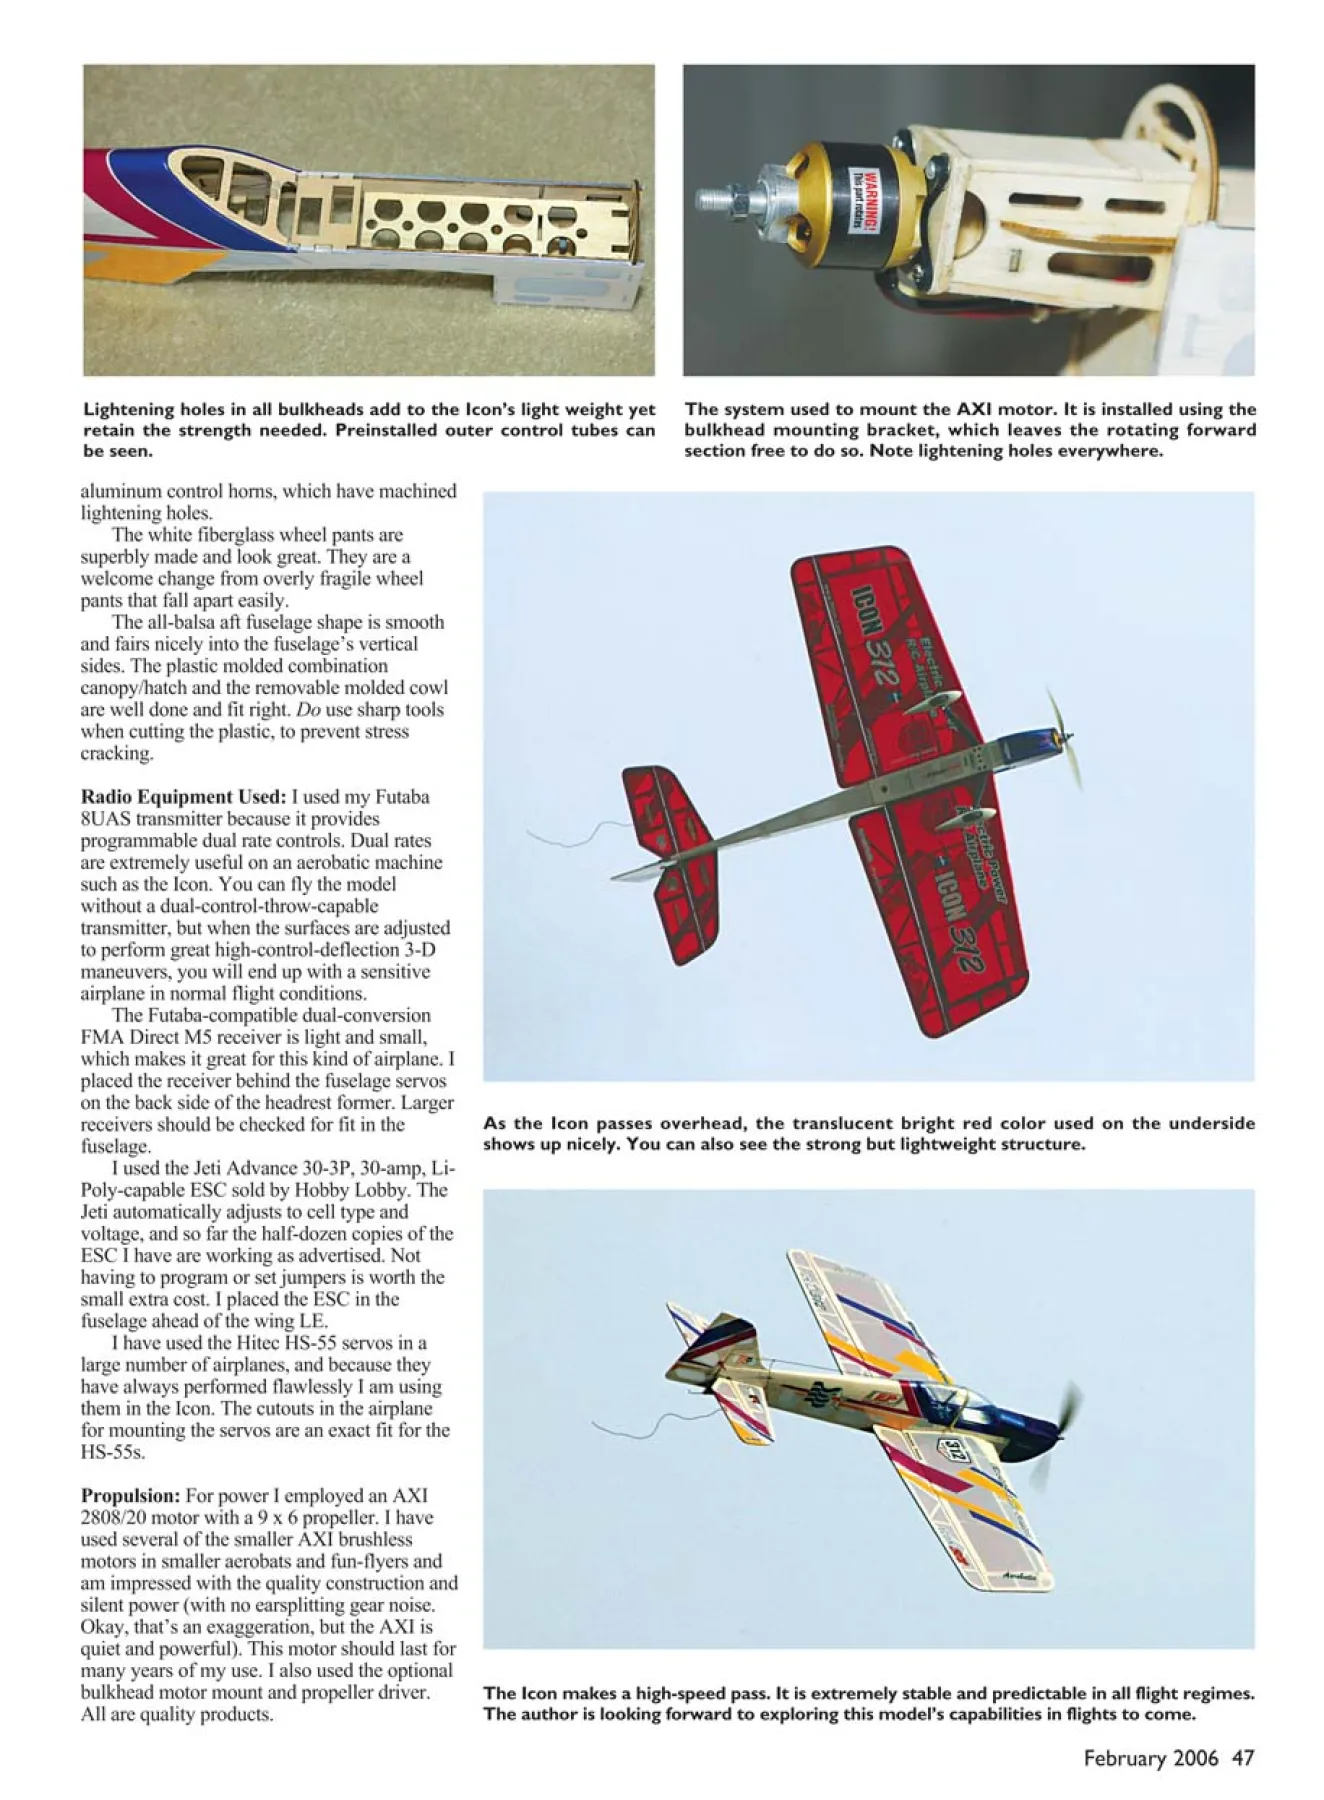
The system used to mount the AXI motor. It is installed using the
bulkhead mounting bracket, which leaves the rotating forward
section free to do so. Note lightening holes everywhere.
Lightening holes in all bulkheads add to the Icon’s light weight yet
retain the strength needed. Preinstalled outer control tubes can
be seen.
As the Icon passes overhead, the translucent bright red color used on the underside
shows up nicely. You can also see the strong but lightweight structure.
The Icon makes a high-speed pass. It is extremely stable and predictable in all flight regimes.
The author is looking forward to exploring this model’s capabilities in flights to come.
aluminum control horns, which have machined
lightening holes.
The white fiberglass wheel pants are
superbly made and look great. They are a
welcome change from overly fragile wheel
pants that fall apart easily.
The all-balsa aft fuselage shape is smooth
and fairs nicely into the fuselage’s vertical
sides. The plastic molded combination
canopy/hatch and the removable molded cowl
are well done and fit right. Do use sharp tools
when cutting the plastic, to prevent stress
cracking.
Radio Equipment Used: I used my Futaba
8UAS transmitter because it provides
programmable dual rate controls. Dual rates
are extremely useful on an aerobatic machine
such as the Icon. You can fly the model
without a dual-control-throw-capable
transmitter, but when the surfaces are adjusted
to perform great high-control-deflection 3-D
maneuvers, you will end up with a sensitive
airplane in normal flight conditions.
The Futaba-compatible dual-conversion
FMA Direct M5 receiver is light and small,
which makes it great for this kind of airplane. I
placed the receiver behind the fuselage servos
on the back side of the headrest former. Larger
receivers should be checked for fit in the
fuselage.
I used the Jeti Advance 30-3P, 30-amp, Li-
Poly-capable ESC sold by Hobby Lobby. The
Jeti automatically adjusts to cell type and
voltage, and so far the half-dozen copies of the
ESC I have are working as advertised. Not
having to program or set jumpers is worth the
small extra cost. I placed the ESC in the
fuselage ahead of the wing LE.
I have used the Hitec HS-55 servos in a
large number of airplanes, and because they
have always performed flawlessly I am using
them in the Icon. The cutouts in the airplane
for mounting the servos are an exact fit for the
HS-55s.
Propulsion: For power I employed an AXI
2808/20 motor with a 9 x 6 propeller. I have
used several of the smaller AXI brushless
motors in smaller aerobats and fun-flyers and
am impressed with the quality construction and
silent power (with no earsplitting gear noise.
Okay, that’s an exaggeration, but the AXI is
quiet and powerful). This motor should last for
many years of my use. I also used the optional
bulkhead motor mount and propeller driver.
All are quality products.
The number of cells, the type of cells, and the charging method are
automatically determined for you on the charger, making handling Li-
Poly cells much safer and easier. A built-in fan is provided to keep the
unit cool.
This is the fifth AstroFlight charger I have owned. Although it is
initially costly, I highly recommend it. If it saves you one mistake while
charging the Li-Poly packs, it will be worth the extra cost.
Although other radio gear and servos would work equally well in
the Icon, I only recommend what I have used and am comfortable with.
You should have equally good success with the products I have
recommended.
Assembly Notes: There isn’t much to comment on with regards to this
airplane’s assembly. It goes together without fuss, with everything
fitting exactly as it should.
The instruction manual is adequate, with minimal words but good
illustrations showing all details needed to perform the construction
steps. The fact that the manual doesn’t contain much text is okay since
most experienced modelers (the only ones who should be flying this
model) probably don’t read the instructions anyway; they tend to look at
the photos and then do things the way they have always done them. I
followed the instructions exactly and had no problems.
An interesting thing I encountered (and an operation I hate; I
have spent many minutes/hours trying to fish the wires through big
wings) was how to maneuver the aileron extension wires through the
cutouts in the wing ribs. The one-piece wing made this a potentially
difficult process.
I tied a small, heavy nut to a string. While holding the wing in a
vertical orientation, I dangled the nut into the servo cutout hole.
Not believing my luck, it passed through all the obstacles in the
wing to exactly the right spot at the centerline of the wing, where I
grabbed it with a pair of needle-nose pliers. (I was surprised; this had
never happened before!) The other wing went just as easily, so
apparently there is magic in the Icon.
Two motor-mounting provisions are provided in the kit, which
allow for firewall mounting systems (such as the AXI motors use) or a
beam mounting system (for the GWS geared motors). Although the
GWS system won’t provide 3-D performance on a model this large,other systems using a brushless motor and
gears have used the same mounting method.
The correct motor thrust angle is built in
with either system. If you are using the beam
mounting system, you should verify that the
beam doesn’t intrude into the battery area.
The wheel pants are kept from rotating by
their friction against the landing-gear legs.
This lets the pants rotate if bumped and will
stop them from breaking (although they are
extremely strong and I doubt that they will
break easily).
Even though I worked slowly to draw out
the pleasure of building such a nice kit, this
airplane was finished all too soon.
Concerns and Modifications: While doing a
nice, soft landing at the end of the first flight,
both gear legs broke! I didn’t think I had hit
hard enough to break the landing gear.
(Throughout the years I have landed enough
airplanes hard enough to bend/break many
landing gears, but this time wasn’t one of
them.)
I did an Internet search that resulted in
several other cases where the landing gear had
broken in the same place. It is prudent to use
fiberglass or carbon fiber and epoxy to
reinforce the landing gear in this area; roughly
double the cross-sectional area. I understand
that the manufacturer is changing plastic
compounds to prevent possible breakage and
that these modified landing-gear legs have
been put in all the kits.
The motor mounting area under the cowl
is adequately sized for all motors except my
big outrunner; the AXI rubbed the inside of
the cowl when it was mounted. I split the cowl
lengthwise and put a 0.4-inch-wide insert in
the top of the cowl. I used 1/64 plywood and
shaded it with a permanent marker.
This isn’t noticeable unless you are close
to the airplane. The result is that the motor can
turn freely, and it leaves a space of
approximately 1/8 inch around the motor to
allow the cool air to flow around it and the
ESC.
The Icon 312 is definitely not for
beginners. You should be comfortable
controlling a fully aerobatic model with
ailerons, large control surfaces, and
corresponding large control-surface throws,
which make for great aerobatics but not for
training.
The Icon is advertised as a park flyer. It
can be flown in a small area under the control
of an expert pilot; however, it is still large
enough that a momentary “oops” could be
harmful. The pilot should use good judgment
in choosing a flying site (and everything else).
Flying: Winter is not a nice time to do product
reviews here in Missouri. We have wind, cold,
rain, or snow, or all of the above. A nice,
sunny, semiwarm day is against the Winter
Rules. We waited until it wasn’t freezing,
raining, or snowing. (I have flown in a light
snowstorm, and the airplane can disappear—
not a good idea!) At least the motor will stay
cool in the winter.
The day we (my wife/mechanic and I)
chose for test-flying greeted us with
temperatures in the mid-40s and was not too
windy. It wasn’t raining or snowing, and it
was the best day promised in several weeks.
I had checked the CG previously and
found the airplane balancing exactly on the
spar with the battery positioned all the way
forward in the battery area and the extra ounce
of the big AXI motor helping. This balance
point has proven to be good based on the good
flying qualities we encountered.
As part of the preflight I also made sure
the control surfaces were aligned, and it was
time well spent.
As I slowly applied power to the AXI, the
Icon smoothly tracked straight ahead. Within a
few feet the slight up I was holding caused the
airplane to lift off the runway.
I added a bit more elevator throw, and the
Icon headed upward. I kept feeding in more
power and started reducing the elevator input.
The Icon was soon impersonating a moon
rocket. This was great!
I cut back on the power and brought the
airplane down low enough to see it again. At
low altitude I tried all the combinations of
various maneuvers with control throws and
power settings that were available.
The Icon was proving to be a nice flier. It
will perform large, full-power Loops that are
straight and true. At full power as you increase
the up-elevator setting, the Loop will tighten
until the speed and angle of attack are reached
where the model will snap out of the Loop.
This is normal airplane behavior. Rolls were
straight, with only a breath’s worth of elevator
correction, and the roll rate corresponded to
aileron throw.
The Icon will perform any 3-D maneuver
the pilot is capable of and will fly high- and
low-speed maneuvers with ease. It is much
more capable than I am, but that didn’t
diminish my fun one bit.The only downer of the day was the
breakage of the landing-gear struts; everything
else was terrific. I am having a difficult time
waiting for the next good day.
The Icon 312 is good-looking and well
constructed. The well-proven aerodynamic
configuration ensures that it will be a winner
with modelers everywhere.
The Icon with reduced control throws can
be flown comfortably by almost anyone with
aileron experience. The more experienced
pilot can take advantage of the aerodynamic
performance the Icon will deliver in its
smooth, predictable manner.
I highly recommend the Icon, and it has
found a permanent home in my modelairplane
hangar. MA
David Adams
[email protected]
Manufacturer:
FlitonUSA
4790 Irvine Blvd. Suite 105/229
Irvine CA 92620
(888) 473-0856
www.fliton.com
Products used in review:
Futaba 8UAS transmitter:
Great Planes Model Distributors
Box 9021
Champaign IL 61826
(217) 398-8970
www.futaba-rc.com/radios/
M5 receiver:
FMA Direct
5716A Industry Ln.
Frederick MD 21704
(800) 343-2934
www.fmadirect.com
HS-55 servos:
Hitec RCD USA, Inc.
12115 Paine St.
Poway CA 92064
(858) 748-6948
www.hitecrcd.com
Jeti Advance 30-3P ESC:
Hobby Lobby
5614 Franklin Pike Cir.
Brentwood TN 37027
(615) 373-1444
Edition: Model Aviation - 2006/02
Page Numbers: 46,47,48,50,52
Edition: Model Aviation - 2006/02
Page Numbers: 46,47,48,50,52
Classic lines and a modern color scheme combine to produce a striking model. Note the
rubber-band canopy hold-down the author used. A blue rubber band would blend in.
SOME AIRPLANES just look right. You
know the type—with sleek lines, good
moments, and balanced areas, that looks like it
belongs in the air. You might look at it and
mutter to yourself, “I wish I had designed
that!”
In my younger years I spent some idle time
in boring classes (so it seemed at the time; with
age I can see the benefits of all of them)
sketching various world-beater aerobatic
airplanes I would build someday—when I got
the homemade single-channel, rudder-only
radio to work properly in my deBolt Live Wire
Trainer. (Thanks for the design, Hal.)
It was love at first sight when I saw the
FlitonUSA advertisements for the Icon 312;
the shapes and general lines of my best designs
were the same as that model’s. The Icon is one
of many terrific-looking FlitonUSA airplanes.
I was delighted when I was offered the
chance to review this model! I might have
hesitated all of two seconds before begging
without shame to do it.
The Icon is a product of modelers who
know how to construct a good-looking, light,
well-performing RC airplane. The design uses
the conventional 0-0° symmetrical-airfoil wing
and tail alignment, which ensures a true-flying
airplane.
The wing has a lower aspect ratio than that
of most modern RC Aerobatics (Pattern)
aircraft, but this is not a bad thing in a 3-Dcapable
airplane. You get a great deal of wing
area without a large increase in wing structural
weight. A comparison with many successful
airplanes will indicate that the Icon’s moments
and areas are well chosen.
Kit: While surveying the model box’s parts, I
couldn’t help but notice the great wood joinery
used in the design. I have always enjoyed
seeing the way modern model kit and ARF
designers can take advantage of the ability to
laser-cut wooden parts.
All the Icon’s prebuilt parts fit together as
they should, with a fit and finish as precise as
most of us could ever hope to build. Whenever
a piece of balsa intersects another piece of
balsa in a prebuilt assembly, the individual
parts are notched to add mechanical strength to
the glue joint. There will be no accidental
breakage of a TE from a rib with this airplane.
A lightweight-design philosophy seems to
be used throughout the Icon. Generous
lightening holes and cutouts are used in the
areas where extra wood is making weight
without providing strength.
The kit has a complete hardware package,
including all screws, nuts, bolts, etc., to enable
you to finish the model. Among the things that
caught my interest were the neat anodized-February 2006 47
The system used to mount the AXI motor. It is installed using the
bulkhead mounting bracket, which leaves the rotating forward
section free to do so. Note lightening holes everywhere.
Lightening holes in all bulkheads add to the Icon’s light weight yet
retain the strength needed. Preinstalled outer control tubes can
be seen.
As the Icon passes overhead, the translucent bright red color used on the underside
shows up nicely. You can also see the strong but lightweight structure.
The Icon makes a high-speed pass. It is extremely stable and predictable in all flight regimes.
The author is looking forward to exploring this model’s capabilities in flights to come.
aluminum control horns, which have machined
lightening holes.
The white fiberglass wheel pants are
superbly made and look great. They are a
welcome change from overly fragile wheel
pants that fall apart easily.
The all-balsa aft fuselage shape is smooth
and fairs nicely into the fuselage’s vertical
sides. The plastic molded combination
canopy/hatch and the removable molded cowl
are well done and fit right. Do use sharp tools
when cutting the plastic, to prevent stress
cracking.
Radio Equipment Used: I used my Futaba
8UAS transmitter because it provides
programmable dual rate controls. Dual rates
are extremely useful on an aerobatic machine
such as the Icon. You can fly the model
without a dual-control-throw-capable
transmitter, but when the surfaces are adjusted
to perform great high-control-deflection 3-D
maneuvers, you will end up with a sensitive
airplane in normal flight conditions.
The Futaba-compatible dual-conversion
FMA Direct M5 receiver is light and small,
which makes it great for this kind of airplane. I
placed the receiver behind the fuselage servos
on the back side of the headrest former. Larger
receivers should be checked for fit in the
fuselage.
I used the Jeti Advance 30-3P, 30-amp, Li-
Poly-capable ESC sold by Hobby Lobby. The
Jeti automatically adjusts to cell type and
voltage, and so far the half-dozen copies of the
ESC I have are working as advertised. Not
having to program or set jumpers is worth the
small extra cost. I placed the ESC in the
fuselage ahead of the wing LE.
I have used the Hitec HS-55 servos in a
large number of airplanes, and because they
have always performed flawlessly I am using
them in the Icon. The cutouts in the airplane
for mounting the servos are an exact fit for the
HS-55s.
Propulsion: For power I employed an AXI
2808/20 motor with a 9 x 6 propeller. I have
used several of the smaller AXI brushless
motors in smaller aerobats and fun-flyers and
am impressed with the quality construction and
silent power (with no earsplitting gear noise.
Okay, that’s an exaggeration, but the AXI is
quiet and powerful). This motor should last for
many years of my use. I also used the optional
bulkhead motor mount and propeller driver.
All are quality products.
The number of cells, the type of cells, and the charging method are
automatically determined for you on the charger, making handling Li-
Poly cells much safer and easier. A built-in fan is provided to keep the
unit cool.
This is the fifth AstroFlight charger I have owned. Although it is
initially costly, I highly recommend it. If it saves you one mistake while
charging the Li-Poly packs, it will be worth the extra cost.
Although other radio gear and servos would work equally well in
the Icon, I only recommend what I have used and am comfortable with.
You should have equally good success with the products I have
recommended.
Assembly Notes: There isn’t much to comment on with regards to this
airplane’s assembly. It goes together without fuss, with everything
fitting exactly as it should.
The instruction manual is adequate, with minimal words but good
illustrations showing all details needed to perform the construction
steps. The fact that the manual doesn’t contain much text is okay since
most experienced modelers (the only ones who should be flying this
model) probably don’t read the instructions anyway; they tend to look at
the photos and then do things the way they have always done them. I
followed the instructions exactly and had no problems.
An interesting thing I encountered (and an operation I hate; I
have spent many minutes/hours trying to fish the wires through big
wings) was how to maneuver the aileron extension wires through the
cutouts in the wing ribs. The one-piece wing made this a potentially
difficult process.
I tied a small, heavy nut to a string. While holding the wing in a
vertical orientation, I dangled the nut into the servo cutout hole.
Not believing my luck, it passed through all the obstacles in the
wing to exactly the right spot at the centerline of the wing, where I
grabbed it with a pair of needle-nose pliers. (I was surprised; this had
never happened before!) The other wing went just as easily, so
apparently there is magic in the Icon.
Two motor-mounting provisions are provided in the kit, which
allow for firewall mounting systems (such as the AXI motors use) or a
beam mounting system (for the GWS geared motors). Although the
GWS system won’t provide 3-D performance on a model this large,other systems using a brushless motor and
gears have used the same mounting method.
The correct motor thrust angle is built in
with either system. If you are using the beam
mounting system, you should verify that the
beam doesn’t intrude into the battery area.
The wheel pants are kept from rotating by
their friction against the landing-gear legs.
This lets the pants rotate if bumped and will
stop them from breaking (although they are
extremely strong and I doubt that they will
break easily).
Even though I worked slowly to draw out
the pleasure of building such a nice kit, this
airplane was finished all too soon.
Concerns and Modifications: While doing a
nice, soft landing at the end of the first flight,
both gear legs broke! I didn’t think I had hit
hard enough to break the landing gear.
(Throughout the years I have landed enough
airplanes hard enough to bend/break many
landing gears, but this time wasn’t one of
them.)
I did an Internet search that resulted in
several other cases where the landing gear had
broken in the same place. It is prudent to use
fiberglass or carbon fiber and epoxy to
reinforce the landing gear in this area; roughly
double the cross-sectional area. I understand
that the manufacturer is changing plastic
compounds to prevent possible breakage and
that these modified landing-gear legs have
been put in all the kits.
The motor mounting area under the cowl
is adequately sized for all motors except my
big outrunner; the AXI rubbed the inside of
the cowl when it was mounted. I split the cowl
lengthwise and put a 0.4-inch-wide insert in
the top of the cowl. I used 1/64 plywood and
shaded it with a permanent marker.
This isn’t noticeable unless you are close
to the airplane. The result is that the motor can
turn freely, and it leaves a space of
approximately 1/8 inch around the motor to
allow the cool air to flow around it and the
ESC.
The Icon 312 is definitely not for
beginners. You should be comfortable
controlling a fully aerobatic model with
ailerons, large control surfaces, and
corresponding large control-surface throws,
which make for great aerobatics but not for
training.
The Icon is advertised as a park flyer. It
can be flown in a small area under the control
of an expert pilot; however, it is still large
enough that a momentary “oops” could be
harmful. The pilot should use good judgment
in choosing a flying site (and everything else).
Flying: Winter is not a nice time to do product
reviews here in Missouri. We have wind, cold,
rain, or snow, or all of the above. A nice,
sunny, semiwarm day is against the Winter
Rules. We waited until it wasn’t freezing,
raining, or snowing. (I have flown in a light
snowstorm, and the airplane can disappear—
not a good idea!) At least the motor will stay
cool in the winter.
The day we (my wife/mechanic and I)
chose for test-flying greeted us with
temperatures in the mid-40s and was not too
windy. It wasn’t raining or snowing, and it
was the best day promised in several weeks.
I had checked the CG previously and
found the airplane balancing exactly on the
spar with the battery positioned all the way
forward in the battery area and the extra ounce
of the big AXI motor helping. This balance
point has proven to be good based on the good
flying qualities we encountered.
As part of the preflight I also made sure
the control surfaces were aligned, and it was
time well spent.
As I slowly applied power to the AXI, the
Icon smoothly tracked straight ahead. Within a
few feet the slight up I was holding caused the
airplane to lift off the runway.
I added a bit more elevator throw, and the
Icon headed upward. I kept feeding in more
power and started reducing the elevator input.
The Icon was soon impersonating a moon
rocket. This was great!
I cut back on the power and brought the
airplane down low enough to see it again. At
low altitude I tried all the combinations of
various maneuvers with control throws and
power settings that were available.
The Icon was proving to be a nice flier. It
will perform large, full-power Loops that are
straight and true. At full power as you increase
the up-elevator setting, the Loop will tighten
until the speed and angle of attack are reached
where the model will snap out of the Loop.
This is normal airplane behavior. Rolls were
straight, with only a breath’s worth of elevator
correction, and the roll rate corresponded to
aileron throw.
The Icon will perform any 3-D maneuver
the pilot is capable of and will fly high- and
low-speed maneuvers with ease. It is much
more capable than I am, but that didn’t
diminish my fun one bit.The only downer of the day was the
breakage of the landing-gear struts; everything
else was terrific. I am having a difficult time
waiting for the next good day.
The Icon 312 is good-looking and well
constructed. The well-proven aerodynamic
configuration ensures that it will be a winner
with modelers everywhere.
The Icon with reduced control throws can
be flown comfortably by almost anyone with
aileron experience. The more experienced
pilot can take advantage of the aerodynamic
performance the Icon will deliver in its
smooth, predictable manner.
I highly recommend the Icon, and it has
found a permanent home in my modelairplane
hangar. MA
David Adams
[email protected]
Manufacturer:
FlitonUSA
4790 Irvine Blvd. Suite 105/229
Irvine CA 92620
(888) 473-0856
www.fliton.com
Products used in review:
Futaba 8UAS transmitter:
Great Planes Model Distributors
Box 9021
Champaign IL 61826
(217) 398-8970
www.futaba-rc.com/radios/
M5 receiver:
FMA Direct
5716A Industry Ln.
Frederick MD 21704
(800) 343-2934
www.fmadirect.com
HS-55 servos:
Hitec RCD USA, Inc.
12115 Paine St.
Poway CA 92064
(858) 748-6948
www.hitecrcd.com
Jeti Advance 30-3P ESC:
Hobby Lobby
5614 Franklin Pike Cir.
Brentwood TN 37027
(615) 373-1444

