
132 MODEL AVIATION
Bob Kopski, 25 West End Dr., Lansdale PA 19446
RADIO CONTROL ELECTRICS
The attractive Miracle EPP-foam ARF from Hobby Lobby. It was
much more work than many other ARFs, but it flies great.
The adjusted motor-mount structure in the Miracle is more
robust than the original and is highly recommended.
Recessing the Miracle’s aileron servo deeper permits short,
direct pushrods. Wheel collars secure rod adjustment.
THIS COLUMN INCLUDES one meet announcement, shares
some reader input, updates an earlier connector story, describes an
easy E-airplane upgrade, and suggests improvements to the
Miracle ARF.
Randy Covington (3106 YMCA Camp Rd., King NC 27021; Tel.:
[336] 983-9126; E-mail: [email protected]) wrote to tell
us about the upcoming Triad Electric Weekend scheduled for April
30-May 1, 2005, and co-hosted by the Riverside Aeromodelers of
King, North Carolina (RAMS), and the Winston-Salem Radio
Control Club of Winston-Salem, North Carolina (WSRC).
Saturday’s meet will be at the RAMS field in King. Sunday’s
events will be at the WSRC field in Advance, North Carolina.
That’s one meet, two days, two clubs, and two fields! Get in touch
with Randy for all of the details, and do tell him Bob sent ya!
My average for reader mail has been roughly 200 letters per year
for the last 20-plus years, and most of it brings specific questions.
As a matter of personal policy, I strive to provide the best answers
I can as fast as I can. Other incoming mail shares comments or
information, and some just says “Thanks.” And there are always a
few letters resulting from misunderstanding column content.
The latter population is rather small and so far has been the
apparent result of modelers not reading carefully. Normally I’d just
fix this with correspondence; however, there was a recent, more
important instance of this that I want to share.
The December 2004 column included a “wish list” that
described some new electric products that I’d like to see come
about—for everyone. One item I envisioned was a slow charger for
Li-Poly batteries. Several readers reacted, and some of them
clearly misunderstood what I wrote.
That column expressed my interest in a Li-Poly charger that
would be AC-line powered. This would simplify in-shop charging;
there would be no need for a car battery or a robust line-operated,
12-volt power supply to power the usual 12-volt-input Li-Poly
charger.
More fundamentally, I suggested that this could be a slow
charger because the faster, one-hour Li-Poly charge is often
unnecessary with in-shop charging. This would allow such a
product to be smaller, lighter, and cost less—all good things.
I concluded that column topic with the query “This wish
assumes that slow-charging Li-Poly batteries is acceptable. Does
anyone out there actually know if that’s true?”
A variety of reader reactions resulted; unfortunately several
thought I had proposed charging Li-Polys with the same (kind of)
charger used for transmitters and receivers. I did not! They
misread it.
By now everyone should be aware that Li-Polys are to be
charged with products designed for this chemistry—not with
chargers designed for Ni-Cd and NiMH batteries. I guess what
surprised me most was how many got it wrong.
Some reactions were quite positive; i.e., it’s clear that I’m not
the only one desiring such a product! One reader described that
because his (smaller) charger is incapable of supplying charge at
the usual one-hour rate to his larger packs, in effect he is already
“slower charging”—with no apparent adverse consequence. But
another reader wrote that he did not want to have to extend the “sit
there and watch it” time while charging.
The industry input is that it would be technically okay to slow
charge, provided it’s with a charger designed for Li-Poly. I’m
working on one—for me.
This brings us up to date on this matter. Reader input on any
column topic is always welcome, but it’s better for us all if you
read what I actually wrote first! And yes, sometimes I do have an
error—and input in this case is strongly desired and encouraged,
and it’s accepted with appreciation.
April 2005 133
L-R: AstroFlight three-pin connector set for smaller systems and
original AstroFlight connectors for larger systems.
AXI-motor retrofit to the Skyvolt’s front end. The inner plywood
ring and 1-ounce stick-on weight are partly visible.
An inside peek at the updated Skyvolt power-system installation.
Those changes made it a whole new airplane!
The January 2005 column shared some home-brew modification
and utilization ideas involving two Deans connectors. One
described modifying a Deans four-pin connector set to yield a
three-pin version. This is for use with smaller brushlessmotor/
ESC interconnections.
The idea is to cut off the fourth or widest-spaced pins, leaving
three equally spaced pins intact. The resulting connector pair
would then permit easy motor rotation reversal by simply turning
the connector pairing.
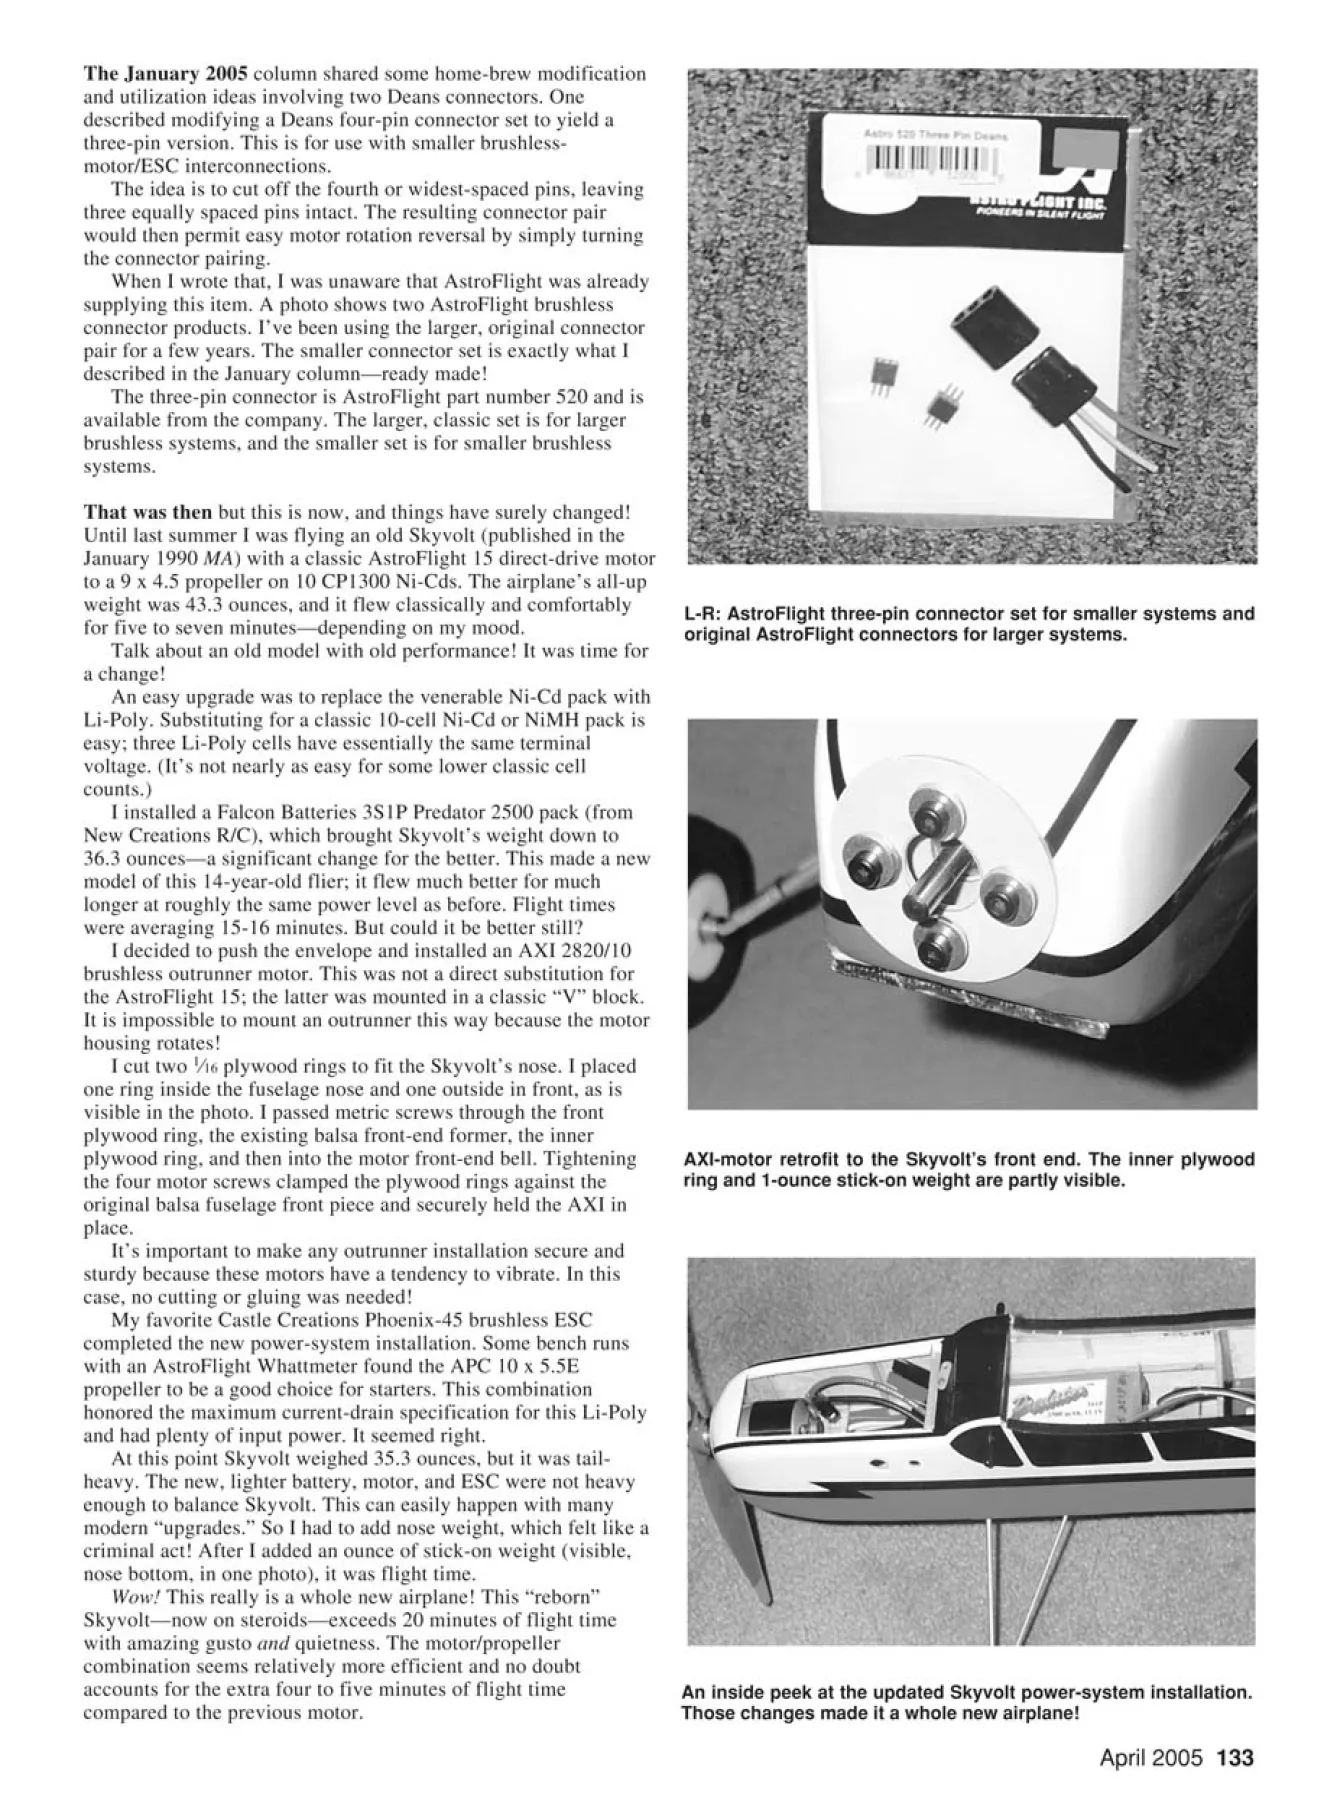
When I wrote that, I was unaware that AstroFlight was already
supplying this item. A photo shows two AstroFlight brushless
connector products. I’ve been using the larger, original connector
pair for a few years. The smaller connector set is exactly what I
described in the January column—ready made!
The three-pin connector is AstroFlight part number 520 and is
available from the company. The larger, classic set is for larger
brushless systems, and the smaller set is for smaller brushless
systems.
That was then but this is now, and things have surely changed!
Until last summer I was flying an old Skyvolt (published in the
January 1990 MA) with a classic AstroFlight 15 direct-drive motor
to a 9 x 4.5 propeller on 10 CP1300 Ni-Cds. The airplane’s all-up
weight was 43.3 ounces, and it flew classically and comfortably
for five to seven minutes—depending on my mood.
Talk about an old model with old performance! It was time for
a change!
An easy upgrade was to replace the venerable Ni-Cd pack with
Li-Poly. Substituting for a classic 10-cell Ni-Cd or NiMH pack is
easy; three Li-Poly cells have essentially the same terminal
voltage. (It’s not nearly as easy for some lower classic cell
counts.)
I installed a Falcon Batteries 3S1P Predator 2500 pack (from
New Creations R/C), which brought Skyvolt’s weight down to
36.3 ounces—a significant change for the better. This made a new
model of this 14-year-old flier; it flew much better for much
longer at roughly the same power level as before. Flight times
were averaging 15-16 minutes. But could it be better still?
I decided to push the envelope and installed an AXI 2820/10
brushless outrunner motor. This was not a direct substitution for
the AstroFlight 15; the latter was mounted in a classic “V” block.
It is impossible to mount an outrunner this way because the motor
housing rotates!
I cut two 1⁄16 plywood rings to fit the Skyvolt’s nose. I placed
one ring inside the fuselage nose and one outside in front, as is
visible in the photo. I passed metric screws through the front
plywood ring, the existing balsa front-end former, the inner
plywood ring, and then into the motor front-end bell. Tightening
the four motor screws clamped the plywood rings against the
original balsa fuselage front piece and securely held the AXI in
place.
It’s important to make any outrunner installation secure and
sturdy because these motors have a tendency to vibrate. In this
case, no cutting or gluing was needed!
My favorite Castle Creations Phoenix-45 brushless ESC
completed the new power-system installation. Some bench runs
with an AstroFlight Whattmeter found the APC 10 x 5.5E
propeller to be a good choice for starters. This combination
honored the maximum current-drain specification for this Li-Poly
and had plenty of input power. It seemed right.
At this point Skyvolt weighed 35.3 ounces, but it was tailheavy.
The new, lighter battery, motor, and ESC were not heavy
enough to balance Skyvolt. This can easily happen with many
modern “upgrades.” So I had to add nose weight, which felt like a
criminal act! After I added an ounce of stick-on weight (visible,
nose bottom, in one photo), it was flight time.
Wow! This really is a whole new airplane! This “reborn”
Skyvolt—now on steroids—exceeds 20 minutes of flight time
with amazing gusto and quietness. The motor/propeller
combination seems relatively more efficient and no doubt
accounts for the extra four to five minutes of flight time
compared to the previous motor.
Overall, this was a worthy upgrade to an
old favorite. Why not dig out one of your then
favorites and convert it to a new now favorite?
A local E-flier asked me to check out his new
Hobby Lobby EPP-foam, aerobatic Miracle:
an attractive ARF foamie. Several things came
out of this, one of which was to stiffen what
seemed to be a “floppy” horizontal stabilizer.
I suggested that he glue a piece of 1⁄32
plywood strip measuring roughly 7⁄16 inch
wide on the rear stabilizer edge at the hinge
line. This meant that he had to remove the
already hinged elevator, but I felt it was
warranted. This thin wood strip made a huge
difference in the stabilizer’s stiffness.
Another modification abandoned the
difficult aileron pushrod installation, which
had the pushrods moving sluggishly through
bent guide tubes. An alternative approach was
to “sink” the aileron servo deeper in the
fuselage and run short, straight 1⁄32-inch wire
rods (no guide tubing) to the horns.
Also, these pushrods were made in
sections, with 1⁄16-inch wheel collars used to
secure the overlapping rod pieces. This made
the aileron linkage operate smoothly and easy
to adjust.
Another change was to substitute a
steerable tail wheel for the fixed skid. This
was accomplished by epoxying a thin
plywood plate to the bottom of the rudder. A
formed 1⁄32-inch-wire tail-wheel strut was held
in place on the added plywood plate with a
small buildup of hot glue. It works great!
Other modifications improved the hatch
and canopy attachments and located the
receiver and ESC under the canopy. These
changes allowed more room under the hatch
for placing the Li-Poly pack for balance
adjustment.
The Miracle’s test flight was no
disappointment! The recommended PJS 3D
550R External Rotor Brushless Motor on a
3S1P 1500 Li-Poly pack did a nice job in
this 19-ounce model. I enjoyed flight-testing
this smooth flier and felt it would be a good
step up for this learning pilot. But I had a
small mishap in landing this checkout flight.
The motor is mounted to a tiny wood
piece which is glued to the fuselage EPP
foam. I brought the Miracle in a bit hard on
grass, and the propeller strike broke this
joint. It was clear—with the broken foam
still stuck to the wood—that such a small
area of attachment would not hold up well
in routine flight activity.
Since I broke it, I offered to fix it. The
approach is shown in a photo. I cut a 1⁄8
light-plywood plate “full-size” to fit all of
the available foam mounting area—much
more attachment area than the original
motor-mount piece provided. I used fiveminute
epoxy to adhere the plate in place.
Then I added some light 1⁄8 balsa side
pieces, as shown. I epoxied them inside
each cowl cheek and against the new
plywood motor plate. The result was a
much more robust front end.
We were back on the field that same
morning, flying the Miracle nicely. You
might want to consider these simple
modifications before your first flight of
this or any similar model.
Thus ends one more column. Please
enclose an SASE with any correspondence
for which you’d like a reply. Everyone so
doing does get one—as fast as I can do it.
And no, I do not use E-mail for this
purpose!
Happy springtime E-landings,
everyone. MA

Edition: Model Aviation - 2005/04
Page Numbers: 132,133,134
Edition: Model Aviation - 2005/04
Page Numbers: 132,133,134
132 MODEL AVIATION
Bob Kopski, 25 West End Dr., Lansdale PA 19446
RADIO CONTROL ELECTRICS
The attractive Miracle EPP-foam ARF from Hobby Lobby. It was
much more work than many other ARFs, but it flies great.
The adjusted motor-mount structure in the Miracle is more
robust than the original and is highly recommended.
Recessing the Miracle’s aileron servo deeper permits short,
direct pushrods. Wheel collars secure rod adjustment.
THIS COLUMN INCLUDES one meet announcement, shares
some reader input, updates an earlier connector story, describes an
easy E-airplane upgrade, and suggests improvements to the
Miracle ARF.
Randy Covington (3106 YMCA Camp Rd., King NC 27021; Tel.:
[336] 983-9126; E-mail: [email protected]) wrote to tell
us about the upcoming Triad Electric Weekend scheduled for April
30-May 1, 2005, and co-hosted by the Riverside Aeromodelers of
King, North Carolina (RAMS), and the Winston-Salem Radio
Control Club of Winston-Salem, North Carolina (WSRC).
Saturday’s meet will be at the RAMS field in King. Sunday’s
events will be at the WSRC field in Advance, North Carolina.
That’s one meet, two days, two clubs, and two fields! Get in touch
with Randy for all of the details, and do tell him Bob sent ya!
My average for reader mail has been roughly 200 letters per year
for the last 20-plus years, and most of it brings specific questions.
As a matter of personal policy, I strive to provide the best answers
I can as fast as I can. Other incoming mail shares comments or
information, and some just says “Thanks.” And there are always a
few letters resulting from misunderstanding column content.
The latter population is rather small and so far has been the
apparent result of modelers not reading carefully. Normally I’d just
fix this with correspondence; however, there was a recent, more
important instance of this that I want to share.
The December 2004 column included a “wish list” that
described some new electric products that I’d like to see come
about—for everyone. One item I envisioned was a slow charger for
Li-Poly batteries. Several readers reacted, and some of them
clearly misunderstood what I wrote.
That column expressed my interest in a Li-Poly charger that
would be AC-line powered. This would simplify in-shop charging;
there would be no need for a car battery or a robust line-operated,
12-volt power supply to power the usual 12-volt-input Li-Poly
charger.
More fundamentally, I suggested that this could be a slow
charger because the faster, one-hour Li-Poly charge is often
unnecessary with in-shop charging. This would allow such a
product to be smaller, lighter, and cost less—all good things.
I concluded that column topic with the query “This wish
assumes that slow-charging Li-Poly batteries is acceptable. Does
anyone out there actually know if that’s true?”
A variety of reader reactions resulted; unfortunately several
thought I had proposed charging Li-Polys with the same (kind of)
charger used for transmitters and receivers. I did not! They
misread it.
By now everyone should be aware that Li-Polys are to be
charged with products designed for this chemistry—not with
chargers designed for Ni-Cd and NiMH batteries. I guess what
surprised me most was how many got it wrong.
Some reactions were quite positive; i.e., it’s clear that I’m not
the only one desiring such a product! One reader described that
because his (smaller) charger is incapable of supplying charge at
the usual one-hour rate to his larger packs, in effect he is already
“slower charging”—with no apparent adverse consequence. But
another reader wrote that he did not want to have to extend the “sit
there and watch it” time while charging.
The industry input is that it would be technically okay to slow
charge, provided it’s with a charger designed for Li-Poly. I’m
working on one—for me.
This brings us up to date on this matter. Reader input on any
column topic is always welcome, but it’s better for us all if you
read what I actually wrote first! And yes, sometimes I do have an
error—and input in this case is strongly desired and encouraged,
and it’s accepted with appreciation.
April 2005 133
L-R: AstroFlight three-pin connector set for smaller systems and
original AstroFlight connectors for larger systems.
AXI-motor retrofit to the Skyvolt’s front end. The inner plywood
ring and 1-ounce stick-on weight are partly visible.
An inside peek at the updated Skyvolt power-system installation.
Those changes made it a whole new airplane!
The January 2005 column shared some home-brew modification
and utilization ideas involving two Deans connectors. One
described modifying a Deans four-pin connector set to yield a
three-pin version. This is for use with smaller brushlessmotor/
ESC interconnections.
The idea is to cut off the fourth or widest-spaced pins, leaving
three equally spaced pins intact. The resulting connector pair
would then permit easy motor rotation reversal by simply turning
the connector pairing.
When I wrote that, I was unaware that AstroFlight was already
supplying this item. A photo shows two AstroFlight brushless
connector products. I’ve been using the larger, original connector
pair for a few years. The smaller connector set is exactly what I
described in the January column—ready made!
The three-pin connector is AstroFlight part number 520 and is
available from the company. The larger, classic set is for larger
brushless systems, and the smaller set is for smaller brushless
systems.
That was then but this is now, and things have surely changed!
Until last summer I was flying an old Skyvolt (published in the
January 1990 MA) with a classic AstroFlight 15 direct-drive motor
to a 9 x 4.5 propeller on 10 CP1300 Ni-Cds. The airplane’s all-up
weight was 43.3 ounces, and it flew classically and comfortably
for five to seven minutes—depending on my mood.
Talk about an old model with old performance! It was time for
a change!
An easy upgrade was to replace the venerable Ni-Cd pack with
Li-Poly. Substituting for a classic 10-cell Ni-Cd or NiMH pack is
easy; three Li-Poly cells have essentially the same terminal
voltage. (It’s not nearly as easy for some lower classic cell
counts.)
I installed a Falcon Batteries 3S1P Predator 2500 pack (from
New Creations R/C), which brought Skyvolt’s weight down to
36.3 ounces—a significant change for the better. This made a new
model of this 14-year-old flier; it flew much better for much
longer at roughly the same power level as before. Flight times
were averaging 15-16 minutes. But could it be better still?
I decided to push the envelope and installed an AXI 2820/10
brushless outrunner motor. This was not a direct substitution for
the AstroFlight 15; the latter was mounted in a classic “V” block.
It is impossible to mount an outrunner this way because the motor
housing rotates!
I cut two 1⁄16 plywood rings to fit the Skyvolt’s nose. I placed
one ring inside the fuselage nose and one outside in front, as is
visible in the photo. I passed metric screws through the front
plywood ring, the existing balsa front-end former, the inner
plywood ring, and then into the motor front-end bell. Tightening
the four motor screws clamped the plywood rings against the
original balsa fuselage front piece and securely held the AXI in
place.
It’s important to make any outrunner installation secure and
sturdy because these motors have a tendency to vibrate. In this
case, no cutting or gluing was needed!
My favorite Castle Creations Phoenix-45 brushless ESC
completed the new power-system installation. Some bench runs
with an AstroFlight Whattmeter found the APC 10 x 5.5E
propeller to be a good choice for starters. This combination
honored the maximum current-drain specification for this Li-Poly
and had plenty of input power. It seemed right.
At this point Skyvolt weighed 35.3 ounces, but it was tailheavy.
The new, lighter battery, motor, and ESC were not heavy
enough to balance Skyvolt. This can easily happen with many
modern “upgrades.” So I had to add nose weight, which felt like a
criminal act! After I added an ounce of stick-on weight (visible,
nose bottom, in one photo), it was flight time.
Wow! This really is a whole new airplane! This “reborn”
Skyvolt—now on steroids—exceeds 20 minutes of flight time
with amazing gusto and quietness. The motor/propeller
combination seems relatively more efficient and no doubt
accounts for the extra four to five minutes of flight time
compared to the previous motor.
Overall, this was a worthy upgrade to an
old favorite. Why not dig out one of your then
favorites and convert it to a new now favorite?
A local E-flier asked me to check out his new
Hobby Lobby EPP-foam, aerobatic Miracle:
an attractive ARF foamie. Several things came
out of this, one of which was to stiffen what
seemed to be a “floppy” horizontal stabilizer.
I suggested that he glue a piece of 1⁄32
plywood strip measuring roughly 7⁄16 inch
wide on the rear stabilizer edge at the hinge
line. This meant that he had to remove the
already hinged elevator, but I felt it was
warranted. This thin wood strip made a huge
difference in the stabilizer’s stiffness.
Another modification abandoned the
difficult aileron pushrod installation, which
had the pushrods moving sluggishly through
bent guide tubes. An alternative approach was
to “sink” the aileron servo deeper in the
fuselage and run short, straight 1⁄32-inch wire
rods (no guide tubing) to the horns.
Also, these pushrods were made in
sections, with 1⁄16-inch wheel collars used to
secure the overlapping rod pieces. This made
the aileron linkage operate smoothly and easy
to adjust.
Another change was to substitute a
steerable tail wheel for the fixed skid. This
was accomplished by epoxying a thin
plywood plate to the bottom of the rudder. A
formed 1⁄32-inch-wire tail-wheel strut was held
in place on the added plywood plate with a
small buildup of hot glue. It works great!
Other modifications improved the hatch
and canopy attachments and located the
receiver and ESC under the canopy. These
changes allowed more room under the hatch
for placing the Li-Poly pack for balance
adjustment.
The Miracle’s test flight was no
disappointment! The recommended PJS 3D
550R External Rotor Brushless Motor on a
3S1P 1500 Li-Poly pack did a nice job in
this 19-ounce model. I enjoyed flight-testing
this smooth flier and felt it would be a good
step up for this learning pilot. But I had a
small mishap in landing this checkout flight.
The motor is mounted to a tiny wood
piece which is glued to the fuselage EPP
foam. I brought the Miracle in a bit hard on
grass, and the propeller strike broke this
joint. It was clear—with the broken foam
still stuck to the wood—that such a small
area of attachment would not hold up well
in routine flight activity.
Since I broke it, I offered to fix it. The
approach is shown in a photo. I cut a 1⁄8
light-plywood plate “full-size” to fit all of
the available foam mounting area—much
more attachment area than the original
motor-mount piece provided. I used fiveminute
epoxy to adhere the plate in place.
Then I added some light 1⁄8 balsa side
pieces, as shown. I epoxied them inside
each cowl cheek and against the new
plywood motor plate. The result was a
much more robust front end.
We were back on the field that same
morning, flying the Miracle nicely. You
might want to consider these simple
modifications before your first flight of
this or any similar model.
Thus ends one more column. Please
enclose an SASE with any correspondence
for which you’d like a reply. Everyone so
doing does get one—as fast as I can do it.
And no, I do not use E-mail for this
purpose!
Happy springtime E-landings,
everyone. MA

Edition: Model Aviation - 2005/04
Page Numbers: 132,133,134
132 MODEL AVIATION
Bob Kopski, 25 West End Dr., Lansdale PA 19446
RADIO CONTROL ELECTRICS
The attractive Miracle EPP-foam ARF from Hobby Lobby. It was
much more work than many other ARFs, but it flies great.
The adjusted motor-mount structure in the Miracle is more
robust than the original and is highly recommended.
Recessing the Miracle’s aileron servo deeper permits short,
direct pushrods. Wheel collars secure rod adjustment.
THIS COLUMN INCLUDES one meet announcement, shares
some reader input, updates an earlier connector story, describes an
easy E-airplane upgrade, and suggests improvements to the
Miracle ARF.
Randy Covington (3106 YMCA Camp Rd., King NC 27021; Tel.:
[336] 983-9126; E-mail: [email protected]) wrote to tell
us about the upcoming Triad Electric Weekend scheduled for April
30-May 1, 2005, and co-hosted by the Riverside Aeromodelers of
King, North Carolina (RAMS), and the Winston-Salem Radio
Control Club of Winston-Salem, North Carolina (WSRC).
Saturday’s meet will be at the RAMS field in King. Sunday’s
events will be at the WSRC field in Advance, North Carolina.
That’s one meet, two days, two clubs, and two fields! Get in touch
with Randy for all of the details, and do tell him Bob sent ya!
My average for reader mail has been roughly 200 letters per year
for the last 20-plus years, and most of it brings specific questions.
As a matter of personal policy, I strive to provide the best answers
I can as fast as I can. Other incoming mail shares comments or
information, and some just says “Thanks.” And there are always a
few letters resulting from misunderstanding column content.
The latter population is rather small and so far has been the
apparent result of modelers not reading carefully. Normally I’d just
fix this with correspondence; however, there was a recent, more
important instance of this that I want to share.
The December 2004 column included a “wish list” that
described some new electric products that I’d like to see come
about—for everyone. One item I envisioned was a slow charger for
Li-Poly batteries. Several readers reacted, and some of them
clearly misunderstood what I wrote.
That column expressed my interest in a Li-Poly charger that
would be AC-line powered. This would simplify in-shop charging;
there would be no need for a car battery or a robust line-operated,
12-volt power supply to power the usual 12-volt-input Li-Poly
charger.
More fundamentally, I suggested that this could be a slow
charger because the faster, one-hour Li-Poly charge is often
unnecessary with in-shop charging. This would allow such a
product to be smaller, lighter, and cost less—all good things.
I concluded that column topic with the query “This wish
assumes that slow-charging Li-Poly batteries is acceptable. Does
anyone out there actually know if that’s true?”
A variety of reader reactions resulted; unfortunately several
thought I had proposed charging Li-Polys with the same (kind of)
charger used for transmitters and receivers. I did not! They
misread it.
By now everyone should be aware that Li-Polys are to be
charged with products designed for this chemistry—not with
chargers designed for Ni-Cd and NiMH batteries. I guess what
surprised me most was how many got it wrong.
Some reactions were quite positive; i.e., it’s clear that I’m not
the only one desiring such a product! One reader described that
because his (smaller) charger is incapable of supplying charge at
the usual one-hour rate to his larger packs, in effect he is already
“slower charging”—with no apparent adverse consequence. But
another reader wrote that he did not want to have to extend the “sit
there and watch it” time while charging.
The industry input is that it would be technically okay to slow
charge, provided it’s with a charger designed for Li-Poly. I’m
working on one—for me.
This brings us up to date on this matter. Reader input on any
column topic is always welcome, but it’s better for us all if you
read what I actually wrote first! And yes, sometimes I do have an
error—and input in this case is strongly desired and encouraged,
and it’s accepted with appreciation.
April 2005 133
L-R: AstroFlight three-pin connector set for smaller systems and
original AstroFlight connectors for larger systems.
AXI-motor retrofit to the Skyvolt’s front end. The inner plywood
ring and 1-ounce stick-on weight are partly visible.
An inside peek at the updated Skyvolt power-system installation.
Those changes made it a whole new airplane!
The January 2005 column shared some home-brew modification
and utilization ideas involving two Deans connectors. One
described modifying a Deans four-pin connector set to yield a
three-pin version. This is for use with smaller brushlessmotor/
ESC interconnections.
The idea is to cut off the fourth or widest-spaced pins, leaving
three equally spaced pins intact. The resulting connector pair
would then permit easy motor rotation reversal by simply turning
the connector pairing.
When I wrote that, I was unaware that AstroFlight was already
supplying this item. A photo shows two AstroFlight brushless
connector products. I’ve been using the larger, original connector
pair for a few years. The smaller connector set is exactly what I
described in the January column—ready made!
The three-pin connector is AstroFlight part number 520 and is
available from the company. The larger, classic set is for larger
brushless systems, and the smaller set is for smaller brushless
systems.
That was then but this is now, and things have surely changed!
Until last summer I was flying an old Skyvolt (published in the
January 1990 MA) with a classic AstroFlight 15 direct-drive motor
to a 9 x 4.5 propeller on 10 CP1300 Ni-Cds. The airplane’s all-up
weight was 43.3 ounces, and it flew classically and comfortably
for five to seven minutes—depending on my mood.
Talk about an old model with old performance! It was time for
a change!
An easy upgrade was to replace the venerable Ni-Cd pack with
Li-Poly. Substituting for a classic 10-cell Ni-Cd or NiMH pack is
easy; three Li-Poly cells have essentially the same terminal
voltage. (It’s not nearly as easy for some lower classic cell
counts.)
I installed a Falcon Batteries 3S1P Predator 2500 pack (from
New Creations R/C), which brought Skyvolt’s weight down to
36.3 ounces—a significant change for the better. This made a new
model of this 14-year-old flier; it flew much better for much
longer at roughly the same power level as before. Flight times
were averaging 15-16 minutes. But could it be better still?
I decided to push the envelope and installed an AXI 2820/10
brushless outrunner motor. This was not a direct substitution for
the AstroFlight 15; the latter was mounted in a classic “V” block.
It is impossible to mount an outrunner this way because the motor
housing rotates!
I cut two 1⁄16 plywood rings to fit the Skyvolt’s nose. I placed
one ring inside the fuselage nose and one outside in front, as is
visible in the photo. I passed metric screws through the front
plywood ring, the existing balsa front-end former, the inner
plywood ring, and then into the motor front-end bell. Tightening
the four motor screws clamped the plywood rings against the
original balsa fuselage front piece and securely held the AXI in
place.
It’s important to make any outrunner installation secure and
sturdy because these motors have a tendency to vibrate. In this
case, no cutting or gluing was needed!
My favorite Castle Creations Phoenix-45 brushless ESC
completed the new power-system installation. Some bench runs
with an AstroFlight Whattmeter found the APC 10 x 5.5E
propeller to be a good choice for starters. This combination
honored the maximum current-drain specification for this Li-Poly
and had plenty of input power. It seemed right.
At this point Skyvolt weighed 35.3 ounces, but it was tailheavy.
The new, lighter battery, motor, and ESC were not heavy
enough to balance Skyvolt. This can easily happen with many
modern “upgrades.” So I had to add nose weight, which felt like a
criminal act! After I added an ounce of stick-on weight (visible,
nose bottom, in one photo), it was flight time.
Wow! This really is a whole new airplane! This “reborn”
Skyvolt—now on steroids—exceeds 20 minutes of flight time
with amazing gusto and quietness. The motor/propeller
combination seems relatively more efficient and no doubt
accounts for the extra four to five minutes of flight time
compared to the previous motor.
Overall, this was a worthy upgrade to an
old favorite. Why not dig out one of your then
favorites and convert it to a new now favorite?
A local E-flier asked me to check out his new
Hobby Lobby EPP-foam, aerobatic Miracle:
an attractive ARF foamie. Several things came
out of this, one of which was to stiffen what
seemed to be a “floppy” horizontal stabilizer.
I suggested that he glue a piece of 1⁄32
plywood strip measuring roughly 7⁄16 inch
wide on the rear stabilizer edge at the hinge
line. This meant that he had to remove the
already hinged elevator, but I felt it was
warranted. This thin wood strip made a huge
difference in the stabilizer’s stiffness.
Another modification abandoned the
difficult aileron pushrod installation, which
had the pushrods moving sluggishly through
bent guide tubes. An alternative approach was
to “sink” the aileron servo deeper in the
fuselage and run short, straight 1⁄32-inch wire
rods (no guide tubing) to the horns.
Also, these pushrods were made in
sections, with 1⁄16-inch wheel collars used to
secure the overlapping rod pieces. This made
the aileron linkage operate smoothly and easy
to adjust.
Another change was to substitute a
steerable tail wheel for the fixed skid. This
was accomplished by epoxying a thin
plywood plate to the bottom of the rudder. A
formed 1⁄32-inch-wire tail-wheel strut was held
in place on the added plywood plate with a
small buildup of hot glue. It works great!
Other modifications improved the hatch
and canopy attachments and located the
receiver and ESC under the canopy. These
changes allowed more room under the hatch
for placing the Li-Poly pack for balance
adjustment.
The Miracle’s test flight was no
disappointment! The recommended PJS 3D
550R External Rotor Brushless Motor on a
3S1P 1500 Li-Poly pack did a nice job in
this 19-ounce model. I enjoyed flight-testing
this smooth flier and felt it would be a good
step up for this learning pilot. But I had a
small mishap in landing this checkout flight.
The motor is mounted to a tiny wood
piece which is glued to the fuselage EPP
foam. I brought the Miracle in a bit hard on
grass, and the propeller strike broke this
joint. It was clear—with the broken foam
still stuck to the wood—that such a small
area of attachment would not hold up well
in routine flight activity.
Since I broke it, I offered to fix it. The
approach is shown in a photo. I cut a 1⁄8
light-plywood plate “full-size” to fit all of
the available foam mounting area—much
more attachment area than the original
motor-mount piece provided. I used fiveminute
epoxy to adhere the plate in place.
Then I added some light 1⁄8 balsa side
pieces, as shown. I epoxied them inside
each cowl cheek and against the new
plywood motor plate. The result was a
much more robust front end.
We were back on the field that same
morning, flying the Miracle nicely. You
might want to consider these simple
modifications before your first flight of
this or any similar model.
Thus ends one more column. Please
enclose an SASE with any correspondence
for which you’d like a reply. Everyone so
doing does get one—as fast as I can do it.
And no, I do not use E-mail for this
purpose!
Happy springtime E-landings,
everyone. MA

