
ELECTRIC POWER has grown in
popularity until it has just exploded into every
type of competition, including Scale. Some
disciplines have specialty classes for electricpowered
aircraft, but with the Li-Poly
batteries and chargers, electrics have taken
over domination of some types of competition
from the internal-combustion engine or
traditional modeling engines.
Many older small Scale designs from Bob
Holman’s Plans, Scale Plans and Photo
Service, and some of the European magazine
plans sources would be excellent choices for
outdoor or indoor electric-powered models.
There have been several successful electric
models for outdoor competition, including
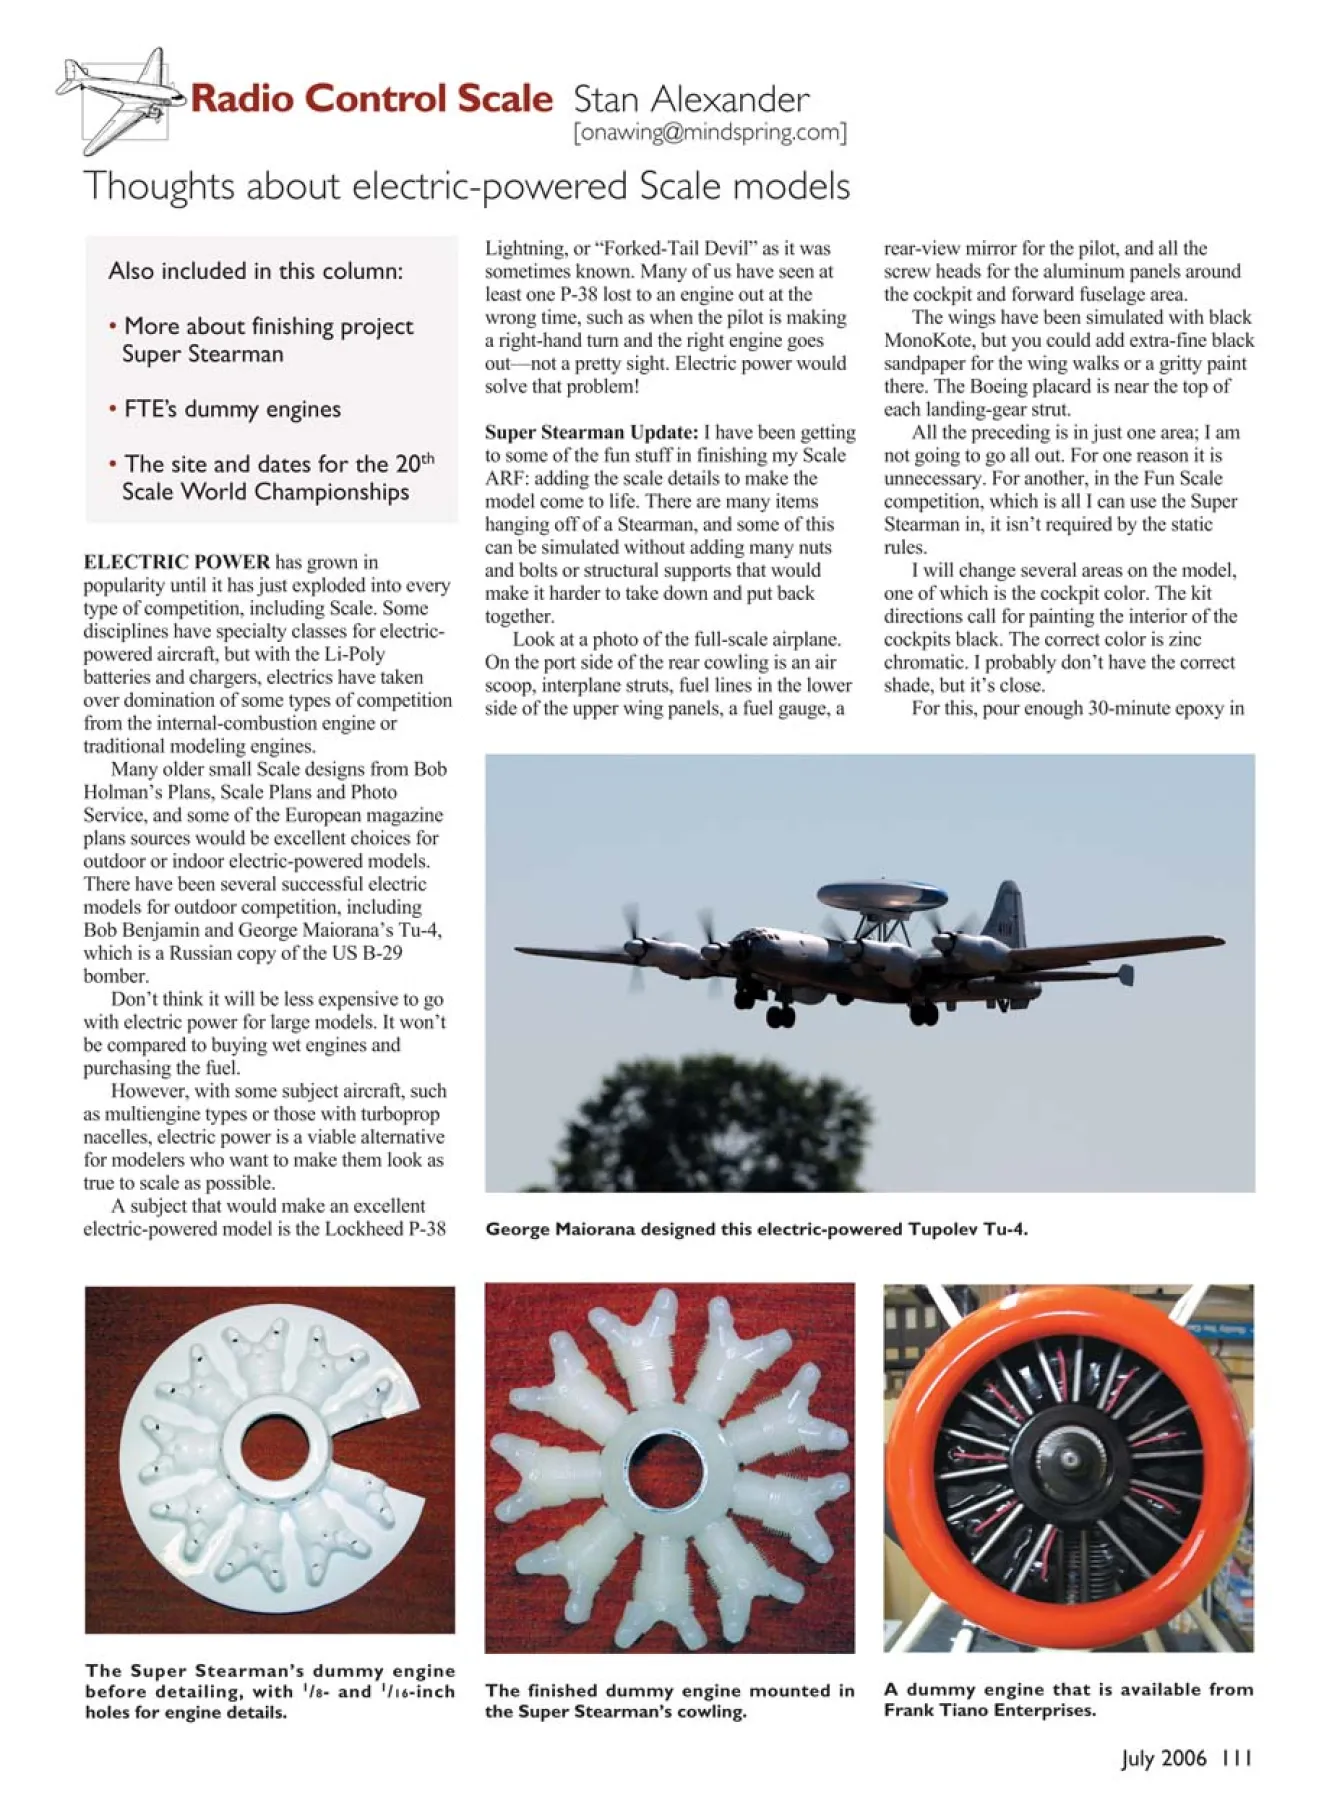
Bob Benjamin and George Maiorana’s Tu-4,
which is a Russian copy of the US B-29
bomber.
Don’t think it will be less expensive to go
with electric power for large models. It won’t
be compared to buying wet engines and
purchasing the fuel.
However, with some subject aircraft, such
as multiengine types or those with turboprop
nacelles, electric power is a viable alternative
for modelers who want to make them look as
true to scale as possible.
A subject that would make an excellent
electric-powered model is the Lockheed P-38
Thoughts about electric-powered Scale models
[[email protected]]
Radio Control Scale Stan Alexander
Also included in this column:
• More about finishing project
Super Stearman
• FTE’s dummy engines
• The site and dates for the 20th
Scale World Championships
George Maiorana designed this electric-powered Tupolev Tu-4.
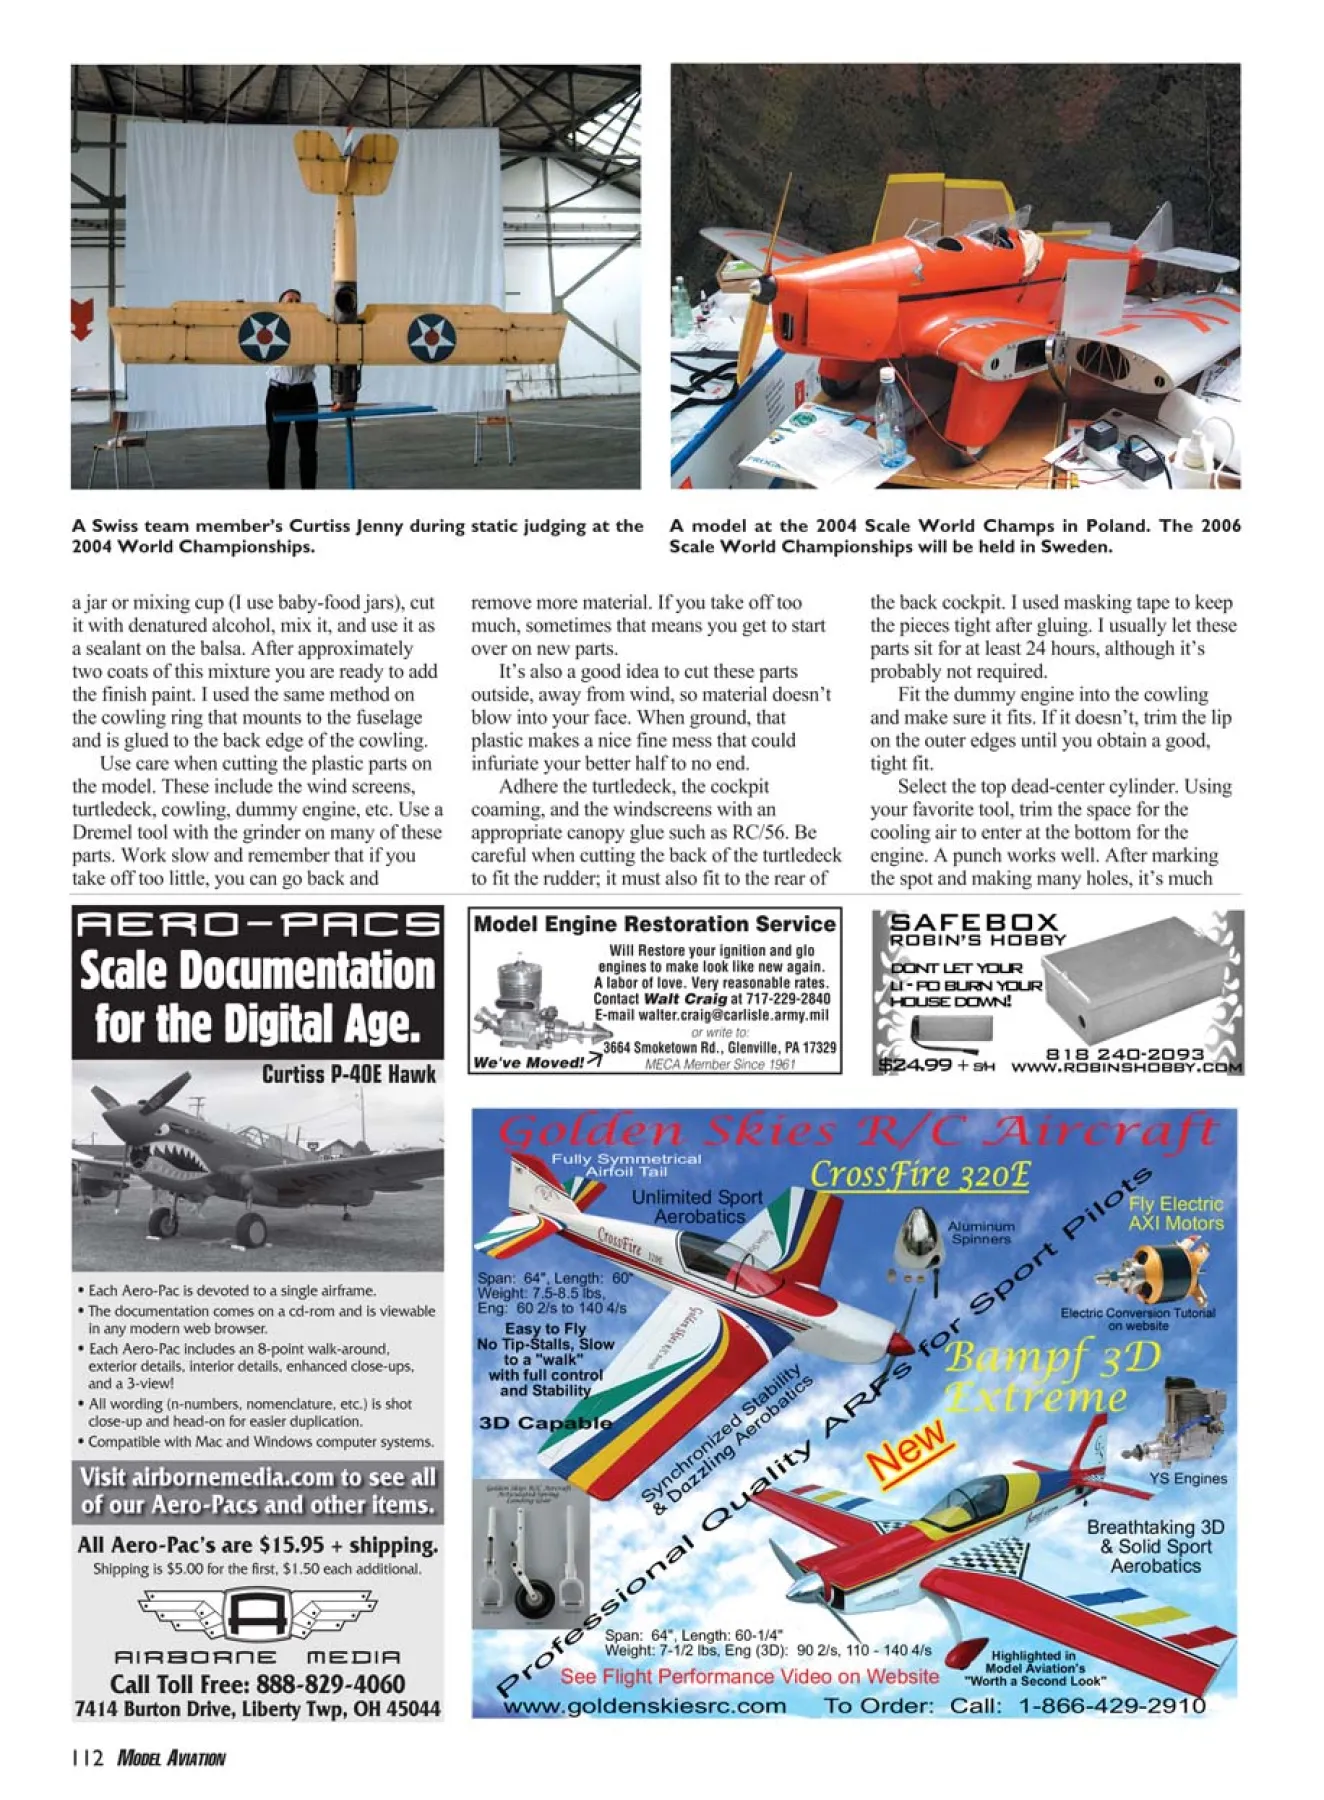
The Super Stearman’s dummy engine
before detailing, with 1/8- and 1/16-inch
holes for engine details.
The finished dummy engine mounted in
the Super Stearman’s cowling.
A dummy engine that is available from
Frank Tiano Enterprises.
Lightning, or “Forked-Tail Devil” as it was
sometimes known. Many of us have seen at
least one P-38 lost to an engine out at the
wrong time, such as when the pilot is making
a right-hand turn and the right engine goes
out—not a pretty sight. Electric power would
solve that problem!
Super Stearman Update: I have been getting
to some of the fun stuff in finishing my Scale
ARF: adding the scale details to make the
model come to life. There are many items
hanging off of a Stearman, and some of this
can be simulated without adding many nuts
and bolts or structural supports that would
make it harder to take down and put back
together.
Look at a photo of the full-scale airplane.
On the port side of the rear cowling is an air
scoop, interplane struts, fuel lines in the lower
side of the upper wing panels, a fuel gauge, a
rear-view mirror for the pilot, and all the
screw heads for the aluminum panels around
the cockpit and forward fuselage area.
The wings have been simulated with black
MonoKote, but you could add extra-fine black
sandpaper for the wing walks or a gritty paint
there. The Boeing placard is near the top of
each landing-gear strut.
All the preceding is in just one area; I am
not going to go all out. For one reason it is
unnecessary. For another, in the Fun Scale
competition, which is all I can use the Super
Stearman in, it isn’t required by the static
rules.
I will change several areas on the model,
one of which is the cockpit color. The kit
directions call for painting the interior of the
cockpits black. The correct color is zinc
chromatic. I probably don’t have the correct
shade, but it’s close.
For this, pour enough 30-minute epoxy in
July 2006 111
a jar or mixing cup (I use baby-food jars), cut
it with denatured alcohol, mix it, and use it as
a sealant on the balsa. After approximately
two coats of this mixture you are ready to add
the finish paint. I used the same method on
the cowling ring that mounts to the fuselage
and is glued to the back edge of the cowling.
Use care when cutting the plastic parts on
the model. These include the wind screens,
turtledeck, cowling, dummy engine, etc. Use a
Dremel tool with the grinder on many of these
parts. Work slow and remember that if you
take off too little, you can go back and
remove more material. If you take off too
much, sometimes that means you get to start
over on new parts.
It’s also a good idea to cut these parts
outside, away from wind, so material doesn’t
blow into your face. When ground, that
plastic makes a nice fine mess that could
infuriate your better half to no end.
Adhere the turtledeck, the cockpit
coaming, and the windscreens with an
appropriate canopy glue such as RC/56. Be
careful when cutting the back of the turtledeck
to fit the rudder; it must also fit to the rear of
the back cockpit. I used masking tape to keep
the pieces tight after gluing. I usually let these
parts sit for at least 24 hours, although it’s
probably not required.
Fit the dummy engine into the cowling
and make sure it fits. If it doesn’t, trim the lip
on the outer edges until you obtain a good,
tight fit.
Select the top dead-center cylinder. Using
your favorite tool, trim the space for the
cooling air to enter at the bottom for the
engine. A punch works well. After markingeasier to cut the plastic without cracking it.
The spots for locating the holes in the
dummy engine are unmarked, and you have to
make a best guess by using the photo in the
directions. After drilling the two 1/8-inch holes
for the pushrod tubes, try one to make sure it
fits. If it does, the rest should follow easily.
Per the directions, make 1/16-inch holes in the
top part of the cylinder heads for the sparkplug
wires.
After looking at several radial engines
throughout the years, I decided to paint this
one gloss black instead of flat black. Any
owner worth his or her salt will keep his
Stearman’s beautiful radial in great shape and
those cylinders will be glossy—especially if
it’s a show aircraft. Set the dummy engine
aside and let it dry after the second coat of
paint.
The next day I added the pushrod tubes
and then the spark-plug wires using electrical
wire I found in my junk box. Leave
approximately 3/8 inch of wire on each end, to
have something to epoxy the wire to the back
of the dummy engine.
Mount the dummy engine to the inside of
the cowling using a mix of microballoons and
epoxy. Make sure you have the cutout
cylinder at the bottom to cool the engine.
Scale Products: There are other dummy
engines and cylinders you could purchase for
this and other models. Frank Tiano
Enterprises (FTE) supplies different sizes of
dummy engines for Scale modelers. These are
made from resin, and you can detail them to
an accurate nine-cylinder radial in little time.
They will also add a bit of weight to the front
of a Scale model, and what radial-powered
Scale model doesn’t need a little extra weight?
The engines come in a variety of sizes
including 1/8 scale (5.75-inch diameter), 1/6
scale (7.25-inch diameter), 1/5 scale (8.75-inch
diameter), and 1/4 scale (11.5-inch diameter).
The last two weigh 12 ounces. Add the 1/4
plywood mounting plate, and you’ve added
some much-needed weight up front.
Prices range from $22 to $34 plus
shipping. Visit www.franktiano.com for more
information.
Upcoming World Championships: It has
recently been announced that the 20th Scale
114 MODEL AVIATION
World Championships will be held in
Wloclawek, Poland, in 2008. The contest
will be hosted by the Aero Club of Poland
and the Aero Club of Wloclawek. Events
will include F4C (RC scale with a weight
limit of 33.03 pounds, or 15 kilograms) and
F4B CL Scale.
The 2004 Scale World Championships
was held in Deblin, Poland, at the Air Force
Academy. If any country wants to see how to
run a Scale World Championships, the 2008
event is the place to go. The Poles have their
act together as far as organization, officials,
food, and accommodations, and their
sponsorships are generous.
Although it’s not for RC Scale, in 2008
the Polish Aero Club will host the first Junior
Scale event at a World Championships, to
my knowledge. It will be held for F4B, but
it’s great to see a country with the foresight
to attack this issue of bringing a new
generation into competition.
My wife and I were fortunate to get to go
to the 2004 Scale World Championships, and
we traveled through Warsaw, Krakow, and a
few other places. The company was warm,
the tours were great, and the Poles are
quickly embracing Western ideas. Poland is a
great place for Americans to travel. Polish
currency isn’t on the euro yet, as most of
Western Europe is.
The US Team Selection will be sometime
in 2007. If you are interested, please contact
me and I’ll get you all the details. I can also
provide a list of contacts to help you. For
updates on the Team Selection, periodically
check www.nasascale.org.
Fair skies and tailwinds. MA
Sources:
Bob Holman Plans
Box 741
San Bernardino CA 92404
(909) 885-3959
[email protected]
www.bhplans.com
Scale Plans and Photo Service
3209 Madison Ave.
Greensboro NC 27403
(336) 292-5239 (evenings)
Edition: Model Aviation - 2006/07
Page Numbers: 111,112,113,114
Edition: Model Aviation - 2006/07
Page Numbers: 111,112,113,114
ELECTRIC POWER has grown in
popularity until it has just exploded into every
type of competition, including Scale. Some
disciplines have specialty classes for electricpowered
aircraft, but with the Li-Poly
batteries and chargers, electrics have taken
over domination of some types of competition
from the internal-combustion engine or
traditional modeling engines.
Many older small Scale designs from Bob
Holman’s Plans, Scale Plans and Photo
Service, and some of the European magazine
plans sources would be excellent choices for
outdoor or indoor electric-powered models.
There have been several successful electric
models for outdoor competition, including
Bob Benjamin and George Maiorana’s Tu-4,
which is a Russian copy of the US B-29
bomber.
Don’t think it will be less expensive to go
with electric power for large models. It won’t
be compared to buying wet engines and
purchasing the fuel.
However, with some subject aircraft, such
as multiengine types or those with turboprop
nacelles, electric power is a viable alternative
for modelers who want to make them look as
true to scale as possible.
A subject that would make an excellent
electric-powered model is the Lockheed P-38
Thoughts about electric-powered Scale models
[[email protected]]
Radio Control Scale Stan Alexander
Also included in this column:
• More about finishing project
Super Stearman
• FTE’s dummy engines
• The site and dates for the 20th
Scale World Championships
George Maiorana designed this electric-powered Tupolev Tu-4.
The Super Stearman’s dummy engine
before detailing, with 1/8- and 1/16-inch
holes for engine details.
The finished dummy engine mounted in
the Super Stearman’s cowling.
A dummy engine that is available from
Frank Tiano Enterprises.
Lightning, or “Forked-Tail Devil” as it was
sometimes known. Many of us have seen at
least one P-38 lost to an engine out at the
wrong time, such as when the pilot is making
a right-hand turn and the right engine goes
out—not a pretty sight. Electric power would
solve that problem!
Super Stearman Update: I have been getting
to some of the fun stuff in finishing my Scale
ARF: adding the scale details to make the
model come to life. There are many items
hanging off of a Stearman, and some of this
can be simulated without adding many nuts
and bolts or structural supports that would
make it harder to take down and put back
together.
Look at a photo of the full-scale airplane.
On the port side of the rear cowling is an air
scoop, interplane struts, fuel lines in the lower
side of the upper wing panels, a fuel gauge, a
rear-view mirror for the pilot, and all the
screw heads for the aluminum panels around
the cockpit and forward fuselage area.
The wings have been simulated with black
MonoKote, but you could add extra-fine black
sandpaper for the wing walks or a gritty paint
there. The Boeing placard is near the top of
each landing-gear strut.
All the preceding is in just one area; I am
not going to go all out. For one reason it is
unnecessary. For another, in the Fun Scale
competition, which is all I can use the Super
Stearman in, it isn’t required by the static
rules.
I will change several areas on the model,
one of which is the cockpit color. The kit
directions call for painting the interior of the
cockpits black. The correct color is zinc
chromatic. I probably don’t have the correct
shade, but it’s close.
For this, pour enough 30-minute epoxy in
July 2006 111
a jar or mixing cup (I use baby-food jars), cut
it with denatured alcohol, mix it, and use it as
a sealant on the balsa. After approximately
two coats of this mixture you are ready to add
the finish paint. I used the same method on
the cowling ring that mounts to the fuselage
and is glued to the back edge of the cowling.
Use care when cutting the plastic parts on
the model. These include the wind screens,
turtledeck, cowling, dummy engine, etc. Use a
Dremel tool with the grinder on many of these
parts. Work slow and remember that if you
take off too little, you can go back and
remove more material. If you take off too
much, sometimes that means you get to start
over on new parts.
It’s also a good idea to cut these parts
outside, away from wind, so material doesn’t
blow into your face. When ground, that
plastic makes a nice fine mess that could
infuriate your better half to no end.
Adhere the turtledeck, the cockpit
coaming, and the windscreens with an
appropriate canopy glue such as RC/56. Be
careful when cutting the back of the turtledeck
to fit the rudder; it must also fit to the rear of
the back cockpit. I used masking tape to keep
the pieces tight after gluing. I usually let these
parts sit for at least 24 hours, although it’s
probably not required.
Fit the dummy engine into the cowling
and make sure it fits. If it doesn’t, trim the lip
on the outer edges until you obtain a good,
tight fit.
Select the top dead-center cylinder. Using
your favorite tool, trim the space for the
cooling air to enter at the bottom for the
engine. A punch works well. After markingeasier to cut the plastic without cracking it.
The spots for locating the holes in the
dummy engine are unmarked, and you have to
make a best guess by using the photo in the
directions. After drilling the two 1/8-inch holes
for the pushrod tubes, try one to make sure it
fits. If it does, the rest should follow easily.
Per the directions, make 1/16-inch holes in the
top part of the cylinder heads for the sparkplug
wires.
After looking at several radial engines
throughout the years, I decided to paint this
one gloss black instead of flat black. Any
owner worth his or her salt will keep his
Stearman’s beautiful radial in great shape and
those cylinders will be glossy—especially if
it’s a show aircraft. Set the dummy engine
aside and let it dry after the second coat of
paint.
The next day I added the pushrod tubes
and then the spark-plug wires using electrical
wire I found in my junk box. Leave
approximately 3/8 inch of wire on each end, to
have something to epoxy the wire to the back
of the dummy engine.
Mount the dummy engine to the inside of
the cowling using a mix of microballoons and
epoxy. Make sure you have the cutout
cylinder at the bottom to cool the engine.
Scale Products: There are other dummy
engines and cylinders you could purchase for
this and other models. Frank Tiano
Enterprises (FTE) supplies different sizes of
dummy engines for Scale modelers. These are
made from resin, and you can detail them to
an accurate nine-cylinder radial in little time.
They will also add a bit of weight to the front
of a Scale model, and what radial-powered
Scale model doesn’t need a little extra weight?
The engines come in a variety of sizes
including 1/8 scale (5.75-inch diameter), 1/6
scale (7.25-inch diameter), 1/5 scale (8.75-inch
diameter), and 1/4 scale (11.5-inch diameter).
The last two weigh 12 ounces. Add the 1/4
plywood mounting plate, and you’ve added
some much-needed weight up front.
Prices range from $22 to $34 plus
shipping. Visit www.franktiano.com for more
information.
Upcoming World Championships: It has
recently been announced that the 20th Scale
114 MODEL AVIATION
World Championships will be held in
Wloclawek, Poland, in 2008. The contest
will be hosted by the Aero Club of Poland
and the Aero Club of Wloclawek. Events
will include F4C (RC scale with a weight
limit of 33.03 pounds, or 15 kilograms) and
F4B CL Scale.
The 2004 Scale World Championships
was held in Deblin, Poland, at the Air Force
Academy. If any country wants to see how to
run a Scale World Championships, the 2008
event is the place to go. The Poles have their
act together as far as organization, officials,
food, and accommodations, and their
sponsorships are generous.
Although it’s not for RC Scale, in 2008
the Polish Aero Club will host the first Junior
Scale event at a World Championships, to
my knowledge. It will be held for F4B, but
it’s great to see a country with the foresight
to attack this issue of bringing a new
generation into competition.
My wife and I were fortunate to get to go
to the 2004 Scale World Championships, and
we traveled through Warsaw, Krakow, and a
few other places. The company was warm,
the tours were great, and the Poles are
quickly embracing Western ideas. Poland is a
great place for Americans to travel. Polish
currency isn’t on the euro yet, as most of
Western Europe is.
The US Team Selection will be sometime
in 2007. If you are interested, please contact
me and I’ll get you all the details. I can also
provide a list of contacts to help you. For
updates on the Team Selection, periodically
check www.nasascale.org.
Fair skies and tailwinds. MA
Sources:
Bob Holman Plans
Box 741
San Bernardino CA 92404
(909) 885-3959
[email protected]
www.bhplans.com
Scale Plans and Photo Service
3209 Madison Ave.
Greensboro NC 27403
(336) 292-5239 (evenings)

