
Te c h n i c a l R e v i e w Jim Ryan
6941 Rob Vern Dr., Cincinnati OH 45239; E-mail: [email protected]
66 MODEL AVIATION
what I knew about other computer radios.
Before using the Evo for the first time,
there are some initial setup steps. The sixcell
NiMH battery is fully discharged, so
you must charge it overnight. The wall
charger that comes with the Evo is the
weakest item in the package. It’s a dated
design, lacking even a status LED to let you
know when it’s properly connected. I hope
this will be addressed on future versions.
I FIRST HANDLED the Multiplex Royal
Evo 12 transmitter at the 2003 Toledo,
Ohio, Weak Signals Expo, and after a few
minutes of discussing its features with
product-line manager Glen Merritt, I knew I
wanted one. Unfortunately the initial
demand exceeded the limited supply, but I
was eventually able to purchase one. It was
well worth the wait.
Several features set the Royal Evo apart
from the Asian radios that dominate the US
market. They are:
• Model memories. The Royal Evo 12 offers
36 model memories—more than you’ll find
on nearly any other radio sold in the US.
This feature first attracted me to the Evo
because I like having a single transmitter to
master, maintain, and transport.
• Frequency synthesizer. The Royal Evo is
available with a radio frequency (RF)
synthesizer module that allows the operator
to switch to any frequency in a matter of
seconds. Furthermore, it has a more “goofproof”
selection procedure than other
synthesizer modules available in the US.
• Assignable functions. The Royal Evo
gives the user almost infinite flexibility in
assigning functions to the transmitter’s
various sticks, sliders, knobs, and buttons.
Also, each socket on the receiver can be
assigned to any servo and any function.
Modelers who are familiar with high-
Multiplex Royal Evo 12
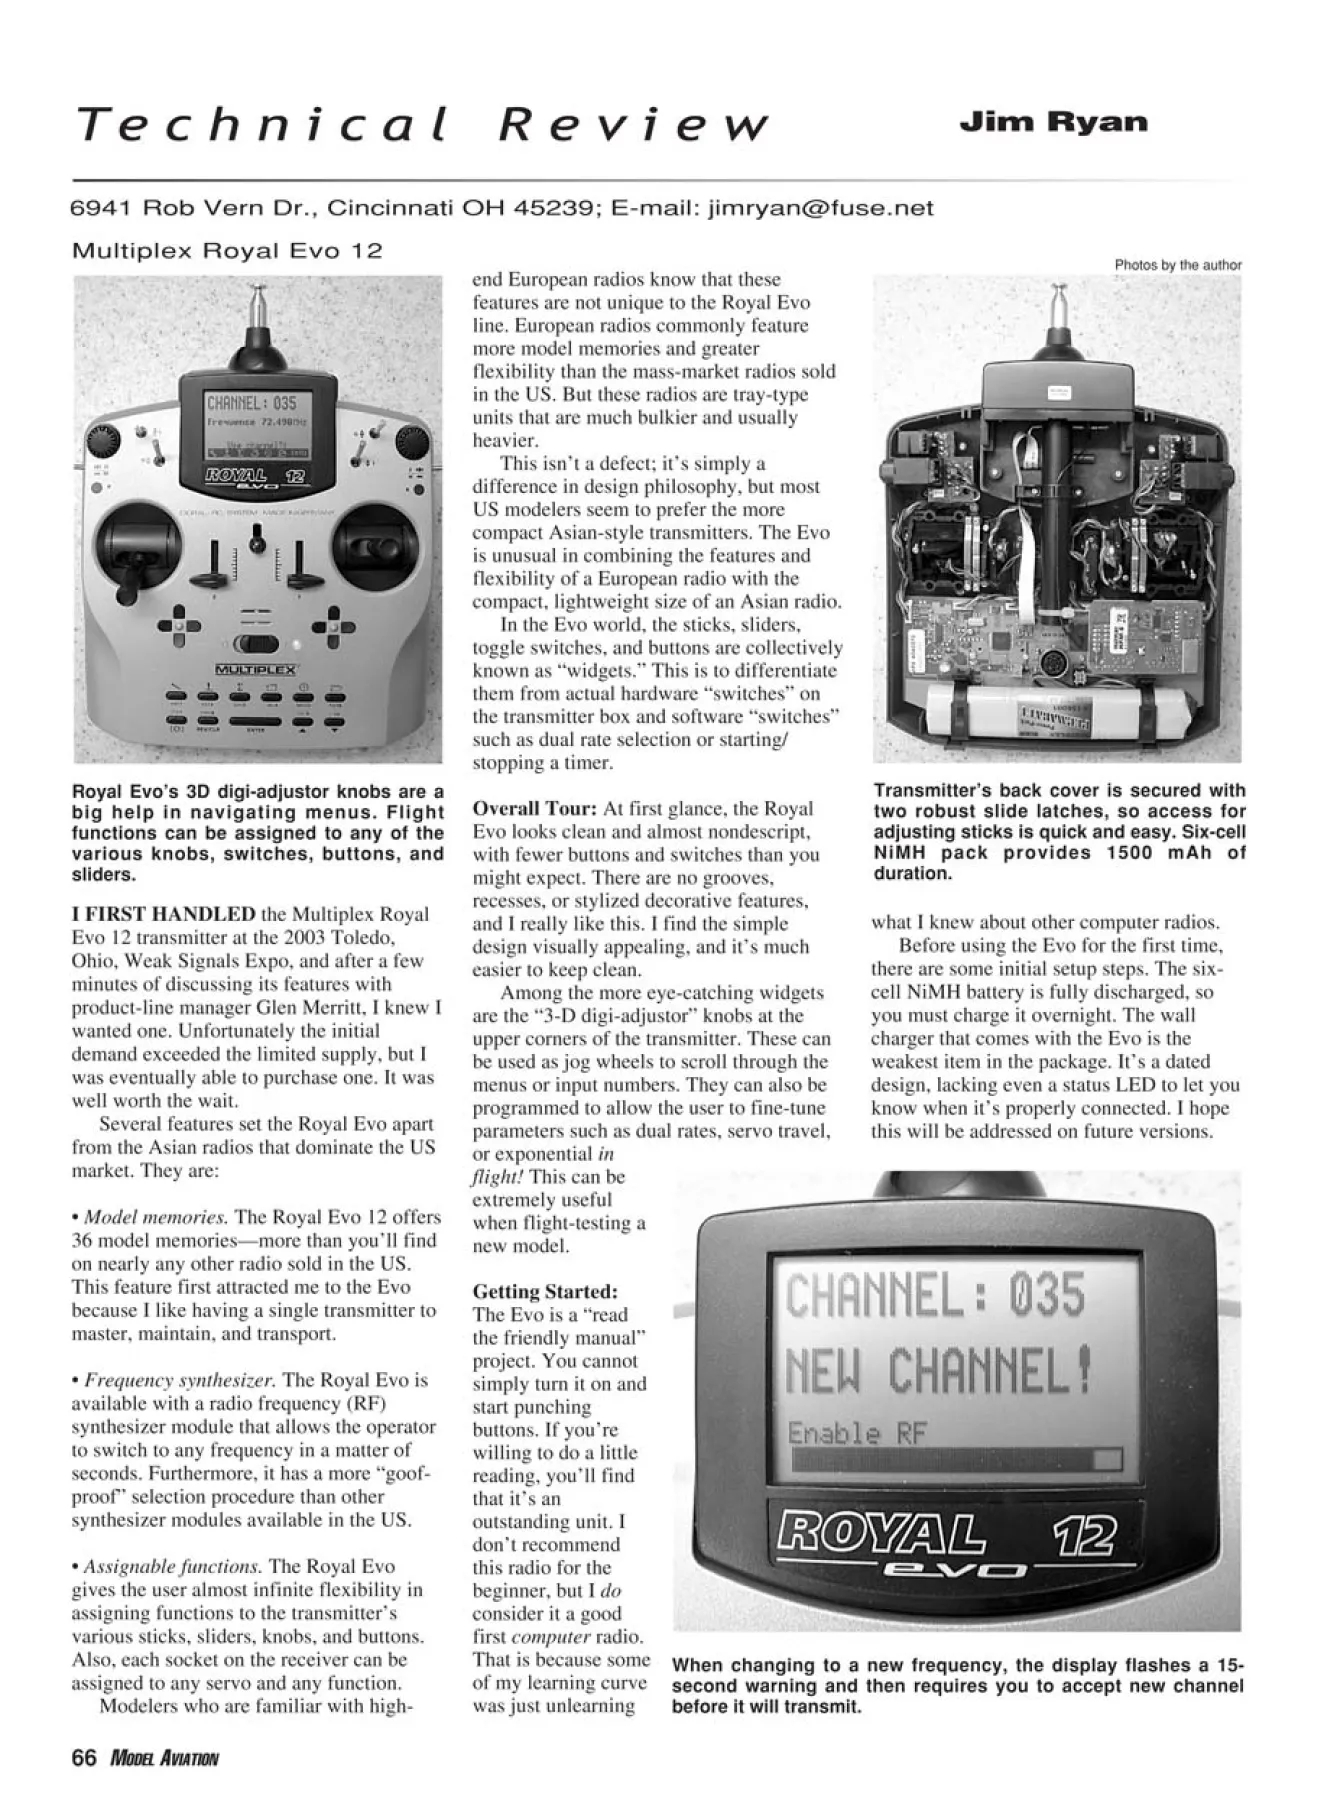
Royal Evo’s 3D digi-adjustor knobs are a
big help in navigating menus. Flight
functions can be assigned to any of the
various knobs, switches, buttons, and
sliders.
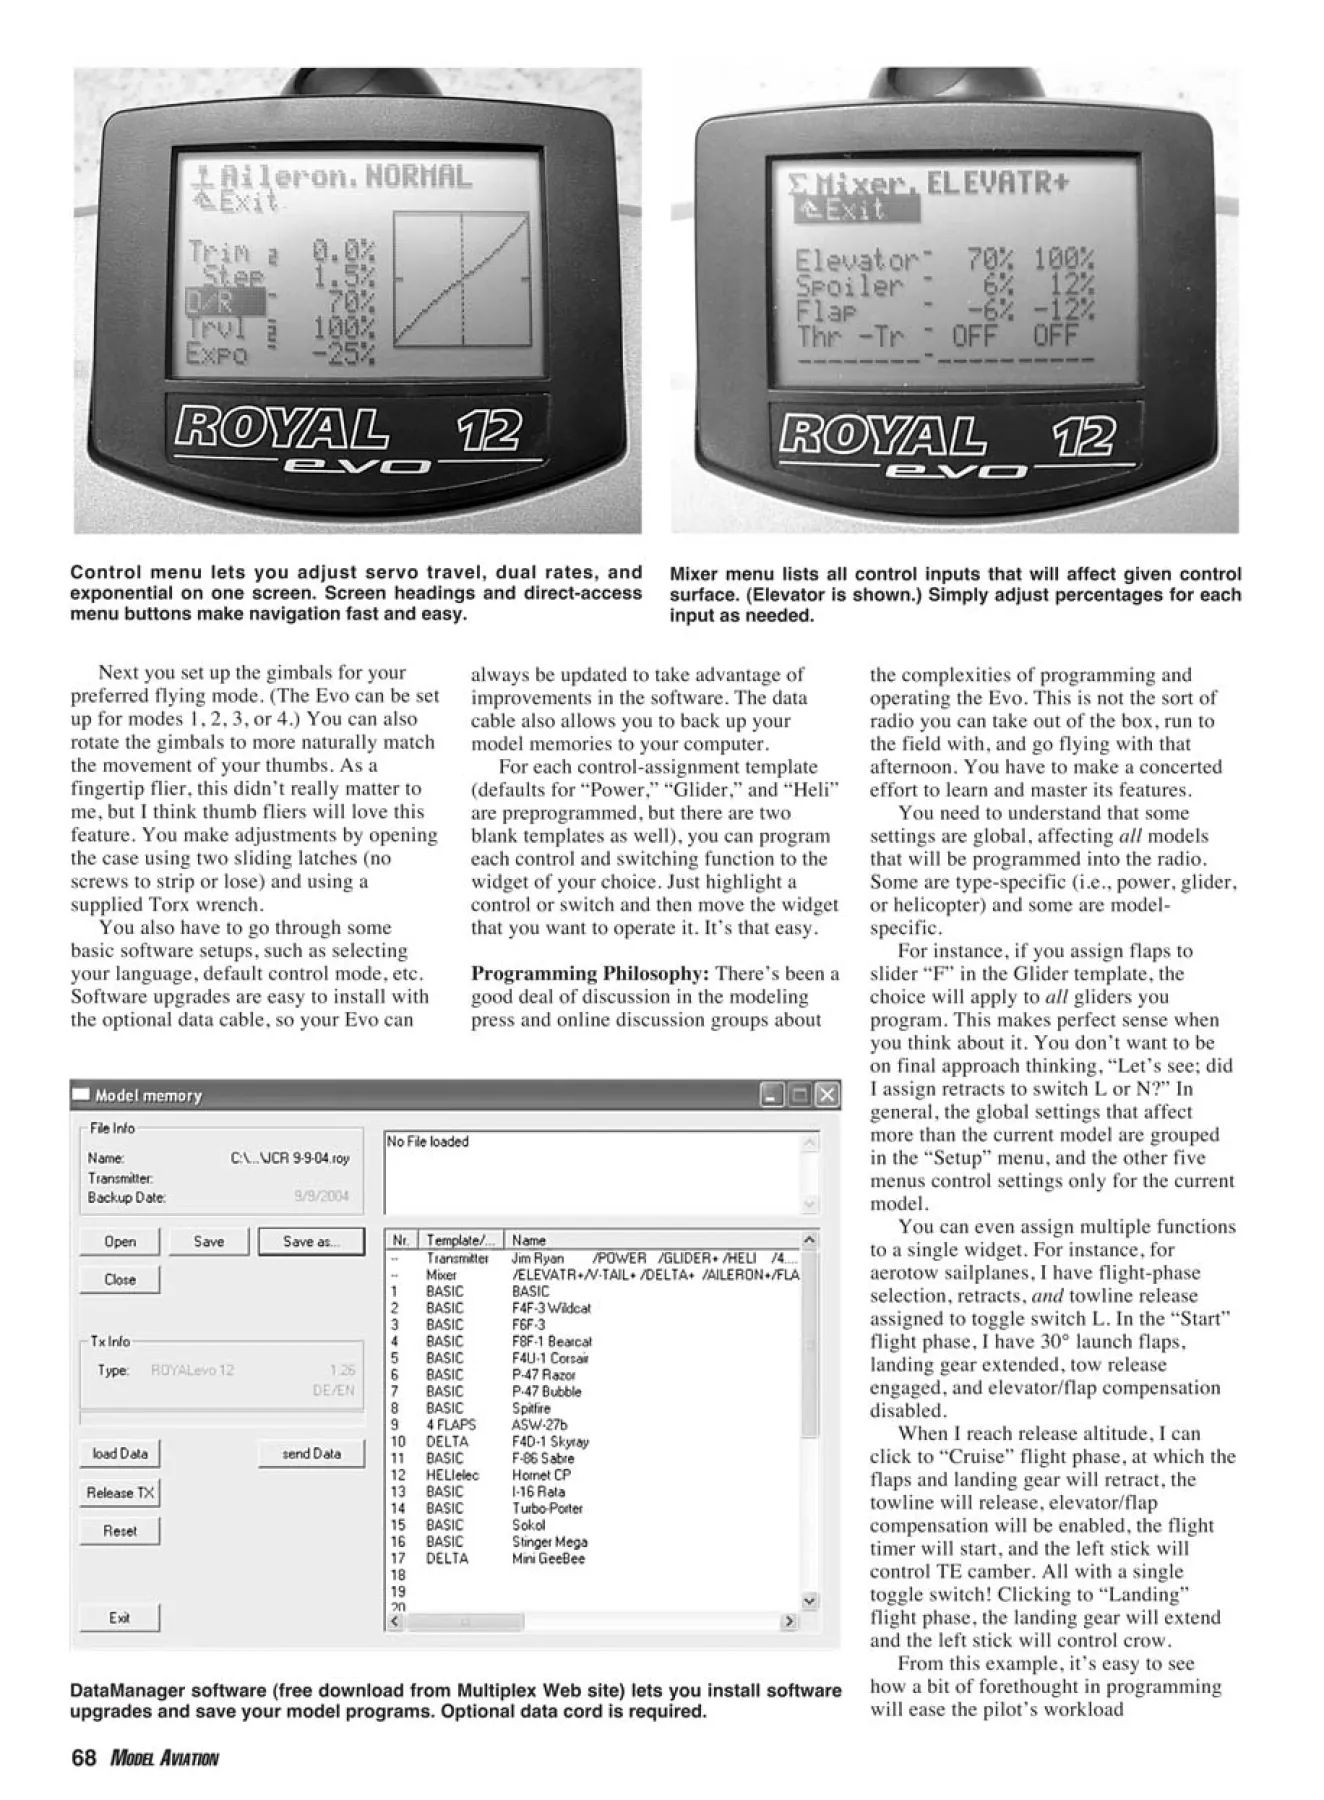
Transmitter’s back cover is secured with
two robust slide latches, so access for
adjusting sticks is quick and easy. Six-cell
NiMH pack provides 1500 mAh of
duration.
end European radios know that these
features are not unique to the Royal Evo
line. European radios commonly feature
more model memories and greater
flexibility than the mass-market radios sold
in the US. But these radios are tray-type
units that are much bulkier and usually
heavier.
This isn’t a defect; it’s simply a
difference in design philosophy, but most
US modelers seem to prefer the more
compact Asian-style transmitters. The Evo
is unusual in combining the features and
flexibility of a European radio with the
compact, lightweight size of an Asian radio.
In the Evo world, the sticks, sliders,
toggle switches, and buttons are collectively
known as “widgets.” This is to differentiate
them from actual hardware “switches” on
the transmitter box and software “switches”
such as dual rate selection or starting/
stopping a timer.
Overall Tour: At first glance, the Royal
Evo looks clean and almost nondescript,
with fewer buttons and switches than you
might expect. There are no grooves,
recesses, or stylized decorative features,
and I really like this. I find the simple
design visually appealing, and it’s much
easier to keep clean.
Among the more eye-catching widgets
are the “3-D digi-adjustor” knobs at the
upper corners of the transmitter. These can
be used as jog wheels to scroll through the
menus or input numbers. They can also be
programmed to allow the user to fine-tune
parameters such as dual rates, servo travel,
or exponential in
flight! This can be
extremely useful
when flight-testing a
new model.
Getting Started:
The Evo is a “read
the friendly manual”
project. You cannot
simply turn it on and
start punching
buttons. If you’re
willing to do a little
reading, you’ll find
that it’s an
outstanding unit. I
don’t recommend
this radio for the
beginner, but I do
consider it a good
first computer radio.
That is because some
of my learning curve
was just unlearning
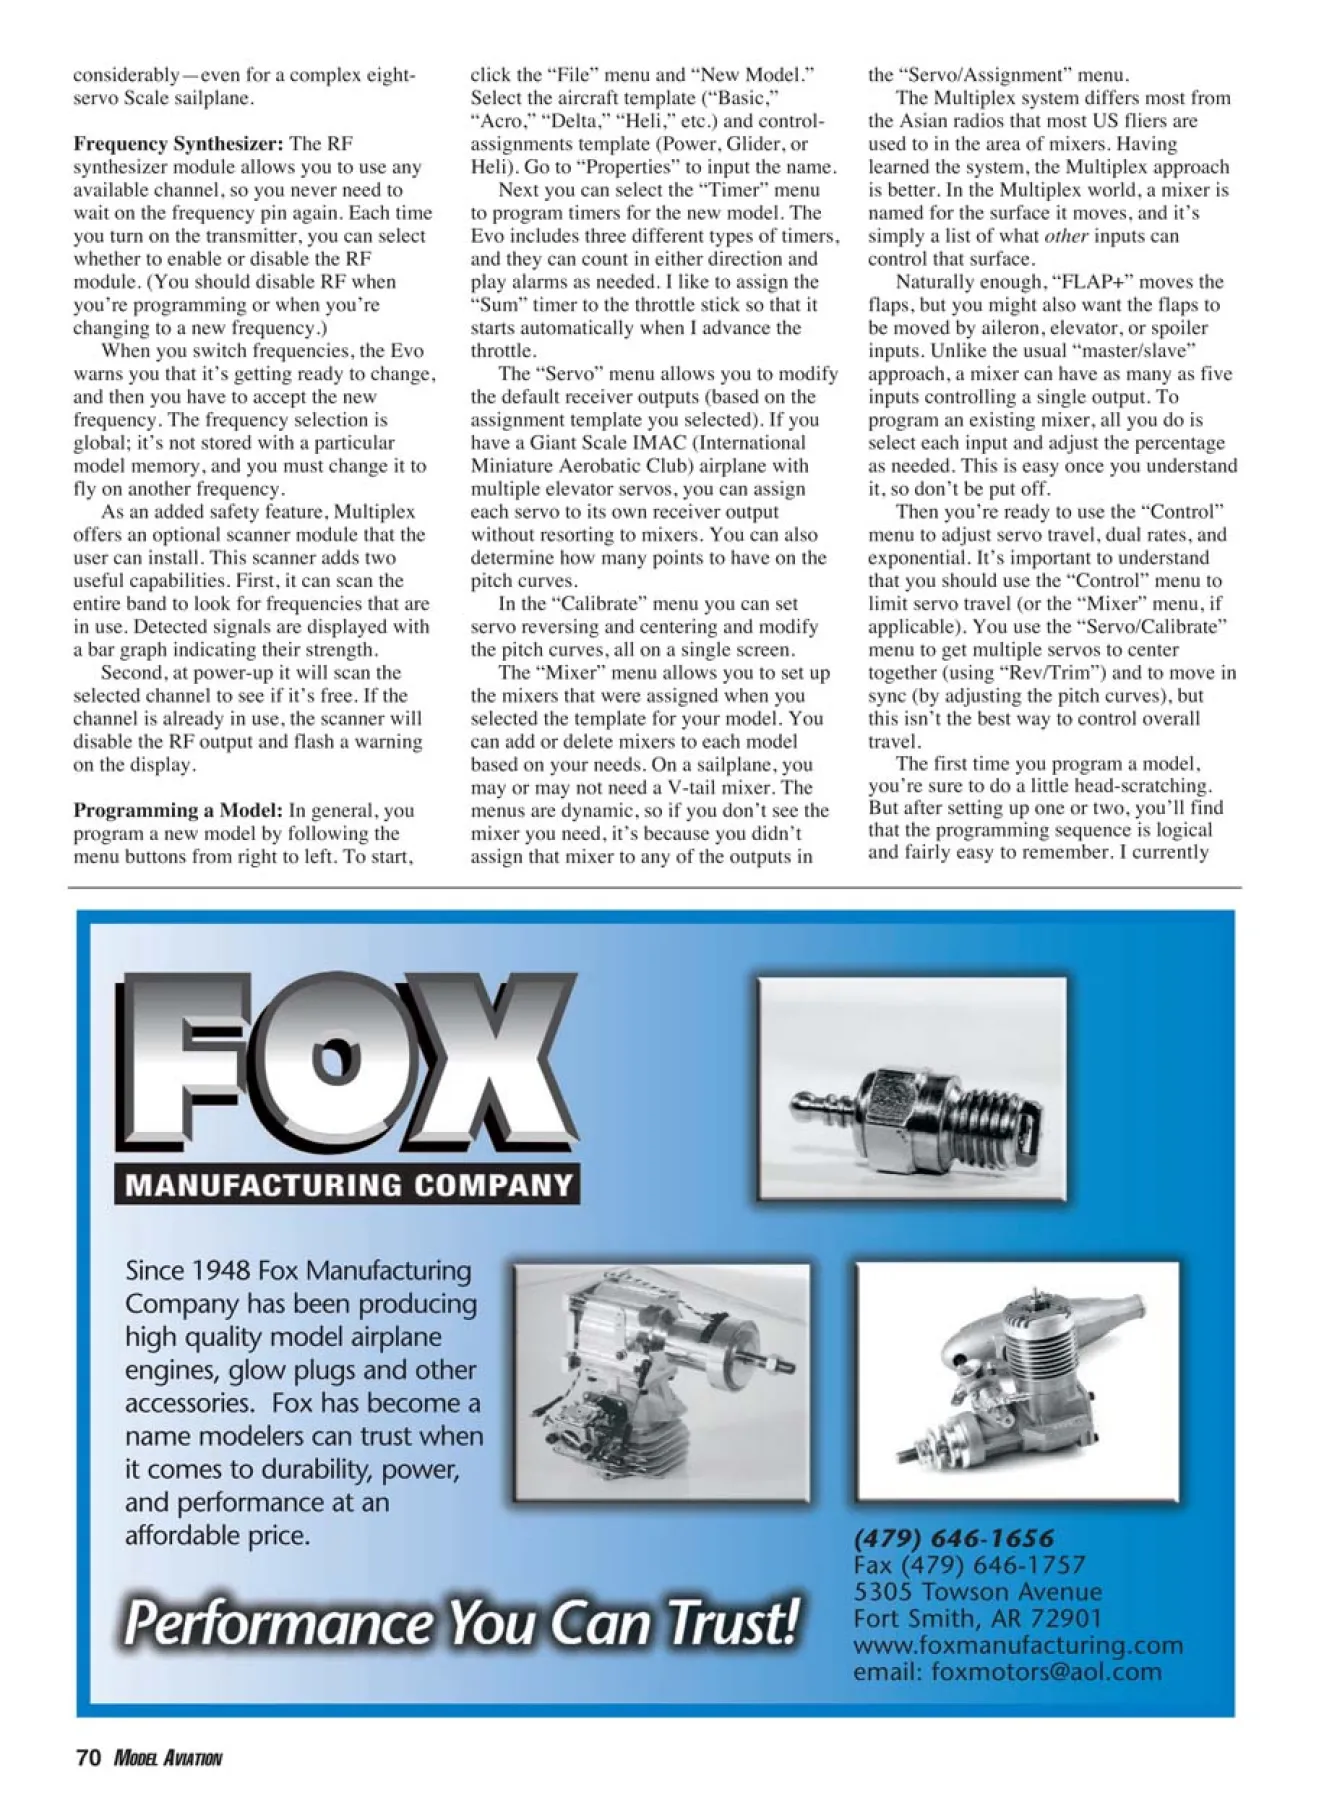
When changing to a new frequency, the display flashes a 15-
second warning and then requires you to accept new channel
before it will transmit.
Photos by the author
Next you set up the gimbals for your
preferred flying mode. (The Evo can be set
up for modes 1, 2, 3, or 4.) You can also
rotate the gimbals to more naturally match
the movement of your thumbs. As a
fingertip flier, this didn’t really matter to
me, but I think thumb fliers will love this
feature. You make adjustments by opening
the case using two sliding latches (no
screws to strip or lose) and using a
supplied Torx wrench.
You also have to go through some
basic software setups, such as selecting
your language, default control mode, etc.
Software upgrades are easy to install with
the optional data cable, so your Evo can
the complexities of programming and
operating the Evo. This is not the sort of
radio you can take out of the box, run to
the field with, and go flying with that
afternoon. You have to make a concerted
effort to learn and master its features.
You need to understand that some
settings are global, affecting all models
that will be programmed into the radio.
Some are type-specific (i.e., power, glider,
or helicopter) and some are modelspecific.
For instance, if you assign flaps to
slider “F” in the Glider template, the
choice will apply to all gliders you
program. This makes perfect sense when
you think about it. You don’t want to be
on final approach thinking, “Let’s see; did
I assign retracts to switch L or N?” In
general, the global settings that affect
more than the current model are grouped
in the “Setup” menu, and the other five
menus control settings only for the current
model.
You can even assign multiple functions
to a single widget. For instance, for
aerotow sailplanes, I have flight-phase
selection, retracts, and towline release
assigned to toggle switch L. In the “Start”
flight phase, I have 30° launch flaps,
landing gear extended, tow release
engaged, and elevator/flap compensation
disabled.
When I reach release altitude, I can
click to “Cruise” flight phase, at which the
flaps and landing gear will retract, the
towline will release, elevator/flap
compensation will be enabled, the flight
timer will start, and the left stick will
control TE camber. All with a single
toggle switch! Clicking to “Landing”
flight phase, the landing gear will extend
and the left stick will control crow.
From this example, it’s easy to see
how a bit of forethought in programming
will ease the pilot’s workload
always be updated to take advantage of
improvements in the software. The data
cable also allows you to back up your
model memories to your computer.
For each control-assignment template
(defaults for “Power,” “Glider,” and “Heli”
are preprogrammed, but there are two
blank templates as well), you can program
each control and switching function to the
widget of your choice. Just highlight a
control or switch and then move the widget
that you want to operate it. It’s that easy.
Programming Philosophy: There’s been a
good deal of discussion in the modeling
press and online discussion groups about
68 MODEL AVIATION
Control menu lets you adjust servo travel, dual rates, and
exponential on one screen. Screen headings and direct-access
menu buttons make navigation fast and easy.
Mixer menu lists all control inputs that will affect given control
surface. (Elevator is shown.) Simply adjust percentages for each
input as needed.
DataManager software (free download from Multiplex Web site) lets you install software
upgrades and save your model programs. Optional data cord is required.
considerably—even for a complex eightservo
Scale sailplane.
Frequency Synthesizer: The RF
synthesizer module allows you to use any
available channel, so you never need to
wait on the frequency pin again. Each time
you turn on the transmitter, you can select
whether to enable or disable the RF
module. (You should disable RF when
you’re programming or when you’re
changing to a new frequency.)
When you switch frequencies, the Evo
warns you that it’s getting ready to change,
and then you have to accept the new
frequency. The frequency selection is
global; it’s not stored with a particular
model memory, and you must change it to
fly on another frequency.
As an added safety feature, Multiplex
offers an optional scanner module that the
user can install. This scanner adds two
useful capabilities. First, it can scan the
entire band to look for frequencies that are
in use. Detected signals are displayed with
a bar graph indicating their strength.
Second, at power-up it will scan the
selected channel to see if it’s free. If the
channel is already in use, the scanner will
disable the RF output and flash a warning
on the display.
Programming a Model: In general, you
program a new model by following the
menu buttons from right to left. To start,
click the “File” menu and “New Model.”
Select the aircraft template (“Basic,”
“Acro,” “Delta,” “Heli,” etc.) and controlassignments
template (Power, Glider, or
Heli). Go to “Properties” to input the name.
Next you can select the “Timer” menu
to program timers for the new model. The
Evo includes three different types of timers,
and they can count in either direction and
play alarms as needed. I like to assign the
“Sum” timer to the throttle stick so that it
starts automatically when I advance the
throttle.
The “Servo” menu allows you to modify
the default receiver outputs (based on the
assignment template you selected). If you
have a Giant Scale IMAC (International
Miniature Aerobatic Club) airplane with
multiple elevator servos, you can assign
each servo to its own receiver output
without resorting to mixers. You can also
determine how many points to have on the
pitch curves.
In the “Calibrate” menu you can set
servo reversing and centering and modify
the pitch curves, all on a single screen.
The “Mixer” menu allows you to set up
the mixers that were assigned when you
selected the template for your model. You
can add or delete mixers to each model
based on your needs. On a sailplane, you
may or may not need a V-tail mixer. The
menus are dynamic, so if you don’t see the
mixer you need, it’s because you didn’t
assign that mixer to any of the outputs in
the “Servo/Assignment” menu.
The Multiplex system differs most from
the Asian radios that most US fliers are
used to in the area of mixers. Having
learned the system, the Multiplex approach
is better. In the Multiplex world, a mixer is
named for the surface it moves, and it’s
simply a list of what other inputs can
control that surface.
Naturally enough, “FLAP+” moves the
flaps, but you might also want the flaps to
be moved by aileron, elevator, or spoiler
inputs. Unlike the usual “master/slave”
approach, a mixer can have as many as five
inputs controlling a single output. To
program an existing mixer, all you do is
select each input and adjust the percentage
as needed. This is easy once you understand
it, so don’t be put off.
Then you’re ready to use the “Control”
menu to adjust servo travel, dual rates, and
exponential. It’s important to understand
that you should use the “Control” menu to
limit servo travel (or the “Mixer” menu, if
applicable). You use the “Servo/Calibrate”
menu to get multiple servos to center
together (using “Rev/Trim”) and to move in
sync (by adjusting the pitch curves), but
this isn’t the best way to control overall
travel.
The first time you program a model,
you’re sure to do a little head-scratching.
But after setting up one or two, you’ll find
that the programming sequence is logical
and fairly easy to remember. I currently
have 18 models programmed, and unless
there’s something unusual about the airplane,
I can add a new one in a few minutes.
Flight Operation: This is the reason for all
the work! Switch on with the RF disabled to
choose the frequency. The selection
procedure makes it difficult to make a
mistake. Click the “Memory” menu to select
the model you want to fly. I’ve seen many
ways of doing this, and the Multiplex
approach is the fastest and easiest I’ve
witnessed.
With the model selected, pick the
appropriate flight phase (if you programmed
phases) and you’re ready to preflight your
aircraft. The digital trims are specific to each
flight phase. On my small hand-launched
models, I like to program in a few clicks of
up-trim for the “Launch” phase. Once the
model is flying, I switch to the “Normal”
flight phase and the model is trimmed for
level flight.
In flight the cruciform-trim keypads are
more accessible than the trim levers on a
traditional transmitter. They’re easy to find
by feel, which is a big help on a maiden
flight when the model may be badly out of
trim.
However, with the nearly infinite
flexibility of assigning functions, it seems
odd that the Evo doesn’t offer the ability to
assign “cross-trims” (i.e., the left-trim
keypad controls the right stick and vice
versa). This seems like a natural feature to
include, and I can only hope that Multiplex
will add this option to future versions of the
software.
It is while flying that you truly come to
appreciate the Evo’s ability to assign
controls to various widgets and combine
multiple functions on a single widget. Being
able to change three or four different settings
with a flip of a switch really decreases the
pilot’s workload. The gimbals are
72 MODEL AVIATION
SIG Manufacturing Company, Inc.
P. O. Box 520 • Montezuma, Iowa
www.sigmfg.com • 641-623-5154
SPECIFICATIONS:
Wingspan: 71.5 inches
Wing Area: 1688 sq.inches
Length: 66 inches
Weight: 17 to 18 pounds
Engine Required: 3.2 to 4.2 cu. in. gas
Radio Required: 4 Channel, 8 servos
Item #SIGRC89ARF - Sun Dancer ARF
Only $399.99 at participating dealers
The ability to reach for the skies
and dance with the sun has long
been the venue of highly aerobatic
biplanes. Think of names like Pitts,
Christen Eagle, and Ultimate. You
can join the party and create beautiful
music, acrobatically speaking, with SIG's
Sun Dancer ARF biplane.
No ordinary pair of wings, the SIG Sun Dancer is craftsman-built using only hand selected balsa and plywood
to our exacting standards. The finish is pure beauty with a dazzling trim scheme of orange, red, and yellow
Oracover® film sure to brighten up even the darkest day.
The SIG Sun Dancer is more than a pretty face. It's pure aerobatic muscle. With a 3.2 gas engine on the nose,
and a competition radio in control, the Sun Dancer will re-write the book on aerobatics. Rock solid knife-edges,
loops big and small, and snap rolls all the way to eternity. All with the authority you've come to expect from SIG.
The SIG Sun Dancer is complete with painted matching fiberglass wheel pants and cowling, pull-pull rudder
assembly, heavy duty control hardware, twin elevator and aileron mounts, scale tail wheel assembly, dural
aluminum landing gear, huge 24 ounce gasoline-ready fuel tank, comprehensive hardware package, and a fully
illustrated assembly manual to guide you from box to field, leaving nothing to chance.
Break out your sunglasses, lather up the SPF45, and come party in the sun.
extraordinarily smooth, and you can
adjust stick length, spring tension, throttle
detents, and even the movement axes to
suit your tastes.
At the end of the day, any product review
is just one person’s opinion. I’ve been
immensely happy with my Evo 12, but I
put a focused effort into learning to
operate it. If you’re in the market for a
radio with nearly unlimited growth
potential and are the sort of modeler who
is willing to read the manual and do some
studying, the Evo is well worth a close
look. MA
Manufacturer:
Multiplex Modelsport USA
12115 Paine St.
Poway CA 92064
(858) 748-6948
Fax: (858) 748-1767
www.multiplexusa.com
(Editor’s note: Hitec and Multiplex
Modelsport USA Director of Marketing
Glen Merritt asked us to mention that in
addition to the 12-channel Evo reviewed
here, there is a nine-channel version. The
only difference in the products [besides
the number of channels, of course] is that
the Royal Evo 12 has 36 model memories
and the Royal Evo 9 has 20 model
memories.)
Edition: Model Aviation - 2005/01
Page Numbers: 66,68,70,72
Edition: Model Aviation - 2005/01
Page Numbers: 66,68,70,72
Te c h n i c a l R e v i e w Jim Ryan
6941 Rob Vern Dr., Cincinnati OH 45239; E-mail: [email protected]
66 MODEL AVIATION
what I knew about other computer radios.
Before using the Evo for the first time,
there are some initial setup steps. The sixcell
NiMH battery is fully discharged, so
you must charge it overnight. The wall
charger that comes with the Evo is the
weakest item in the package. It’s a dated
design, lacking even a status LED to let you
know when it’s properly connected. I hope
this will be addressed on future versions.
I FIRST HANDLED the Multiplex Royal
Evo 12 transmitter at the 2003 Toledo,
Ohio, Weak Signals Expo, and after a few
minutes of discussing its features with
product-line manager Glen Merritt, I knew I
wanted one. Unfortunately the initial
demand exceeded the limited supply, but I
was eventually able to purchase one. It was
well worth the wait.
Several features set the Royal Evo apart
from the Asian radios that dominate the US
market. They are:
• Model memories. The Royal Evo 12 offers
36 model memories—more than you’ll find
on nearly any other radio sold in the US.
This feature first attracted me to the Evo
because I like having a single transmitter to
master, maintain, and transport.
• Frequency synthesizer. The Royal Evo is
available with a radio frequency (RF)
synthesizer module that allows the operator
to switch to any frequency in a matter of
seconds. Furthermore, it has a more “goofproof”
selection procedure than other
synthesizer modules available in the US.
• Assignable functions. The Royal Evo
gives the user almost infinite flexibility in
assigning functions to the transmitter’s
various sticks, sliders, knobs, and buttons.
Also, each socket on the receiver can be
assigned to any servo and any function.
Modelers who are familiar with high-
Multiplex Royal Evo 12
Royal Evo’s 3D digi-adjustor knobs are a
big help in navigating menus. Flight
functions can be assigned to any of the
various knobs, switches, buttons, and
sliders.
Transmitter’s back cover is secured with
two robust slide latches, so access for
adjusting sticks is quick and easy. Six-cell
NiMH pack provides 1500 mAh of
duration.
end European radios know that these
features are not unique to the Royal Evo
line. European radios commonly feature
more model memories and greater
flexibility than the mass-market radios sold
in the US. But these radios are tray-type
units that are much bulkier and usually
heavier.
This isn’t a defect; it’s simply a
difference in design philosophy, but most
US modelers seem to prefer the more
compact Asian-style transmitters. The Evo
is unusual in combining the features and
flexibility of a European radio with the
compact, lightweight size of an Asian radio.
In the Evo world, the sticks, sliders,
toggle switches, and buttons are collectively
known as “widgets.” This is to differentiate
them from actual hardware “switches” on
the transmitter box and software “switches”
such as dual rate selection or starting/
stopping a timer.
Overall Tour: At first glance, the Royal
Evo looks clean and almost nondescript,
with fewer buttons and switches than you
might expect. There are no grooves,
recesses, or stylized decorative features,
and I really like this. I find the simple
design visually appealing, and it’s much
easier to keep clean.
Among the more eye-catching widgets
are the “3-D digi-adjustor” knobs at the
upper corners of the transmitter. These can
be used as jog wheels to scroll through the
menus or input numbers. They can also be
programmed to allow the user to fine-tune
parameters such as dual rates, servo travel,
or exponential in
flight! This can be
extremely useful
when flight-testing a
new model.
Getting Started:
The Evo is a “read
the friendly manual”
project. You cannot
simply turn it on and
start punching
buttons. If you’re
willing to do a little
reading, you’ll find
that it’s an
outstanding unit. I
don’t recommend
this radio for the
beginner, but I do
consider it a good
first computer radio.
That is because some
of my learning curve
was just unlearning
When changing to a new frequency, the display flashes a 15-
second warning and then requires you to accept new channel
before it will transmit.
Photos by the author
Next you set up the gimbals for your
preferred flying mode. (The Evo can be set
up for modes 1, 2, 3, or 4.) You can also
rotate the gimbals to more naturally match
the movement of your thumbs. As a
fingertip flier, this didn’t really matter to
me, but I think thumb fliers will love this
feature. You make adjustments by opening
the case using two sliding latches (no
screws to strip or lose) and using a
supplied Torx wrench.
You also have to go through some
basic software setups, such as selecting
your language, default control mode, etc.
Software upgrades are easy to install with
the optional data cable, so your Evo can
the complexities of programming and
operating the Evo. This is not the sort of
radio you can take out of the box, run to
the field with, and go flying with that
afternoon. You have to make a concerted
effort to learn and master its features.
You need to understand that some
settings are global, affecting all models
that will be programmed into the radio.
Some are type-specific (i.e., power, glider,
or helicopter) and some are modelspecific.
For instance, if you assign flaps to
slider “F” in the Glider template, the
choice will apply to all gliders you
program. This makes perfect sense when
you think about it. You don’t want to be
on final approach thinking, “Let’s see; did
I assign retracts to switch L or N?” In
general, the global settings that affect
more than the current model are grouped
in the “Setup” menu, and the other five
menus control settings only for the current
model.
You can even assign multiple functions
to a single widget. For instance, for
aerotow sailplanes, I have flight-phase
selection, retracts, and towline release
assigned to toggle switch L. In the “Start”
flight phase, I have 30° launch flaps,
landing gear extended, tow release
engaged, and elevator/flap compensation
disabled.
When I reach release altitude, I can
click to “Cruise” flight phase, at which the
flaps and landing gear will retract, the
towline will release, elevator/flap
compensation will be enabled, the flight
timer will start, and the left stick will
control TE camber. All with a single
toggle switch! Clicking to “Landing”
flight phase, the landing gear will extend
and the left stick will control crow.
From this example, it’s easy to see
how a bit of forethought in programming
will ease the pilot’s workload
always be updated to take advantage of
improvements in the software. The data
cable also allows you to back up your
model memories to your computer.
For each control-assignment template
(defaults for “Power,” “Glider,” and “Heli”
are preprogrammed, but there are two
blank templates as well), you can program
each control and switching function to the
widget of your choice. Just highlight a
control or switch and then move the widget
that you want to operate it. It’s that easy.
Programming Philosophy: There’s been a
good deal of discussion in the modeling
press and online discussion groups about
68 MODEL AVIATION
Control menu lets you adjust servo travel, dual rates, and
exponential on one screen. Screen headings and direct-access
menu buttons make navigation fast and easy.
Mixer menu lists all control inputs that will affect given control
surface. (Elevator is shown.) Simply adjust percentages for each
input as needed.
DataManager software (free download from Multiplex Web site) lets you install software
upgrades and save your model programs. Optional data cord is required.
considerably—even for a complex eightservo
Scale sailplane.
Frequency Synthesizer: The RF
synthesizer module allows you to use any
available channel, so you never need to
wait on the frequency pin again. Each time
you turn on the transmitter, you can select
whether to enable or disable the RF
module. (You should disable RF when
you’re programming or when you’re
changing to a new frequency.)
When you switch frequencies, the Evo
warns you that it’s getting ready to change,
and then you have to accept the new
frequency. The frequency selection is
global; it’s not stored with a particular
model memory, and you must change it to
fly on another frequency.
As an added safety feature, Multiplex
offers an optional scanner module that the
user can install. This scanner adds two
useful capabilities. First, it can scan the
entire band to look for frequencies that are
in use. Detected signals are displayed with
a bar graph indicating their strength.
Second, at power-up it will scan the
selected channel to see if it’s free. If the
channel is already in use, the scanner will
disable the RF output and flash a warning
on the display.
Programming a Model: In general, you
program a new model by following the
menu buttons from right to left. To start,
click the “File” menu and “New Model.”
Select the aircraft template (“Basic,”
“Acro,” “Delta,” “Heli,” etc.) and controlassignments
template (Power, Glider, or
Heli). Go to “Properties” to input the name.
Next you can select the “Timer” menu
to program timers for the new model. The
Evo includes three different types of timers,
and they can count in either direction and
play alarms as needed. I like to assign the
“Sum” timer to the throttle stick so that it
starts automatically when I advance the
throttle.
The “Servo” menu allows you to modify
the default receiver outputs (based on the
assignment template you selected). If you
have a Giant Scale IMAC (International
Miniature Aerobatic Club) airplane with
multiple elevator servos, you can assign
each servo to its own receiver output
without resorting to mixers. You can also
determine how many points to have on the
pitch curves.
In the “Calibrate” menu you can set
servo reversing and centering and modify
the pitch curves, all on a single screen.
The “Mixer” menu allows you to set up
the mixers that were assigned when you
selected the template for your model. You
can add or delete mixers to each model
based on your needs. On a sailplane, you
may or may not need a V-tail mixer. The
menus are dynamic, so if you don’t see the
mixer you need, it’s because you didn’t
assign that mixer to any of the outputs in
the “Servo/Assignment” menu.
The Multiplex system differs most from
the Asian radios that most US fliers are
used to in the area of mixers. Having
learned the system, the Multiplex approach
is better. In the Multiplex world, a mixer is
named for the surface it moves, and it’s
simply a list of what other inputs can
control that surface.
Naturally enough, “FLAP+” moves the
flaps, but you might also want the flaps to
be moved by aileron, elevator, or spoiler
inputs. Unlike the usual “master/slave”
approach, a mixer can have as many as five
inputs controlling a single output. To
program an existing mixer, all you do is
select each input and adjust the percentage
as needed. This is easy once you understand
it, so don’t be put off.
Then you’re ready to use the “Control”
menu to adjust servo travel, dual rates, and
exponential. It’s important to understand
that you should use the “Control” menu to
limit servo travel (or the “Mixer” menu, if
applicable). You use the “Servo/Calibrate”
menu to get multiple servos to center
together (using “Rev/Trim”) and to move in
sync (by adjusting the pitch curves), but
this isn’t the best way to control overall
travel.
The first time you program a model,
you’re sure to do a little head-scratching.
But after setting up one or two, you’ll find
that the programming sequence is logical
and fairly easy to remember. I currently
have 18 models programmed, and unless
there’s something unusual about the airplane,
I can add a new one in a few minutes.
Flight Operation: This is the reason for all
the work! Switch on with the RF disabled to
choose the frequency. The selection
procedure makes it difficult to make a
mistake. Click the “Memory” menu to select
the model you want to fly. I’ve seen many
ways of doing this, and the Multiplex
approach is the fastest and easiest I’ve
witnessed.
With the model selected, pick the
appropriate flight phase (if you programmed
phases) and you’re ready to preflight your
aircraft. The digital trims are specific to each
flight phase. On my small hand-launched
models, I like to program in a few clicks of
up-trim for the “Launch” phase. Once the
model is flying, I switch to the “Normal”
flight phase and the model is trimmed for
level flight.
In flight the cruciform-trim keypads are
more accessible than the trim levers on a
traditional transmitter. They’re easy to find
by feel, which is a big help on a maiden
flight when the model may be badly out of
trim.
However, with the nearly infinite
flexibility of assigning functions, it seems
odd that the Evo doesn’t offer the ability to
assign “cross-trims” (i.e., the left-trim
keypad controls the right stick and vice
versa). This seems like a natural feature to
include, and I can only hope that Multiplex
will add this option to future versions of the
software.
It is while flying that you truly come to
appreciate the Evo’s ability to assign
controls to various widgets and combine
multiple functions on a single widget. Being
able to change three or four different settings
with a flip of a switch really decreases the
pilot’s workload. The gimbals are
72 MODEL AVIATION
SIG Manufacturing Company, Inc.
P. O. Box 520 • Montezuma, Iowa
www.sigmfg.com • 641-623-5154
SPECIFICATIONS:
Wingspan: 71.5 inches
Wing Area: 1688 sq.inches
Length: 66 inches
Weight: 17 to 18 pounds
Engine Required: 3.2 to 4.2 cu. in. gas
Radio Required: 4 Channel, 8 servos
Item #SIGRC89ARF - Sun Dancer ARF
Only $399.99 at participating dealers
The ability to reach for the skies
and dance with the sun has long
been the venue of highly aerobatic
biplanes. Think of names like Pitts,
Christen Eagle, and Ultimate. You
can join the party and create beautiful
music, acrobatically speaking, with SIG's
Sun Dancer ARF biplane.
No ordinary pair of wings, the SIG Sun Dancer is craftsman-built using only hand selected balsa and plywood
to our exacting standards. The finish is pure beauty with a dazzling trim scheme of orange, red, and yellow
Oracover® film sure to brighten up even the darkest day.
The SIG Sun Dancer is more than a pretty face. It's pure aerobatic muscle. With a 3.2 gas engine on the nose,
and a competition radio in control, the Sun Dancer will re-write the book on aerobatics. Rock solid knife-edges,
loops big and small, and snap rolls all the way to eternity. All with the authority you've come to expect from SIG.
The SIG Sun Dancer is complete with painted matching fiberglass wheel pants and cowling, pull-pull rudder
assembly, heavy duty control hardware, twin elevator and aileron mounts, scale tail wheel assembly, dural
aluminum landing gear, huge 24 ounce gasoline-ready fuel tank, comprehensive hardware package, and a fully
illustrated assembly manual to guide you from box to field, leaving nothing to chance.
Break out your sunglasses, lather up the SPF45, and come party in the sun.
extraordinarily smooth, and you can
adjust stick length, spring tension, throttle
detents, and even the movement axes to
suit your tastes.
At the end of the day, any product review
is just one person’s opinion. I’ve been
immensely happy with my Evo 12, but I
put a focused effort into learning to
operate it. If you’re in the market for a
radio with nearly unlimited growth
potential and are the sort of modeler who
is willing to read the manual and do some
studying, the Evo is well worth a close
look. MA
Manufacturer:
Multiplex Modelsport USA
12115 Paine St.
Poway CA 92064
(858) 748-6948
Fax: (858) 748-1767
www.multiplexusa.com
(Editor’s note: Hitec and Multiplex
Modelsport USA Director of Marketing
Glen Merritt asked us to mention that in
addition to the 12-channel Evo reviewed
here, there is a nine-channel version. The
only difference in the products [besides
the number of channels, of course] is that
the Royal Evo 12 has 36 model memories
and the Royal Evo 9 has 20 model
memories.)
Edition: Model Aviation - 2005/01
Page Numbers: 66,68,70,72
Te c h n i c a l R e v i e w Jim Ryan
6941 Rob Vern Dr., Cincinnati OH 45239; E-mail: [email protected]
66 MODEL AVIATION
what I knew about other computer radios.
Before using the Evo for the first time,
there are some initial setup steps. The sixcell
NiMH battery is fully discharged, so
you must charge it overnight. The wall
charger that comes with the Evo is the
weakest item in the package. It’s a dated
design, lacking even a status LED to let you
know when it’s properly connected. I hope
this will be addressed on future versions.
I FIRST HANDLED the Multiplex Royal
Evo 12 transmitter at the 2003 Toledo,
Ohio, Weak Signals Expo, and after a few
minutes of discussing its features with
product-line manager Glen Merritt, I knew I
wanted one. Unfortunately the initial
demand exceeded the limited supply, but I
was eventually able to purchase one. It was
well worth the wait.
Several features set the Royal Evo apart
from the Asian radios that dominate the US
market. They are:
• Model memories. The Royal Evo 12 offers
36 model memories—more than you’ll find
on nearly any other radio sold in the US.
This feature first attracted me to the Evo
because I like having a single transmitter to
master, maintain, and transport.
• Frequency synthesizer. The Royal Evo is
available with a radio frequency (RF)
synthesizer module that allows the operator
to switch to any frequency in a matter of
seconds. Furthermore, it has a more “goofproof”
selection procedure than other
synthesizer modules available in the US.
• Assignable functions. The Royal Evo
gives the user almost infinite flexibility in
assigning functions to the transmitter’s
various sticks, sliders, knobs, and buttons.
Also, each socket on the receiver can be
assigned to any servo and any function.
Modelers who are familiar with high-
Multiplex Royal Evo 12
Royal Evo’s 3D digi-adjustor knobs are a
big help in navigating menus. Flight
functions can be assigned to any of the
various knobs, switches, buttons, and
sliders.
Transmitter’s back cover is secured with
two robust slide latches, so access for
adjusting sticks is quick and easy. Six-cell
NiMH pack provides 1500 mAh of
duration.
end European radios know that these
features are not unique to the Royal Evo
line. European radios commonly feature
more model memories and greater
flexibility than the mass-market radios sold
in the US. But these radios are tray-type
units that are much bulkier and usually
heavier.
This isn’t a defect; it’s simply a
difference in design philosophy, but most
US modelers seem to prefer the more
compact Asian-style transmitters. The Evo
is unusual in combining the features and
flexibility of a European radio with the
compact, lightweight size of an Asian radio.
In the Evo world, the sticks, sliders,
toggle switches, and buttons are collectively
known as “widgets.” This is to differentiate
them from actual hardware “switches” on
the transmitter box and software “switches”
such as dual rate selection or starting/
stopping a timer.
Overall Tour: At first glance, the Royal
Evo looks clean and almost nondescript,
with fewer buttons and switches than you
might expect. There are no grooves,
recesses, or stylized decorative features,
and I really like this. I find the simple
design visually appealing, and it’s much
easier to keep clean.
Among the more eye-catching widgets
are the “3-D digi-adjustor” knobs at the
upper corners of the transmitter. These can
be used as jog wheels to scroll through the
menus or input numbers. They can also be
programmed to allow the user to fine-tune
parameters such as dual rates, servo travel,
or exponential in
flight! This can be
extremely useful
when flight-testing a
new model.
Getting Started:
The Evo is a “read
the friendly manual”
project. You cannot
simply turn it on and
start punching
buttons. If you’re
willing to do a little
reading, you’ll find
that it’s an
outstanding unit. I
don’t recommend
this radio for the
beginner, but I do
consider it a good
first computer radio.
That is because some
of my learning curve
was just unlearning
When changing to a new frequency, the display flashes a 15-
second warning and then requires you to accept new channel
before it will transmit.
Photos by the author
Next you set up the gimbals for your
preferred flying mode. (The Evo can be set
up for modes 1, 2, 3, or 4.) You can also
rotate the gimbals to more naturally match
the movement of your thumbs. As a
fingertip flier, this didn’t really matter to
me, but I think thumb fliers will love this
feature. You make adjustments by opening
the case using two sliding latches (no
screws to strip or lose) and using a
supplied Torx wrench.
You also have to go through some
basic software setups, such as selecting
your language, default control mode, etc.
Software upgrades are easy to install with
the optional data cable, so your Evo can
the complexities of programming and
operating the Evo. This is not the sort of
radio you can take out of the box, run to
the field with, and go flying with that
afternoon. You have to make a concerted
effort to learn and master its features.
You need to understand that some
settings are global, affecting all models
that will be programmed into the radio.
Some are type-specific (i.e., power, glider,
or helicopter) and some are modelspecific.
For instance, if you assign flaps to
slider “F” in the Glider template, the
choice will apply to all gliders you
program. This makes perfect sense when
you think about it. You don’t want to be
on final approach thinking, “Let’s see; did
I assign retracts to switch L or N?” In
general, the global settings that affect
more than the current model are grouped
in the “Setup” menu, and the other five
menus control settings only for the current
model.
You can even assign multiple functions
to a single widget. For instance, for
aerotow sailplanes, I have flight-phase
selection, retracts, and towline release
assigned to toggle switch L. In the “Start”
flight phase, I have 30° launch flaps,
landing gear extended, tow release
engaged, and elevator/flap compensation
disabled.
When I reach release altitude, I can
click to “Cruise” flight phase, at which the
flaps and landing gear will retract, the
towline will release, elevator/flap
compensation will be enabled, the flight
timer will start, and the left stick will
control TE camber. All with a single
toggle switch! Clicking to “Landing”
flight phase, the landing gear will extend
and the left stick will control crow.
From this example, it’s easy to see
how a bit of forethought in programming
will ease the pilot’s workload
always be updated to take advantage of
improvements in the software. The data
cable also allows you to back up your
model memories to your computer.
For each control-assignment template
(defaults for “Power,” “Glider,” and “Heli”
are preprogrammed, but there are two
blank templates as well), you can program
each control and switching function to the
widget of your choice. Just highlight a
control or switch and then move the widget
that you want to operate it. It’s that easy.
Programming Philosophy: There’s been a
good deal of discussion in the modeling
press and online discussion groups about
68 MODEL AVIATION
Control menu lets you adjust servo travel, dual rates, and
exponential on one screen. Screen headings and direct-access
menu buttons make navigation fast and easy.
Mixer menu lists all control inputs that will affect given control
surface. (Elevator is shown.) Simply adjust percentages for each
input as needed.
DataManager software (free download from Multiplex Web site) lets you install software
upgrades and save your model programs. Optional data cord is required.
considerably—even for a complex eightservo
Scale sailplane.
Frequency Synthesizer: The RF
synthesizer module allows you to use any
available channel, so you never need to
wait on the frequency pin again. Each time
you turn on the transmitter, you can select
whether to enable or disable the RF
module. (You should disable RF when
you’re programming or when you’re
changing to a new frequency.)
When you switch frequencies, the Evo
warns you that it’s getting ready to change,
and then you have to accept the new
frequency. The frequency selection is
global; it’s not stored with a particular
model memory, and you must change it to
fly on another frequency.
As an added safety feature, Multiplex
offers an optional scanner module that the
user can install. This scanner adds two
useful capabilities. First, it can scan the
entire band to look for frequencies that are
in use. Detected signals are displayed with
a bar graph indicating their strength.
Second, at power-up it will scan the
selected channel to see if it’s free. If the
channel is already in use, the scanner will
disable the RF output and flash a warning
on the display.
Programming a Model: In general, you
program a new model by following the
menu buttons from right to left. To start,
click the “File” menu and “New Model.”
Select the aircraft template (“Basic,”
“Acro,” “Delta,” “Heli,” etc.) and controlassignments
template (Power, Glider, or
Heli). Go to “Properties” to input the name.
Next you can select the “Timer” menu
to program timers for the new model. The
Evo includes three different types of timers,
and they can count in either direction and
play alarms as needed. I like to assign the
“Sum” timer to the throttle stick so that it
starts automatically when I advance the
throttle.
The “Servo” menu allows you to modify
the default receiver outputs (based on the
assignment template you selected). If you
have a Giant Scale IMAC (International
Miniature Aerobatic Club) airplane with
multiple elevator servos, you can assign
each servo to its own receiver output
without resorting to mixers. You can also
determine how many points to have on the
pitch curves.
In the “Calibrate” menu you can set
servo reversing and centering and modify
the pitch curves, all on a single screen.
The “Mixer” menu allows you to set up
the mixers that were assigned when you
selected the template for your model. You
can add or delete mixers to each model
based on your needs. On a sailplane, you
may or may not need a V-tail mixer. The
menus are dynamic, so if you don’t see the
mixer you need, it’s because you didn’t
assign that mixer to any of the outputs in
the “Servo/Assignment” menu.
The Multiplex system differs most from
the Asian radios that most US fliers are
used to in the area of mixers. Having
learned the system, the Multiplex approach
is better. In the Multiplex world, a mixer is
named for the surface it moves, and it’s
simply a list of what other inputs can
control that surface.
Naturally enough, “FLAP+” moves the
flaps, but you might also want the flaps to
be moved by aileron, elevator, or spoiler
inputs. Unlike the usual “master/slave”
approach, a mixer can have as many as five
inputs controlling a single output. To
program an existing mixer, all you do is
select each input and adjust the percentage
as needed. This is easy once you understand
it, so don’t be put off.
Then you’re ready to use the “Control”
menu to adjust servo travel, dual rates, and
exponential. It’s important to understand
that you should use the “Control” menu to
limit servo travel (or the “Mixer” menu, if
applicable). You use the “Servo/Calibrate”
menu to get multiple servos to center
together (using “Rev/Trim”) and to move in
sync (by adjusting the pitch curves), but
this isn’t the best way to control overall
travel.
The first time you program a model,
you’re sure to do a little head-scratching.
But after setting up one or two, you’ll find
that the programming sequence is logical
and fairly easy to remember. I currently
have 18 models programmed, and unless
there’s something unusual about the airplane,
I can add a new one in a few minutes.
Flight Operation: This is the reason for all
the work! Switch on with the RF disabled to
choose the frequency. The selection
procedure makes it difficult to make a
mistake. Click the “Memory” menu to select
the model you want to fly. I’ve seen many
ways of doing this, and the Multiplex
approach is the fastest and easiest I’ve
witnessed.
With the model selected, pick the
appropriate flight phase (if you programmed
phases) and you’re ready to preflight your
aircraft. The digital trims are specific to each
flight phase. On my small hand-launched
models, I like to program in a few clicks of
up-trim for the “Launch” phase. Once the
model is flying, I switch to the “Normal”
flight phase and the model is trimmed for
level flight.
In flight the cruciform-trim keypads are
more accessible than the trim levers on a
traditional transmitter. They’re easy to find
by feel, which is a big help on a maiden
flight when the model may be badly out of
trim.
However, with the nearly infinite
flexibility of assigning functions, it seems
odd that the Evo doesn’t offer the ability to
assign “cross-trims” (i.e., the left-trim
keypad controls the right stick and vice
versa). This seems like a natural feature to
include, and I can only hope that Multiplex
will add this option to future versions of the
software.
It is while flying that you truly come to
appreciate the Evo’s ability to assign
controls to various widgets and combine
multiple functions on a single widget. Being
able to change three or four different settings
with a flip of a switch really decreases the
pilot’s workload. The gimbals are
72 MODEL AVIATION
SIG Manufacturing Company, Inc.
P. O. Box 520 • Montezuma, Iowa
www.sigmfg.com • 641-623-5154
SPECIFICATIONS:
Wingspan: 71.5 inches
Wing Area: 1688 sq.inches
Length: 66 inches
Weight: 17 to 18 pounds
Engine Required: 3.2 to 4.2 cu. in. gas
Radio Required: 4 Channel, 8 servos
Item #SIGRC89ARF - Sun Dancer ARF
Only $399.99 at participating dealers
The ability to reach for the skies
and dance with the sun has long
been the venue of highly aerobatic
biplanes. Think of names like Pitts,
Christen Eagle, and Ultimate. You
can join the party and create beautiful
music, acrobatically speaking, with SIG's
Sun Dancer ARF biplane.
No ordinary pair of wings, the SIG Sun Dancer is craftsman-built using only hand selected balsa and plywood
to our exacting standards. The finish is pure beauty with a dazzling trim scheme of orange, red, and yellow
Oracover® film sure to brighten up even the darkest day.
The SIG Sun Dancer is more than a pretty face. It's pure aerobatic muscle. With a 3.2 gas engine on the nose,
and a competition radio in control, the Sun Dancer will re-write the book on aerobatics. Rock solid knife-edges,
loops big and small, and snap rolls all the way to eternity. All with the authority you've come to expect from SIG.
The SIG Sun Dancer is complete with painted matching fiberglass wheel pants and cowling, pull-pull rudder
assembly, heavy duty control hardware, twin elevator and aileron mounts, scale tail wheel assembly, dural
aluminum landing gear, huge 24 ounce gasoline-ready fuel tank, comprehensive hardware package, and a fully
illustrated assembly manual to guide you from box to field, leaving nothing to chance.
Break out your sunglasses, lather up the SPF45, and come party in the sun.
extraordinarily smooth, and you can
adjust stick length, spring tension, throttle
detents, and even the movement axes to
suit your tastes.
At the end of the day, any product review
is just one person’s opinion. I’ve been
immensely happy with my Evo 12, but I
put a focused effort into learning to
operate it. If you’re in the market for a
radio with nearly unlimited growth
potential and are the sort of modeler who
is willing to read the manual and do some
studying, the Evo is well worth a close
look. MA
Manufacturer:
Multiplex Modelsport USA
12115 Paine St.
Poway CA 92064
(858) 748-6948
Fax: (858) 748-1767
www.multiplexusa.com
(Editor’s note: Hitec and Multiplex
Modelsport USA Director of Marketing
Glen Merritt asked us to mention that in
addition to the 12-channel Evo reviewed
here, there is a nine-channel version. The
only difference in the products [besides
the number of channels, of course] is that
the Royal Evo 12 has 36 model memories
and the Royal Evo 9 has 20 model
memories.)

