
NO OCR TEXT NO OCR TEXT entire center section above wing removes easy disassembly convenient ac cess Insides Saito 65 exIts cowling nicely clean smooth front end cowling splits allow installation tinkering engine Use either modi fied CB Associates mount Saitos mount Picture shows details plumbing Perry pump smoker system two pages French metric calloutsenough move project along Ignoring French metrics compared three-view Laser variations stockpile Using pictures get some shapes firmed up laid out fuselage accom modate engine tanks well Due lightweight construction heavy Saito engine radio equipment will have installed far back possible keep model coming out nose heavy landing gear fairs nicely sur rounding 1Am sheet fuselage bottom Note 1A ply edging around vent hole dummy exhaust stacks poke out establish force arrangement Since ap peared stab lower relation thrust line Lasers decided arrangement tail section airfoils constructed same manner CAP seriesalthough thick mak ing much easier build dont know whether Don assigns TR-260 ugly beautiful category collection aircraft sub jects over years What know about model beautiful-flying airplane should please modeler 26 Model Aviation ne elevator pusnroa snows neat installa hidden tall wheel arrangement maKes tion Sullivan hardware rods neat practical setup steerable tail have some drawbacks easy wheel rudder pushrod exit hole install dont vibrate exit hole can should also neat trim lowest drag nice smooth inexpensive author says typical arrange ment setting up aileron actuator system Its slop-free allows covering put interfering link N zuJ0 -4 N/-m U V 1 LU N0 LU U 0 0 zo UJUJoO m D o o 1 LU 7 7 December 1987 27 Left Assemble wing workbench covered piece Celotex sheeting make easier insert stick pins Note shims trailing edge referred text Right Epoxy plywood dihedral brace against spar stubs inside spar caps predilection aerobatics sound four-stroker its realistic exhaust bonus first test flight TR-260 March 1987 proved instructive Flying buddy Leon Folse loaded up Cher okee headed north flying field owned modeling friends friend mowed site out some flatland works farmer/rancher fabulous flying site isall close-cropped grass middle nothingwith no trees houses power lines sight An other modeling friend coastal town joined us pleasant afternoon dont know what Bill Winters Shangri-la like place must come close others unloaded assembled air occupied myself readying TR close call fired up engine Ill describe hopes preventing getting sim ilar situation CG 2/2-in spinner used model along Master Airscrew 13-6 prop spinner re worked order enlarge cutouts receive prop also file little off prop make fit After engine fired up advancing throt tle prop spinner came flying off prop hit right hand between thumb forefinger leaving two-inch gash could have much worse prop taken different route As hand numb about five minutes bleeding stopped didnt think stitches required proceeded testing Naturally concluded method used essentially unsafe fourstroke engine size am sure prop can tightened sufficiently using arrangement Im flying out spinner until better setup can de 28 Model Aviation Left After bottom sheeting glued turn wing over epoxy 1A-in LEB balsa brace 1-A ply sub-ribs proper places Right Build fuselage side directly over wax-paper-covered plans Note lightening holes ply doubler its location Left left fuselage side built directly over wax-paper-covered right side assure both sides will match straight fuselage will result Right Assemble fuselage over top view Install Former F-6 glue temporary braces keep structure square remaining A x ks glued method fuselage construction results lighter structure sheet construction IS rITE P LY TOOIIBBALSA LOWLOJYLOLETOD OSLOros101 IICLITE PLYilCprr IIITLIIE PLY Ao SHESHEHCTBIHHALE--l [ BALSA HOAROIALTOALSMLSArmnoorsAlII COOIL2 SLOSHHIBAIA PITSHEETI iITHIoMAuSSLTF1Y~SHEET RIBSLTE PLY S2tt ITI II 0 CSI14 11600~AIL I1IBO14OHLSLASLLS IIITOHOLLAB ITULOWfl [v32][b-1-10-1-10]] II SlOE 1011000 PLO P000020HLIO LOSSLPT0000 HF C CDEEl0 0 CDFRENCH _0 •Fl STOOL CUTBALSA HUTLIHE _____TR260 0 ALLBALSA UNLESS NOTED 0I %ojN AEROSA C MODE S ROKE500065CO OSPESRAN 6 10 OZ0 I-IDESIGNED DRAWN BRAD SHEPHERD___ MATEALLOOHYS 05500000 8rLBTI Oi0 Left Epoxy firewall Former F-3 place keeping fuselage sides square Pin balsa blocks outside line top view secure sides glue sets Right Position turtledeck stringers glue place CyA Remove temporary braces termined fitted goals designing model keep weight down 6- 6/2-lb range making aerobatic four-stroke 65 giving good vertical capability Although final weight edged up over goal 6 lb 12 oz perform ance hindered least because grossly underestimated power Saito fact mildly taken aback first time took off literally jumping off ground throttle opened let climb out straight some distance adjusting servo trims slightly made turn back watched fly hands-off length field After such promising start moved some maneuversloops snaps side outside loops square loops ham merheads vertical rolls four-points forth vertical climb snap roll model just kept going up pushed irrepressible dynamo Saito second flight got little fancier making inverted passes outside ioops outside snap top handed transmitter friend Leon criti cal comments Leon steered business jets around before retired grinned broadly pronouncing TR-260 far superior Laser designed few years ago judgment carried special force because own mind Laser best flying model ever designed built Construction achieve goala model talents full-size aer obatics shipI chose building techniques geared toward keeping airplane light enough intricate maneuvers Wing Any various methods used cutting out set ribs tapered wing appropriate Rather dictating particu lar method suggest using 30 Model Aviation Sheet turtledeck %2 sheeting extreme curve better easy curve A-grain light balsa used Glue top 1/4-in sheeting onto turtledeck trim rough shape knife Glue bottom -in sheeting 1/x stringers place Note transi tion round corners sheet stringers has sanded sheeting Glue %-in side stringer %2 strips around wing saddle sand nice fairing Cut right side fuselage away al low engine fitted throttle pushrod location can established Glue n balsa onto sides stock triangle pieces located NO OCR TEXT comfortable full set ribs has laid out drawing tracing copy can made method use cutting out parts plans make tracing spray con tact cement paper press wood cut out peel paper off part Please dont get willies look lightweight wing construction Ive never wing give up flight using method box spar being lighter stiffer two large balsa sticks almost totally resists twisting panel Another advantage method guaranteed straight wing workbench straight Select sheet medium-to-hard straight-grained %-in balsa Lay out spars jig used trailing edge TE Note jig 3114 long % #1 rib tapering #11 rib Pin / x A-in cap plans glue spar slots up leading edge LE cap Set ribs place trialfitting trinuning necessary Pin ribs spar jig go over joints thick cyanoacrylate CyA glue Lay bead glue along top spar install /8 x 4-in cap Glue /8 x /2-in LB ribs Glue / x %-in strip edge /32 x 1 /2-in sheet quarter-grain balsa Glue sheet ribs making sure / x %-in strip butts against TE ribs use aliphatic resin glue job Select some medium straight-grained wood LE sheeting Using long block sand bevel -in LB con form rib shape Lay sheet posi tion panel edge parallel A-in LE Roll sheet back mark TE spar cap trim ex cess off Using Sigs handy mini glue gun full al iphatic resin lay bead rib Lay bead thick CyA top A-in LB Carefully place sheet position over LB place some pins nlong sheet Wait few seconds lay bead CyA spar cap roll sheet back pin spar cap feel qualms about using CyA botching job use 32 Model Aviation Glue FB pieces along %2 floor air dam After glue sets epoxy whole area fuel proofing install /l6 plywood bottom Protect tubes tanks dust sanding finishing putting piece plugged tubing Glue Former F-i place Notice align ment mark top /4-in sheeting sist getting former glued squarely Glue -in nose blocks front blocks cheek cowls Ae ply bottom Note grain nose blocks Once glued place nose blocks should appear Lots sanding #100 grit sandpaper will shape up nicely cheek cowls under construction lack ing side sheeting Rough out side shape nose blocks bot tom block round oft corners FB right side top has roughly carved knife left side has al ready carved sanded its primary shape point good idea lay model sheet foam prevent dings front end shape rough-sanded its ap proximate final shape cheek cowls changed somewhat after photo final outline shown plans After front end sanded final shape cut cowl off install plywood tabs blind nuts Build up air scoop aliphatic glue everything pin gener ously gives little time position sheet Glue vertical /16 spar webbing place Glue aileron crank plate landing gear cures form Note plastic wrap both sides material fiberglass laid layer time top layer plastic sheet put smoothed shape hand Brace bot tom weight dry saw rough shape finish file sandpaper Au beautiful looks finished balsawood model its almost shame put lot color hide beautiful work cap strips place sheet center section yet Turn panel over pin down using jig again Sheet top panel using same method de scribed bottom Again sheet Sand stab fin ribs airfoil shape before sheeting use shim under leading edge keep unit square center section area inside rib #1 LE both panels completed draw straight line workbench least 66 long guideline pinning pan els Lay some wax paper poly sheet down bench about midline pin panels upside down spar cap along line Shim center section TE /16 Shim TE outboard #11 ribs pin down securely Epoxy A-in ply dihedral brace spar stubs inside spar caps Glue TE LE A-in balsa braces place Glue December 1987 33 Left Build removable section over wing first covering wing fuseiage plastic wrap pinning F-3A F-5 doubie A-in front portion piace Right Next instaii triangle pieces instrument panel -in top sheet F-4 lAin rear top Left /8-in sides have completed formers F-4 F-5 unit ready shaping fixing up cockpit Right Note final shape fuselage rounded corners cowl Two types landing gear tried wire version too flexibie form used making fiber glass landing gear takes few min utes construct variations theme just about infinite custom gear can fabricated special need Using inc stan guide position eleva tor halves Pin down epoxy brass tie bar place Note airfoil shape Designed Ken Willard earnaster4t Capture spirit aviators magnificent machines & Lucky Ladies brought safely home premiere commemorative wall calendar 12x18 featuring official US Army Air Force archival photographs mere pinups tradition nautical figureheads mascots new age aerial combat first series issued through 1995 Available @ $995 postpaid PA res add 6% tax ALKMAAR ASSOCIATES 503 Todd Way-F West Chester PA 19380 bottom center-section sheet place Turn wing over epoxy lA ribs place epoxy ply plate LE panel spar LE Glue %-in balsa sheet place tween #1 ribs Sheet center section behind spar leaving area over ply plate uncovered until after wing has bolted fuselage Epoxy ply TE panel place Unpin wing lay aside temporar ily Cut proper angles in TE stock meet center sec tion Take wing press down TE bench trial fit TE stock sanding necessary eliminate gaps holding panel down TE snug hit joint CyA Hold wing up eyeball TE trueness satisfied finish gluing up Repeat procedure other panel Lay out ailerons cut out TE stock Install block tips rough out shape following plans stall aileron cranks plate along /16 music wire pushrods /6 ply fairleads lay wing aside Fuselage effort save weight over previous designs using full-sheeted fuse lage full-depth Lite Ply doublers used sheet stress areas lightened ply doublers holes building re mainder sticks proved strong arrangement still weighed light scales Cut out doublers lay out A-in sides will necessary piece some sheet together get enough width quickly accomplished CyA Lay out balsa side using thrust line benchmark cut out glue dou blers sides contact cement go around edges CyA glue Lay side over plan construct aft lower section sides using 4-in-sq /8 x 4-in balsa Trace former pat terns contact-cement ply noted cut out Glue temporary brace scrap balsa A-in stick about halfway down across opening F-6 Pin sides down over top view F-6 tail post after sand ing bevel sides tail Slip F-6 place brace sides temporarily 900 workbench square glue tail post F-6 Glue A-in crosspieces / X A-in diagonals place Cut gusset out A-in sheet balsa top lon geron joints F-6 glue place Unpin fuselage repin about two inches behind F-3 Pin blocks over plan front fuselage hold halves alignment slip F-3 F-2 firewall formers slots epoxy place Unpin repin aft end fuse lage Trial fit F-7 F-8 pinning frame trying stringers Trim necessary stringers fonners straight line satisfied glue placeContinued page 133 34 Model Aviation Flies off both land water Crisply die-cut balsa lite ply parts complete hardware easy sembly sensible engineering clear plans photo illustrated assembly manual L omplete Catalog $200 ordered direct add uu Manaling 116 W 19th St PO Box 511 E7 Higginsville MO 64037 call 816 584-7121 1988k Wings War Nose-Art Calendar LUCKY LADIES THE GALS WHO BROUGHT US HOME 1987 NATIONAL CHAMPION Tony Frackowiak shown winning FAI RC Pattern 1987 NATS original design LENGE IV CHALLENGE IV available basic kit featuring epoxyglass fuselage foam wings stab $14995 Deluxe Kit $35000 much assem bly complete exceptionally smooth pre cise flying aircraft equally adept AMA FAI pattern Much individual preference can accomodated including choice Tn-Gear Tail Dragger 790 sq wing 820 sq depending desired flight speed C\Soe\C $8je ~ ietractS9 GO& par1terSs a0d atpiP~3 ~oyS oriented public relations better way us go Martin Dilly West Wickham Kent England can t think anyone wouldn t like see high respect airplane mod eling general public unfortunate ly doesnt seem magic answers assure giant leap di rection Safety/Preston Continued page 22 accident no else field Just two minutes before accident two other members left leaving just two us accident happened grabbed torn finger Sue helped load van drove nearby fire station para medic gave preliminary check said going live bound up wound off went hospital After receiving seven stitches finger several days later returned field T-Craft did again time prop flew off hit leg no hospital trip time made deep cut After lengthy dis cussion club president engine expert Frank Warren electronics expert Ron Roeder bought zero-to-five-ohm wirewound rheostat could handle 25 amps found local surplus outlet $150 also picked up toggle switch 50 cents lit tle fellows went power panel field box Since Ive no problems Frank Ron contended glow plug getting too much juice causing detonation problem loosening prop nut causing insurance company shudder would recommend addition anyone firing up four-stroke toggle switch works kill-switch glow plug can cut heat quickly havent personally tried out Dukes sugges tion However worked him may work others Meanwhile wonder engine manufacturers going provide some means positively retain prop nut shaft column has discussed several methods have suggested readers its ex actly new technology wrap up months column letter Joe Wagner New Wilmington PA points out buddy system infallible Ill let Joe tell tale Im responding latest column Sep tember 87 mentioning buddy tystem good bit model flying alone although Ive never problems agree its better have buddy along However make sure youve got dependable An experience back 1942 case point building solid Scale models friend basement big knife using roughly shape Short Stirling fuse lage slipped made huge gash hand Blood everywhere before could pick up rag slow flow turned buddy help saw him collapsed heap floor learned later despite Boy Scout training merit badges First Aid friend people simply can stand sight blood did know Bleeding hand managed carry friend upstairs alone house lay him down couch make sure breathing OK before left made way doctors office circumstances Id have better off alone now wonder about some peo ple occasionally fly would react case bloody accident Maybe ought ask themtactfully course Have another safe month John Preston 2812 Northampton St N W Washington DC 20015 TR-260/Shepherd Continued page 34 Select some grain 3/ sheet tur fledeck sides cut little oversize Wet outside sheet will curve over formers stringers easily use CyA glue attach Sand top sheets flush formers top stringers glue -in light sheet top Cut excess off sides A-in sheet sand top long straight block Glue landing gear plate place epoxy Glue bottom A-in sheet place December 1987 133 U Letters Editor Continued page 12 PRECISION MODEL PRODUCTS Made U S BARSTOCK AIIi&AINUM CDIMMERS RETAIL APPHOX PART NOSIZEPRICEWT TT-175-B 4$12950950Z TT-200-B 21395 OZ TT-225-B 41495 OZ TT-226-B 2114 FAI 0Z TT-250-B 2-1/21695 0Z TT-251-B /2FAI 1895 0Z TT-275-R 2-3/41995 OZ TT-276-B . 23/4/FAI 2195 OZ TT-300-B 32395 OZ TT-301-B . 3/FAt 2595 OZ 3 Pieces Cone Back Plate Retainer Screw Note 3 4 Blade Spinners Available Sizes Add $300 Per Spinner PART NOSIZE TT-140-A .1/4-28 TT-610-A . 6x 10mm TT-710-A .7x 10mm . TT-516-A .5/16-24 TT-81 0-A fl-825-A TT-375-A Th125-A 8x1Omm 8x 125mm 3/8-24 lOx 125mm RETAIL APPROX PRICEWT $395 1 OZ 395 . 063 OZ 395 . 082 OZ 395 . 076 OZ 395 . 076 OZ 395 . 075 OZ 495 0Z 495 . 115oz 3 Piece Set Nut Washer Machined Bushing Add $350 Shipping Handling Prices subject change notice ROMCO MFG INC OX 836 SOUTH HOUSTON TEXAS 77587 713 943-1867 cross grained glue two bottom /8 x A-in stringers Glue %-in side string ers %2 fairing strips around aft end wing saddle Sand fair fuselage noting picture Assembly CB Associates mount works OK Saito engine top portion above bolt holes cut away allows engine slide back mount interfere throttle choke plate have Saito mount means use Remove fuselage side inside cheek cowl outline order bolt engine place locate throttle pushrod hole refer picture Drill hole pushrod install plastic tubing used outside tube Gold n Rod prototype Make up tankor tanks going smoke install Glue FB-l FB about 3/ inside outer curve glue place sides Glue 3/ sheet under smoke tank place Glue /16 ply bottom vent hole cut out per top view Glue top 34-in triangles top A-in sheet place Use centerlines F-i align square fuselage glue place Noting direction grain picture shaping inside blocks according drawing F-i glue 3A -in medium blocks front F-l Glue blocks tops sides cheek cowls place rough-carve shape along top sheet triangles first noting shadows highlights photos good sharp pocket knife 80-grit sandpaper recommended procedure air inlet bottom constructed out 3A 6 sheet sanded shape Cut away removable cowl half using Zona Saw take care procedure stall maple blocks trailing edge ply sheet WMP using epoxy Epoxy LGB WMB ply braces place making sure WMB up against bottom WMP Mount wing fuselage saddle sanding LE wing square re moving enough TE allow proper fit Align wing square fuselage pin firmly place Drill holes 4-20 hold-down bolts remove wing tap maple blocks -20 nylon bolts Bolt wing back place Lay out trace sides remov able top above wing onto A-in balsa sheet Make double side portions front instrument panel F-3B noting con figuration photo prototype top under construction Take some poly sheet long enough cover front F-3 rear F-6 formers place top wing Pin clamp F-3A F-3 pin F5 F-6 Pin sides place glue F-3A F-S Glue former F-4 position Glue 34-in triangle stock sides flush top Glue top A-in sheet front cabin section piece top F-4 F-S Sand cabin section con form rest fuselage after install ing -in dowels 4-40 holddown bolts blind nuts Fix up cockpit suit fancy pilot Williams Bros 2%-in figure head cut off little plastic trimmed side neck head glued back angle Carefully trim off front back canopy along bottom flange start fitting fuselage Trim just little time go along use small felt-tip pen rough out outline botched canopy cutting too much off once expensive lessons Two landing gears built check weight strength out double Ain music wire out fiberglass epoxy wire gear little too springy opted fiberglass As pictures show form held vise layered epoxy-saturated fiber glass placed between two sheets poly draped over form held against some heavy objects Im mis taken credit idea goes Pet Reed described earlier article mags Cut fiberglass strips over size use slow-setting epoxy Sig used prototype resulted strong gear flexes well stabilizer elevator fin rudder constructed directly over plans using conventional building methods eleva tor tie bar fashioned out /16 brass tub ing Solder -in wire arms tie bar epoxy assembly eleva tors Finishing Supershrink Coverite used fuselage up including cabin section rudder elevator re mainder fuselage covered Sig medium Plyspan using butyrate dope entire setup given four coats dope contained some talc sprayed polyurethane colors wing covered MonoKote aluminum Coverite Black Baron red plastic heat-shrink serial letters made Sig blank decal sheet sprayed two coats red poly paint letters laid out cut dipped water transferred model PRODERA lettering created Presto Stik vinyl letters 34-in Hel vetica found office supply stores Theyre perfect resemble original closely enough realistic look pinstriping black tape shoul der harness parachute straps Jean Claude turned shoelaces sunglasses Williams Bros pair back side painted black choose build Sirius version leave off wheel pants move former F-4 rearward position Whichever version choose enjoy aerobatics performer vir tuoso capabilities full-size airplane youll find TR-260 rewarding model build 134 Model Aviation PROP NUT ADAPTORS

Edition: Model Aviation - 1987/12
Page Numbers: 24, 25, 26, 27, 28, 29, 30, 31, 32, 33, 34, 133, 134

Edition: Model Aviation - 1987/12
Page Numbers: 24, 25, 26, 27, 28, 29, 30, 31, 32, 33, 34, 133, 134
NO OCR TEXT NO OCR TEXT entire center section above wing removes easy disassembly convenient ac cess Insides Saito 65 exIts cowling nicely clean smooth front end cowling splits allow installation tinkering engine Use either modi fied CB Associates mount Saitos mount Picture shows details plumbing Perry pump smoker system two pages French metric calloutsenough move project along Ignoring French metrics compared three-view Laser variations stockpile Using pictures get some shapes firmed up laid out fuselage accom modate engine tanks well Due lightweight construction heavy Saito engine radio equipment will have installed far back possible keep model coming out nose heavy landing gear fairs nicely sur rounding 1Am sheet fuselage bottom Note 1A ply edging around vent hole dummy exhaust stacks poke out establish force arrangement Since ap peared stab lower relation thrust line Lasers decided arrangement tail section airfoils constructed same manner CAP seriesalthough thick mak ing much easier build dont know whether Don assigns TR-260 ugly beautiful category collection aircraft sub jects over years What know about model beautiful-flying airplane should please modeler 26 Model Aviation ne elevator pusnroa snows neat installa hidden tall wheel arrangement maKes tion Sullivan hardware rods neat practical setup steerable tail have some drawbacks easy wheel rudder pushrod exit hole install dont vibrate exit hole can should also neat trim lowest drag nice smooth inexpensive author says typical arrange ment setting up aileron actuator system Its slop-free allows covering put interfering link N zuJ0 -4 N/-m U V 1 LU N0 LU U 0 0 zo UJUJoO m D o o 1 LU 7 7 December 1987 27 Left Assemble wing workbench covered piece Celotex sheeting make easier insert stick pins Note shims trailing edge referred text Right Epoxy plywood dihedral brace against spar stubs inside spar caps predilection aerobatics sound four-stroker its realistic exhaust bonus first test flight TR-260 March 1987 proved instructive Flying buddy Leon Folse loaded up Cher okee headed north flying field owned modeling friends friend mowed site out some flatland works farmer/rancher fabulous flying site isall close-cropped grass middle nothingwith no trees houses power lines sight An other modeling friend coastal town joined us pleasant afternoon dont know what Bill Winters Shangri-la like place must come close others unloaded assembled air occupied myself readying TR close call fired up engine Ill describe hopes preventing getting sim ilar situation CG 2/2-in spinner used model along Master Airscrew 13-6 prop spinner re worked order enlarge cutouts receive prop also file little off prop make fit After engine fired up advancing throt tle prop spinner came flying off prop hit right hand between thumb forefinger leaving two-inch gash could have much worse prop taken different route As hand numb about five minutes bleeding stopped didnt think stitches required proceeded testing Naturally concluded method used essentially unsafe fourstroke engine size am sure prop can tightened sufficiently using arrangement Im flying out spinner until better setup can de 28 Model Aviation Left After bottom sheeting glued turn wing over epoxy 1A-in LEB balsa brace 1-A ply sub-ribs proper places Right Build fuselage side directly over wax-paper-covered plans Note lightening holes ply doubler its location Left left fuselage side built directly over wax-paper-covered right side assure both sides will match straight fuselage will result Right Assemble fuselage over top view Install Former F-6 glue temporary braces keep structure square remaining A x ks glued method fuselage construction results lighter structure sheet construction IS rITE P LY TOOIIBBALSA LOWLOJYLOLETOD OSLOros101 IICLITE PLYilCprr IIITLIIE PLY Ao SHESHEHCTBIHHALE--l [ BALSA HOAROIALTOALSMLSArmnoorsAlII COOIL2 SLOSHHIBAIA PITSHEETI iITHIoMAuSSLTF1Y~SHEET RIBSLTE PLY S2tt ITI II 0 CSI14 11600~AIL I1IBO14OHLSLASLLS IIITOHOLLAB ITULOWfl [v32][b-1-10-1-10]] II SlOE 1011000 PLO P000020HLIO LOSSLPT0000 HF C CDEEl0 0 CDFRENCH _0 •Fl STOOL CUTBALSA HUTLIHE _____TR260 0 ALLBALSA UNLESS NOTED 0I %ojN AEROSA C MODE S ROKE500065CO OSPESRAN 6 10 OZ0 I-IDESIGNED DRAWN BRAD SHEPHERD___ MATEALLOOHYS 05500000 8rLBTI Oi0 Left Epoxy firewall Former F-3 place keeping fuselage sides square Pin balsa blocks outside line top view secure sides glue sets Right Position turtledeck stringers glue place CyA Remove temporary braces termined fitted goals designing model keep weight down 6- 6/2-lb range making aerobatic four-stroke 65 giving good vertical capability Although final weight edged up over goal 6 lb 12 oz perform ance hindered least because grossly underestimated power Saito fact mildly taken aback first time took off literally jumping off ground throttle opened let climb out straight some distance adjusting servo trims slightly made turn back watched fly hands-off length field After such promising start moved some maneuversloops snaps side outside loops square loops ham merheads vertical rolls four-points forth vertical climb snap roll model just kept going up pushed irrepressible dynamo Saito second flight got little fancier making inverted passes outside ioops outside snap top handed transmitter friend Leon criti cal comments Leon steered business jets around before retired grinned broadly pronouncing TR-260 far superior Laser designed few years ago judgment carried special force because own mind Laser best flying model ever designed built Construction achieve goala model talents full-size aer obatics shipI chose building techniques geared toward keeping airplane light enough intricate maneuvers Wing Any various methods used cutting out set ribs tapered wing appropriate Rather dictating particu lar method suggest using 30 Model Aviation Sheet turtledeck %2 sheeting extreme curve better easy curve A-grain light balsa used Glue top 1/4-in sheeting onto turtledeck trim rough shape knife Glue bottom -in sheeting 1/x stringers place Note transi tion round corners sheet stringers has sanded sheeting Glue %-in side stringer %2 strips around wing saddle sand nice fairing Cut right side fuselage away al low engine fitted throttle pushrod location can established Glue n balsa onto sides stock triangle pieces located NO OCR TEXT comfortable full set ribs has laid out drawing tracing copy can made method use cutting out parts plans make tracing spray con tact cement paper press wood cut out peel paper off part Please dont get willies look lightweight wing construction Ive never wing give up flight using method box spar being lighter stiffer two large balsa sticks almost totally resists twisting panel Another advantage method guaranteed straight wing workbench straight Select sheet medium-to-hard straight-grained %-in balsa Lay out spars jig used trailing edge TE Note jig 3114 long % #1 rib tapering #11 rib Pin / x A-in cap plans glue spar slots up leading edge LE cap Set ribs place trialfitting trinuning necessary Pin ribs spar jig go over joints thick cyanoacrylate CyA glue Lay bead glue along top spar install /8 x 4-in cap Glue /8 x /2-in LB ribs Glue / x %-in strip edge /32 x 1 /2-in sheet quarter-grain balsa Glue sheet ribs making sure / x %-in strip butts against TE ribs use aliphatic resin glue job Select some medium straight-grained wood LE sheeting Using long block sand bevel -in LB con form rib shape Lay sheet posi tion panel edge parallel A-in LE Roll sheet back mark TE spar cap trim ex cess off Using Sigs handy mini glue gun full al iphatic resin lay bead rib Lay bead thick CyA top A-in LB Carefully place sheet position over LB place some pins nlong sheet Wait few seconds lay bead CyA spar cap roll sheet back pin spar cap feel qualms about using CyA botching job use 32 Model Aviation Glue FB pieces along %2 floor air dam After glue sets epoxy whole area fuel proofing install /l6 plywood bottom Protect tubes tanks dust sanding finishing putting piece plugged tubing Glue Former F-i place Notice align ment mark top /4-in sheeting sist getting former glued squarely Glue -in nose blocks front blocks cheek cowls Ae ply bottom Note grain nose blocks Once glued place nose blocks should appear Lots sanding #100 grit sandpaper will shape up nicely cheek cowls under construction lack ing side sheeting Rough out side shape nose blocks bot tom block round oft corners FB right side top has roughly carved knife left side has al ready carved sanded its primary shape point good idea lay model sheet foam prevent dings front end shape rough-sanded its ap proximate final shape cheek cowls changed somewhat after photo final outline shown plans After front end sanded final shape cut cowl off install plywood tabs blind nuts Build up air scoop aliphatic glue everything pin gener ously gives little time position sheet Glue vertical /16 spar webbing place Glue aileron crank plate landing gear cures form Note plastic wrap both sides material fiberglass laid layer time top layer plastic sheet put smoothed shape hand Brace bot tom weight dry saw rough shape finish file sandpaper Au beautiful looks finished balsawood model its almost shame put lot color hide beautiful work cap strips place sheet center section yet Turn panel over pin down using jig again Sheet top panel using same method de scribed bottom Again sheet Sand stab fin ribs airfoil shape before sheeting use shim under leading edge keep unit square center section area inside rib #1 LE both panels completed draw straight line workbench least 66 long guideline pinning pan els Lay some wax paper poly sheet down bench about midline pin panels upside down spar cap along line Shim center section TE /16 Shim TE outboard #11 ribs pin down securely Epoxy A-in ply dihedral brace spar stubs inside spar caps Glue TE LE A-in balsa braces place Glue December 1987 33 Left Build removable section over wing first covering wing fuseiage plastic wrap pinning F-3A F-5 doubie A-in front portion piace Right Next instaii triangle pieces instrument panel -in top sheet F-4 lAin rear top Left /8-in sides have completed formers F-4 F-5 unit ready shaping fixing up cockpit Right Note final shape fuselage rounded corners cowl Two types landing gear tried wire version too flexibie form used making fiber glass landing gear takes few min utes construct variations theme just about infinite custom gear can fabricated special need Using inc stan guide position eleva tor halves Pin down epoxy brass tie bar place Note airfoil shape Designed Ken Willard earnaster4t Capture spirit aviators magnificent machines & Lucky Ladies brought safely home premiere commemorative wall calendar 12x18 featuring official US Army Air Force archival photographs mere pinups tradition nautical figureheads mascots new age aerial combat first series issued through 1995 Available @ $995 postpaid PA res add 6% tax ALKMAAR ASSOCIATES 503 Todd Way-F West Chester PA 19380 bottom center-section sheet place Turn wing over epoxy lA ribs place epoxy ply plate LE panel spar LE Glue %-in balsa sheet place tween #1 ribs Sheet center section behind spar leaving area over ply plate uncovered until after wing has bolted fuselage Epoxy ply TE panel place Unpin wing lay aside temporar ily Cut proper angles in TE stock meet center sec tion Take wing press down TE bench trial fit TE stock sanding necessary eliminate gaps holding panel down TE snug hit joint CyA Hold wing up eyeball TE trueness satisfied finish gluing up Repeat procedure other panel Lay out ailerons cut out TE stock Install block tips rough out shape following plans stall aileron cranks plate along /16 music wire pushrods /6 ply fairleads lay wing aside Fuselage effort save weight over previous designs using full-sheeted fuse lage full-depth Lite Ply doublers used sheet stress areas lightened ply doublers holes building re mainder sticks proved strong arrangement still weighed light scales Cut out doublers lay out A-in sides will necessary piece some sheet together get enough width quickly accomplished CyA Lay out balsa side using thrust line benchmark cut out glue dou blers sides contact cement go around edges CyA glue Lay side over plan construct aft lower section sides using 4-in-sq /8 x 4-in balsa Trace former pat terns contact-cement ply noted cut out Glue temporary brace scrap balsa A-in stick about halfway down across opening F-6 Pin sides down over top view F-6 tail post after sand ing bevel sides tail Slip F-6 place brace sides temporarily 900 workbench square glue tail post F-6 Glue A-in crosspieces / X A-in diagonals place Cut gusset out A-in sheet balsa top lon geron joints F-6 glue place Unpin fuselage repin about two inches behind F-3 Pin blocks over plan front fuselage hold halves alignment slip F-3 F-2 firewall formers slots epoxy place Unpin repin aft end fuse lage Trial fit F-7 F-8 pinning frame trying stringers Trim necessary stringers fonners straight line satisfied glue placeContinued page 133 34 Model Aviation Flies off both land water Crisply die-cut balsa lite ply parts complete hardware easy sembly sensible engineering clear plans photo illustrated assembly manual L omplete Catalog $200 ordered direct add uu Manaling 116 W 19th St PO Box 511 E7 Higginsville MO 64037 call 816 584-7121 1988k Wings War Nose-Art Calendar LUCKY LADIES THE GALS WHO BROUGHT US HOME 1987 NATIONAL CHAMPION Tony Frackowiak shown winning FAI RC Pattern 1987 NATS original design LENGE IV CHALLENGE IV available basic kit featuring epoxyglass fuselage foam wings stab $14995 Deluxe Kit $35000 much assem bly complete exceptionally smooth pre cise flying aircraft equally adept AMA FAI pattern Much individual preference can accomodated including choice Tn-Gear Tail Dragger 790 sq wing 820 sq depending desired flight speed C\Soe\C $8je ~ ietractS9 GO& par1terSs a0d atpiP~3 ~oyS oriented public relations better way us go Martin Dilly West Wickham Kent England can t think anyone wouldn t like see high respect airplane mod eling general public unfortunate ly doesnt seem magic answers assure giant leap di rection Safety/Preston Continued page 22 accident no else field Just two minutes before accident two other members left leaving just two us accident happened grabbed torn finger Sue helped load van drove nearby fire station para medic gave preliminary check said going live bound up wound off went hospital After receiving seven stitches finger several days later returned field T-Craft did again time prop flew off hit leg no hospital trip time made deep cut After lengthy dis cussion club president engine expert Frank Warren electronics expert Ron Roeder bought zero-to-five-ohm wirewound rheostat could handle 25 amps found local surplus outlet $150 also picked up toggle switch 50 cents lit tle fellows went power panel field box Since Ive no problems Frank Ron contended glow plug getting too much juice causing detonation problem loosening prop nut causing insurance company shudder would recommend addition anyone firing up four-stroke toggle switch works kill-switch glow plug can cut heat quickly havent personally tried out Dukes sugges tion However worked him may work others Meanwhile wonder engine manufacturers going provide some means positively retain prop nut shaft column has discussed several methods have suggested readers its ex actly new technology wrap up months column letter Joe Wagner New Wilmington PA points out buddy system infallible Ill let Joe tell tale Im responding latest column Sep tember 87 mentioning buddy tystem good bit model flying alone although Ive never problems agree its better have buddy along However make sure youve got dependable An experience back 1942 case point building solid Scale models friend basement big knife using roughly shape Short Stirling fuse lage slipped made huge gash hand Blood everywhere before could pick up rag slow flow turned buddy help saw him collapsed heap floor learned later despite Boy Scout training merit badges First Aid friend people simply can stand sight blood did know Bleeding hand managed carry friend upstairs alone house lay him down couch make sure breathing OK before left made way doctors office circumstances Id have better off alone now wonder about some peo ple occasionally fly would react case bloody accident Maybe ought ask themtactfully course Have another safe month John Preston 2812 Northampton St N W Washington DC 20015 TR-260/Shepherd Continued page 34 Select some grain 3/ sheet tur fledeck sides cut little oversize Wet outside sheet will curve over formers stringers easily use CyA glue attach Sand top sheets flush formers top stringers glue -in light sheet top Cut excess off sides A-in sheet sand top long straight block Glue landing gear plate place epoxy Glue bottom A-in sheet place December 1987 133 U Letters Editor Continued page 12 PRECISION MODEL PRODUCTS Made U S BARSTOCK AIIi&AINUM CDIMMERS RETAIL APPHOX PART NOSIZEPRICEWT TT-175-B 4$12950950Z TT-200-B 21395 OZ TT-225-B 41495 OZ TT-226-B 2114 FAI 0Z TT-250-B 2-1/21695 0Z TT-251-B /2FAI 1895 0Z TT-275-R 2-3/41995 OZ TT-276-B . 23/4/FAI 2195 OZ TT-300-B 32395 OZ TT-301-B . 3/FAt 2595 OZ 3 Pieces Cone Back Plate Retainer Screw Note 3 4 Blade Spinners Available Sizes Add $300 Per Spinner PART NOSIZE TT-140-A .1/4-28 TT-610-A . 6x 10mm TT-710-A .7x 10mm . TT-516-A .5/16-24 TT-81 0-A fl-825-A TT-375-A Th125-A 8x1Omm 8x 125mm 3/8-24 lOx 125mm RETAIL APPROX PRICEWT $395 1 OZ 395 . 063 OZ 395 . 082 OZ 395 . 076 OZ 395 . 076 OZ 395 . 075 OZ 495 0Z 495 . 115oz 3 Piece Set Nut Washer Machined Bushing Add $350 Shipping Handling Prices subject change notice ROMCO MFG INC OX 836 SOUTH HOUSTON TEXAS 77587 713 943-1867 cross grained glue two bottom /8 x A-in stringers Glue %-in side string ers %2 fairing strips around aft end wing saddle Sand fair fuselage noting picture Assembly CB Associates mount works OK Saito engine top portion above bolt holes cut away allows engine slide back mount interfere throttle choke plate have Saito mount means use Remove fuselage side inside cheek cowl outline order bolt engine place locate throttle pushrod hole refer picture Drill hole pushrod install plastic tubing used outside tube Gold n Rod prototype Make up tankor tanks going smoke install Glue FB-l FB about 3/ inside outer curve glue place sides Glue 3/ sheet under smoke tank place Glue /16 ply bottom vent hole cut out per top view Glue top 34-in triangles top A-in sheet place Use centerlines F-i align square fuselage glue place Noting direction grain picture shaping inside blocks according drawing F-i glue 3A -in medium blocks front F-l Glue blocks tops sides cheek cowls place rough-carve shape along top sheet triangles first noting shadows highlights photos good sharp pocket knife 80-grit sandpaper recommended procedure air inlet bottom constructed out 3A 6 sheet sanded shape Cut away removable cowl half using Zona Saw take care procedure stall maple blocks trailing edge ply sheet WMP using epoxy Epoxy LGB WMB ply braces place making sure WMB up against bottom WMP Mount wing fuselage saddle sanding LE wing square re moving enough TE allow proper fit Align wing square fuselage pin firmly place Drill holes 4-20 hold-down bolts remove wing tap maple blocks -20 nylon bolts Bolt wing back place Lay out trace sides remov able top above wing onto A-in balsa sheet Make double side portions front instrument panel F-3B noting con figuration photo prototype top under construction Take some poly sheet long enough cover front F-3 rear F-6 formers place top wing Pin clamp F-3A F-3 pin F5 F-6 Pin sides place glue F-3A F-S Glue former F-4 position Glue 34-in triangle stock sides flush top Glue top A-in sheet front cabin section piece top F-4 F-S Sand cabin section con form rest fuselage after install ing -in dowels 4-40 holddown bolts blind nuts Fix up cockpit suit fancy pilot Williams Bros 2%-in figure head cut off little plastic trimmed side neck head glued back angle Carefully trim off front back canopy along bottom flange start fitting fuselage Trim just little time go along use small felt-tip pen rough out outline botched canopy cutting too much off once expensive lessons Two landing gears built check weight strength out double Ain music wire out fiberglass epoxy wire gear little too springy opted fiberglass As pictures show form held vise layered epoxy-saturated fiber glass placed between two sheets poly draped over form held against some heavy objects Im mis taken credit idea goes Pet Reed described earlier article mags Cut fiberglass strips over size use slow-setting epoxy Sig used prototype resulted strong gear flexes well stabilizer elevator fin rudder constructed directly over plans using conventional building methods eleva tor tie bar fashioned out /16 brass tub ing Solder -in wire arms tie bar epoxy assembly eleva tors Finishing Supershrink Coverite used fuselage up including cabin section rudder elevator re mainder fuselage covered Sig medium Plyspan using butyrate dope entire setup given four coats dope contained some talc sprayed polyurethane colors wing covered MonoKote aluminum Coverite Black Baron red plastic heat-shrink serial letters made Sig blank decal sheet sprayed two coats red poly paint letters laid out cut dipped water transferred model PRODERA lettering created Presto Stik vinyl letters 34-in Hel vetica found office supply stores Theyre perfect resemble original closely enough realistic look pinstriping black tape shoul der harness parachute straps Jean Claude turned shoelaces sunglasses Williams Bros pair back side painted black choose build Sirius version leave off wheel pants move former F-4 rearward position Whichever version choose enjoy aerobatics performer vir tuoso capabilities full-size airplane youll find TR-260 rewarding model build 134 Model Aviation PROP NUT ADAPTORS

Edition: Model Aviation - 1987/12
Page Numbers: 24, 25, 26, 27, 28, 29, 30, 31, 32, 33, 34, 133, 134
NO OCR TEXT NO OCR TEXT entire center section above wing removes easy disassembly convenient ac cess Insides Saito 65 exIts cowling nicely clean smooth front end cowling splits allow installation tinkering engine Use either modi fied CB Associates mount Saitos mount Picture shows details plumbing Perry pump smoker system two pages French metric calloutsenough move project along Ignoring French metrics compared three-view Laser variations stockpile Using pictures get some shapes firmed up laid out fuselage accom modate engine tanks well Due lightweight construction heavy Saito engine radio equipment will have installed far back possible keep model coming out nose heavy landing gear fairs nicely sur rounding 1Am sheet fuselage bottom Note 1A ply edging around vent hole dummy exhaust stacks poke out establish force arrangement Since ap peared stab lower relation thrust line Lasers decided arrangement tail section airfoils constructed same manner CAP seriesalthough thick mak ing much easier build dont know whether Don assigns TR-260 ugly beautiful category collection aircraft sub jects over years What know about model beautiful-flying airplane should please modeler 26 Model Aviation ne elevator pusnroa snows neat installa hidden tall wheel arrangement maKes tion Sullivan hardware rods neat practical setup steerable tail have some drawbacks easy wheel rudder pushrod exit hole install dont vibrate exit hole can should also neat trim lowest drag nice smooth inexpensive author says typical arrange ment setting up aileron actuator system Its slop-free allows covering put interfering link N zuJ0 -4 N/-m U V 1 LU N0 LU U 0 0 zo UJUJoO m D o o 1 LU 7 7 December 1987 27 Left Assemble wing workbench covered piece Celotex sheeting make easier insert stick pins Note shims trailing edge referred text Right Epoxy plywood dihedral brace against spar stubs inside spar caps predilection aerobatics sound four-stroker its realistic exhaust bonus first test flight TR-260 March 1987 proved instructive Flying buddy Leon Folse loaded up Cher okee headed north flying field owned modeling friends friend mowed site out some flatland works farmer/rancher fabulous flying site isall close-cropped grass middle nothingwith no trees houses power lines sight An other modeling friend coastal town joined us pleasant afternoon dont know what Bill Winters Shangri-la like place must come close others unloaded assembled air occupied myself readying TR close call fired up engine Ill describe hopes preventing getting sim ilar situation CG 2/2-in spinner used model along Master Airscrew 13-6 prop spinner re worked order enlarge cutouts receive prop also file little off prop make fit After engine fired up advancing throt tle prop spinner came flying off prop hit right hand between thumb forefinger leaving two-inch gash could have much worse prop taken different route As hand numb about five minutes bleeding stopped didnt think stitches required proceeded testing Naturally concluded method used essentially unsafe fourstroke engine size am sure prop can tightened sufficiently using arrangement Im flying out spinner until better setup can de 28 Model Aviation Left After bottom sheeting glued turn wing over epoxy 1A-in LEB balsa brace 1-A ply sub-ribs proper places Right Build fuselage side directly over wax-paper-covered plans Note lightening holes ply doubler its location Left left fuselage side built directly over wax-paper-covered right side assure both sides will match straight fuselage will result Right Assemble fuselage over top view Install Former F-6 glue temporary braces keep structure square remaining A x ks glued method fuselage construction results lighter structure sheet construction IS rITE P LY TOOIIBBALSA LOWLOJYLOLETOD OSLOros101 IICLITE PLYilCprr IIITLIIE PLY Ao SHESHEHCTBIHHALE--l [ BALSA HOAROIALTOALSMLSArmnoorsAlII COOIL2 SLOSHHIBAIA PITSHEETI iITHIoMAuSSLTF1Y~SHEET RIBSLTE PLY S2tt ITI II 0 CSI14 11600~AIL I1IBO14OHLSLASLLS IIITOHOLLAB ITULOWfl [v32][b-1-10-1-10]] II SlOE 1011000 PLO P000020HLIO LOSSLPT0000 HF C CDEEl0 0 CDFRENCH _0 •Fl STOOL CUTBALSA HUTLIHE _____TR260 0 ALLBALSA UNLESS NOTED 0I %ojN AEROSA C MODE S ROKE500065CO OSPESRAN 6 10 OZ0 I-IDESIGNED DRAWN BRAD SHEPHERD___ MATEALLOOHYS 05500000 8rLBTI Oi0 Left Epoxy firewall Former F-3 place keeping fuselage sides square Pin balsa blocks outside line top view secure sides glue sets Right Position turtledeck stringers glue place CyA Remove temporary braces termined fitted goals designing model keep weight down 6- 6/2-lb range making aerobatic four-stroke 65 giving good vertical capability Although final weight edged up over goal 6 lb 12 oz perform ance hindered least because grossly underestimated power Saito fact mildly taken aback first time took off literally jumping off ground throttle opened let climb out straight some distance adjusting servo trims slightly made turn back watched fly hands-off length field After such promising start moved some maneuversloops snaps side outside loops square loops ham merheads vertical rolls four-points forth vertical climb snap roll model just kept going up pushed irrepressible dynamo Saito second flight got little fancier making inverted passes outside ioops outside snap top handed transmitter friend Leon criti cal comments Leon steered business jets around before retired grinned broadly pronouncing TR-260 far superior Laser designed few years ago judgment carried special force because own mind Laser best flying model ever designed built Construction achieve goala model talents full-size aer obatics shipI chose building techniques geared toward keeping airplane light enough intricate maneuvers Wing Any various methods used cutting out set ribs tapered wing appropriate Rather dictating particu lar method suggest using 30 Model Aviation Sheet turtledeck %2 sheeting extreme curve better easy curve A-grain light balsa used Glue top 1/4-in sheeting onto turtledeck trim rough shape knife Glue bottom -in sheeting 1/x stringers place Note transi tion round corners sheet stringers has sanded sheeting Glue %-in side stringer %2 strips around wing saddle sand nice fairing Cut right side fuselage away al low engine fitted throttle pushrod location can established Glue n balsa onto sides stock triangle pieces located NO OCR TEXT comfortable full set ribs has laid out drawing tracing copy can made method use cutting out parts plans make tracing spray con tact cement paper press wood cut out peel paper off part Please dont get willies look lightweight wing construction Ive never wing give up flight using method box spar being lighter stiffer two large balsa sticks almost totally resists twisting panel Another advantage method guaranteed straight wing workbench straight Select sheet medium-to-hard straight-grained %-in balsa Lay out spars jig used trailing edge TE Note jig 3114 long % #1 rib tapering #11 rib Pin / x A-in cap plans glue spar slots up leading edge LE cap Set ribs place trialfitting trinuning necessary Pin ribs spar jig go over joints thick cyanoacrylate CyA glue Lay bead glue along top spar install /8 x 4-in cap Glue /8 x /2-in LB ribs Glue / x %-in strip edge /32 x 1 /2-in sheet quarter-grain balsa Glue sheet ribs making sure / x %-in strip butts against TE ribs use aliphatic resin glue job Select some medium straight-grained wood LE sheeting Using long block sand bevel -in LB con form rib shape Lay sheet posi tion panel edge parallel A-in LE Roll sheet back mark TE spar cap trim ex cess off Using Sigs handy mini glue gun full al iphatic resin lay bead rib Lay bead thick CyA top A-in LB Carefully place sheet position over LB place some pins nlong sheet Wait few seconds lay bead CyA spar cap roll sheet back pin spar cap feel qualms about using CyA botching job use 32 Model Aviation Glue FB pieces along %2 floor air dam After glue sets epoxy whole area fuel proofing install /l6 plywood bottom Protect tubes tanks dust sanding finishing putting piece plugged tubing Glue Former F-i place Notice align ment mark top /4-in sheeting sist getting former glued squarely Glue -in nose blocks front blocks cheek cowls Ae ply bottom Note grain nose blocks Once glued place nose blocks should appear Lots sanding #100 grit sandpaper will shape up nicely cheek cowls under construction lack ing side sheeting Rough out side shape nose blocks bot tom block round oft corners FB right side top has roughly carved knife left side has al ready carved sanded its primary shape point good idea lay model sheet foam prevent dings front end shape rough-sanded its ap proximate final shape cheek cowls changed somewhat after photo final outline shown plans After front end sanded final shape cut cowl off install plywood tabs blind nuts Build up air scoop aliphatic glue everything pin gener ously gives little time position sheet Glue vertical /16 spar webbing place Glue aileron crank plate landing gear cures form Note plastic wrap both sides material fiberglass laid layer time top layer plastic sheet put smoothed shape hand Brace bot tom weight dry saw rough shape finish file sandpaper Au beautiful looks finished balsawood model its almost shame put lot color hide beautiful work cap strips place sheet center section yet Turn panel over pin down using jig again Sheet top panel using same method de scribed bottom Again sheet Sand stab fin ribs airfoil shape before sheeting use shim under leading edge keep unit square center section area inside rib #1 LE both panels completed draw straight line workbench least 66 long guideline pinning pan els Lay some wax paper poly sheet down bench about midline pin panels upside down spar cap along line Shim center section TE /16 Shim TE outboard #11 ribs pin down securely Epoxy A-in ply dihedral brace spar stubs inside spar caps Glue TE LE A-in balsa braces place Glue December 1987 33 Left Build removable section over wing first covering wing fuseiage plastic wrap pinning F-3A F-5 doubie A-in front portion piace Right Next instaii triangle pieces instrument panel -in top sheet F-4 lAin rear top Left /8-in sides have completed formers F-4 F-5 unit ready shaping fixing up cockpit Right Note final shape fuselage rounded corners cowl Two types landing gear tried wire version too flexibie form used making fiber glass landing gear takes few min utes construct variations theme just about infinite custom gear can fabricated special need Using inc stan guide position eleva tor halves Pin down epoxy brass tie bar place Note airfoil shape Designed Ken Willard earnaster4t Capture spirit aviators magnificent machines & Lucky Ladies brought safely home premiere commemorative wall calendar 12x18 featuring official US Army Air Force archival photographs mere pinups tradition nautical figureheads mascots new age aerial combat first series issued through 1995 Available @ $995 postpaid PA res add 6% tax ALKMAAR ASSOCIATES 503 Todd Way-F West Chester PA 19380 bottom center-section sheet place Turn wing over epoxy lA ribs place epoxy ply plate LE panel spar LE Glue %-in balsa sheet place tween #1 ribs Sheet center section behind spar leaving area over ply plate uncovered until after wing has bolted fuselage Epoxy ply TE panel place Unpin wing lay aside temporar ily Cut proper angles in TE stock meet center sec tion Take wing press down TE bench trial fit TE stock sanding necessary eliminate gaps holding panel down TE snug hit joint CyA Hold wing up eyeball TE trueness satisfied finish gluing up Repeat procedure other panel Lay out ailerons cut out TE stock Install block tips rough out shape following plans stall aileron cranks plate along /16 music wire pushrods /6 ply fairleads lay wing aside Fuselage effort save weight over previous designs using full-sheeted fuse lage full-depth Lite Ply doublers used sheet stress areas lightened ply doublers holes building re mainder sticks proved strong arrangement still weighed light scales Cut out doublers lay out A-in sides will necessary piece some sheet together get enough width quickly accomplished CyA Lay out balsa side using thrust line benchmark cut out glue dou blers sides contact cement go around edges CyA glue Lay side over plan construct aft lower section sides using 4-in-sq /8 x 4-in balsa Trace former pat terns contact-cement ply noted cut out Glue temporary brace scrap balsa A-in stick about halfway down across opening F-6 Pin sides down over top view F-6 tail post after sand ing bevel sides tail Slip F-6 place brace sides temporarily 900 workbench square glue tail post F-6 Glue A-in crosspieces / X A-in diagonals place Cut gusset out A-in sheet balsa top lon geron joints F-6 glue place Unpin fuselage repin about two inches behind F-3 Pin blocks over plan front fuselage hold halves alignment slip F-3 F-2 firewall formers slots epoxy place Unpin repin aft end fuse lage Trial fit F-7 F-8 pinning frame trying stringers Trim necessary stringers fonners straight line satisfied glue placeContinued page 133 34 Model Aviation Flies off both land water Crisply die-cut balsa lite ply parts complete hardware easy sembly sensible engineering clear plans photo illustrated assembly manual L omplete Catalog $200 ordered direct add uu Manaling 116 W 19th St PO Box 511 E7 Higginsville MO 64037 call 816 584-7121 1988k Wings War Nose-Art Calendar LUCKY LADIES THE GALS WHO BROUGHT US HOME 1987 NATIONAL CHAMPION Tony Frackowiak shown winning FAI RC Pattern 1987 NATS original design LENGE IV CHALLENGE IV available basic kit featuring epoxyglass fuselage foam wings stab $14995 Deluxe Kit $35000 much assem bly complete exceptionally smooth pre cise flying aircraft equally adept AMA FAI pattern Much individual preference can accomodated including choice Tn-Gear Tail Dragger 790 sq wing 820 sq depending desired flight speed C\Soe\C $8je ~ ietractS9 GO& par1terSs a0d atpiP~3 ~oyS oriented public relations better way us go Martin Dilly West Wickham Kent England can t think anyone wouldn t like see high respect airplane mod eling general public unfortunate ly doesnt seem magic answers assure giant leap di rection Safety/Preston Continued page 22 accident no else field Just two minutes before accident two other members left leaving just two us accident happened grabbed torn finger Sue helped load van drove nearby fire station para medic gave preliminary check said going live bound up wound off went hospital After receiving seven stitches finger several days later returned field T-Craft did again time prop flew off hit leg no hospital trip time made deep cut After lengthy dis cussion club president engine expert Frank Warren electronics expert Ron Roeder bought zero-to-five-ohm wirewound rheostat could handle 25 amps found local surplus outlet $150 also picked up toggle switch 50 cents lit tle fellows went power panel field box Since Ive no problems Frank Ron contended glow plug getting too much juice causing detonation problem loosening prop nut causing insurance company shudder would recommend addition anyone firing up four-stroke toggle switch works kill-switch glow plug can cut heat quickly havent personally tried out Dukes sugges tion However worked him may work others Meanwhile wonder engine manufacturers going provide some means positively retain prop nut shaft column has discussed several methods have suggested readers its ex actly new technology wrap up months column letter Joe Wagner New Wilmington PA points out buddy system infallible Ill let Joe tell tale Im responding latest column Sep tember 87 mentioning buddy tystem good bit model flying alone although Ive never problems agree its better have buddy along However make sure youve got dependable An experience back 1942 case point building solid Scale models friend basement big knife using roughly shape Short Stirling fuse lage slipped made huge gash hand Blood everywhere before could pick up rag slow flow turned buddy help saw him collapsed heap floor learned later despite Boy Scout training merit badges First Aid friend people simply can stand sight blood did know Bleeding hand managed carry friend upstairs alone house lay him down couch make sure breathing OK before left made way doctors office circumstances Id have better off alone now wonder about some peo ple occasionally fly would react case bloody accident Maybe ought ask themtactfully course Have another safe month John Preston 2812 Northampton St N W Washington DC 20015 TR-260/Shepherd Continued page 34 Select some grain 3/ sheet tur fledeck sides cut little oversize Wet outside sheet will curve over formers stringers easily use CyA glue attach Sand top sheets flush formers top stringers glue -in light sheet top Cut excess off sides A-in sheet sand top long straight block Glue landing gear plate place epoxy Glue bottom A-in sheet place December 1987 133 U Letters Editor Continued page 12 PRECISION MODEL PRODUCTS Made U S BARSTOCK AIIi&AINUM CDIMMERS RETAIL APPHOX PART NOSIZEPRICEWT TT-175-B 4$12950950Z TT-200-B 21395 OZ TT-225-B 41495 OZ TT-226-B 2114 FAI 0Z TT-250-B 2-1/21695 0Z TT-251-B /2FAI 1895 0Z TT-275-R 2-3/41995 OZ TT-276-B . 23/4/FAI 2195 OZ TT-300-B 32395 OZ TT-301-B . 3/FAt 2595 OZ 3 Pieces Cone Back Plate Retainer Screw Note 3 4 Blade Spinners Available Sizes Add $300 Per Spinner PART NOSIZE TT-140-A .1/4-28 TT-610-A . 6x 10mm TT-710-A .7x 10mm . TT-516-A .5/16-24 TT-81 0-A fl-825-A TT-375-A Th125-A 8x1Omm 8x 125mm 3/8-24 lOx 125mm RETAIL APPROX PRICEWT $395 1 OZ 395 . 063 OZ 395 . 082 OZ 395 . 076 OZ 395 . 076 OZ 395 . 075 OZ 495 0Z 495 . 115oz 3 Piece Set Nut Washer Machined Bushing Add $350 Shipping Handling Prices subject change notice ROMCO MFG INC OX 836 SOUTH HOUSTON TEXAS 77587 713 943-1867 cross grained glue two bottom /8 x A-in stringers Glue %-in side string ers %2 fairing strips around aft end wing saddle Sand fair fuselage noting picture Assembly CB Associates mount works OK Saito engine top portion above bolt holes cut away allows engine slide back mount interfere throttle choke plate have Saito mount means use Remove fuselage side inside cheek cowl outline order bolt engine place locate throttle pushrod hole refer picture Drill hole pushrod install plastic tubing used outside tube Gold n Rod prototype Make up tankor tanks going smoke install Glue FB-l FB about 3/ inside outer curve glue place sides Glue 3/ sheet under smoke tank place Glue /16 ply bottom vent hole cut out per top view Glue top 34-in triangles top A-in sheet place Use centerlines F-i align square fuselage glue place Noting direction grain picture shaping inside blocks according drawing F-i glue 3A -in medium blocks front F-l Glue blocks tops sides cheek cowls place rough-carve shape along top sheet triangles first noting shadows highlights photos good sharp pocket knife 80-grit sandpaper recommended procedure air inlet bottom constructed out 3A 6 sheet sanded shape Cut away removable cowl half using Zona Saw take care procedure stall maple blocks trailing edge ply sheet WMP using epoxy Epoxy LGB WMB ply braces place making sure WMB up against bottom WMP Mount wing fuselage saddle sanding LE wing square re moving enough TE allow proper fit Align wing square fuselage pin firmly place Drill holes 4-20 hold-down bolts remove wing tap maple blocks -20 nylon bolts Bolt wing back place Lay out trace sides remov able top above wing onto A-in balsa sheet Make double side portions front instrument panel F-3B noting con figuration photo prototype top under construction Take some poly sheet long enough cover front F-3 rear F-6 formers place top wing Pin clamp F-3A F-3 pin F5 F-6 Pin sides place glue F-3A F-S Glue former F-4 position Glue 34-in triangle stock sides flush top Glue top A-in sheet front cabin section piece top F-4 F-S Sand cabin section con form rest fuselage after install ing -in dowels 4-40 holddown bolts blind nuts Fix up cockpit suit fancy pilot Williams Bros 2%-in figure head cut off little plastic trimmed side neck head glued back angle Carefully trim off front back canopy along bottom flange start fitting fuselage Trim just little time go along use small felt-tip pen rough out outline botched canopy cutting too much off once expensive lessons Two landing gears built check weight strength out double Ain music wire out fiberglass epoxy wire gear little too springy opted fiberglass As pictures show form held vise layered epoxy-saturated fiber glass placed between two sheets poly draped over form held against some heavy objects Im mis taken credit idea goes Pet Reed described earlier article mags Cut fiberglass strips over size use slow-setting epoxy Sig used prototype resulted strong gear flexes well stabilizer elevator fin rudder constructed directly over plans using conventional building methods eleva tor tie bar fashioned out /16 brass tub ing Solder -in wire arms tie bar epoxy assembly eleva tors Finishing Supershrink Coverite used fuselage up including cabin section rudder elevator re mainder fuselage covered Sig medium Plyspan using butyrate dope entire setup given four coats dope contained some talc sprayed polyurethane colors wing covered MonoKote aluminum Coverite Black Baron red plastic heat-shrink serial letters made Sig blank decal sheet sprayed two coats red poly paint letters laid out cut dipped water transferred model PRODERA lettering created Presto Stik vinyl letters 34-in Hel vetica found office supply stores Theyre perfect resemble original closely enough realistic look pinstriping black tape shoul der harness parachute straps Jean Claude turned shoelaces sunglasses Williams Bros pair back side painted black choose build Sirius version leave off wheel pants move former F-4 rearward position Whichever version choose enjoy aerobatics performer vir tuoso capabilities full-size airplane youll find TR-260 rewarding model build 134 Model Aviation PROP NUT ADAPTORS
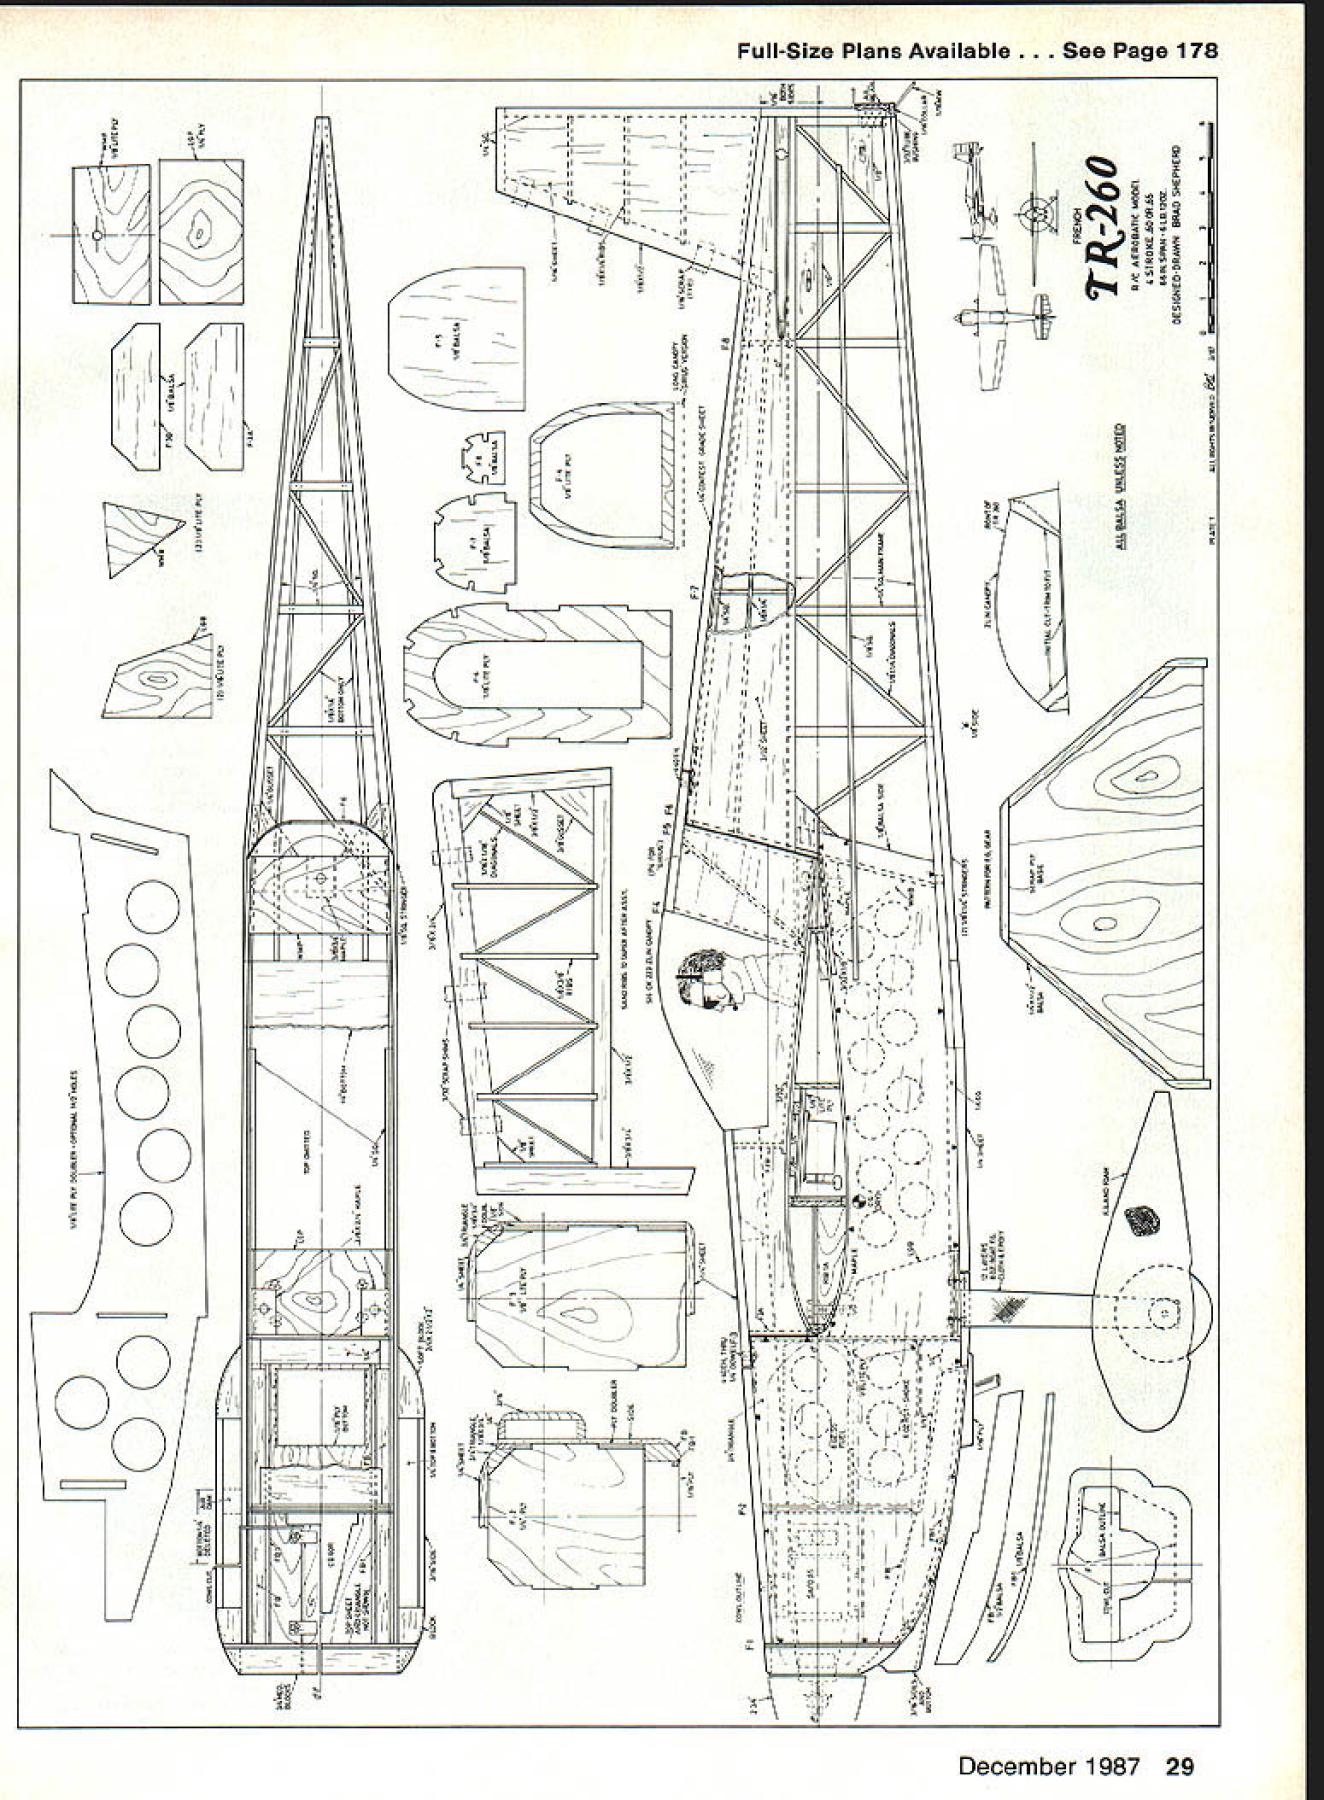
Edition: Model Aviation - 1987/12
Page Numbers: 24, 25, 26, 27, 28, 29, 30, 31, 32, 33, 34, 133, 134
NO OCR TEXT NO OCR TEXT entire center section above wing removes easy disassembly convenient ac cess Insides Saito 65 exIts cowling nicely clean smooth front end cowling splits allow installation tinkering engine Use either modi fied CB Associates mount Saitos mount Picture shows details plumbing Perry pump smoker system two pages French metric calloutsenough move project along Ignoring French metrics compared three-view Laser variations stockpile Using pictures get some shapes firmed up laid out fuselage accom modate engine tanks well Due lightweight construction heavy Saito engine radio equipment will have installed far back possible keep model coming out nose heavy landing gear fairs nicely sur rounding 1Am sheet fuselage bottom Note 1A ply edging around vent hole dummy exhaust stacks poke out establish force arrangement Since ap peared stab lower relation thrust line Lasers decided arrangement tail section airfoils constructed same manner CAP seriesalthough thick mak ing much easier build dont know whether Don assigns TR-260 ugly beautiful category collection aircraft sub jects over years What know about model beautiful-flying airplane should please modeler 26 Model Aviation ne elevator pusnroa snows neat installa hidden tall wheel arrangement maKes tion Sullivan hardware rods neat practical setup steerable tail have some drawbacks easy wheel rudder pushrod exit hole install dont vibrate exit hole can should also neat trim lowest drag nice smooth inexpensive author says typical arrange ment setting up aileron actuator system Its slop-free allows covering put interfering link N zuJ0 -4 N/-m U V 1 LU N0 LU U 0 0 zo UJUJoO m D o o 1 LU 7 7 December 1987 27 Left Assemble wing workbench covered piece Celotex sheeting make easier insert stick pins Note shims trailing edge referred text Right Epoxy plywood dihedral brace against spar stubs inside spar caps predilection aerobatics sound four-stroker its realistic exhaust bonus first test flight TR-260 March 1987 proved instructive Flying buddy Leon Folse loaded up Cher okee headed north flying field owned modeling friends friend mowed site out some flatland works farmer/rancher fabulous flying site isall close-cropped grass middle nothingwith no trees houses power lines sight An other modeling friend coastal town joined us pleasant afternoon dont know what Bill Winters Shangri-la like place must come close others unloaded assembled air occupied myself readying TR close call fired up engine Ill describe hopes preventing getting sim ilar situation CG 2/2-in spinner used model along Master Airscrew 13-6 prop spinner re worked order enlarge cutouts receive prop also file little off prop make fit After engine fired up advancing throt tle prop spinner came flying off prop hit right hand between thumb forefinger leaving two-inch gash could have much worse prop taken different route As hand numb about five minutes bleeding stopped didnt think stitches required proceeded testing Naturally concluded method used essentially unsafe fourstroke engine size am sure prop can tightened sufficiently using arrangement Im flying out spinner until better setup can de 28 Model Aviation Left After bottom sheeting glued turn wing over epoxy 1A-in LEB balsa brace 1-A ply sub-ribs proper places Right Build fuselage side directly over wax-paper-covered plans Note lightening holes ply doubler its location Left left fuselage side built directly over wax-paper-covered right side assure both sides will match straight fuselage will result Right Assemble fuselage over top view Install Former F-6 glue temporary braces keep structure square remaining A x ks glued method fuselage construction results lighter structure sheet construction IS rITE P LY TOOIIBBALSA LOWLOJYLOLETOD OSLOros101 IICLITE PLYilCprr IIITLIIE PLY Ao SHESHEHCTBIHHALE--l [ BALSA HOAROIALTOALSMLSArmnoorsAlII COOIL2 SLOSHHIBAIA PITSHEETI iITHIoMAuSSLTF1Y~SHEET RIBSLTE PLY S2tt ITI II 0 CSI14 11600~AIL I1IBO14OHLSLASLLS IIITOHOLLAB ITULOWfl [v32][b-1-10-1-10]] II SlOE 1011000 PLO P000020HLIO LOSSLPT0000 HF C CDEEl0 0 CDFRENCH _0 •Fl STOOL CUTBALSA HUTLIHE _____TR260 0 ALLBALSA UNLESS NOTED 0I %ojN AEROSA C MODE S ROKE500065CO OSPESRAN 6 10 OZ0 I-IDESIGNED DRAWN BRAD SHEPHERD___ MATEALLOOHYS 05500000 8rLBTI Oi0 Left Epoxy firewall Former F-3 place keeping fuselage sides square Pin balsa blocks outside line top view secure sides glue sets Right Position turtledeck stringers glue place CyA Remove temporary braces termined fitted goals designing model keep weight down 6- 6/2-lb range making aerobatic four-stroke 65 giving good vertical capability Although final weight edged up over goal 6 lb 12 oz perform ance hindered least because grossly underestimated power Saito fact mildly taken aback first time took off literally jumping off ground throttle opened let climb out straight some distance adjusting servo trims slightly made turn back watched fly hands-off length field After such promising start moved some maneuversloops snaps side outside loops square loops ham merheads vertical rolls four-points forth vertical climb snap roll model just kept going up pushed irrepressible dynamo Saito second flight got little fancier making inverted passes outside ioops outside snap top handed transmitter friend Leon criti cal comments Leon steered business jets around before retired grinned broadly pronouncing TR-260 far superior Laser designed few years ago judgment carried special force because own mind Laser best flying model ever designed built Construction achieve goala model talents full-size aer obatics shipI chose building techniques geared toward keeping airplane light enough intricate maneuvers Wing Any various methods used cutting out set ribs tapered wing appropriate Rather dictating particu lar method suggest using 30 Model Aviation Sheet turtledeck %2 sheeting extreme curve better easy curve A-grain light balsa used Glue top 1/4-in sheeting onto turtledeck trim rough shape knife Glue bottom -in sheeting 1/x stringers place Note transi tion round corners sheet stringers has sanded sheeting Glue %-in side stringer %2 strips around wing saddle sand nice fairing Cut right side fuselage away al low engine fitted throttle pushrod location can established Glue n balsa onto sides stock triangle pieces located NO OCR TEXT comfortable full set ribs has laid out drawing tracing copy can made method use cutting out parts plans make tracing spray con tact cement paper press wood cut out peel paper off part Please dont get willies look lightweight wing construction Ive never wing give up flight using method box spar being lighter stiffer two large balsa sticks almost totally resists twisting panel Another advantage method guaranteed straight wing workbench straight Select sheet medium-to-hard straight-grained %-in balsa Lay out spars jig used trailing edge TE Note jig 3114 long % #1 rib tapering #11 rib Pin / x A-in cap plans glue spar slots up leading edge LE cap Set ribs place trialfitting trinuning necessary Pin ribs spar jig go over joints thick cyanoacrylate CyA glue Lay bead glue along top spar install /8 x 4-in cap Glue /8 x /2-in LB ribs Glue / x %-in strip edge /32 x 1 /2-in sheet quarter-grain balsa Glue sheet ribs making sure / x %-in strip butts against TE ribs use aliphatic resin glue job Select some medium straight-grained wood LE sheeting Using long block sand bevel -in LB con form rib shape Lay sheet posi tion panel edge parallel A-in LE Roll sheet back mark TE spar cap trim ex cess off Using Sigs handy mini glue gun full al iphatic resin lay bead rib Lay bead thick CyA top A-in LB Carefully place sheet position over LB place some pins nlong sheet Wait few seconds lay bead CyA spar cap roll sheet back pin spar cap feel qualms about using CyA botching job use 32 Model Aviation Glue FB pieces along %2 floor air dam After glue sets epoxy whole area fuel proofing install /l6 plywood bottom Protect tubes tanks dust sanding finishing putting piece plugged tubing Glue Former F-i place Notice align ment mark top /4-in sheeting sist getting former glued squarely Glue -in nose blocks front blocks cheek cowls Ae ply bottom Note grain nose blocks Once glued place nose blocks should appear Lots sanding #100 grit sandpaper will shape up nicely cheek cowls under construction lack ing side sheeting Rough out side shape nose blocks bot tom block round oft corners FB right side top has roughly carved knife left side has al ready carved sanded its primary shape point good idea lay model sheet foam prevent dings front end shape rough-sanded its ap proximate final shape cheek cowls changed somewhat after photo final outline shown plans After front end sanded final shape cut cowl off install plywood tabs blind nuts Build up air scoop aliphatic glue everything pin gener ously gives little time position sheet Glue vertical /16 spar webbing place Glue aileron crank plate landing gear cures form Note plastic wrap both sides material fiberglass laid layer time top layer plastic sheet put smoothed shape hand Brace bot tom weight dry saw rough shape finish file sandpaper Au beautiful looks finished balsawood model its almost shame put lot color hide beautiful work cap strips place sheet center section yet Turn panel over pin down using jig again Sheet top panel using same method de scribed bottom Again sheet Sand stab fin ribs airfoil shape before sheeting use shim under leading edge keep unit square center section area inside rib #1 LE both panels completed draw straight line workbench least 66 long guideline pinning pan els Lay some wax paper poly sheet down bench about midline pin panels upside down spar cap along line Shim center section TE /16 Shim TE outboard #11 ribs pin down securely Epoxy A-in ply dihedral brace spar stubs inside spar caps Glue TE LE A-in balsa braces place Glue December 1987 33 Left Build removable section over wing first covering wing fuseiage plastic wrap pinning F-3A F-5 doubie A-in front portion piace Right Next instaii triangle pieces instrument panel -in top sheet F-4 lAin rear top Left /8-in sides have completed formers F-4 F-5 unit ready shaping fixing up cockpit Right Note final shape fuselage rounded corners cowl Two types landing gear tried wire version too flexibie form used making fiber glass landing gear takes few min utes construct variations theme just about infinite custom gear can fabricated special need Using inc stan guide position eleva tor halves Pin down epoxy brass tie bar place Note airfoil shape Designed Ken Willard earnaster4t Capture spirit aviators magnificent machines & Lucky Ladies brought safely home premiere commemorative wall calendar 12x18 featuring official US Army Air Force archival photographs mere pinups tradition nautical figureheads mascots new age aerial combat first series issued through 1995 Available @ $995 postpaid PA res add 6% tax ALKMAAR ASSOCIATES 503 Todd Way-F West Chester PA 19380 bottom center-section sheet place Turn wing over epoxy lA ribs place epoxy ply plate LE panel spar LE Glue %-in balsa sheet place tween #1 ribs Sheet center section behind spar leaving area over ply plate uncovered until after wing has bolted fuselage Epoxy ply TE panel place Unpin wing lay aside temporar ily Cut proper angles in TE stock meet center sec tion Take wing press down TE bench trial fit TE stock sanding necessary eliminate gaps holding panel down TE snug hit joint CyA Hold wing up eyeball TE trueness satisfied finish gluing up Repeat procedure other panel Lay out ailerons cut out TE stock Install block tips rough out shape following plans stall aileron cranks plate along /16 music wire pushrods /6 ply fairleads lay wing aside Fuselage effort save weight over previous designs using full-sheeted fuse lage full-depth Lite Ply doublers used sheet stress areas lightened ply doublers holes building re mainder sticks proved strong arrangement still weighed light scales Cut out doublers lay out A-in sides will necessary piece some sheet together get enough width quickly accomplished CyA Lay out balsa side using thrust line benchmark cut out glue dou blers sides contact cement go around edges CyA glue Lay side over plan construct aft lower section sides using 4-in-sq /8 x 4-in balsa Trace former pat terns contact-cement ply noted cut out Glue temporary brace scrap balsa A-in stick about halfway down across opening F-6 Pin sides down over top view F-6 tail post after sand ing bevel sides tail Slip F-6 place brace sides temporarily 900 workbench square glue tail post F-6 Glue A-in crosspieces / X A-in diagonals place Cut gusset out A-in sheet balsa top lon geron joints F-6 glue place Unpin fuselage repin about two inches behind F-3 Pin blocks over plan front fuselage hold halves alignment slip F-3 F-2 firewall formers slots epoxy place Unpin repin aft end fuse lage Trial fit F-7 F-8 pinning frame trying stringers Trim necessary stringers fonners straight line satisfied glue placeContinued page 133 34 Model Aviation Flies off both land water Crisply die-cut balsa lite ply parts complete hardware easy sembly sensible engineering clear plans photo illustrated assembly manual L omplete Catalog $200 ordered direct add uu Manaling 116 W 19th St PO Box 511 E7 Higginsville MO 64037 call 816 584-7121 1988k Wings War Nose-Art Calendar LUCKY LADIES THE GALS WHO BROUGHT US HOME 1987 NATIONAL CHAMPION Tony Frackowiak shown winning FAI RC Pattern 1987 NATS original design LENGE IV CHALLENGE IV available basic kit featuring epoxyglass fuselage foam wings stab $14995 Deluxe Kit $35000 much assem bly complete exceptionally smooth pre cise flying aircraft equally adept AMA FAI pattern Much individual preference can accomodated including choice Tn-Gear Tail Dragger 790 sq wing 820 sq depending desired flight speed C\Soe\C $8je ~ ietractS9 GO& par1terSs a0d atpiP~3 ~oyS oriented public relations better way us go Martin Dilly West Wickham Kent England can t think anyone wouldn t like see high respect airplane mod eling general public unfortunate ly doesnt seem magic answers assure giant leap di rection Safety/Preston Continued page 22 accident no else field Just two minutes before accident two other members left leaving just two us accident happened grabbed torn finger Sue helped load van drove nearby fire station para medic gave preliminary check said going live bound up wound off went hospital After receiving seven stitches finger several days later returned field T-Craft did again time prop flew off hit leg no hospital trip time made deep cut After lengthy dis cussion club president engine expert Frank Warren electronics expert Ron Roeder bought zero-to-five-ohm wirewound rheostat could handle 25 amps found local surplus outlet $150 also picked up toggle switch 50 cents lit tle fellows went power panel field box Since Ive no problems Frank Ron contended glow plug getting too much juice causing detonation problem loosening prop nut causing insurance company shudder would recommend addition anyone firing up four-stroke toggle switch works kill-switch glow plug can cut heat quickly havent personally tried out Dukes sugges tion However worked him may work others Meanwhile wonder engine manufacturers going provide some means positively retain prop nut shaft column has discussed several methods have suggested readers its ex actly new technology wrap up months column letter Joe Wagner New Wilmington PA points out buddy system infallible Ill let Joe tell tale Im responding latest column Sep tember 87 mentioning buddy tystem good bit model flying alone although Ive never problems agree its better have buddy along However make sure youve got dependable An experience back 1942 case point building solid Scale models friend basement big knife using roughly shape Short Stirling fuse lage slipped made huge gash hand Blood everywhere before could pick up rag slow flow turned buddy help saw him collapsed heap floor learned later despite Boy Scout training merit badges First Aid friend people simply can stand sight blood did know Bleeding hand managed carry friend upstairs alone house lay him down couch make sure breathing OK before left made way doctors office circumstances Id have better off alone now wonder about some peo ple occasionally fly would react case bloody accident Maybe ought ask themtactfully course Have another safe month John Preston 2812 Northampton St N W Washington DC 20015 TR-260/Shepherd Continued page 34 Select some grain 3/ sheet tur fledeck sides cut little oversize Wet outside sheet will curve over formers stringers easily use CyA glue attach Sand top sheets flush formers top stringers glue -in light sheet top Cut excess off sides A-in sheet sand top long straight block Glue landing gear plate place epoxy Glue bottom A-in sheet place December 1987 133 U Letters Editor Continued page 12 PRECISION MODEL PRODUCTS Made U S BARSTOCK AIIi&AINUM CDIMMERS RETAIL APPHOX PART NOSIZEPRICEWT TT-175-B 4$12950950Z TT-200-B 21395 OZ TT-225-B 41495 OZ TT-226-B 2114 FAI 0Z TT-250-B 2-1/21695 0Z TT-251-B /2FAI 1895 0Z TT-275-R 2-3/41995 OZ TT-276-B . 23/4/FAI 2195 OZ TT-300-B 32395 OZ TT-301-B . 3/FAt 2595 OZ 3 Pieces Cone Back Plate Retainer Screw Note 3 4 Blade Spinners Available Sizes Add $300 Per Spinner PART NOSIZE TT-140-A .1/4-28 TT-610-A . 6x 10mm TT-710-A .7x 10mm . TT-516-A .5/16-24 TT-81 0-A fl-825-A TT-375-A Th125-A 8x1Omm 8x 125mm 3/8-24 lOx 125mm RETAIL APPROX PRICEWT $395 1 OZ 395 . 063 OZ 395 . 082 OZ 395 . 076 OZ 395 . 076 OZ 395 . 075 OZ 495 0Z 495 . 115oz 3 Piece Set Nut Washer Machined Bushing Add $350 Shipping Handling Prices subject change notice ROMCO MFG INC OX 836 SOUTH HOUSTON TEXAS 77587 713 943-1867 cross grained glue two bottom /8 x A-in stringers Glue %-in side string ers %2 fairing strips around aft end wing saddle Sand fair fuselage noting picture Assembly CB Associates mount works OK Saito engine top portion above bolt holes cut away allows engine slide back mount interfere throttle choke plate have Saito mount means use Remove fuselage side inside cheek cowl outline order bolt engine place locate throttle pushrod hole refer picture Drill hole pushrod install plastic tubing used outside tube Gold n Rod prototype Make up tankor tanks going smoke install Glue FB-l FB about 3/ inside outer curve glue place sides Glue 3/ sheet under smoke tank place Glue /16 ply bottom vent hole cut out per top view Glue top 34-in triangles top A-in sheet place Use centerlines F-i align square fuselage glue place Noting direction grain picture shaping inside blocks according drawing F-i glue 3A -in medium blocks front F-l Glue blocks tops sides cheek cowls place rough-carve shape along top sheet triangles first noting shadows highlights photos good sharp pocket knife 80-grit sandpaper recommended procedure air inlet bottom constructed out 3A 6 sheet sanded shape Cut away removable cowl half using Zona Saw take care procedure stall maple blocks trailing edge ply sheet WMP using epoxy Epoxy LGB WMB ply braces place making sure WMB up against bottom WMP Mount wing fuselage saddle sanding LE wing square re moving enough TE allow proper fit Align wing square fuselage pin firmly place Drill holes 4-20 hold-down bolts remove wing tap maple blocks -20 nylon bolts Bolt wing back place Lay out trace sides remov able top above wing onto A-in balsa sheet Make double side portions front instrument panel F-3B noting con figuration photo prototype top under construction Take some poly sheet long enough cover front F-3 rear F-6 formers place top wing Pin clamp F-3A F-3 pin F5 F-6 Pin sides place glue F-3A F-S Glue former F-4 position Glue 34-in triangle stock sides flush top Glue top A-in sheet front cabin section piece top F-4 F-S Sand cabin section con form rest fuselage after install ing -in dowels 4-40 holddown bolts blind nuts Fix up cockpit suit fancy pilot Williams Bros 2%-in figure head cut off little plastic trimmed side neck head glued back angle Carefully trim off front back canopy along bottom flange start fitting fuselage Trim just little time go along use small felt-tip pen rough out outline botched canopy cutting too much off once expensive lessons Two landing gears built check weight strength out double Ain music wire out fiberglass epoxy wire gear little too springy opted fiberglass As pictures show form held vise layered epoxy-saturated fiber glass placed between two sheets poly draped over form held against some heavy objects Im mis taken credit idea goes Pet Reed described earlier article mags Cut fiberglass strips over size use slow-setting epoxy Sig used prototype resulted strong gear flexes well stabilizer elevator fin rudder constructed directly over plans using conventional building methods eleva tor tie bar fashioned out /16 brass tub ing Solder -in wire arms tie bar epoxy assembly eleva tors Finishing Supershrink Coverite used fuselage up including cabin section rudder elevator re mainder fuselage covered Sig medium Plyspan using butyrate dope entire setup given four coats dope contained some talc sprayed polyurethane colors wing covered MonoKote aluminum Coverite Black Baron red plastic heat-shrink serial letters made Sig blank decal sheet sprayed two coats red poly paint letters laid out cut dipped water transferred model PRODERA lettering created Presto Stik vinyl letters 34-in Hel vetica found office supply stores Theyre perfect resemble original closely enough realistic look pinstriping black tape shoul der harness parachute straps Jean Claude turned shoelaces sunglasses Williams Bros pair back side painted black choose build Sirius version leave off wheel pants move former F-4 rearward position Whichever version choose enjoy aerobatics performer vir tuoso capabilities full-size airplane youll find TR-260 rewarding model build 134 Model Aviation PROP NUT ADAPTORS
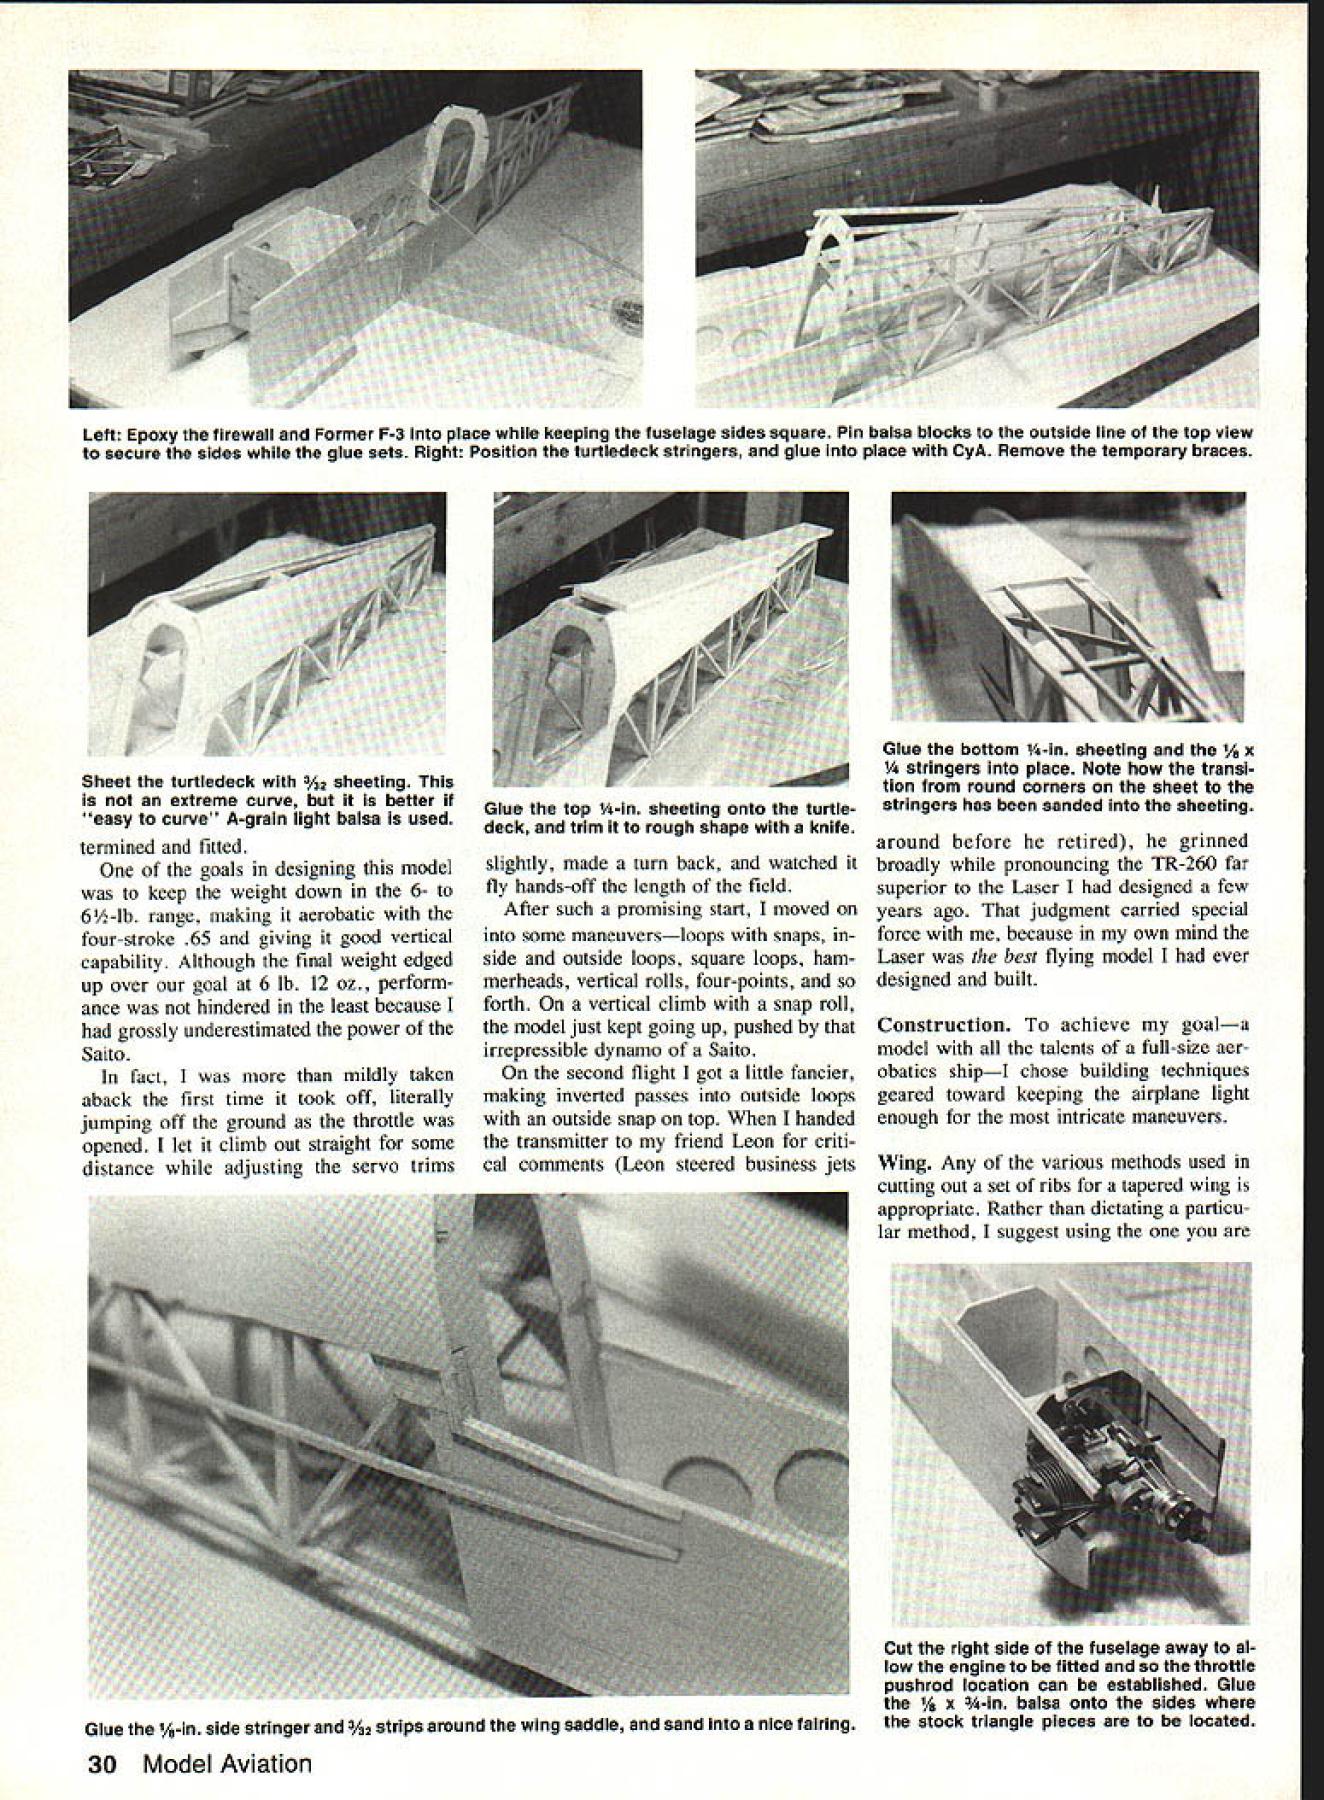
Edition: Model Aviation - 1987/12
Page Numbers: 24, 25, 26, 27, 28, 29, 30, 31, 32, 33, 34, 133, 134
NO OCR TEXT NO OCR TEXT entire center section above wing removes easy disassembly convenient ac cess Insides Saito 65 exIts cowling nicely clean smooth front end cowling splits allow installation tinkering engine Use either modi fied CB Associates mount Saitos mount Picture shows details plumbing Perry pump smoker system two pages French metric calloutsenough move project along Ignoring French metrics compared three-view Laser variations stockpile Using pictures get some shapes firmed up laid out fuselage accom modate engine tanks well Due lightweight construction heavy Saito engine radio equipment will have installed far back possible keep model coming out nose heavy landing gear fairs nicely sur rounding 1Am sheet fuselage bottom Note 1A ply edging around vent hole dummy exhaust stacks poke out establish force arrangement Since ap peared stab lower relation thrust line Lasers decided arrangement tail section airfoils constructed same manner CAP seriesalthough thick mak ing much easier build dont know whether Don assigns TR-260 ugly beautiful category collection aircraft sub jects over years What know about model beautiful-flying airplane should please modeler 26 Model Aviation ne elevator pusnroa snows neat installa hidden tall wheel arrangement maKes tion Sullivan hardware rods neat practical setup steerable tail have some drawbacks easy wheel rudder pushrod exit hole install dont vibrate exit hole can should also neat trim lowest drag nice smooth inexpensive author says typical arrange ment setting up aileron actuator system Its slop-free allows covering put interfering link N zuJ0 -4 N/-m U V 1 LU N0 LU U 0 0 zo UJUJoO m D o o 1 LU 7 7 December 1987 27 Left Assemble wing workbench covered piece Celotex sheeting make easier insert stick pins Note shims trailing edge referred text Right Epoxy plywood dihedral brace against spar stubs inside spar caps predilection aerobatics sound four-stroker its realistic exhaust bonus first test flight TR-260 March 1987 proved instructive Flying buddy Leon Folse loaded up Cher okee headed north flying field owned modeling friends friend mowed site out some flatland works farmer/rancher fabulous flying site isall close-cropped grass middle nothingwith no trees houses power lines sight An other modeling friend coastal town joined us pleasant afternoon dont know what Bill Winters Shangri-la like place must come close others unloaded assembled air occupied myself readying TR close call fired up engine Ill describe hopes preventing getting sim ilar situation CG 2/2-in spinner used model along Master Airscrew 13-6 prop spinner re worked order enlarge cutouts receive prop also file little off prop make fit After engine fired up advancing throt tle prop spinner came flying off prop hit right hand between thumb forefinger leaving two-inch gash could have much worse prop taken different route As hand numb about five minutes bleeding stopped didnt think stitches required proceeded testing Naturally concluded method used essentially unsafe fourstroke engine size am sure prop can tightened sufficiently using arrangement Im flying out spinner until better setup can de 28 Model Aviation Left After bottom sheeting glued turn wing over epoxy 1A-in LEB balsa brace 1-A ply sub-ribs proper places Right Build fuselage side directly over wax-paper-covered plans Note lightening holes ply doubler its location Left left fuselage side built directly over wax-paper-covered right side assure both sides will match straight fuselage will result Right Assemble fuselage over top view Install Former F-6 glue temporary braces keep structure square remaining A x ks glued method fuselage construction results lighter structure sheet construction IS rITE P LY TOOIIBBALSA LOWLOJYLOLETOD OSLOros101 IICLITE PLYilCprr IIITLIIE PLY Ao SHESHEHCTBIHHALE--l [ BALSA HOAROIALTOALSMLSArmnoorsAlII COOIL2 SLOSHHIBAIA PITSHEETI iITHIoMAuSSLTF1Y~SHEET RIBSLTE PLY S2tt ITI II 0 CSI14 11600~AIL I1IBO14OHLSLASLLS IIITOHOLLAB ITULOWfl [v32][b-1-10-1-10]] II SlOE 1011000 PLO P000020HLIO LOSSLPT0000 HF C CDEEl0 0 CDFRENCH _0 •Fl STOOL CUTBALSA HUTLIHE _____TR260 0 ALLBALSA UNLESS NOTED 0I %ojN AEROSA C MODE S ROKE500065CO OSPESRAN 6 10 OZ0 I-IDESIGNED DRAWN BRAD SHEPHERD___ MATEALLOOHYS 05500000 8rLBTI Oi0 Left Epoxy firewall Former F-3 place keeping fuselage sides square Pin balsa blocks outside line top view secure sides glue sets Right Position turtledeck stringers glue place CyA Remove temporary braces termined fitted goals designing model keep weight down 6- 6/2-lb range making aerobatic four-stroke 65 giving good vertical capability Although final weight edged up over goal 6 lb 12 oz perform ance hindered least because grossly underestimated power Saito fact mildly taken aback first time took off literally jumping off ground throttle opened let climb out straight some distance adjusting servo trims slightly made turn back watched fly hands-off length field After such promising start moved some maneuversloops snaps side outside loops square loops ham merheads vertical rolls four-points forth vertical climb snap roll model just kept going up pushed irrepressible dynamo Saito second flight got little fancier making inverted passes outside ioops outside snap top handed transmitter friend Leon criti cal comments Leon steered business jets around before retired grinned broadly pronouncing TR-260 far superior Laser designed few years ago judgment carried special force because own mind Laser best flying model ever designed built Construction achieve goala model talents full-size aer obatics shipI chose building techniques geared toward keeping airplane light enough intricate maneuvers Wing Any various methods used cutting out set ribs tapered wing appropriate Rather dictating particu lar method suggest using 30 Model Aviation Sheet turtledeck %2 sheeting extreme curve better easy curve A-grain light balsa used Glue top 1/4-in sheeting onto turtledeck trim rough shape knife Glue bottom -in sheeting 1/x stringers place Note transi tion round corners sheet stringers has sanded sheeting Glue %-in side stringer %2 strips around wing saddle sand nice fairing Cut right side fuselage away al low engine fitted throttle pushrod location can established Glue n balsa onto sides stock triangle pieces located NO OCR TEXT comfortable full set ribs has laid out drawing tracing copy can made method use cutting out parts plans make tracing spray con tact cement paper press wood cut out peel paper off part Please dont get willies look lightweight wing construction Ive never wing give up flight using method box spar being lighter stiffer two large balsa sticks almost totally resists twisting panel Another advantage method guaranteed straight wing workbench straight Select sheet medium-to-hard straight-grained %-in balsa Lay out spars jig used trailing edge TE Note jig 3114 long % #1 rib tapering #11 rib Pin / x A-in cap plans glue spar slots up leading edge LE cap Set ribs place trialfitting trinuning necessary Pin ribs spar jig go over joints thick cyanoacrylate CyA glue Lay bead glue along top spar install /8 x 4-in cap Glue /8 x /2-in LB ribs Glue / x %-in strip edge /32 x 1 /2-in sheet quarter-grain balsa Glue sheet ribs making sure / x %-in strip butts against TE ribs use aliphatic resin glue job Select some medium straight-grained wood LE sheeting Using long block sand bevel -in LB con form rib shape Lay sheet posi tion panel edge parallel A-in LE Roll sheet back mark TE spar cap trim ex cess off Using Sigs handy mini glue gun full al iphatic resin lay bead rib Lay bead thick CyA top A-in LB Carefully place sheet position over LB place some pins nlong sheet Wait few seconds lay bead CyA spar cap roll sheet back pin spar cap feel qualms about using CyA botching job use 32 Model Aviation Glue FB pieces along %2 floor air dam After glue sets epoxy whole area fuel proofing install /l6 plywood bottom Protect tubes tanks dust sanding finishing putting piece plugged tubing Glue Former F-i place Notice align ment mark top /4-in sheeting sist getting former glued squarely Glue -in nose blocks front blocks cheek cowls Ae ply bottom Note grain nose blocks Once glued place nose blocks should appear Lots sanding #100 grit sandpaper will shape up nicely cheek cowls under construction lack ing side sheeting Rough out side shape nose blocks bot tom block round oft corners FB right side top has roughly carved knife left side has al ready carved sanded its primary shape point good idea lay model sheet foam prevent dings front end shape rough-sanded its ap proximate final shape cheek cowls changed somewhat after photo final outline shown plans After front end sanded final shape cut cowl off install plywood tabs blind nuts Build up air scoop aliphatic glue everything pin gener ously gives little time position sheet Glue vertical /16 spar webbing place Glue aileron crank plate landing gear cures form Note plastic wrap both sides material fiberglass laid layer time top layer plastic sheet put smoothed shape hand Brace bot tom weight dry saw rough shape finish file sandpaper Au beautiful looks finished balsawood model its almost shame put lot color hide beautiful work cap strips place sheet center section yet Turn panel over pin down using jig again Sheet top panel using same method de scribed bottom Again sheet Sand stab fin ribs airfoil shape before sheeting use shim under leading edge keep unit square center section area inside rib #1 LE both panels completed draw straight line workbench least 66 long guideline pinning pan els Lay some wax paper poly sheet down bench about midline pin panels upside down spar cap along line Shim center section TE /16 Shim TE outboard #11 ribs pin down securely Epoxy A-in ply dihedral brace spar stubs inside spar caps Glue TE LE A-in balsa braces place Glue December 1987 33 Left Build removable section over wing first covering wing fuseiage plastic wrap pinning F-3A F-5 doubie A-in front portion piace Right Next instaii triangle pieces instrument panel -in top sheet F-4 lAin rear top Left /8-in sides have completed formers F-4 F-5 unit ready shaping fixing up cockpit Right Note final shape fuselage rounded corners cowl Two types landing gear tried wire version too flexibie form used making fiber glass landing gear takes few min utes construct variations theme just about infinite custom gear can fabricated special need Using inc stan guide position eleva tor halves Pin down epoxy brass tie bar place Note airfoil shape Designed Ken Willard earnaster4t Capture spirit aviators magnificent machines & Lucky Ladies brought safely home premiere commemorative wall calendar 12x18 featuring official US Army Air Force archival photographs mere pinups tradition nautical figureheads mascots new age aerial combat first series issued through 1995 Available @ $995 postpaid PA res add 6% tax ALKMAAR ASSOCIATES 503 Todd Way-F West Chester PA 19380 bottom center-section sheet place Turn wing over epoxy lA ribs place epoxy ply plate LE panel spar LE Glue %-in balsa sheet place tween #1 ribs Sheet center section behind spar leaving area over ply plate uncovered until after wing has bolted fuselage Epoxy ply TE panel place Unpin wing lay aside temporar ily Cut proper angles in TE stock meet center sec tion Take wing press down TE bench trial fit TE stock sanding necessary eliminate gaps holding panel down TE snug hit joint CyA Hold wing up eyeball TE trueness satisfied finish gluing up Repeat procedure other panel Lay out ailerons cut out TE stock Install block tips rough out shape following plans stall aileron cranks plate along /16 music wire pushrods /6 ply fairleads lay wing aside Fuselage effort save weight over previous designs using full-sheeted fuse lage full-depth Lite Ply doublers used sheet stress areas lightened ply doublers holes building re mainder sticks proved strong arrangement still weighed light scales Cut out doublers lay out A-in sides will necessary piece some sheet together get enough width quickly accomplished CyA Lay out balsa side using thrust line benchmark cut out glue dou blers sides contact cement go around edges CyA glue Lay side over plan construct aft lower section sides using 4-in-sq /8 x 4-in balsa Trace former pat terns contact-cement ply noted cut out Glue temporary brace scrap balsa A-in stick about halfway down across opening F-6 Pin sides down over top view F-6 tail post after sand ing bevel sides tail Slip F-6 place brace sides temporarily 900 workbench square glue tail post F-6 Glue A-in crosspieces / X A-in diagonals place Cut gusset out A-in sheet balsa top lon geron joints F-6 glue place Unpin fuselage repin about two inches behind F-3 Pin blocks over plan front fuselage hold halves alignment slip F-3 F-2 firewall formers slots epoxy place Unpin repin aft end fuse lage Trial fit F-7 F-8 pinning frame trying stringers Trim necessary stringers fonners straight line satisfied glue placeContinued page 133 34 Model Aviation Flies off both land water Crisply die-cut balsa lite ply parts complete hardware easy sembly sensible engineering clear plans photo illustrated assembly manual L omplete Catalog $200 ordered direct add uu Manaling 116 W 19th St PO Box 511 E7 Higginsville MO 64037 call 816 584-7121 1988k Wings War Nose-Art Calendar LUCKY LADIES THE GALS WHO BROUGHT US HOME 1987 NATIONAL CHAMPION Tony Frackowiak shown winning FAI RC Pattern 1987 NATS original design LENGE IV CHALLENGE IV available basic kit featuring epoxyglass fuselage foam wings stab $14995 Deluxe Kit $35000 much assem bly complete exceptionally smooth pre cise flying aircraft equally adept AMA FAI pattern Much individual preference can accomodated including choice Tn-Gear Tail Dragger 790 sq wing 820 sq depending desired flight speed C\Soe\C $8je ~ ietractS9 GO& par1terSs a0d atpiP~3 ~oyS oriented public relations better way us go Martin Dilly West Wickham Kent England can t think anyone wouldn t like see high respect airplane mod eling general public unfortunate ly doesnt seem magic answers assure giant leap di rection Safety/Preston Continued page 22 accident no else field Just two minutes before accident two other members left leaving just two us accident happened grabbed torn finger Sue helped load van drove nearby fire station para medic gave preliminary check said going live bound up wound off went hospital After receiving seven stitches finger several days later returned field T-Craft did again time prop flew off hit leg no hospital trip time made deep cut After lengthy dis cussion club president engine expert Frank Warren electronics expert Ron Roeder bought zero-to-five-ohm wirewound rheostat could handle 25 amps found local surplus outlet $150 also picked up toggle switch 50 cents lit tle fellows went power panel field box Since Ive no problems Frank Ron contended glow plug getting too much juice causing detonation problem loosening prop nut causing insurance company shudder would recommend addition anyone firing up four-stroke toggle switch works kill-switch glow plug can cut heat quickly havent personally tried out Dukes sugges tion However worked him may work others Meanwhile wonder engine manufacturers going provide some means positively retain prop nut shaft column has discussed several methods have suggested readers its ex actly new technology wrap up months column letter Joe Wagner New Wilmington PA points out buddy system infallible Ill let Joe tell tale Im responding latest column Sep tember 87 mentioning buddy tystem good bit model flying alone although Ive never problems agree its better have buddy along However make sure youve got dependable An experience back 1942 case point building solid Scale models friend basement big knife using roughly shape Short Stirling fuse lage slipped made huge gash hand Blood everywhere before could pick up rag slow flow turned buddy help saw him collapsed heap floor learned later despite Boy Scout training merit badges First Aid friend people simply can stand sight blood did know Bleeding hand managed carry friend upstairs alone house lay him down couch make sure breathing OK before left made way doctors office circumstances Id have better off alone now wonder about some peo ple occasionally fly would react case bloody accident Maybe ought ask themtactfully course Have another safe month John Preston 2812 Northampton St N W Washington DC 20015 TR-260/Shepherd Continued page 34 Select some grain 3/ sheet tur fledeck sides cut little oversize Wet outside sheet will curve over formers stringers easily use CyA glue attach Sand top sheets flush formers top stringers glue -in light sheet top Cut excess off sides A-in sheet sand top long straight block Glue landing gear plate place epoxy Glue bottom A-in sheet place December 1987 133 U Letters Editor Continued page 12 PRECISION MODEL PRODUCTS Made U S BARSTOCK AIIi&AINUM CDIMMERS RETAIL APPHOX PART NOSIZEPRICEWT TT-175-B 4$12950950Z TT-200-B 21395 OZ TT-225-B 41495 OZ TT-226-B 2114 FAI 0Z TT-250-B 2-1/21695 0Z TT-251-B /2FAI 1895 0Z TT-275-R 2-3/41995 OZ TT-276-B . 23/4/FAI 2195 OZ TT-300-B 32395 OZ TT-301-B . 3/FAt 2595 OZ 3 Pieces Cone Back Plate Retainer Screw Note 3 4 Blade Spinners Available Sizes Add $300 Per Spinner PART NOSIZE TT-140-A .1/4-28 TT-610-A . 6x 10mm TT-710-A .7x 10mm . TT-516-A .5/16-24 TT-81 0-A fl-825-A TT-375-A Th125-A 8x1Omm 8x 125mm 3/8-24 lOx 125mm RETAIL APPROX PRICEWT $395 1 OZ 395 . 063 OZ 395 . 082 OZ 395 . 076 OZ 395 . 076 OZ 395 . 075 OZ 495 0Z 495 . 115oz 3 Piece Set Nut Washer Machined Bushing Add $350 Shipping Handling Prices subject change notice ROMCO MFG INC OX 836 SOUTH HOUSTON TEXAS 77587 713 943-1867 cross grained glue two bottom /8 x A-in stringers Glue %-in side string ers %2 fairing strips around aft end wing saddle Sand fair fuselage noting picture Assembly CB Associates mount works OK Saito engine top portion above bolt holes cut away allows engine slide back mount interfere throttle choke plate have Saito mount means use Remove fuselage side inside cheek cowl outline order bolt engine place locate throttle pushrod hole refer picture Drill hole pushrod install plastic tubing used outside tube Gold n Rod prototype Make up tankor tanks going smoke install Glue FB-l FB about 3/ inside outer curve glue place sides Glue 3/ sheet under smoke tank place Glue /16 ply bottom vent hole cut out per top view Glue top 34-in triangles top A-in sheet place Use centerlines F-i align square fuselage glue place Noting direction grain picture shaping inside blocks according drawing F-i glue 3A -in medium blocks front F-l Glue blocks tops sides cheek cowls place rough-carve shape along top sheet triangles first noting shadows highlights photos good sharp pocket knife 80-grit sandpaper recommended procedure air inlet bottom constructed out 3A 6 sheet sanded shape Cut away removable cowl half using Zona Saw take care procedure stall maple blocks trailing edge ply sheet WMP using epoxy Epoxy LGB WMB ply braces place making sure WMB up against bottom WMP Mount wing fuselage saddle sanding LE wing square re moving enough TE allow proper fit Align wing square fuselage pin firmly place Drill holes 4-20 hold-down bolts remove wing tap maple blocks -20 nylon bolts Bolt wing back place Lay out trace sides remov able top above wing onto A-in balsa sheet Make double side portions front instrument panel F-3B noting con figuration photo prototype top under construction Take some poly sheet long enough cover front F-3 rear F-6 formers place top wing Pin clamp F-3A F-3 pin F5 F-6 Pin sides place glue F-3A F-S Glue former F-4 position Glue 34-in triangle stock sides flush top Glue top A-in sheet front cabin section piece top F-4 F-S Sand cabin section con form rest fuselage after install ing -in dowels 4-40 holddown bolts blind nuts Fix up cockpit suit fancy pilot Williams Bros 2%-in figure head cut off little plastic trimmed side neck head glued back angle Carefully trim off front back canopy along bottom flange start fitting fuselage Trim just little time go along use small felt-tip pen rough out outline botched canopy cutting too much off once expensive lessons Two landing gears built check weight strength out double Ain music wire out fiberglass epoxy wire gear little too springy opted fiberglass As pictures show form held vise layered epoxy-saturated fiber glass placed between two sheets poly draped over form held against some heavy objects Im mis taken credit idea goes Pet Reed described earlier article mags Cut fiberglass strips over size use slow-setting epoxy Sig used prototype resulted strong gear flexes well stabilizer elevator fin rudder constructed directly over plans using conventional building methods eleva tor tie bar fashioned out /16 brass tub ing Solder -in wire arms tie bar epoxy assembly eleva tors Finishing Supershrink Coverite used fuselage up including cabin section rudder elevator re mainder fuselage covered Sig medium Plyspan using butyrate dope entire setup given four coats dope contained some talc sprayed polyurethane colors wing covered MonoKote aluminum Coverite Black Baron red plastic heat-shrink serial letters made Sig blank decal sheet sprayed two coats red poly paint letters laid out cut dipped water transferred model PRODERA lettering created Presto Stik vinyl letters 34-in Hel vetica found office supply stores Theyre perfect resemble original closely enough realistic look pinstriping black tape shoul der harness parachute straps Jean Claude turned shoelaces sunglasses Williams Bros pair back side painted black choose build Sirius version leave off wheel pants move former F-4 rearward position Whichever version choose enjoy aerobatics performer vir tuoso capabilities full-size airplane youll find TR-260 rewarding model build 134 Model Aviation PROP NUT ADAPTORS
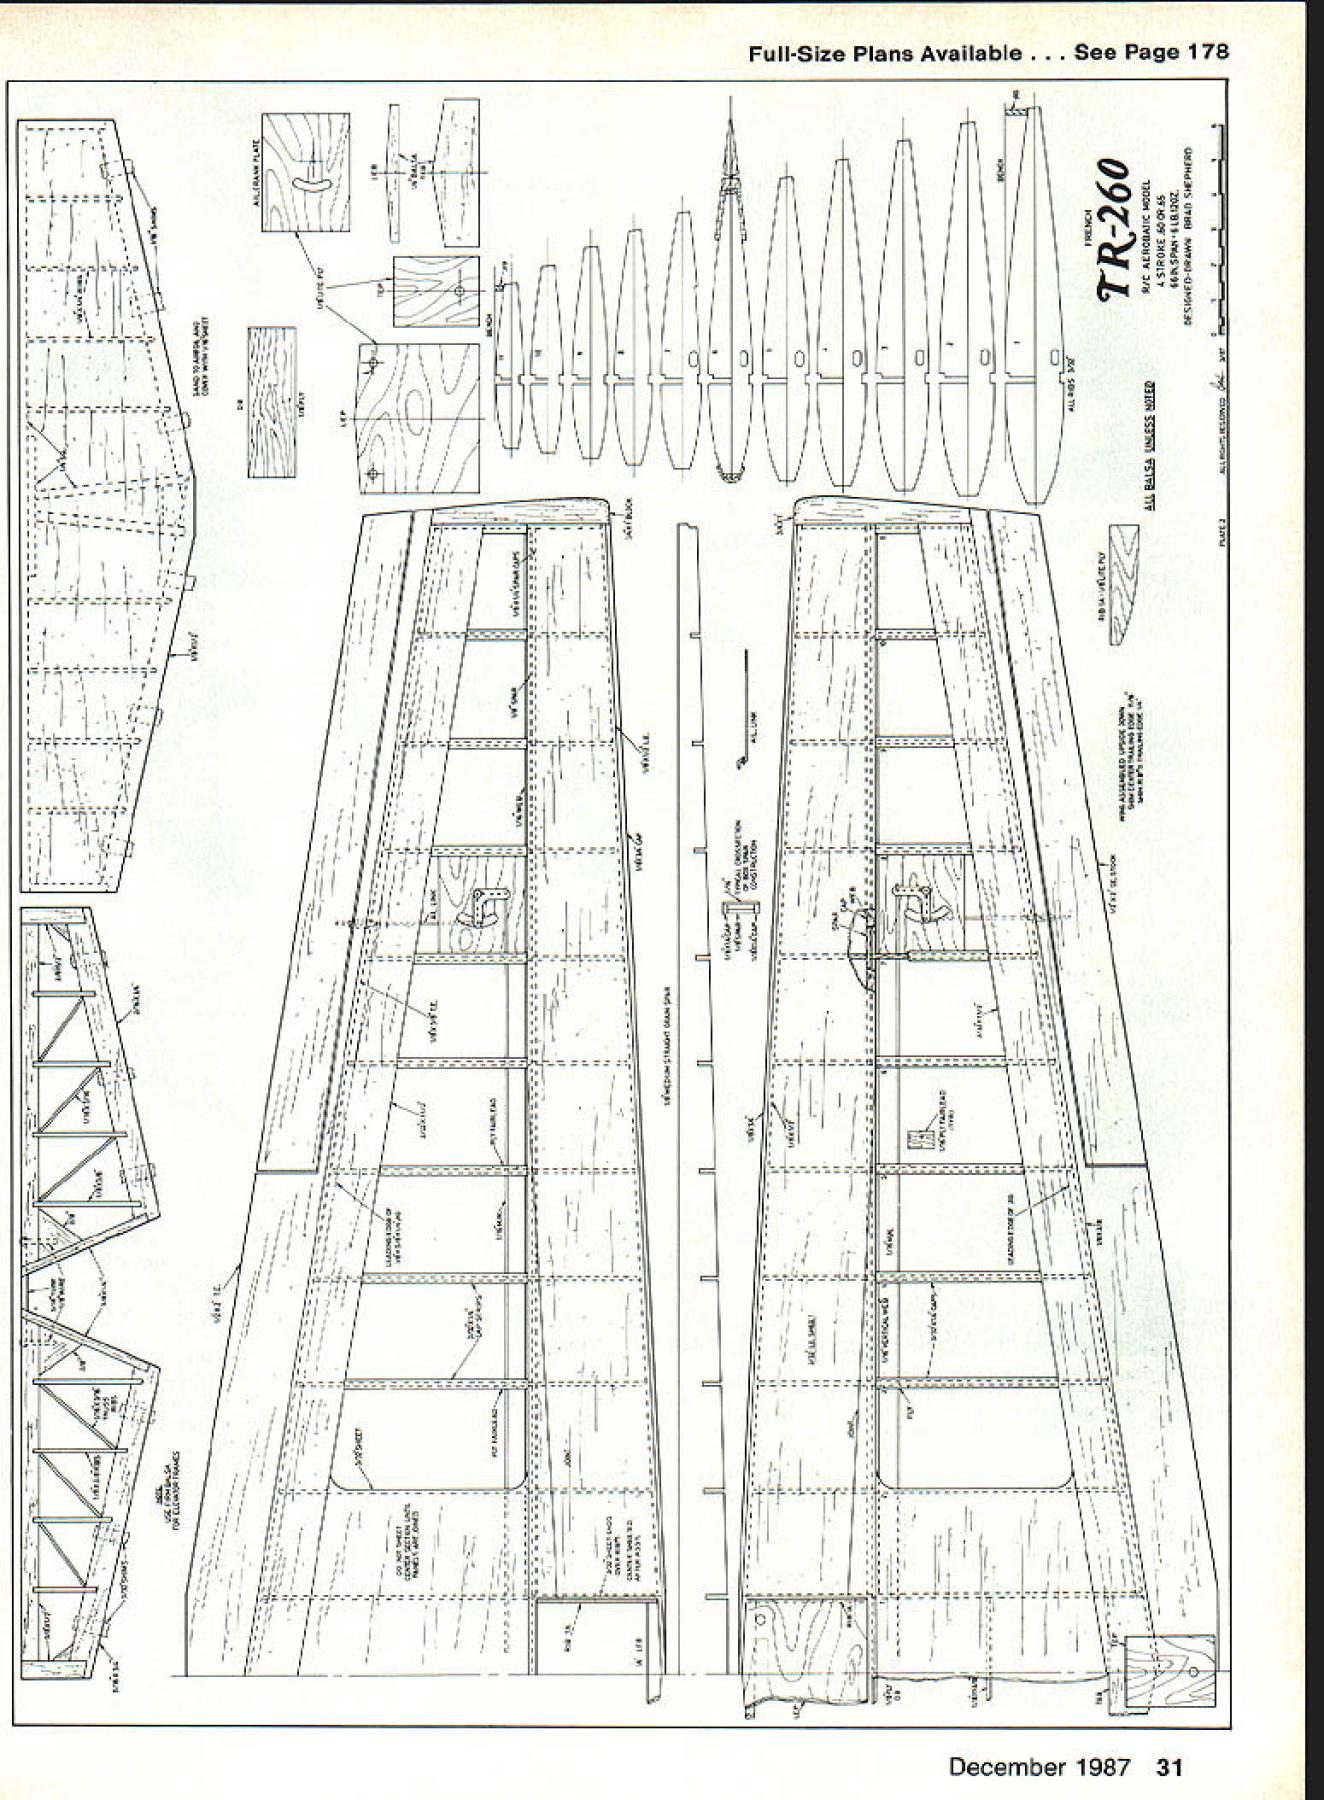
Edition: Model Aviation - 1987/12
Page Numbers: 24, 25, 26, 27, 28, 29, 30, 31, 32, 33, 34, 133, 134
NO OCR TEXT NO OCR TEXT entire center section above wing removes easy disassembly convenient ac cess Insides Saito 65 exIts cowling nicely clean smooth front end cowling splits allow installation tinkering engine Use either modi fied CB Associates mount Saitos mount Picture shows details plumbing Perry pump smoker system two pages French metric calloutsenough move project along Ignoring French metrics compared three-view Laser variations stockpile Using pictures get some shapes firmed up laid out fuselage accom modate engine tanks well Due lightweight construction heavy Saito engine radio equipment will have installed far back possible keep model coming out nose heavy landing gear fairs nicely sur rounding 1Am sheet fuselage bottom Note 1A ply edging around vent hole dummy exhaust stacks poke out establish force arrangement Since ap peared stab lower relation thrust line Lasers decided arrangement tail section airfoils constructed same manner CAP seriesalthough thick mak ing much easier build dont know whether Don assigns TR-260 ugly beautiful category collection aircraft sub jects over years What know about model beautiful-flying airplane should please modeler 26 Model Aviation ne elevator pusnroa snows neat installa hidden tall wheel arrangement maKes tion Sullivan hardware rods neat practical setup steerable tail have some drawbacks easy wheel rudder pushrod exit hole install dont vibrate exit hole can should also neat trim lowest drag nice smooth inexpensive author says typical arrange ment setting up aileron actuator system Its slop-free allows covering put interfering link N zuJ0 -4 N/-m U V 1 LU N0 LU U 0 0 zo UJUJoO m D o o 1 LU 7 7 December 1987 27 Left Assemble wing workbench covered piece Celotex sheeting make easier insert stick pins Note shims trailing edge referred text Right Epoxy plywood dihedral brace against spar stubs inside spar caps predilection aerobatics sound four-stroker its realistic exhaust bonus first test flight TR-260 March 1987 proved instructive Flying buddy Leon Folse loaded up Cher okee headed north flying field owned modeling friends friend mowed site out some flatland works farmer/rancher fabulous flying site isall close-cropped grass middle nothingwith no trees houses power lines sight An other modeling friend coastal town joined us pleasant afternoon dont know what Bill Winters Shangri-la like place must come close others unloaded assembled air occupied myself readying TR close call fired up engine Ill describe hopes preventing getting sim ilar situation CG 2/2-in spinner used model along Master Airscrew 13-6 prop spinner re worked order enlarge cutouts receive prop also file little off prop make fit After engine fired up advancing throt tle prop spinner came flying off prop hit right hand between thumb forefinger leaving two-inch gash could have much worse prop taken different route As hand numb about five minutes bleeding stopped didnt think stitches required proceeded testing Naturally concluded method used essentially unsafe fourstroke engine size am sure prop can tightened sufficiently using arrangement Im flying out spinner until better setup can de 28 Model Aviation Left After bottom sheeting glued turn wing over epoxy 1A-in LEB balsa brace 1-A ply sub-ribs proper places Right Build fuselage side directly over wax-paper-covered plans Note lightening holes ply doubler its location Left left fuselage side built directly over wax-paper-covered right side assure both sides will match straight fuselage will result Right Assemble fuselage over top view Install Former F-6 glue temporary braces keep structure square remaining A x ks glued method fuselage construction results lighter structure sheet construction IS rITE P LY TOOIIBBALSA LOWLOJYLOLETOD OSLOros101 IICLITE PLYilCprr IIITLIIE PLY Ao SHESHEHCTBIHHALE--l [ BALSA HOAROIALTOALSMLSArmnoorsAlII COOIL2 SLOSHHIBAIA PITSHEETI iITHIoMAuSSLTF1Y~SHEET RIBSLTE PLY S2tt ITI II 0 CSI14 11600~AIL I1IBO14OHLSLASLLS IIITOHOLLAB ITULOWfl [v32][b-1-10-1-10]] II SlOE 1011000 PLO P000020HLIO LOSSLPT0000 HF C CDEEl0 0 CDFRENCH _0 •Fl STOOL CUTBALSA HUTLIHE _____TR260 0 ALLBALSA UNLESS NOTED 0I %ojN AEROSA C MODE S ROKE500065CO OSPESRAN 6 10 OZ0 I-IDESIGNED DRAWN BRAD SHEPHERD___ MATEALLOOHYS 05500000 8rLBTI Oi0 Left Epoxy firewall Former F-3 place keeping fuselage sides square Pin balsa blocks outside line top view secure sides glue sets Right Position turtledeck stringers glue place CyA Remove temporary braces termined fitted goals designing model keep weight down 6- 6/2-lb range making aerobatic four-stroke 65 giving good vertical capability Although final weight edged up over goal 6 lb 12 oz perform ance hindered least because grossly underestimated power Saito fact mildly taken aback first time took off literally jumping off ground throttle opened let climb out straight some distance adjusting servo trims slightly made turn back watched fly hands-off length field After such promising start moved some maneuversloops snaps side outside loops square loops ham merheads vertical rolls four-points forth vertical climb snap roll model just kept going up pushed irrepressible dynamo Saito second flight got little fancier making inverted passes outside ioops outside snap top handed transmitter friend Leon criti cal comments Leon steered business jets around before retired grinned broadly pronouncing TR-260 far superior Laser designed few years ago judgment carried special force because own mind Laser best flying model ever designed built Construction achieve goala model talents full-size aer obatics shipI chose building techniques geared toward keeping airplane light enough intricate maneuvers Wing Any various methods used cutting out set ribs tapered wing appropriate Rather dictating particu lar method suggest using 30 Model Aviation Sheet turtledeck %2 sheeting extreme curve better easy curve A-grain light balsa used Glue top 1/4-in sheeting onto turtledeck trim rough shape knife Glue bottom -in sheeting 1/x stringers place Note transi tion round corners sheet stringers has sanded sheeting Glue %-in side stringer %2 strips around wing saddle sand nice fairing Cut right side fuselage away al low engine fitted throttle pushrod location can established Glue n balsa onto sides stock triangle pieces located NO OCR TEXT comfortable full set ribs has laid out drawing tracing copy can made method use cutting out parts plans make tracing spray con tact cement paper press wood cut out peel paper off part Please dont get willies look lightweight wing construction Ive never wing give up flight using method box spar being lighter stiffer two large balsa sticks almost totally resists twisting panel Another advantage method guaranteed straight wing workbench straight Select sheet medium-to-hard straight-grained %-in balsa Lay out spars jig used trailing edge TE Note jig 3114 long % #1 rib tapering #11 rib Pin / x A-in cap plans glue spar slots up leading edge LE cap Set ribs place trialfitting trinuning necessary Pin ribs spar jig go over joints thick cyanoacrylate CyA glue Lay bead glue along top spar install /8 x 4-in cap Glue /8 x /2-in LB ribs Glue / x %-in strip edge /32 x 1 /2-in sheet quarter-grain balsa Glue sheet ribs making sure / x %-in strip butts against TE ribs use aliphatic resin glue job Select some medium straight-grained wood LE sheeting Using long block sand bevel -in LB con form rib shape Lay sheet posi tion panel edge parallel A-in LE Roll sheet back mark TE spar cap trim ex cess off Using Sigs handy mini glue gun full al iphatic resin lay bead rib Lay bead thick CyA top A-in LB Carefully place sheet position over LB place some pins nlong sheet Wait few seconds lay bead CyA spar cap roll sheet back pin spar cap feel qualms about using CyA botching job use 32 Model Aviation Glue FB pieces along %2 floor air dam After glue sets epoxy whole area fuel proofing install /l6 plywood bottom Protect tubes tanks dust sanding finishing putting piece plugged tubing Glue Former F-i place Notice align ment mark top /4-in sheeting sist getting former glued squarely Glue -in nose blocks front blocks cheek cowls Ae ply bottom Note grain nose blocks Once glued place nose blocks should appear Lots sanding #100 grit sandpaper will shape up nicely cheek cowls under construction lack ing side sheeting Rough out side shape nose blocks bot tom block round oft corners FB right side top has roughly carved knife left side has al ready carved sanded its primary shape point good idea lay model sheet foam prevent dings front end shape rough-sanded its ap proximate final shape cheek cowls changed somewhat after photo final outline shown plans After front end sanded final shape cut cowl off install plywood tabs blind nuts Build up air scoop aliphatic glue everything pin gener ously gives little time position sheet Glue vertical /16 spar webbing place Glue aileron crank plate landing gear cures form Note plastic wrap both sides material fiberglass laid layer time top layer plastic sheet put smoothed shape hand Brace bot tom weight dry saw rough shape finish file sandpaper Au beautiful looks finished balsawood model its almost shame put lot color hide beautiful work cap strips place sheet center section yet Turn panel over pin down using jig again Sheet top panel using same method de scribed bottom Again sheet Sand stab fin ribs airfoil shape before sheeting use shim under leading edge keep unit square center section area inside rib #1 LE both panels completed draw straight line workbench least 66 long guideline pinning pan els Lay some wax paper poly sheet down bench about midline pin panels upside down spar cap along line Shim center section TE /16 Shim TE outboard #11 ribs pin down securely Epoxy A-in ply dihedral brace spar stubs inside spar caps Glue TE LE A-in balsa braces place Glue December 1987 33 Left Build removable section over wing first covering wing fuseiage plastic wrap pinning F-3A F-5 doubie A-in front portion piace Right Next instaii triangle pieces instrument panel -in top sheet F-4 lAin rear top Left /8-in sides have completed formers F-4 F-5 unit ready shaping fixing up cockpit Right Note final shape fuselage rounded corners cowl Two types landing gear tried wire version too flexibie form used making fiber glass landing gear takes few min utes construct variations theme just about infinite custom gear can fabricated special need Using inc stan guide position eleva tor halves Pin down epoxy brass tie bar place Note airfoil shape Designed Ken Willard earnaster4t Capture spirit aviators magnificent machines & Lucky Ladies brought safely home premiere commemorative wall calendar 12x18 featuring official US Army Air Force archival photographs mere pinups tradition nautical figureheads mascots new age aerial combat first series issued through 1995 Available @ $995 postpaid PA res add 6% tax ALKMAAR ASSOCIATES 503 Todd Way-F West Chester PA 19380 bottom center-section sheet place Turn wing over epoxy lA ribs place epoxy ply plate LE panel spar LE Glue %-in balsa sheet place tween #1 ribs Sheet center section behind spar leaving area over ply plate uncovered until after wing has bolted fuselage Epoxy ply TE panel place Unpin wing lay aside temporar ily Cut proper angles in TE stock meet center sec tion Take wing press down TE bench trial fit TE stock sanding necessary eliminate gaps holding panel down TE snug hit joint CyA Hold wing up eyeball TE trueness satisfied finish gluing up Repeat procedure other panel Lay out ailerons cut out TE stock Install block tips rough out shape following plans stall aileron cranks plate along /16 music wire pushrods /6 ply fairleads lay wing aside Fuselage effort save weight over previous designs using full-sheeted fuse lage full-depth Lite Ply doublers used sheet stress areas lightened ply doublers holes building re mainder sticks proved strong arrangement still weighed light scales Cut out doublers lay out A-in sides will necessary piece some sheet together get enough width quickly accomplished CyA Lay out balsa side using thrust line benchmark cut out glue dou blers sides contact cement go around edges CyA glue Lay side over plan construct aft lower section sides using 4-in-sq /8 x 4-in balsa Trace former pat terns contact-cement ply noted cut out Glue temporary brace scrap balsa A-in stick about halfway down across opening F-6 Pin sides down over top view F-6 tail post after sand ing bevel sides tail Slip F-6 place brace sides temporarily 900 workbench square glue tail post F-6 Glue A-in crosspieces / X A-in diagonals place Cut gusset out A-in sheet balsa top lon geron joints F-6 glue place Unpin fuselage repin about two inches behind F-3 Pin blocks over plan front fuselage hold halves alignment slip F-3 F-2 firewall formers slots epoxy place Unpin repin aft end fuse lage Trial fit F-7 F-8 pinning frame trying stringers Trim necessary stringers fonners straight line satisfied glue placeContinued page 133 34 Model Aviation Flies off both land water Crisply die-cut balsa lite ply parts complete hardware easy sembly sensible engineering clear plans photo illustrated assembly manual L omplete Catalog $200 ordered direct add uu Manaling 116 W 19th St PO Box 511 E7 Higginsville MO 64037 call 816 584-7121 1988k Wings War Nose-Art Calendar LUCKY LADIES THE GALS WHO BROUGHT US HOME 1987 NATIONAL CHAMPION Tony Frackowiak shown winning FAI RC Pattern 1987 NATS original design LENGE IV CHALLENGE IV available basic kit featuring epoxyglass fuselage foam wings stab $14995 Deluxe Kit $35000 much assem bly complete exceptionally smooth pre cise flying aircraft equally adept AMA FAI pattern Much individual preference can accomodated including choice Tn-Gear Tail Dragger 790 sq wing 820 sq depending desired flight speed C\Soe\C $8je ~ ietractS9 GO& par1terSs a0d atpiP~3 ~oyS oriented public relations better way us go Martin Dilly West Wickham Kent England can t think anyone wouldn t like see high respect airplane mod eling general public unfortunate ly doesnt seem magic answers assure giant leap di rection Safety/Preston Continued page 22 accident no else field Just two minutes before accident two other members left leaving just two us accident happened grabbed torn finger Sue helped load van drove nearby fire station para medic gave preliminary check said going live bound up wound off went hospital After receiving seven stitches finger several days later returned field T-Craft did again time prop flew off hit leg no hospital trip time made deep cut After lengthy dis cussion club president engine expert Frank Warren electronics expert Ron Roeder bought zero-to-five-ohm wirewound rheostat could handle 25 amps found local surplus outlet $150 also picked up toggle switch 50 cents lit tle fellows went power panel field box Since Ive no problems Frank Ron contended glow plug getting too much juice causing detonation problem loosening prop nut causing insurance company shudder would recommend addition anyone firing up four-stroke toggle switch works kill-switch glow plug can cut heat quickly havent personally tried out Dukes sugges tion However worked him may work others Meanwhile wonder engine manufacturers going provide some means positively retain prop nut shaft column has discussed several methods have suggested readers its ex actly new technology wrap up months column letter Joe Wagner New Wilmington PA points out buddy system infallible Ill let Joe tell tale Im responding latest column Sep tember 87 mentioning buddy tystem good bit model flying alone although Ive never problems agree its better have buddy along However make sure youve got dependable An experience back 1942 case point building solid Scale models friend basement big knife using roughly shape Short Stirling fuse lage slipped made huge gash hand Blood everywhere before could pick up rag slow flow turned buddy help saw him collapsed heap floor learned later despite Boy Scout training merit badges First Aid friend people simply can stand sight blood did know Bleeding hand managed carry friend upstairs alone house lay him down couch make sure breathing OK before left made way doctors office circumstances Id have better off alone now wonder about some peo ple occasionally fly would react case bloody accident Maybe ought ask themtactfully course Have another safe month John Preston 2812 Northampton St N W Washington DC 20015 TR-260/Shepherd Continued page 34 Select some grain 3/ sheet tur fledeck sides cut little oversize Wet outside sheet will curve over formers stringers easily use CyA glue attach Sand top sheets flush formers top stringers glue -in light sheet top Cut excess off sides A-in sheet sand top long straight block Glue landing gear plate place epoxy Glue bottom A-in sheet place December 1987 133 U Letters Editor Continued page 12 PRECISION MODEL PRODUCTS Made U S BARSTOCK AIIi&AINUM CDIMMERS RETAIL APPHOX PART NOSIZEPRICEWT TT-175-B 4$12950950Z TT-200-B 21395 OZ TT-225-B 41495 OZ TT-226-B 2114 FAI 0Z TT-250-B 2-1/21695 0Z TT-251-B /2FAI 1895 0Z TT-275-R 2-3/41995 OZ TT-276-B . 23/4/FAI 2195 OZ TT-300-B 32395 OZ TT-301-B . 3/FAt 2595 OZ 3 Pieces Cone Back Plate Retainer Screw Note 3 4 Blade Spinners Available Sizes Add $300 Per Spinner PART NOSIZE TT-140-A .1/4-28 TT-610-A . 6x 10mm TT-710-A .7x 10mm . TT-516-A .5/16-24 TT-81 0-A fl-825-A TT-375-A Th125-A 8x1Omm 8x 125mm 3/8-24 lOx 125mm RETAIL APPROX PRICEWT $395 1 OZ 395 . 063 OZ 395 . 082 OZ 395 . 076 OZ 395 . 076 OZ 395 . 075 OZ 495 0Z 495 . 115oz 3 Piece Set Nut Washer Machined Bushing Add $350 Shipping Handling Prices subject change notice ROMCO MFG INC OX 836 SOUTH HOUSTON TEXAS 77587 713 943-1867 cross grained glue two bottom /8 x A-in stringers Glue %-in side string ers %2 fairing strips around aft end wing saddle Sand fair fuselage noting picture Assembly CB Associates mount works OK Saito engine top portion above bolt holes cut away allows engine slide back mount interfere throttle choke plate have Saito mount means use Remove fuselage side inside cheek cowl outline order bolt engine place locate throttle pushrod hole refer picture Drill hole pushrod install plastic tubing used outside tube Gold n Rod prototype Make up tankor tanks going smoke install Glue FB-l FB about 3/ inside outer curve glue place sides Glue 3/ sheet under smoke tank place Glue /16 ply bottom vent hole cut out per top view Glue top 34-in triangles top A-in sheet place Use centerlines F-i align square fuselage glue place Noting direction grain picture shaping inside blocks according drawing F-i glue 3A -in medium blocks front F-l Glue blocks tops sides cheek cowls place rough-carve shape along top sheet triangles first noting shadows highlights photos good sharp pocket knife 80-grit sandpaper recommended procedure air inlet bottom constructed out 3A 6 sheet sanded shape Cut away removable cowl half using Zona Saw take care procedure stall maple blocks trailing edge ply sheet WMP using epoxy Epoxy LGB WMB ply braces place making sure WMB up against bottom WMP Mount wing fuselage saddle sanding LE wing square re moving enough TE allow proper fit Align wing square fuselage pin firmly place Drill holes 4-20 hold-down bolts remove wing tap maple blocks -20 nylon bolts Bolt wing back place Lay out trace sides remov able top above wing onto A-in balsa sheet Make double side portions front instrument panel F-3B noting con figuration photo prototype top under construction Take some poly sheet long enough cover front F-3 rear F-6 formers place top wing Pin clamp F-3A F-3 pin F5 F-6 Pin sides place glue F-3A F-S Glue former F-4 position Glue 34-in triangle stock sides flush top Glue top A-in sheet front cabin section piece top F-4 F-S Sand cabin section con form rest fuselage after install ing -in dowels 4-40 holddown bolts blind nuts Fix up cockpit suit fancy pilot Williams Bros 2%-in figure head cut off little plastic trimmed side neck head glued back angle Carefully trim off front back canopy along bottom flange start fitting fuselage Trim just little time go along use small felt-tip pen rough out outline botched canopy cutting too much off once expensive lessons Two landing gears built check weight strength out double Ain music wire out fiberglass epoxy wire gear little too springy opted fiberglass As pictures show form held vise layered epoxy-saturated fiber glass placed between two sheets poly draped over form held against some heavy objects Im mis taken credit idea goes Pet Reed described earlier article mags Cut fiberglass strips over size use slow-setting epoxy Sig used prototype resulted strong gear flexes well stabilizer elevator fin rudder constructed directly over plans using conventional building methods eleva tor tie bar fashioned out /16 brass tub ing Solder -in wire arms tie bar epoxy assembly eleva tors Finishing Supershrink Coverite used fuselage up including cabin section rudder elevator re mainder fuselage covered Sig medium Plyspan using butyrate dope entire setup given four coats dope contained some talc sprayed polyurethane colors wing covered MonoKote aluminum Coverite Black Baron red plastic heat-shrink serial letters made Sig blank decal sheet sprayed two coats red poly paint letters laid out cut dipped water transferred model PRODERA lettering created Presto Stik vinyl letters 34-in Hel vetica found office supply stores Theyre perfect resemble original closely enough realistic look pinstriping black tape shoul der harness parachute straps Jean Claude turned shoelaces sunglasses Williams Bros pair back side painted black choose build Sirius version leave off wheel pants move former F-4 rearward position Whichever version choose enjoy aerobatics performer vir tuoso capabilities full-size airplane youll find TR-260 rewarding model build 134 Model Aviation PROP NUT ADAPTORS

