


Airbrushing Your Model’s Finish 2008/04
By Dave Garwood
When that dried I sprayed yellow, from the 3-ounce can, on the front of the fuselage and on the LEs of the upper side of the wings. Oops! I forgot to mask the clear canopy, which the observant reader will notice is missing from the yellow spray session. Most of the clear canopy as modeled gets painted, with only small areas left clear. I masked the clear areas with plastic tape, gave the area a light sanding with 400-grit sandpaper, sprayed primer, and then sprayed the yellow. I was glad I had purchased a spare can of yellow paint. Now back to the paint bench to take care of yellow overspray with more light gray—this time applied with the airbrush, which gives me much finer control of the paint. The yellow paint came in a glossy version only, and I dulled the shine with steel wool.
In the photos you can see prints of the full-scale Su-25K "White 9013" tacked to the board behind the bench. I used these pictures, as well as three-view drawings, as a guide to the canopy markings, the yellow, and the camouflage green and brown paint.
It's time for airbrush fun: painting the freehand camouflage areas. Slowly and carefully I started with the outline of each area in one camo color, working to get the prototypical size and shape of the brown and green sections and paying attention to the distinctive military-camo soft edges—not too sharp and not too fuzzy. Then I gradually filled in the centers with airbrush strokes.
It's hard to put too little paint on with the airbrush since it's so easy to add more color. My main technique is to add a bit more at a time and build up the paint application until I get the look I want.
There are three camo colors—brown and two greens—so after two more sessions of building up the camo blobs with the airbrush, I'm starting to feel like I might have captured the look of the prototype aircraft. Make sure to note the colors' "layer" order so you overlap them correctly. Try to always spray the light colors first and the darker colors later.
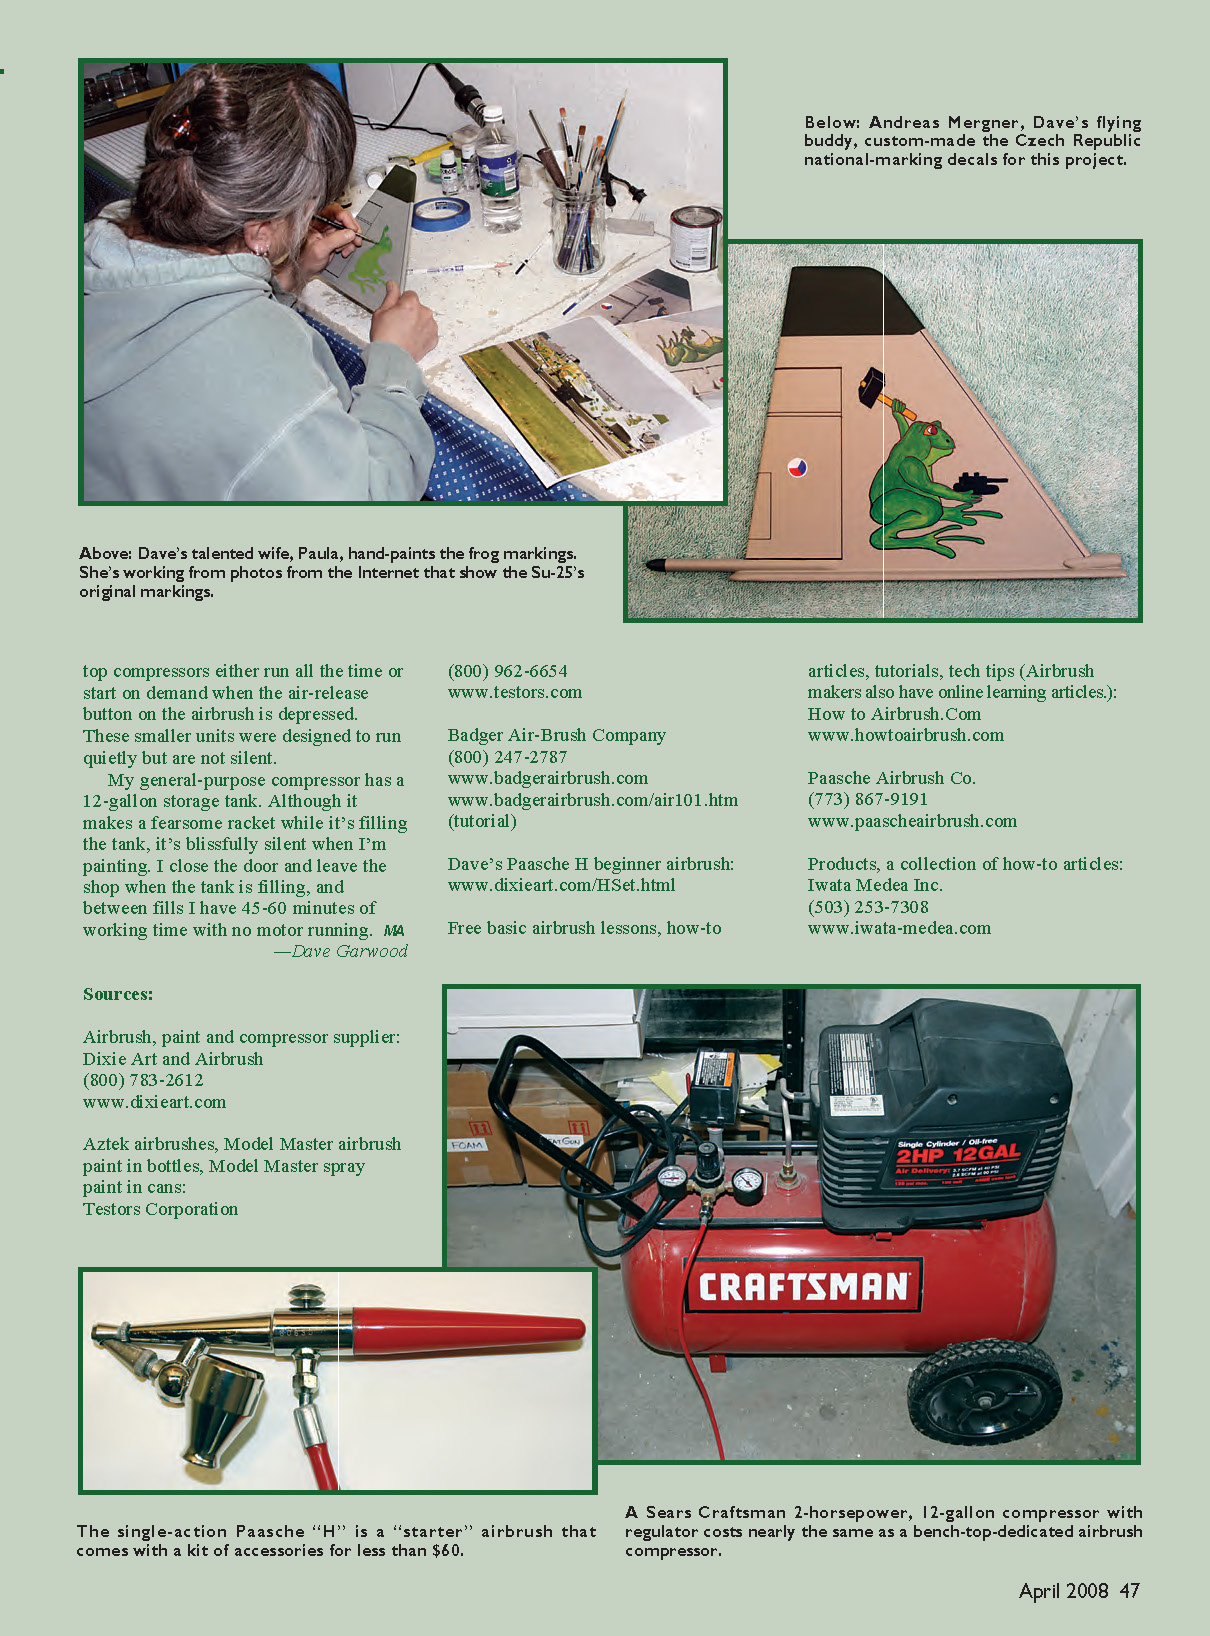
Additional details in this finishing job are the "9013" numerals, which were cut from sticky-back vinyl at the local truck lettering shop, and national insignia decals. I am indebted to Andreas Mergner at Plane Insane Models for making the custom Czech Republic markings. They are easy to draw but require attention to detail to lay out correctly on the airframe. The markings have left and right mirror-image layouts, which I discovered by studying the photographs.
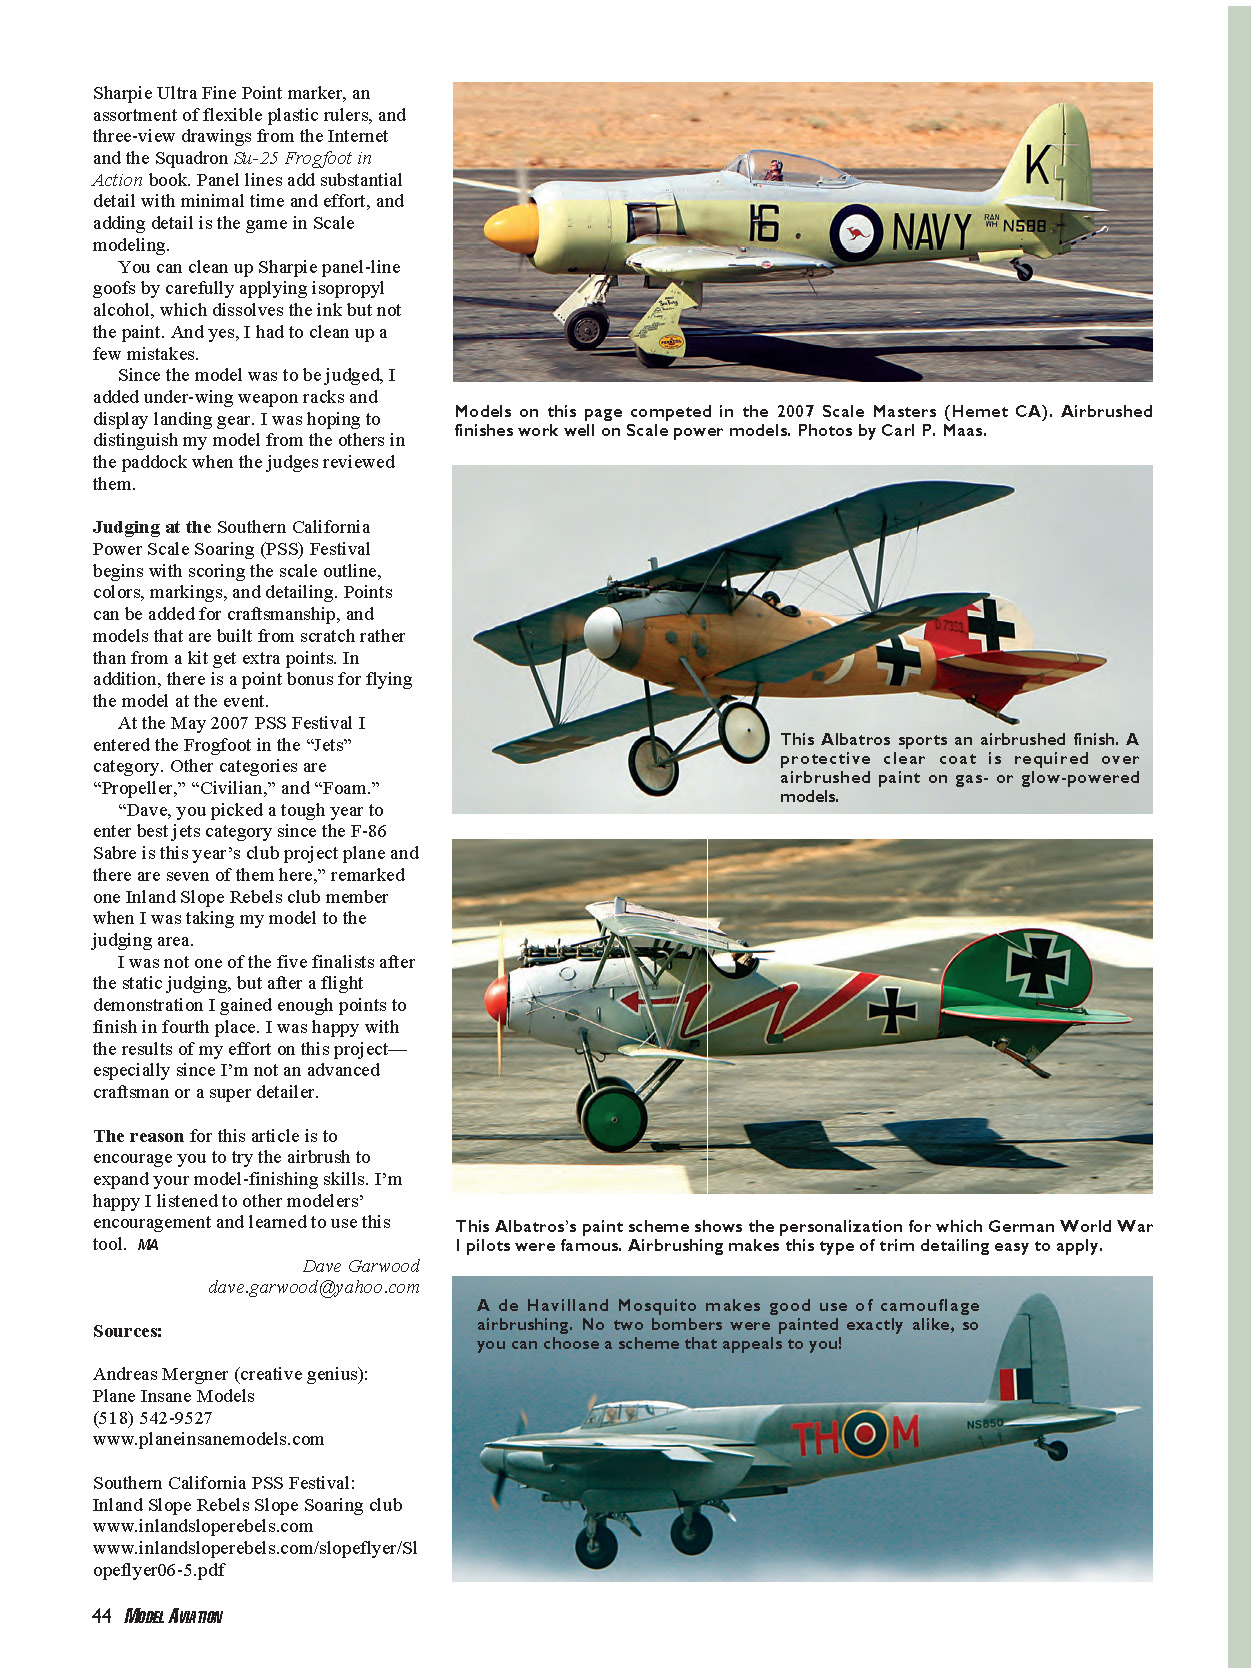
I added panel lines using a Sanford Ultra Fine Point Sharpie marker, an assortment of flexible plastic rulers, and three-view drawings from the Internet and the Squadron Su-25 Frogfoot in Action book. Panel lines add substantial detail with minimal time and effort, and adding detail is the game in scale modeling.
You can clean up Sharpie panel-line goofs by carefully applying isopropyl alcohol, which dissolves the ink but not the paint. And yes, I had to clean up a few mistakes.
Since the model was to be judged, I added under-wing weapon racks and display landing gear. I was hoping to distinguish my model from the others in the paddock when the judges reviewed them.
Judging at the Southern California Power Scale Soaring (PSS) Festival begins with scoring the scale outline, colors, markings, and detailing. Points can be added for craftsmanship, and models that are built from scratch rather than from a kit get extra points. In addition, there is a point bonus for flying the model at the event.
At the May 2007 PSS Festival I entered the Frogfoot in the "Jets" category. Other categories are "Propeller," "Civilian," and "Foam."
"Dave, you picked a tough year to enter the best jets category since the F-86 Sabre is this year's club project plane and there are seven of them here," remarked one Inland Slope Rebels club member when I was taking my model to the judging area.
I was not one of the five finalists after the static judging, but after a flight demonstration I gained enough points to finish in fourth place. I was happy with the results of my effort on this project—especially since I'm not an advanced craftsman or a super detailer.
The reason for this article is to encourage you to try the airbrush to expand your model-finishing skills. I'm happy I listened to other modelers' encouragement and learned to use this tool. MA
—Dave Garwood [email protected]
Sources
- Andreas Mergner (creative genius): Plane Insane Models, (518) 542-9527, www.planeinsanemodels.com
- Southern California PSS Festival: Inland Slope Rebels Slope Soaring club, www.inlandsloperebels.com, www.inlandsloperebels.com/slopeflyer/Slopeflyer06-5.pdf
Scale Documentation
The Sukhoi Su-25 Frogfoot is the Soviet counterpart to the American Fairchild-Republic A-10 Warthog. Both are ground-attack, or “strike,” aircraft, sometimes called “tank busters.” Both are designed to fly at low altitude and deliver ordnance onto enemy targets; they carry rapid-firing, high-caliber guns.
The A-10’s official nickname was “Thunderbolt II,” but it has more often been called the “Warthog,” perhaps reflecting its ungainly appearance. The Sukhoi Design Bureau nicknamed the Su-25 “Grach” (Raven), but its assigned NATO reporting name was “Frogfoot.” That name has become associated with the Su-25 in many English-speaking countries.
I had long been interested in this aircraft, and I am heavily indebted to my flying and photography buddy, Carl Maas, for molding the fiberglass fuselage. This mold was not a trivial project; the complicated shape of the fuselage, especially the engine nacelles, required a four-part mold. Carl was magnificently generous with his talent and expertise, and his work on this project inspires me to learn fuselage molding on one of my next endeavors.
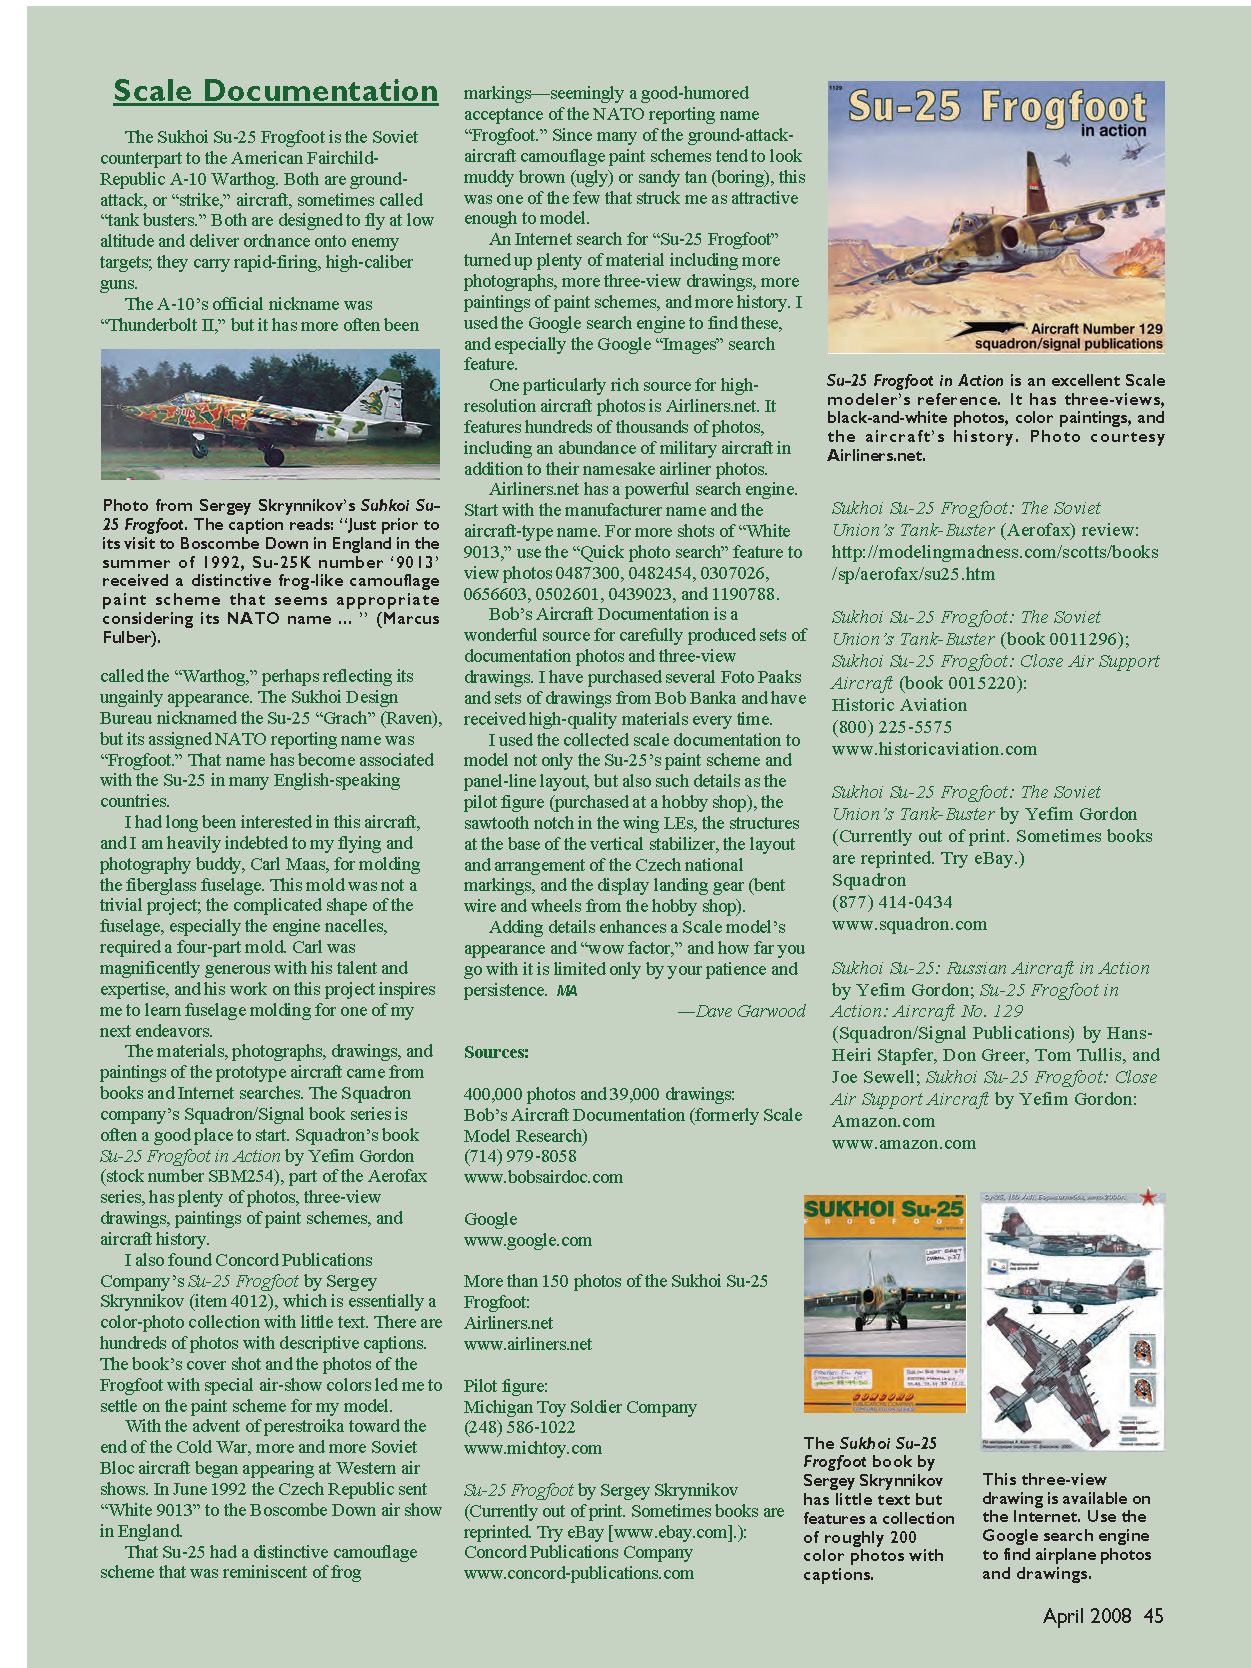
The materials, photographs, drawings, and paintings of the prototype aircraft came from books and Internet searches. The Squadron company’s Squadron/Signal book series is often a good place to start. Squadron’s Su-25 Frogfoot in Action by Yefim Gordon (stock number SBM254), part of the Aerofax series, has plenty of photos, three-view drawings, paintings of paint schemes, and aircraft history.
I also found Concord Publications Company’s Su-25 Frogfoot by Sergey Skrynnikov (item 4012), which is essentially a color-photo collection with little text. There are hundreds of photos with descriptive captions. The book’s cover shot and the photos of the Frogfoot with special airshow colors led me to settle on the paint scheme for my model.
With the advent of perestroika toward the end of the Cold War, more and more Soviet Bloc aircraft began appearing at Western air shows. In June 1992 the Czech Republic sent “White 9013” to the Boscombe Down air show in England.
That Su-25 had a distinctive camouflage scheme that was reminiscent of frog markings—seemingly a good-humored acceptance of the NATO reporting name “Frogfoot.” Since many of the ground-attack aircraft camouflage paint schemes tend to look muddy brown (ugly) or sandy tan (boring), this was one of the few that struck me as attractive enough to model.
An Internet search for “Su-25 Frogfoot” turned up plenty of material including more photographs, more three-view drawings, more paintings of paint schemes, and more history. I used the Google search engine to find these, and especially the Google Images search feature.
One particularly rich source for high-resolution aircraft photos is Airliners.net. It features hundreds of thousands of photos, including an abundance of military aircraft in addition to their namesake airliner photos.
Airliners.net has a powerful search engine. Start with the manufacturer name and the aircraft-type name. For more shots of “White 9013,” use the Quick photo search feature to view photos 048730, 0482454, 0307026, 0656603, 0502601, 0439023, and 1190788.
Bob’s Aircraft Documentation is a wonderful source for carefully produced sets of documentation photos and three-view drawings. I have purchased several Foto Paaks and sets of drawings from Bob Banka and have received high-quality materials every time.
I used the collected scale documentation to model not only the Su-25’s paint scheme and panel-line layout, but also such details as the pilot figure (purchased at a hobby shop), the sawtooth notch in the wing LEs, the structures at the base of the vertical stabilizer, the layout and arrangement of the Czech national markings, and the display landing gear (bent wire and wheels from the hobby shop).
Adding details enhances a scale model’s appearance and “wow factor,” and how far you go with it is limited only by your patience and persistence. MA
—Dave Garwood
Sources:
- Bob’s Aircraft Documentation (formerly Scale Model Research), 400,000 photos and 39,000 drawings: (714) 979-8058, www.bobsairdoc.com
- Google: www.google.com
- Airliners.net: more than 150 photos of the Sukhoi Su-25 Frogfoot, www.airliners.net
- Pilot figure: Michigan Toy Soldier Company, (248) 586-1022, www.michtoy.com
- Su-25 Frogfoot by Sergey Skrynnikov (Currently out of print. Sometimes books are reprinted. Try eBay [www.ebay.com]): Concord Publications Company, www.concord-publications.com
- Sukhoi Su-25 Frogfoot: The Soviet Union’s Tank-Buster (Aerofax) review: http://modelingmadness.com/scotts/books/sp/aerofax/su25.htm
- Historic Aviation (Sukhoi Su-25 Frogfoot titles): (800) 225-5575, www.historicaviation.com
- Squadron (books by Yefim Gordon, sometimes out of print): (877) 414-0434, www.squadron.com
- Amazon.com (various Su-25 titles): www.amazon.com
Airbrush Technique
I'm going to cover the steps involved with airbrush painting; in this case I'm working with masked areas of the Su-25. Freehand painting involves the same steps, just with more practice at handling the airbrush.
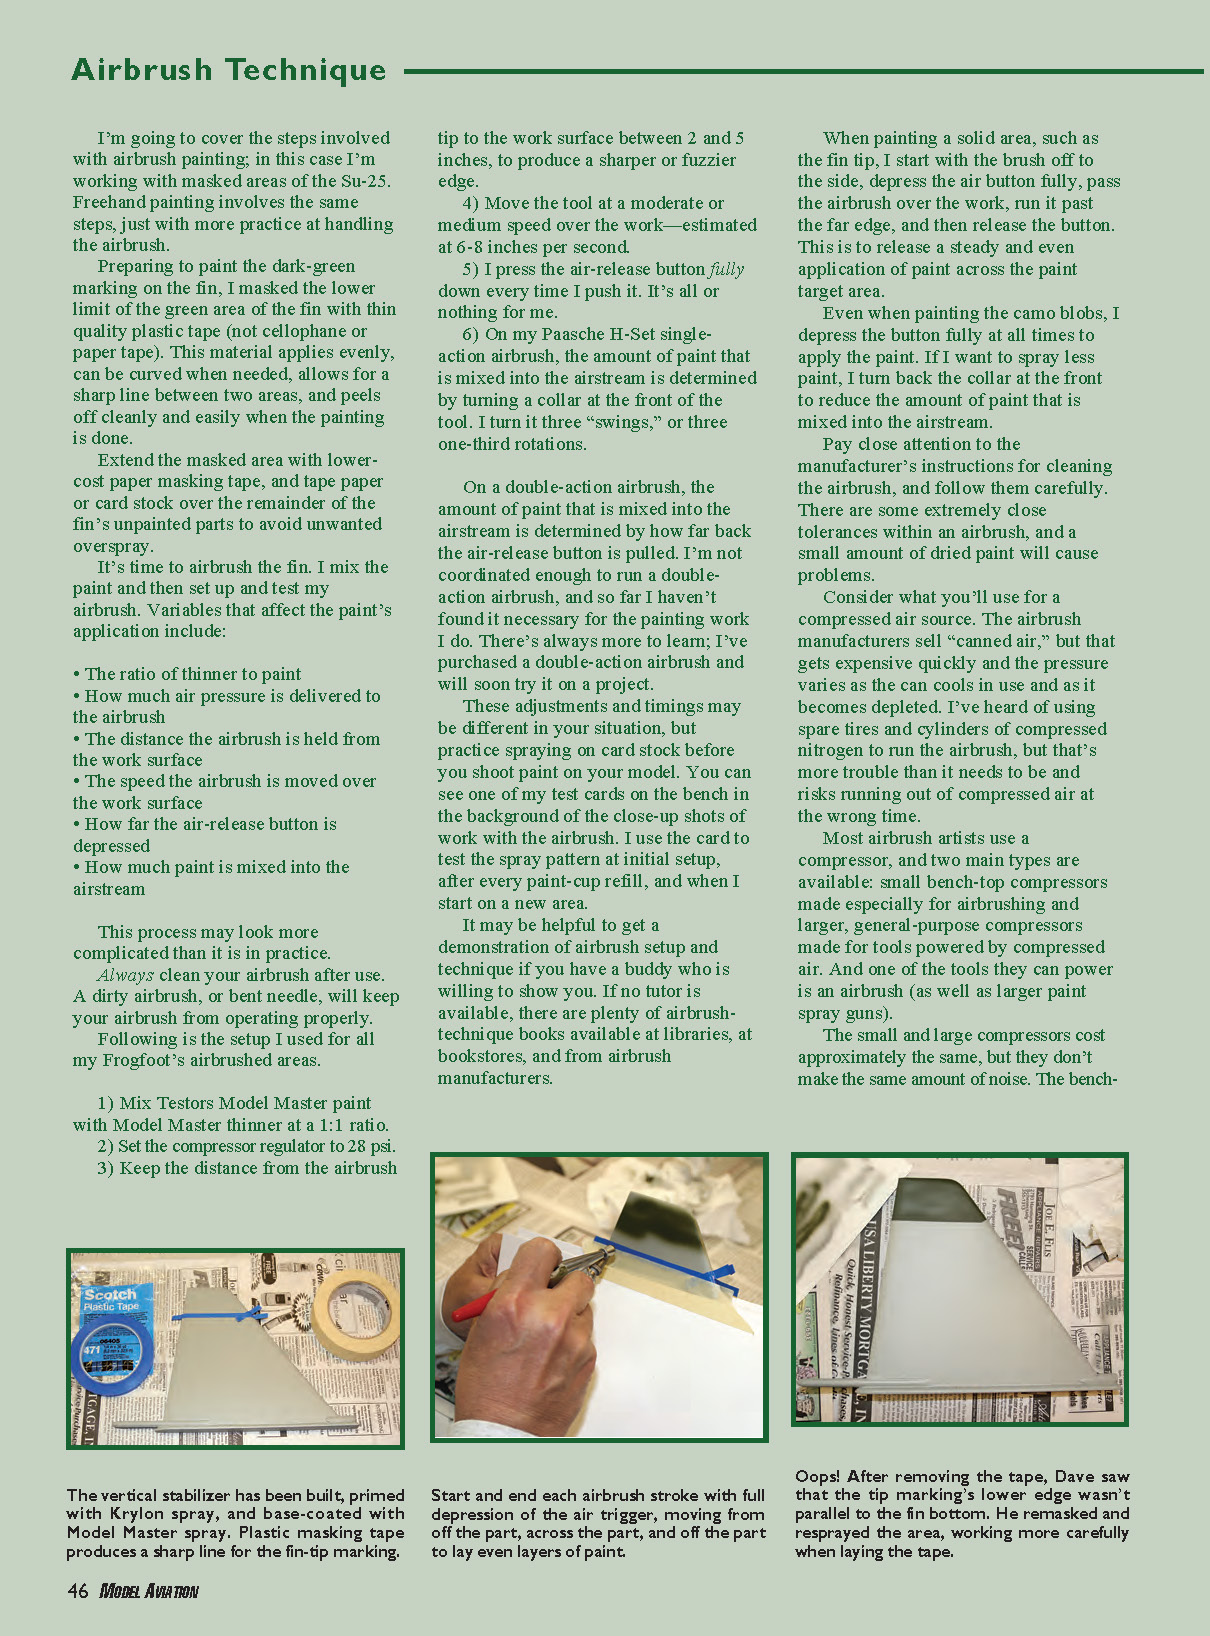
Preparing to paint the dark-green marking on the fin, I masked the lower limit of the green area of the fin with thin quality plastic tape (not cellophane or paper tape). This material applies evenly, can be curved when needed, allows for a sharp line between two areas, and peels off cleanly and easily when the painting is done.
Extend the masked area with lower-cost paper masking tape, and tape paper or card stock over the remainder of the fin's unpainted parts to avoid unwanted overspray.
It's time to airbrush the fin. I mix the paint and then set up and test my airbrush. Variables that affect the paint's application include:
- The ratio of thinner to paint
- How much air pressure is delivered to the airbrush
- The distance the airbrush is held from the work surface
- The speed the airbrush is moved over the work surface
- How far the air-release button is depressed
- How much paint is mixed into the airstream
This process may look more complicated than it is in practice. Always clean your airbrush after use. A dirty airbrush, or bent needle, will keep your airbrush from operating properly.
Following is the setup I used for all my Frogfoot's airbrushed areas.
- Mix Testors Model Master paint with Model Master thinner at a 1:1 ratio.
- Set the compressor regulator to 28 psi.
- Keep the distance from the airbrush tip to the work surface between 2 and 5 inches, to produce a sharper or fuzzier edge.
- Move the tool at a moderate or medium speed over the work—estimated at 6–8 inches per second.
- I press the air-release button fully down every time I push it. It's all or nothing for me.
- On my Paasche H-Set single-action airbrush, the amount of paint that is mixed into the airstream is determined by turning a collar at the front of the tool. I turn it three "swings," or three one-third rotations.
On a double-action airbrush, the amount of paint that is mixed into the airstream is determined by how far back the air-release button is pulled. I'm not coordinated enough to run a double-action airbrush, and so far I haven't found it necessary for the painting work I do. There's always more to learn; I've purchased a double-action airbrush and will soon try it on a project.
These adjustments and timings may be different in your situation, but practice spraying on card stock before you shoot paint on your model. You can see one of my test cards on the bench in the background of the close-up shots of work with the airbrush. I use the card to test the spray pattern at initial setup, after every paint-cup refill, and when I start on a new area.
It may be helpful to get a demonstration of airbrush setup and technique if you have a buddy who is willing to show you. If no tutor is available, there are plenty of airbrush-technique books available at libraries, at bookstores, and from airbrush manufacturers.
When painting a solid area, such as the fin tip, I start with the brush off to the side, depress the air button fully, pass the airbrush over the work, run it past the far edge, and then release the button. This is to release a steady and even application of paint across the paint target area.
Even when painting the camo blobs, I depress the button fully at all times to apply the paint. If I want to spray less paint, I turn back the collar at the front to reduce the amount of paint that is mixed into the airstream.
Pay close attention to the manufacturer's instructions for cleaning the airbrush, and follow them carefully. There are some extremely close tolerances within an airbrush, and a small amount of dried paint will cause problems.
Consider what you'll use for a compressed air source. The airbrush manufacturers sell "canned air," but that gets expensive quickly and the pressure varies as the can cools in use and as it becomes depleted. I've heard of using spare tires and cylinders of compressed nitrogen to run the airbrush, but that's more trouble than it needs to be and risks running out of compressed air at the wrong time.
Most airbrush artists use a compressor, and two main types are available: small bench-top compressors made especially for airbrushing and larger, general-purpose compressors made for tools powered by compressed air. And one of the tools they can power is an airbrush (as well as larger paint spray guns).
The small and large compressors cost approximately the same, but they don't make the same amount of noise. The bench-top compressors either run all the time or start on demand when the air-release button on the airbrush is depressed. These smaller units were designed to run quietly but are not silent.
My general-purpose compressor has a 12-gallon storage tank. Although it makes a fearsome racket while it's filling the tank, it's blissfully silent when I'm painting. I close the door and leave the shop when the tank is filling, and between fills I have 45–60 minutes of working time with no motor running.
—Dave Garwood
Sources
- Dixie Art and Airbrush (Airbrush, paint and compressor supplier): (800) 783-2612, www.dixieart.com
- Testors Corporation (Aztek airbrushes, Model Master airbrush paint in bottles, Model Master spray paint in cans): (800) 962-6654, www.testors.com
- Badger Air-Brush Company: (800) 247-2787, www.badgerairbrush.com, www.badgerairbrush.com/air101.htm (tutorial)
- Paasche H beginner airbrush: www.dixieart.com/HSet.html
- How to Airbrush.Com (free basic airbrush lessons, how-to articles, tutorials, tech tips): www.howtoairbrush.com
- Paasche Airbrush Co.: (773) 867-9191, www.paascheairbrush.com
- Iwata Medea Inc. (products, how-to articles): (503) 253-7308, www.iwata-medea.com
Painting Hints and Tips
- Practice with the airbrush and spray cans before shooting paint on a model. You may learn that you need less paint than expected. A light touch on the nozzle and patience lead to good application of scale paint. Keep the can or airbrush moving while spraying.
- Vinyl tape works better than paper masking tape; it gives a consistently clean edge line and peels off cleanly and easily.
- Be wary of aggressive adhesive on masking materials; they can pull up paint even after it has dried thoroughly. Test your masking materials. You can cut down the adhesive aggressiveness by carefully applying talcum powder. Be conservative; it's easy to use too much powder and remove all the stickiness.
- Consider making one or more practice panels to check the spray pattern from the cans, paint coverage, decal coverage, and the masking materials' performance.
- Newsprint is not the best choice for masking off large areas that don't receive paint. The ink can rub off on your hands and on the model. Brown wrapping paper works well.
- Take your time and work carefully. Most mistakes can be fixed with a brush or toothpick application of more paint, but that generally takes more time than doing it right the first time.
- Don't forget panel lines; they dress up the airplane and require little extra work. I use a Sanford Ultra Fine Point Sharpie marker, a flexible plastic ruler, and plastic templates. You can clean up mistakes with isopropyl alcohol.
- Don't be too hard on yourself for lack of perfection. Plenty of full-scale warplanes were painted and repainted in the field under adverse conditions. Little mistakes often seem huge on the bench but are unnoticeable in the air. If you make a mistake, respray the base coat and start again in that area.
Working carefully, modelers with moderate skills can improve their models' appearance using these techniques. It's worth the effort. Few will notice if a Zero panel-line layout is applied to a Spitfire, but everyone can tell the difference between an airplane with panel lines and one without. MA
—Dave Garwood
No text from the primary article ("Airbrushing Your Model’s Finish 2008/04") appears on this scanned page.
Transcribed from original scans by AI. Minor OCR errors may remain.

