
Arado Ar.96B
by Bob Isaacks
Low-wing German advanced flight trainer has great properties for FF Scale
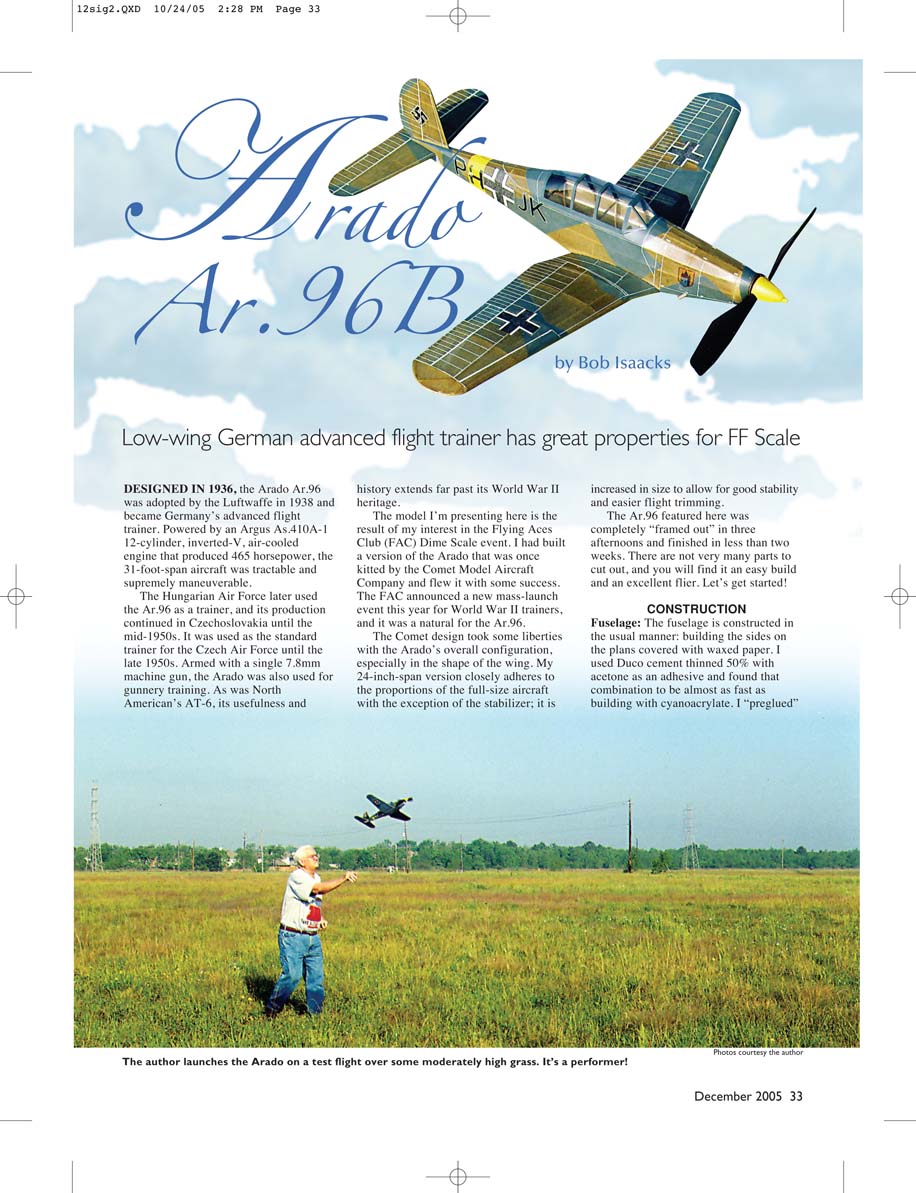
DESIGNED IN 1936, the Arado Ar.96 was adopted by the Luftwaffe in 1938 and became Germany's advanced flight trainer. Powered by an Argus As.410A-1 12-cylinder, inverted-V, air-cooled engine that produced 465 horsepower, the 31-foot-span aircraft was tractable and supremely maneuverable.
The Hungarian Air Force later used the Ar.96 as a trainer, and its production continued in Czechoslovakia until the mid-1950s. It was used as the standard trainer for the Czech Air Force until the late 1950s. Armed with a single 7.8mm machine gun, the Arado was also used for gunnery training. As was North American's AT-6, its usefulness and history extends far past its World War II heritage.
The model I'm presenting here is the result of my interest in the Flying Aces Club (FAC) Dime Scale event. I had built a version of the Arado that was once kitted by the Comet Model Aircraft Company and flew it with some success. The FAC announced a new mass-launch event this year for World War II trainers, and it was a natural for the Ar.96.
The Comet design took some liberties with the Arado's overall configuration, especially in the shape of the wing. My 24-inch-span version closely adheres to the proportions of the full-size aircraft with the exception of the stabilizer; it is increased in size to allow for good stability and easier flight trimming.
The Ar.96 featured here was completely "framed out" in the three afternoons and finished in less than two weeks. There are not very many parts to cut out, and you will find it an easy build and an excellent flier. Let's get started!
CONSTRUCTION
Fuselage: The fuselage is constructed in the usual manner; building the sides on the plans covered with waxed paper. I used Duco cement thinned 50% with acetone as an adhesive and found that combination to be almost as fast as building with cyanoacrylate. I "preglued" each joint and tried to get a good fit on each component.
I used 1/16 basswood stringers for the top and bottom of the fuselage framework. I found this wood's extra weight to be negligible and its added rigidity to be valuable on this lightly constructed model.
I pre-shaped the curved lower longeron by rolling an X-Acto knife handle on the end of the longeron while exerting downward pressure. This pre-shaping will help keep the fuselage plumb during assembly. Notice that the upper longeron is "cracked" on either side of the cockpit area, to follow the natural fuselage contours.
I built one fuselage side on top of the other and separated them with a judiciously and carefully applied double-edged razor blade. After the sides were completed, I joined them at the rear and added crosspieces, front to rear, to complete the fuselage "box."
If you closely inspect one of the accompanying photographs, you will see some internal, temporary bracing. This is in place to hold the fuselage square during assembly; it is removed before covering begins.
You will find it helpful to make the laminated nose former slightly oversize when adding it to the structure. Then it becomes easier to contour it to the 1/32 plywood nose ring and fuselage.
It's best to fabricate the side stringer by laminating two 1/16 square balsa strips over the top view of the plans. Note that this stringer is 1/8 inch wide at the nose and ends at the last vertical upright. I sand the taper into this component after gluing it to the fuselage side.
Add the formers to the box and install the stringers to complete the fuselage. I "eyeball" the stringer alignment and use a small Swiss file to cut the former notches. To keep the fuselage straight during assembly I add the stringers alternately, side to side, and cut from the same balsa strip.
It is imperative that you cut the notch for the wing spar in the bottom plate before you assemble the fuselage. Make sure the bottom former, 5b, is positioned accurately to allow a gluing surface for a wing spar.
Check your work for accuracy and proceed to the wing.
Wing: Begin the wing structure by pinning down the LE, TE, and wingtip components. Add all the ribs except the root rib. When that assembly is dry, unpin the wing and shim the tip 2 1/4 inches. Now add the root rib.
You will find it helpful to cut the ribs slightly overlength at the TE to ensure a good fit front and rear. I use a long sanding block to carefully contour the ribs before I add the spars. After the rib contour is sanded I use a steel ruler to mark the spar locations on the top of each rib; this will help achieve a "dead straight" spar run and pay off when you cover and assemble your model.
I tack-glue a length of 1/32-inch-diameter music wire to the bottom of the TE before I sand the final wing contour. This yields a uniform and straight TE. I use thinned Duco cement for this process and remove the wire with a bit of acetone.
I sand and carve the LE, and the wing is ready to cover.
Tail Surfaces: There is nothing unusual about the tail structures. Cut them out, pin them down, and glue. Try to use a hard, straight 1/16 square balsa strip for the stabilizer main spar. Make sure each component has a good fit, to prevent warping after assembly.
Propeller/Spinner/Nose Plug: Carve the propeller from a block of 12-pound-density balsa. Band-saw the top and side profiles to shape, and begin the shaping with corner-to-corner pairing of the undercamber. Carve and sand the top and drill the center hole for the bushing, which is a short length of 1/16-inch-outside-diameter aluminum tubing.
For those who have not mastered propeller carving, a yellow Czech P-30 propeller trimmed to 8 1/2 inches in diameter is a good substitute.
Sand the spinner to shape on a mandrel mounted in a Dremel tool that is set to operate at a slow speed. The front of the spinner includes a short length of 3/16-inch-diameter brass tubing that is filed to provide a clutch and freewheel ramp.
The nose plug is constructed from four laminations of 1/8 balsa, capped front and rear with 1/32 plywood. The plug is keyed in place with a short length of 1/8-inch-diameter aluminum tubing and drilled to supply 3° right thrust and downthrust. It is also bushed with a short length of 1/16-inch aluminum tubing.
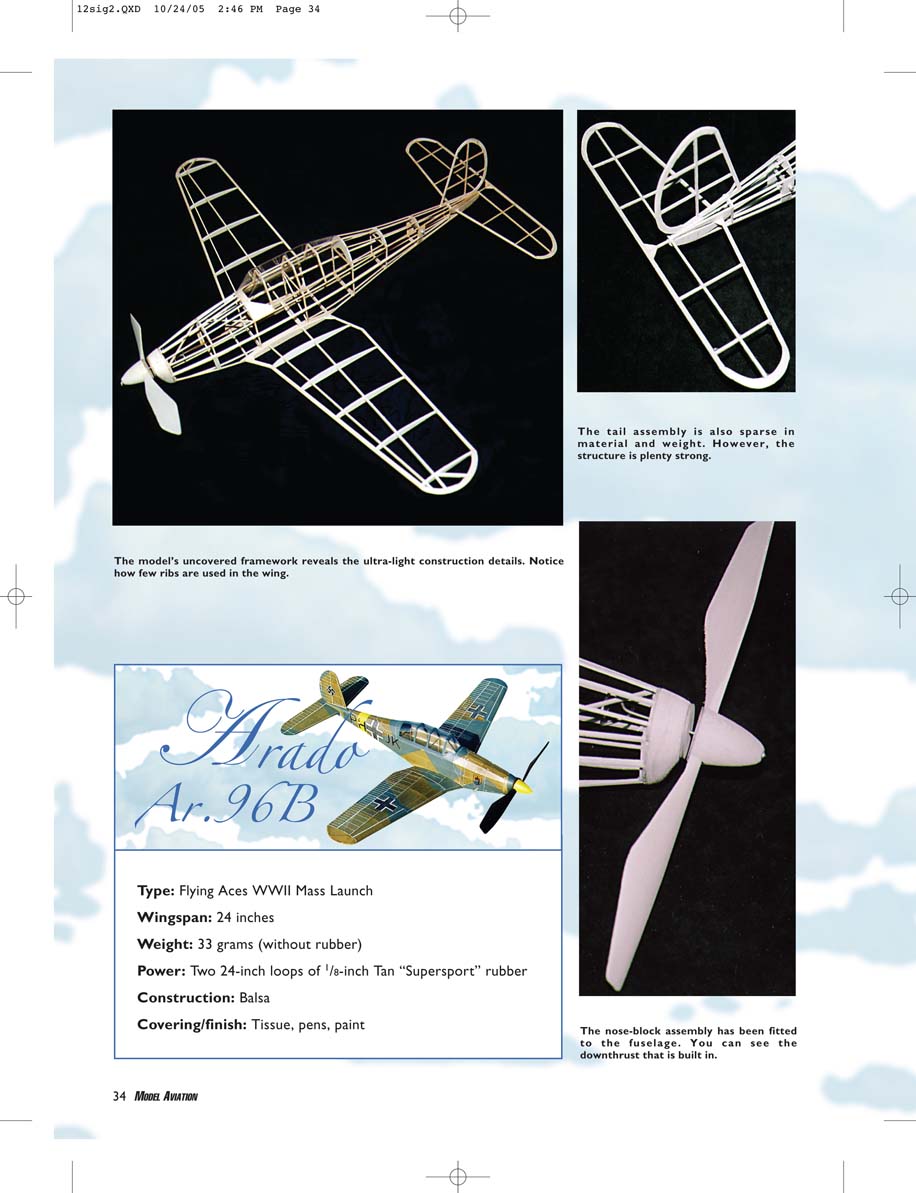
Type: Flying Aces WWII Mass Launch
Wingspan: 24 inches
Weight: 33 grams (without rubber)
Power: Two 24-inch loops of 1/8-inch Tan "Supersport" rubber
Construction: Balsa
Covering/finish: Tissue, pens, paint
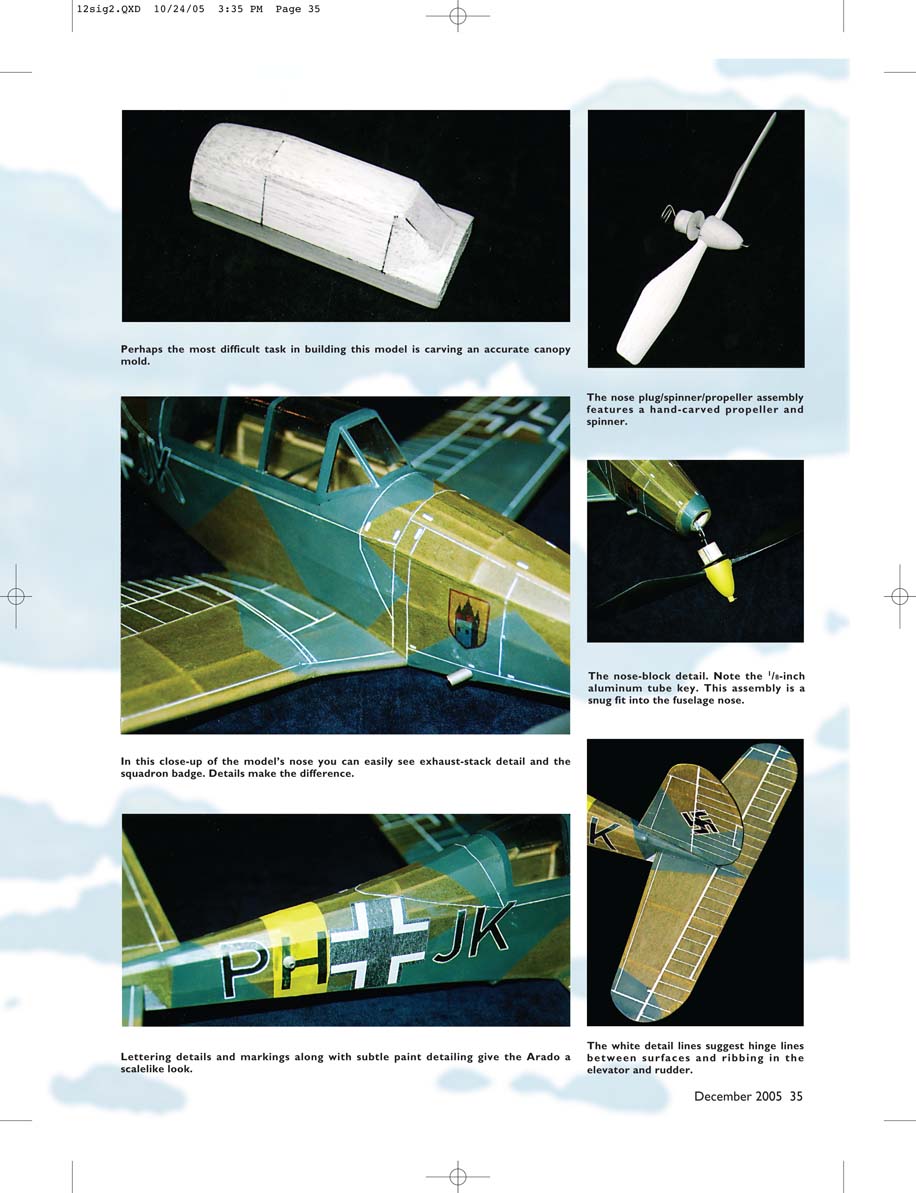
Perhaps the most difficult task in building this model is carving an accurate canopy mold.
The nose plug/spinner/propeller assembly features a hand-carved propeller and spinner.
The nose-block detail. Note the 1/8-inch aluminum tube key. This assembly is a snug fit into the fuselage nose.
In this close-up of the model's nose you can easily see exhaust-stack detail and the squadron badge. Details make the difference.
Lettering details and markings along with subtle paint detailing give the Arado a scale-like look.
The white detail lines suggest hinge lines between surfaces and ribbing in the elevator and rudder.
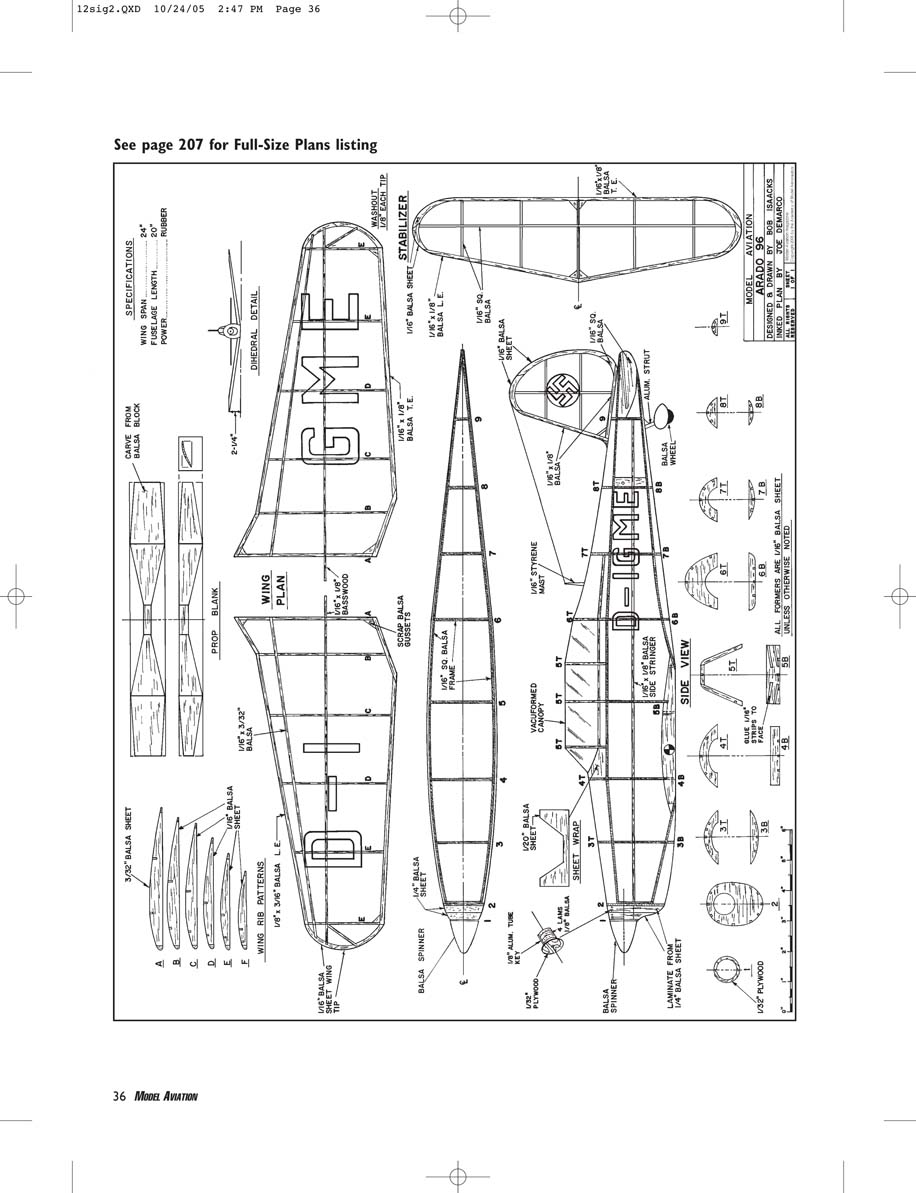
No additional article text appears on this scanned page. The page contains full-size plan drawings and a caption ("See page 207 for Full-Size Plans listing") but no continuing article prose to transcribe.
Covering:
There are many ways to cover a stick-and-tissue model. My preference has always been the classic nitrate-dope procedure.
I apply thinned nitrate dope to every component the covering will touch. I put on enough dope that the wood will appear to be glossy/varnished. I apply the tissue wet (using alcohol as a wetting agent) and use thinner to adhere the tissue to the periphery of the area being covered.
After the tissue dries, it will be free of wrinkles and taut. Any induced warps can be removed by holding the surface over a steam kettle and twisting in the opposite direction of the warp while moving to cold air. I usually apply two coats of thinned nitrate dope to the tissue after the shrinking is complete.
If you are interested in this technique, a DVD that is available through www.smallflyingarts.com illustrates it.
Finishing:
There are some steps you can take to make your model out of the ordinary and elicit some “oohs” and “aahs” at the flying field.
I finished my Ar.96 in the “splinter” camouflage scheme the Germans used during World War II. I covered the model with olive-drab tissue on the upper surfaces and light blue on the underside. I masked off the splinter camo with frisket film and airbrushed it on using Model Master Schwarzgrun water-based paint.
I applied the control-surface markings with a white gel roller on the dark upper surfaces and a black Identapen on the light undersurfaces. I purchased both markers at an art-supply store. I painted the propeller with flat-black auto primer and the spinner with Tamiya acrylic Flat Yellow, as I did with the fuselage stripe.
The decals were computer-generated and printed on white tissue. I painted the back side of the tissue with white lacquer to prevent the dark colors from bleeding through. Then I positioned the decals and glued them in place with thinned white glue.
I obtained the cockpit framing by painting a strip of white tissue with Schwarzgrun during the splinter painting. I cut it into the proper-width strips and applied it to the exterior of the canopy with thinned white glue.
I have a canopy mold and can provide canopies for this model for $7 postpaid in the U.S. Send a request to me at the address at the end of the article.
I completed all the detailing before I assembled the model. During assembly be sure to check for equal dihedral of both wings, that the stabilizer and rudder are square to the fuselage, and that the stabilizer tips are equidistant from the wingtips.
Trimming/Flying:
Double-check each surface for warps and remove any before proceeding. (I build/warp approximately 1/8 inch of washout—TE high—in each wingtip.) Check to make sure the CG is correct.
Test-glide the model over high grass and correct any stalling/diving tendencies by sheeting the stabilizer. Once the glide looks good, hand-wind in roughly 400 turns and launch into the wind, nose level.
If the model begins to climb and turn left, you are on your way! If it does not climb, adjust the thrustline. If it does not turn left, a small clump of clay on the left wingtip will help things along. Continue to add turns until your Arado climbs out and near-maximum turns are used.
Good luck with your model, and watch out for Hung (the thermal god)!
Bob Isaacks 4335 Field Meadow Katy TX 77449
Transcribed from original scans by AI. Minor OCR errors may remain.

