
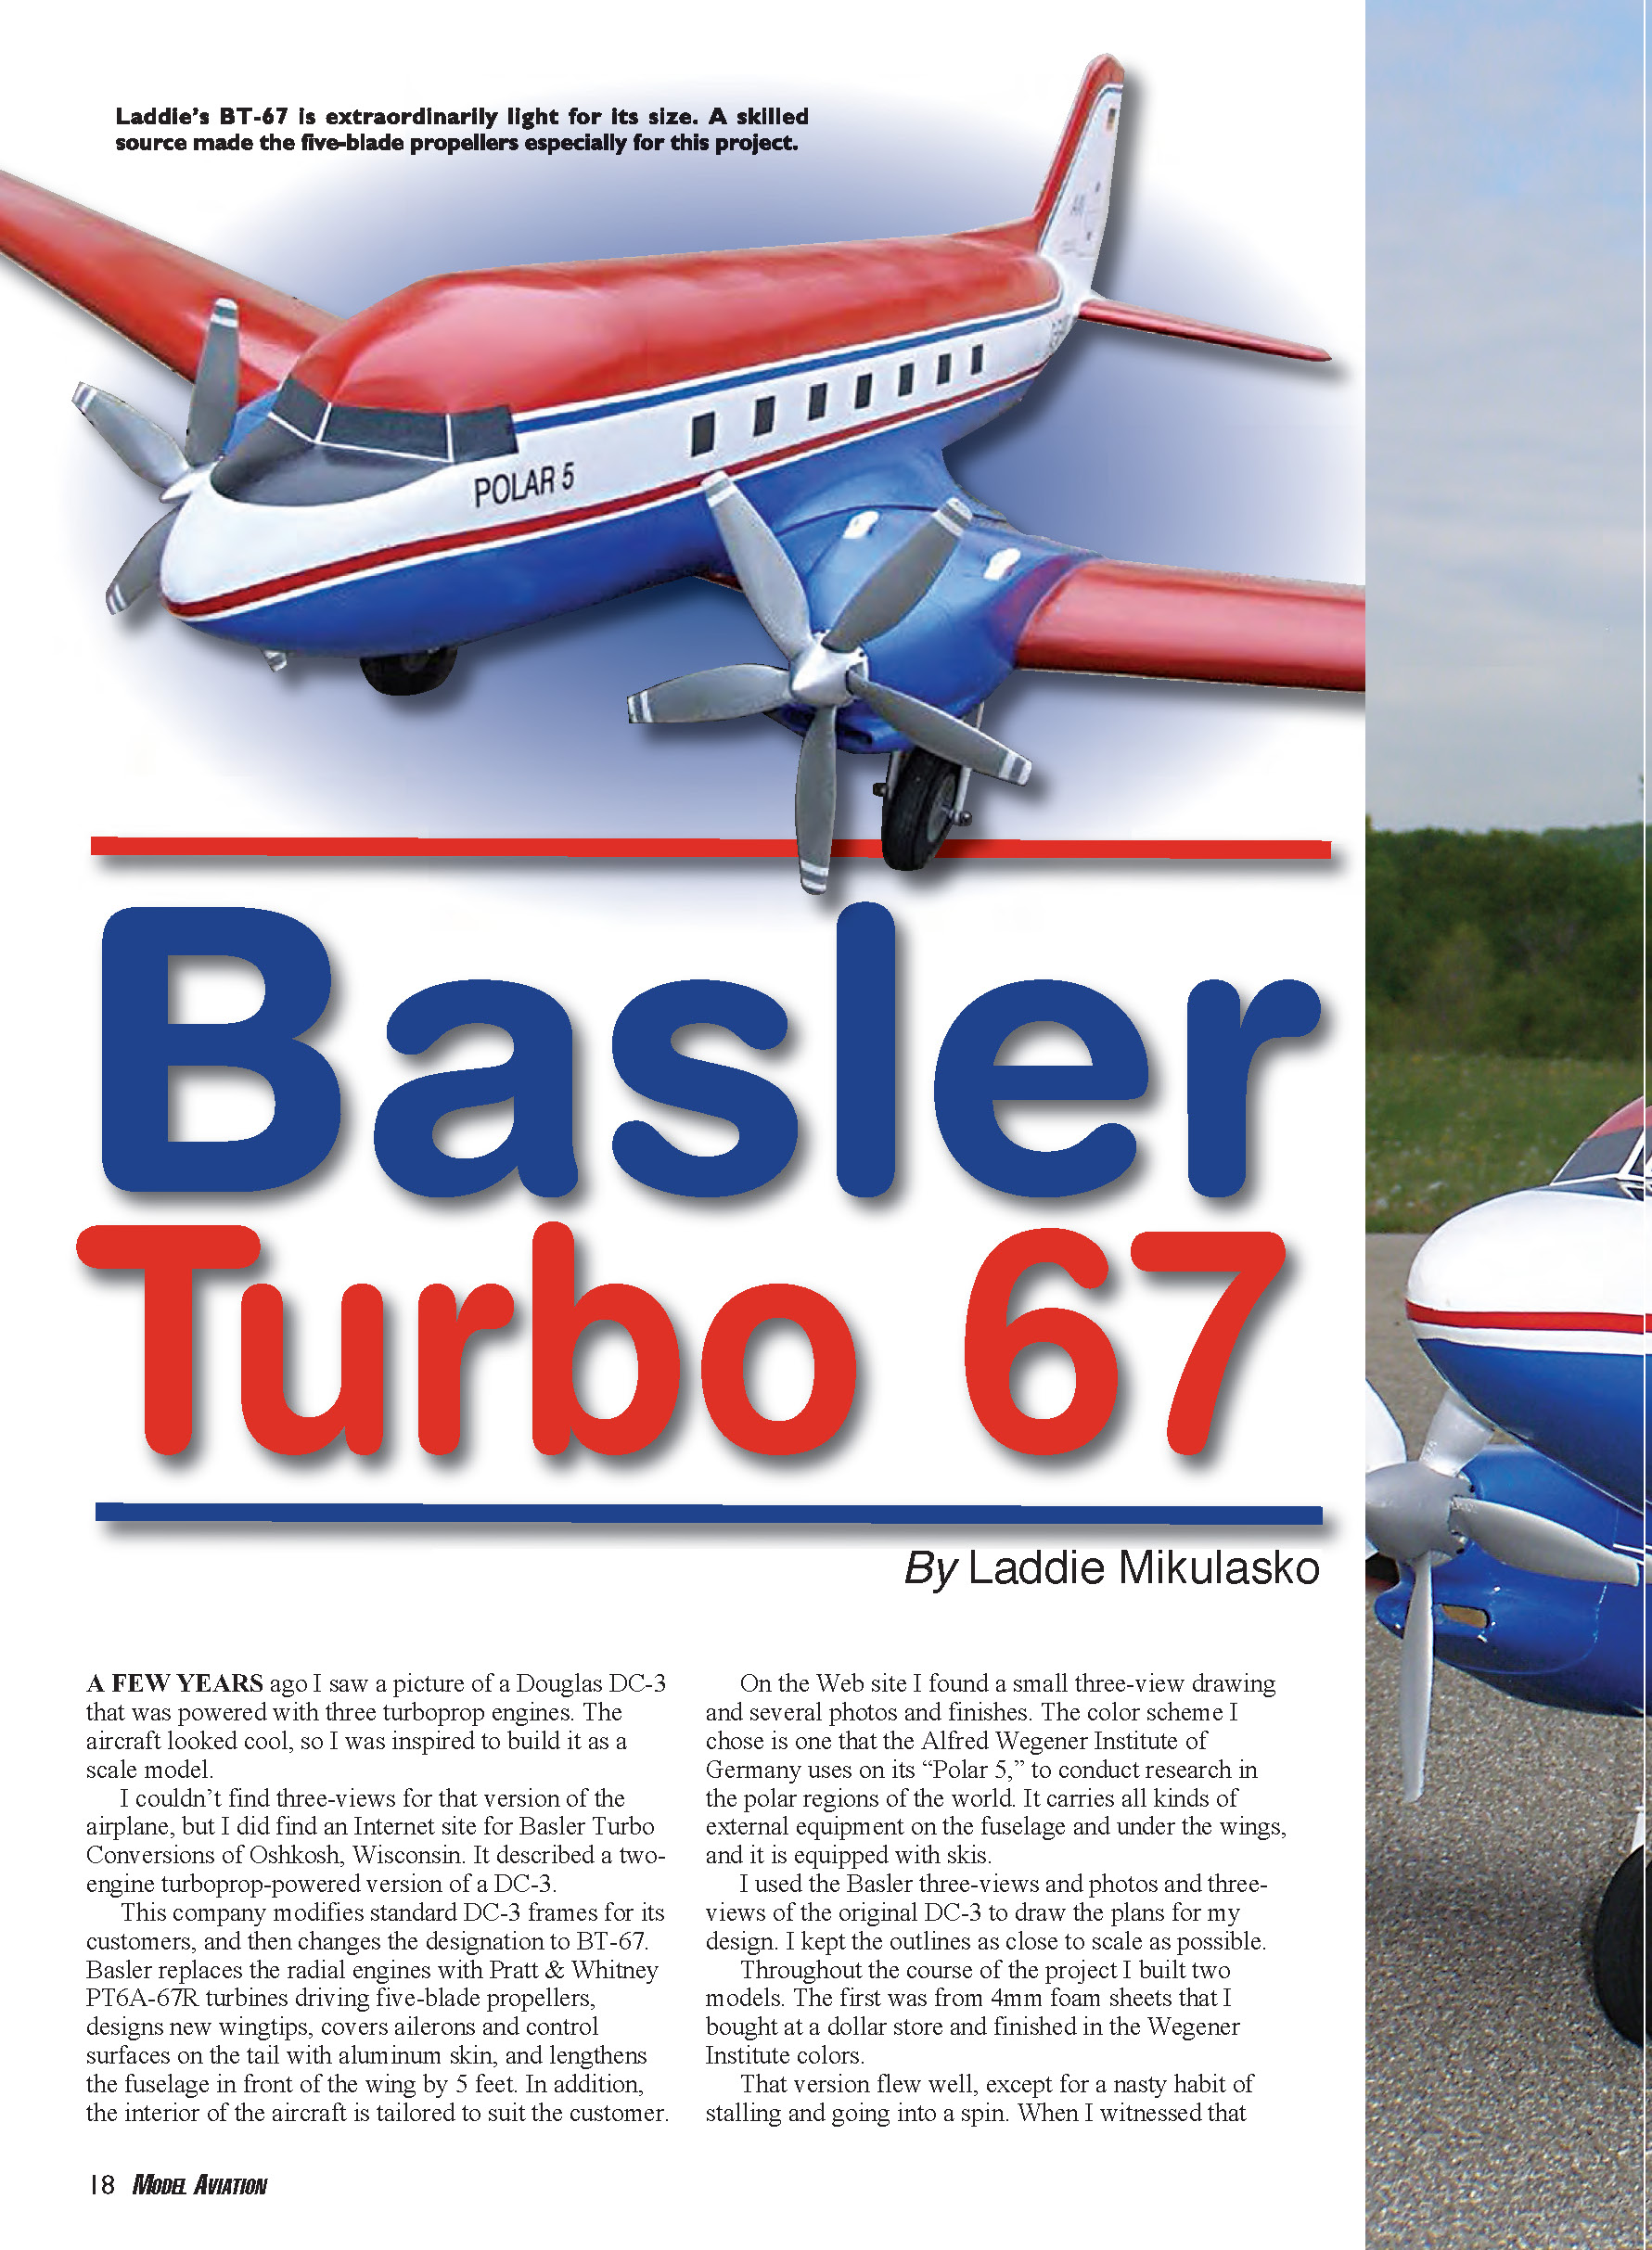
Basler Turbo 67
By Laddie Mikulasko
A few years ago I saw a picture of a Douglas DC-3 powered with three turboprop engines. The aircraft looked cool, and I was inspired to build it as a scale model. I couldn't find three-views for that version, but I did find Basler Turbo Conversions of Oshkosh, Wisconsin, which describes a two-engine turboprop conversion of the DC-3 designated BT-67.
Basler modifies standard DC-3 airframes: they replace the radial engines with Pratt & Whitney PT6A-67R turbines driving five-blade propellers, design new wingtips, cover ailerons and tail control surfaces with aluminum skin, and lengthen the fuselage in front of the wing by 5 feet. Interiors are tailored to each customer.
On the Basler web site I found a small three-view and several photos and finishes. I chose the color scheme used by the Alfred Wegener Institute of Germany on its "Polar 5" research aircraft. That airplane carries external equipment on the fuselage and under the wings and is equipped with skis.
I used the Basler three-views, photos, and three-views of the original DC-3 to draw the plans for my design, keeping the outlines as close to scale as possible.
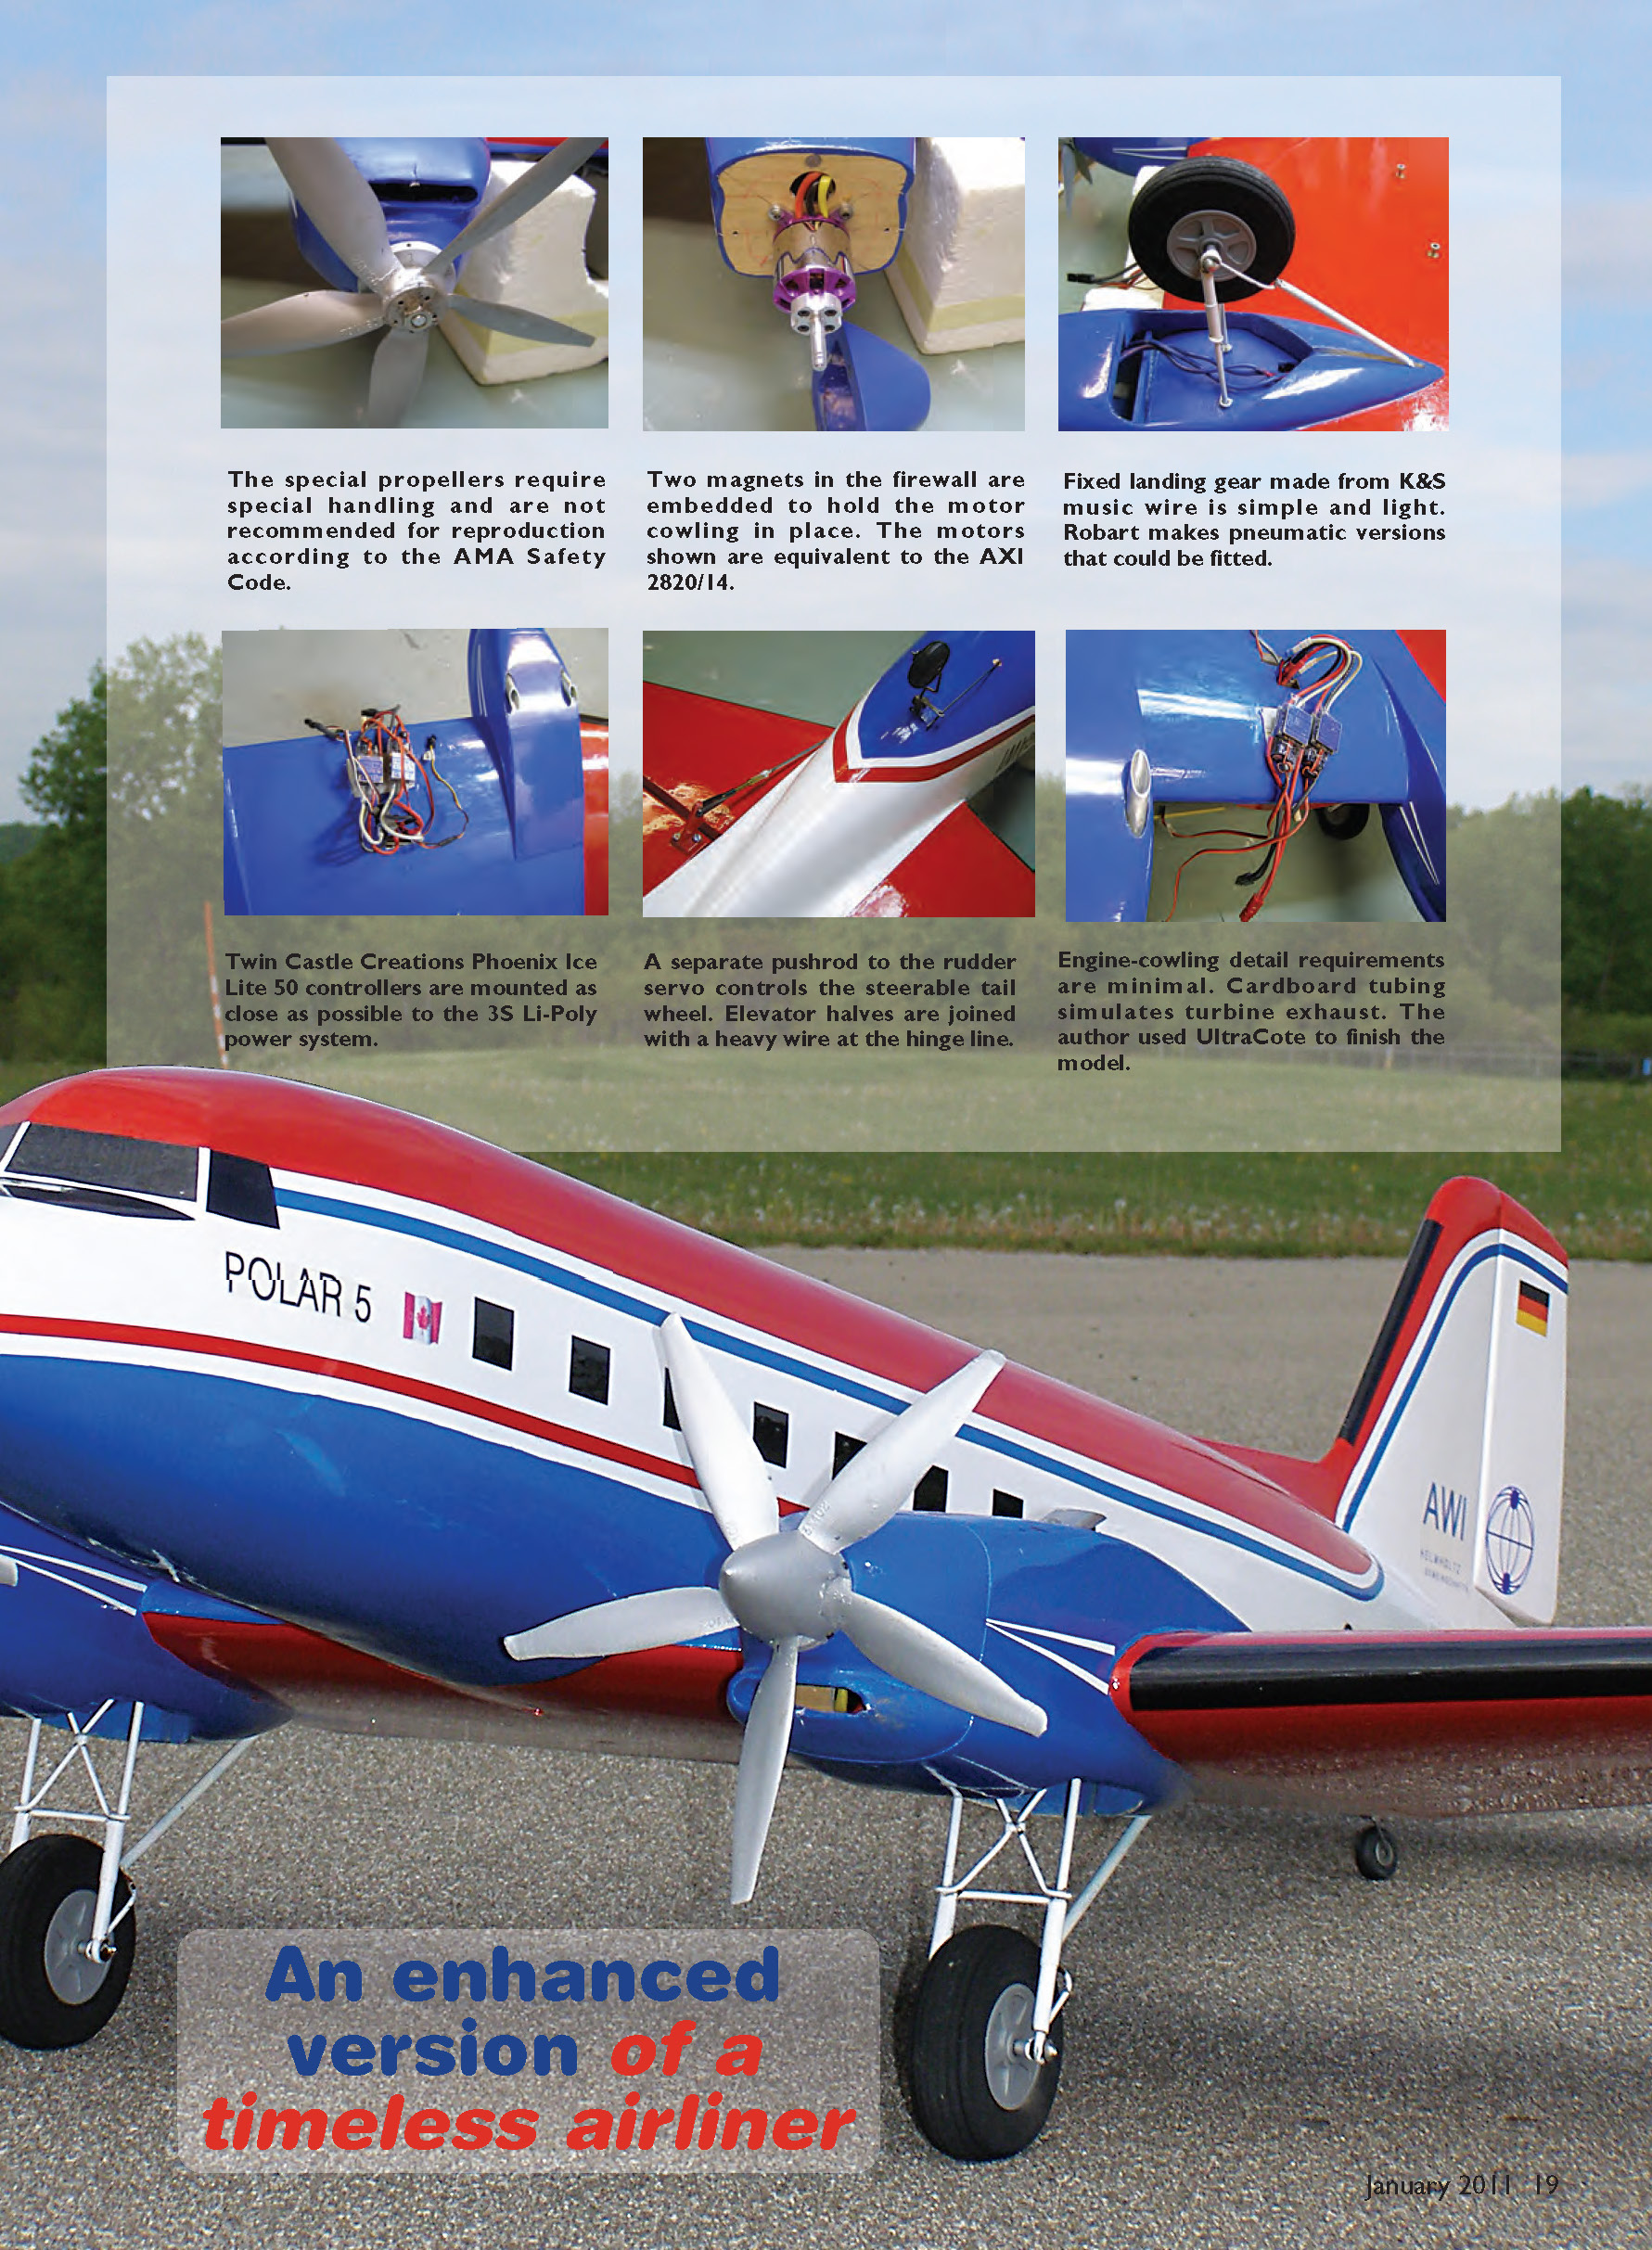
An enhanced version of a timeless airliner
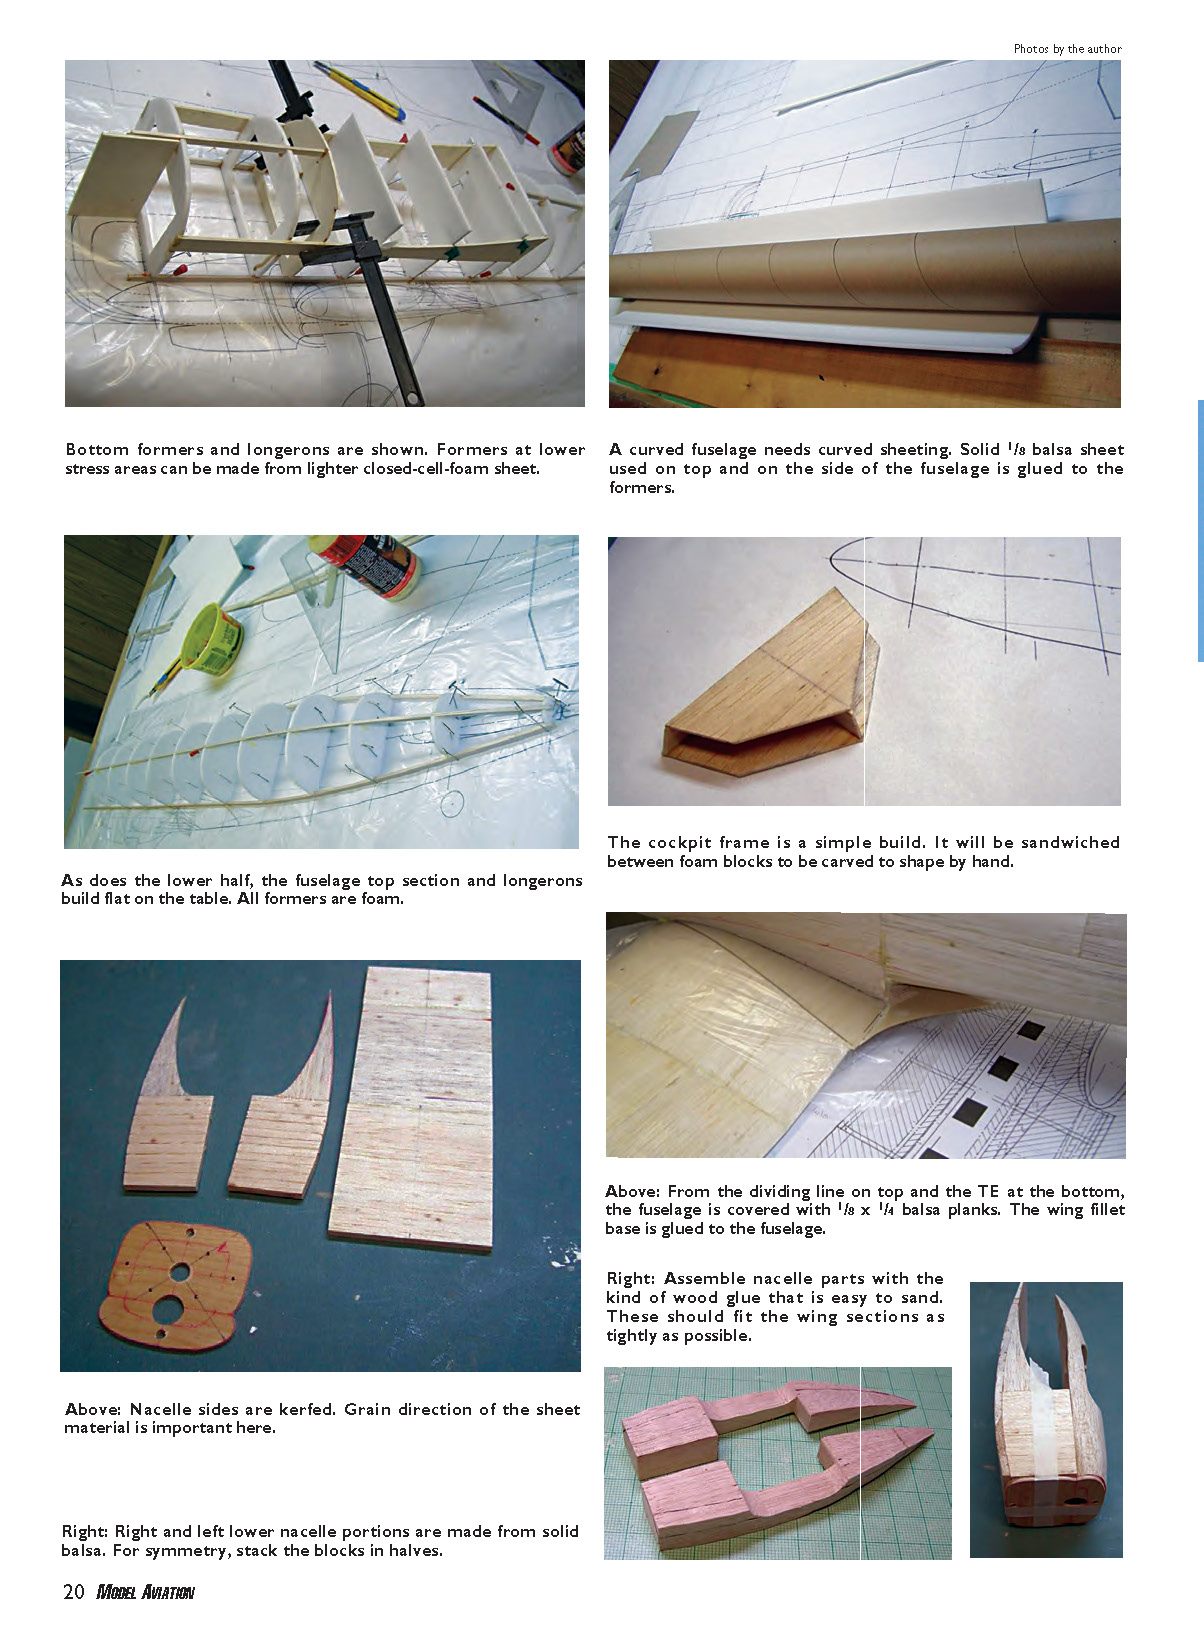
Prototypes and construction materials
- I built two models. The first was from 4 mm foam sheets bought at a dollar store and finished in the Wegener Institute colors. It flew well except for a nasty habit of stalling and entering a spin. From that behavior I learned that omitting washout from the wing was a mistake.
- I intended to build a new wing, but after several modelers showed interest in the plans, I built a new airframe using balsa and plywood—materials more familiar to many aeromodelers. I also experimented using Depron sheet material for some formers that are normally built from plywood or balsa.
Construction materials and finish
- Construction: balsa, plywood, foam (with some Depron formers)
- Finish: heat-shrink film (I used UltraCote)
- Other details: fixed landing gear made from K&S music wire; Robart makes pneumatic retracts that could be fitted as the model is large enough to accept them. Cardboard tubing simulates turbine exhaust. Elevator halves are joined with a heavy wire at the hinge line. Two magnets embedded in the firewall hold the motor cowl in place. Engine-cowling detail requirements are minimal.
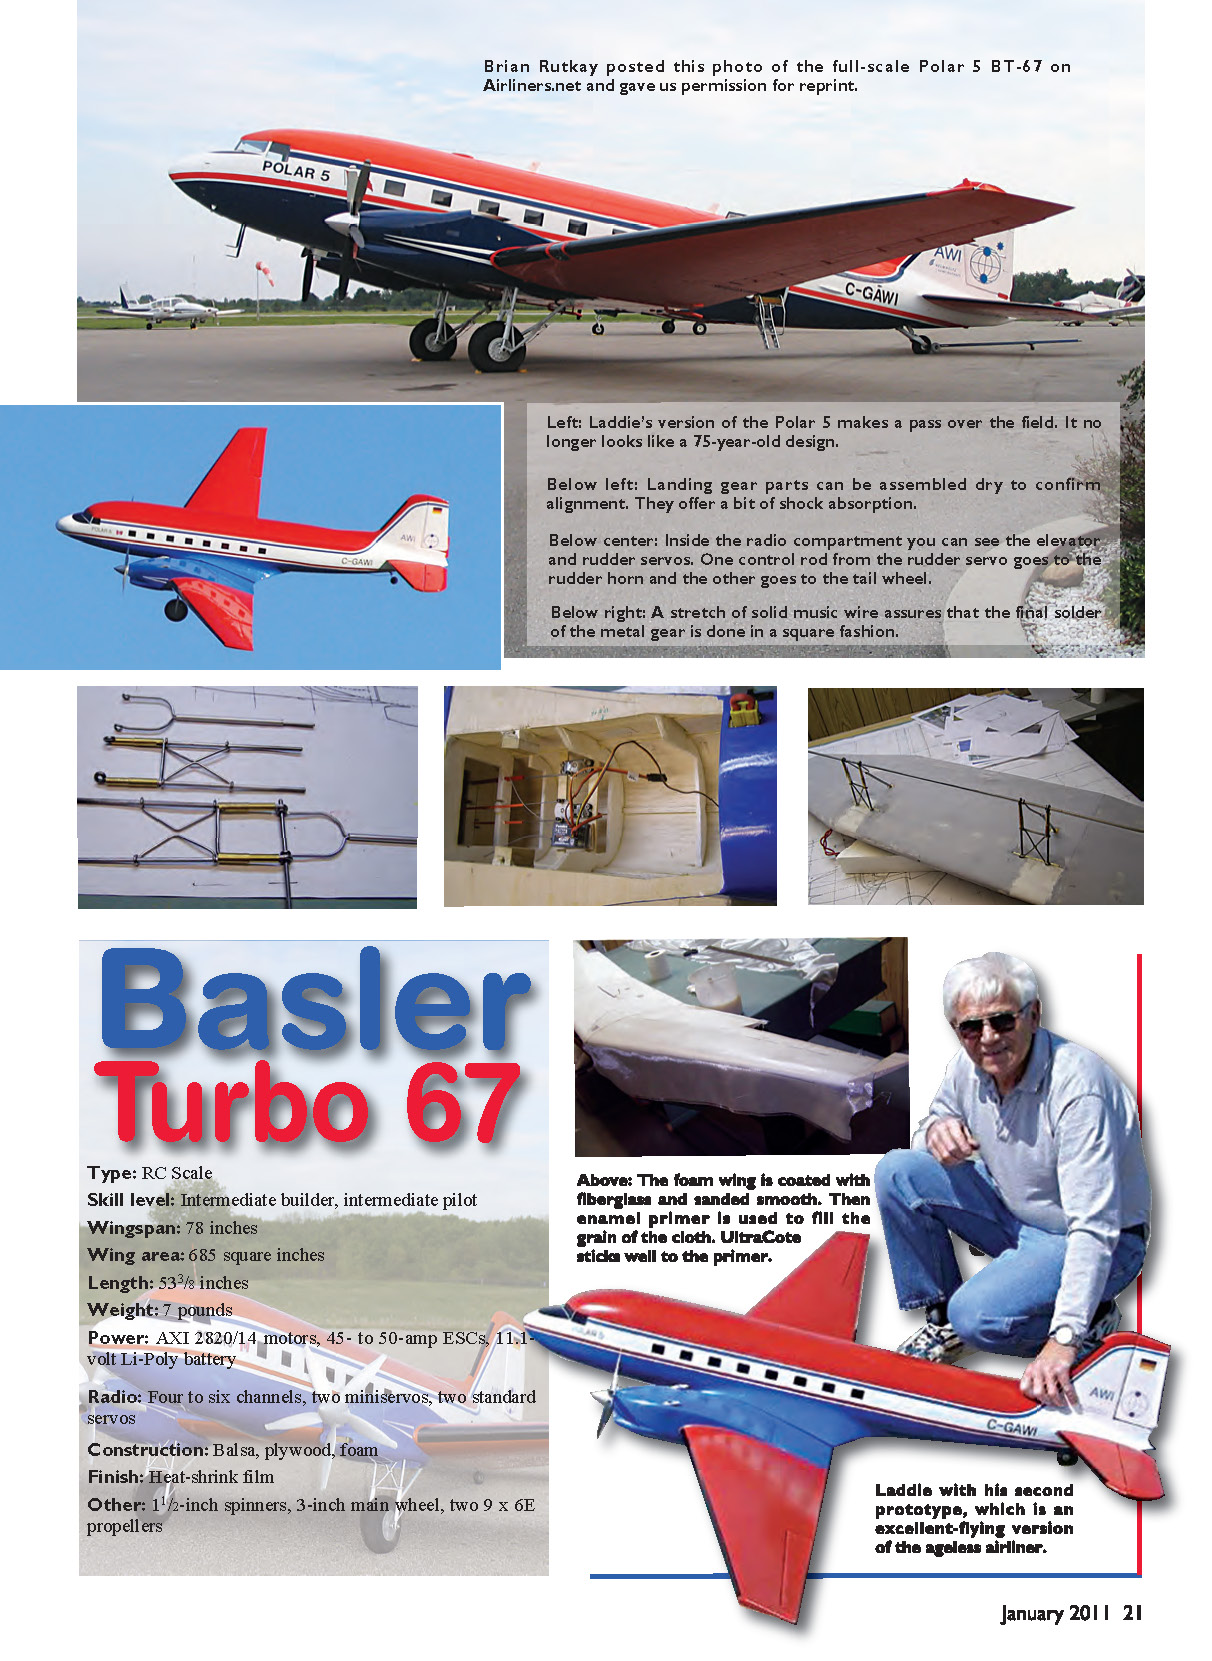
Specifications
- Type: RC Scale
- Skill level: Intermediate builder, intermediate pilot
- Wingspan: 78 inches
- Wing area: 685 square inches
- Length: 53-3/8 inches
- Weight: 7.0–7.5 pounds (depending on batteries)
- Power: AXI 2820/14 motors
- ESC: 45- to 50-amp ESCs (Castle Creations Phoenix Ice Lite 50 used)
- Battery: pair of 3S 3000 mAh Li-Poly packs (mounted near center section)
- Radio: Four to six channels; two mini servos, two standard servos
- Propellers: originally 9 x 6; author experimented with three-blade and five-blade setups (see warnings below)
- Landing gear: 3-inch main wheel; 1-1/2-inch spinners
- Construction: balsa, plywood, foam
- Finish: Heat-shrink film
Powerplant and propeller experiments
- I installed two AXI 2820/14 outrunner motors powered from a pair of 3S 3000 mAh Li-Poly battery packs. Castle Creations Phoenix Ice Lite 50 ESCs are mounted at the wing center-section near the batteries.
- I originally flew the airplane with 9 x 6 propellers. Flight performance was good with this setup; each motor draws about 24 amps and produces roughly 2.5 pounds of static thrust.
- For a better scale appearance I made five-blade propellers from five 8 x 4 two-blade APC-E propellers. I do not encourage anyone to make propellers. It can be dangerous if done improperly; vibration and hub strength are critical concerns. My experiment was done extraordinarily carefully to ensure hub strength and correct balance. There are many ways to build propellers wrong—do not attempt unless you accept the dangers and know what you are doing.
- Note: The special propellers require special handling and are not recommended for reproduction according to the AMA Safety Code.
Flight characteristics and handling
- After correcting the wing with washout, the design flew docilely.
- During takeoff, allow the BT-67 to pick up considerable speed before liftoff. Gain a good deal of height before exploring flight characteristics.
- At high altitude, slow the model to check behavior; the BT-67 will loop and roll, but it is intended to be flown in a more scale manner. Low passes down the runway are a crowd pleaser.
- Like the full-scale aircraft, this model will probably operate well from snow if equipped with proper skis.
- Check the CG carefully. Move the motor batteries if needed to achieve the correct balance.
Practical tips and tricks
- After you determine the best flight-testing CG positions, remove the wing as if to change batteries. With the fuselage upside-down in a cradle, check the balance point of the fuselage with the motor batteries still inside. Mark the level-balance location using a pen on the wing-fillet base or inside the wing saddle. When using different batteries, balance the fuselage based on this mark so you won't have to bolt and unbolt the wing to locate the correct CG.
- Because the model is electric, panel-line details can be added with a fine-point Sharpie marker to taste.
- A separate pushrod to the rudder servo controls a steerable tailwheel.
The best part
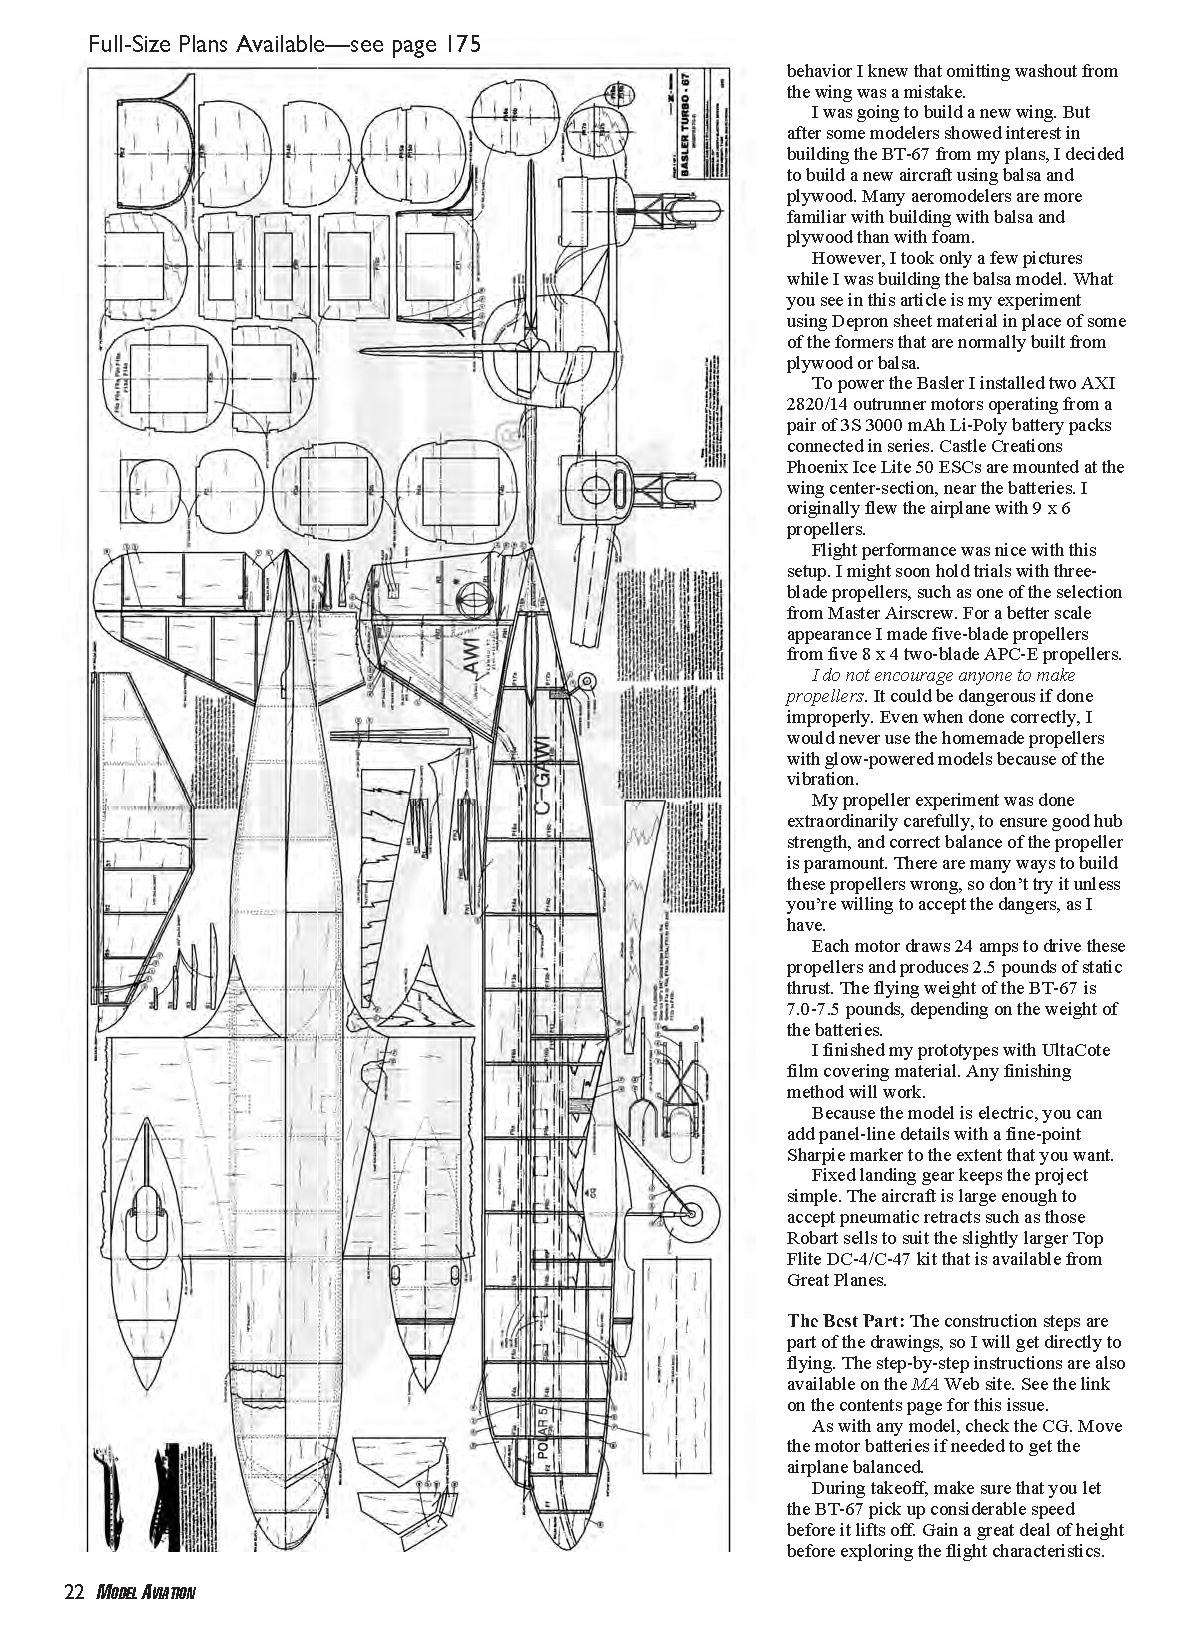
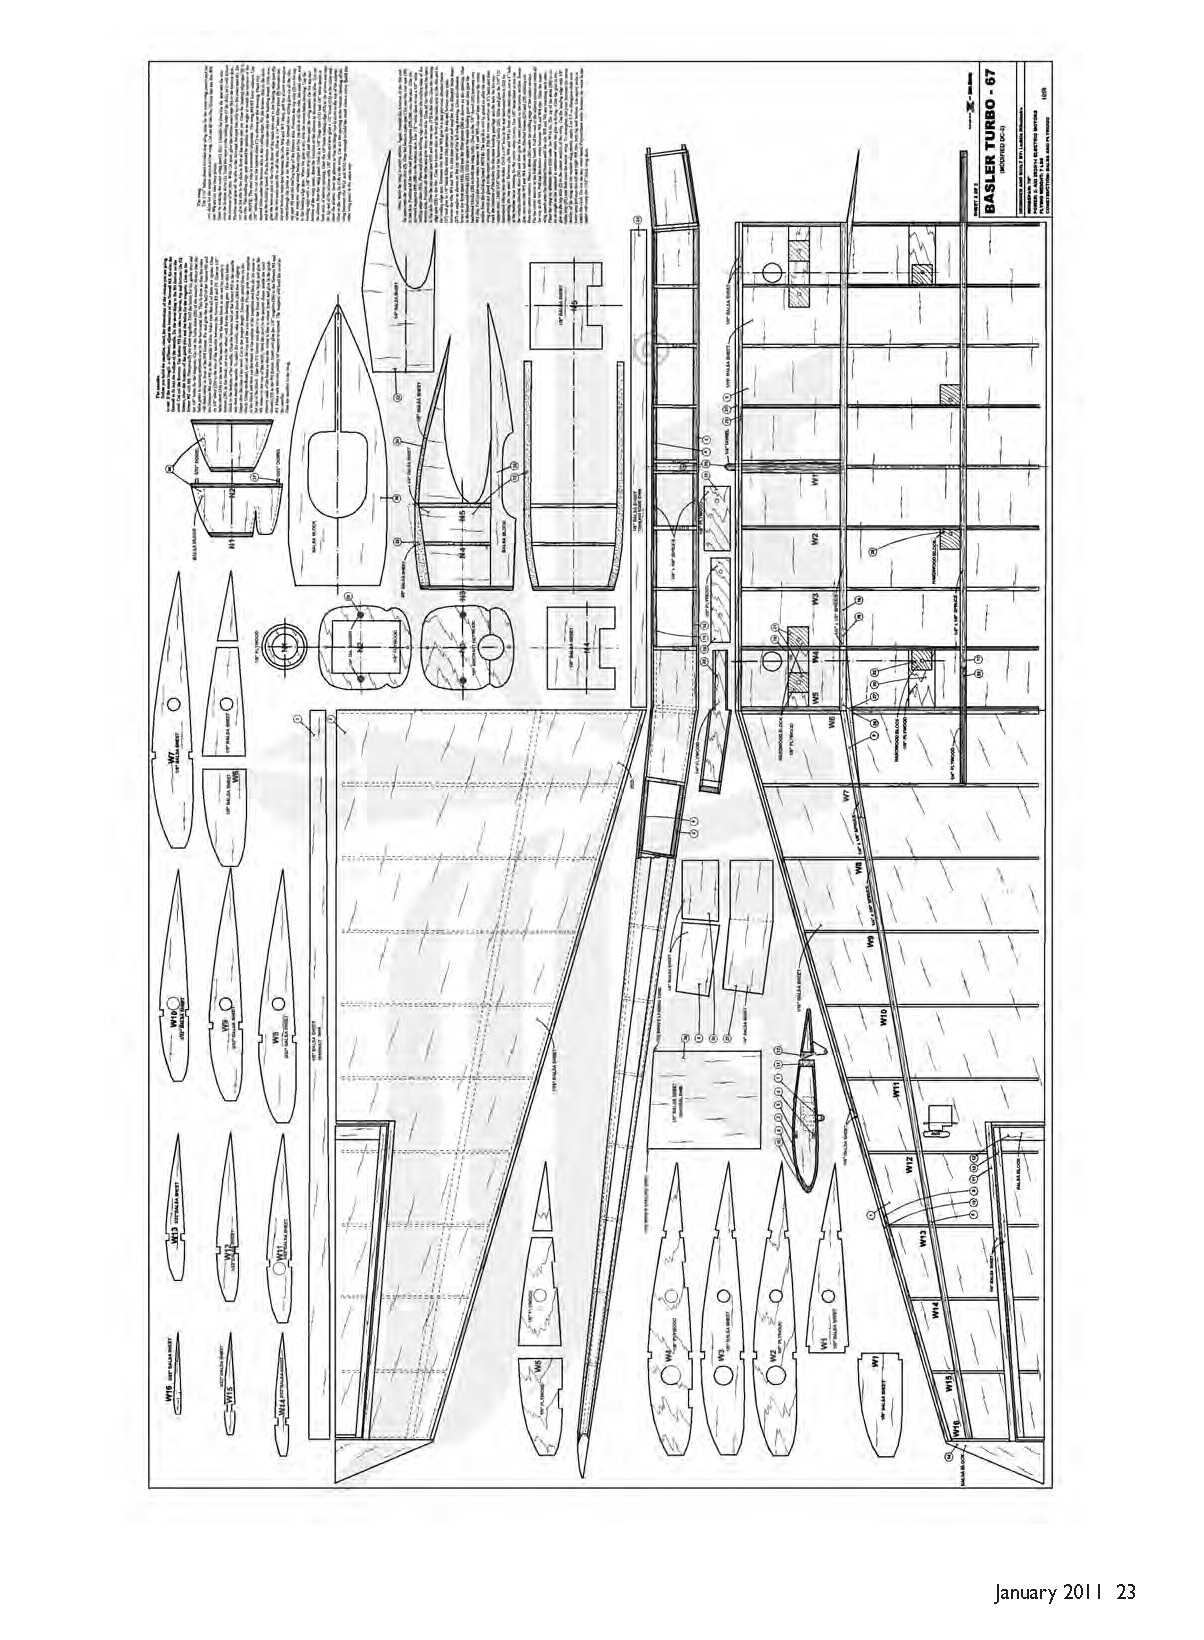
The construction steps are included in the drawings, and step-by-step instructions are also available on the Model Aviation web site (see Sources). With the plans and these notes, you can go directly to flying once the model is finished.
Good luck!
Laddie Mikulasko [email protected]
Sources
- AXI motors: Hobby Lobby — (866) 512-1444 — www.hobby-lobby.com
- UltraCote: Hangar 9 — (800) 338-4639 — www.hangar9.com
- Castle Creations — (913) 390-6939 — www.castlecreations.com
- Robart — (630) 584-7616 — www.robart.com
- Model Aviation — www.modelaircraft.org/mag/December11/toc.htm
Transcribed from original scans by AI. Minor OCR errors may remain.

