
The Battery Clinic - 2010/03
New source of A123 cells
Also included in this column:
- AXI motor failure examined
- A friend of Lt. Col. Taplin
- Electrify Dynaflite’s Bird of Time
- TME news
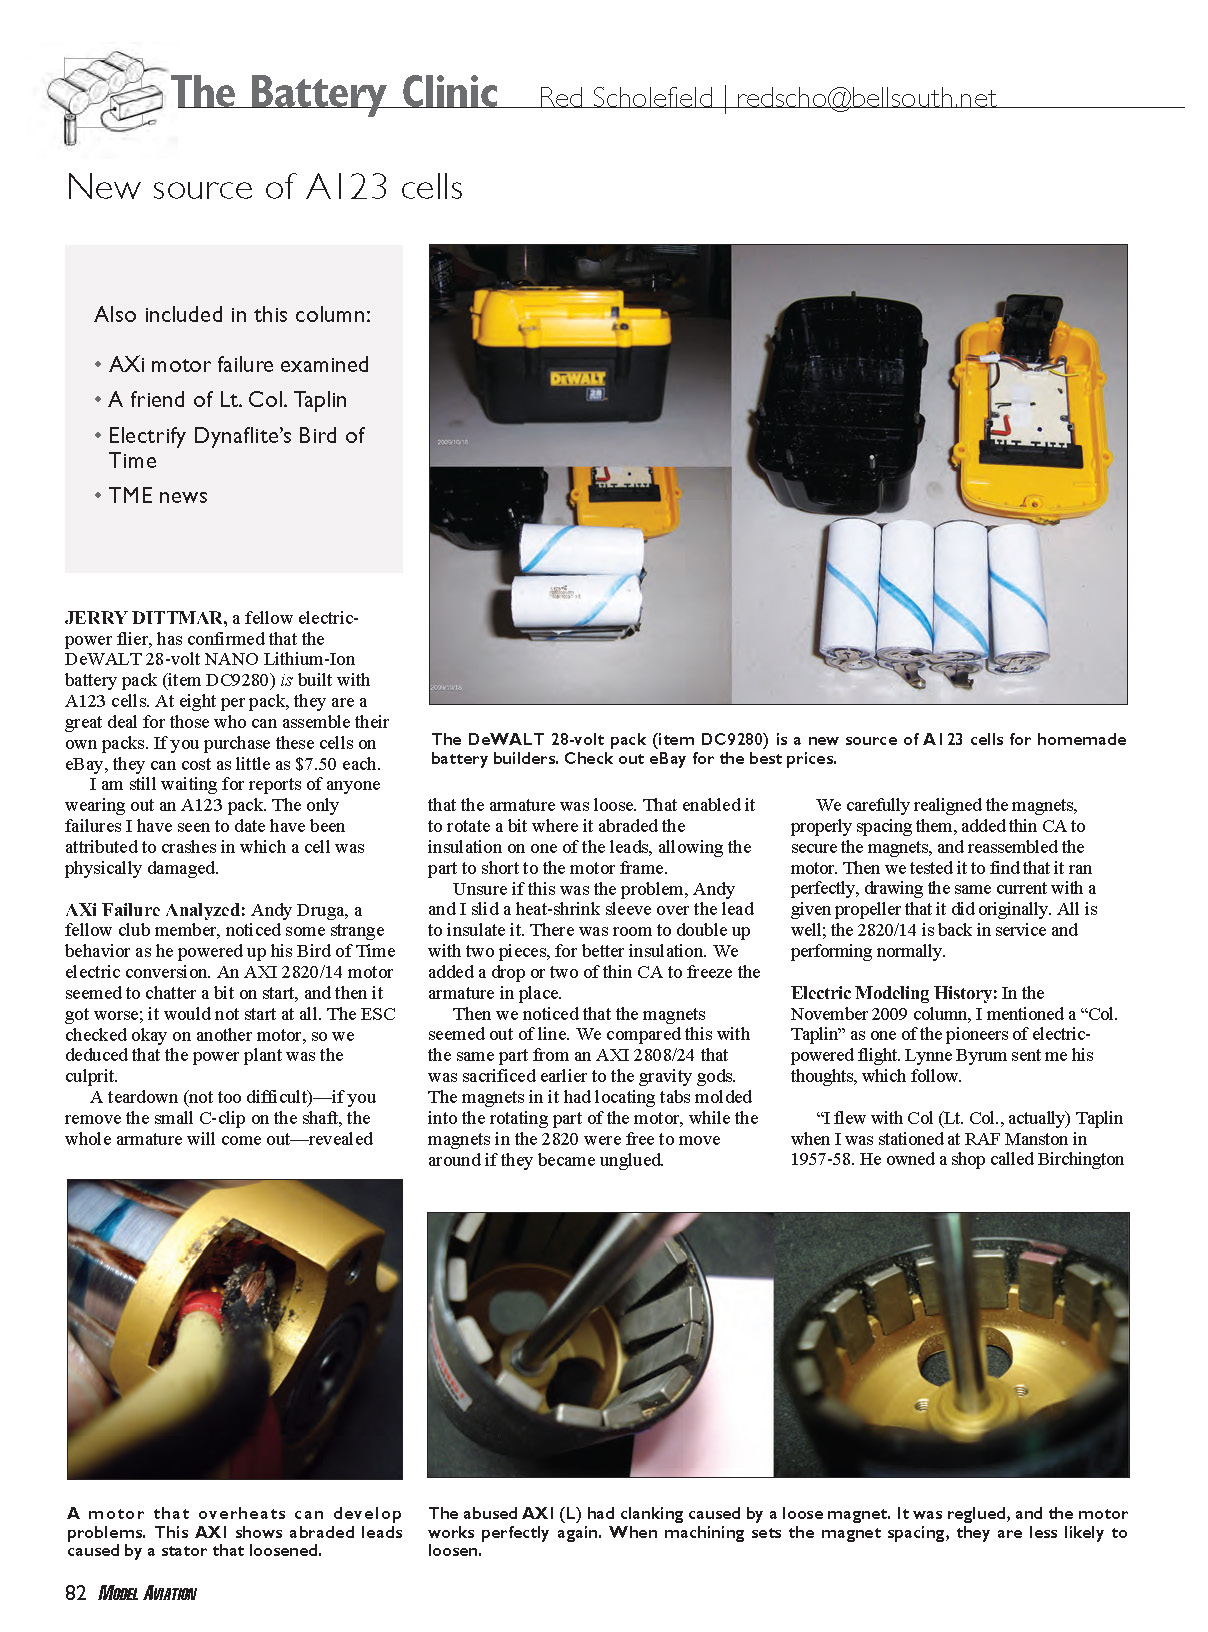
Jerry Dittmar, a fellow electric-power flier, has confirmed that the DeWALT 28-volt NANO Lithium-Ion battery pack (item DC9280) is built with A123 cells. At eight per pack, they are a great deal for those who can assemble their own packs. If you purchase these cells on eBay, they can cost as little as $7.50 each.
I am still waiting for reports of anyone wearing out an A123 pack. The only failures I have seen to date have been attributed to crashes in which a cell was physically damaged.
AXI Failure Analyzed
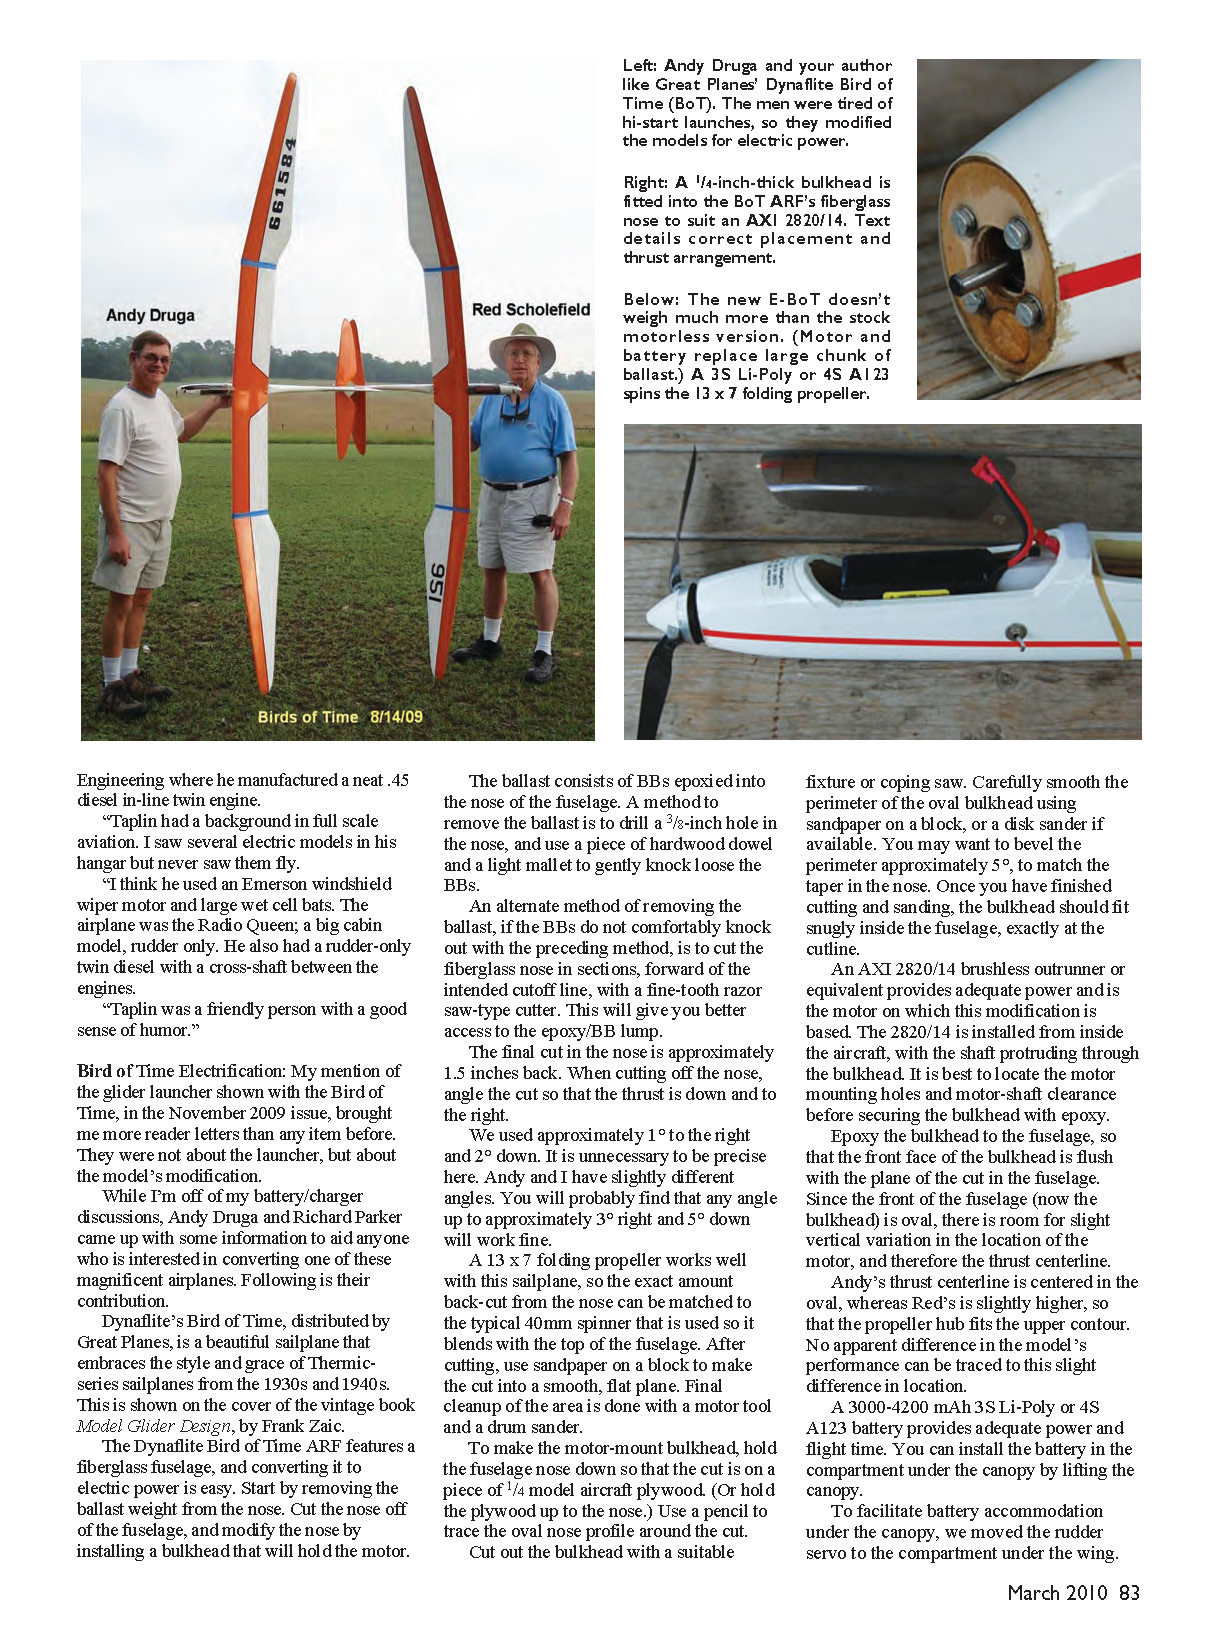
Andy Druga, a fellow club member, noticed some strange behavior as he powered up his Bird of Time electric conversion. An AXI 2820/14 motor seemed to chatter a bit on start, and then it got worse; it would not start at all. The ESC checked okay on another motor, so we deduced that the power plant was the culprit.
A teardown (not too difficult)—if you remove the small C-clip on the shaft, the whole armature will come out—revealed that the armature was loose. That enabled it to rotate a bit where it abraded the insulation on one of the leads, allowing the part to short to the motor frame.
Unsure if this was the problem, Andy and I slid a heat-shrink sleeve over the lead to insulate it. There was room to double up with two pieces for better insulation. We added a drop or two of thin CA to freeze the armature in place.
Then we noticed that the magnets seemed out of line. We compared this with the same part from an AXI 2808/24 that was sacrificed earlier to the gravity gods. The magnets in it had locating tabs molded into the rotating part of the motor, while the magnets in the 2820 were free to move around if they became unglued.
We carefully realigned the magnets, properly spacing them, added thin CA to secure the magnets, and reassembled the motor. Then we tested it to find that it ran perfectly, drawing the same current with a given propeller that it did originally. All is well; the 2820/14 is back in service and performing normally.
Electric Modeling History
In the November 2009 column, I mentioned a “Col. Taplin” as one of the pioneers of electric-powered flight. Lynne Byrum sent me his thoughts, which follow.
“I flew with Col (Lt. Col., actually) Taplin when I was stationed at RAF Manston in 1957–58. He owned a shop called Birchington Engineering where he manufactured a neat .45 diesel in-line twin engine.
“Taplin had a background in full-scale aviation. I saw several electric models in his hangar but never saw them fly.
“I think he used an Emerson windshield wiper motor and large wet-cell batteries. The airplane was the Radio Queen; a big cabin model, rudder only. He also had a rudder-only twin diesel with a cross-shaft between the engines.
“Taplin was a friendly person with a good sense of humor.”
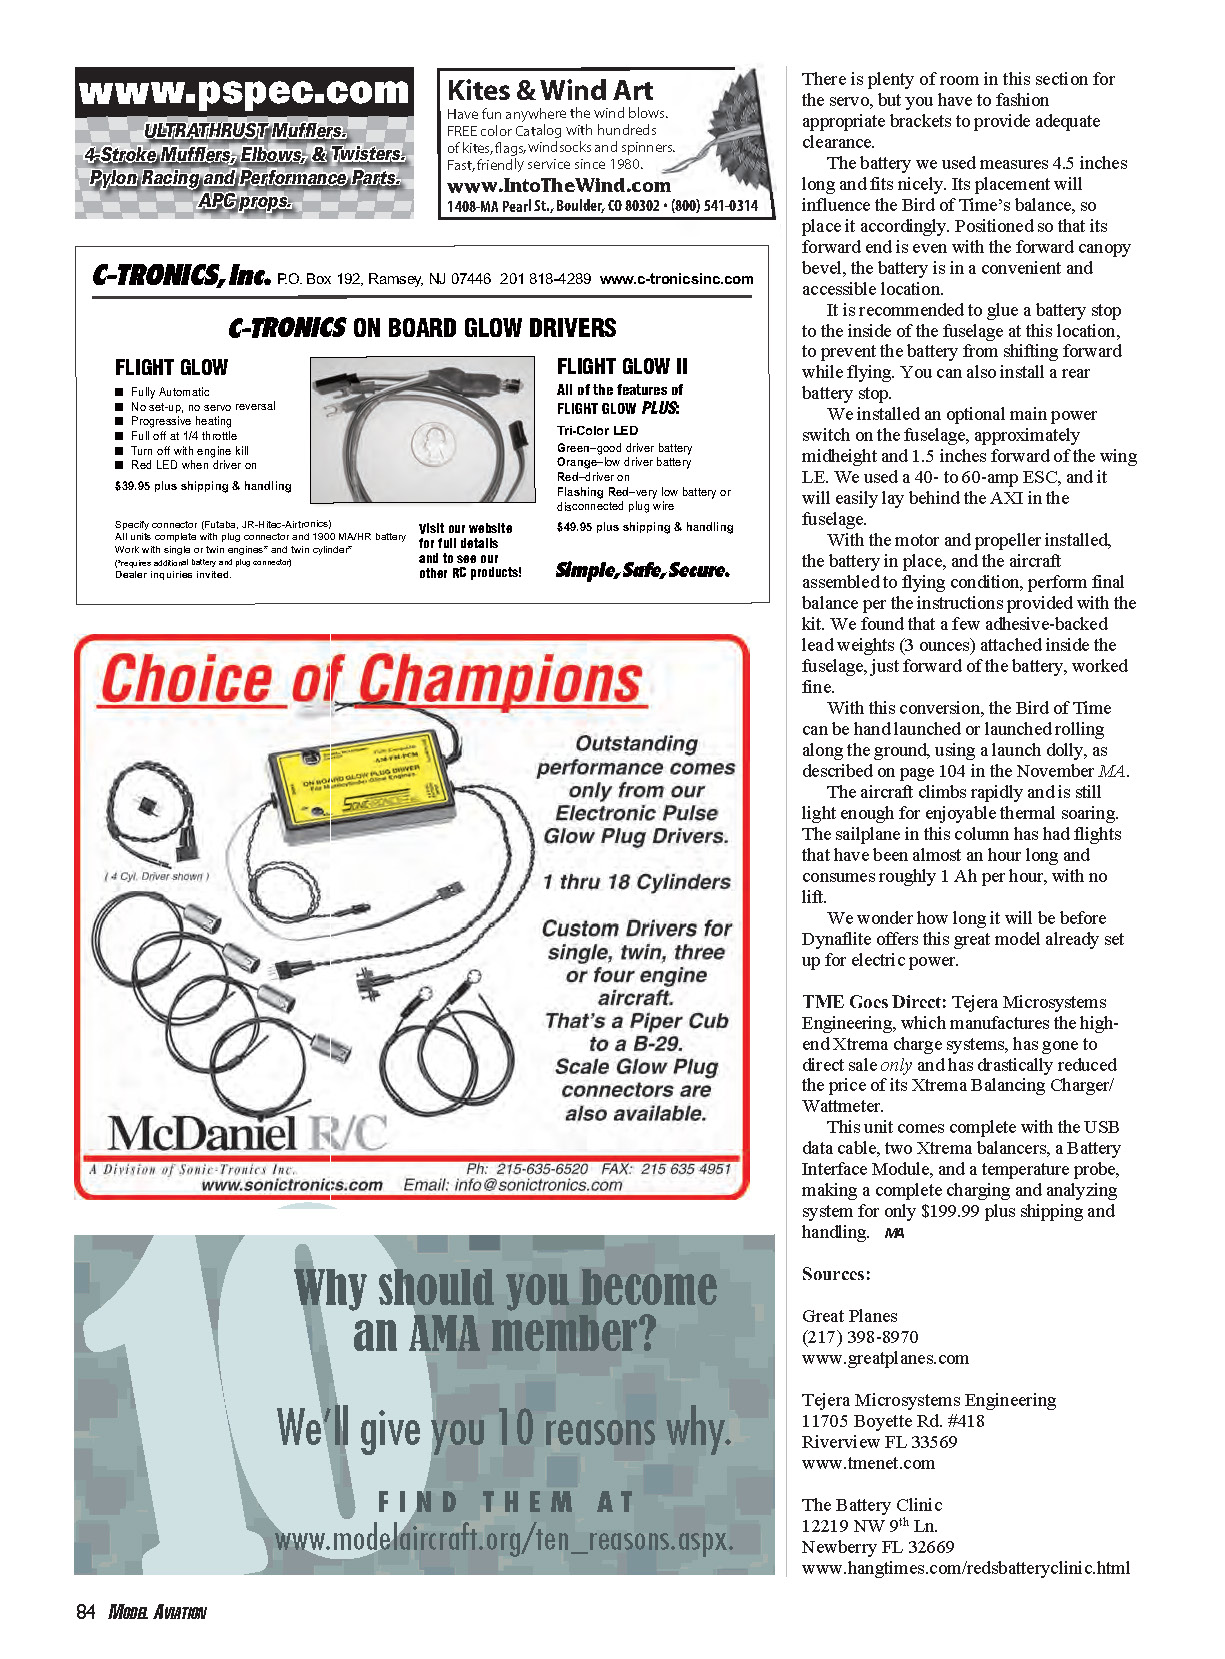
Bird of Time Electrification
My mention of the glider launcher shown with the Bird of Time, in the November 2009 issue, brought me more reader letters than any item before. They were not about the launcher, but about the model’s modification.
While I’m off my battery/charger discussions, Andy Druga and Richard Parker came up with some information to aid anyone who is interested in converting one of these magnificent airplanes. Following is their contribution.
Dynaflite’s Bird of Time, distributed by Great Planes, is a beautiful sailplane that embraces the style and grace of Thermic-series sailplanes from the 1930s and 1940s. This is shown on the cover of the vintage book Model Glider Design, by Frank Zaic.
The Dynaflite Bird of Time ARF features a fiberglass fuselage, and converting it to electric power is easy. Start by removing the ballast weight from the nose. Cut the nose off the fuselage, and modify the nose by installing a bulkhead that will hold the motor.
The ballast consists of BBs epoxied into the nose of the fuselage. A method to remove the ballast is to drill a 3/8-inch hole in the nose, and use a piece of hardwood dowel and a light mallet to gently knock loose the BBs.
An alternate method of removing the ballast, if the BBs do not comfortably knock out with the preceding method, is to cut the fiberglass nose in sections, forward of the intended cutoff line, with a fine-tooth razor-saw-type cutter. This will give you better access to the epoxy/BB lump.
The final cut in the nose is approximately 1.5 inches back. When cutting off the nose, angle the cut so that the thrust is down and to the right. We used approximately 1° to the right and 2° down. It is unnecessary to be precise here. Andy and I have slightly different angles. You will probably find that any angle up to approximately 3° right and 3° down will work fine.
A 13x7 folding propeller works well with this sailplane, so the exact amount back-cut from the nose can be matched to the typical 40 mm spinner that is used so it blends with the top of the fuselage. After cutting, use sandpaper on a block to make the cut into a smooth, flat plane. Final cleanup of the area is done with a motor tool and a drum sander.
To make the motor-mount bulkhead, hold the fuselage nose down so that the cut is on a piece of 1/4-inch model aircraft plywood (or hold the plywood up to the nose). Use a pencil to trace the oval nose profile around the cut.
Cut out the bulkhead with a suitable fixture or coping saw. Carefully smooth the perimeter of the oval bulkhead using sandpaper on a block, or a disk sander if available. You may want to bevel the perimeter approximately 5° to match the taper in the nose. Once you have finished cutting and sanding, the bulkhead should fit snugly inside the fuselage, exactly at the cutline.
An AXI 2820/14 brushless outrunner or equivalent provides adequate power and is the motor on which this modification is based. The 2820/14 is installed from inside the aircraft, with the shaft protruding through the bulkhead. It is best to locate the motor mounting holes and motor-shaft clearance before securing the bulkhead with epoxy.
Epoxy the bulkhead to the fuselage so that the front face of the bulkhead is flush with the plane of the cut in the fuselage. Since the front of the fuselage (now the bulkhead) is oval, there is room for slight vertical variation in the location of the motor, and therefore the thrust centerline. Andy’s thrust centerline is centered in the oval, whereas Red’s is slightly higher, so the propeller hub fits the upper contour. No apparent difference in the model’s performance can be traced to this slight difference in location.
A 3000–4200 mAh 3S Li-Poly or 4S A123 battery provides adequate power and weight. You can install the battery in the compartment under the canopy by lifting the canopy.
To facilitate battery accommodation under the canopy, we moved the rudder servo to the compartment under the wing. There is plenty of room in this section for the servo, but you have to fashion appropriate brackets to provide adequate clearance.
The battery we used measures 4.5 inches long and fits nicely. Its placement will influence the Bird of Time’s balance, so place it accordingly. Positioned so that its forward end is even with the forward canopy bevel, the battery is in a convenient and accessible location.
It is recommended to glue a battery stop to the inside of the fuselage at this location, to prevent the battery from shifting forward while flying. You can also install a rear battery stop.
We installed an optional main power switch on the fuselage, approximately midheight and 1.5 inches forward of the wing LE. We used a 40- to 60-amp ESC, and it will easily lay behind the AXI in the fuselage.
With the motor and propeller installed, the battery in place, and the aircraft assembled to flying condition, perform final balance per the instructions provided with the kit. We found that a few adhesive-backed lead weights (3 ounces) attached inside the fuselage, just forward of the battery, worked fine.
With this conversion, the Bird of Time can be hand-launched or launched rolling along the ground, using a launch dolly, as described on page 104 in the November MA.
The aircraft climbs rapidly and is still light enough for enjoyable thermal soaring. The sailplane in this column has had flights that have been almost an hour long and consumes roughly 1 Ah per hour, with no lift.
We wonder how long it will be before Dynaflite offers this great model already set up for electric power.
TME Goes Direct
Tejera Microsystems Engineering, which manufactures the high-end Xtrema charge systems, has gone to direct sale only and has drastically reduced the price of its Xtrema Balancing Charger/Wattmeter.
This unit comes complete with the USB data cable, two Xtrema balancers, a Battery Interface Module, and a temperature probe, making a complete charging and analyzing system for only $199.99 plus shipping and handling.
Sources
- Great Planes
(217) 398-8970 www.greatplanes.com
- Tejera Microsystems Engineering
11705 Boyette Rd. #418 Riverview, FL 33569 www.tmenet.com
- The Battery Clinic
12219 NW 9th Ln. Newberry, FL 32669 www.hangtimes.com/redsbatteryclinic.html
Transcribed from original scans by AI. Minor OCR errors may remain.

