
First impressions
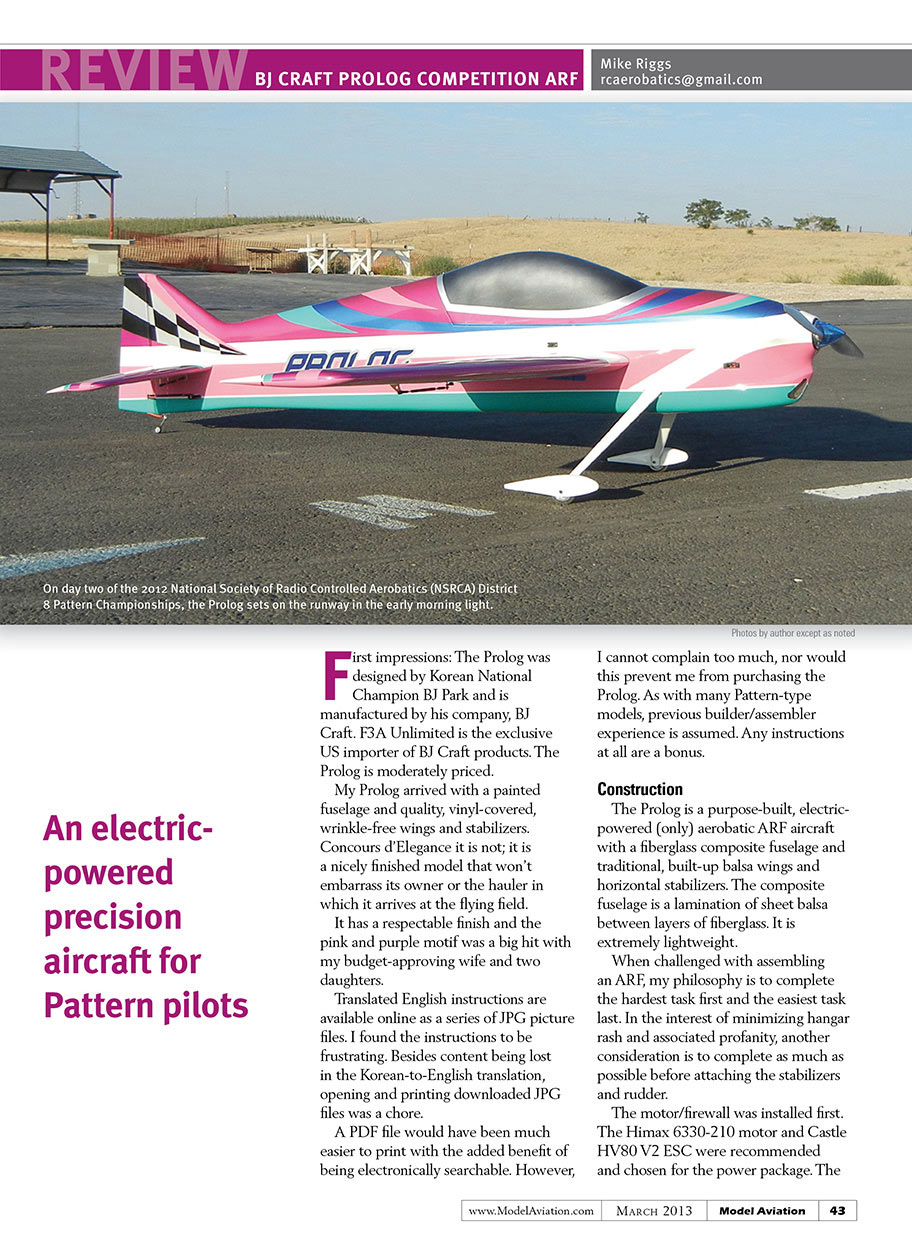
The Prolog was designed by Korean National Champion BJ Park and is manufactured by his company, BJ Craft. F3A Unlimited is the exclusive U.S. importer of BJ Craft products. The Prolog is moderately priced.
My Prolog arrived with a painted fuselage and quality, vinyl-covered, wrinkle-free wings and stabilizers. Concours d’Elegance it is not; it is a nicely finished model that won’t embarrass its owner or the hauler in which it arrives at the flying field.
It has a respectable finish and the pink-and-purple motif was a big hit with my budget-approving wife and two daughters.
Translated English instructions are available online as a series of JPG picture files. I found the instructions frustrating. Besides content being lost in the Korean-to-English translation, opening and printing downloaded JPG files was a chore. A PDF file would have been much easier to print with the added benefit of being electronically searchable. However, I cannot complain too much, nor would this prevent me from purchasing the Prolog. As with many Pattern-type models, previous builder/assembler experience is assumed. Any instructions at all are a bonus.
Construction
The Prolog is a purpose-built, electric-powered (only) aerobatic ARF aircraft with a fiberglass-composite fuselage and traditional, built-up balsa wings and horizontal stabilizers. The composite fuselage is a lamination of sheet balsa between layers of fiberglass. It is extremely lightweight.
When challenged with assembling an ARF, my philosophy is to complete the hardest task first and the easiest task last. In the interest of minimizing hangar rash and associated profanity, another consideration is to complete as much as possible before attaching the stabilizers and rudder.
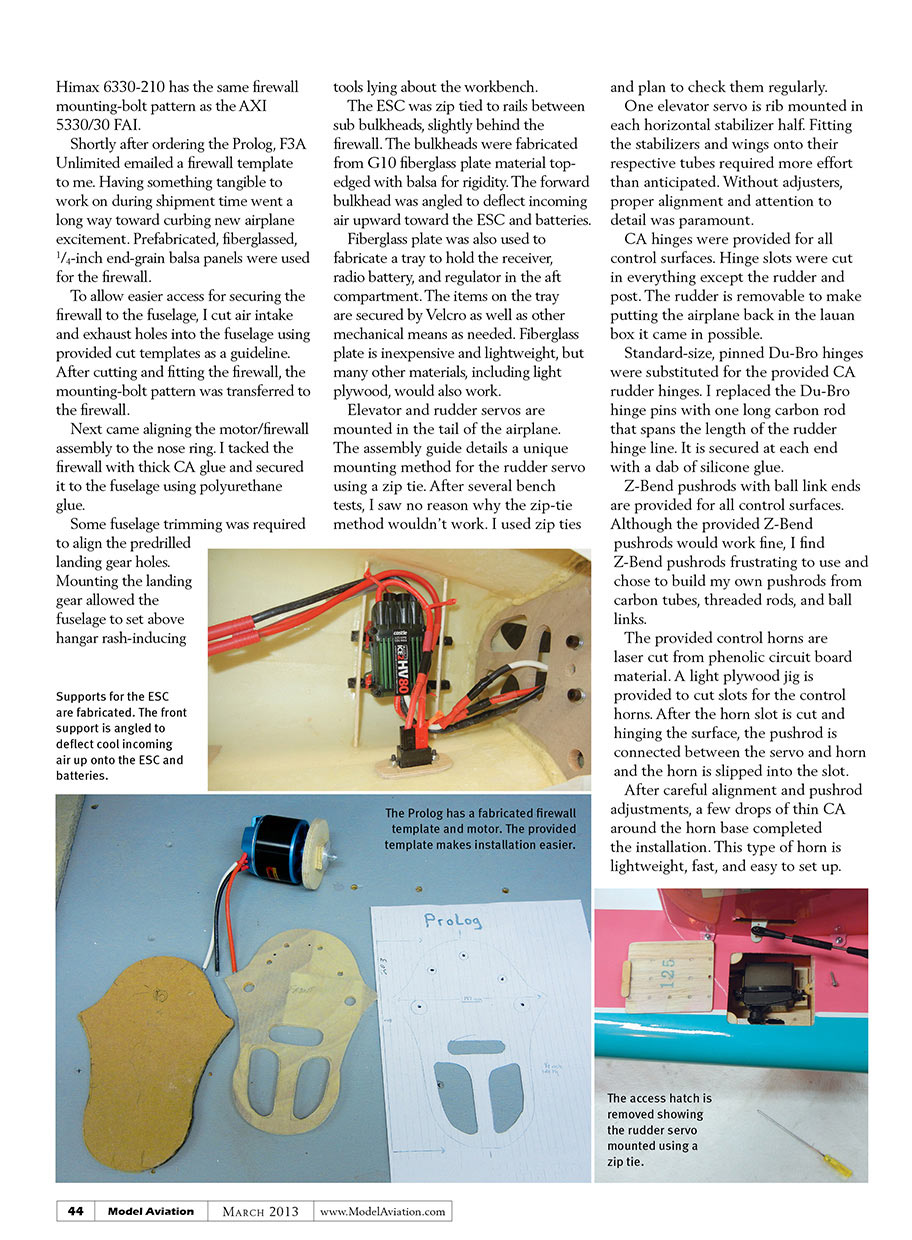
The motor/firewall was installed first. The Himax 6330-210 motor and Castle HV80 V2 ESC were recommended and chosen for the power package. The Himax 6330-210 has the same firewall mounting-bolt pattern as the AXI 5330/30 FAI.
Shortly after ordering the Prolog, F3A Unlimited emailed a firewall template to me. Having something tangible to work on during shipment time went a long way toward curbing new-airplane excitement.
Prefabricated, fiberglassed, 1/4-inch end-grain balsa panels were used for the firewall. To allow easier access for securing the firewall to the fuselage, I cut air-intake and exhaust holes into the fuselage using provided cut templates as a guideline. After cutting and fitting the firewall, the mounting-bolt pattern was transferred to the firewall.
Next came aligning the motor/firewall assembly to the nose ring. I tacked the firewall with thick CA glue and secured it to the fuselage using polyurethane glue. Some fuselage trimming was required to align the predrilled landing-gear holes. Mounting the landing gear allowed the fuselage to sit above hangar-rash–inducing tools lying about the workbench.
The ESC was zip-tied to rails between sub-bulkheads, slightly behind the firewall. The bulkheads were fabricated from G10 fiberglass-plate material, top-edged with balsa for rigidity. The forward bulkhead was angled to deflect incoming air upward toward the ESC and batteries.
Fiberglass plate was also used to fabricate a tray to hold the receiver, radio battery, and regulator in the aft compartment. The items on the tray are secured by Velcro as well as other mechanical means as needed. Fiberglass plate is inexpensive and lightweight, but many other materials, including light plywood, would also work.
Elevator and rudder servos are mounted in the tail of the airplane. The assembly guide details a unique mounting method for the rudder servo using a zip tie. After several bench tests, I saw no reason why the zip-tie method wouldn't work. I used zip ties and plan to check them regularly.
One elevator servo is rib-mounted in each horizontal-stabilizer half. Fitting the stabilizers and wings onto their respective tubes required more effort than anticipated. Without adjusters, proper alignment and attention to detail were paramount.
CA hinges were provided for all control surfaces. Hinge slots were cut in everything except the rudder post. The rudder is removable to make putting the airplane back in the lauan box it came in possible.
Standard-size, pinned Du-Bro hinges were substituted for the provided CA rudder hinges. I replaced the Du-Bro hinge pins with one long carbon rod that spans the length of the rudder hinge line. It is secured at each end with a dab of silicone glue.
Z-bend pushrods with ball-link ends are provided for all control surfaces. Although the provided Z-bend pushrods would work fine, I find Z-bend pushrods frustrating to use and chose to build my own pushrods from carbon tubes, threaded rods, and ball links.
The provided control horns are laser-cut from phenolic circuit-board material. A light plywood jig is provided to cut slots for the control horns. After the horn slot is cut and the surface is hinged, the pushrod is connected between the servo and horn and the horn is slipped into the slot. After careful alignment and pushrod adjustments, a few drops of thin CA around the horn base completed the installation. This type of horn is lightweight, fast, and easy to set up.
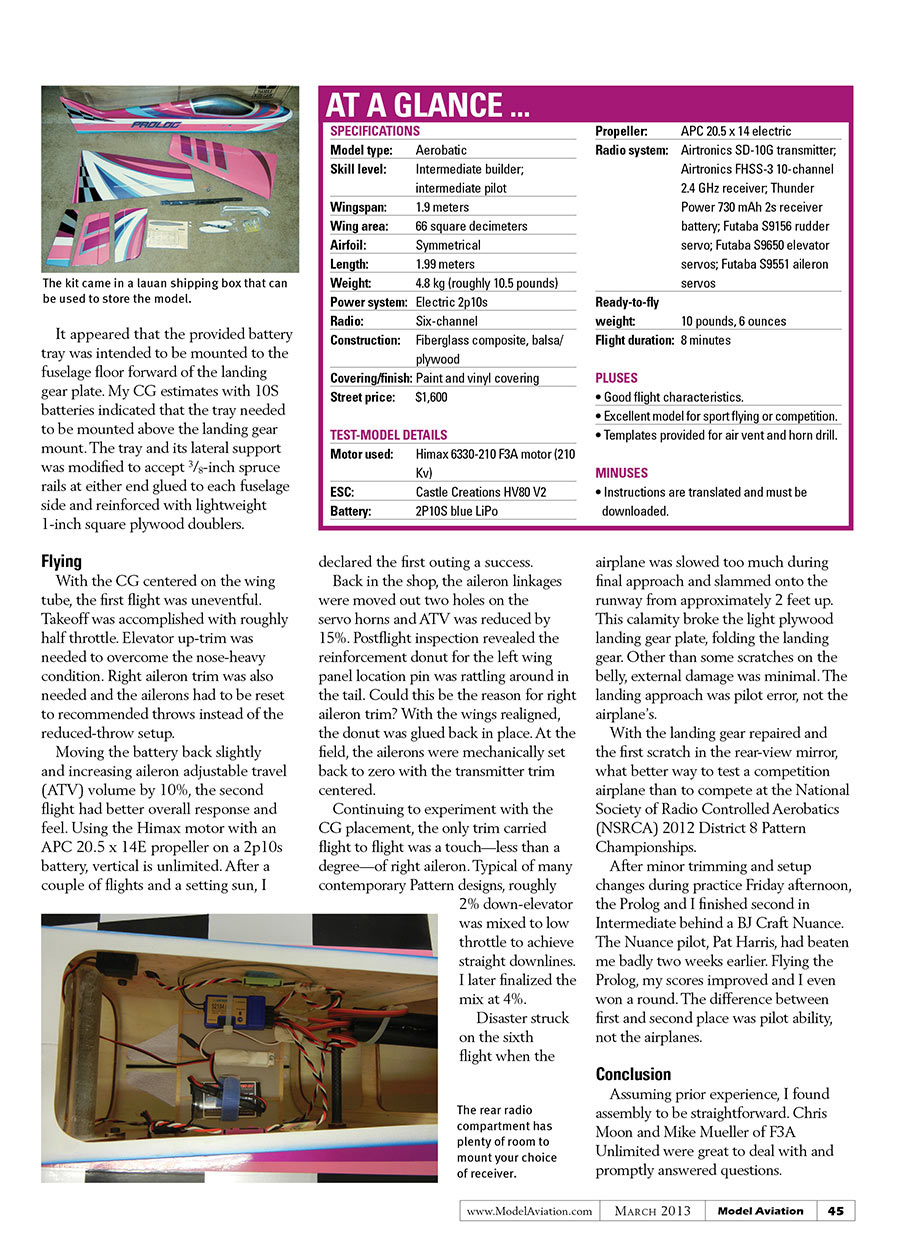
It appeared that the provided battery tray was intended to be mounted to the fuselage floor forward of the landing-gear plate. My CG estimates with 10S batteries indicated that the tray needed to be mounted above the landing-gear mount. The tray and its lateral support were modified to accept 5/8-inch spruce rails at either end glued to each fuselage side and reinforced with lightweight 1-inch square plywood doublers.
AT A GLANCE ...
SPECIFICATIONS
- Model type: Aerobatic
- Skill level: Intermediate builder; intermediate pilot
- Wingspan: 1.9 meters
- Wing area: 66 square decimeters
- Airfoil: Symmetrical
- Length: 1.99 meters
- Weight: 4.8 kg (roughly 10.5 pounds)
- Power system: Electric 2P10S
- Radio: Six-channel
- Construction: Fiberglass composite, balsa/plywood
- Covering/finish: Paint and vinyl covering
- Street price: $1,600
TEST-MODEL DETAILS
- Motor used: Himax 6330-210 F3A motor (210 Kv)
- ESC: Castle Creations HV80 V2
- Battery: 2P10S blue LiPo
- Propeller: APC 20.5 x 14E electric propeller
- Radio system: Airtronics SD-10G transmitter; Airtronics FHSS-3 10-channel 2.4 GHz receiver; Thunder Power 730 mAh 2S receiver battery
- Servos: Futaba S9156 rudder servo; Futaba S9650 elevator servos; Futaba S9551 aileron servos
- Ready-to-fly weight: 10 pounds, 6 ounces
- Flight duration: 8 minutes
PLUSES
- Good flight characteristics
- Excellent model for sport flying or competition
- Templates provided for air vent and horn drill
MINUSES
- Instructions are translated and must be downloaded
Flying
With the CG centered on the wing tube, the first flight was uneventful. Takeoff was accomplished with roughly half throttle. Elevator up-trim was needed to overcome the nose-heavy condition. Right aileron trim was also needed and the ailerons had to be reset to recommended throws instead of the reduced-throw setup.
Moving the battery back slightly and increasing aileron ATV (adjustable travel volume) by 10%, the second flight had better overall response and feel. Using the Himax motor with an APC 20.5 x 14E propeller on a 2P10S battery, vertical is unlimited. After a couple of flights and a setting sun, I declared the first outing a success.
Back in the shop, the aileron linkages were moved out two holes on the servo horns and ATV was reduced by 15%. Postflight inspection revealed the reinforcement donut for the left wing panel location pin was rattling around in the tail. Could this be the reason for right aileron trim? With the wings realigned, the donut was glued back in place. At the field, the ailerons were mechanically set back to zero with the transmitter trim centered.
Continuing to experiment with CG placement, the only trim carried flight to flight was a touch—less than a degree—of right aileron. Typical of many contemporary Pattern designs, roughly 2% down-elevator was mixed to low throttle to achieve straight downlines. I later finalized the mix at 4%.
Disaster struck on the sixth flight when the airplane was slowed too much during final approach and slammed onto the runway from approximately 2 feet up. This calamity broke the light-plywood landing-gear plate, folding the landing gear. Other than some scratches on the belly, external damage was minimal. The landing approach was pilot error, not the airplane's.
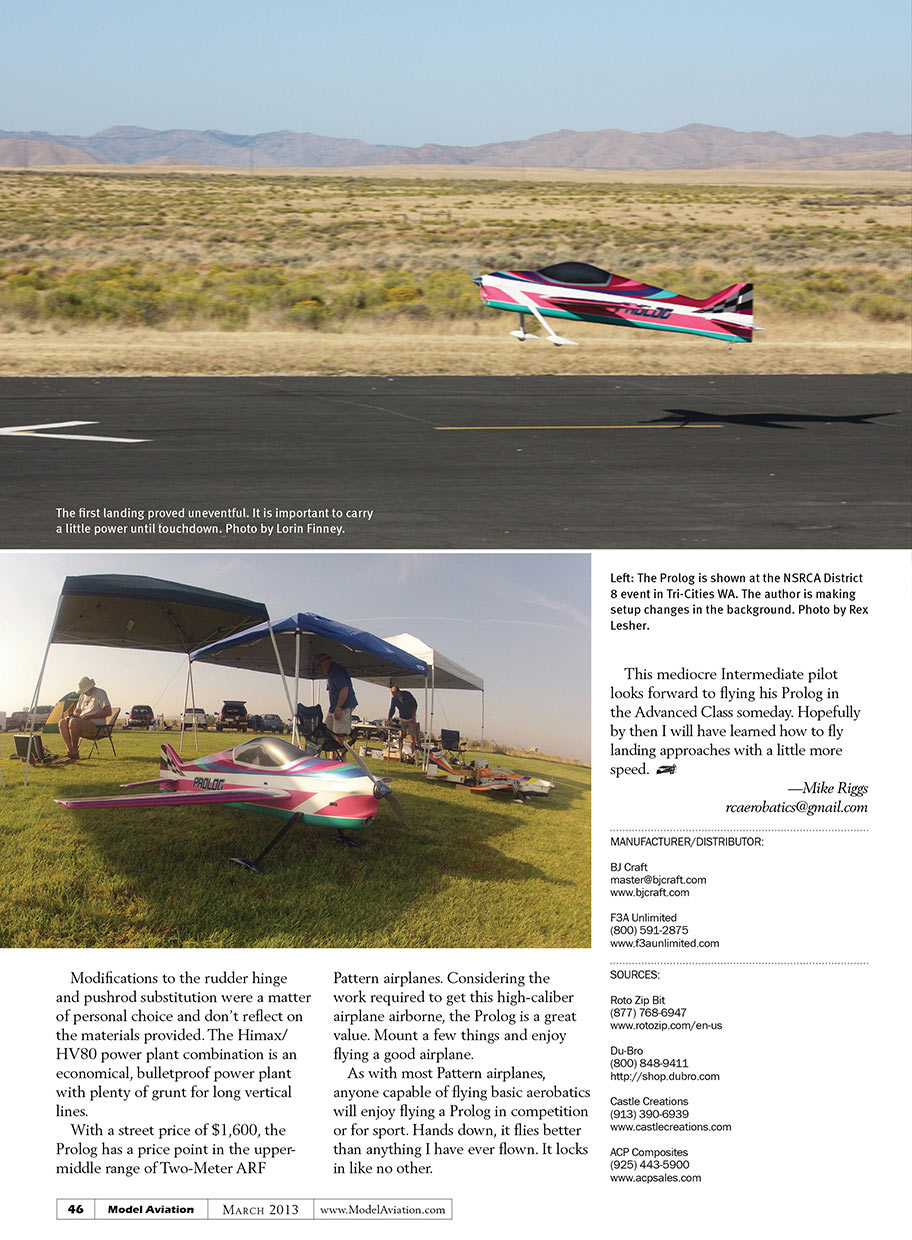
With the landing gear repaired and the first scratch in the rear-view mirror, what better way to test a competition airplane than to compete at the National Society of Radio Controlled Aerobatics (NSRCA) 2012 District 8 Pattern Championships?
After minor trimming and setup changes during practice Friday afternoon, the Prolog and I finished second in Intermediate behind a BJ Craft Nuance. The Nuance pilot, Pat Harris, had beaten me badly two weeks earlier. Flying the Prolog, my scores improved and I even won a round. The difference between first and second place was pilot ability, not the airplanes.
Conclusion
Assuming prior experience, I found assembly to be straightforward. Chris Moon and Mike Mueller of F3A Unlimited were great to deal with and promptly answered questions.
Modifications to the rudder hinge and pushrod substitution were a matter of personal choice and don't reflect on the materials provided. The Himax/HV80 power-plant combination is an economical, bulletproof power plant with plenty of grunt for long vertical lines.
With a street price of $1,600, the Prolog has a price point in the upper-middle range of Two-Meter ARF Pattern airplanes. Considering the work required to get this high-caliber airplane airborne, the Prolog is a great value. Mount a few things and enjoy flying a good airplane.
As with most Pattern airplanes, anyone capable of flying basic aerobatics will enjoy flying a Prolog in competition or for sport. Hands down, it flies better than anything I have ever flown. It locks in like no other.
This mediocre Intermediate pilot looks forward to flying his Prolog in the Advanced Class someday. Hopefully by then I will have learned how to fly landing approaches with a little more speed.
—Mike Riggs [email protected]
MANUFACTURER/DISTRIBUTOR
- BJ Craft
- Email: [email protected]
- Website: www.bjcraft.com
- F3A Unlimited
- Phone: (800) 591-2875
- Website: www.f3aunlimited.com
SOURCES
- Roto Zip Bit
- Phone: (877) 768-6947
- Website: www.rotozip.com/en-us
- Du-Bro
- Phone: (800) 848-9411
- Website: http://shop.dubro.com
- Castle Creations
- Phone: (913) 390-6939
- Website: www.castlecreations.com
- ACP Composites
- Phone: (925) 443-5900
- Website: www.acpsales.com
Transcribed from original scans by AI. Minor OCR errors may remain.

