
Blade CX Tow System
by Bill Mixon
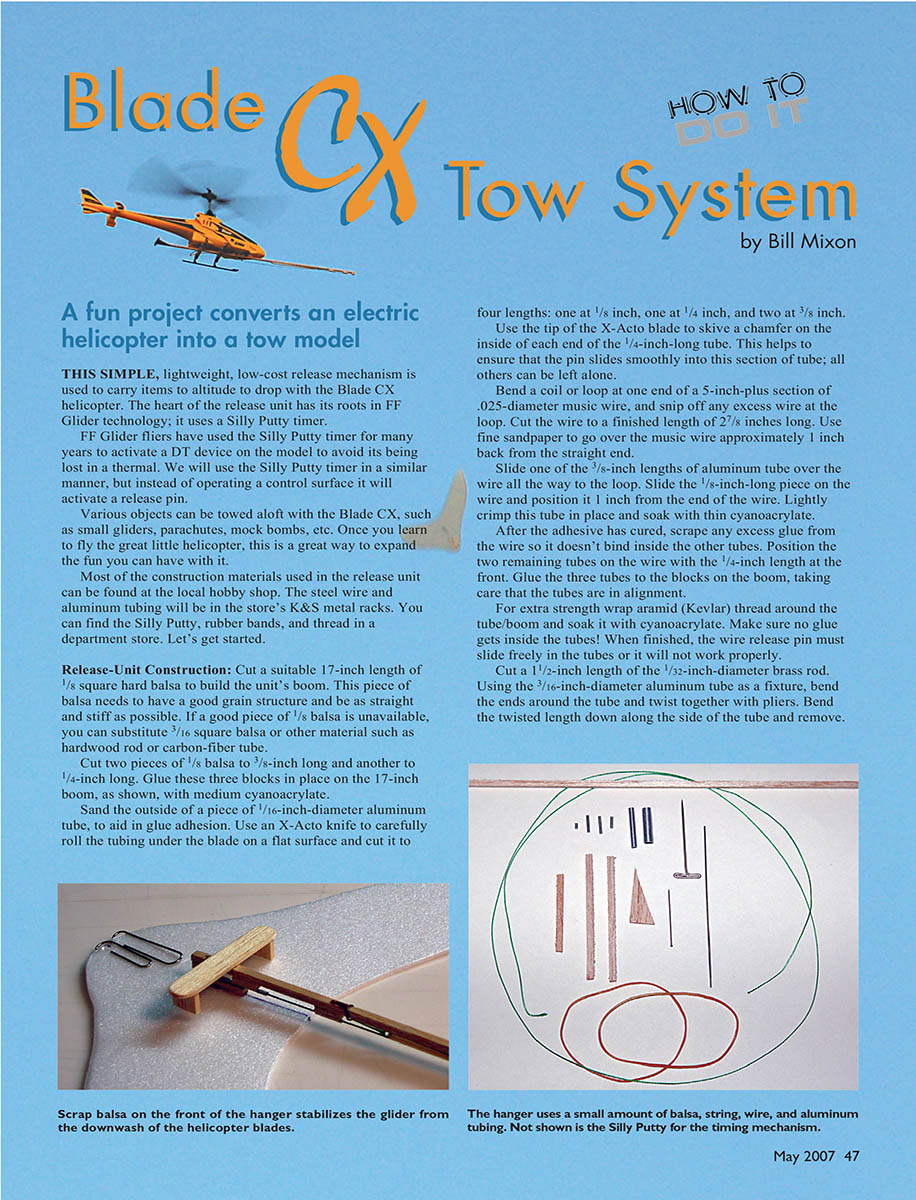
A fun project converts an electric helicopter into a tow model.
This simple, lightweight, low-cost release mechanism is used to carry items to altitude and drop them with the Blade CX helicopter. The heart of the release unit has its roots in free-flight (FF) glider technology: it uses a Silly Putty timer.
FF glider fliers have used the Silly Putty timer for many years to activate a DT device on the model to avoid losing it in a thermal. We use the Silly Putty timer in a similar manner, but instead of operating a control surface it activates a release pin.
Various objects can be towed aloft with the Blade CX, such as small gliders, parachutes, mock bombs, etc. Once you learn to fly the great little helicopter, this is a great way to expand the fun.
Most construction materials for the release unit can be found at the local hobby shop. Steel wire and aluminum tubing are typically in the store’s K&S metal racks. Silly Putty, rubber bands, and thread are found in department stores.
Materials Needed for Tow System Construction (tools)
- Needle-nose pliers
- Sandpaper
- X-Acto knife
- Razor saw (optional)
- Thin cyanoacrylate (thin CA)
- Medium cyanoacrylate (medium CA)
- Foam-safe glue (for glider)
Tow System Materials (components)
- 1/32-inch solid brass rod (K&S stock number 160)
- 1/16-inch aluminum tubing (K&S stock number 100)
- 1/8-inch aluminum tubing (K&S stock number 102)
- 3/16-inch aluminum tubing (K&S stock number 104)
- .025-inch music wire (K&S stock number 500)
- T-pin
- Straight pin
- 1/8–3/16-inch square hard balsa, 36 inches long (for boom and blocks)
- Office rubber bands (3.5-inch loop, #19)
- Kevlar or other thread for reinforcement binding
- Fishing line (braided works best)
- Silly Putty
- 2mm Depron (for the glider)
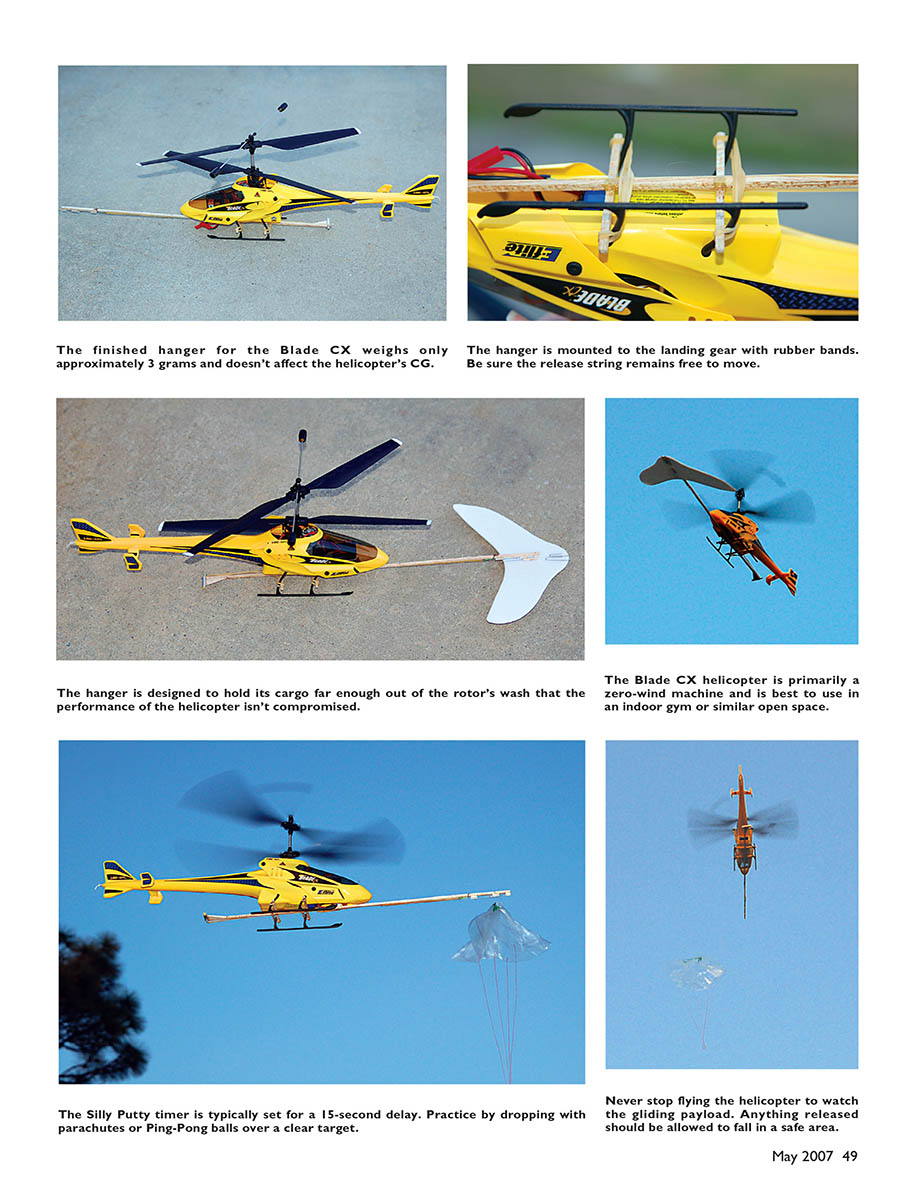
The finished hanger for the Blade CX weighs approximately 3–3.5 grams and doesn't normally affect the helicopter's CG. The hanger mounts to the landing gear with rubber bands. Be sure the release string remains free to move and that the cargo hangs well out of the rotor's wash so helicopter performance isn't compromised.
Blade CX is primarily a zero-wind machine and is best flown in an indoor gym or similar open space. The Silly Putty timer is typically set for about a 15-second delay. Practice drops with parachutes or ping-pong balls over a clear target. Never stop flying the helicopter to watch the gliding payload — maintain control of the helicopter at all times.
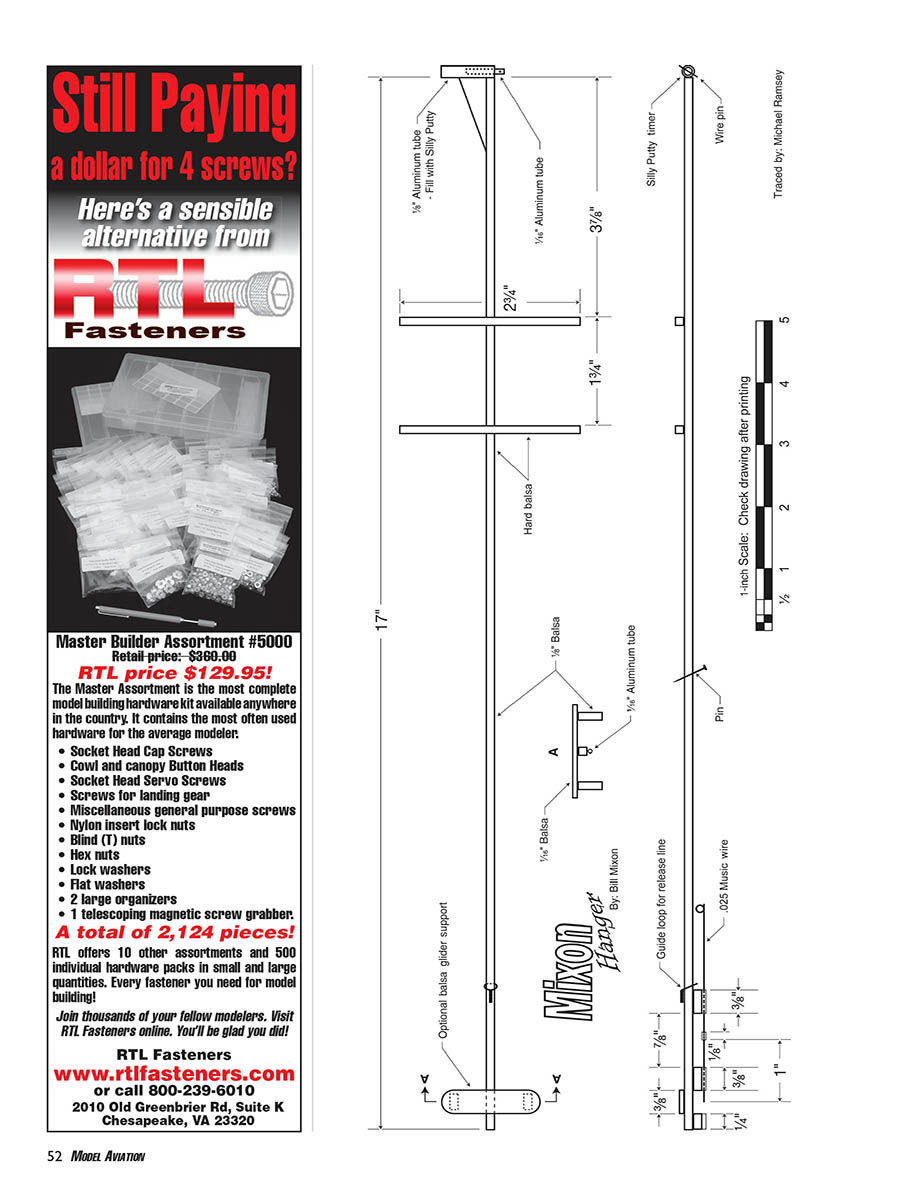
Release-Unit Construction
- Prepare the boom
- Cut a suitable 17-inch length of 1/8-inch square hard balsa to build the unit’s boom. The balsa should have good grain structure, be as straight and stiff as possible. If you can't find 1/8-inch balsa, substitute 3/16-inch square balsa, hardwood rod, or a carbon-fiber tube.
- Cut two pieces of 1/8-inch balsa to 3/8 inch long and one piece to 1/4 inch long. Glue these three blocks in place on the 17-inch boom with medium cyanoacrylate (CA) as shown in the illustrations (rear block, middle block, front block positions).
- Prepare the guide tubes
- Sand the outside of a piece of 1/16-inch-diameter aluminum tube to aid glue adhesion.
- Using an X-Acto knife, roll the tubing under the blade on a flat surface and cut it to four lengths: one at 1/8 inch, one at 1/4 inch, and two at 3/8 inch.
- Use the X-Acto tip to skive a chamfer on the inside of each end of the 1/4-inch-long tube so the release pin slides smoothly; the other tubes can be left as cut.
- Make the release pin
- Bend a coil or loop at one end of a 5-inch-plus section of .025-inch-diameter music wire and snip off any excess wire at the loop.
- Cut the wire to a finished length of 2 7/8 inches.
- Use fine sandpaper to roughen the music wire about 1 inch back from the straight end to help CA adhesion.
- Slide one of the 3/8-inch lengths of aluminum tube over the wire all the way to the loop. Slide the 1/8-inch-long piece onto the wire and position it 1 inch from the straight end of the wire. Lightly crimp this tube in place and soak with thin CA. After the adhesive cures, scrape any excess glue from the wire so it won’t bind inside the other tubes.
- Position the remaining tubes on the wire with the 1/4-inch length at the front, then glue the three tubes to the blocks on the boom, taking care that the tubes are aligned.
- Reinforce and finish guide tube assembly
- For extra strength, wrap aramid (Kevlar) thread around each tube/boom joint and soak with thin CA. Make sure no glue gets inside the tubes. When finished, the wire release pin must slide freely in the tubes or it will not work.
- Make the guide loop for the release line
- Cut a 1 1/2-inch length of 1/32-inch-diameter brass rod.
- Using the 3/16-inch-diameter aluminum tube as a bending form, bend the ends of the brass rod around the tube and twist them together with pliers. Bend the twisted length down along the side of the tube and remove from the form.
- Slice off the excess rod, leaving approximately 1/4 inch of twisted length, and glue this in place where shown. This will serve as the guide loop for the release line.
- Add top supports
- Cut two balsa pieces to 2 3/4 inches long and glue them to the top of the boom, ensuring they are perpendicular to the boom and parallel to each other. Wrap both joints with thread and soak with thin CA for reinforcement.
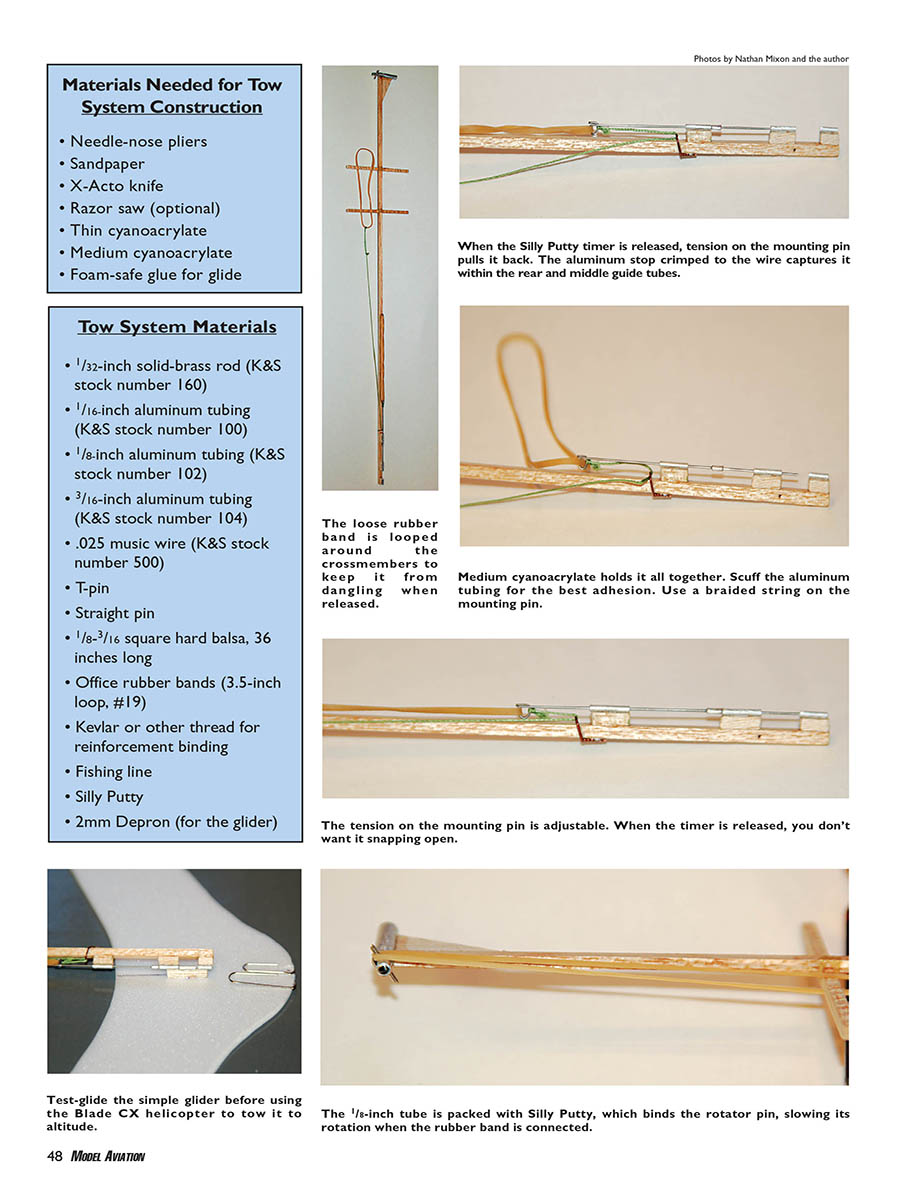
When the Silly Putty timer is released, tension on the mounting pin pulls the release pin back. The aluminum stop crimped to the wire captures it within the rear and middle guide tubes.
Time for the Timer
- Cut a section of 3/16-inch-diameter tube to 3/4 inch long.
- Plug one end of this tube by gluing a short piece of wood inside it or by crimping the very end with pliers.
- Cut a 7/8-inch length of 1/8-inch-diameter tube and remove any burrs.
- Set the 1/8-inch tube inside the 3/16-inch body tube and mark the 1/8-inch tube approximately 1/16 inch out from the outside edge of the 3/16-inch tube.
- Remove the inner tube and push a T-pin through the center of the 1/8-inch tube at the mark. The pin will go through without crushing if you apply firm pressure; predrill if necessary.
- Cut the excess T-pin from each side; you only need about 1/8–3/16 inch of pin extending from each side of the tube.
- Roll a small amount of Silly Putty to a size that will fit inside the 3/16-inch tube and pack the tube approximately half full.
- Push the 1/8-inch-tube-plus-pin assembly slowly into the Putty-filled tube until it bottoms out.
- Glue a balsa gusset to one side and flush with the rear of the main boom. Adhere the timer to the back of the gusset/boom with medium CA, with the timer body flush with the boom edge.
Rubber Bands and Release Line
- Hook a #19 rubber band (3.5-inch loop) onto the loop in the release pin.
- With the pin in the released position (pulled all the way back), mark the wood boom approximately 3.5 inches back from the loop in the wire.
- At that mark, push a straight pin up through the boom at an angle, snip off the excess on the top side, and soak the area with thin CA. With the band in place over the pin there should be virtually no tension pulling back on the release pin — too much tension can damage the mechanism when the pin slams aft on release.
- Tie a release line to the front portion of the loop in the release pin. A braided-type line (e.g., Spiderwire Original Braid) slides around the guide loop better than monofilament.
- Run the other end of the line up through the guide loop and back toward the timer. Tie a loop in the line so it is approximately 5.5 inches from the center of the timer.
- Loop another #19 band through the loop in the line. Because rubber-band lengths vary, you may need to adjust line length.
Test the Operation
- Pull the rubber band aft and loop it over the pin on the timer. There should be just enough tension on the bands to slowly rotate the timer, and the release pin should be fully engaged.
- When the timer pin rotates far enough that the band slides off, the release pin should pop to the released position.
- Set the time for release by rotating the timer pin accordingly. The rate at which the timer rotates is affected by band tension and the amount of Silly Putty in the tube.
- A typical time from takeoff to drop altitude with the Blade CX is roughly 15 seconds. Experiment with the timer to become familiar with its operation.
Mounting and Use
- Starting at the front, mount the unit to the bottom of the helicopter’s landing skids using rubber bands. Make sure the release line is free to slide and will not be interfered with by the bands or any part of the helicopter.
- Loop the rear band over the rear frame crosspiece before mounting the unit to the helicopter. This prevents the release line from being shot out in front of the helicopter when released. The frame crosspiece spacing should set the boom pointed slightly upward to clear the ground better.
- The finished release unit weighs approximately 3–3.5 grams, so in most cases rebalancing the helicopter will not be necessary. Check the balance; if needed, shift the battery or add a small amount of weight aft.
- To tow an item:
- Remove the front rubber band from its pin so you can slide the release pin freely.
- Place the object to be dropped into position and slide the release pin forward.
- Pull the release line/band back and loop the band over the timer body. Reconnect the front band to its pin.
- When ready to fly, pull the band to the timer pin and set the desired time.
- Take off, climb to altitude, and watch for the drop. Maintain control of the helicopter — do not concentrate solely on the object you just dropped.
Flight tips and safety
- Start with simple, lightweight items for tow practice (ping-pong balls, small parachutes).
- Ensure whatever you tow will not interfere with or become tangled in the rotor blades.
- Minimize hovering in ground effect with a tow object due to turbulence; climb out slowly with no abrupt flight-path changes.
- Avoid carrying objects that are too heavy (more than a few grams) or objects with large area (a large glider), which could cause stability/control problems.
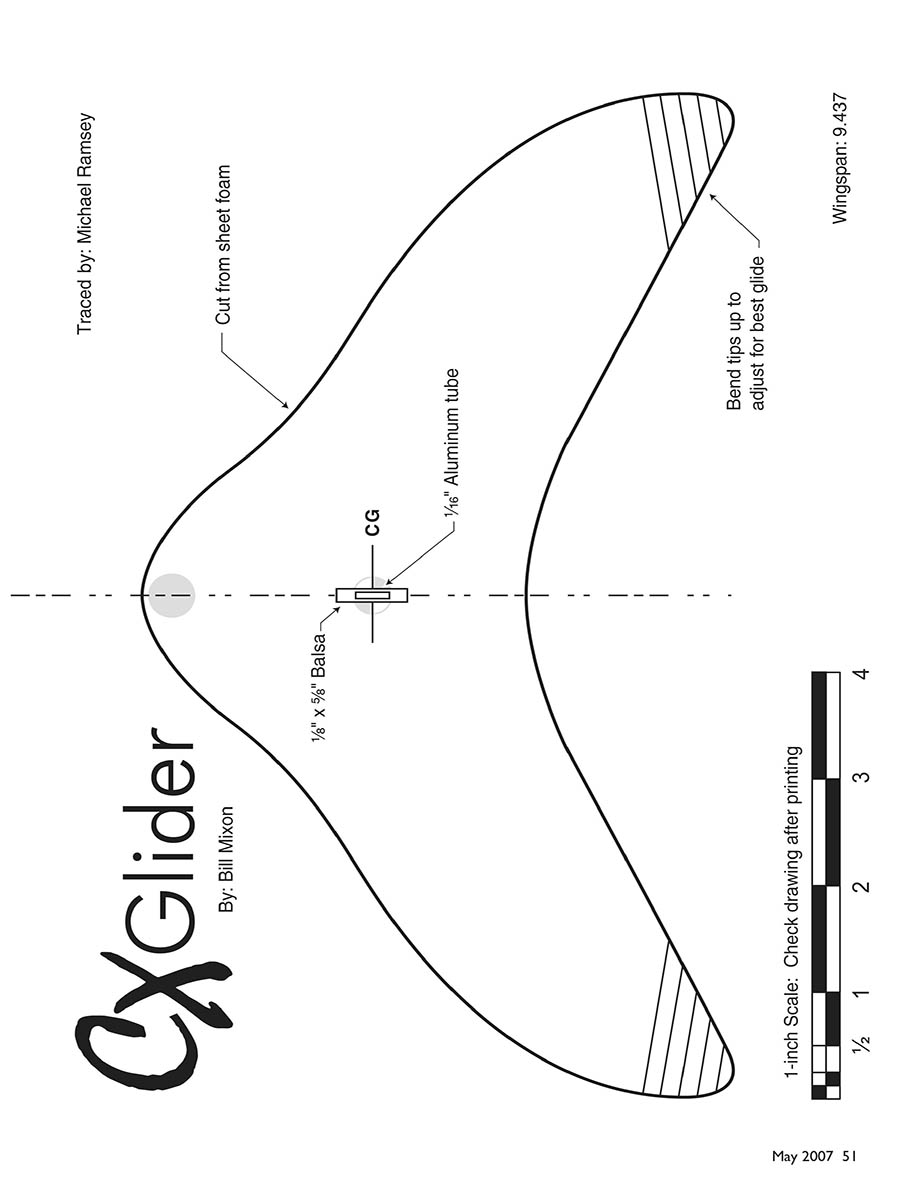
Simple Glider for the Blade CX
- Cut the glider from a sheet of 2mm Depron or other lightweight foam material (a template was provided with the original article).
- Glue a 1/4-inch-long piece of the 1/16-inch-diameter tube to the top of the glider for the release pin to pass through.
- Balance the glider as shown in the template and set the wing by bending the outside tips of the wing upward to adjust glide.
- To keep the wing from rocking side to side during the tow, glue a scrap piece of balsa to the boom near the release mechanism — this prevents the glider from moving around.
- Other objects will generally hang under the helicopter with no problems. Tape a loop of fishing line to parachutes, balls, and similar items for their release.
- Test-glide the simple glider before towing it to altitude.
The loose rubber band is looped around the crossmembers to keep it from dangling when released.
CX Glider (notes)
- Cut from sheet foam (2mm Depron recommended)
- Balance (CG) per template
- Use 1/16-inch aluminum tube as release guide
- Use 1/8 x 5/16-inch balsa for scrapers/supports as needed
- Bend wing tips up to adjust for best glide
- Wingspan: 9.437 inches (check drawing after printing at 1-inch scale)
- Scale: check printed drawing for desired scale
Sources
- "The Home of Higher Silly Putty Learning" — www.sillyputty.com
- Kevlar thread, carbon tubes, etc. — www.cstsales.com
- Useful Silly Putty timer — www.gryfinaero.com/models/ffpages/tips/timer/timer.html
- Depron foam sheets — www.depronusa.com
Contact: Bill Mixon — [email protected]
Transcribed from original scans by AI. Minor OCR errors may remain.

