
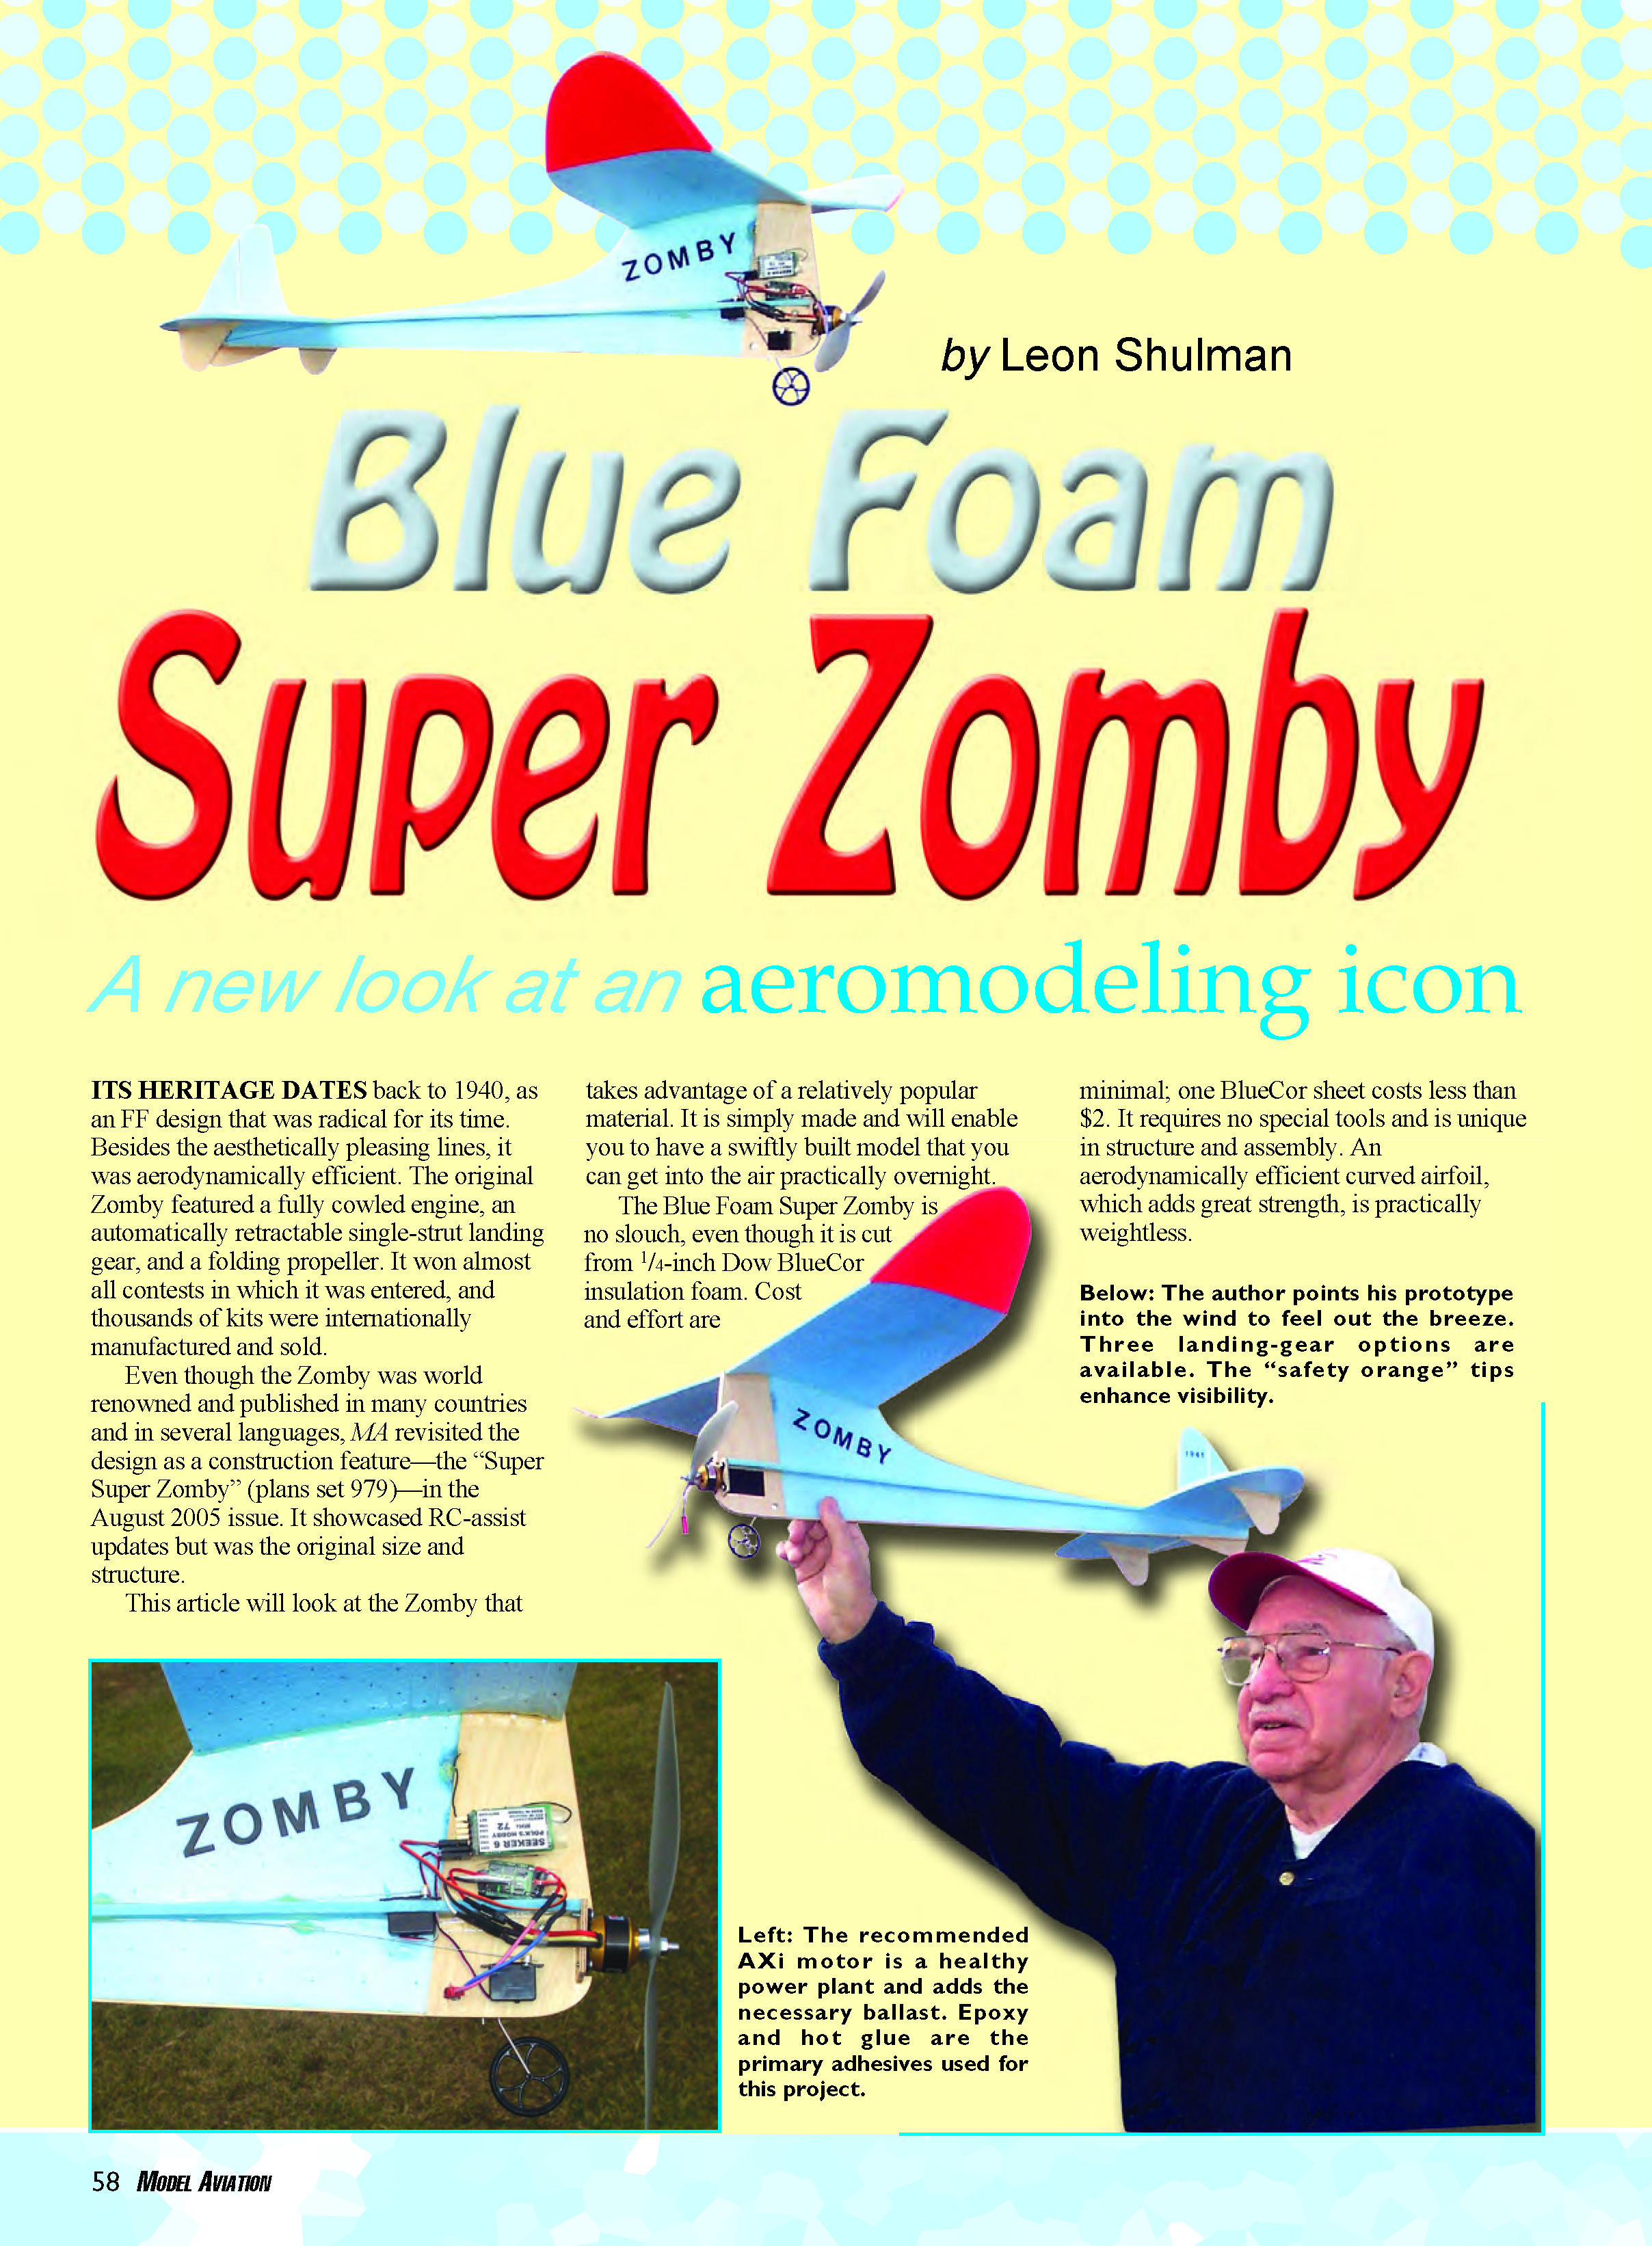

Blue Foam Super Zomby
by Leon Shulman
A new look at an aeromodeling icon
Its heritage dates back to 1940 as a free-flight (FF) design that was radical for its time. Besides the aesthetically pleasing lines, it was aerodynamically efficient. The original Zomby featured a fully cowled engine, an automatically retractable single‑strut landing gear, and a folding propeller. It won almost every contest in which it was entered, and thousands of kits were manufactured and sold internationally.
Model Aviation revisited the design as a construction feature—the “Super Super Zomby” (plans set 979)—in the August 2005 issue, showcasing RC‑assist updates while retaining the original size and structure.
This article looks at a Zomby that takes advantage of a popular, low‑cost material. It is simply made and fast to build, enabling you to get a flying model practically overnight.
The Blue Foam Super Zomby is no slouch, even though it is cut from 1/4‑inch Dow BlueCor insulation foam. Cost and effort are minimal; one BlueCor sheet costs less than $2. It requires no special tools and is unique in structure and assembly. An aerodynamically efficient curved airfoil, which adds great strength, is practically weightless.
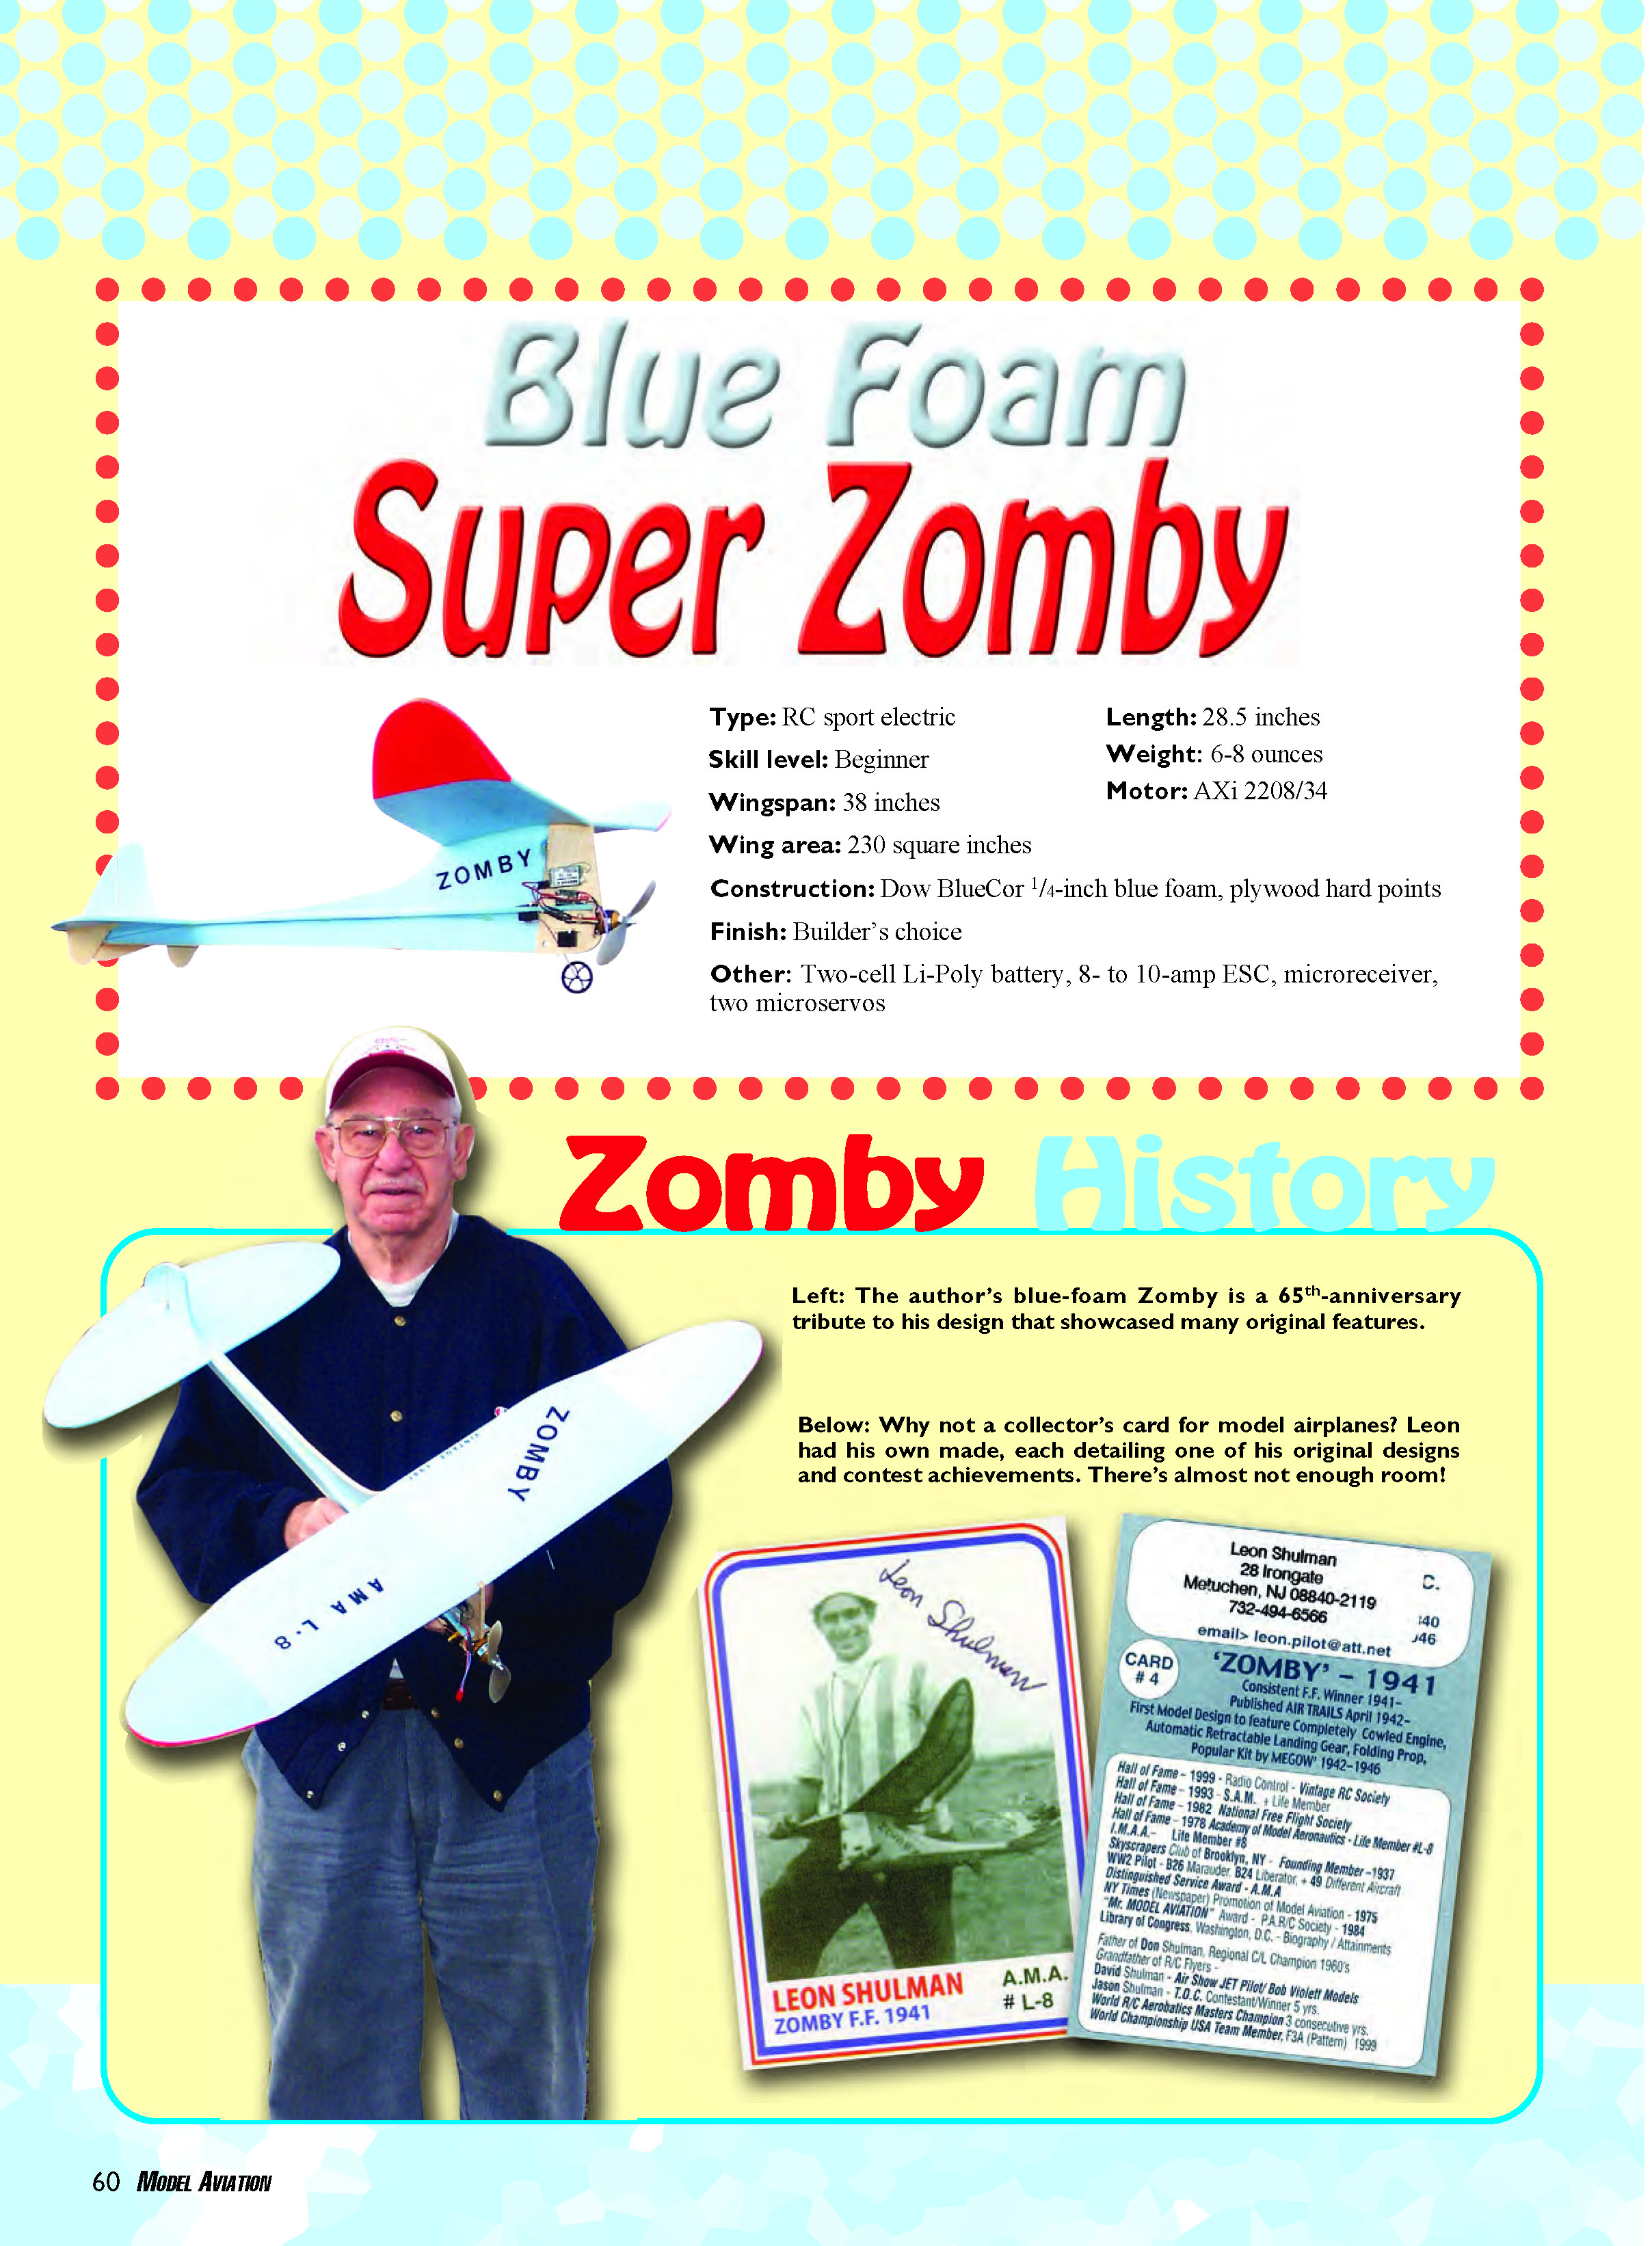
- Construction: Dow BlueCor 1/4‑inch blue foam, plywood hard points
- Finish: Builder’s choice
- Other: Two‑cell Li‑Poly battery, 8‑ to 10‑amp ESC, microreceiver, two microservos
- Type: RC sport electric
- Skill level: Beginner
- Wingspan: 38 inches
- Wing area: 230 square inches
- Length: 28.5 inches
- Weight: 6–8 ounces (up to 9 ounces max)
- Motor: AXi 2208/34
Zomby History
The original Zomby kit sold for $1.95 in the early 1940s, and building this Blue Foam Zomby won’t cost you any more—maybe even less. Inflation isn’t kicking in here, but performance is. The approach to this Blue Foam Super Zomby incorporates the original design concept coined as “Designed to Climb.” With either a brushed or brushless motor system, it will climb higher than you can see in close to 20 seconds. Upon throttling back, the model will transition into a beautiful, flat glide. You can take advantage of any lift, whether from a tree line or hot‑air thermals.
This Zomby weighs, at most, a mere 9 ounces and boasts a wing loading of about 5.6 ounces per square foot. Mild winds do not bother this model—its FF tradition makes it naturally stable. Although it will climb rapidly with full power, it will also fly slowly on slightly more than idle. This airplane can also be successful flying indoors, in spaces as small as a typical school gym.
The Blue Foam Super Zomby features a removable single‑strut landing gear, like the original, but the plans show an option for conventional dual‑wheel gear. You can even mimic the retracted look by leaving the undercarriage off altogether. My good friend and collaborator Frank Pisano developed these features and drew the featured plans.
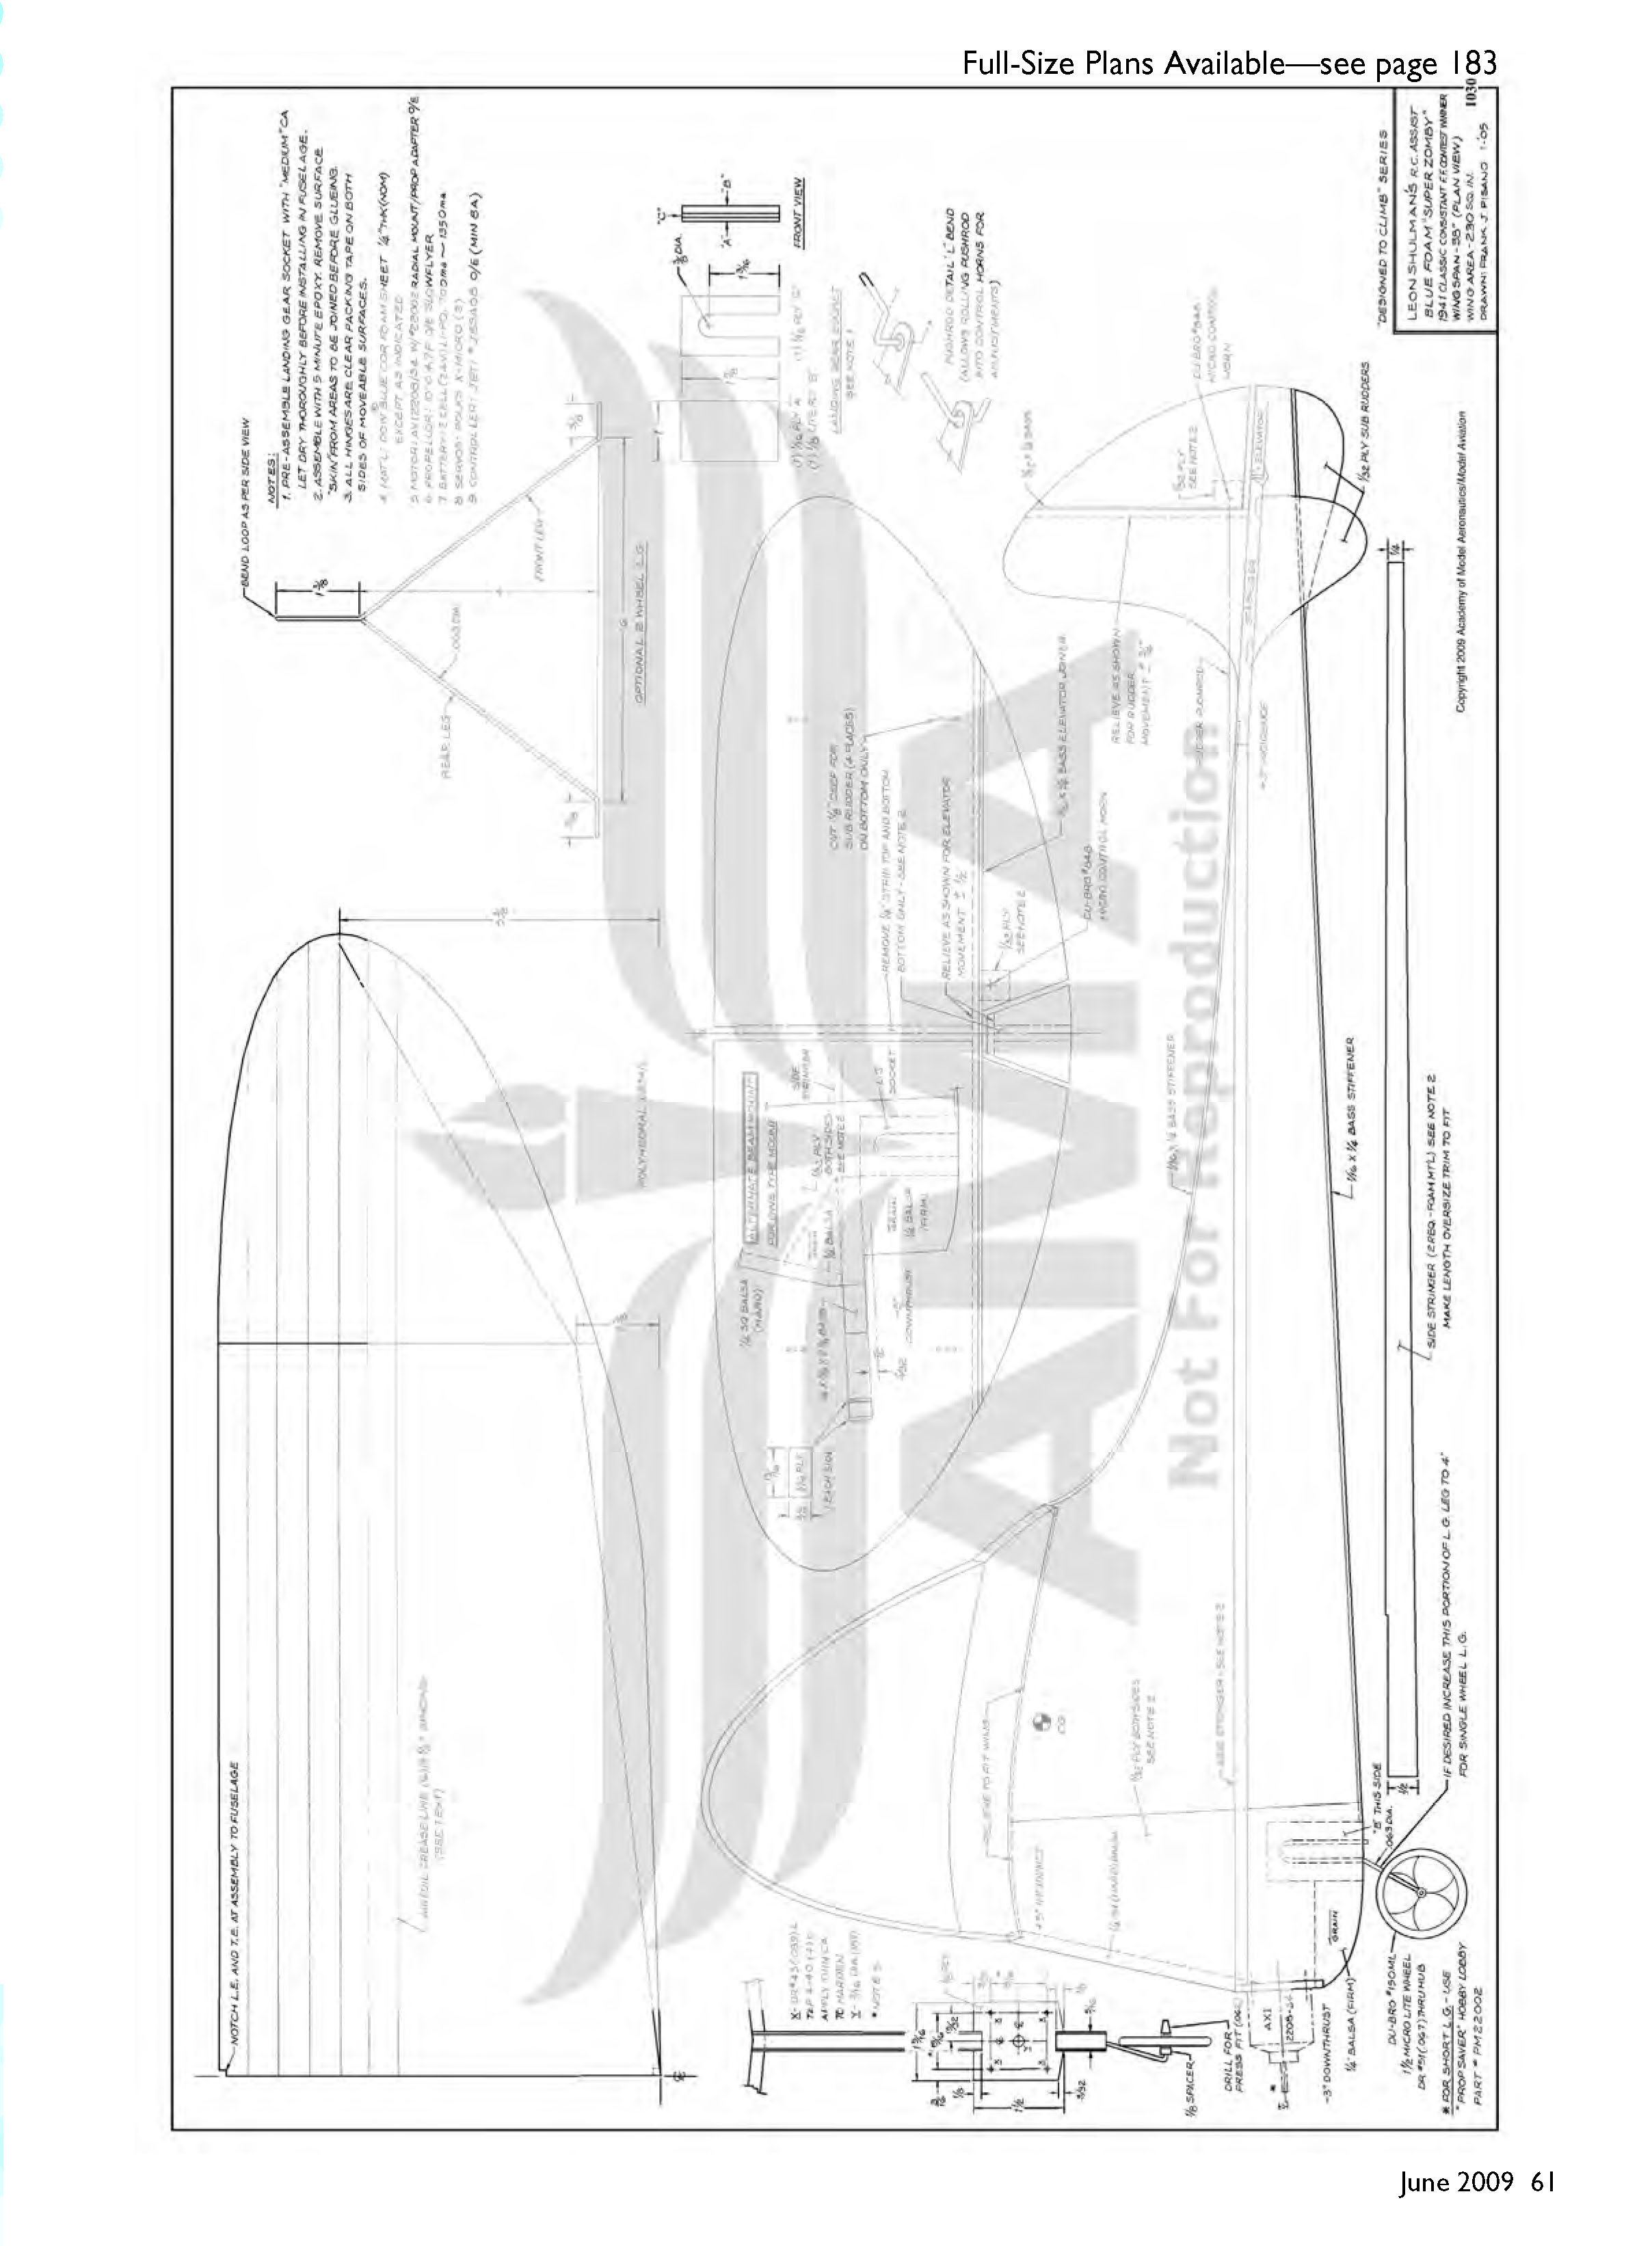
Full‑Size Plans Available—see page 183
Construction
Plans show full‑size model parts with construction notes. This Zomby is made from Dow BlueCor fan‑fold foam or any material with similar weight and characteristics. BlueCor is available from Lowe’s, The Home Depot, and most large hardware stores.
Items necessary for this build:
- Sharp razor or hobby knife (fresh blade)
- Sandpaper block
- Basic modeler’s tools (ruler, pencil, tape, pins)
- Foam‑friendly cyanoacrylate and epoxy
- 1/32", 1/16", and 1/8" plywood (small hard points)
- Small pieces of 1/16" x 1/4" basswood (or hard balsa) for stiffeners
- 1/16"‑diameter wire for landing gear
- Wheel(s)
- Masking tape, Du‑Bro hook‑and‑loop tape, double‑stick tape, clear packing tape
Construction goes quickly; follow this step‑by‑step procedure.
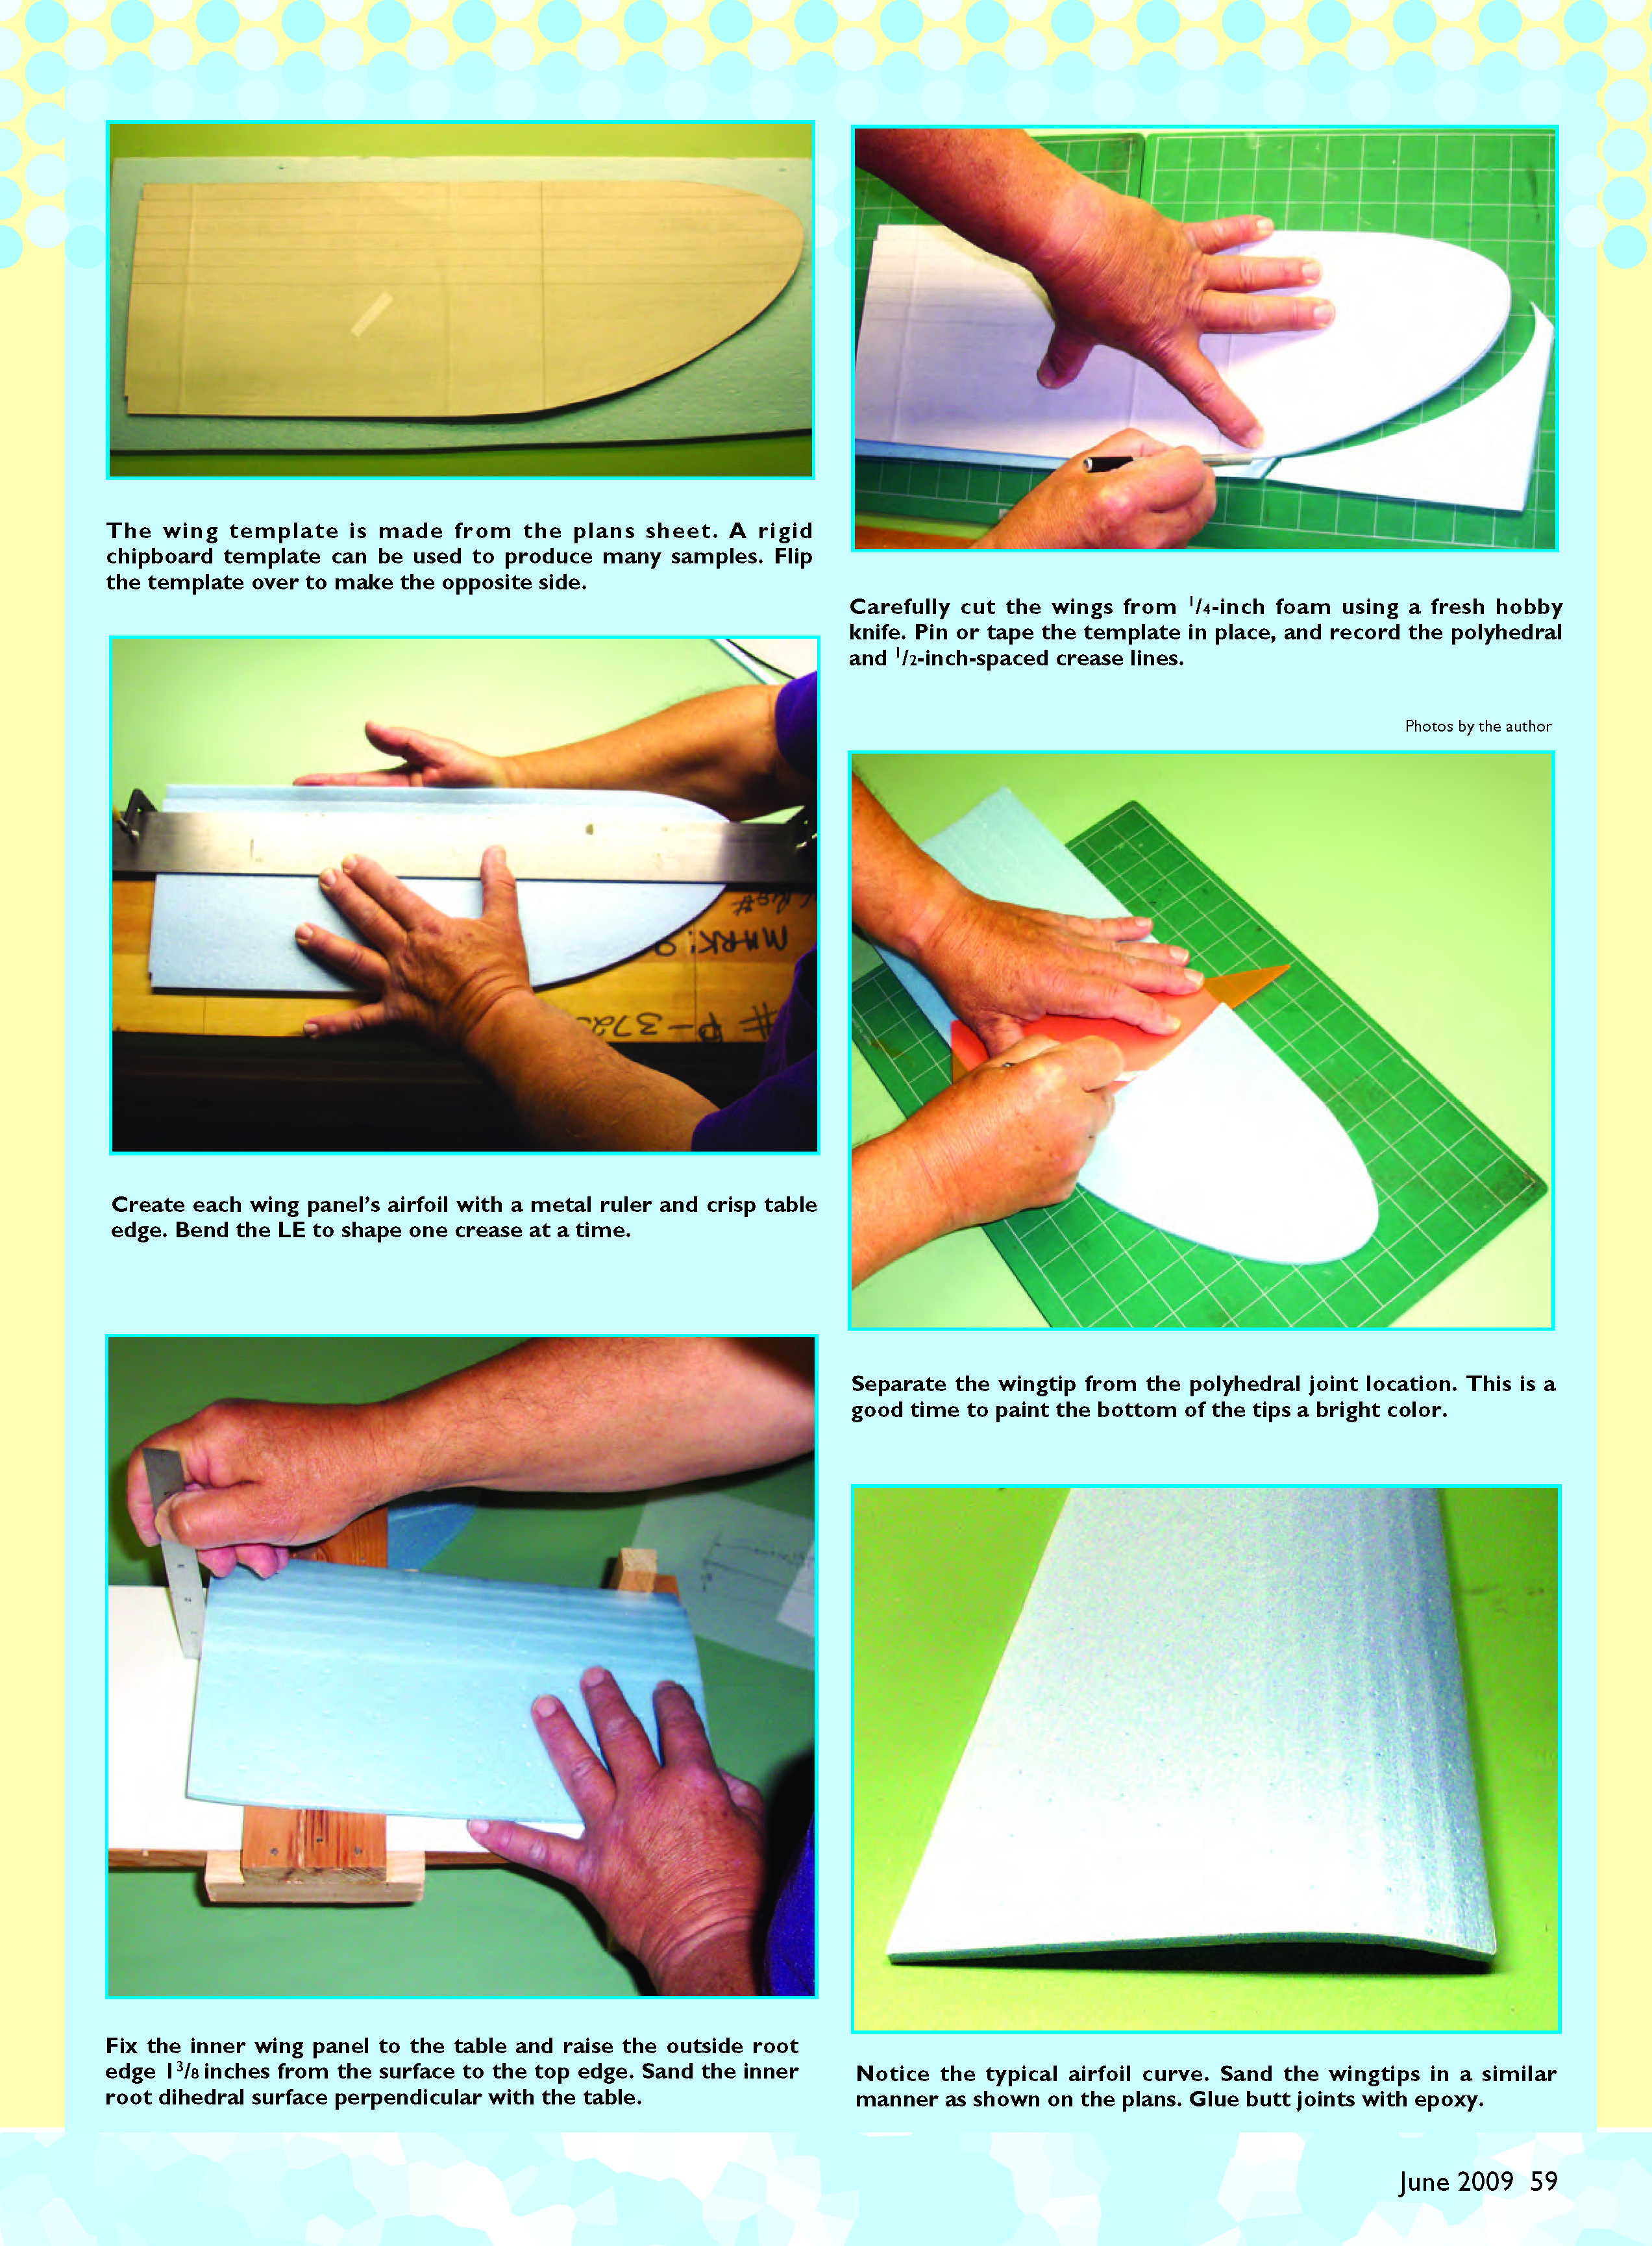
- Cut all parts to shape from the plans and make a kit. Use the plans sheet to make a wing template; a rigid chipboard template produces many samples. Flip the template over to make the opposite side. Pin or tape the template in place and record the polyhedral and 1/2‑inch‑spaced crease lines.
- Carefully cut the wings from 1/4‑inch foam using a fresh hobby knife. Create each wing panel’s airfoil by scoring/bending the leading edge (LE) to shape one crease at a time using a metal ruler and a crisp table edge. Crease the foam wing in six 1/2‑inch increments to form the airfoil—this gives an efficient wing with tremendous strength.
- Fix the inner wing panel to the table and raise the outside root edge 1 3/8 inches from the surface to the top edge. Sand the inner root dihedral surface perpendicular to the table. Separate the wingtip from the polyhedral joint location. Sand the wingtips to match the typical airfoil curve shown on the plans. Glue butt joints with epoxy.
- Assemble the landing‑gear socket with cyanoacrylate. For the optional beam mount, shave the 3/8‑inch beam as desired.
- Bevel the horizontal stabilizer’s bottom edges and one side of the vertical tail. Add basswood stiffeners to the control surfaces.
- Make hinges from clear packing tape: apply tape on both sides of the movable surfaces, leaving a 1/32‑inch gap between surfaces. Press tape in place, fold the surfaces back the other way, apply a second piece of tape to complete the hinge, and rub firmly to secure it.
- Assemble the model using masking tape to hold parts while adhering with epoxy or cyanoacrylate. All incidence and motor thrust settings are built in; you can make small thrust adjustments by using washers between the motor mount and plywood when using an outrunner‑style motor.
Equipment placement and setup:
- The motor, ESC, battery, servos, and receiver locations are shown on the plans. The receiver, controller, and Li‑Poly battery can be held to the fuselage with Du‑Bro hook‑and‑loop tape (item 348). Du‑Bro double‑stick tape (item 634) works well to mount servos.
- The center of gravity (CG) is at the 50% point of the wing chord (shown on the plans).
- I used Du‑Bro Micro Control Horns (item 848) and the Micro Push Rod System (item 847) to connect Polk’s Hobby X‑Micro servos and Polk’s Seeker 6 receiver. Set the servos to allow about 3/4 inch of rudder throw and 1/2 inch of elevator throw.
Recommended power systems:
- High‑performance: AXi 2208/34 motor with a Jeti 8‑amp brushless ESC. On a two‑cell Li‑Poly pack this turns an APC 10 x 4.3 SF propeller (available from Landing Products).
- Economy setup: GWS 350C motor with a Castle Creations Pixie‑20 ESC and a GWS 10 x 4.3 SF propeller.
I found little performance differential between the setups. The brushless package was sprightlier, weighed slightly less, and exhibited better overall efficiency—the Zomby climbed higher on a single charge.
Finish and visibility:
- I recommend painting the undersides of the wings a bright color or using Fluorescent Orange Solartrim. The airplane climbs like a rocket and glides like an eagle, but the blue foam can blend into a clear sky.
Flight
Upon launch, the Blue Foam Super Zomby will angle up and turn by itself as it spirals upward. You can steer it gently if you want. Before it climbs out of sight, throttle back slowly and allow it to transition into a soaring glide. This model is gentle and responsive. Try landing it at your feet—you can do it with this Zomby.
Leon Shulman [email protected]
Sources
- Du‑Bro
(800) 848‑9411 www.dubro.com
- Polk’s Hobby
(973) 351‑9800 www.polkshobby.com
- Hobby Lobby
(866) 933‑5972 www.hobby‑lobby.com
- Landing Products
(530) 661‑0399 www.apcprop.com
- GWS
(909) 594‑4979 www.gwsus.com
- Castle Creations
(913) 390‑6939 www.castlecreations.com
Transcribed from original scans by AI. Minor OCR errors may remain.

