

BMJR Models Swami
Jerry Smith [email protected]
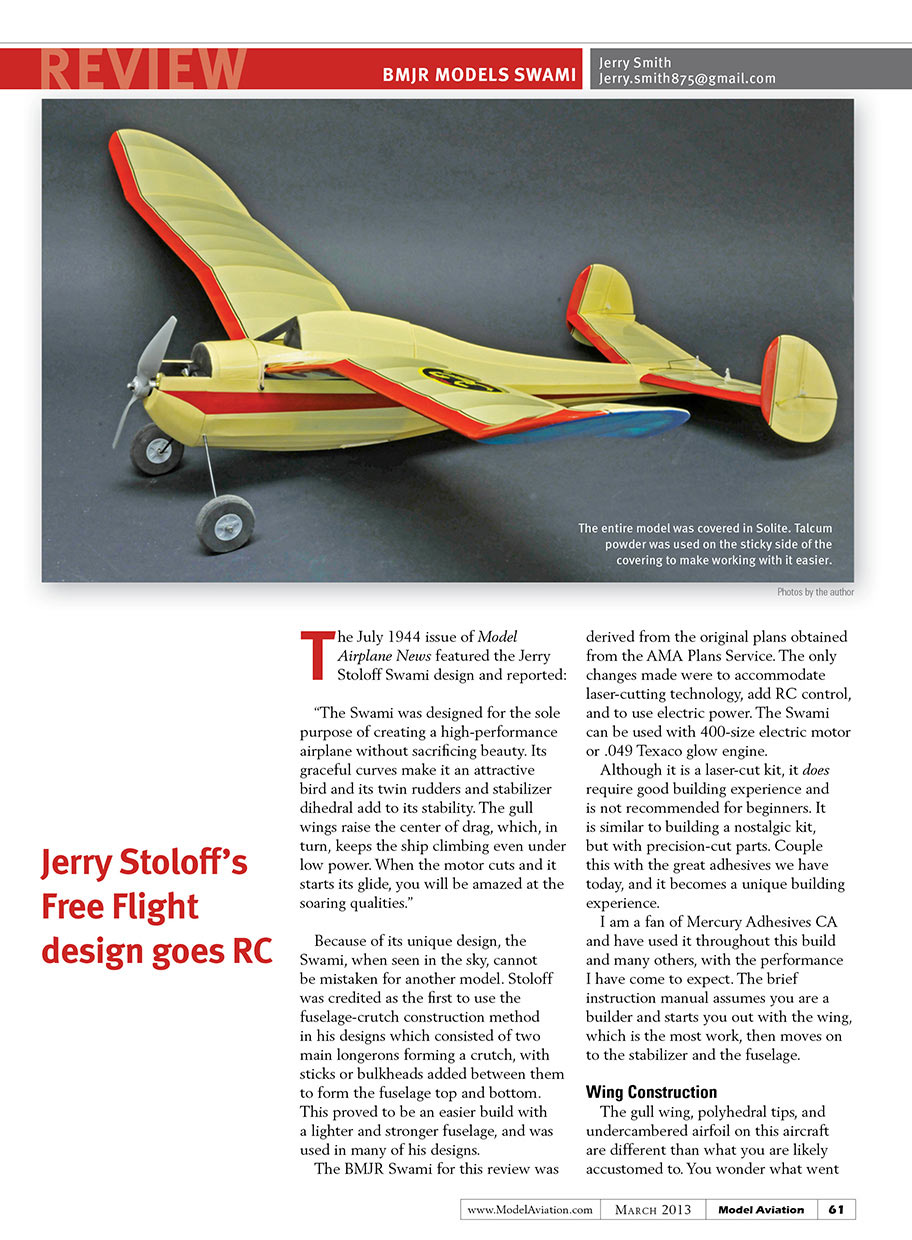
“The Swami was designed for the sole purpose of creating a high-performance airplane without sacrificing beauty. Its graceful curves make it an attractive bird and its twin rudders and stabilizer dihedral add to its stability. The gull wings raise the center of drag, which, in turn, keeps the ship climbing even under low power. When the motor cuts and it starts its glide, you will be amazed at the soaring qualities.” —Model Airplane News, July 1944 (on the Jerry Stoloff Swami design)
Because of its unique design, the Swami, when seen in the sky, cannot be mistaken for another model. Stoloff was credited as the first to use the fuselage-crutch construction method in his designs, which consisted of two main longerons forming a crutch, with sticks or bulkheads added between them to form the fuselage top and bottom. This proved to be an easier build with a lighter and stronger fuselage and was used in many of his designs.
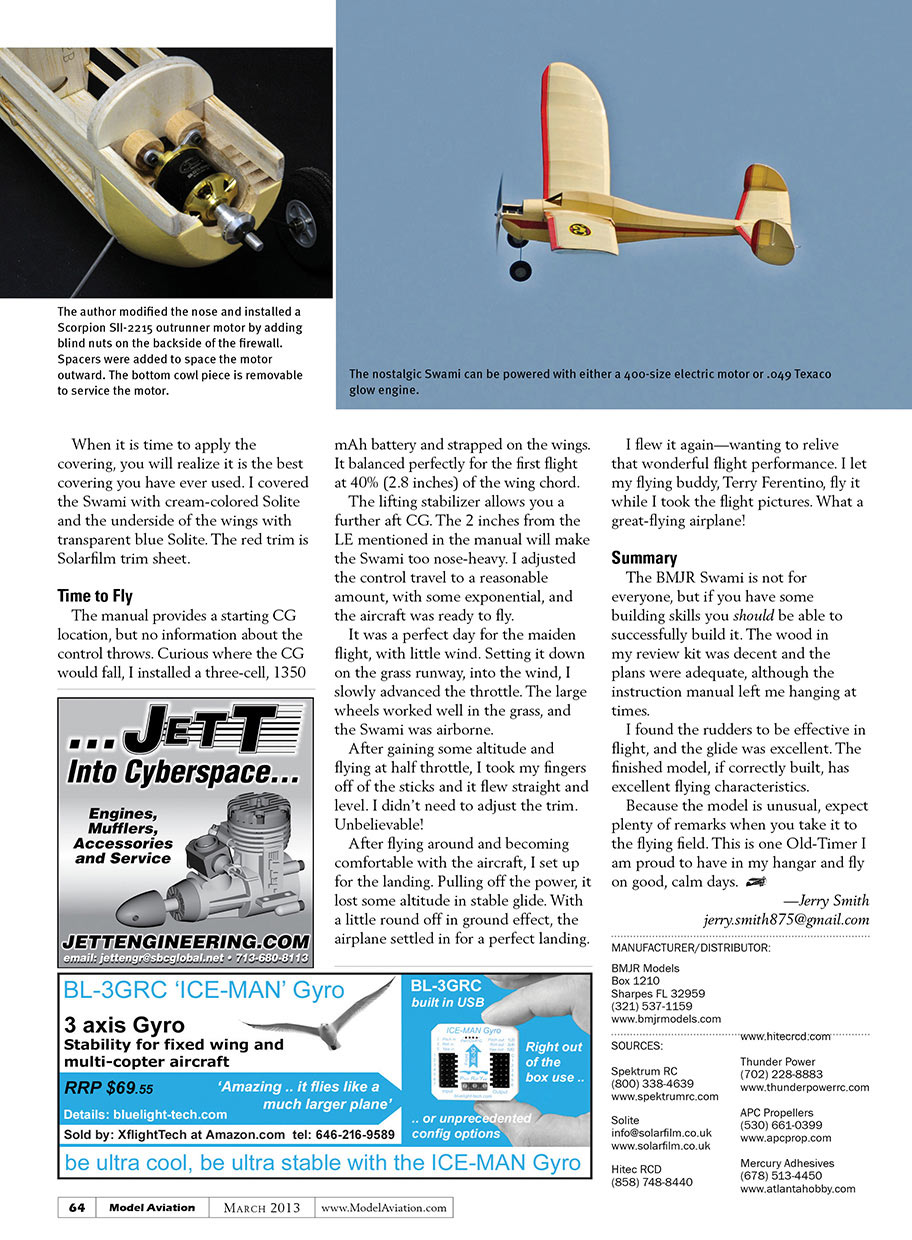
The BMJR Swami reviewed here was derived from the original plans obtained from the AMA Plans Service. The only changes made were to accommodate laser-cutting technology, add RC control, and use electric power. The Swami can be used with a 400-size electric motor or a .049 Texaco glow engine.
Although it is a laser-cut kit, it does require good building experience and is not recommended for beginners. It’s similar to building a nostalgic kit, but with precision-cut parts. Couple this with the great adhesives we have today, and it becomes a unique building experience.
I am a fan of Mercury Adhesives CA and have used it throughout this build and many others, with the performance I have come to expect. The brief instruction manual assumes you are a builder and starts you out with the wing, which is the most work, then moves on to the stabilizer and the fuselage.
Wing Construction
The gull wing, polyhedral tips, and undercambered airfoil on this aircraft are different than what you are likely accustomed to. You wonder what went through the designer's mind when he thought of it and what he was after, but it is a thing of beauty—with flowing lines and varied shapes.
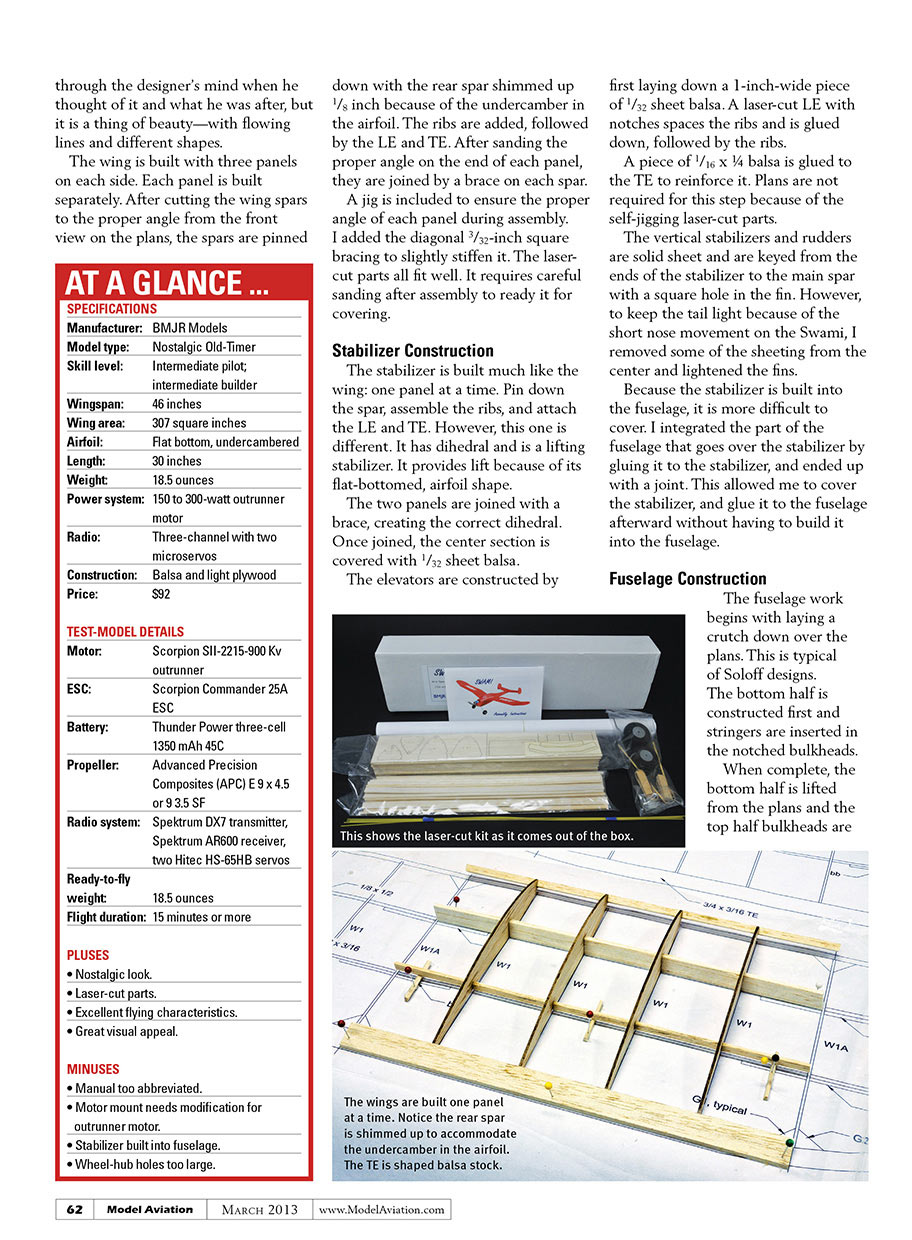
The wing is built with three panels on each side. Each panel is built separately. After cutting the wing spars to the proper angle from the front view on the plans, the spars are pinned down with the rear spar shimmed up 1/8 inch because of the undercamber in the airfoil. The ribs are added, followed by the leading edge (LE) and trailing edge (TE). After sanding the proper angle on the end of each panel, they are joined by a brace on each spar.
A jig is included to ensure the proper angle of each panel during assembly. I added diagonal 3/32-inch square bracing to slightly stiffen it. The laser-cut parts all fit well. It requires careful sanding after assembly to ready it for covering.
AT A GLANCE ...
SPECIFICATIONS
- Manufacturer: BMJR Models
- Model type: Nostalgic Old-Timer
- Skill level: Intermediate pilot; intermediate builder
- Wingspan: 46 inches
- Wing area: 307 square inches
- Airfoil: Flat bottom, undercambered
- Length: 30 inches
- Weight: 18.5 ounces
- Power system: 150–300 watt outrunner motor
- Radio: Three-channel with two microservos
- Construction: Balsa and light plywood
- Price: $92
TEST-MODEL DETAILS
- Motor: Scorpion SII-2215-900Kv outrunner
- ESC: Scorpion Commander 25A ESC
- Battery: Thunder Power 3-cell 1350 mAh 45C
- Propeller: Advanced Precision Composites (APC) E 9 x 4.5 or 9 x 3.5 SF
- Radio system: Spektrum DX7 transmitter, Spektrum AR600 receiver, two Hitec HS-65HB servos
- Ready-to-fly weight: 18.5 ounces
- Flight duration: 15 minutes or more
PLUSES
- Nostalgic look
- Laser-cut parts
- Excellent flying characteristics
- Great visual appeal
MINUSES
- Manual too abbreviated
- Motor mount needs modification for outrunner motor
- Stabilizer built into fuselage (makes some steps harder)
- Wheel-hub holes too large
Stabilizer Construction
The stabilizer is built much like the wing: one panel at a time. Pin down the spar, assemble the ribs, and attach the LE and TE. However, this one is different. It has dihedral and is a lifting stabilizer. It provides lift because of its flat-bottomed airfoil shape.
The two panels are joined with a brace, creating the correct dihedral. Once joined, the center section is covered with 1/32-inch sheet balsa.
The elevators are constructed by first laying down a 1-inch-wide piece of 1/32-inch sheet balsa. A laser-cut LE with notches spaces the ribs and is glued down, followed by the ribs. A piece of 1/16 x 1/4 balsa is glued to the TE to reinforce it. Plans are not required for this step because of the self-jigging laser-cut parts.
The vertical stabilizers and rudders are solid sheet and are keyed from the ends of the stabilizer to the main spar with a square hole in the fin. However, to keep the tail light because of the short nose moment on the Swami, I removed some of the sheeting from the center and lightened the fins.
Because the stabilizer is built into the fuselage, it is more difficult to cover. I integrated the part of the fuselage that goes over the stabilizer by gluing it to the stabilizer, and ended up with a joint. This allowed me to cover the stabilizer, then glue it to the fuselage afterward without having to build it into the fuselage first.
Fuselage Construction
The fuselage work begins with laying a crutch down over the plans. This is typical of Stoloff designs. The bottom half is constructed first and stringers are inserted in the notched bulkheads.
When complete, the bottom half is lifted from the plans and the top bulkheads are installed, and then the stringers are added.
The fit of the parts is good, and the fuselage takes shape in a hurry. I assembled the cabin/wing hold-down on the fuselage with the wing in place to ensure a good fit. Because I was using a different motor than recommended, I modified the front end and made the cowl removable so I could easily install or remove the motor. I used dowel pins to locate it, and magnets to hold it in place. This took extra time but worked out well.
The motor I chose to power the Swami was a Scorpion SII-2215-900Kv connected to a Commander 25A ESC. I have had good luck with these excellent-quality motors. I like that the ESC can be programmed with an IR programmer and keypad. No more listening for a certain number of beeps. All of this is included in the Commander 25A ESC package.
The most painstaking job on this build is hooking up the pull-pull linkage to the rudders. BMJR did a great job of keeping it lightweight with no heavy bellcranks and solid-wire linkage. Small plastic tubing is threaded through the stabilizer from the rudders and then down the fuselage to the servos.
SpiderWire 10-pound fishing line is threaded through the tubes to provide the linkage connection. This requires plenty of patience, but it’s not impossible provided you don’t kink the line and can see it. The rudders work well.
Covering the Swami
After I carefully sanded the airframe parts with 220-grit sandpaper, I began the covering. I used Solite, the lightweight version of Solarfilm, to keep the weight low. If you have never covered with Solite, you’ll find it takes some understanding to apply it well.
The first problem is removing the backing. Take a square corner and place tape on both sides, then pull the tape apart. If that doesn’t work, place the corner between your thumb and forefinger and use an X-Acto knife to start the separation, and then use the tape method.
Pull off the backing but be careful because static electricity will cause it to curl and stick together. While pulling off the backing, lay it flat on the surface and dust it with talcum powder. This will cut the tackiness of the adhesive and allow you to pull it apart if it sticks together.
When it is time to apply the covering, you will realize it is the best covering you have ever used. I covered the Swami with cream-colored Solite and the underside of the wings with transparent blue Solite. The red trim is Solarfilm trim sheet.
Time to Fly
The manual provides a starting CG location, but no information about the control throws. Curious where the CG would fall, I installed a 3-cell, 1350 mAh battery and strapped on the wings. It balanced perfectly for the first flight at 40% of the wing chord (2.8 inches).
The lifting stabilizer allows you to move the CG further aft. The 2 inches from the LE mentioned in the manual will make the Swami too nose-heavy. I adjusted the control travel to a reasonable amount, with some exponential, and the aircraft was ready to fly.
It was a perfect day for the maiden flight, with little wind. Setting it down on the grass runway, into the wind, I slowly advanced the throttle. The large wheels worked well in the grass, and the Swami was airborne.
After gaining some altitude and flying at half throttle, I took my fingers off the sticks and it flew straight and level. I didn't need to adjust the trim. Unbelievable!
After flying around and becoming comfortable with the aircraft, I set up for the landing. Pulling off the power, it lost some altitude in a stable glide. With a little round-off in ground effect, the airplane settled in for a perfect landing.
I flew it again—wanting to relive that wonderful flight performance. I let my flying buddy, Terry Ferentino, fly it while I took the flight pictures. What a great-flying airplane!
Summary
The BMJR Swami is not for everyone, but if you have some building skills you should be able to successfully build it. The wood in my review kit was decent and the plans were adequate, although the instruction manual left me hanging at times.
I found the rudders to be effective in flight, and the glide was excellent. The finished model, if correctly built, has excellent flying characteristics.
Because the model is unusual, expect plenty of remarks when you take it to the flying field. This is one Old-Timer I am proud to have in my hangar and fly on good, calm days.
—Jerry Smith [email protected]
MANUFACTURER/DISTRIBUTOR
BMJR Models Box 1210 Sharpes, FL 32959 (321) 537-1159 www.bmjrmodels.com
SOURCES
- Spektrum RC
(800) 338-4639 www.spektrumrc.com
- Hitec RCD
(858) 748-8440 www.hitecrcd.com
- Thunder Power
(702) 228-8883 www.thunderpowerrc.com
- APC Propellers
(530) 661-0399 www.apcprop.com
- Solite / Solarfilm
[email protected] www.solarfilm.co.uk
- Mercury Adhesives
(678) 513-4450 www.atlantahobby.com
Transcribed from original scans by AI. Minor OCR errors may remain.

