
Bristol Brownie
Charming British monoplane for geared Speed 400 motors
by Dave Robelen
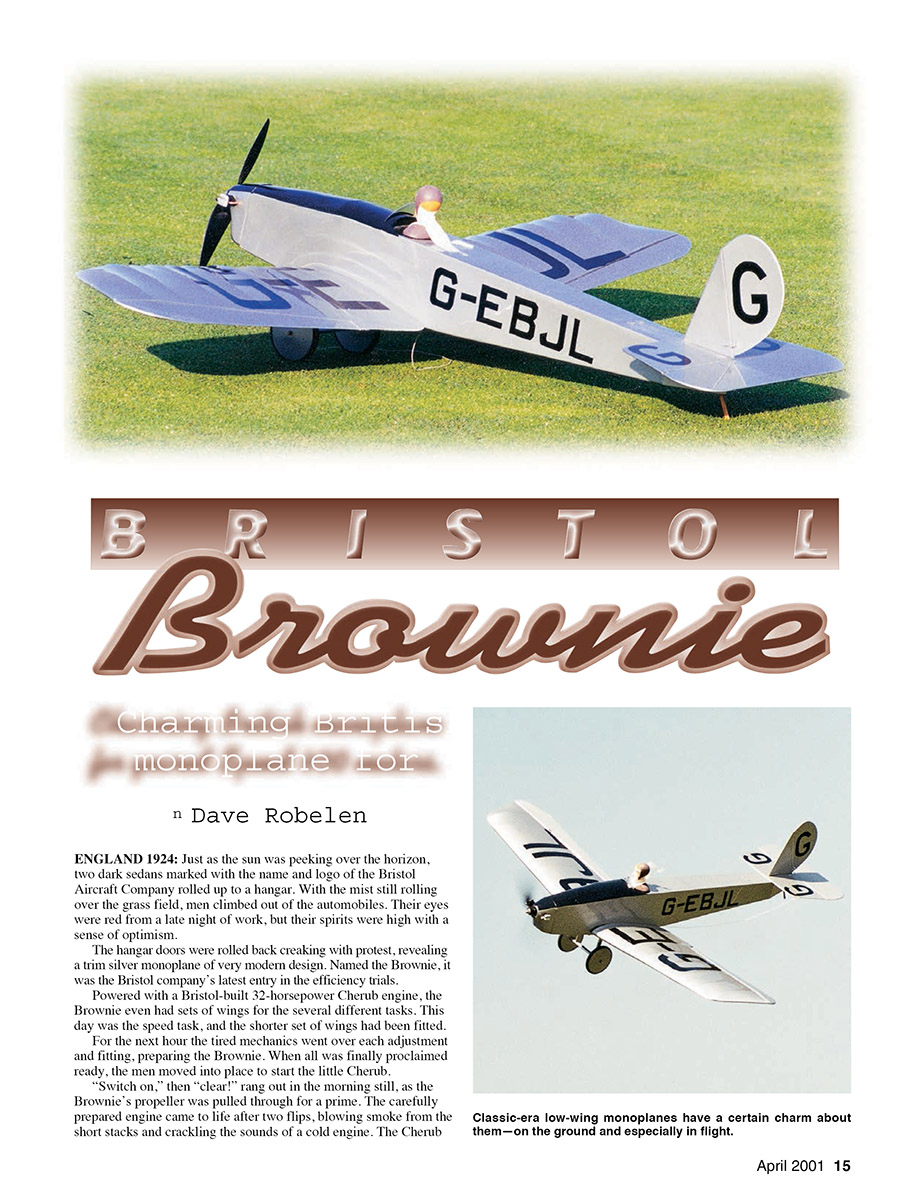
ENGLAND, 1924: Just as the sun was peeking over the horizon, two dark sedans marked with the name and logo of the Bristol Aircraft Company rolled up to a hangar. With the mist still rolling over the grass field, men climbed out of the automobiles. Their eyes were red from a late night of work, but their spirits were high with a sense of optimism.
The hangar doors were rolled back, creaking with protest, revealing a trim silver monoplane of very modern design. Named the Brownie, it was the Bristol company's latest entry in the efficiency trials. Powered with a Bristol-built 32-horsepower Cherub engine, the Brownie even had sets of wings for several different tasks. This day was the speed task, and the shorter set of wings had been fitted.
For the next hour the tired mechanics went over each adjustment and fitting, preparing the Brownie. When all was finally proclaimed ready, the men moved into place to start the little Cherub.
"Switch on," then "clear!" rang out in the morning still, as the Brownie's propeller was pulled through for a prime. The carefully prepared engine came to life after two flips, blowing smoke from the short stacks and crackling with the sounds of a cold engine. The Cherub was smoothly puttering at idle minutes later, and all had been checked one last time.
Climbing into the snug cockpit, the pilot was determined to push Brownie to the limit and let it show its stuff. The takeoff went smoothly on the grassy field, and the climb was impressive for such a small engine. The pilot signaled readiness for the first run after two laps around the field to warm the engine. Diving for speed, the Brownie accelerated to a most impressive velocity. The pilot leveled off with the little Cherub singing as they rocketed down the course. Pulling up, the run was repeated in the opposite direction for an average speed of 70 mph. As Brownie was setting up to land, hands were being shaken, backs were being pounded, and the long night was being forgotten. Was it really that way? I don't know the details, but my imagination can supply plenty as I consider the feat accomplished that day.
The Brownie kept coming back to my attention when I was looking for a suitable scale model for electric power. It was efficient, it could be built light, and it has the charm found in so many British airplanes. Besides, the fields are not exactly crowded with model Brownies!
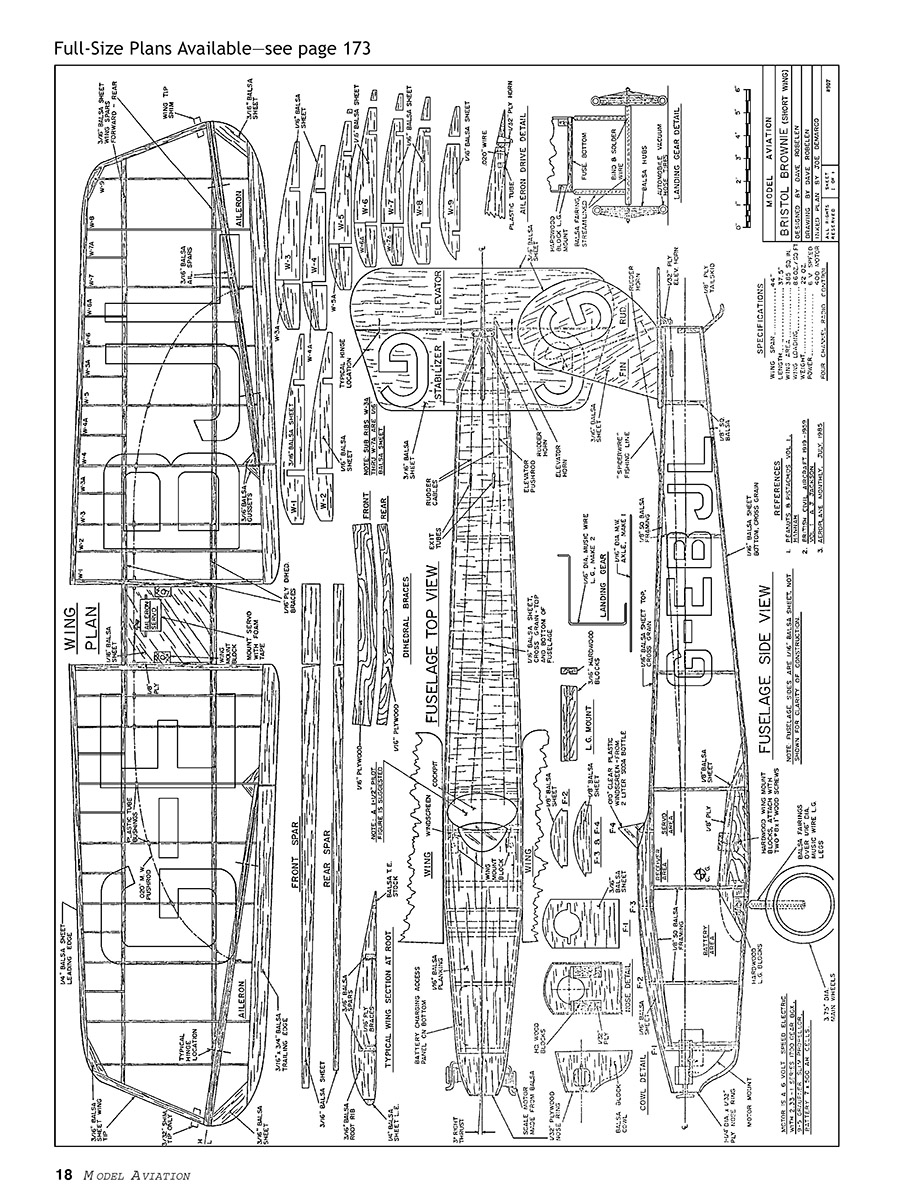
Specifications
- Type: RC Scale
- Wingspan: 44 inches
- Motor: Geared six-volt Speed 400
- Functions: Rudder, elevator, aileron, motor control
- Flying weight: 23 ounces
- Construction: Built-up balsa
- Finish: Heat-shrink film
The model presented here is true scale in all dimensions but has been simplified in detail to provide a scale model suited to the rigors of regular flying. Even though the model is large for the chosen motor, the performance is pleasing. The climb rate is healthy, Brownie will roll and loop with ease, and the high-speed passes are downright satisfying. The model has never shown a tendency to snap-roll or have unpleasant tendencies in slow flight. In fact, it has been known to gain altitude power-off in a thermal.
As far as skill required for flying, anyone who has mastered an aileron trainer could easily handle Brownie. The key to this degree of success lies largely in weight control. At about 23 ounces, Brownie has a wing loading comparable to a powered glider. With modern motors, propellers, batteries, and gearboxes, there is more than ample power for flights of at least 10 minutes and plenty of time for maneuvering.
Because of the clean design and responsive controls, Brownie is not grounded by a breeze. I have flown the model comfortably in 15 mph winds.
The issue of weight control is very real and critical to this project's success. The radio control gear does not have to be ultralight or small; a nice, basic four-channel set will do. If you have small servos, by all means use them—every little bit adds up. "Building light" is as much an attitude as a technique or skill. One of the worst things you can do to a proven model is add "reinforcements" against the possibility of a crash. Using plenty of heavy epoxy glue for the same reason is also a no-no.
My model is covered with TopFlite MonoKote; it was probably a heavy choice, but I am familiar with this material. If you know of a lighter system, go for it and let me know what you used!
For reference, a sheet of 1/16 x 3 x 36-inch balsa should weigh 12–14 grams, or approximately 1/2 ounce. To get target weights for other sizes, multiply by the difference in thickness. This grade of wood is not common in local stores, but several mail-order balsa-supply houses advertising in this magazine can satisfy your needs.
I use a good hobby grade of medium cyanoacrylate glue (CyA) for most of the project. There is also technique here, in learning to apply enough glue for a secure joint without flowing excess around. Scratch-building a project such as Brownie can be very rewarding—especially if you keep your standards high.
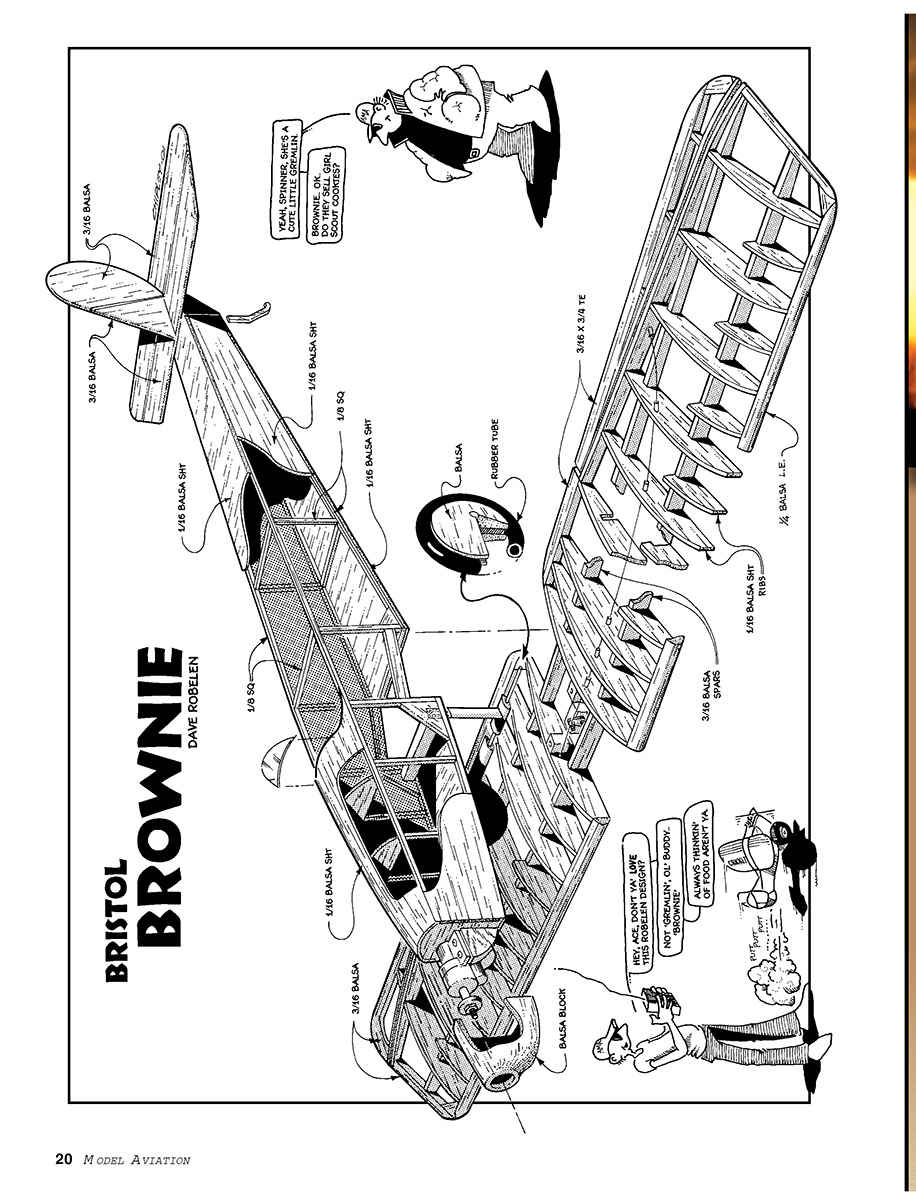
Construction
Fuselage
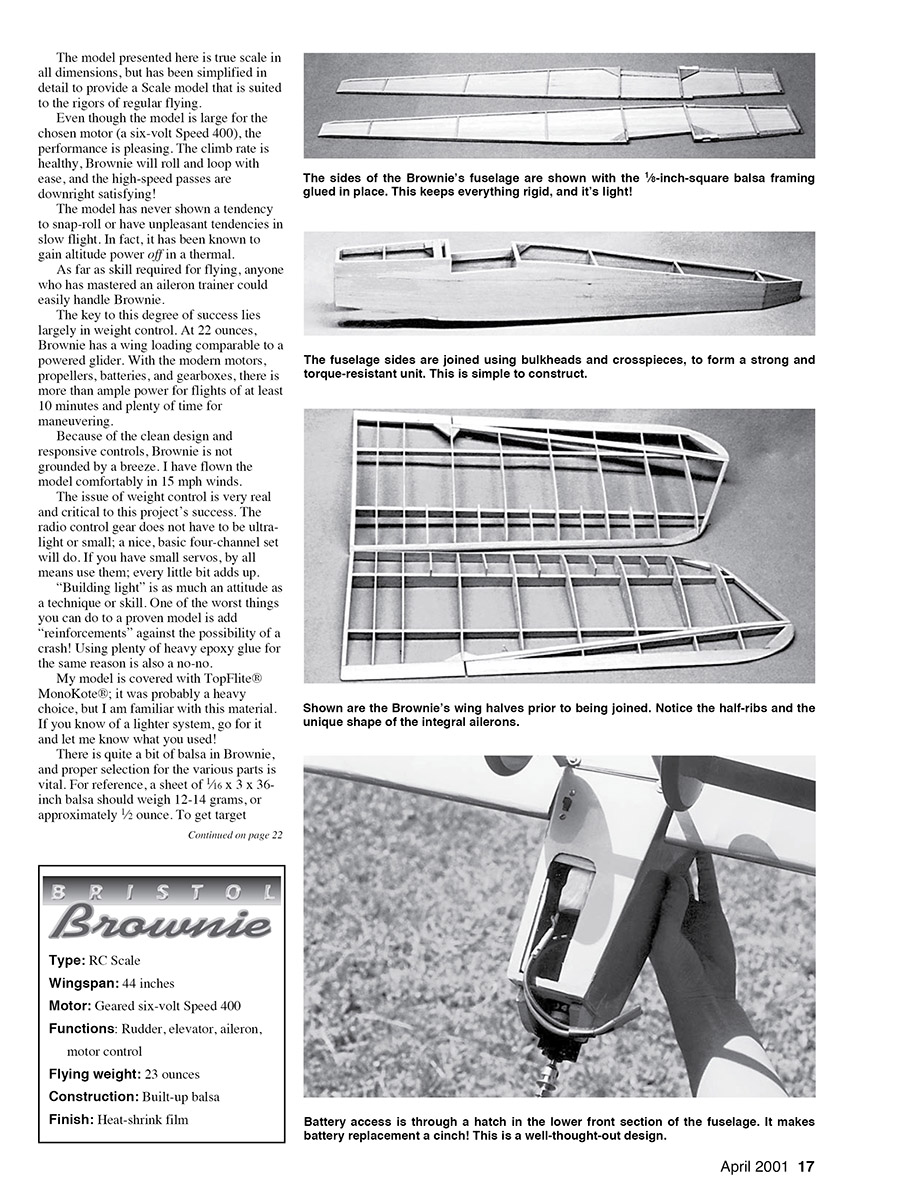
Let's start here to get warmed up. I spliced three-inch-wide balsa into wider sheets to make the sides. The next step involves gluing all the 1/8-inch balsa strips to the sides. Follow the plans closely, and please make a left and a right!
The sides may be joined in the center first, with the bulkheads and crosspieces keeping everything nice and square. Pull the nose into the front bulkhead, glue, and add the rest of the forward crosspieces.
The tail cone should be next, working back to the station where it angles together sharply. I had to cut through the 1/8-inch strip material, leaving a "V" notch in the stringers to pull it together.
The top and bottom are sheeted with 1/16-inch stock, with the grain running across the fuselage. I glued all the short planks together on the workboard and sanded the joints smooth before gluing to the fuselage.
The front decking needs to be made from fairly flexible wood, and it is necessary to splice the width. Fit carefully, and use plenty of masking tape when gluing in place. This is one job where a slower-drying wood glue does a much better job than CyA.
Mount the landing-gear block and any remaining sheeting, and sand the whole works smooth. For reference, my fuselage weighed 64 grams at this stage.
Cut the cowling from a soft balsa block, splicing if necessary to achieve the dimensions. An X-Acto whittler's blade does a fine job of trimming the outside to shape, and a Dremel tool is handy to shape the inside.
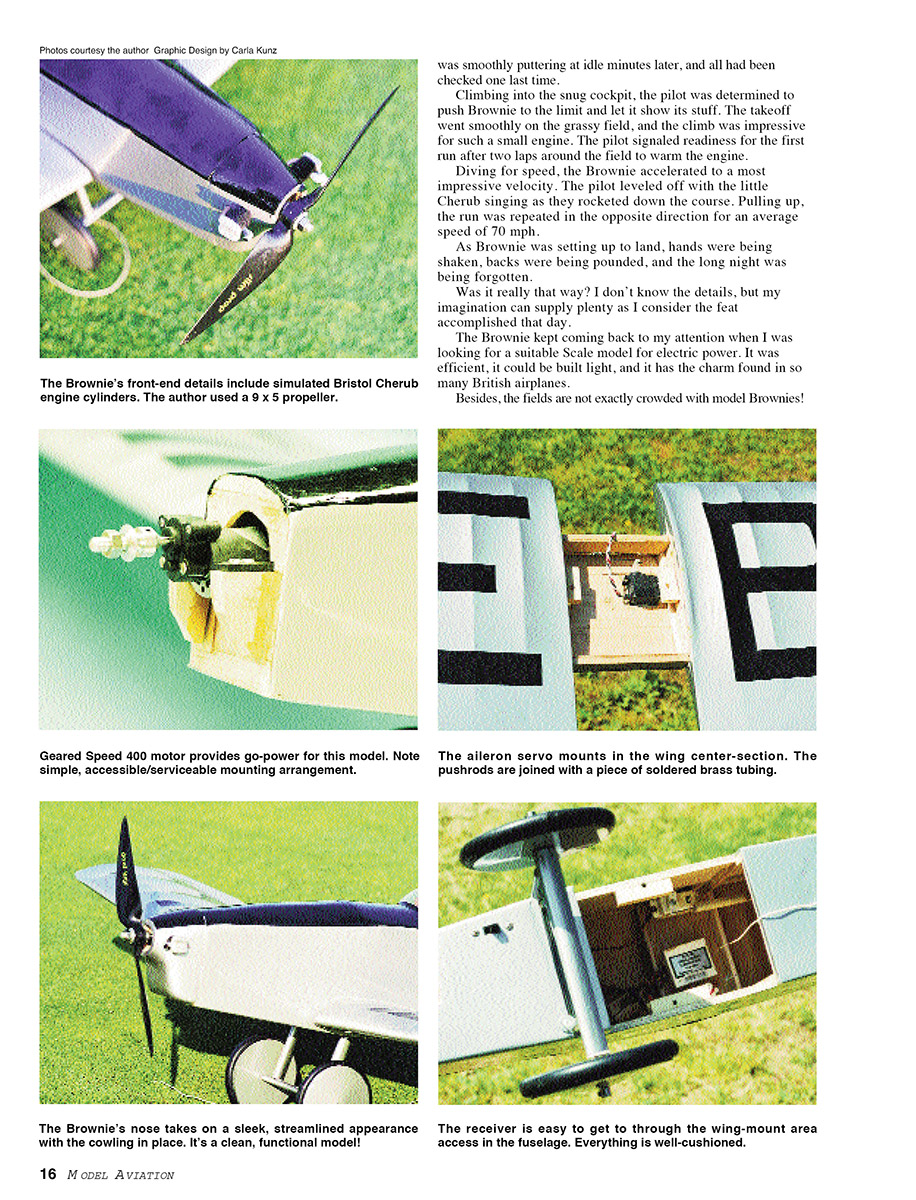
I have shown a 1700-series 2.33:1 gearbox on the plan, which works very well for me. This is a good time to fit the mounts and make changes if you are going to use a different unit (a Mini Olympus gearbox would do fine).
Tail Feathers
These are simplicity itself. Find some 3/16-inch balsa sheet that weighs about 36–38 grams/sheet, and cut the parts. Depending on your wood width, you may have to do some splicing.
Be sure to sand the taper in the elevator and bevel the edges of the controls as shown. My tail assembly weighed 21 grams at this stage. Set it aside for later.
Wing
The wing involves more parts-cutting than the fuselage, but it can still go rather quickly. Take the plan to an office copier and make reproductions of the rib shapes to be used.
All the ribs except the root rib are made from light 1/16-inch balsa. If you can find some quarter-grain stock, so much the better.
Since we are dealing with a tapered wing, it is necessary to cut several sizes of ribs. Cut two balsa blanks and one paper pattern for each rib size. Sparingly affix the two sheets with a glue stick, with the pattern on top. Remember to apply the glue sparingly—if you use too much, you will have a nice, thick rib with a permanent pattern. A few strips is plenty. Cut the ribs shortly after gluing and pull apart, and things should go nicely. Proceed until you have a full set of ribs.
This is a good time to mark and drill for the aileron wire bushings. I used slices of thin tubing for a throttle cable housing.
The wing spars are the only place I used moderately firm wood—not hard, but firm. Mark and slice a set of spars, and saw the plywood dihedral braces.
The 1/4-inch-thick leading edge should be cut from soft balsa, slightly wider than the finished size. The same goes for the aileron spars; measure the depth from the ribs at the ends and cut slightly oversize. Round the parts by cutting the tip pieces from light 1/16-inch stock.
Assemble the wing in two panels. Start by pinning the spars down along the trailing edge, then gluing the main ribs in place. Clamp the leading edge to the ribs and glue.
Assemble the tips, noting that the rear of the tip is shimmed up to the center of the aileron spar. Add the nose ribs and let it dry a bit. Glue the dihedral braces to the center spar sections.
Lift the panels off the board when dry, and trim and sand to shape. Do not cut the ailerons loose yet. Join the two panels to the center spars, using plenty of clamps on the braces. Finish the bottom of the center with 1/16-inch sheet and sand everything smooth.
My model's wing weighed 64 grams at this stage.
Install all the aileron wire bushings without glue. Cut the ailerons loose and shape the leading edge to a bevel. Temporarily fit the ailerons on their hinges. I recommend the small Klett hinges.
Slide the wire rods through the bushings and join in the center with a thin brass tube. Fabricate and install the plywood control horns and finish bending the wire rods, leaving the ends so the ailerons can be removed.
When everything lines up, solder the brass tube in the center to both rods. Slide the rod back and forth and note the free action without play. When satisfied, put a small drop of glue on each bushing and remove the ailerons for covering.
Bend up the 1/16-inch-diameter wire landing gear assembly, and bind and solder where shown. Cut the fairings from 3/16-inch balsa stock and shape to a streamlined section. Slot to fit over the wire, but do not install until covered.
Wheels
These are made from a sandwich of 1/16-inch balsa discs with a brass-tube bushing for the axle. Work with a sanding block to achieve the conical shape on the outside surface. Wrap sandpaper around a dowel and sand a round groove for the tires.
I made my tires from vacuum tubing bought at an auto-parts store. CyA does a fine job of attaching the tubing. (Attach tires after covering hubs.) Cut the tail skid from 1/8-inch plywood and sand smooth. Stain if desired.
Covering
I am poorly equipped to give much advice on covering with plastic, but I took pains to bond the film completely to all the wood surfaces, and I am very glad I did.
Since only one Brownie was built, there is little choice if you want a scale color scheme; however, this is your model and you can use whatever colors suit you. The plan sheet has the references for the scale color and markings.
I used a trim film for the letters, and I highly recommend it. The adhesive is slightly less aggressive, and you can get a "second chance."
Final Assembly
Fit the wing in the opening and seat the mounting screws. The tail surfaces are aligned in relation to the wing, so take care—measure twice and glue once. I used flexible plastic hinges cut 1/4-inch wide on the tail surfaces.
Mount the landing gear and drive motor. Fit the cowling, trimming clearance as needed around the gear drive. I used clear plastic tape to hold the cowl on my Brownie. Install the plywood horns on the tail surfaces, and make an elevator pushrod from a 3/32-inch square balsa stick with 3/32-inch-diameter wire ends.
I used servo-mounting tape to mount my servos, and I am very pleased with the result. Make and install the wire link from the aileron servo arm, double-checking for smooth operation and neutral settings.
Bend the elevator pushrod to length and install with "Z" bends. I made my rudder pull-pull lines from SpiderWire fishing line and used short lengths of aluminum tubing crimped at the ends to secure it. Check all controls for smooth and free operation.
I made a few flights with my Brownie before installing the scale motor and pilot (chicken, I guess). The motor battery should be used to balance Brownie where shown on the plans. Find a clear area outdoors, and do a thorough range check with the motor running at all speeds.
Flying
Because of the close spacing between the center of gravity and the axle, Brownie needs full up-elevator at the start of the takeoff roll. Once the speed builds slightly, relax the stick to neutral. Meanwhile, the rudder will be needed if there is any crosswind blowing.
When the speed looks reasonable, apply a little back-stick and Brownie will lift smoothly when ready. Keep the initial climb smooth and shallow while you gain a little altitude.
You should be at 100 feet very quickly, where you can throttle back to half power and start getting acquainted. The roll and pitch response is smooth and crisp—comfortable. Put the nose in a shallow dive and go to full power, and observe how fast Brownie accelerates! Still looking good? Plan on a long, flat glide when you set up for touchdown; Brownie is quite clean.
You can touch down three-point or mains first; either technique works fine. If you are landing in grass, a three-point flare will help prevent a nose-over. Take the model home and put on the finishing touches.
Scale Motor and Pilot
The scale motor is made from bits of balsa. I spun the cylinders in a drill and used a Dremel with a parting wheel to cut the fins. It went quickly and looks good. Use flat model enamels to paint the parts before final assembly. Cut the windshield from a section of a two-liter drink bottle where the bottle tapers near the top. Attach the windshield with a strip of trim film.
I am not the world's best sculptor, but I persevered and I have a light balsa pilot. Do what you can, but please don't glue one of those heavy plastic dolls on Brownie. This is not a payload event!
I hope you can have fun with Brownie. If you have any questions, I will be glad to try to help.
Dave Robelen Route #4, Box 369 Farmville, VA 23901 [email protected]
Transcribed from original scans by AI. Minor OCR errors may remain.

