
BUTTERCUP
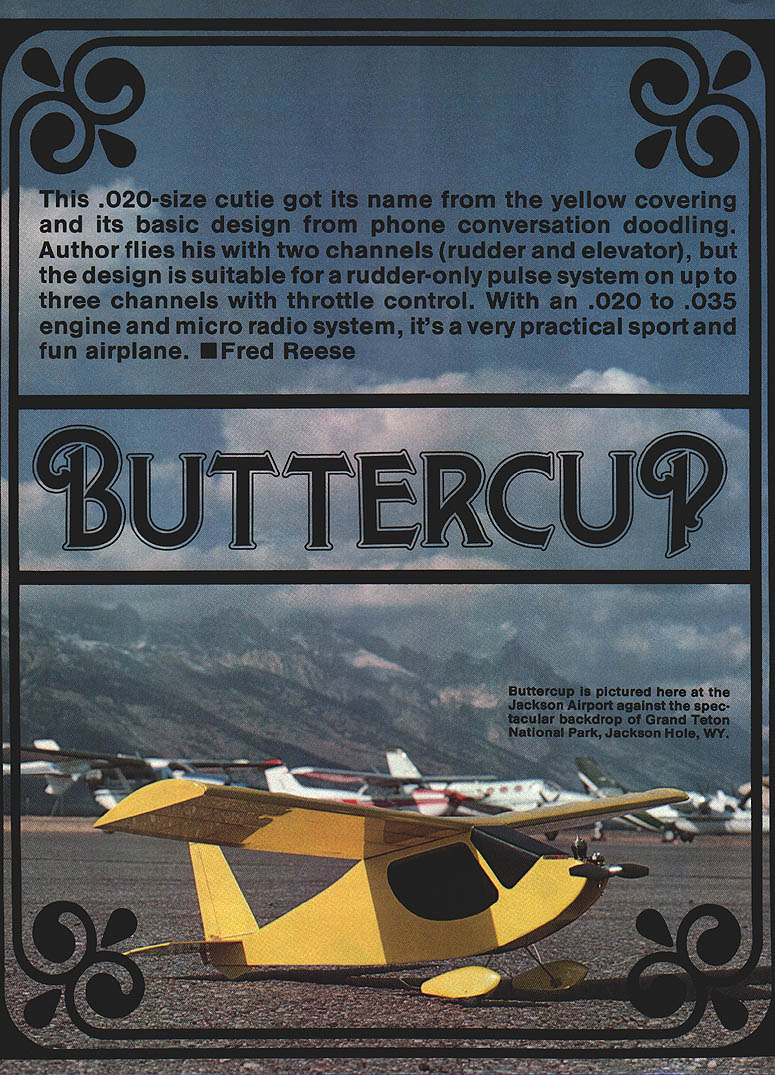
This .020-size cutie got its name from the yellow covering and its basic design from phone-conversation doodling. The author flies his with two channels (rudder and elevator), but the design is suitable for a rudder-only pulse system on up to three channels with throttle control. With an .020 to .035 engine and a micro radio system, it's a very practical sport-and-fun airplane. — Fred Reese
I have always liked little airplanes.
Actually, I like all airplanes, but I prefer to build small ones. I especially like simple little airplanes so that, once I get the idea, I can get into the air quickly. I also like a change of pace. I will spend months on a scale project, then turn around and build something like the Buttercup in a few days.
This particular small, simple model is actually a caricature of an airplane that I doodled while on the phone. I thought it was kind of cute, so I built it. When it came time to cover the model, I chose yellow, as I had a lot of yellow Super MonoKote. I like yellow, so I named it Buttercup.
In addition to being very simple and small, Buttercup really performs well. Especially when pushing limits, sometimes simple things are best. Buttercup is not the smallest RC that is possible, but it is a practical small airplane that does not require any special techniques, and it uses all stock components. It is designed to use the Ace (or other) micro-sized radios or the Ace micro servos and your receiver along with a 100 mAh battery pack. Two different-shaped 100 mAh battery packs are available from Ace RC, and either one of these will fit. There is room enough for most any receiver.
Buttercup was three years old when this was written, and it was still going strong. I have taken it traveling on vacations. I have flown it everywhere with what seems like reckless abandon, and it still survives.
My goal for the weight of Buttercup was 10 oz., ready to fly. With the wheel pants and a few repairs, it now weighs 10-1/2 oz.
This airplane is not a docile "putt-putter." With a TD .020 engine, it really zips along and will keep up your interest. At 6,200 ft elevation, where I fly, Buttercup will easily loop and roll from level flight.
The rudder needs to be tall to offset the large fuselage side area up front. In fact, I added 1/2 in. to the top of the rudder after the third flight to smooth out the rudder response. Buttercup climbs continuously at neutral trim, but with the relatively short engine run, I feel more comfortable when the airplane naturally regains lost altitude from maneuvers. A little down-trim will level it right out.
Since Buttercup has a built-in climb, it is ideal for the Ace Pulse rudder-only system. I did not show the installation on the plan, but if you go this route, you should make the stabilizer and elevator in one piece, and cut a little hole for the oscillating wire to pass up through the elevator to a yoke on the rudder. I have very fond memories of a little Piper Cub of this size that I built about 15 years ago using the Ace Pulse system. If you fly closer to sea level than I do, you might consider the little G-Mark .03 throttleable engine from Cannon and three micro servos.
Construction
I used Zap CA+ for all construction, except for some 5-minute epoxy to join the wing panels and to glue on the wheel pants.
Fuselage
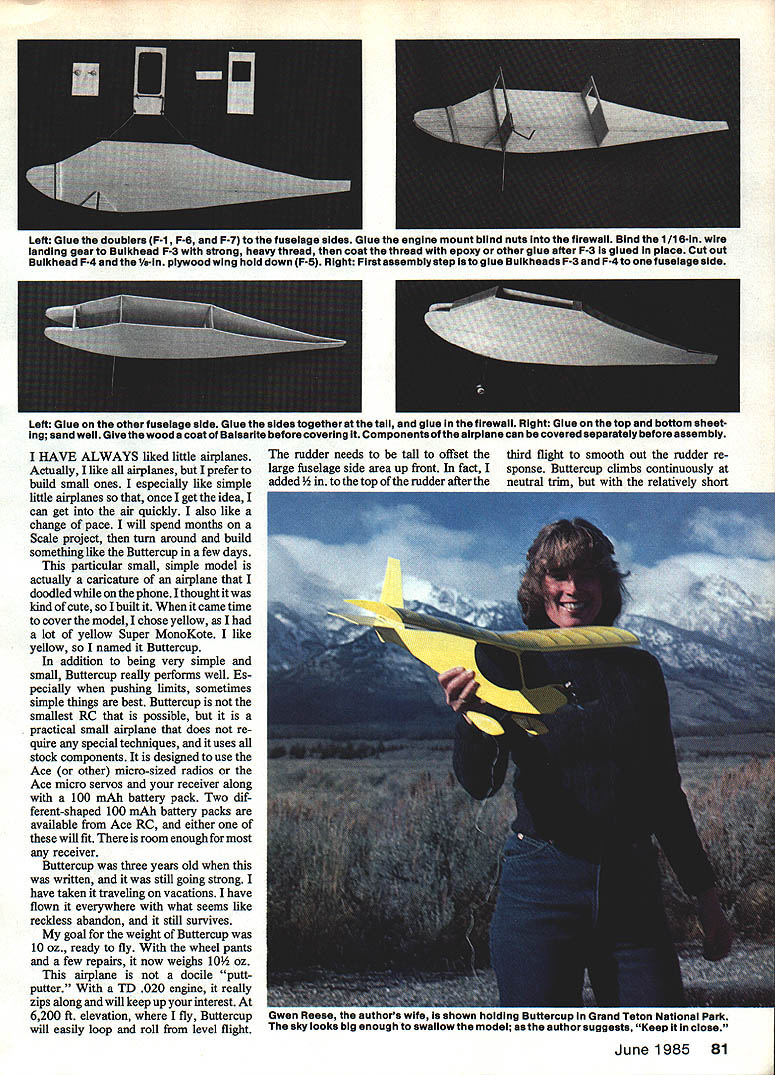
Cut out the sides, and glue on the nose doubler, F-1, the 1/8 x 1/4 strips behind the firewall, and the landing gear braces, F-6 and F-7. Bind the 1/16-in. wire landing gear to F-3 with heavy thread. Glue bulkheads F-3 and F-4 between the fuselage sides. Glue the sides together at the tail.
Mount the engine to the firewall, F-2, using 2-56 x 1/2-in. bolts and 2-56 blind nuts. Glue F-2 into the fuselage. Glue the wing mount F-5 in place, and add the 1/8-in. balsa top front sheeting. Glue on all of the top and bottom 1/16-in. sheeting with the grain crosswise. Sand and cover the fuselage with your favorite yellow covering film.
Wing
Start building the 2-in. center section by pinning down the bottom 1/16-in. sheet. Glue on the two W-4 center spars. Notch the rear spar for the ribs, and glue on the two W-1 ribs. Add the leading and trailing edges and the top sheeting to complete the center section.
Build the outer panels by gluing all of the W-2 ribs onto the W-3 spars over the plan.
Glue the wing to the fuselage by a dowel into Bulkhead F-3 in front and two 3/32-in. #2-56 sheet-metal screws through the trailing edge into F-5 in the rear. Reinforce the holes in the trailing edge and F-5 with epoxy after the screws have been run once. To fit the hole in F-3 as shown, the 1/8-in. dowel must be spaced 1/16 in. below the wing. Trim away the covering, and glue a 1/16-in. square of 1/16-in. balsa to the bottom of the wing as a spacer. Cut a slot for W-6, and glue it in place at the same time as the dowel.
Tail surfaces
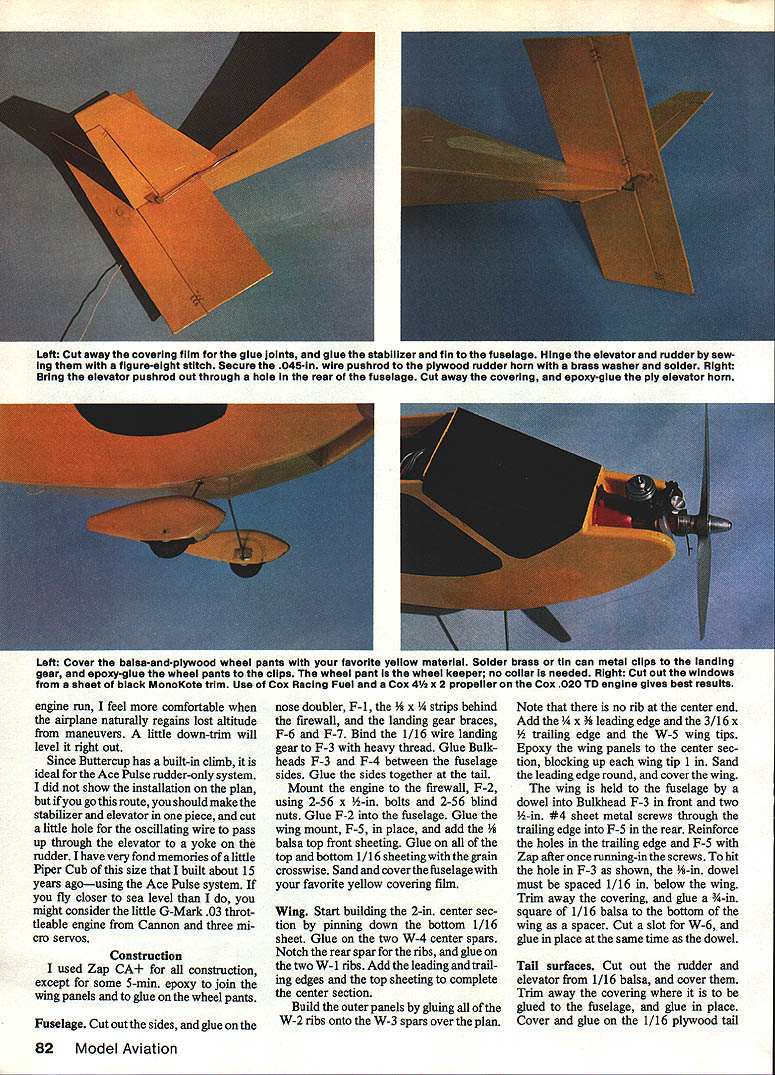
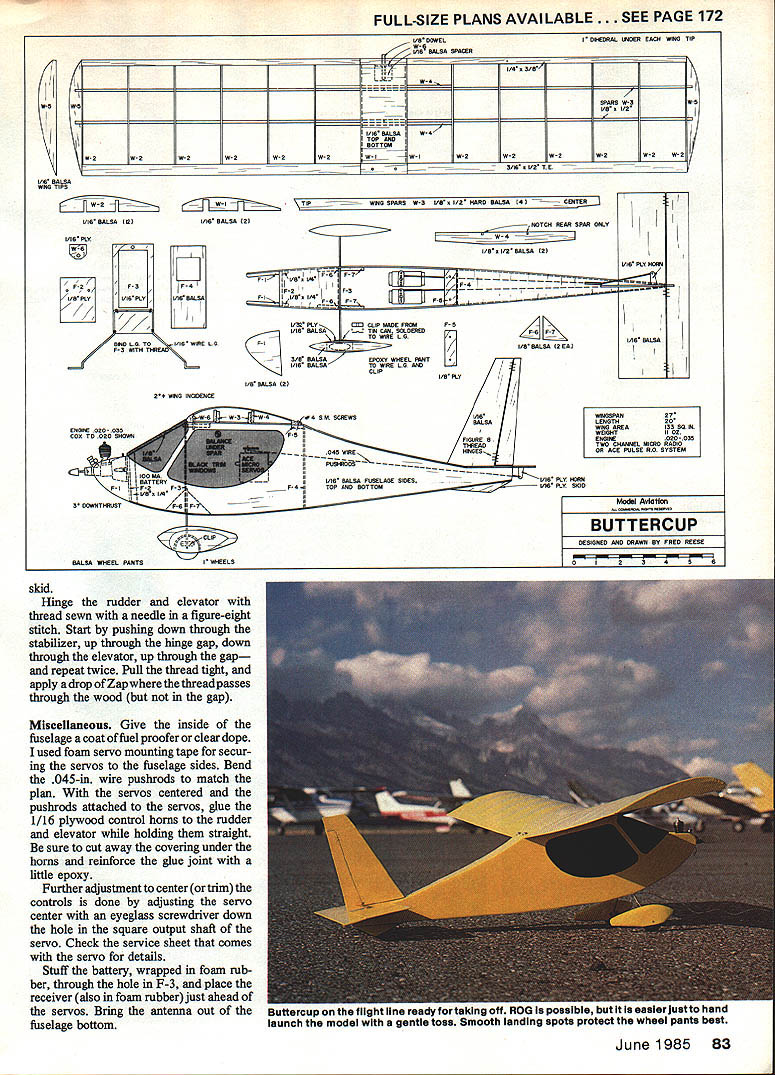
Cut out the rudder and elevator from 1/16-in. balsa and cover them. Trim away the covering where they are to be glued to the fuselage, and glue them in place. Cover and glue on the 1/16-in. plywood rudder and elevator horns. Hinge the elevator and rudder with a figure-eight stitch.
Secure the .045-in. wire pushrod to the plywood rudder horn with a brass washer and solder. Bring the elevator pushrod out through a hole in the rear of the fuselage; cut away the covering and epoxy-glue the plywood elevator horn.
Wheel pants
Cover the balsa-and-plywood wheel pants with your favorite yellow material. Solder brass or tin-can metal clips to the landing gear, and epoxy-glue the wheel pants to the clips. The wheel pant is the wheel keeper; no collar is needed.
Finish
Cut out the windows from a sheet of black MonoKote trim. Use Cox Racing Fuel and a Cox 4-1/2 x 2 propeller on the Cox .020 TD engine for best results.
Miscellaneous
Give the inside of the fuselage a coat of fuel proofer or clear dope. I used foam servo mounting tape for securing the servos to the fuselage sides. Bend the .045-in. wire pushrods to match the plan. With the servos centered and the pushrods attached to the servos, glue the 1/16-in. plywood control horns to the rudder and elevator while holding them straight. Be sure to cut away the covering under the horns, and reinforce the glue joint with a little epoxy.
Further adjustment to center (or trim) the controls is done by adjusting the servo center with an eyeglass screwdriver down the hole in the square output shaft of the servo. Check the service sheet that comes with the servo for details.
Stuff the battery, wrapped in foam rubber, through the hole in F-3, and place the receiver (also in foam rubber) just ahead of the servos. Bring the antenna out through the fuselage bottom.
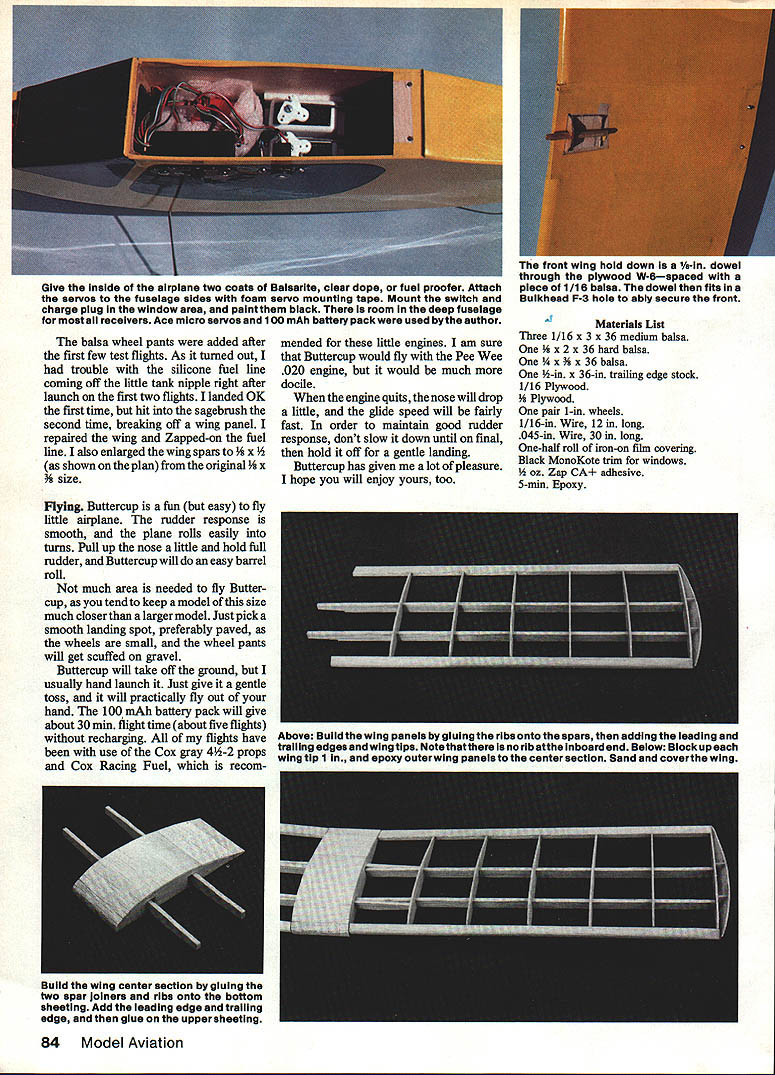
Give the inside of the airplane two coats of Balsarite, clear dope, or fuel proofer. Attach the servos to the fuselage sides with foam servo mounting tape. Mount the switch and charge plug in the window area, and paint them black. There is room in the deep fuselage for most receivers. Ace micro servos and a 100 mAh battery pack were used by the author.
The balsa wheel pants were added after the first few test flights. As it turned out, I had trouble with the silicone fuel line coming off the little tank nipples right after launch on the first two flights. I landed OK the first time, but hit into the seagrass the second time, breaking off a wing panel. I repaired the wing and Zapped-on the fuel line. I also enlarged the wing spars to 1/8 x 1/2 in. (as shown on the plan) from the original 1/8 x 3/8-in. size.
Flying
Buttercup is a fun (but easy to) fly little airplane. The rudder response is smooth, and the plane rolls easily into turns. Pull up the nose a little and hold full rudder, and Buttercup will do an easy barrel roll.
Not much area is needed to fly Buttercup, as you tend to keep a model of this size much closer than a larger model. Just pick a smooth landing spot, preferably paved, as the wheels are small and the wheel pants will get scuffed on gravel.
Buttercup will take off from the ground, but I usually hand-launch it. Just give it a gentle toss, and it will practically fly out of your hand. The 100 mAh battery pack will give about 30 minutes' flight time (about five flights) without recharging. All of my flights have been with one of the Cox gray 4-1/2 x 2 props and Cox Racing Fuel, which is recommended for these little engines. I am sure that Buttercup would fly with the Pee Wee .020 engine, but it would be much more docile.
When the engine quits, the nose will drop a little, and the glide speed will be fairly fast. In order to maintain good rudder response, don't slow it down until on final, then hold it off for a gentle landing.
Buttercup has given me a lot of pleasure. I hope you will enjoy yours, too.
Materials List
- Three 1/16 x 3 x 36-in. medium balsa
- One 1/16 x 2 x 36-in. hard balsa
- One 1/4 x 3 x 36-in. balsa
- One 3/16 x 3/16-in. trailing edge stock
- 1/16-in. plywood
- 1/8-in. plywood
- One pair 1-in. wheels
- 1/16-in. wire, 12 in. long
- .045-in. wire, 30 in. long
- One-half roll of iron-on film covering
- Black MonoKote trim for windows
- 1/2-oz. Zap CA+ adhesive
- 5-min. epoxy
Transcribed from original scans by AI. Minor OCR errors may remain.

