
CL Aerobatics
Curt Contrata 8341 S.W. 28 St., Davie FL 33328 E-mail: [email protected]
Introduction
When Bob Hunt called and asked if I would take over this column, I was truly overwhelmed. How could anyone possibly follow Frank McMillan? Frank's columns throughout the years have not only been accurate, but also informative, and have seemingly covered every topic imaginable.
On a personal level, Frank has always gone out of his way to offer me help, advice, and friendship. His support for me is not unique, as I have seen him taking time with many fliers, helping any way he can. I cannot thank Frank enough for the years he wrote this column and the unselfish passion he holds for this event and all who participate.
Background
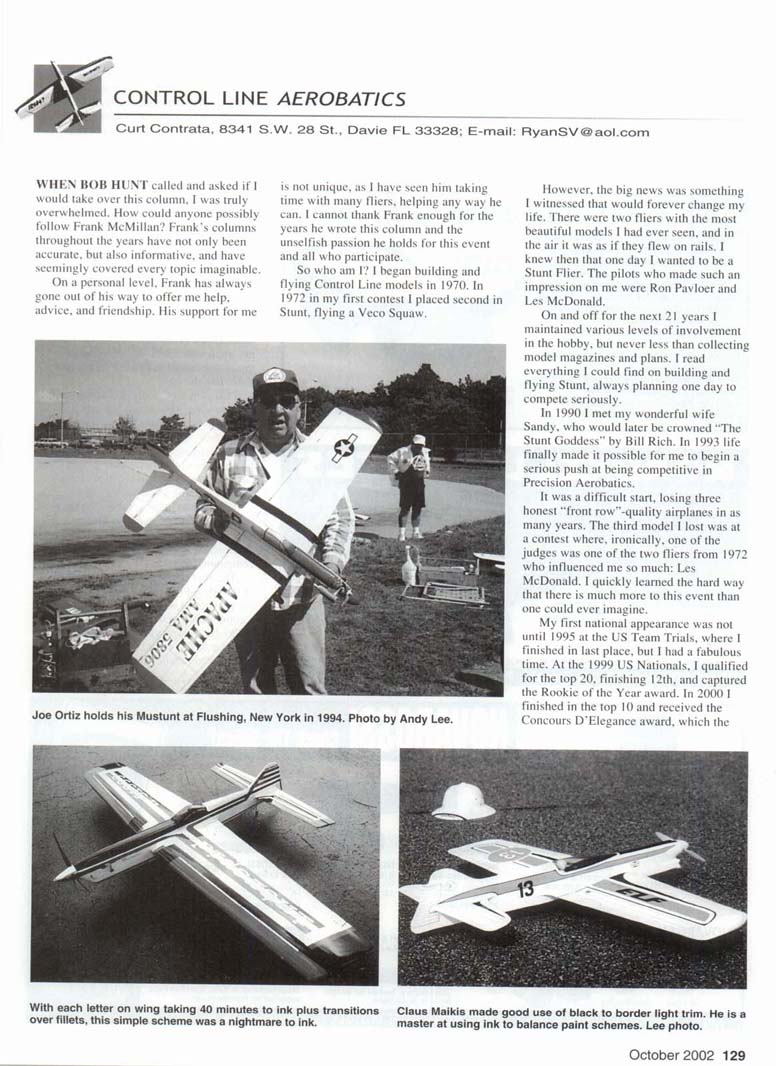
So who am I? I began building and flying control-line models in 1970. In 1972, in my first contest, I placed second in Stunt, flying a Veco Squaw.
However, the big news was something I witnessed that would forever change my life. There were two fliers with the most beautiful models I had ever seen, and in the air it was as if they flew on rails. I knew then that one day I wanted to be a Stunt flier. The pilots who made such an impression on me were Ron Pavloer and Les McDonald.
On and off for the next 21 years I maintained various levels of involvement in the hobby, but never less than collecting model magazines and plans. I read everything I could find on building and flying Stunt, always planning one day to compete seriously.
In 1990 I met my wonderful wife Sandy, who would later be crowned "The Stunt Goddess" by Bill Rich. In 1993 life finally made it possible for me to begin a serious push at being competitive in Precision Aerobatics.
It was a difficult start, losing three honest "front row"-quality airplanes in as many years. The third model I lost was at a contest where, ironically, one of the judges was one of the two fliers from 1972 who influenced me so much: Les McDonald. I quickly learned the hard way that there is much more to this event than one could ever imagine.
My first national appearance was not until 1995 at the US Team Trials, where I finished in last place, but I had a fabulous time. At the 1999 US Nationals, I qualified for the top 20, finishing 12th, and captured the Rookie of the Year award. In 2000 I finished in the top 10 and received the Concours D'Elegance award, which the pilots vote on. Both of these honors were huge moments in my life.
Each of us is looking for something different in this event. After all, there are so many different things one can enjoy in it. From engines to aerodynamics, from balsa dust to a waxed work of art, there are countless areas for discussion. Hopefully, no matter which method you use, which school you subscribe to, or even which part of the event you find the most rewarding, you will at least find this column interesting to read.
Inking Techniques
Many people have asked me about inking techniques, and since I am presently finishing up a model for the 2002 Nationals, the details of the methods worth writing about are fresh in my mind.
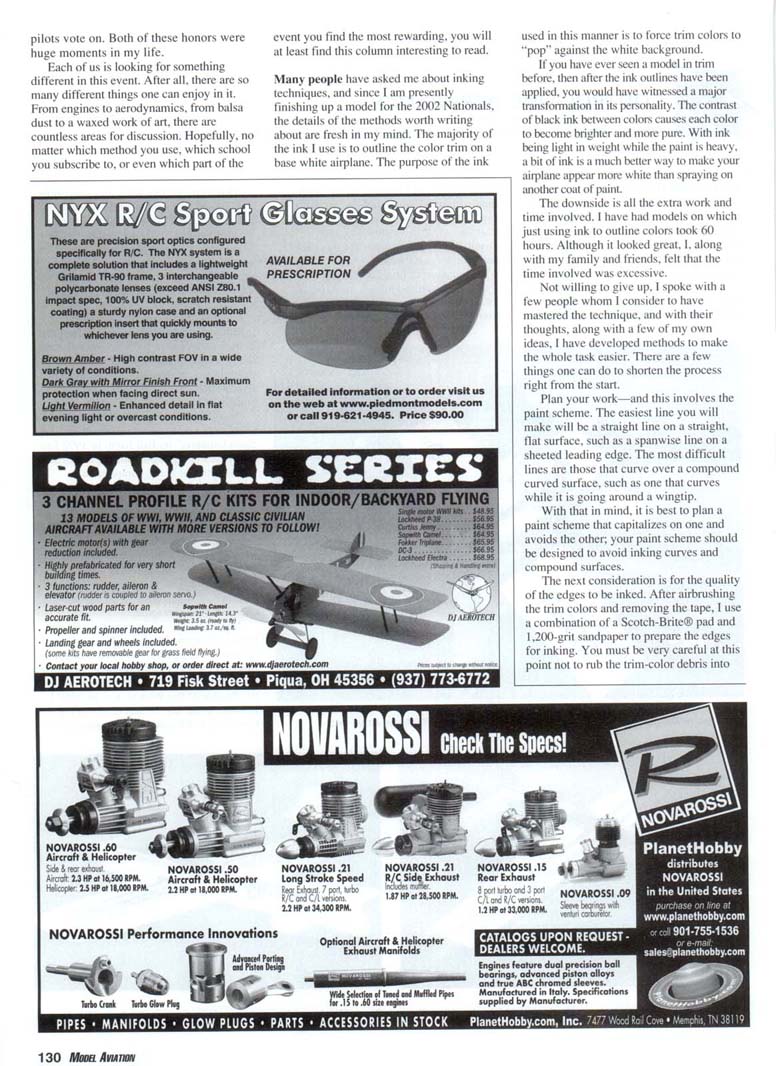
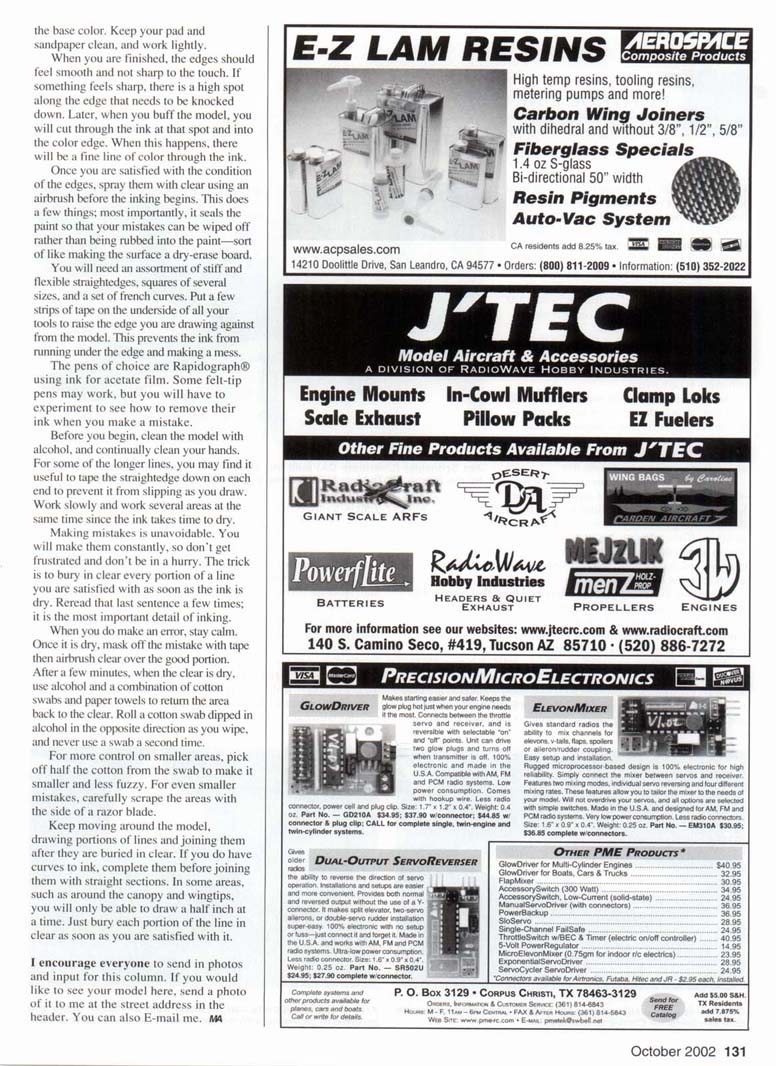
The majority of the ink I use is to outline the color trim on a base white airplane. The purpose of the ink used in this manner is to force trim colors to "pop" against the white background. If you have ever seen a model before and then after the ink outlines have been applied, you would have witnessed a major transformation in its personality. The contrast of black ink between colors causes each color to become brighter and more pure.
With ink being light in weight while paint is heavy, a bit of ink is a much better way to make your airplane appear more white than spraying on another coat of paint. The downside is all the extra work and time involved. I have had models on which just using ink to outline colors took 60 hours. Although it looked great, I, along with my family and friends, felt that the time involved was excessive. Not willing to give up, I spoke with a few people whom I consider to have mastered the technique, and with their thoughts, along with a few of my own ideas, I have developed methods to make the whole task easier.
There are a few things one can do to shorten the process right from the start.
- Plan your work — and this involves the paint scheme.
- The easiest line you will make is a straight line on a straight, flat surface, such as a spanwise line on a sheeted leading edge.
- The most difficult lines are those that curve over a compound curved surface, such as one that curves while it is going around a wingtip.
- With that in mind, design a paint scheme that capitalizes on straight, flat areas and avoids inking curves and compound surfaces.
- Prepare the edges.
- After airbrushing the trim colors and removing the tape, use a combination of a Scotch-Brite pad and 1,200-grit sandpaper to prepare the edges for inking.
- Be very careful not to rub the trim-color debris into the base color — keep your pad and sandpaper clean, and work lightly.
- When finished, the edges should feel smooth and not sharp to the touch. If something feels sharp, there is a high spot along the edge that needs to be knocked down. Later, when you buff the model, you will cut through the ink at that spot and into the color edge, which will show a fine line of color through the ink.
- Seal the edges.
- Spray the edges with clear using an airbrush before inking. This seals the paint so that mistakes can be wiped off rather than rubbed into the paint — like making the surface a dry-erase board.
- Tools and supplies.
- You will need an assortment of stiff and flexible straightedges, squares of several sizes, and a set of French curves.
- Put a few strips of tape on the underside of all your tools to raise the edge you are drawing against from the model; this prevents the ink from running under the edge and making a mess.
- Pens of choice are Rapidograph® using ink for acetate film. Some felt-tip pens may work, but you will have to experiment to see how to remove their ink when you make a mistake.
- Working method.
- Before you begin, clean the model with alcohol, and continually clean your hands.
- For some of the longer lines, tape the straightedge down on each end to prevent slipping as you draw.
- Work slowly and work several areas at the same time since the ink takes time to dry.
- Keep moving around the model, drawing portions of lines and joining them after they are buried in clear. If you have curves to ink, complete them before joining with straight sections. In some areas, such as around the canopy and wingtips, you will only be able to draw a half inch at a time — just bury each portion of the line in clear as soon as you are satisfied with it.
- Dealing with mistakes.
- Making mistakes is unavoidable. You will make them constantly, so don't get frustrated and don't be in a hurry. The trick is to bury in clear every portion of a line you are satisfied with as soon as the ink is dry — this is the most important detail of inking.
- When you do make an error, stay calm. Once it is dry, mask off the mistake with tape, then airbrush clear over the good portion. After a few minutes, when the clear is dry, use alcohol and a combination of cotton swabs and paper towels to return the area back to the clear. Roll a cotton swab dipped in alcohol in the opposite direction as you wipe, and never use a swab a second time.
- For more control on smaller areas, pick off half the cotton from the swab to make it smaller and less fuzzy. For even smaller mistakes, carefully scrape the areas with the side of a razor blade.
Closing
I encourage everyone to send in photos and input for this column. If you would like to see your model here, send a photo of it to me at the street address in the header. You can also e-mail me.
Transcribed from original scans by AI. Minor OCR errors may remain.

