
CL Speed
Scott Newkirk, 4840 N. Glendale, Bel Aire KS 67220
New Equipment for the Speed World
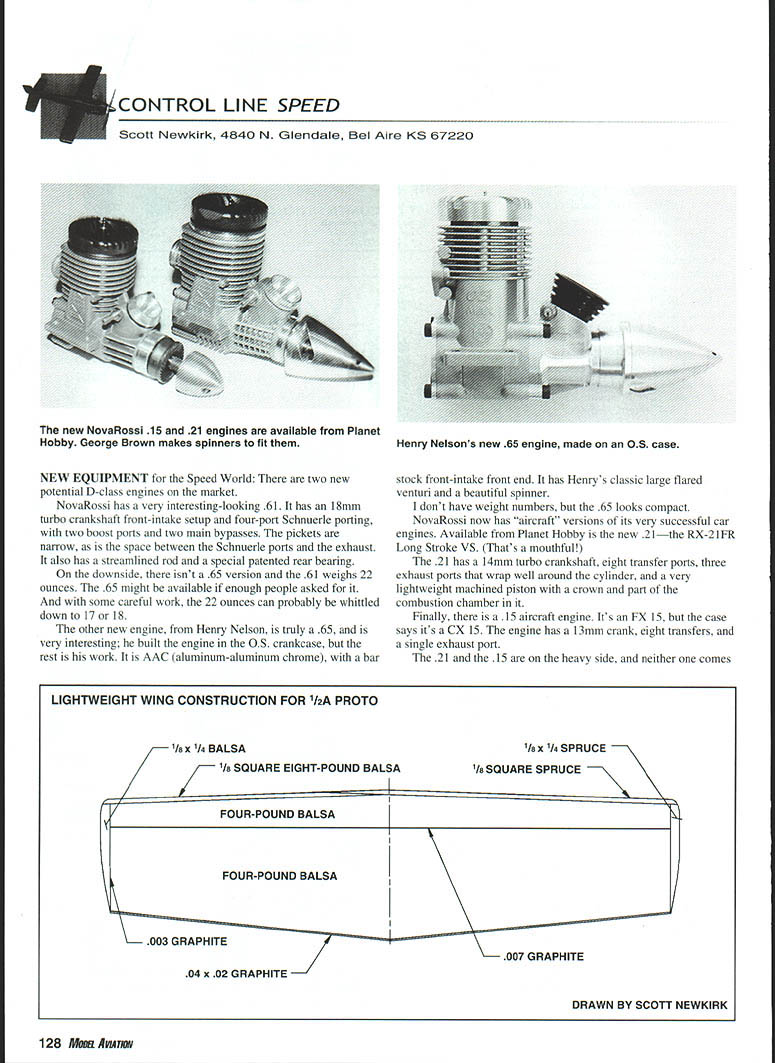
There are two new potential D-class engines on the market.
- NovaRossi .61
- Very interesting-looking .61 with an 18 mm turbo crankshaft front-intake setup.
- Four-port Schnuerle porting: two boost ports and two main bypasses.
- Ports are narrow, as is the space between the Schnuerle ports and the exhaust.
- Streamlined rod and a special patented rear bearing.
- Downsides: there isn't a .65 version and the .61 weighs 22 ounces. The .65 might be available if enough people ask for it. With careful work the 22 ounces can probably be reduced to 17 or 18 ounces.
- Henry Nelson .65
- Truly a .65, built in the O.S. crankcase but otherwise Henry's work.
- AAC (aluminum-aluminum chrome) construction with a bar-stock front-intake front end.
- Henry's classic large flared venturi and a beautiful spinner.
- No weight numbers available, but the .65 looks compact.
NovaRossi now has "aircraft" versions of its very successful car engines. Available from Planet Hobby is the new .21—the RX-21FR Long Stroke V.S.
- RX-21FR .21
- 14 mm turbo crankshaft.
- Eight transfer ports.
- Three exhaust ports that wrap well around the cylinder.
- Very lightweight machined piston with a crown and part of the combustion chamber in it.
- .15 aircraft engine
- FX 15 (case says CX 15).
- 3 mm crank, eight transfers, and a single exhaust port.
The .21 and the .15 are on the heavy side, and neither one comes with a spinner; however, George Brown makes a beautiful spinner that fits them.
Building Light
I started out flying Free Flight and Indoor models in the 1960s. I learned early that light models performed better. They had lower drag for a given lift and required less horsepower to fly.
When I got into Control Line, I spent quite a bit of time with Racing models—and I still do. There was an adage in FAI Team Race circles that "light is right"; that also applies to Speed models.
I build the lightest of anybody I know. My 1/2A Proto weighs 98 grams with fuel, flying prop, and wires attached to the bellcrank, and the reed suspended, so there is no weight added or subtracted; this is less than four ounces.
- Each of my two FAs weighs between 14 and 15 ounces.
- My A weighs 15 ounces.
- My new Form 40 looks as though it will weigh between 19 and 20 ounces.
I have never had an airplane come apart in the air: I use many composites and four-pound balsa in my models. The lightest thing you can put in your models is air! The next-lightest is two-pound foam, and the next-lightest is four-pound balsa.
I weigh all my materials with a gram scale before building; I weigh my wing and stabilizer blanks, and I weigh the spruce pieces I use around the edges on the wing and stabs.
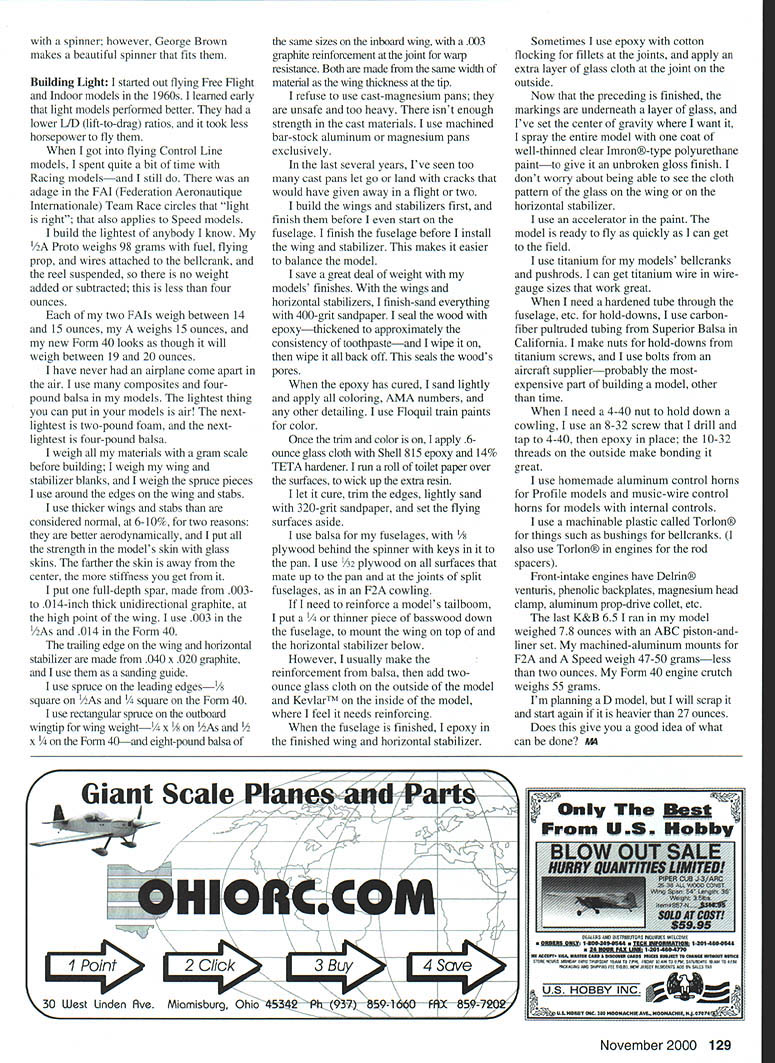
I use thicker wings and stabs than are considered normal, at 6–10%, for two reasons: they are better aerodynamically, and I put all the strength in the model's skin with Mylar skins. The farther the skin is away from the center, the more stiffness you get from it.
I put one full-depth spar, made from .003- to .014-inch thick unidirectional graphite, at the high point of the wing.
- I use .003 in the 1/2As and .014 in the Form 40.
The trailing edge on the wing and horizontal stabilizer are made from .040 x .020 graphite, and I use them as a sanding guide.
I use spruce on the leading edges—1/8 square on 1/2As and 1/4 square on the Form 40.
I use rectangular spruce on the outboard wingtip for wing weight—1/4 x 1/4 on 1/2As and 1/2 x 1/4 on the Form 40—and eight-pound balsa of the same sizes on the inboard wing, with a .003 graphite reinforcement at the joint for warp resistance. Both are made from the same width of material as the wing thickness at the tip.
I refuse to use cast-magnesium pans; they are unsafe and too heavy. There isn't enough strength in the cast materials. I use machined bar-stock aluminum or magnesium pans exclusively. In the last several years, I've seen too many cast pans let go or land with cracks that would have failed in a flight or two.
I build the wings and stabilizers first, and finish them before I even start on the fuselage. I finish the fuselage before I install the wing and stabilizer. This makes it easier to balance the model.
I save a great deal of weight with my models' finishes. With the wings and horizontal stabilizers, I finish-sand everything with 400-grit sandpaper. I seal the wood with epoxy—thickened to approximately the consistency of toothpaste—and I wipe it on, then wipe it all back off. This seals the wood's pores.
When the epoxy has cured, I sand lightly and apply all coloring, AMA numbers, and any other detailing. I use Floquil train paints for color.
Once the trim and color are on, I apply 6-ounce glass cloth with Shell 815 epoxy and 14% TETA hardener. I run a roll of toilet paper over the surfaces to wick up the extra resin.
I let it cure, trim the edges, lightly sand with 320-grit sandpaper, and set the flying surfaces aside.
I use balsa for my fuselages, with 1/8 plywood behind the spinner with keys in it to join. I use 1/8 plywood on all surfaces that mate up to the pan and at the joints of split fuselages, as in an F2A cowling.
If I need to reinforce a model's tailboom, I put a 1/4- or thinner piece of basswood down the fuselage, to mount the wing on top of and the horizontal stabilizer below. However, I usually make the reinforcement from balsa, then add two-ounce glass cloth on the outside of the model and Kevlar™ on the inside where I feel it needs reinforcing.
When the fuselage is finished, I epoxy in the finished wing and horizontal stabilizer. Sometimes I use epoxy with cotton flocking for fillets at the joints, and apply an extra layer of glass cloth at the joint on the outside.
Now that the preceding is finished, the markings are underneath a layer of glass, and I've set the center of gravity where I want it, I spray the entire model with one coat of well-thinned clear Imron®-type polyurethane paint—to give it an unbroken gloss finish. I don't worry about seeing the cloth pattern of the glass on the wing or horizontal stabilizer.
I use an accelerator in the paint. The model is ready to fly as quickly as I can get to the field.
I use titanium for my models' bellcranks and pushrods. I can get titanium wire in wire-gauge sizes that work great.
When I need a hardened tube through the fuselage for hold-downs, I use carbon-fiber pultruded tubing from Superior Balsa in California. I make nuts for hold-downs from titanium screws, and I use bolts from an aircraft supplier—probably the most expensive part of building a model, other than time.
When I need a 4-40 nut to hold down a cowling, I use an 8-32 screw that I drill and tap to 4-40, then epoxy in place; the 10-32 threads on the outside make bonding it great.
I use homemade aluminum control horns for Profile models and music-wire control horns for models with internal controls.
I use a machinable plastic called Torlon® for things such as bushings for bellcranks. (I also use Torlon® in engines for the spacers.)
Front-intake engines have Delrin® vents, phenolic backplates, magnesium head clamp, aluminum prop-driver collet, etc.
The last K&B 6.5 I ran in my model weighed 7.8 ounces with an ABC piston-and-liner set. My machined-aluminum mounts for F2A and A Speed weigh 47–50 grams—less than two ounces. My Form 40 engine crutch weighs 55 grams.
I'm planning a D model, but I will scrap it and start again if it is heavier than 27 ounces.
Does this give you a good idea of what can be done? MA
Transcribed from original scans by AI. Minor OCR errors may remain.

