

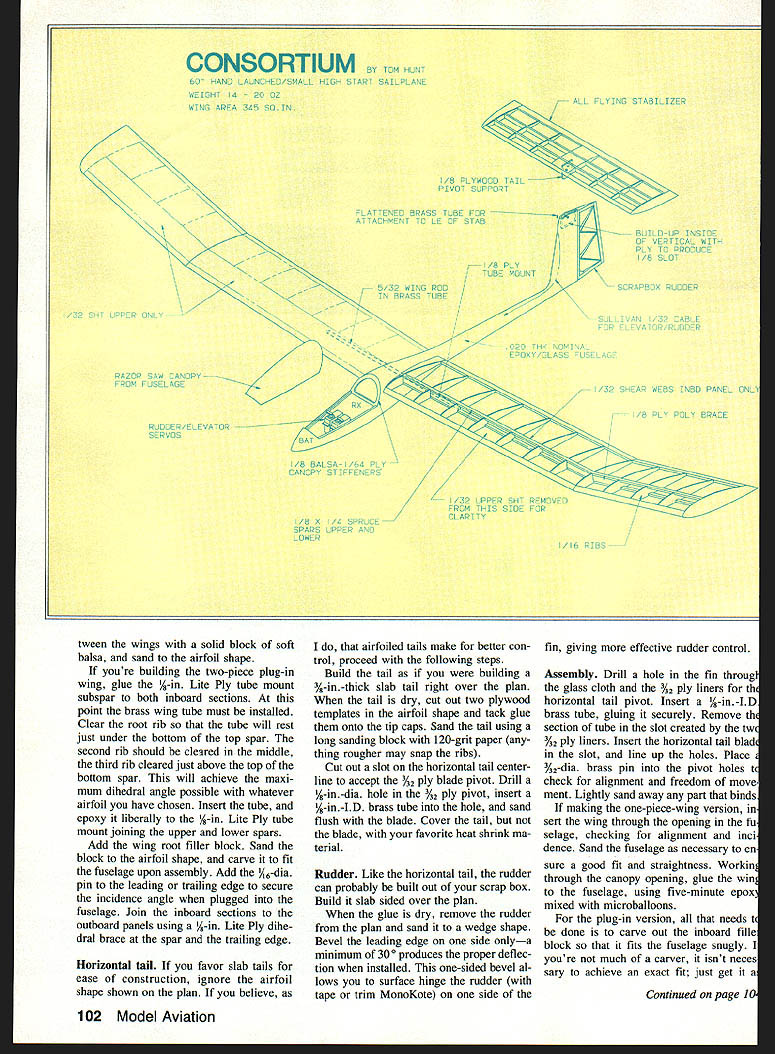
Consortium
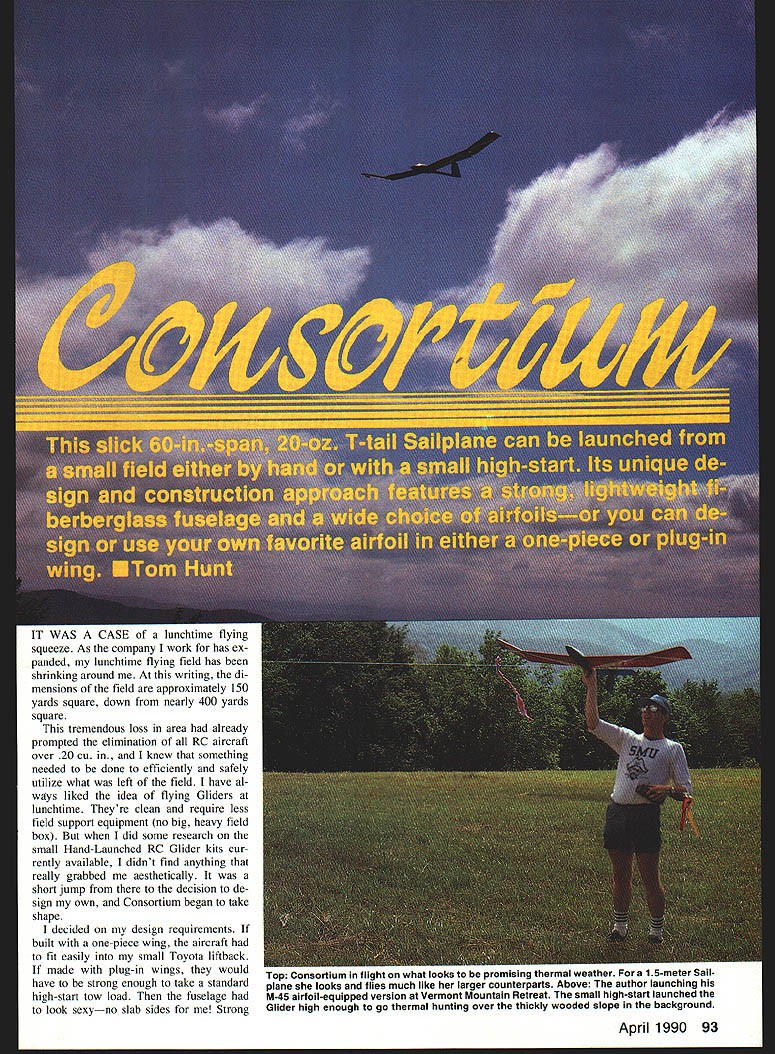
This slick 60-in.-span, 20-oz. T-tail sailplane can be launched from a small field either by hand or with a small high-start. Its unique design and construction approach features a strong, lightweight fiberglass fuselage and a wide choice of airfoils—or you can design or use your own favorite airfoil in either a one-piece or plug-in wing. —Tom Hunt
It was a case of a lunchtime flying squeeze. As the company I work for has expanded, my lunchtime flying field has been shrinking around me. At this writing, the dimensions of the field are approximately 150 yards square, down from nearly 400 yards square.
This tremendous loss in area had already prompted the elimination of all RC aircraft over .20 cu. in., and I knew that something needed to be done to efficiently and safely utilize what was left of the field. I have always liked the idea of flying gliders at lunchtime. They're clean and require less field support equipment (no big, heavy field box). But when I did some research on the small hand-launched RC glider kits currently available, I didn't find anything that really grabbed me aesthetically. It was a short jump from there to the decision to design my own, and Consortium began to take shape.
I decided on my design requirements:
- If built with a one-piece wing, the aircraft had to fit easily into my small Toyota liftback.
- If made with plug-in wings, they would have to be strong enough to take a standard high-start tow load.
- The fuselage had to look sexy—no slab sides.
- Strong T-tail for looks, performance, and to keep control surfaces out of harm's way while launching and landing.
- Rudder/elevator for control to keep it simple, with variants to include coupled aileron and rudder.
- Lightweight structure for good performance.
The design emerged as a 60-in. span, built-up, constant-chord, polyhedral wing. Wing area is 345 sq. in. Building a shapely, non-slab-sided fuselage out of balsa would have added too much weight, so fiberglass construction was chosen (more on this later).
Control is provided by a constant-chord stabilator on top of the molded-in fin/fuselage with an adjoining rudder. Though it may seem rather bulbous to some tastes, the fuselage is proportioned to permit use of standard-size radio gear. Use a 225- or 100-mAh receiver pack; total weight of the model should be between 14 and 20 ounces.
Something told me that this project was going to be popular with many of my fellow fliers. Sure enough, no sooner had I shown around some of the first draft plans and mentioned that the fuselage would be fiberglass than the dreaded words (for those not in the business) were heard — "I want one!"
So I offered to produce the fuselages for club members at no cost. All I expected in return was that the airplane be built and not just collect dust in the basement. I also expected posed photographs of all builders with their models near press time — finished or not.
Thoughts of lunchtime Precision Duration contests soon followed. The builders would vary the basic design only by choosing their own airfoil. This could be one of the airfoils shown on the plans or another of their own choice.
Construction
Fuselage. Fiberglass construction tends to scare a lot of people away, especially when it must be done from scratch. In this case, "from scratch" means creating a master out of some easily workable material (basswood or foam).
Prepare the master with a release agent. Position it on a jig so that one half is exposed, and begin heavy glass layup on the exposed surface to produce a female mold of one half of the fuselage. Allow this first half to cure, then flip over the master and repeat the process for the other half. Use medium-weight glass to lay up your fuselage in the molds.
Join the two halves while they're still wet and in the molds. After final curing, separate the molds and sand the edges of the newly formed fuselage. You've finally got something to which you can attach the wings and tail! It's a lot of work for one fuselage (unless your Consortium will also be a club venture).
Keep in mind that the smoother and more accurate the master, the better the mold. However, there's an easier—and equally satisfying—way of creating a light, strong fiberglass parts mold. Create the shape of the part in a soft wood (pine is fine, but basswood is better).
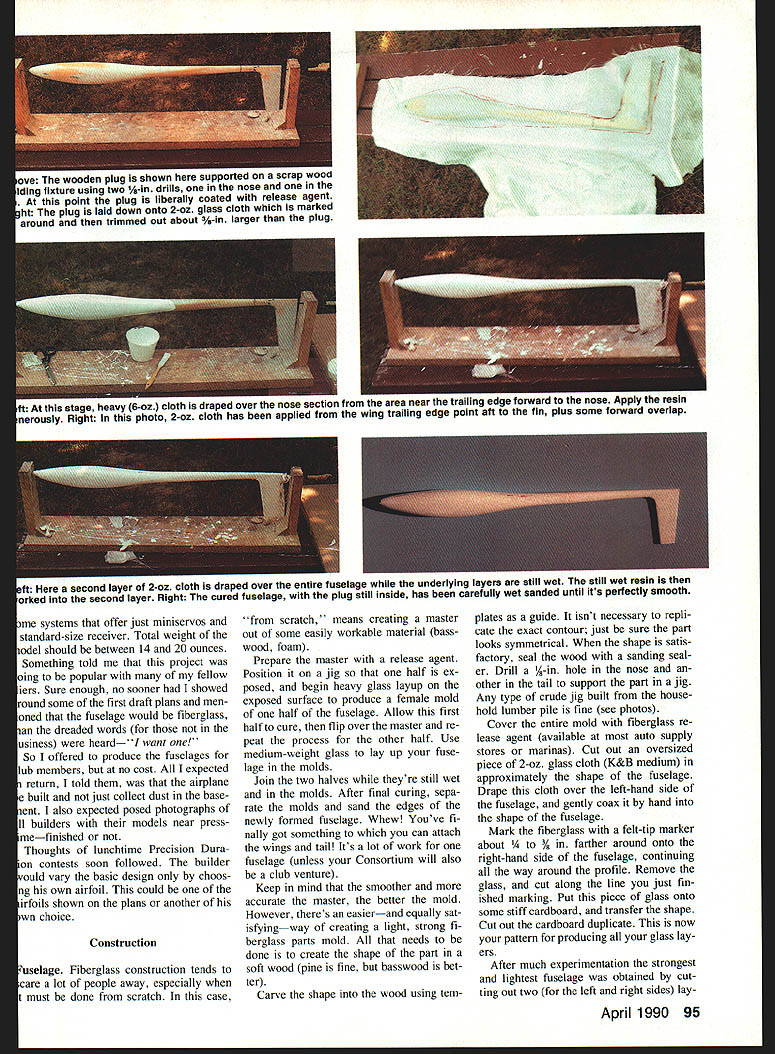
Carve the shape into the wood using templates as a guide. It isn't necessary to replicate the exact contour; just be sure the parts look symmetrical. When the shape is satisfactory, seal the wood with a sanding sealer. Drill a 1/4-in. hole in the nose and a like hole in the tail to support the part in a jig. Any type of crude jig built from household lumber is fine.
Cover the center mold with fiberglass release agent (available at most auto supply stores or marinas). Cut out an oversized piece of 2-oz. glass cloth (K&B medium) approximately the shape of the fuselage. Drape this cloth over one side of the fuselage, and gently coax it by hand into the shape.
Mark the fiberglass with a felt-tip marker about 3/4 to 1 in. farther around onto the opposite side of the fuselage, continuing all the way around the profile. Remove the glass and cut along the line you just marked. Put this piece of glass onto some stiff cardboard and transfer the shape. Cut out the cardboard duplicate. This is now your pattern for producing all your glass layups as a guide.
After much experimentation the strongest and lightest fuselage was obtained by cutting out two profiles (for the left and right sides) from this pattern and laying up three layers of 2-oz. cloth on each side, with an additional 2-oz. layer over the nose (about 6 oz. over the nose area). Let cure, trim, and join with epoxy. The inside can be glassed with a single layer of 2-oz. cloth to add stiffness. Paint and fill as desired.
Cut two profiles from K&B medium cloth from the trailing edge of the wing aft to the fin, allowing some forward overlap. This is the inside layer of the tail boom and fin. Begin laying up the heavier nose layer. Don't worry that it doesn't conform to the tight nose radius — it'll be fixed later with a pine nose block. Continue the wet layup with medium-weight glass cloth aft of the wing position.
When these sections are secure, drape the full-length piece over the first layers, and dab a dry brush against the glass to bring all the resin to the surface, wetting the outside layer thoroughly. Try to get the outside layer thoroughly wet without using any additional resin from the cup, since it will have to be sanded off later if you do. Allow the resin to cure thoroughly, then remove the glass-wrapped plug from the fixture.
Take this to your slop sink (if you have one) and start wet sanding your fuselage while it's still on the plug. Continue sanding until you're happy with the finish.
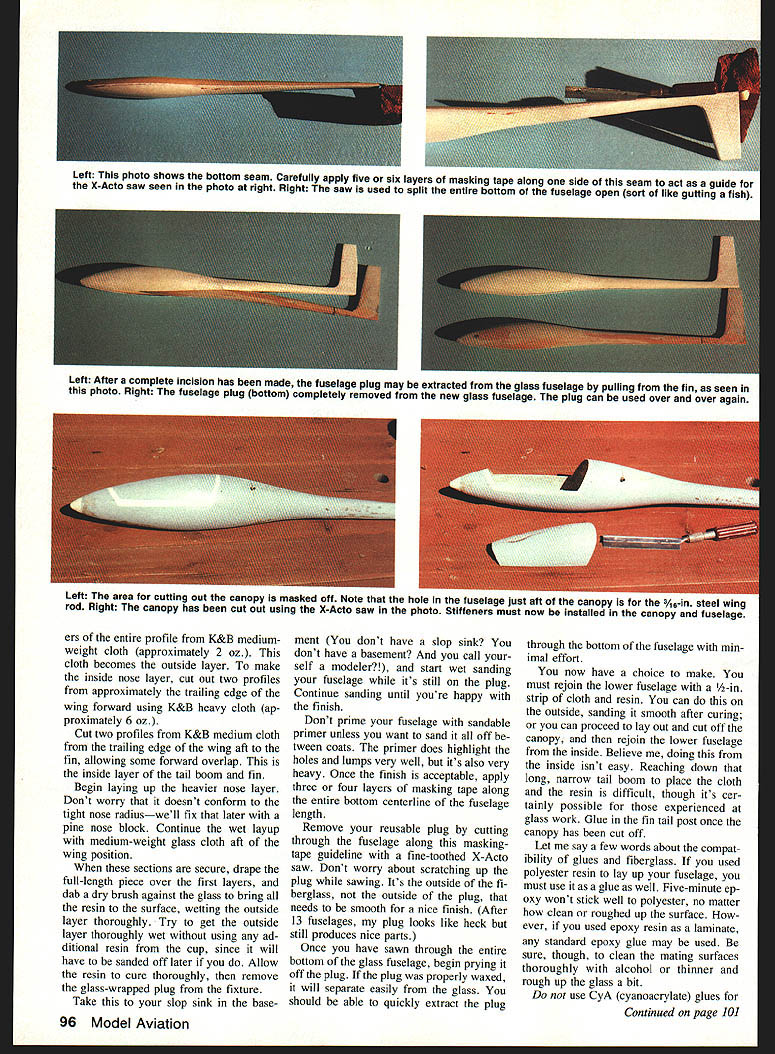
Don't prime your fuselage with sandable primer unless you want to sand it all off between coats. The primer does highlight holes and lumps very well, but it's also very heavy. Once the finish is acceptable, apply three or four layers of masking tape along the entire bottom centerline of the fuselage length.
Remove your reusable plug by cutting through the fuselage along this masking-tape guideline with a fine-toothed X-Acto saw. Don't worry about scratching up the plug while sawing. It's the outside of the fiberglass, not the outside of the plug, that needs to be smooth for a nice finish. After sawing through the entire bottom of the glass fuselage, begin prying it off the plug. If the plug was properly waxed, it will separate easily from the glass. You should be able to quickly extract the plug through the bottom of the fuselage with minimal effort.
You now have a choice. You must rejoin the lower fuselage with a 1/2-in. strip of cloth and resin. You can do this on the outside, sanding it smooth after curing; or you can proceed to lay out and cut off the canopy, and then resin in the lower fuselage from the inside. Doing this from the inside isn't easy—reaching down that long, narrow tail boom to place the cloth and resin is difficult, though certainly possible for those experienced at glass work. Glue in the fin tail post once the canopy has been cut off.
A few words about compatibility of glues and fiberglass:
- If you used polyester resin to lay up your fuselage, use polyester as a glue as well. Polyester may be difficult to sand, but with care it adheres to itself and makes a durable joint.
- Epoxy works fine as a laminate and will stick well to polyester, no matter how clean or rough the surface is. If you used epoxy resin as a laminate, clean mating surfaces thoroughly with alcohol or thinner and rough up the glass a bit before bonding.
- Do not use CyA (cyanoacrylate) glues for bonding anything to fiberglass. Although the bond feels strong in tension, the glue cannot take the shearing forces produced when the fuselage flexes or encounters a sudden impact in a hard landing.
- RTV or silicone glues make a good alternative, regardless of the type of resin used. Overnight cure types such as Dow Corning's 3145 high-strength/high-temperature silicone glue/sealant work best and can be found in any good electrical supply house.
Again, be absolutely certain that all release agent has been removed from the mating surfaces inside the fuselage.
Sand down the fiberglass on the nose until a clean cross section is obtained. Cut a small block of pine to the approximate shape of the nose, then glue it to the fuselage. Sand to shape, making sure the nose radius is not too sharp.
Cut out and glue the canopy area stiffeners (1/2-in. balsa with 1/4 ply doublers) to the fuselage, then cut out and glue the stiffeners for the canopy itself. Glue the 3/32 ply inner liner to each side of the inside wall of the fin halves, assuring a 3/32-in. gap between the two liners in which the 3/32 ply blade glued to the stabilator will slide and pivot. Install the two Sullivan flight cables and their sheaths in the aft fuselage at this time.
Decide whether you want a one-piece airplane or one with plug-in wings:
- For a one-piece wing, mark the fuselage to conform to the chosen airfoil and cut away the necessary fiberglass. Set the fuselage aside until final assembly.
- For plug-in wings, position and firmly epoxy the 3/16 O.D. brass or aluminum wing rod in place, then set the fuselage aside until final assembly.
Wings
Basic top-and-bottom spar construction is used. To save weight, only the upper leading edge is sheeted. Choose one of the airfoils shown on the plan, and cut 26 identical ribs.
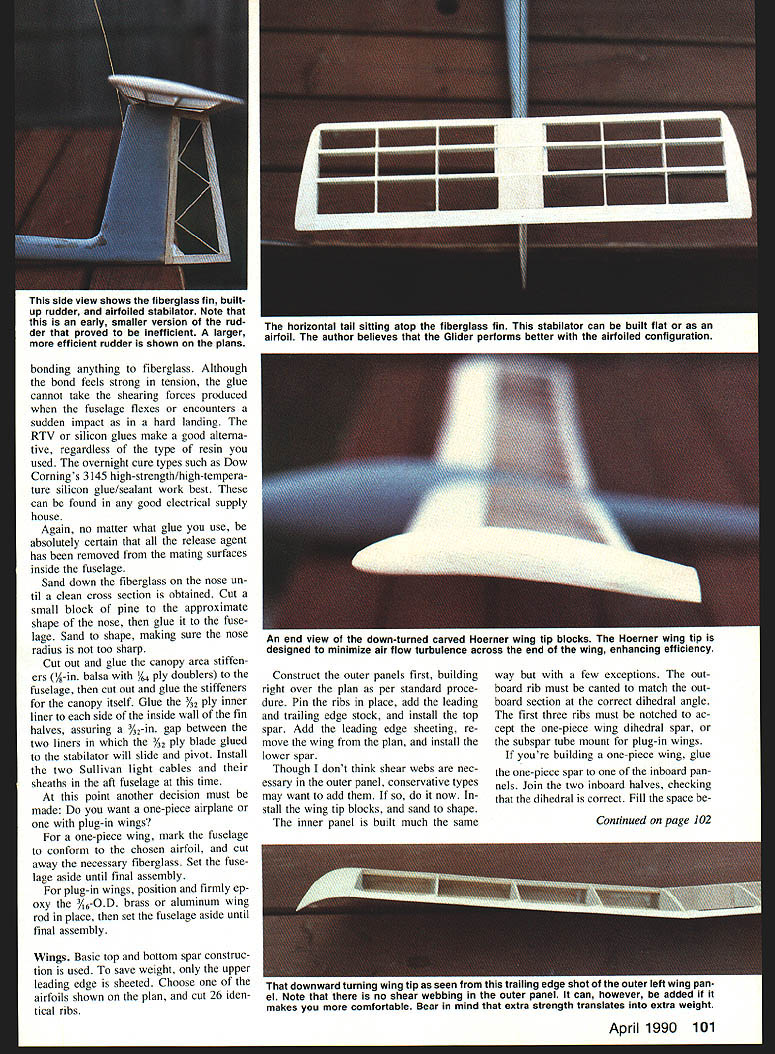
Construct the outer panels first, building right over the plan as per standard procedure. Pin the ribs in place, add the leading and trailing edge stock, and install the top spar. Add the leading edge sheeting, remove the wing from the plan, and install the lower spar.
Though I don't think shear webs are necessary in the outer panel, conservative types may want to add them. If so, do it now. Install the wing tip blocks and sand to shape. The inner panel is built much the same way but with a few exceptions. The outboard rib must be canted to match the outboard section to the correct dihedral angle. The first three ribs must be notched to accept the one-piece wing dihedral spar, or the sub-spar tube mount for plug-in wings.
If you're building a one-piece wing, glue the one-piece spar to one of the inboard panels. Join the two inboard halves, checking that the dihedral is correct. Fill the space between the wings with a solid block of soft balsa, and sand to the airfoil shape.
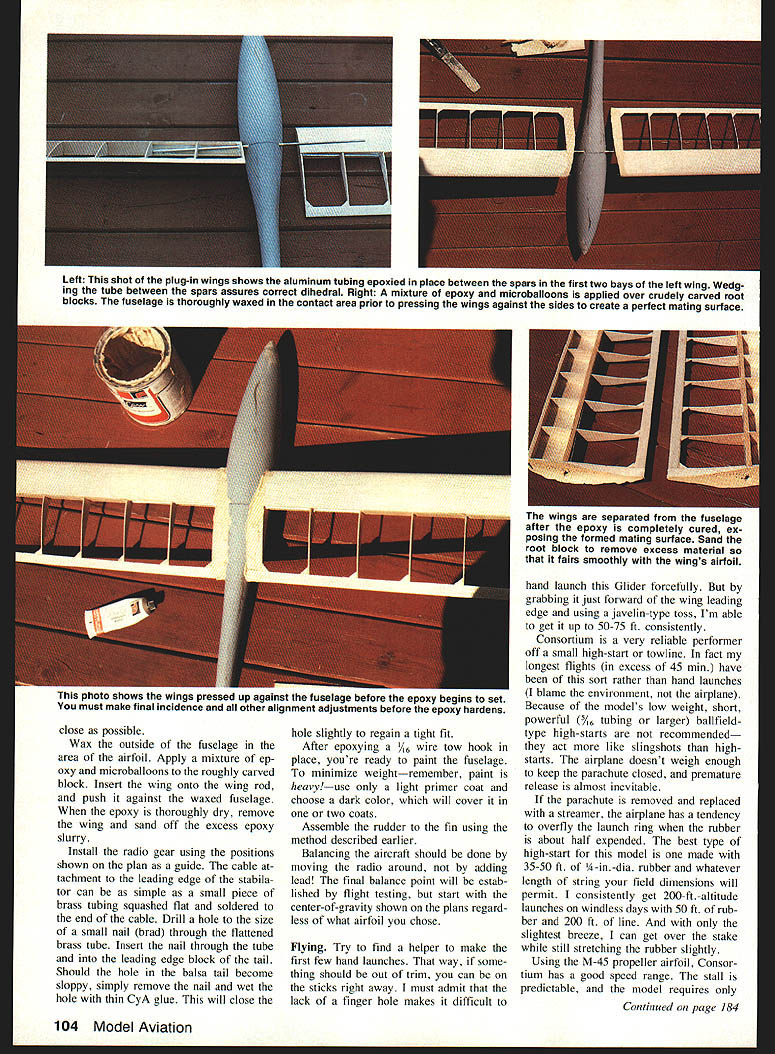
If you're building the two-piece plug-in wing, glue the 1/8-in. Lite Ply tube mount sub-spar to both inboard sections. At this point the brass wing tube must be installed. Clear the root rib so that the tube will rest just under the bottom of the top spar. The second rib should be cleared in the middle; the third rib cleared just above the top of the bottom spar. This will achieve the maximum dihedral angle possible with whatever airfoil you have chosen. Insert the tube and epoxy it liberally to the 1/8-in. Lite Ply tube mount joining the upper and lower spars.
Add the wing root filler block. Sand the block to the airfoil shape and carve it to fit the fuselage upon assembly. Add the 1/16-dia. pin to the leading or trailing edge to secure the incidence angle when plugged into the fuselage. Join the inboard sections to the outboard panels using a 3/16-in. Lite Ply dihedral brace at the spar and the trailing edge.
Horizontal tail
If you favor slab tails for ease of construction, ignore the airfoil shape shown on the plan. If you believe, as I do, that airfoiled tails make for better control, proceed with the following steps.
Build the tail as if you were building a 3/16-in.-thick slab tail right over the plan. When the tail is dry, cut out two plywood templates in the airfoil shape and tack-glue them onto the tip caps. Sand the tail using a long sanding block with 120-grit paper (anything rougher may snap the ribs).
Cut out a slot on the horizontal tail centerline to accept the 3/32 ply blade pivot. Drill a 1/8-in.-dia. hole in the 3/32 ply pivot, insert a 5/32-in.-I.D. brass tube into the hole, and sand flush with the blade. Cover the tail, but not the blade, with your favorite heat-shrink material to give more effective rudder control.
Rudder
Like the horizontal tail, the rudder can probably be built out of your scrap box. Build it slab-sided over the plan.
When the glue is dry, remove the rudder from the plan and sand it to a wedge shape. Bevel the leading edge on one side only—a minimum of 30° produces the proper deflection when installed. This one-sided bevel allows you to surface-hinge the rudder (with tape or trim MonoKote) on one side of the fin.
Assembly
Drill a hole in the fin through the glass cloth and cap, lay in liners for the horizontal tail pivot. Insert a 5/32-in.-I.D. brass tube, gluing it secure. Remove the top section of tube in the slot created by the two 3/32 ply liners. Insert the horizontal tail blade into the slot, and line up the holes. Place a 3/32-dia. brass pin into the pivot holes to check for alignment and freedom of movement. Lightly sand away any excess fiberglass.
If making the one-piece-wing version, insert the wing through the opening in the fuselage, checking for alignment and incidence. Sand the fuselage as necessary to ensure a good fit and smoothness. Working through the canopy opening, glue the wing to the fuselage, using five-minute epoxy mixed with microballoons.
For the plug-in version, carve out the inboard filler block so that it fits the fuselage snugly. If you're not much of a carver, it isn't necessary to achieve an exact fit; just get it as close as possible.
Wax the outside of the fuselage in the area of the airfoil. Apply a mixture of epoxy and microballoons to the roughly carved block. Insert the wing onto the wing rod, and push it against the waxed fuselage. When the epoxy is thoroughly dry, remove the wing and sand off the excess epoxy slurry.
Install the radio gear using the positions shown on the plan as a guide. The cable attachment to the leading edge of the stabilator can be as simple as a small piece of brass tubing squashed flat and soldered to the end of the cable. Drill a hole to the size of a small nail (brad) through the flattened brass tube. Insert the nail through the tube and into the leading edge block of the tail. Should the hole in the balsa tail become sloppy, simply remove the nail and wet the hole with thin CyA glue. This will close the hole slightly to regain a tight fit.
After epoxying a 1/16 wire tow hook in place, you're ready to paint the fuselage. To minimize weight—remember, paint is heavy—use only a light primer coat and choose a dark color, which will cover in one or two coats.
Assemble the rudder to the fin using the method described earlier.
Balance the aircraft by moving the radio gear around, not by adding lead. The final balance point will be established by flight testing, but start with the center-of-gravity shown on the plans regardless of what airfoil you chose.
Flying
Try to find a helper to make the first few hand launches. That way, if something should be out of trim, you can be on the sticks right away. I must admit that the lack of a finger hole makes it difficult to hand-launch this glider forcefully. But by grabbing it just forward of the wing leading edge and using a javelin-type toss, I'm able to get it up to 50–75 ft. consistently.
Consortium is a very reliable performer off a small high-start or towline. In fact my longest flights (in excess of 45 minutes) have been of this sort rather than hand launches (I blame the environment, not the airplane). Because of the model's low weight, short, powerful high-starts are not recommended—they act more like slingshots than high-starts. The airplane doesn't weigh enough to keep the parachute closed, and premature release is almost inevitable.
If the parachute is removed and replaced with a streamer, the airplane has a tendency to overthrow the launch ring when the rubber is about half expended. The best type of high-start for this model is one made with 35–50 ft. of 1/4-in.-dia. rubber and whatever length of string your field dimensions will permit. I consistently get 200-ft. altitude launches on windless days with 50 ft. of rubber and 300 ft. if run into a light breeze. On the slightest breeze, I can get over the stake while still stretching the rubber slightly.
Using the M-45 propeller airfoil, Consortium has a good speed range. The stall is predictable, and the model requires only a slight down elevator to pick up and hold some speed while chasing the next thermal.
Ron Farkas built the model with an Eppler 201 airfoil. With its higher weight (3 oz. heavier) and thinner wing, his version flies just as well but at a higher speed. Others made with Clark Y, RAF 32, and Eppler 193 airfoils were scheduled to be flown soon after this article was submitted.
As a builder, I get bored very easily with the same old construction techniques, the same old low-wing sport and high-wing trainer airplanes. I'm in this hobby to learn as well as to have fun, and I certainly admit both in designing the Consortium. I hope that reading about the project has acquainted other builders with some new techniques in building and designing model airplanes.
If you've got the urge to try something different—and a little time to spend in the workshop—this classy-looking, good-performing sailplane will give you a lot of fun at any small flying field.
Transcribed from original scans by AI. Minor OCR errors may remain.

