
Control Line Aerobatics - 2006/11
Nats/CL World Championships recap
How many Californians does it take to tweak a flap? That depends on your definition of a flap. Just when you thought it was back to business as usual and it was safe to hit the snooze button, I’m back, bridging the gap between the old and the yet to be discovered.
By the time you read this, the Nats and the World Championships will be history. We know who the winners are and have heard many of the stories.
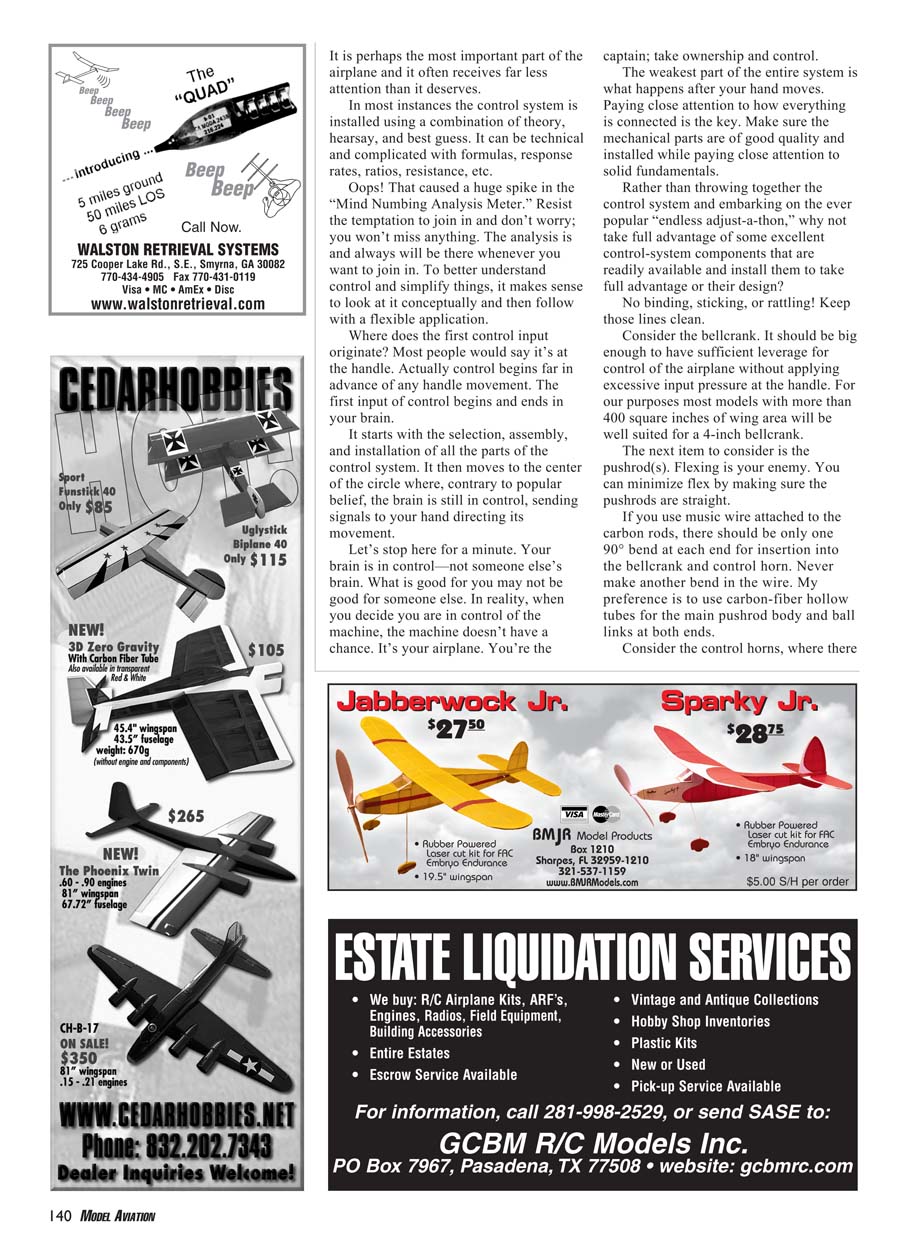
Two kids made the headlines, one of which is new National Champion Brett Buck. He did it the only way it can be done: through consistency, commitment, and perseverance.
The same is true for the other kid—Dave Fitzgerald—who, for possibly the blink of an eye, might have been the reigning World Champ. Dave led the strong US team of Paul Walker, who finished third; Bob Hunt; and junior member Chris Rud, who finished second in that division.
Bill Werwage was the returning Senior World Champ; he finished 10th this time. Robby Gruber was the defending Junior Champ; he finished in 19th place overall. Congratulations to all for their excellent performances under some challenging conditions.
Control systems for CL Precision Aerobatics
Are you in control? Since the first machines were invented, we’ve been designing and building ever more complicated contraptions. Did you ever wonder why machines are built and then some of the greatest minds on the planet spend massive amounts of energy and brainpower trying to get them to behave?
It seems every time we figure out how to do something, we come up with a better way, and progress is once again defined by whether or not we can control the better thing we just built to replace the thing that worked pretty well in the first place.
Take heart: control is possible. We have the tools and we have the talent.
Let’s say you have a new airplane. The engine is running and you have the handle in your hand. Are you sure you’ve got control? What will the model do when it leaves the strict confines of the person launching? What if… ad infinitum?
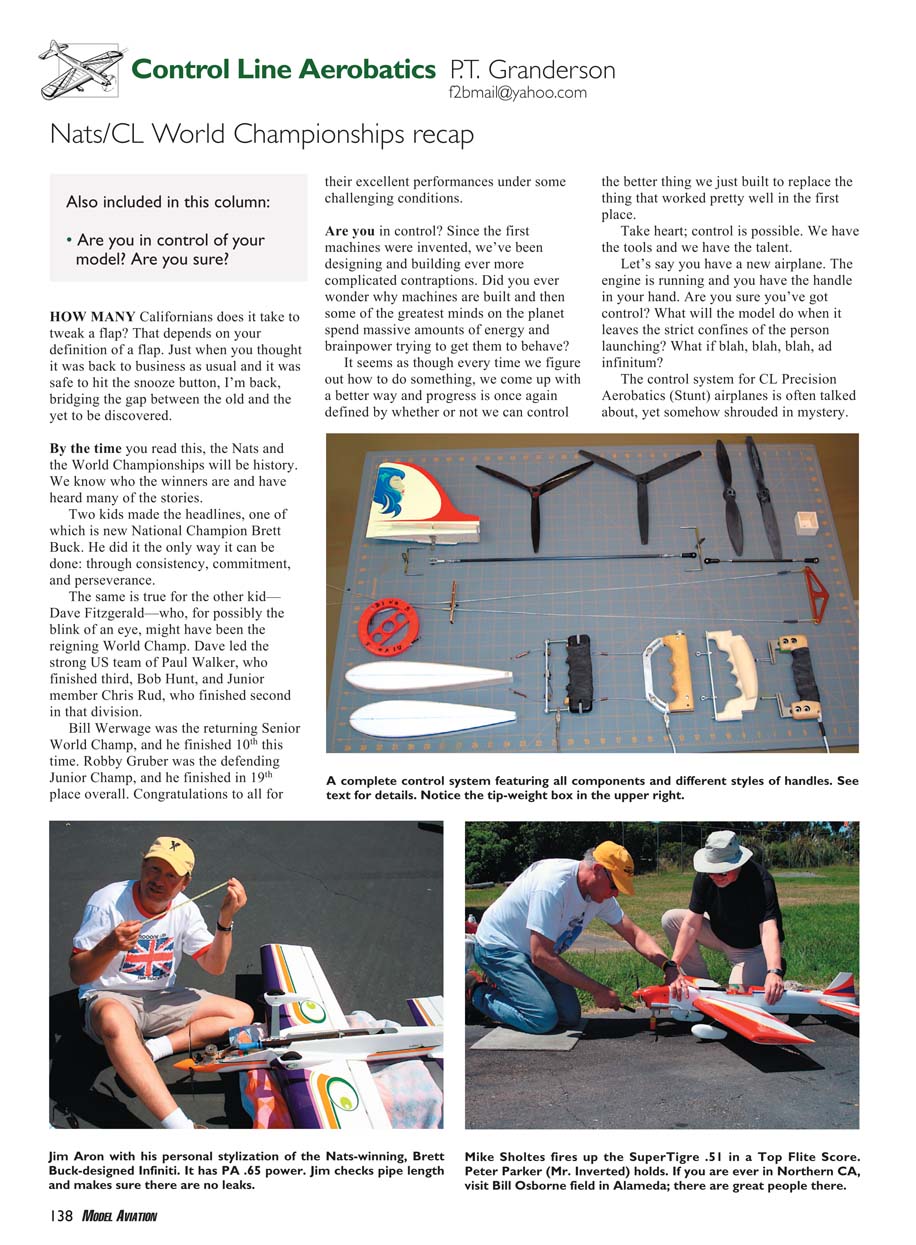
The control system for CL precision aerobatics (stunt) airplanes is often talked about, yet somehow shrouded in mystery. It is perhaps the most important part of the airplane and it often receives far less attention than it deserves. In most instances the control system is installed using a combination of theory, hearsay, and best guess. It can be technical and complicated with formulas, response rates, ratios, resistance, etc. Oops—that caused a huge spike in the “Mind-Numbing Analysis Meter.” Resist the temptation to join in and don’t worry; you won’t miss anything. The analysis will always be there whenever you want to join in.
To better understand control and simplify things, it makes sense to look at it conceptually and then follow with a flexible application.
Where control begins
Where does the first control input originate? Most people would say it’s at the handle. Actually, control begins far in advance of any handle movement. The first input of control begins and ends in your brain. It starts with the selection, assembly, and installation of all the parts of the control system. It then moves to the center of the circle where, contrary to popular belief, the brain is still in control, sending signals to your hand directing its movement.
Let’s stop here for a minute. Your brain is in control—not someone else's. What is good for you may not be good for someone else. In reality, when you decide you are in control of the machine, the machine doesn't have a chance. It's your airplane. You're the captain; take ownership and control.
The weakest part of the entire system is what happens after your hand moves. Paying close attention to how everything is connected is the key. Make sure the mechanical parts are of good quality and installed with solid fundamentals.
Rather than throwing together the control system and embarking on the ever-popular "endless adjust-a-thon," take full advantage of some excellent control-system components that are readily available and install them to take full advantage of their design. No binding, sticking, or rattling! Keep those lines clean.
Key components and recommendations
Consider the bellcrank. It should be big enough to have sufficient leverage for control of the airplane without applying excessive input pressure at the handle. For our purposes, most models with more than 400 square inches of wing area will be well suited to a 4-inch bellcrank.
The next item to consider is the pushrod(s). Flexing is your enemy. You can minimize flex by making sure the pushrods are straight. If you use music wire attached to carbon rods, there should be only one 90° bend at each end for insertion into the bellcrank and control horn. Never make another bend in the wire. My preference is to use carbon-fiber hollow tubes for the main pushrod body and ball links at both ends.
Consider the control horns, where there is some controversy. On airplanes weighing less than 65 ounces I have found no advantage to using control horns with 1/8-inch-diameter wire; 3/32-inch-diameter wire works well for most applications.
Control horns are usually bent 90° at both ends for insertion into the control surface (elevator and flap). The length of the wire inserted into the control surface should be kept relatively short. I shorten the wire to 3/4 inch at the insertion and make sure the attachment is heavily reinforced by plywood. This will minimize leverage at both ends of the horn and greatly reduce its tendency to twist under loads. There's no need to get technical here; this is just simple applied physics.
Although it is commonly stated and accepted that the best flap-to-elevator ratio is 1:1 (equal flap and elevator deflection), I have not found that to be the case. Remember that we want a solid foundation.
The geometry of the nonadjustable parts is critical. In the case of a built-up fuselage, most of the crucial components will be internal and not easily accessible without cutting into the airplane.
For many years I was right there with everyone; I used the same parts and set things up the same way. The result was ultimately fighting for control of the airplane most of the time.
You may want to consider making the control response slower than you would normally when determining the spacing of the pushrod connection to the pivot hole of the bellcrank. Simply attach the pushrod closer to the pivot, or center hole. This will allow the speed of the system and response of the airplane to be changed at the handle, where it is easy to do.
Another commonly accepted practice is to have "slop," or loose fit, at the control horn where the pushrod is inserted. This comes from the early days of control systems when components wore excessively and airplanes seemed to become more stable, especially in level flight. Today we know stability is more a factor of alignment and CG, but that is a topic for a future column. Slop is not a good thing and can cause more problems than it cures.
The control system is the primary guidance system for flight. In CL our system is relatively simple, consisting of:
- bellcrank
- pushrod(s)
- control horn(s)
- leadouts
- wingtip weight
- lines
- handle
What makes the system good is the size, type, and geometry of its components. Beyond the components, the most important function is the ability to tune the system for the specific aircraft and your individual feel for flying. With that goal in mind, it makes sense to ensure that the major portion of tuning is in the most accessible system components.
Leadout position must be adjustable. The model pivots on the pitch and yaw axis (up/down, in/out) where the leadouts exit the wing. Although I have tried individually adjustable leadouts, there is no evidence that the additional work is advantageous. Leadouts should be spaced no more than 3/4 inch apart.
The amount of tip weight is, and always should be, adjustable.
We now have elevator control horns (commonly called "sliders") which allow the ratio of flap-to-elevator movement and the relative speed of movement to be easily adjusted. I highly recommend their use.
We also have pushrod couplings that allow us to bias the neutral relationship of flaps to elevator. We can easily change substantive incidence and flight attitude to compensate for alignment imperfections.
Handles, ergonomics, and other considerations
Handles can make a huge difference. There are many variations, but most fall into two categories:
- Cable-type handles: heavy-gauge wire attached to the lines by a line clip.
- Hard-point type: the control line attaches directly to both ends of the handle using only a line clip.
There is a huge difference in the feel of the controls between the two handles. If you have not tried both, I strongly urge you to do so.
Also, no one size of handle fits all. I make a concerted effort to contour the handle to fit my hand comfortably. Part of being in control is being comfortable.
Given that our models are constructed from wood and covered with materials that constantly expand and contract, the often-touted "perfect alignment" does not exist, or at best is momentary. Our airplanes are not static. Parts continually move depending on differences in temperature, atmosphere, winds, and dynamic flight loads. A well-thought-out control system that lets you adapt to those changes will go a long way toward achieving consistent, predictable performance.
Other components of the control system are the rudder, propeller, and airfoil. These are personal preferences. I like rudder offset, usually no more than 3°, and thin rudders with moderate area. There's some controversy about those preferences, but they work for me.
Propellers are the biggest mystery of all and can make a huge difference in the flight and feel of your airplane. The subject of airfoils is like a deep hole filled with Gila monsters! Here's a hint: don't bet the farm on thick airfoils.
This Californian wishes you flat bottoms and slippery lines. Rely on the fact that something is working to validate the fact that it does work.
MA
Transcribed from original scans by AI. Minor OCR errors may remain.

