
Control Line Aerobatics
P.T. Granderson
An explanation of the Granderson Machine Buffing System
Eight years ago I couldn't even say "Concours d'Elegance," and now, thanks to the GMBS, I have some.
What is the GMBS and what will it do for you? It is the Granderson Machine Buffing System and it will make your airplane, car, or boat extremely shiny. Before you get started machine-rubbing and polishing your latest creation, following is the condensed history of power tools.
Let's skip the theology debates and agree that men and women arrived on the planet at the same time. Men, being the most basic of creatures, looked at women and said, "You're cute." Women are far more complex beings. Women looked at men and said, "Honey-do." Women also talked to each other a lot and exchanged "honey-do stories." Soon men everywhere were overloaded and had no time to build or fly airplanes. Although basic by nature, men are resourceful. They invented tools that would allow them to complete "honey-dos" quicker so they would have more time to build and fly.
Women kept talking to each other, reading, and writing about the exponentially expanding world of honey-do. Soon men were once again overloaded and out of time for building and flying. Men responded by inventing power tools, and once again they had some time for building and flying.
Men were so impressed with power tools, they even used them to build furniture for women. In response to furniture, women invented interior decorating. They thought the outlet plugs men needed to run their power tools were ugly, so they convinced men to put furniture in front of the plugs to hide them.
Men got tired of moving furniture to plug in their tools, so they solved that problem by inventing cordless power tools. Now men are frantically working on robots to again have time to build and fly. Unfortunately robot development has stalled; men have been unable to formulate a programming algorithm to accommodate the infinite variations of "honey-do." Okay, maybe that's really not the history of tools, or is it?
Now it's time to move that furniture, expose those outlets, and take out the power tools. This is where you get to use them to rub out and polish the entire airplane.
You may have heard horror stories about machine polishing. Some of you have personal experience with power tools damaging or destroying your masterpiece. I've certainly been there and done that. Imagine if you will a world where the days of power tools ripping airplanes apart are a thing of the past. Eight years ago I had finished the first model in the Diva series and was facing the monumental task of rubbing and polishing by hand. This prompted me to take a close look at the problem of machine buffing. Upon revisiting an experience that ripped a flap completely off my new airplane in 1969 (I remember virtually nothing about 1969 but I do remember that), I realized that the problem was related to friction.
As the buffing pad turned and heated the model's surface, the rubbing compound lost its moisture, which acts as a lubricant. Friction increased and caused the buffing wheel to stick, bounce, and grab the airplane. Parts and even entire airplanes were tossed across workshops everywhere. This interaction between machine and airplane amazed and traumatized us into relegating machine buffing to extinction. Friction is the culprit, so how can it be reduced or eliminated? After trying a variety of surface lubrications such as water or even small amounts of various oils and secret elixirs, my objective changed from reducing friction to actually controlling it. Believe it or not, the heat resulting from friction is a good thing when it comes to paint and making things smooth and shiny. The heat will cause the paint to briefly return to a semi-liquid state.
To control friction it is necessary to regulate the speed of the buffing pad, the amount of pressure, and the area of surface contact. As with most well-defined problems, the solution involved the formulation of a system comprising individual components to address specific areas of the problem.
The type of buffing pad would need to have a smaller area for surface contact. To control the pad’s speed, the power converter would need to have a wide range of adjustments. The point of application where the buffing pad touches the model would need to be isolated from the power converter (motor) so the pad could be easily guided and controlled. The airplane would need to be secured, allowing you to concentrate on controlling the buffing pad.
The final components of the system are the abrasive materials used for rubbing and polishing. They would need to be well suited for delicate work on fragile surfaces using power buffing.
What you need
- A sturdy paint stand (used to hold your airplane securely so you can work with both hands). I found one made by Byron Barker of C.F. Slattery Co., 2101 Logan Ave., New Albany IN 47150. It is welded steel, easy to disassemble for storage, and very versatile. Don't be misled by the name "paint stand"—its usefulness starts long before painting and goes well beyond it.
- A lightweight reversible corded power drill with a variable speed dial and lock.
- A flexible drive shaft with a 1/4-inch chuck that is at least 36 inches long. I use Vermont American Tools’ Flexible Drill Bit Extension (item 71006).
- A small buffing wheel (not a traditional pad). Use a buff used for polishing jewelry and similar delicate work.
- 4–6 inches in diameter.
- Constructed from layers of cotton cloth (muslin) sewn together to form a surface approximately 1/2 to 1 inch wide on the edge.
- Stitching should be close to the center of the pad (trade name "Loose Buff"). This allows the inner layers to spread gradually as you apply pressure.
- Abrasive and finishing materials:
- 3M Perfect-It II Rubbing Compound.
- 3M Finesse-It II Finishing Material.
- Meguiar's Deep Crystal System Step 2 Polish and Step 3 Carnauba Wax.
- Personal protective equipment: particulate mask and eye protection. Machine buffing and polishing is a messy process since materials will go everywhere.
Most items are available at a good hardware store. The 3M and Meguiar's products can be obtained from automotive paint-supply stores that stock 3M products.
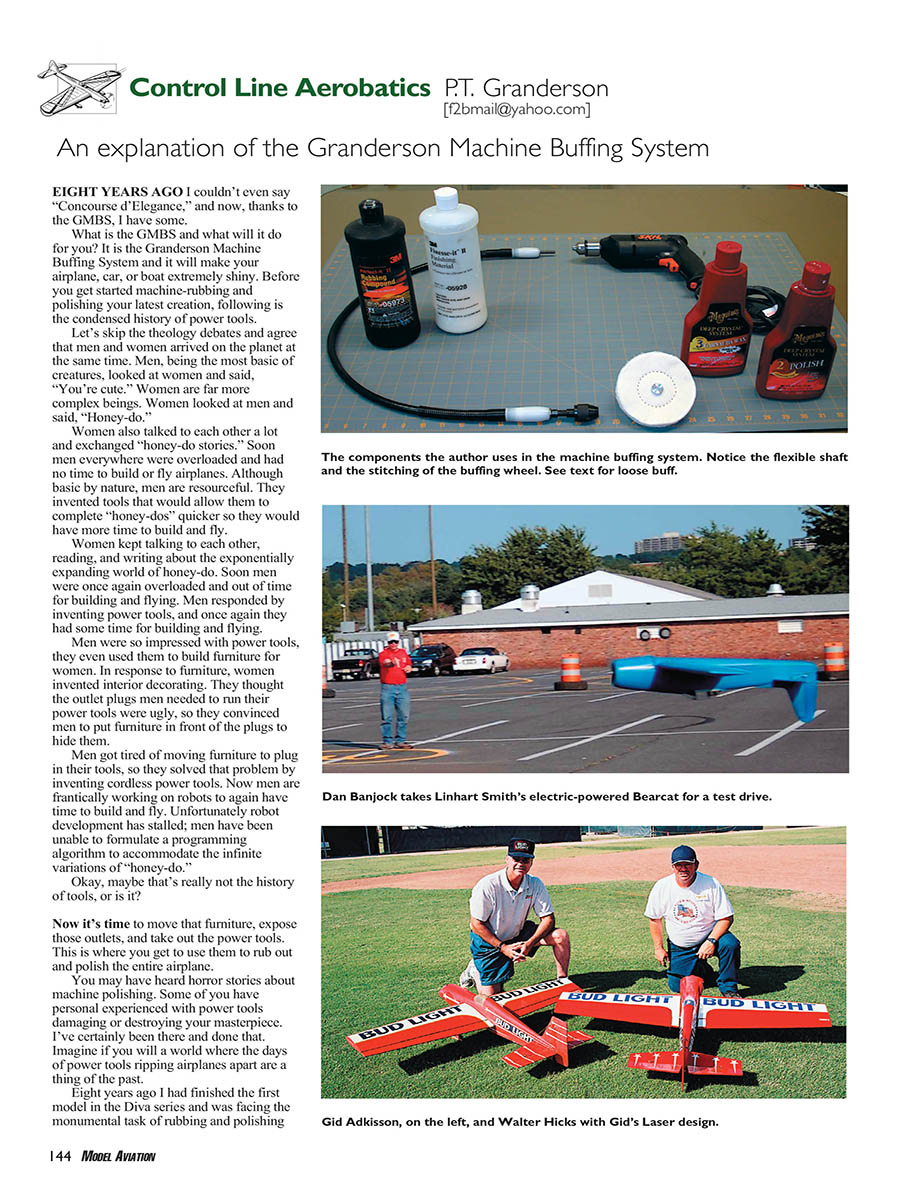
The photo shows the system, including rubbing compound, polish, and wax. Take a close look at the buff. It is composed of layers of muslin cotton. Notice the center stitching. This type allows the inner layers to spread gradually as you apply pressure when buffing. Apply more pressure as the buffing surface becomes larger. Apply less pressure and the buffing surface contracts.
That combined with the flexible shaft and paint stand will give you a high level of control. You can get into tight spaces and polish with full control. I polish every inch of my airplanes including all open bays, hatch covers, flaps, elevons, and cowl using this system.
Once the final clear coat has been wet-sanded using 1,200-, 1,500-, or 2,000-grit paper, mount the airplane to the paint stand and lock it into a position that will allow free access to the area where you want to start. I usually begin on the bottom of the airplane.
The first material to use is the 3M Perfect-It II Rubbing Compound. Be generous with its application. The object in this first round of buffing is to obtain a dull luster. Contrary to what you might think, it is better to have too much compound rather than too little. Go slowly, and soon you will get a feel for the rpm and pressure that achieves the best result. Continue the process and gain confidence in your ability to maintain control of the buffing wheel. During this process you will want to regulate its speed and direction. By changing the direction of the wheel and your angle of attack, you can keep it rotating away from edges as you go around tips, leading edges (LEs), and trailing edges (TEs). You will need to use a tool called a "rake" to clean the excess material from the buffing wheel.
Buff the entire airplane to a dull luster and wipe off all the excess rubbing compound with a soft cotton cloth. You're not looking for shine in this first step. Apply 3M Finesse-It II Finishing Material to bring out the bright shine. The amount of finishing material to use here is the opposite of the rubbing compound; less is better than too much. Clean and/or change buffing wheels as necessary. When this process is completed correctly, your airplane will be shiny and smooth.
Now use Meguiar's Deep Crystal Step 2 Polish. Do this initially with a clean buffing wheel and touch it up by hand-polishing. A hand-applied coat of Meguiar's carnauba wax will bring out a deep, rich shine.
When done properly, your airplane will actually be slippery. Be careful, it really could slip out of your hands! Oops, my mistake! It's not the airplane that slips out of my hands; it's that mystical 4½ points that separates first from third place!
There you have it. Be brave; it does work.
Disclaimer: If somehow you damage your airplane, the responsible parties are the power-tool manufacturer, your local electric company, and a guy named Larry. Good luck finding Larry; he made a fortune stuffing envelopes at home in his spare time and retired. He now owns an island somewhere in the South Pacific.
And remember: Rely on the fact that something is working to validate the fact that it does work.
MA
Transcribed from original scans by AI. Minor OCR errors may remain.

