
Control Line Aerobatics - 2007/07
P.T. Granderson [[email protected]]
The difference between a system and a setup for a Stunt model
SYSTEMS AND SETUPS: What is the difference? A system comprises components with a range of performance that can be adjusted and tuned for changing conditions. A setup comprises specific components that are supposed to work together consistently. Setups can be problematic if we have little or no knowledge of the system on which they are based.
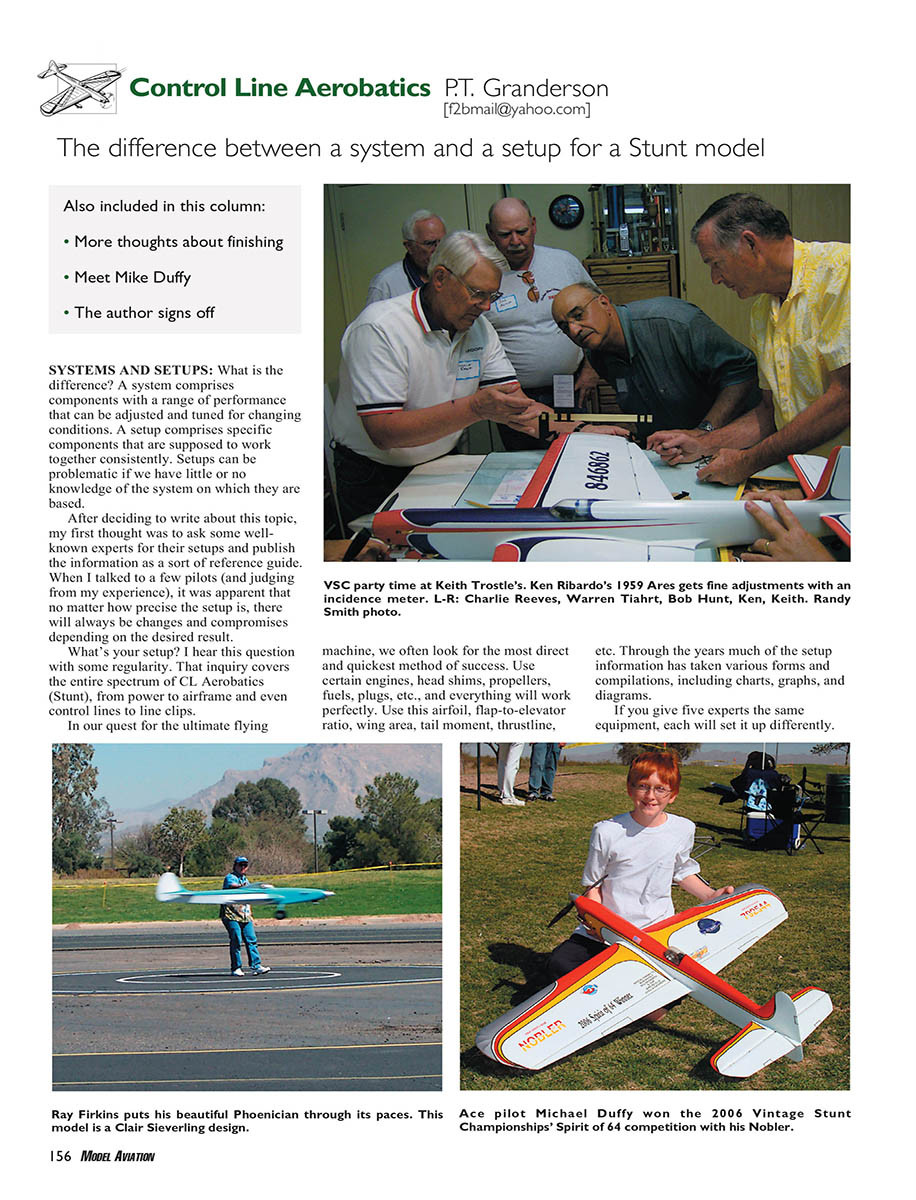
After deciding to write about this topic, my first thought was to ask some well-known experts for their setups and publish the information as a sort of reference guide. When I talked to a few pilots (and judging from my experience), it was apparent that no matter how precise the setup is, there will always be changes and compromises depending on the desired result.
"What's your setup?" I hear this question with some regularity. That inquiry covers the entire spectrum of CL Aerobatics (Stunt), from power to airframe and even control lines to line clips.
In our quest for the ultimate flying machine, we often look for the most direct and quickest method of success: use certain engines, head shims, propellers, fuels, plugs, etc., and everything will work perfectly. Use this airfoil, flap-to-elevator ratio, wing area, tail moment, thrustline, etc. Through the years much of the setup information has taken various forms and compilations, including charts, graphs, and diagrams.
What mysterious, secret knowledge does each possess that causes them to be different? They understand the systems that support the setups and apply that knowledge in an effort to reach success at a specific time and place. The more knowledge you have of the systems, the easier it is to make the setup work.
At a contest last year my good friend Phil Juarez was flying his beautiful Stiletto and having problems with power output. He had purchased the entire O.S. .40 VF setup used, but it was in perfect condition with the pipe header installed and adjusted for the propeller that was included in the setup from one of the local cache of National Champions and world-class fliers. During flight the engine seemed weak and was noisier than usual, slowing and stalling in maneuvers.
After Phil landed the model he complained about the lack of power and turned the needle valve in a little more to get additional power. The next flight was worse, with the problems becoming more exaggerated. Watching Phil's flight I suggested that the engine was not running on the pipe and began looking for the problem. When the cowl was removed the issue was immediately identified. The rubber hose connecting the header and pipe had ruptured. After replacing the hose, the power returned instantly.
After landing the aircraft Phil made an interesting comment: "The guys I fly with don't use pipes and we just don't know what to look for if something goes wrong." Given a reasonable understanding of how the pipe system works, the diagnosis and fix was easy.
In the past year of writing this column I have tried to provide straightforward information that can be easily understood and applied to achieve good results. Although the information is not intended for or directed toward the experts, many have commented that they have found it informative. In this age of TMI (too much information), it is often difficult to digest a lot of what works and how it works. The Internet is bursting with information, good and bad, about almost any subject imaginable, model aviation included.
In general, if you read or hear something and it sounds too complicated, it probably is. So let's go back to the basics.
When it comes to internal-combustion engines, the one thing to avoid is any kind of leak. There should be no leaks in the fuel tubing, tank, exhaust, head, backplate, etc. Avoiding leaks is simple, yet it is the cause of 90% of all the problems I've seen throughout the years.
The next thing to avoid is anything being loose. There should be no loose mounting bolts, engine mounts, propellers, spinners, etc.
If you have been considering using a tuned pipe but are not sure how it works, the pipe regulates and controls the speed of the engine in flight. It has at least one baffle internally, and the distance of the first baffle (in the case of multiple baffles) from the engine exhaust determines how fast the engine will run.
- Moving the baffle closer to the engine exhaust will cause the engine to run faster.
- Moving it farther away will cause the engine to run slower.
To determine the distance we measure a straight line from the center of the combustion chamber—usually the glow plug—to the first baffle. Although that is an oversimplification of how a pipe works, it is how it is used in practice. It is only part of a power system that includes the fuel, fuel mixture, fuel tank, glow plug, engine timing, cooling, seal, and a host of subcomponents to these primary parts, but the setup gives you a good starting point.
Another common problem is your airplane "hunting" or climbing and diving during level flight. Let's say you built it straight, balanced it properly, and set up everything exactly as the designer specified. You tried adding nose weight and tail weight, changing the handle spacing, taping the hinge lines, etc., and nothing seemed to work.
You did everything right, but you missed one basic thing: the controls are stiff and don't move freely. You got some paint or glue in the hinges. A drop of oil or cleaning with alcohol frees up your controls, and your airplane settles into a perfect groove in level flight.
The setup was correct, but the problem was in understanding the system and its basics. A setup is a good starting place. The goal is to find a combination that works best for you and not for someone else.
So what is the best way to learn about the various systems? The answer is closer than you think.
Our airplanes talk to us all the time. By making sure things are straight, tight, and leak-free, you will force your model and its systems to tell you the truth.
Have you ever noticed that most experts who fly classic airplanes don't use a tachometer to set the engine? They can seldom tell you what the rpm is at launch. Have you ever seen someone start the engine, remove the battery, hear a change in engine speed, and diagnose the problem as a faulty glow plug? They listen to what the engine is telling them.
In every case the common link is practical experience. These fliers have run many engines and made many flights. They know the fundamentals.
Enough of the boring but necessary fundamentals. The flying season is here.
Most people think it's never rainy, windy, or cold in California, so let's go with that. We just don't fly much in the winter months because airplanes have to be built. I hope you have at least one new model for the spring coming-out party.
If you're a contest flier, I hope to see you at an event somewhere. If you're a sport flier who likes to do tricks, maybe you have some super-fun stuff that makes you smile and even laugh.
I have a new den ready for paint, but I have painter's block. I can't figure out the exact paint to use and where to put it!
Past columns about paint preparation and finishing have brought quite a few questions and revealed some products and sources that are now extinct. My apologies for recommending out-of-production items.
When I find something that works, I usually stockpile it and sometimes lose track of where I got it. Since I have a 50-pound bag of talc I bought at Tap Plastics, it never occurred to me that the company would no longer carry the stuff. There are other sources for pure talc that contains no asbestos, oils, or perfume. If you have Internet access, you can find a variety of fitness- and billiard-supply sources that sell the pure stuff.
On the subject of talc, many have asked why I prefer it as a filler when other materials are marginally lighter and stay suspended in clear modeling dope. The fact that it does not stay suspended in paint is exactly why I prefer talc.
The object of filler is to fill the low spots on our models. Talc settles into the low spots, and after sanding it is held in place with a thin layer of paint. By having less paint that shrinks and more filler in the low spots, you greatly reduce the chance of grain and low spots reappearing as the paint ages and shrinks.
Others have asked whether they should cover open bays on wings, stabilizers, and elevators before or after the carbon veil. These are covered with silkspan or tissue over the carbon veil.
The photo in the previous column shows a model with open bays on the wing where the carbon veil has been cut between the ribs. Covering with tissue and subsequent painting add tremendous integral and tensile strength to the airframe.
There have also been many questions about using full-strength dope brushed on and no sanding between coats. The reason for this is that thinner is a solvent. Solvents mix with the dope and slow the evaporative process of drying.
Thinned dope sinks deeper into the wood grain and low spots. It will require more coats, while softening and trapping the previous coats deep in the pores and low spots. This drastically slows the entire drying process and creates an unstable foundation on which to apply the final finish.
The reason for not sanding or removing sanding dust between coats is that balsa dust is the perfect filler and adds absolutely no weight while retaining its inert stability. It might seem crazy, but it works!
The PPG Global Performance System D893 clear automotive coat has not been readily available since 2004. My apologies again, but I bought a gallon in 1999. Because it flows out so well and takes little liquid to cover, it has enough left to finish at least another seven or eight models. So far I have used that same gallon for 14 airplanes. Although the purchase price seemed extremely high, this product has proven to be extremely economical.
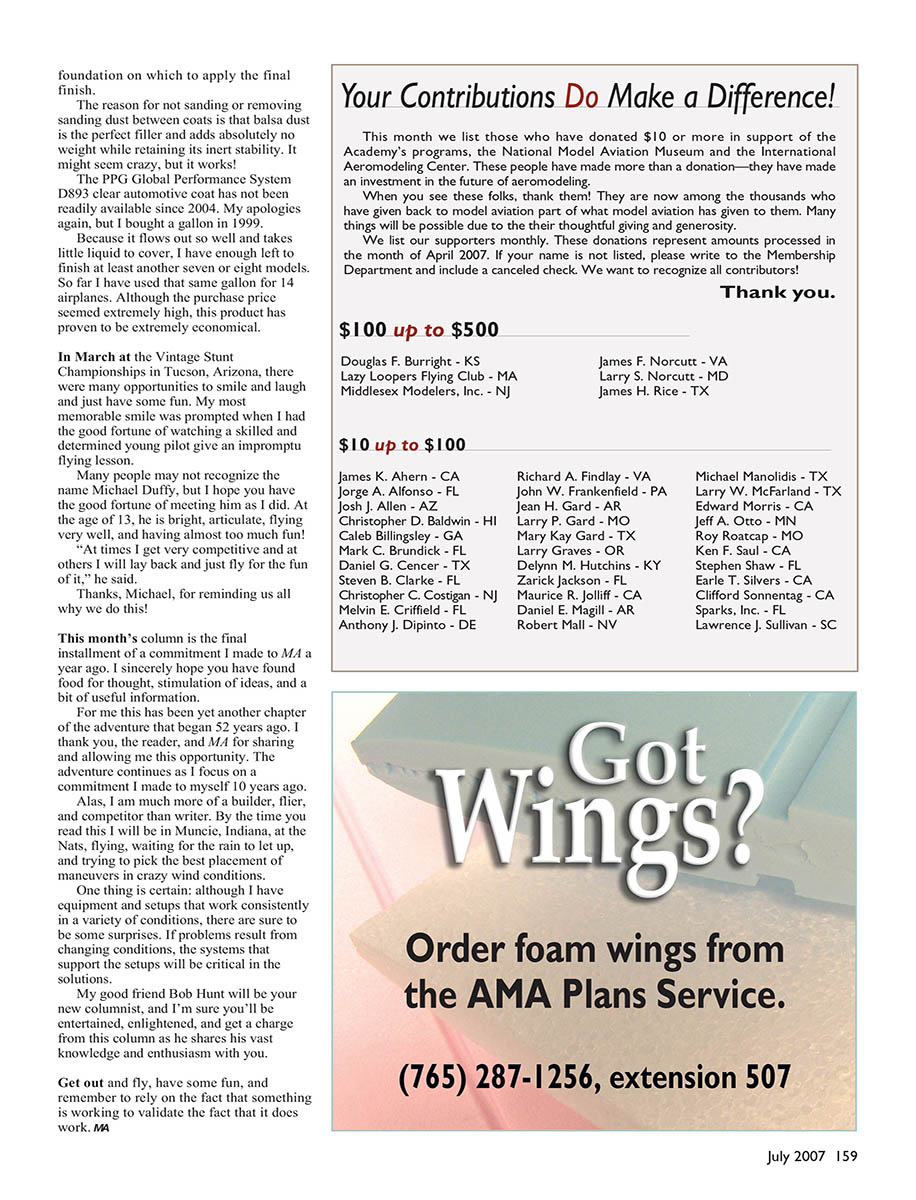
In March at the Vintage Stunt Championships in Tucson, Arizona, there were many opportunities to smile and laugh and just have some fun. My most memorable smile was prompted when I had the good fortune of watching a skilled and determined young pilot give an impromptu flying lesson.
Many people may not recognize the name Michael Duffy, but I hope you have the good fortune of meeting him as I did. At the age of 13, he is bright, articulate, flying very well, and having almost too much fun!
"At times I get very competitive and at others I will lay back and just fly for the fun of it," he said.
Thanks, Michael, for reminding us all why we do this!
This month's column is the final installment of a commitment I made to MA a year ago. I sincerely hope you have found food for thought, stimulation of ideas, and a bit of useful information.
For me this has been yet another chapter to the adventure that began 52 years ago. I thank you, the reader, and MA for sharing and allowing me this opportunity. The adventure continues as I focus on a commitment I made to myself 10 years ago.
Alas, I am much more of a builder, flier, and competitor than writer. By the time you read this I will be in Muncie, Indiana, at the Nats, flying, waiting for the rain to let up, and trying to pick the best placement of maneuvers in crazy wind conditions.
One thing is certain: although I have equipment and setups that work consistently in a variety of conditions, there are sure to be some surprises. If problems result from changing conditions, the systems that support the setups will be critical in the solutions.
My good friend Bob Hunt will be your new columnist, and I'm sure you'll be entertained, enlightened, and get a charge from this column as he shares his vast knowledge and enthusiasm with you.
Get out and fly, have some fun, and remember to rely on the fact that something is working to validate the fact that it does work. MA
Transcribed from original scans by AI. Minor OCR errors may remain.

