

Control Line Throttle-Control Systems
by Fred Cronenwett
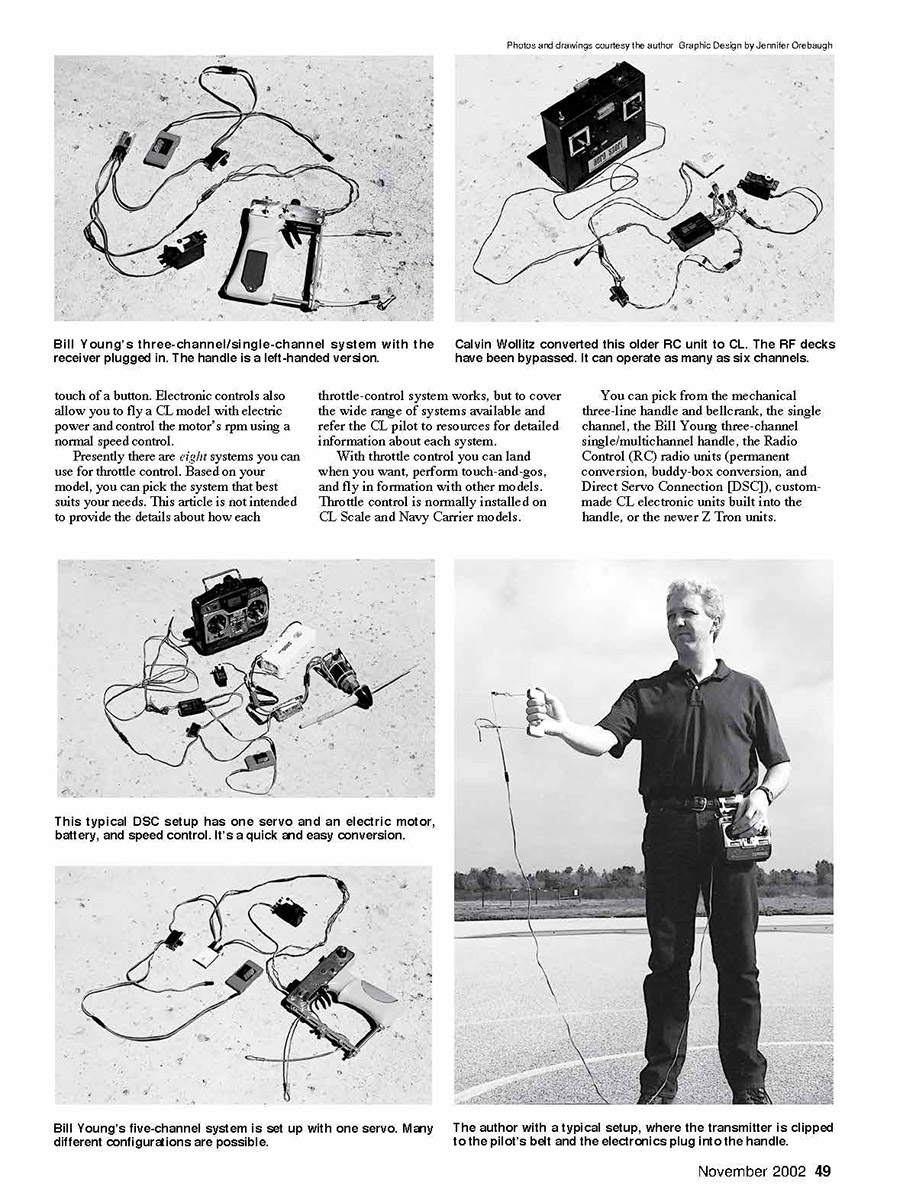
When you're building your next Control Line (CL) model, consider installing an engine with throttle control. It doesn't matter if your aircraft is intended for Precision Aerobatics, Scale, Navy Carrier, or fun-flying.
The throttle-control systems for CL models have gone through a revolution in the last 10 years. Forty years ago the three-line system was normally installed, and it is still in use on some CL models. However, in the last 2? years the electronic control systems have been developed dramatically and have been an improvement over the three-line mechanical system.
Electronic controls allow you to fly with two insulated flying lines and operate multiple functions on the model with the touch of a button. Electronic controls also allow you to fly a CL model with electric power and control the motor's rpm using a normal speed control.
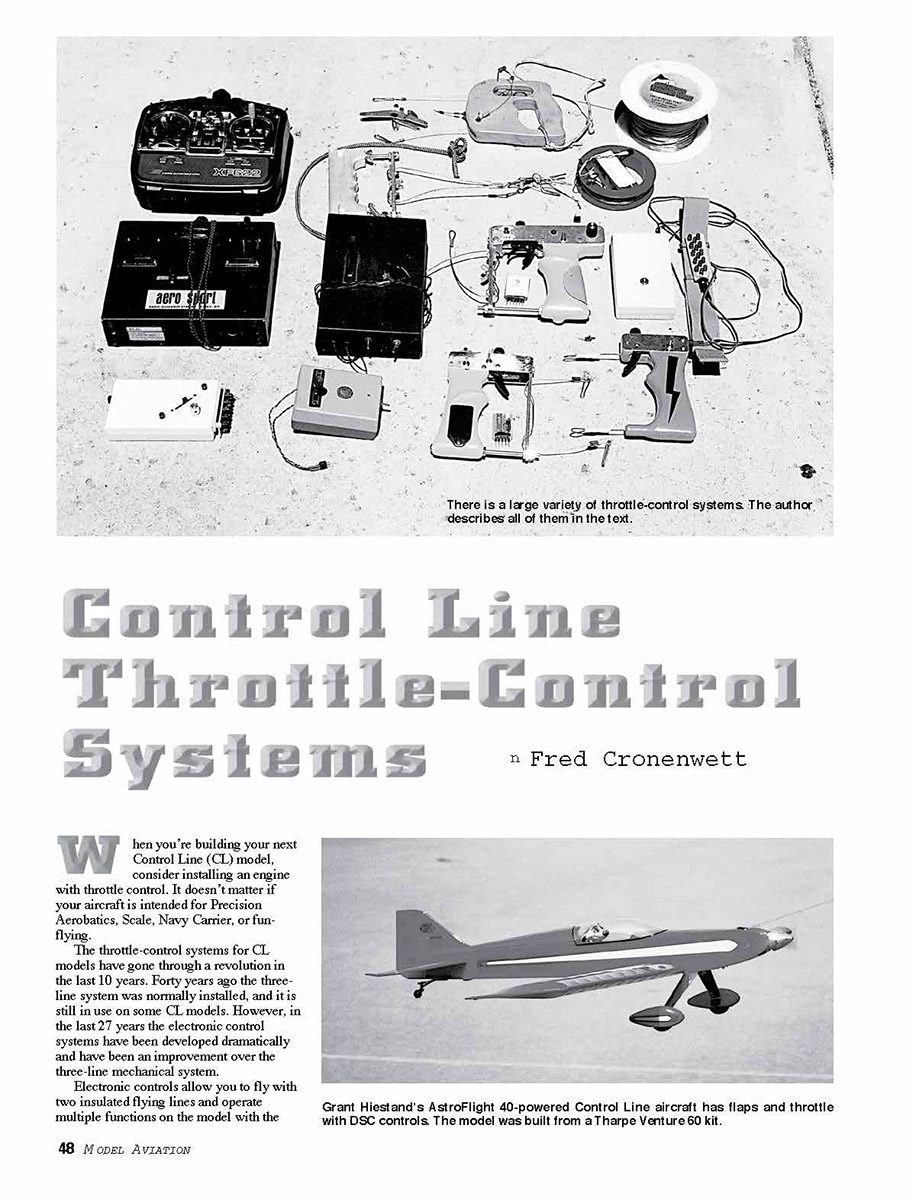
Presently there are eight systems you can use for throttle control. Based on your model, you can pick the system that best suits your needs. This article is not intended to provide the details about how each throttle-control system works, but to cover the wide range of systems available and refer the CL pilot to resources for detailed information about each system.
With throttle control you can land when you want, perform touch-and-gos, and fly in formation with other models. Throttle control is normally installed on CL Scale and Navy Carrier models.
You can pick from the mechanical three-line handle and bellcrank, the single channel, the Bill Young three-channel single/multichannel handle, the Radio Control (RC) radio units (permanent conversion, buddy-box conversion, and Direct Servo Connection [DSC]), custom-made CL electronic units built into the handle, or the newer Z Tron units.
Flying Lines:
There are two basic kinds of flying lines used with these throttle-control systems. If you decide to fly with the three-line or Z Tron systems, you can use the normal flying lines (stranded or solid).
If you decide to use any of the electronic control systems, you have to use the insulated lines. These are nylon-coated saltwater fishing leader available from your local fishing store. The brands available will vary, but I prefer Surflon®; you can purchase it on the Internet.
Several sizes of fishing leader are available, but the 30-pound-test line is best suited for models weighing as much as four pounds. The 80-pound-test line is best for models weighing between four and eight pounds, and the 140-pound-test line is best for models weighing more than eight pounds.
Be sure to order the rolls of this leader in the 300- or 1,000-foot rolls. You can make two sets of lines from the 300-foot roll with roughly 60 feet left over. The 1,000-foot roll will make eight sets of lines.
The insulated lines need to be assembled in such a way that the system cannot short out. The photographs show how these lines are set up with the connectors at both ends, then a normal CL Stunt handle or specialized electronic CL handle can be hooked up to the lines. Be sure to pull-test your lines and handle before flying your prized model. Look in the March 1999 Model Aviation for details on how to assemble the lines or contact your system manufacturer.
Electric-Powered CL Models:
Those who are familiar with electric-powered models know that you can control a motor's rpm by using a speed control. It typically plugs into an RC receiver. If you move the throttle stick on the transmitter, the motor's rpm can be turned on and ramped up to full power on command.
So how do you combine the benefits of electric power, speed controls, and other RC features in a model that is not allowed to have a radio frequency?
If you decide you want to fly your next CL model with electric power and change the motor's rpm in flight, you can fly with any of the systems described herein except the three-line and single-channel (servo driver). Plug the speed control into the receiver just like a servo, and you are in business.
For more details on how to set up an electric-powered CL model, see the list of names at the end of the article.
Three-Line Systems:
The first basic system is the three-line. It is a matched bellcrank and handle that require three flying lines, and the pilot can control the throttle by moving a trigger on the handle. Many CL Scale and Carrier fliers have used this system for many years. It is based on line tension and can only operate one function.
It is common to see CL Scale models with four or more lines—each additional line for each additional option. This requires a matched bellcrank and handle that can cost upward of $50 for the pair.
The two main lines control the elevator, and the third line must be cut an exact length for the system to work properly. The third line changes the throttle when the trigger is moved on the handle. The system was designed to maintain line tension at all times across all three lines, regardless of the throttle setting.
Setting up the third line can take awhile and does not allow for engine kill and neutral elevator adjustment at the handle. Neutral elevator adjustment must be done by changing the length of the up- or down-line.
The three-line system will not work for electric-powered models since this is purely a mechanical system and it moves pushrods. Keep in mind that if you lose line tension, you have no throttle control when the model ground-loops during takeoff, taxi operations, or landing. Even the best CL Scale pilots will ground-loop a model at least once; it is not a matter if, but when.
Multichannel Electronic Controls:
This class which uses two insulated flying lines is an RC transmitter and receiver that are permanently converted for CL use. Models with these systems can operate six or more channels (depending how many the radio system has) on the model.
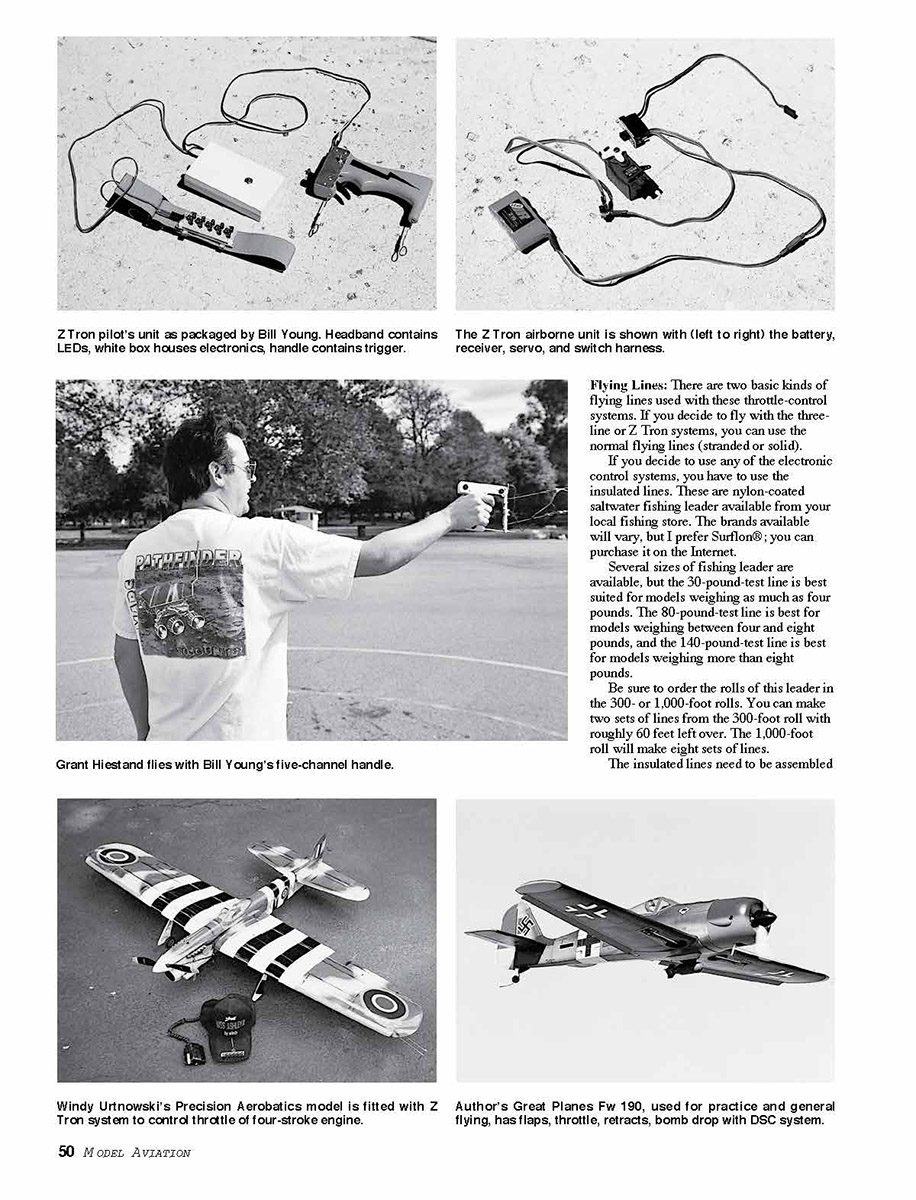
When flying with these systems, the radio-frequency (RF) signal is bypassed, and the signal and ground are sent down the two insulated flying lines. The airborne unit contains the normal RC receiver (permanent conversion also required), switch harness, servos, and battery. The transmitter is usually clipped to your belt, and a wire from the transmitter is plugged into the flying lines.
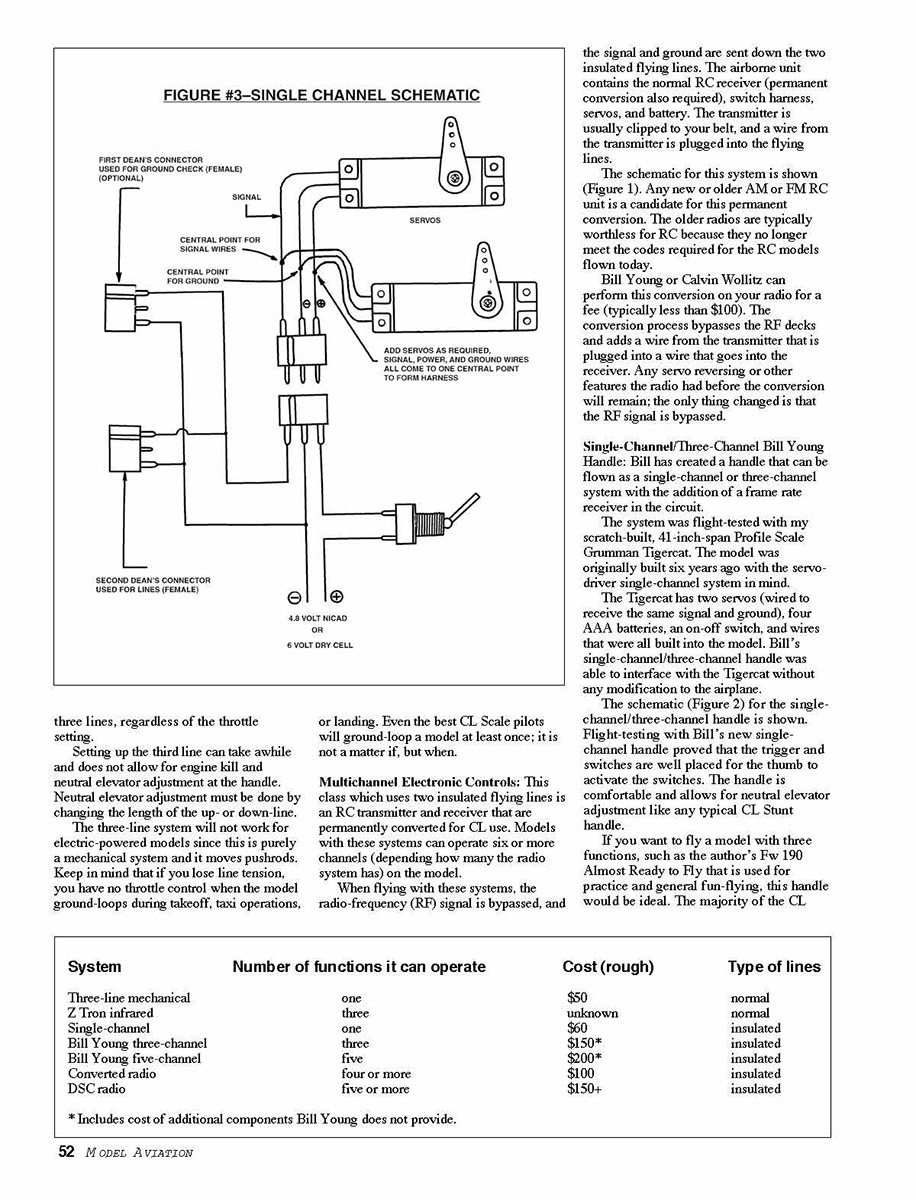
The schematic for this system is shown (Figure 1). Any new or older AM or FM RC unit is a candidate for this permanent conversion. The older radios are typically worthless for RC because they no longer meet the codes required for the RC models flown today.
Bill Young or Calvin Wollitz can perform this conversion on your radio for a fee (typically less than $100). The conversion process bypasses the RF decks and adds a wire from the transmitter that is plugged into a wire that goes into the receiver. Any servo reversing or other features the radio had before the conversion will remain; the only thing changed is that the RF signal is bypassed.
Single-Channel/Three-Channel Bill Young Handle:
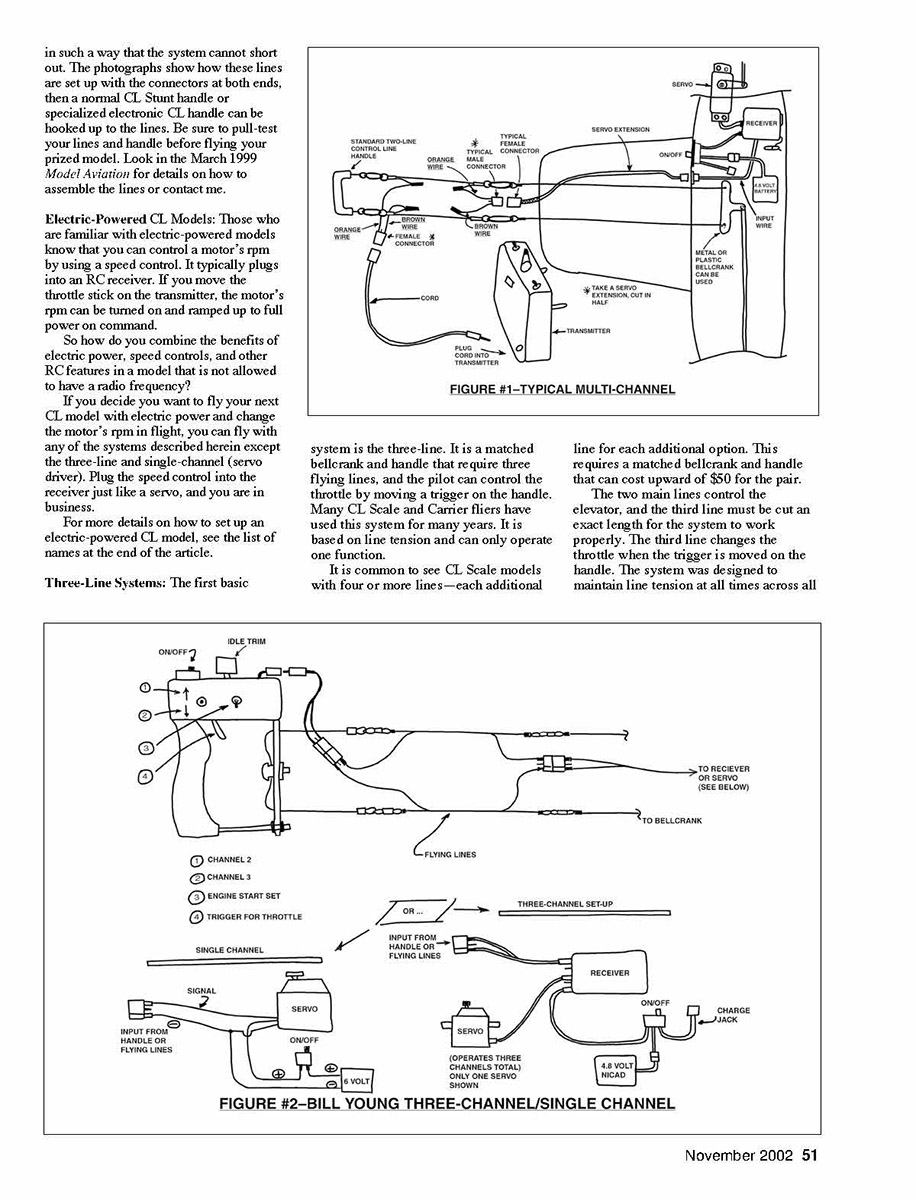
Bill has created a handle that can be flown as a single-channel or three-channel system with the addition of a frame rate receiver in the circuit.
The system was flight-tested with my scratch-built, 41-inch-span Profile Scale Grumman Tigercat. The model was originally built six years ago with the servodriver single-channel system in mind.
The Tigercat has two servos (wired to receive the same signal and ground), four AAA batteries, an on-off switch, and wires that were all built into the model. Bill's single-channel/three-channel handle was able to interface with the Tigercat without any modification to the airplane.
The schematic (Figure 2) for the single-channel/three-channel handle is shown. Flight-testing with Bill's new single-channel handle proved that the trigger and switches are well placed for the thumb to activate the switches. The handle is comfortable and allows for neutral elevator adjustment like any typical CL Stunt handle.
If you want to fly a model with three functions, such as the author's Fw 190 Almost Ready to Fly that is used for practice and general fun-flying, this handle would be ideal. The majority of the CL
System | Number of functions it can operate | Cost (rough) | Type of lines Three-line mechanical | one | $50 | normal Z-Tron infrared | three | unknown | normal Single-channel | one | $60 | insulated Bill Young three-channel | three | $150* | insulated Bill Young five-channel | five | $200* | insulated Converted radio | four or more | $100 | insulated DSC radio | five or more | $150+ | insulated
* Includes cost of additional components Bill Young does not provide.
Scale models have no more than three functions, so this electronic control system is ideal.
This handle was also tested with a speed control (for electric motors), and it worked as expected. The advantage of this system is the low cost and ease of operation. The handle is unobtrusive and is easy to fly with.
Using the Hunter Electronic Controls:
This is the second basic system. It is flown with two insulated flying lines. The signal and ground from a servo driver is sent down the flying lines and controls a servo in the airplane to change the throttle. This system is not a good choice for flying electric-powered models with speed controls.
The idea behind this type of electronic control is to take advantage of the servo drivers that are out on the market for RC models. A servo driver (like the ones sold by Custom Electronics) typically has three wires exiting the case: power, signal, and ground. For CL we can take the signal and ground from the servo driver and send it through the flying lines as shown on the schematic (Figure 5).
The power for the servo normally comes from the servo driver itself, but the power to the servo with a battery in the model. The ground between the servo driver and the model must be common for this to work—very important!
When wired correctly, the model carries the on-off switch, wires, a six-volt battery, and a servo. The battery can be used as wingtip weight and a microservo is more than adequate to control the throttle. The battery that powers the servo does not have to be very big or heavy.
If you use Ni-Cd batteries, 150 mAh is more than enough and four AAA batteries will last quite a while. If you can stand the weight and size, put four AA batteries in the airplane; this combination will usually last months. The servo driver is typically clipped to the pilot’s belt, and a wire from the driver is plugged into the flying lines as shown in the photographs.
Buddy Box RC Conversion:
Bill Young can make an RC transmitter that has a buddy-box connection or work with his normal five-channel CL receiver. You need to provide Bill with the RC transmitter, the switch harness, a 4.8-volt Ni-Cd battery, and servo. He will set it up and ship it back to you for a fee.
Direct-Servo Conversion:
Several RC units on the market today can be purchased and used in CL model without any special conversion. One feature designed into the JR radio is DSC; it was designed so that the RC pilot could check the function of the model in the pits area without transmitting RF.
A wire is plugged into the back of the transmitter, then is plugged into the charge jack of the switch harness. This basically hardwires the transmitter to the receiver with two wires.
The photographs show how we can take advantage of this system for CL. The flying lines become an extension of the DSC chord. But since we do not modify the transmitter and receiver, it means that the model can be flown as RC using the same hardware.
My Six Seniorita has been flown with the JR radio system as CL and RC. With a five-minute conversion, the Seniorita can be flown as either using the identical transmitter and receiver. Some of the Futaba and Hitec radios also have DSC functionality. Check with your local hobby shop for more details on these radios.
The IR radio must use the deluxe switch harness for the DSC to work properly. The basic six-channel JR radio comes with the standard switch harness that must be replaced with the deluxe.
The transmitter normally hangs off the pilot’s belt when this system is used. When your Scale model needs many options, this is a nice solution. Look in the March 1999 Mall’s Mailbox for a detailed article about this system or contact me.
Custom-Made CL Electronic Controls:
These specially made handles combine the normal CL handle and electronic controls into one unit so you don't have to hang anything off your belt when you fly. Bill Young pioneered these custom-made units with a five-channel design that is still available. These handles are light and contain all the required electronics for throttle control (trigger) and other functions by a ring 2-switch or dial. This system requires two insulated flying lines, and the signal and ground is transmitted through the flying lines. The airborne unit contains a custom-made CL five-channel receiver, switch harness, servos, and a battery.
The schematic for this type of system is shown. This system costs roughly $200 and is intended for pilots who have many functions on their CL Scale models, such as flaps, retracts, bomb drops, throttle, and drop tanks. Bill provides only the handle and receiver; you complete the system by obtaining a normal RC switch harness, a 4.8-volt battery, and servos.
Z-Tron Infrared:
The new Z-Tron is an infrared system that eliminates the need for insulated lines. Sergio Zigras originally developed this system for small indoor models and offers a controller and three-channel receiver. The AMA rule book does not allow CL models to use an RC frequency, and this does not fall into that category.
The range of the infrared during daylight hours is limited to approximately 100 feet. This is ideal for our purposes since the flying lines rarely exceed 70 feet in length.
Bill Young modified the Z-Tron unit's packaging to better work for CL. He has made two prototype units I have flight-tested, which are shown in the photographs. Windy Ortnowski pioneered the use of this system on his Precision Aerobatics Typhoon in 2001.
These systems have three channels, and the airborne unit has the receiver, switch harness, servos, and a battery, as shown. The flying lines no longer carry any signal and ground with this system. This allows the pilot to use normal flying lines, reducing the amount of line drag normally associated with the nylon-coated lines.
Windy opted for this system because he flies his model in Precision Aerobatics, where line drag is critical. The majority of the CL Scale models can put up with extra line drag because of the insulated lines. If you fly your model in Carrier events, the line drag could slow your high-speed run.
The airborne unit has the three-channel receiver, a switch harness, a 4.8-volt battery, and the servos. The "eye" on the receiver must point toward the pilot; typically, a small hole is made in the side of the fuselage for the eye to look through. Or you could put the receiver at the port wingtip. During flight testing we noted that the airborne unit lost communication with the controller when the pilot's unit's LEDs were not pointing at the airplane.
The unit that stays with the pilot contains three items: the light-emitting diodes (LEDs), the battery, and the control stick for the throttle control and/or switches. The big question for our purposes is where to mount the LEDs. They must point at the airplane for the system to work properly.
Windy mounted them to the bill of his hat; if he looks at the airplane, the LEDs will be pointing at the model. In the photos you can see the headband Bill uses to power his system. It accomplishes the same thing.
We have not flown two models with the Z-Tron system in formation yet. Based on what we know about the system to date, formation flying with two models would be impossible since both airframes would understand and process the same infrared signal. Nor have we flown two models up to a infrared system in different circles. We do know that there will be no problem if you are the only pilot with a Z-Tron-equipped model at the flying field.
Additional development and testing are required for the system to establish a design for the handle, LEDs, and other components.
Now you have to pick which system is best for your next CL model with throttle control. First decide how many functions you want to operate beyond throttle. If you want to build a bomber with throttle, flaps, retracts, bomb bay doors, bomb drop, rotating turrets, and brakes, perhaps you need a six- or eight-channel system. If you only want throttle control, you can pick from any of the arrangements.
Second, decide if you want to use insulated lines. I have heard many arguments against the insulated lines and the line drag associated with them. I have flown large and small models with insulated lines, and the added line drag has not been a problem for CL Scale and fun-flying. The only time the drag will be a problem is when you want to perform aerobatics or keep it to a minimum for speed (such as in Carrier events).
Don't be afraid to use insulated lines on a CL Scale model; the performance hit is not as bad as you might think. The only thing you might have to do is shorten them two or three feet from your normal length.
Third, look at how much money you want to spend. The single-channel electronic controls are only slightly more expensive than the three-line handle and bellcrank. Single-channel is also much easier to set up.
The Bill Young single-channel/five-channel handle costs approximately $100, and his five-channel unit costs approximately $150. If you can find an older RC unit, the conversion cost may be less than $100.
A new IR radio (DSC) can vary in price, but you get a lot for your money. The Z-Tron system is still being developed, so contact Bill Young about prices for this type of unit.
The throttle-control systems shown here can range from $60 upward to $300. Keep in mind that they are an investment, and you can use them in multiple airplanes by simply getting new receivers and using the same transmitter or handle.
Sources:
Contact the following for more information.
Insulated flying lines: Fred Cronenwett
Three-line mechanical: Instructions come with handle and bellcrank
Single-channel: Fred Cronenwett
Bill Young, three-channel: Bill Young
Bill Young, five-channel: Bill Young
Converted radio: Fred Cronenwett
Buddy-box conversion: Bill Young
DSC radio: Fred Cronenwett or March 1999 AMA catalog
Z-Tron infrared: Bill Young (CL handles) or Sergio Zigaz
Electric-powered CL models: Fred Cronenwett
Fred Cronenwett 18575 Ventura Blvd. #173 Tarzana CA 91356 $24.95 plus shipping California residents pay 8% sales tax ($26.95 plus shipping) $4 for continental U.S., Hawaii, and Alaska $6 for Mexico and Canada $10 international Make checks payable to Fred Cronenwett
Surfused fishing leader (insulated flying lines): Tacklemania.com 18840 US Hwy 19 N Suite 422 Clearwater FL 33764 (727) 445-4629 The Web site shows only what is in stock; if you can't find what you are looking for, check back later. You can only order from this source via the Internet.
Assorted CL-related hardware, three-line handles, bellcranks: Brodak Manufacturing 100 Park Ave. Carmichaels PA 15320 (724) 966-2726 [email protected] www.brodak.com
Servo driver (also check your local hobby store): Custom Electronics Box 125 Higginsville MO 64037 (888) 584-6284 Fax: (888) 584-6285
Three-channel, five-channel, multichannel conversion, buddy-box conversion, Z-Tron handles: Bill Young Designs 448 E. Rustic Knoll Ln. Flagstaff AZ 86004 (520) 522-0155
Multichannel radio conversion: Calvin Wolitz 8996 Barco Ln. Jacksonville FL 32222 (904) 771-0613
Z-Tron components (direct from manufacturer): Z Tron Sergio Zigaz 171 Arundel Rd. Paramus NJ 07652 [email protected] http://home.att.net/~zigaz/
Transcribed from original scans by AI. Minor OCR errors may remain.

