
Converta-Cradle
A simple design for both the field and workbench
Graham Hicks
Perhaps it was an undercooked chicken gizzard that kept me awake one night a few months ago. Not wanting to waste a gift of time, my one-track mind started working on a way to prevent the P-47 fuselage I was building from rolling around on my workbench. It kept getting dinged by the knives, screwdriver handles, and conehead-shaped cyanoacrylate (CyA) caps that inhabit the top of my bench.
A sleepless hour or so later, I came up with a solution. I devised a rough plan for a construction cradle that would solve my problem—one that would only cost around ten dollars to build!
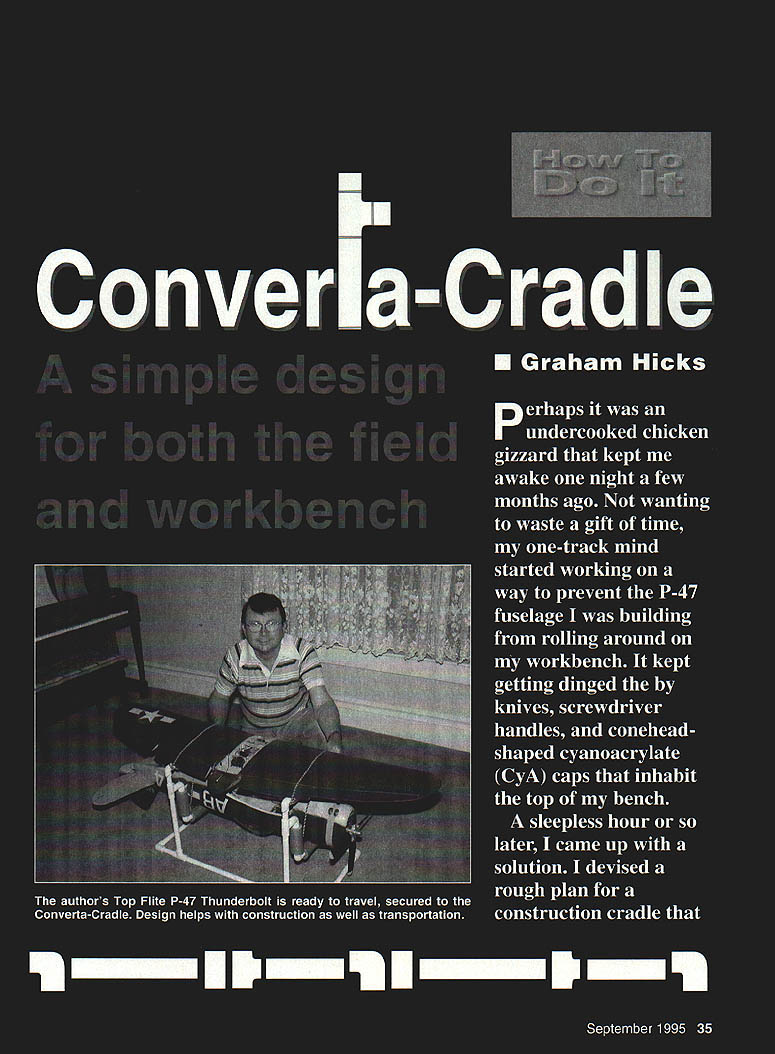
Later, a friend showed me how an addition to the design would convert the simple workbench cradle into a compact carrying rack. Now I had a design that would not only help me build the model, but also help transport the finished model safely to the field. This design became the Converta-Cradle.
This gadget has changed my outlook on modeling and has saved me from countless hours of repairing dents and dings. Read on—maybe this cradle can solve some of your modeling and transportation problems!
Materials and tools
- 1/2-inch PVC pipe and fittings (elbows and T-connectors) — plumbing supply shop
- PVC pipe cement (or thick CyA)
- 5-foot length of foam pipe insulation (for padding)
- Approximately five feet of 1/4-inch bungee cord
- Four hooks (purchased or made from 1/16-inch music wire)
- Simple hand tools: pipe cutter or saw, sander, reamer, razor blade or modeling knife, drill and 1/16-inch bit, small screwdriver
- Optional: acetone and rag to remove printing from PVC
Cutting the pipe
All required straight pieces are cut from a 20-foot length of 1/2-inch pipe. If your compact hatchback can't handle a 20-foot length of pipe, have the plumbing supply shop cut it in half.
Cut the 20-foot pipe into these lengths (in this order makes counting easy):
- Two 20-inch pieces
- Four 14-inch pieces
- Four 12-inch pieces
- Two 9-inch pieces
- Four 6-inch pieces
- Four 4-inch pieces
- Four 3-inch pieces
- Four 1-1/2-inch pieces
After cutting you should have approximately 20 inches of leftover tubing. Keep this for spares or for replacing mistakes. Most (if not all) of the printing on the PVC can be wiped off with an old rag dampened with acetone—use sparingly to avoid damaging the finish.
Preparation
- Assemble each step once without any cement before you begin gluing. This helps you understand the assembly order and alignment.
- T-connectors and elbows allow for exactly 1/2-inch of pipe to seat in each joint—make sure you insert the pipe all the way into each joint to avoid misalignment.
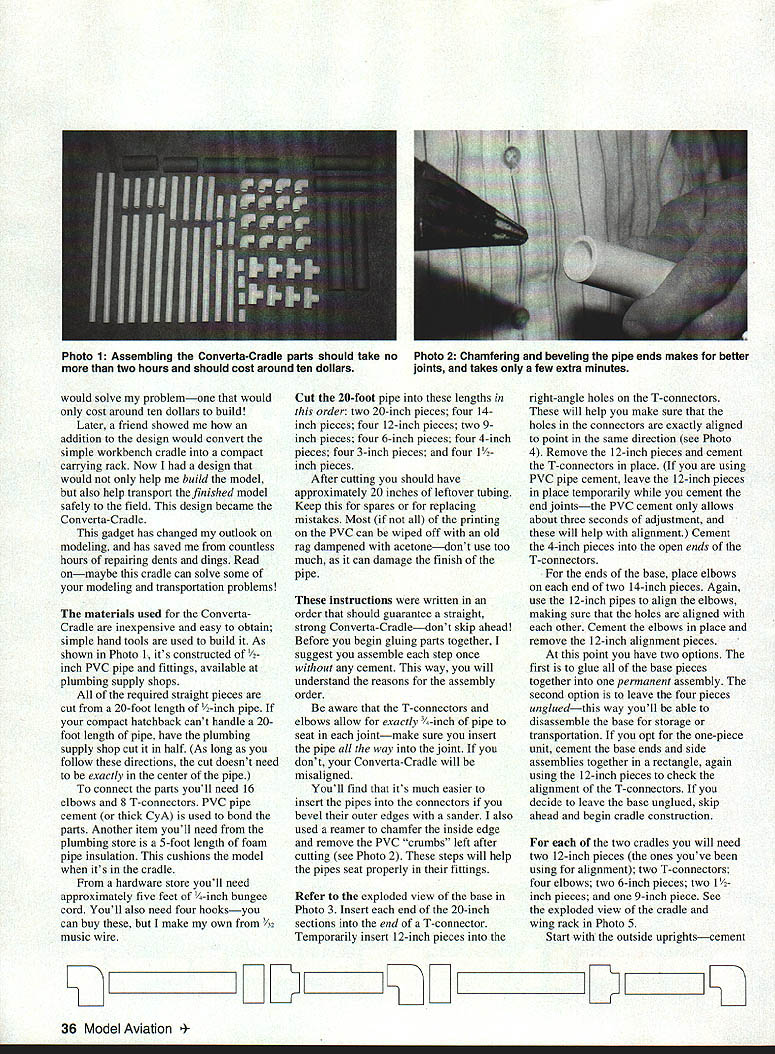
- Bevel the outer edges of the pipe with a sander to ease insertion. Ream and chamfer the inside edges to remove PVC "crumbs" left after cutting. These steps help the pipes seat properly in their fittings.
- Photo references in the original text: Photo 1 (complete unit), Photo 2 (chamfer/ream), Photo 3 (exploded view of base), Photo 4 (alignment), Photo 5 (exploded view of cradle and wing rack).
Base assembly
Refer to the exploded view of the base (Photo 3).
- Insert each end of the two 20-inch sections into the ends of two T-connectors.
- Temporarily insert 12-inch pieces into the right-angle holes on the T-connectors. These alignment pieces make sure the holes in the connectors point in the same direction (see Photo 4).
- Remove the 12-inch pieces and cement the T-connectors in place. If you are using PVC cement, you may leave the 12-inch pieces in place temporarily while you cement the end joints—the PVC cement only allows about three seconds of adjustment, and the fit will help with alignment.
- Cement the 4-inch pieces into the open ends of the T-connectors.
- For the ends of the base, place elbows on each end of two 14-inch pieces. Use the 12-inch pipes to align the elbows so their holes are aligned. Cement the elbows in place and remove the 12-inch alignment pieces.
At this point you have two options:
- Option A — One-piece base: Glue all of the base pieces together into one permanent rectangular assembly. Cement the base ends and side assemblies together, using the 12-inch pieces to check alignment of the T-connectors.
- Option B — Disassemblable base: Leave the four pieces unglued so the base can be disassembled for storage or transportation. If you choose this, skip the final step of gluing the base rectangle and begin cradle construction.
Cradle and wing rack construction
You will need (for two cradles): two 12-inch pieces (the alignment pieces you've been using), two T-connectors, four elbows, two 6-inch pieces, two 1-1/2-inch pieces, and one 9-inch piece. See the exploded view of the cradle and wing rack (Photo 5).
- Start with the outside uprights: cement a 1-1/2-inch piece into the end of a T-connector and set aside.
- Form two U-shaped cradles: use two 6-inch pieces as verticals and a 9-inch piece as the horizontal base. Use two elbows for the corners; align properly and cement them together.
- Cement the elbows so the top vertical open holes point outward in exactly opposite directions.
- Cement the 1-1/2-inch lengths into the open elbow holes to bridge the gap between the cradle outside uprights.
- Cement the open crossbar holes to the T-connector uprights; check alignment—make sure the 12-inch pieces run down parallel to the 6-inch verticals.
- The cradle should fit exactly between two opposite T-connectors.
- The four open T-connector holes on top of the uprights are the sockets for the wing racks.
Wing rack:
- A 14-inch piece of pipe forms the center.
- An elbow holds a 3-inch piece on each end.
- Make sure the 3-inch pieces are aligned, and glue the assembly together.
Padding
Cut the five-foot piece of foam pipe insulation into the following lengths:
- Two 11-1/2-inch pieces
- Two 7-1/2-inch pieces
- Four 4-1/2-inch pieces
You may need to open the slit in the insulation with a razor blade or modeling knife. Install the padding on the wing rack crosspieces and on the inside verticals and bases of the cradles. You can cement them on, but leaving them loose allows for replacement later.
Final assembly and use
- The cradles will hold your fuselage in almost any horizontal position. This is great for working on radio installation or assembling the stabilizer and rudder.
- Remove the cradles from the base, plug in the wing racks, and you have a stable, padded surface for your wing.
One useful modification: slot the ends of the tubes that press-fit into connector sockets. If a tube is reluctant to come out during disassembly, the slot allows you to insert a small screwdriver and pry the leg loose. To make the slots, drill a 1/16-inch hole approximately one inch from the end of the leg, then saw a slot from the hole to the end of the tube.
Converting for transportation
To convert the cradle for model transportation:
- Make four bungee cords with S-hooks big enough to fit around the pipes.
- Place your finished fuselage in the cradle and lash it down with two of the bungee cords.
- Plug in the wing racks and lash on your wing with the other two bungee cords.
Now you have a padded, modular unit that will safely transport your models to the field in the bed of your pickup truck or van. If you have several models, consider making a cradle for each one. I know of no better way to protect aircraft from damage, short of a complete carrying case for each one.
Modifications and final notes
- You may find new uses for the Converta-Cradle or make modifications. For larger models, add an inch or two to the dimensions to accommodate greater size.
- If you do find new uses for the unit, please share them by sending your ideas to Model Aviation.
I have donated the Converta-Cradle manufacturing rights for use in fund-raising. Please do not market this unit commercially—unless you intend to donate the proceeds to the museum.
Transcribed from original scans by AI. Minor OCR errors may remain.

