

Designing in CAD
A beginner's guide to designing your own aircraft
by David Walker
EVOLUTION: Our hobby has been evolving rapidly lately. From computer radios to laser-cut kits to electric-powered aircraft that not only rival their glow counterparts but often exceed them in performance, our hobby is changing.
Another aspect of aeromodeling that has evolved is ARFs and RTFs. There are great benefits to the proliferation of these models, but a result of this progress is that traditional kits have almost disappeared.
If you are the way I am and still love to build, your options are rather limited. This is unfortunate because just as laser-cutting was becoming mainstream, the decline of kits had already begun. What is a modeler to do when he or she loves to build?
The not-so-obvious answer is to design your own kits using CAD, or computer-aided design. Once you are familiar with CAD there is no limit to the aircraft you can model, whether your interest is RC, FF, or CL.
Many aeromodelers who are unfamiliar with CAD might find it daunting. It used to be true that you needed a super-powerful computer; months, if not years, of training; and a lot of money to use a CAD package. Fortunately for us, CAD has also evolved—to the point where any modeler with basic computer knowledge can use it on an existing computer as long as it is less than 10 years old. And for what we are doing, the cost can be zero dollars. Even if you have only a passing interest, you owe it to yourself to learn more and try it.
But why not design a model on good, old paper? Similar to how the word processor replaced the typewriter, CAD for the home user is replacing the paper, pencil, T-square, large drawing table, mechanical compass, and multitude of other tools needed to properly create a set of plans the “old way.”
Drawing model airplane plans has evolved too, with many of the same benefits. Sure, there is a learning curve; but just as you adapted to using a word processor, and likely would never use a typewriter again, you can probably learn and adjust to using CAD almost as easily.
My goal is not to teach you how to design an airplane in CAD using a specific CAD program, or even how to use this design method, but to help you get started and point out some of the advantages of it with which you might be unfamiliar.
The easiest way to begin is to download one of the free CAD programs listed at the end of this article and start using it. For many of them there is plenty of online help and support forums that are specific to the program you are using.
Then, if you find that you like using CAD, you can explore many of the other CAD programs that are available for purchase. My current favorite is the free version of SketchUp.
Once you get the basics down, you can explore the more advanced features. But in all honesty, the basics are really all you need when drawing model airplanes.
With CAD you can download an almost endless supply of free plans on the Internet. If the airplane is not the scale you want, or you want to make design changes, you can easily do that. These plans are also a great way to pick up new techniques and design possibilities.
Additionally, there is a countless array of parts, such as servos and hardware, that are available to download to use in your drawings. And you can share your work with others around the world. There is something gratifying about seeing someone else fly one of your designs—sometimes someone from halfway around the world.
Before going into some of the important features of CAD, it's important to know how it differs from conventional painting, drawing, or photo programs, with which you may be familiar.
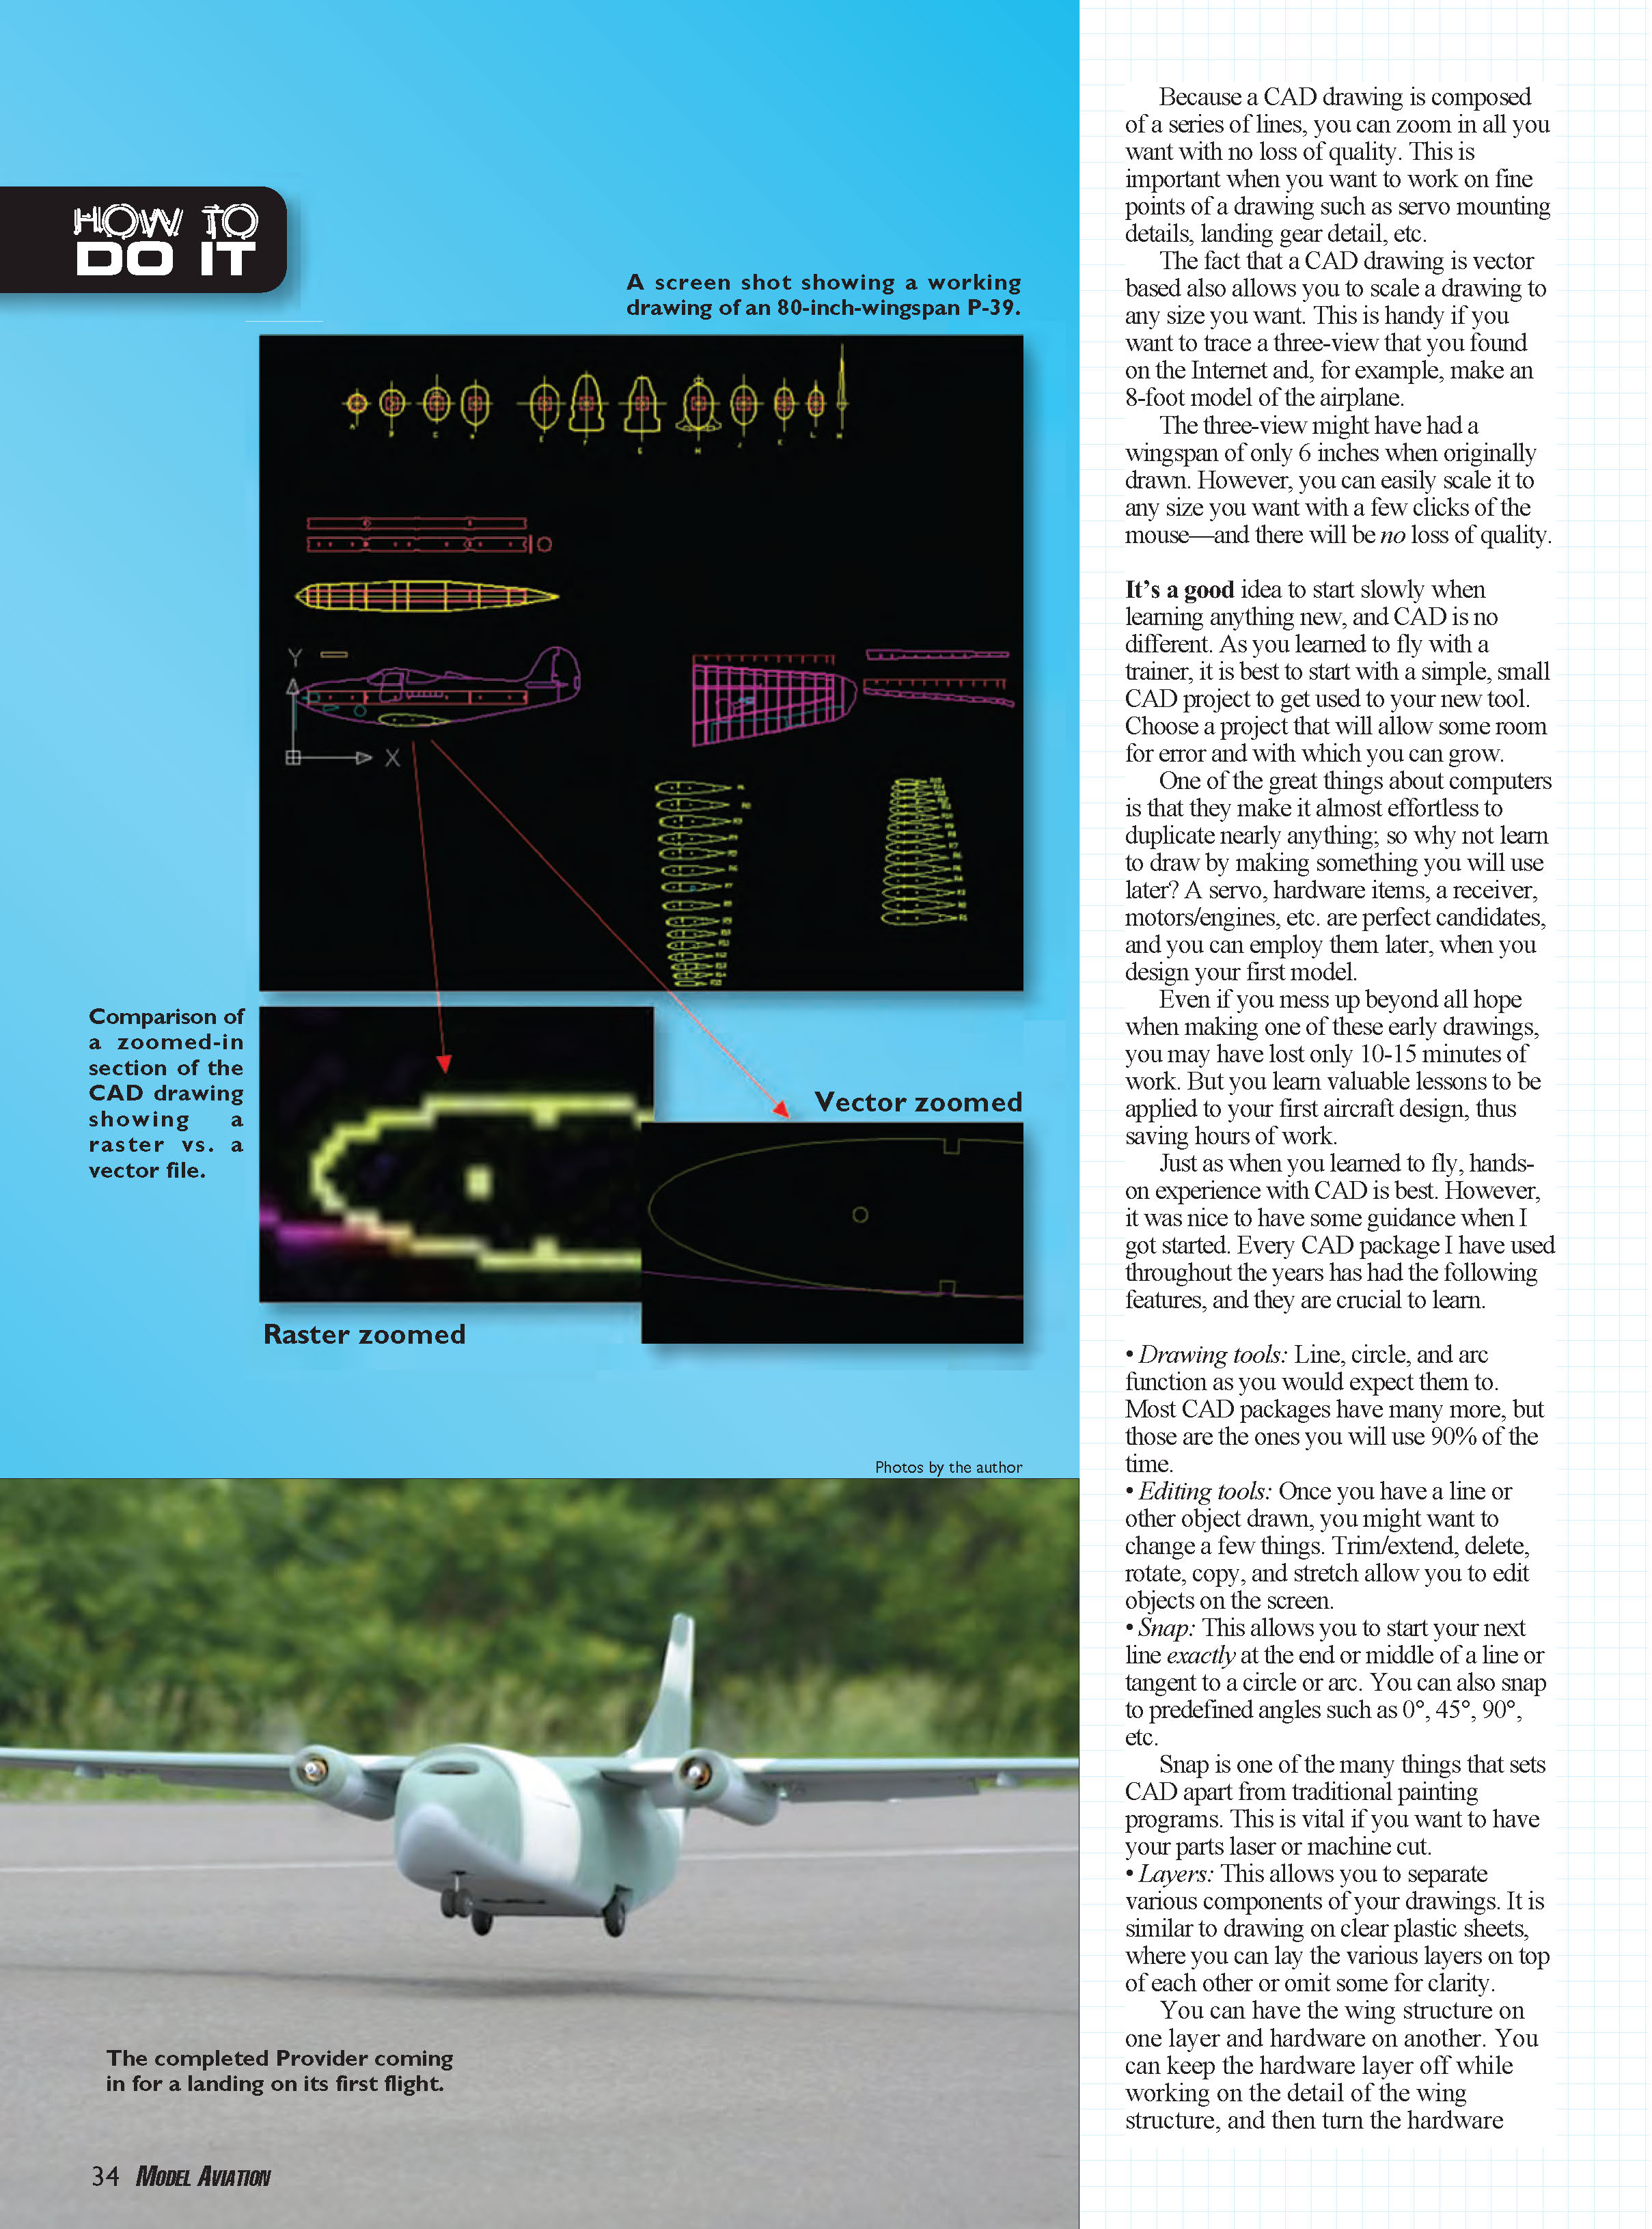
CAD is vector based; that is, the drawing is made from lines and nothing more. Even circles or arcs are composed of many very small line segments.
Photo and painting programs are “raster” images. That simply means that the image from one of these programs is composed of a series of fixed-size squares. That might seem unimportant at first—until you try to zoom in on a raster image.
Most of you have probably tried this at one point. You have a nice picture of your favorite airplane in flight, but it looks like a small dot in the picture. Then you zoom in, and all you have is a larger dot with fuzzy edges.
Because a CAD drawing is composed of a series of lines, you can zoom in all you want with no loss of quality. This is important when you want to work on fine points of a drawing such as servo mounting details, landing gear detail, etc.
The fact that a CAD drawing is vector based also allows you to scale a drawing to any size you want. This is handy if you want to trace a three-view that you found on the Internet and, for example, make an 8-foot model of the airplane.
The three-view might have had a wingspan of only 6 inches when originally drawn. However, you can easily scale it to any size you want with a few clicks of the mouse—and there will be no loss of quality.
It’s a good idea to start slowly when learning anything new, and CAD is no different. As you learned to fly with a trainer, it is best to start with a simple, small CAD project to get used to your new tool. Choose a project that will allow some room for error and with which you can grow.
One of the great things about computers is that they make it almost effortless to duplicate nearly anything; so why not learn to draw by making something you will use later? A servo, hardware items, a receiver, motors/engines, etc. are perfect candidates, and you can employ them later, when you design your first model.
Even if you mess up beyond all hope when making one of these early drawings, you may have lost only 10–15 minutes of work. But you learn valuable lessons to be applied to your first aircraft design, thus saving hours of work.
Just as when you learned to fly, hands-on experience with CAD is best. However, it was nice to have some guidance when I got started. Every CAD package I have used throughout the years has had the following features, and they are crucial to learn.
- Drawing tools: Line, circle, and arc function as you would expect them to. Most CAD packages have many more, but those are the ones you will use 90% of the time.
- Editing tools: Once you have a line or other object drawn, you might want to change a few things. Trim/extend, delete, rotate, copy, and stretch allow you to edit objects on the screen.
- Snap: This allows you to start your next line exactly at the end or middle of a line or tangent to a circle or arc. You can also snap to predefined angles such as 0°, 45°, 90°, etc.
Snap is one of the many things that sets CAD apart from traditional painting programs. This is vital if you want to have your parts laser or machine cut.
- Layers: This allows you to separate various components of your drawings. It is similar to drawing on clear plastic sheets, where you can lay the various layers on top of each other or omit some for clarity.
You can have the wing structure on one layer and hardware on another. You can keep the hardware layer off while working on the detail of the wing structure, and then turn the hardware layer back on to show the final product.
I separate my layers by color so I can better visualize the various objects, but it is not necessary.
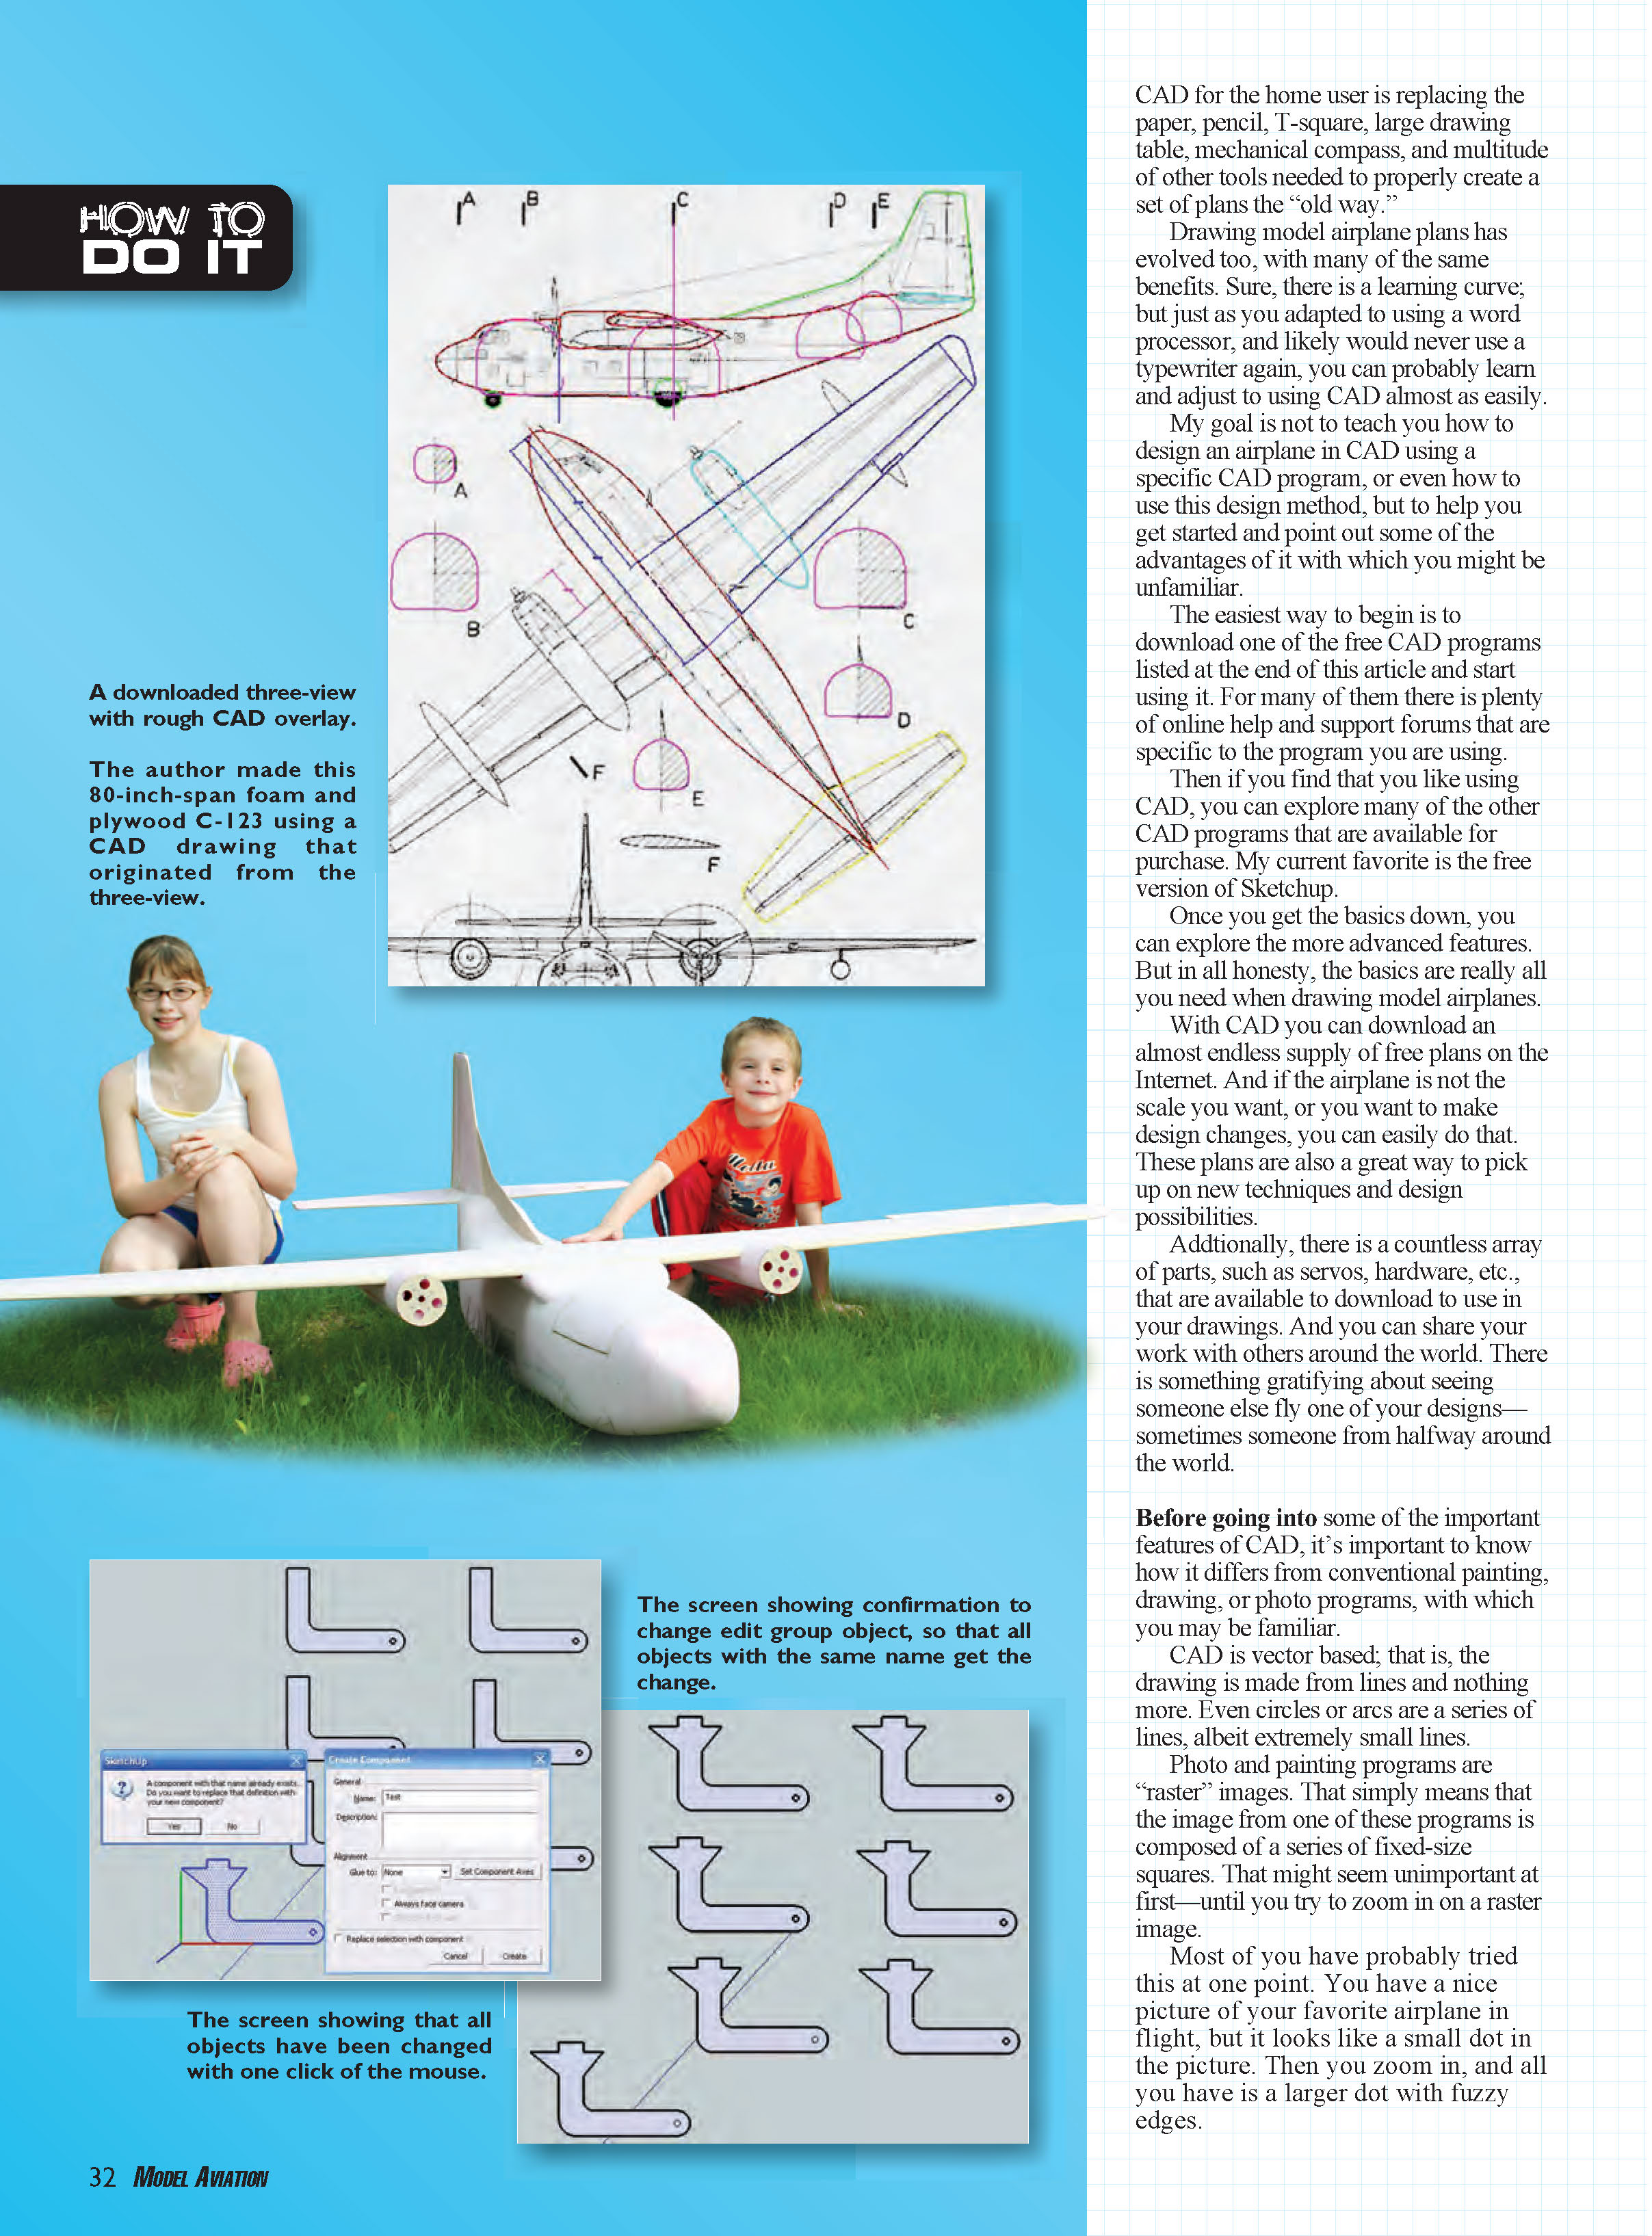
- Groups: This function allows you to group the many lines that comprise an object, such as a servo. Some CAD programs call these "blocks." This lets you copy, move, or rotate the servo as a unit; you don't have to try to select all the individual lines that make up the servo.
Let's keep with the servo example. If you placed six of them on your drawing and later decide to use different servos, all you have to do is redefine the group with the new servo and all servos are changed automatically. Try that with pencil and paper.
- Export to DXF: DXF is a common file type that almost all CAD programs use. Each package has its own proprietary file format, so you will need to export to DXF if you want your parts laser- or machine-cut; almost all shops that offer cutting services accept these kinds of files.
When saving your drawing while working on it, it is best to save in its native format because DXF does not always save all the details of your drawing. If you do not plan on having your parts machine cut, exporting to DXF is not important.
Let's cover printing; after all, what we are after is a set of plans from which to build. Here is where CAD for the home user has its shortcomings.
Each CAD program I have used has its own way of handling printing. Most have a way to tile print with registration marks; that is, your drawing will be produced on your standard home printer on many sheets.
Since printers cannot print to the edge of a sheet of paper, registration marks are printed in the corner of the drawings so you can align all the sheets and tape them together after trimming the margins. This is not as tedious as it sounds, and I have done it quite a few times with great success.
Some CAD programs don't offer printing with registration marks. To deal with this, some aeromodelers export their drawing as full-size PDF files and use the PDF viewer to do the tile printing.
Unfortunately, printing in CAD requires some experimentation to get acceptable results. You could say that printing for the CAD home user needs to evolve a little more.
I am lucky in that I have access to a 48-inch plotter. CAD is designed to work with plotters. Knowing this, I size my drawings accordingly.
Some towns have printing shops that will plot your drawing for a reasonable cost, or maybe you know a friend who has access to a plotter. If you want to submit your drawings to a magazine for publication or have your drawing printed by a local company or friend, it is best to check with them regarding the size that is required.
The AMA Plans Service and the local FedEx/Kinko's require 36-inch drawing heights. Length can be anything you want, but it is best to keep the length less than 60 inches or the plans set becomes too large to use easily.
I hope this article at the very least got you thinking about trying CAD and ultimately has inspired you to draw your own model.
It is important to remember that you will not create a masterpiece the first time you open the program; you probably won't even create a useful drawing the first few times. But stick with it.
Learn how to use the features I mentioned earlier, and build on them each time you work with CAD. Think back to the first time you learned to use a word processor, email program, or made your first model flight. It might have been intimidating at first, but it became second nature before long.
Remember, though, that using a computer to design a model does not guarantee that you will produce a great-flying airplane. That part is also up to you.
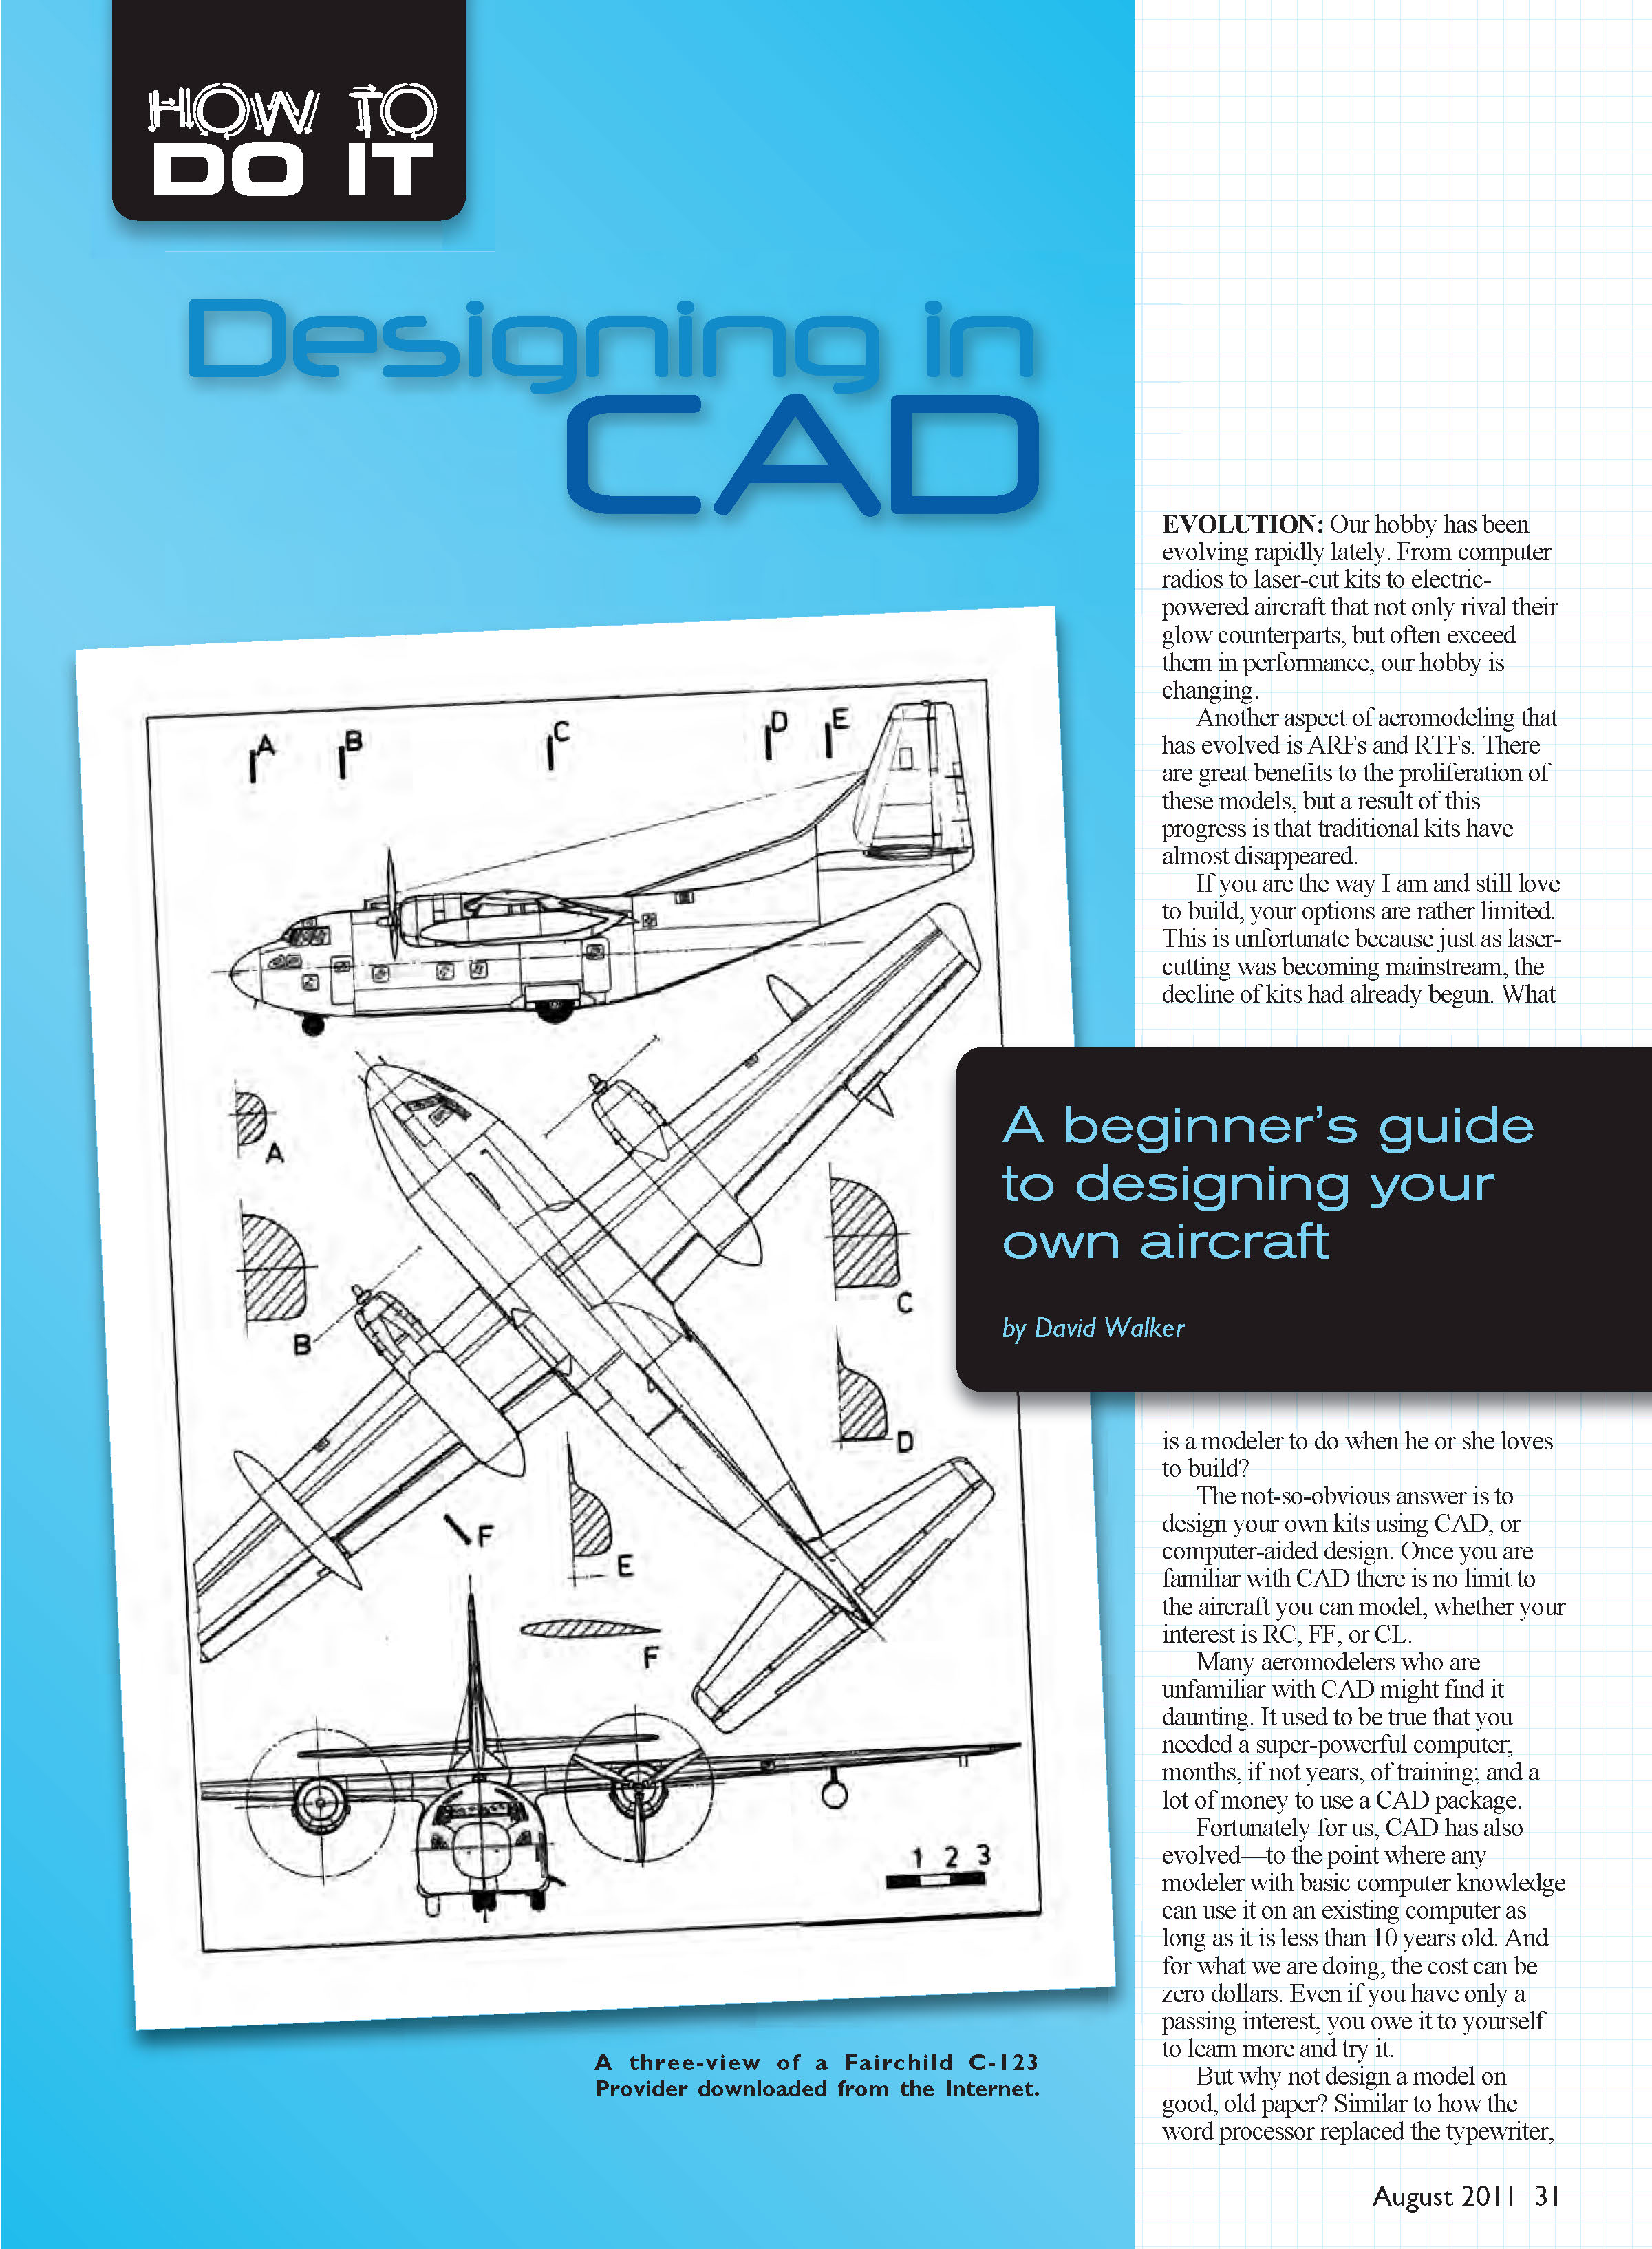
David Walker [email protected]
Sources
- SketchUp: http://sketchup.google.com
Transcribed from original scans by AI. Minor OCR errors may remain.

