
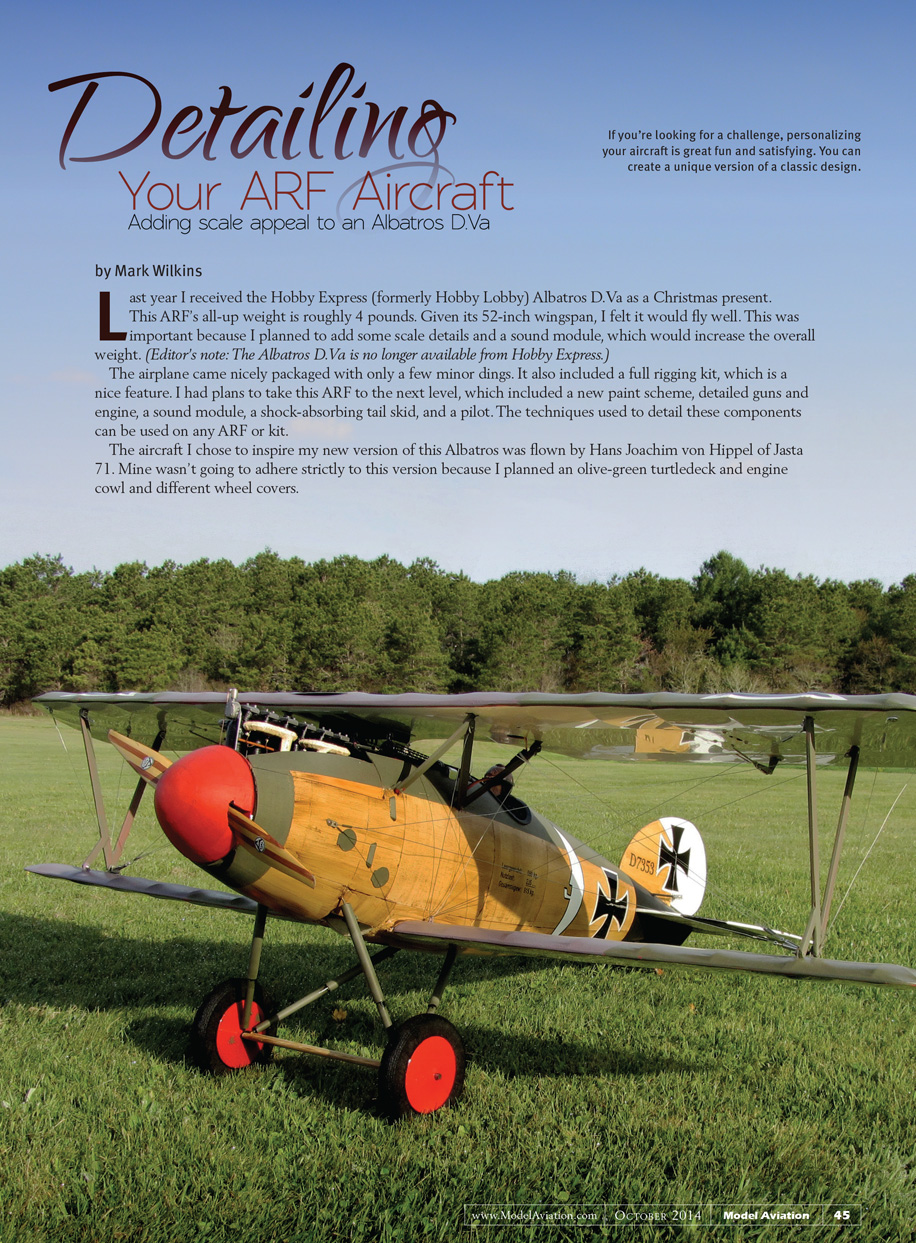
Detailing Your ARF Aircraft
Adding scale appeal to an Albatros D.Va
by Mark Wilkins
Last year I received the Hobby Express (formerly Hobby Lobby) Albatros D.Va as a Christmas present. This ARF's all-up weight is roughly 4 pounds. Given its 52-inch wingspan, I felt it would fly well. That was important because I planned to add some scale details and a sound module, which would increase the overall weight. (Editor's note: The Albatros D.Va is no longer available from Hobby Express.)
The airplane came nicely packaged with only a few minor dings. It also included a full rigging kit, which is a nice feature. I had plans to take this ARF to the next level, which included:
- a new paint scheme
- detailed guns and engine
- a sound module
- a shock-absorbing tail skid
- a pilot figure
The techniques used to detail these components can be applied to any ARF or kit.
The aircraft I chose to inspire my new version of this Albatros was flown by Hans Joachim von Hippel of Jasta 71. Mine did not adhere strictly to that version because I planned an olive-green turtledeck and engine cowl and different wheel covers.
Fuselage
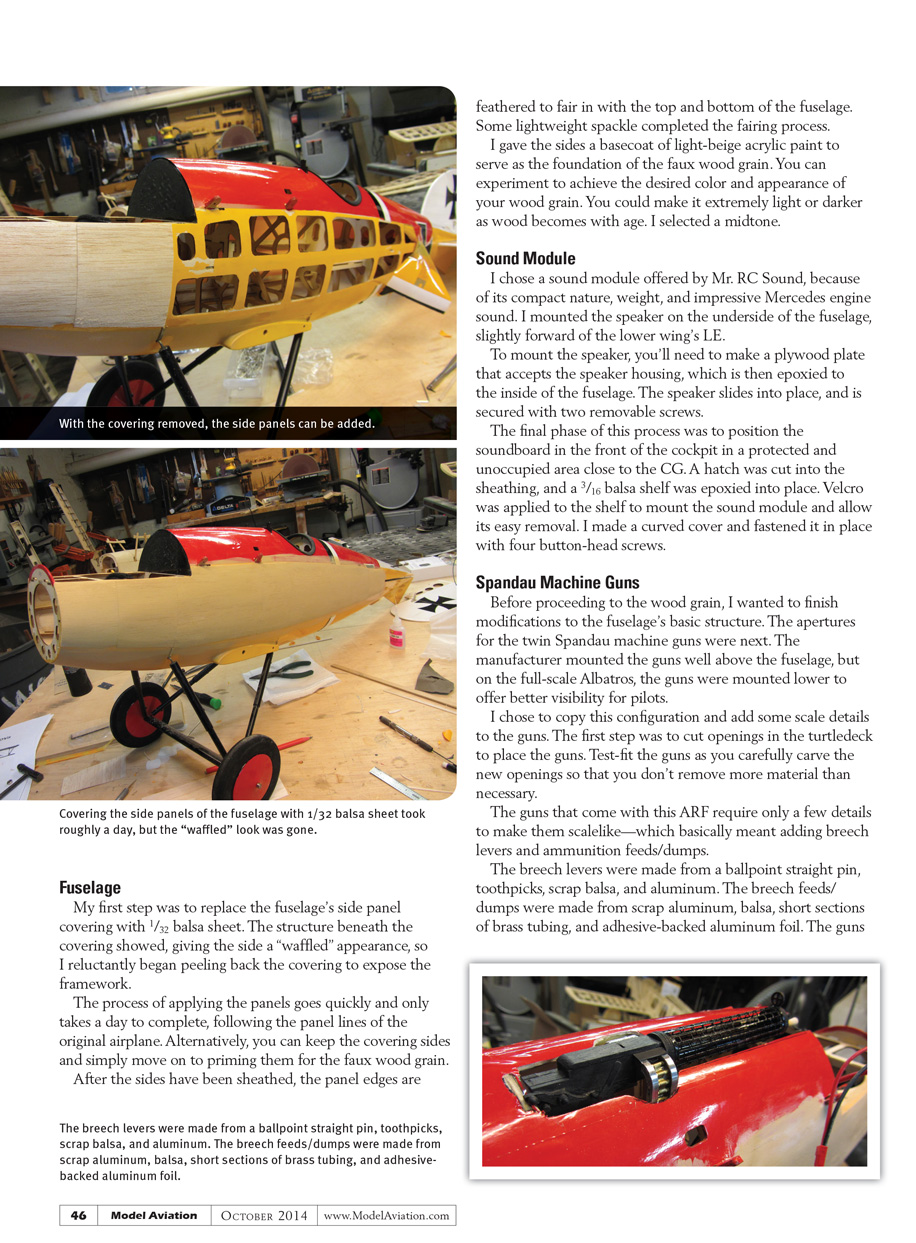
My first step was to replace the fuselage’s side-panel covering with 1/32-inch balsa sheet. The structure beneath the covering showed through, giving the side a “waffled” appearance, so I reluctantly began peeling back the covering to expose the framework.
Applying the panels goes quickly and only takes a day to complete if you follow the panel lines of the original airplane. Alternatively, you can keep the covering sides and simply prime them for the faux wood grain.
After the sides had been sheathed, the panel edges were feathered to fair in with the top and bottom of the fuselage. Some lightweight spackle completed the fairing process.
I gave the sides a basecoat of light-beige acrylic paint to serve as the foundation of the faux wood grain. You can experiment to achieve the desired color and appearance of your wood grain. You could make it extremely light or darker as wood becomes with age; I selected a midtone.
Sound Module
I chose a sound module offered by Mr. RC Sound because of its compact size, weight, and impressive Mercedes engine sound. I mounted the speaker on the underside of the fuselage, slightly forward of the lower wing’s leading edge.
To mount the speaker you’ll need to make a plywood plate that accepts the speaker housing, which is then epoxied to the inside of the fuselage. The speaker slides into place and is secured with two removable screws.
The final phase was to position the soundboard in the front of the cockpit in a protected, unoccupied area close to the CG. A hatch was cut into the sheathing, and a 3/16-inch balsa shelf was epoxied into place. Velcro was applied to the shelf to mount the sound module and allow easy removal. I made a curved cover and fastened it in place with four button-head screws.
Spandau Machine Guns
Before proceeding to the wood grain, I finished modifications to the fuselage’s basic structure. The apertures for the twin Spandau machine guns were next. The manufacturer had mounted the guns well above the fuselage, but on the full-scale Albatros the guns were mounted lower to offer better visibility for pilots.
I chose to copy that configuration and add some scale details to the guns. The first step was to cut openings in the turtledeck to place the guns. Test-fit the guns as you carefully carve the new openings so you don’t remove more material than necessary.
The guns that come with this ARF require only a few details to make them scale-like—basically adding breech levers and ammunition feeds/dumps.
- The breech levers were made from a ballpoint straight pin, toothpicks, scrap balsa, and aluminum.
- The breech feeds/dumps were made from scrap aluminum, balsa, short sections of brass tubing, and adhesive-backed aluminum foil.
They were painted a gunmetal color, antiqued with a black wash, and epoxied into their slots.
Wood Grain
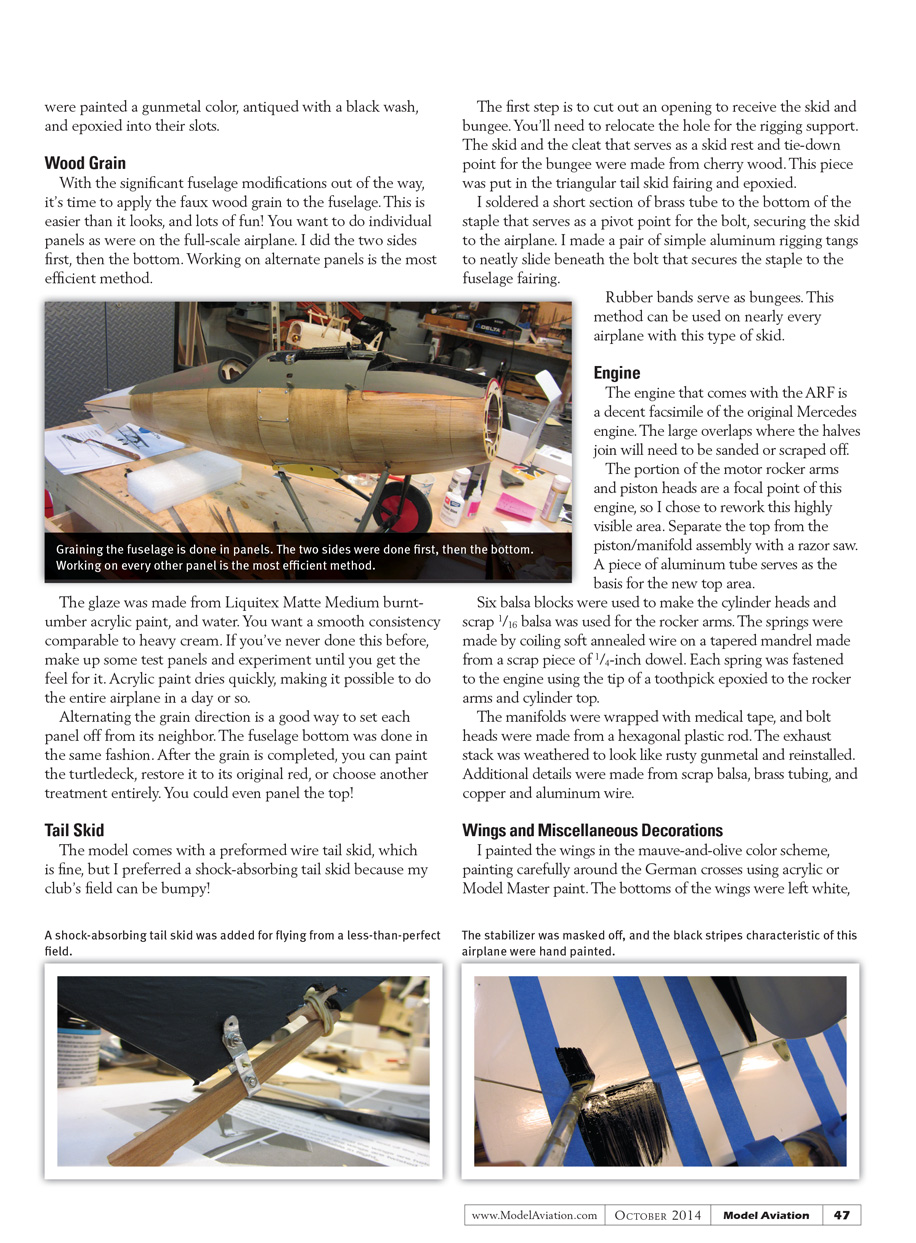
With the significant fuselage modifications out of the way, it was time to apply the faux wood grain to the fuselage. This is easier than it looks and lots of fun! You want to do individual panels as on the full-scale airplane. I did the two sides first, then the bottom. Working on alternate panels is the most efficient method.
The glaze was made from Liquitex Matte Medium, burnt-umber acrylic paint, and water. You want a smooth consistency comparable to heavy cream. If you’ve never done this before, make up some test panels and experiment until you get the feel for it. Acrylic paint dries quickly, making it possible to do the entire airplane in a day or so.
Alternating the grain direction is a good way to set each panel off from its neighbor. The fuselage bottom was done in the same fashion. After the grain is completed, you can paint the turtledeck, restore it to its original red, or choose another treatment entirely. You could even panel the top.
Tail Skid
The model comes with a preformed wire tail skid, which is fine, but I preferred a shock-absorbing tail skid because my club’s field can be bumpy.
The first step is to cut out an opening to receive the skid and bungee. You’ll need to relocate the hole for the rigging support. The skid and the cleat that serves as a skid rest and tie-down point for the bungee were made from cherry wood. This piece was put in the triangular tail-skid fairing and epoxied.
I soldered a short section of brass tube to the bottom of the staple that serves as a pivot point for the bolt securing the skid to the airplane. I made a pair of simple aluminum rigging tangs to neatly slide beneath the bolt that secures the staple to the fuselage fairing.
Rubber bands serve as bungees. This method can be used on nearly every airplane with this type of skid.
Engine
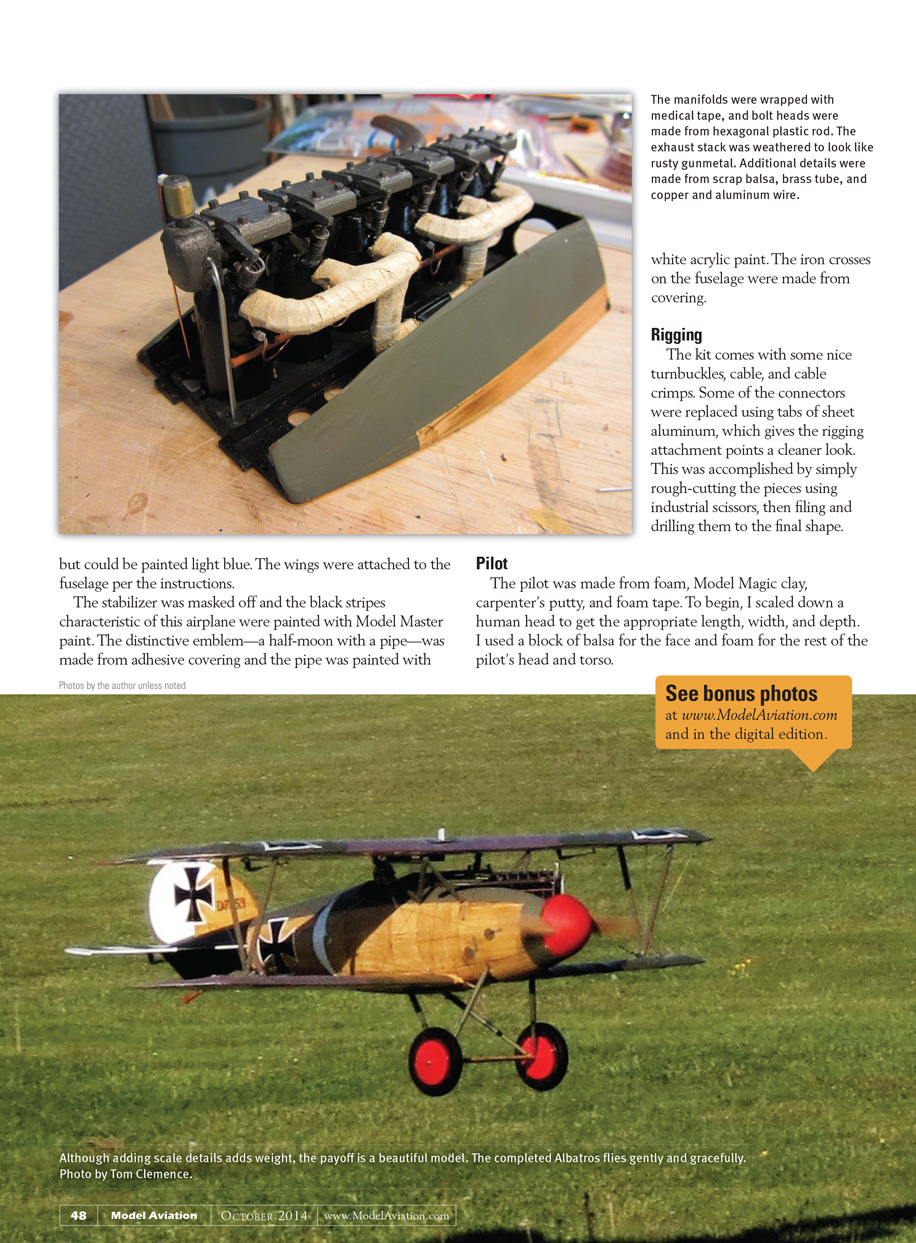
The engine that comes with the ARF is a decent facsimile of the original Mercedes engine. The large overlaps where the halves join will need to be sanded or scraped off. The rocker arms and piston heads are a focal point of this engine, so I chose to rework this highly visible area.
Separate the top from the piston/manifold assembly with a razor saw. A piece of aluminum tube serves as the basis for the new top area.
Six balsa blocks were used to make the cylinder heads and scrap 1/16-inch balsa was used for the rocker arms. The springs were made by coiling soft annealed wire on a tapered mandrel made from a scrap piece of 1/4-inch dowel. Each spring was fastened to the engine using the tip of a toothpick epoxied to the rocker arms and cylinder top.
The manifolds were wrapped with medical tape, and bolt heads were made from a hexagonal plastic rod. The exhaust stack was weathered to look like rusty gunmetal and reinstalled. Additional details were made from scrap balsa, brass tubing, and copper and aluminum wire.
Wings and Miscellaneous Decorations
I painted the wings in the mauve-and-olive color scheme, painting carefully around the German crosses using acrylic or Model Master paint. The bottoms of the wings were left white.
The stabilizer was masked off, and the black stripes characteristic of this airplane were hand painted.
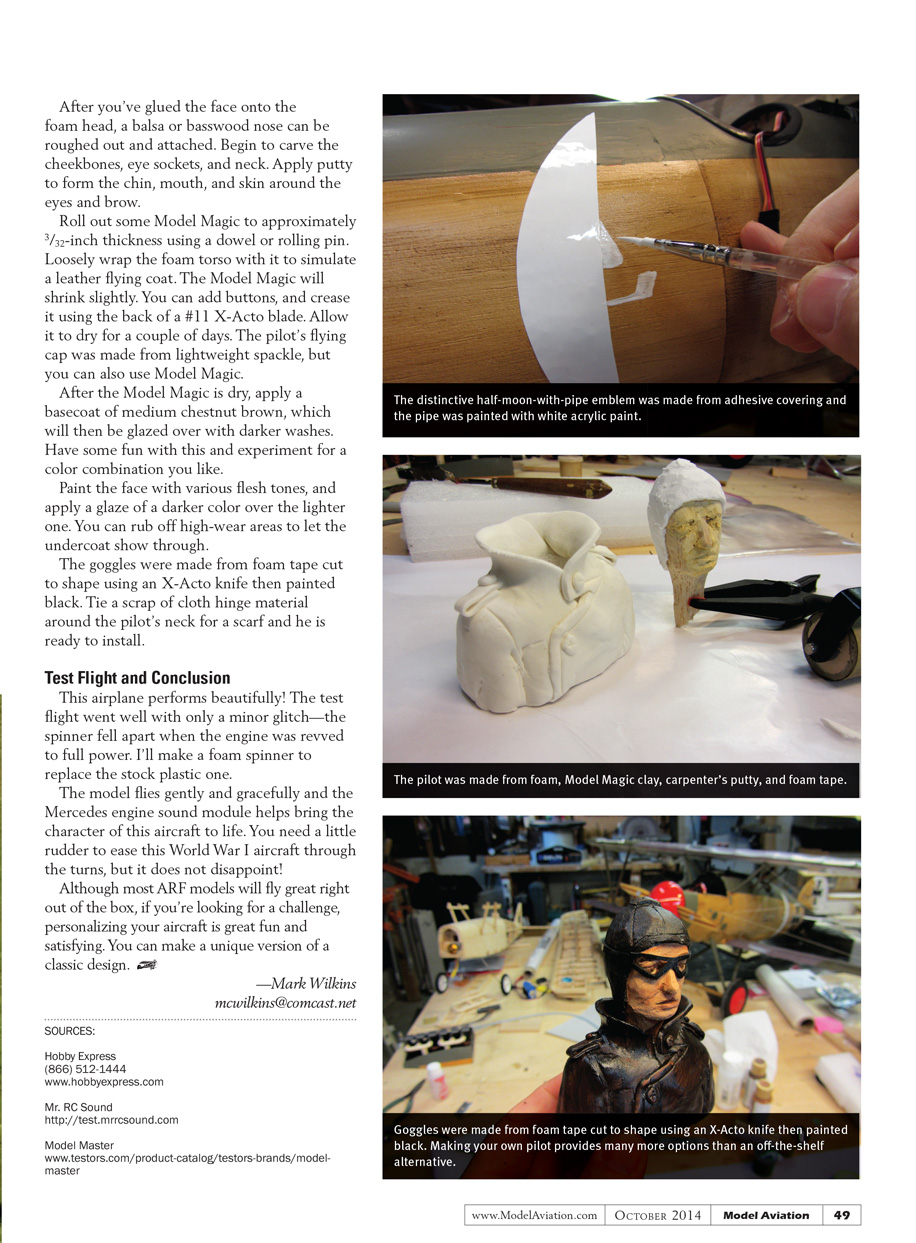
The distinctive emblem—a half-moon with a pipe—was made from adhesive covering and the pipe was painted with white acrylic paint. The iron crosses on the fuselage were made from covering but could be painted light blue. The wings were attached to the fuselage per the instructions.
Rigging
The kit comes with some nice turnbuckles, cable, and cable crimps. Some of the connectors were replaced using tabs of sheet aluminum, which gives the rigging attachment points a cleaner look. This was accomplished by rough-cutting the pieces with industrial scissors, then filing and drilling them to the final shape.
Pilot
The pilot was made from foam, Model Magic clay, carpenter's putty, and foam tape. To begin, scale down a human head to get the appropriate length, width, and depth. I used a block of balsa for the face and foam for the rest of the pilot’s head and torso.
After you glue the face onto the foam head, a balsa or basswood nose can be roughed out and attached. Begin to carve the cheekbones, eye sockets, and neck. Apply putty to form the chin, mouth, and skin around the eyes and brow.
Roll out some Model Magic to approximately 3/32-inch thickness using a dowel or rolling pin. Loosely wrap the foam torso with it to simulate a leather flying coat. The Model Magic will shrink slightly. You can add buttons and crease it using the back of a #11 X-Acto blade. Allow it to dry for a couple of days. The pilot's flying cap was made from lightweight spackle, but you can also use Model Magic.
After the Model Magic is dry, apply a basecoat of medium chestnut brown, which can then be glazed over with darker washes. Experiment for a color combination you like.
Paint the face with various flesh tones, and apply a glaze of a darker color over the lighter one. You can rub off high-wear areas to let the undercoat show through.
The goggles were made from foam tape cut to shape with an X-Acto knife, then painted black. Tie a scrap of cloth hinge material around the pilot's neck for a scarf, and he is ready to install.
Test Flight and Conclusion
This airplane performs beautifully! The test flight went well with only a minor glitch—the spinner fell apart when the engine was revved to full power. I'll make a foam spinner to replace the stock plastic one.
The model flies gently and gracefully, and the Mercedes engine sound module helps bring the character of this aircraft to life. You need a little rudder to ease this World War I aircraft through turns, but it does not disappoint.
Although most ARF models will fly great right out of the box, if you're looking for a challenge, personalizing your aircraft is great fun and very satisfying. You can make a unique version of a classic design.
—Mark Wilkins [email protected]
SOURCES
- Hobby Express (866) 512-1444 www.hobbyexpress.com
- Mr. RC Sound http://www.mrcsound.com
- Model Master www.testors.com/product-catalog/testors-brands/model-master
Transcribed from original scans by AI. Minor OCR errors may remain.

