
Update on the Franken-Evo
Greg Gimlick | [email protected]
TAKING OFF: This month I'll update you on my converted Multiplex Royal Evo 12 radio and then look at some terms we run into when dealing with ESCs. That's a lot for one column, so let's get going.
"Spektrumized" Evo, aka Franken-Evo
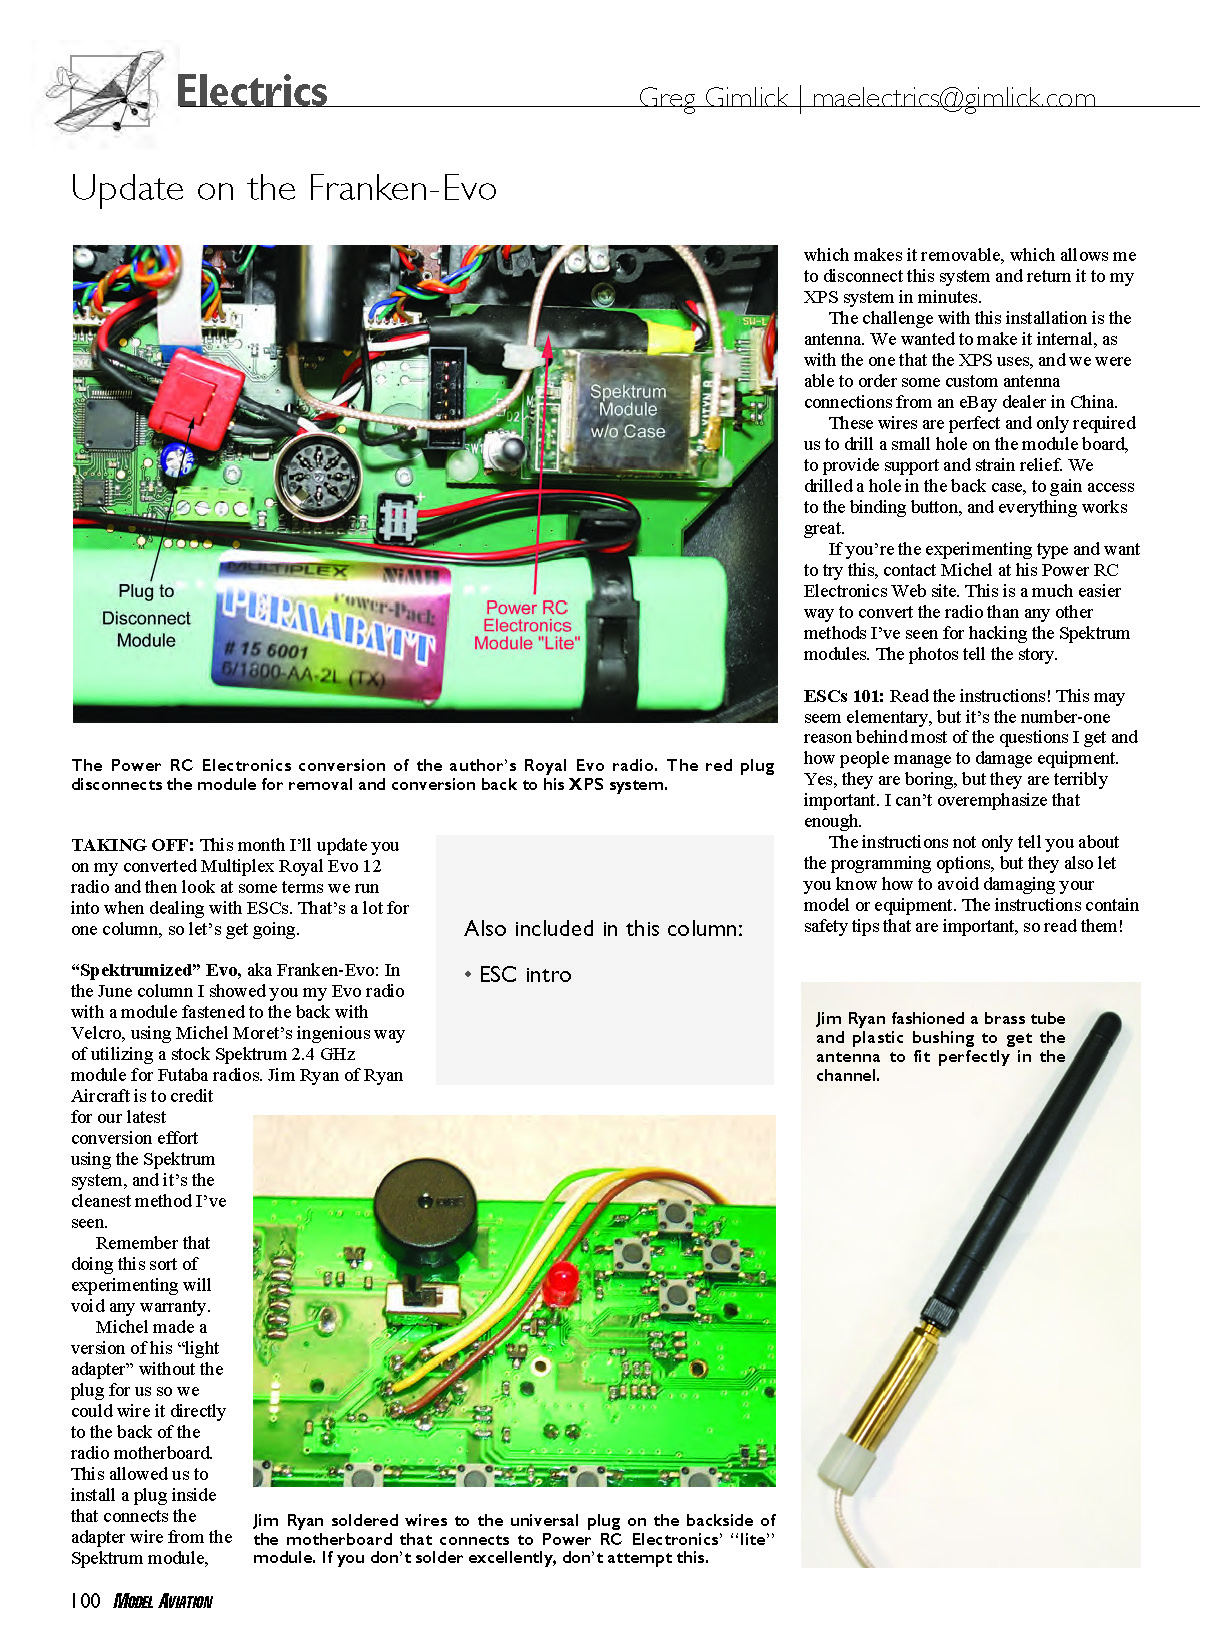
In the June column I showed my Evo radio with a module fastened to the back with Velcro, using Michel Moret's ingenious way of utilizing a stock Spektrum 2.4 GHz module for Futaba radios. Jim Ryan of Ryan Aircraft is to credit for our latest conversion effort using the Spektrum system, and it's the cleanest method I've seen. Remember that doing this sort of experimenting will void any warranty.
Michel made a version of his "lite adapter" without the plug for us so we could wire it directly to the back of the radio motherboard. This allowed us to install a plug inside that connects the adapter wire from the Spektrum module, making it removable and letting me disconnect this system and return it to my XPS system in minutes.
The challenge with this installation is the antenna. We wanted to make it internal, as with the one that the XPS uses, and we were able to order some custom antenna connections from an eBay dealer in China. These wires are perfect and only required us to drill a small hole on the module board to provide support and strain relief. We drilled a hole in the back case to gain access to the binding button, and everything works great. If you're the experimenting type and want to try this, contact Michel at his Power RC Electronics web site. This is a much easier way to convert the radio than other methods I've seen for hacking the Spektrum modules. The photos tell the story.
ESCs 101
Read the instructions! This may seem elementary, but it's the number-one reason behind most of the questions I get and how people manage to damage equipment. Yes, they are boring, but they are terribly important. I can't overemphasize that enough.
The instructions not only tell you about the programming options, but they also let you know how to avoid damaging your model or equipment. The instructions contain safety tips that are important, so read them!
Safety first
Never trust an armed controller. Controllers are smarter and safer than ever, but I always treat them as if they are about to start. Whether they have arming switches or not, I treat them the same way. Never leave a motor battery plugged into a controller, even if it has an arming switch. There will be a slight current drain that will eventually kill your battery, so remove the battery each time you finish flying.
The Big Myth
Many fliers still believe they can use a smaller controller than is actually required because they don't plan to run the motor at full throttle all the time. If the system draws 40 amps at full throttle and they know the model flies fine at half throttle, they assume that a 25-amp controller will work. Wrong!
At the most basic level, an ESC is nothing more than a switch. The controller is either full on or off all the time. The secret is that it turns on and off thousands of times per second; the time it's on or off varies by throttle position. All the way off means no power is being sent to the motor; all the way on means power is being sent. Any throttle position between off and on means the ESC is switching on and off to achieve the power required for that position.
Why do we care? Because if your system draws 40 amps at full throttle, it also draws 40 amps at partial throttle — it's just for microseconds at a time. It's still 40 amps, so you can't expect a controller rated at 25 amps to handle the setup even at half throttle.
Basic Settings
Controllers have a myriad of features that can be changed to optimize your system. Some you will use and others you will disable. In most cases, your controller will come with factory defaults that will be okay for 90% of user applications. Below are the most common elements:
- Brake Setting:
Most controllers let you decide if you want a brake set or not. It can be set to "on" if you want your propeller to stop when you reduce your throttle to idle/off. This is mostly used for folding propellers, but some fliers like to stop their model’s propeller for better glide with the motor off, even if it’s not a folding type.
There are settings for soft brake, hard brake, and no brake. The default for most manufacturers is no brake or soft brake, but read the instructions. Some Jeti controllers default to full brake. If you’re flying a helicopter, make sure the brake is set to "off."
- Low-Voltage Cutoff:
This feature ensures you don’t damage your Li-Poly pack by drawing the voltage too low during a flight. The default on most controllers is “auto,” and most of the time that is fine.
Various brands use different methods to determine the cutoff, but the standard is somewhere near 70%–75% of the voltage level detected when first armed. This is important because if you fly more than one flight on a pack without recharging between flights, the controller may misinterpret the number of cells and therefore allow the voltage to drop too low.
Example: A three-cell Li-Poly pack is fully charged at 12.6 volts (nominal 11.1 V). If the ESC detects 12.6 V when armed and sets cutoff at 75%, the cutoff is 12.6 × 0.75 = 9.45 V (about 3.15 V per cell). If you reconnect the same pack later without charging and it reads 11.5 V at arming, the ESC would set cutoff at 11.5 × 0.75 = 8.63 V (about 2.88 V per cell), which is too low for a three-cell pack.
Check your ESC's instructions. Some set for 3.0 V per cell and give a tone upon arming that indicates how many cells the ESC thinks are in your pack. Verify that it is correct before flying. Some controllers allow you to override the auto setting and select a minimum discharge voltage. Always fly with a freshly charged pack so the controller has the best chance of properly identifying the cell count.
- Cutoff Mode:
Most controllers let you choose whether you want a hard or soft cutoff when the minimum voltage is reached. A hard cutoff means your motor will stop when the voltage is reached. A soft cutoff means the motor will pulse on and off to let you know it's time to land. When this happens, you can often reduce your throttle to idle for a second and then return to normal operation long enough to get the model on the ground. Don't abuse this ability — it is meant to give you power to avoid a dead-stick landing.
- Startup Mode:
This defines how the motor starts when you open the throttle. The choices are generally "normal," "soft start," and "super soft start," or similar. Normal is usually the default and fine for most airplanes. If you're flying an aircraft with a gearbox, you might select soft to make it easier on the gears and motor when it starts. For helicopters you will want a very soft start most of the time to reduce strain on the main gear while the motor attempts to get the rotor blades started; using normal on a helicopter can often strip a gear.
- Timing:
Timing causes more questions than a paragraph or two can answer. The default for most ESCs is "standard" or "medium." Unless you really want to get into motor theory and optimize for competition, you're safe leaving this alone. The instructions will provide notes if you have a problem with your motor running roughly. With a park flyer, chances are you won't use a motor that requires special timing. Some ESCs will instruct you to set it to "high" on certain outrunners.
- PWM Switching Frequency:
Stick with factory defaults unless there is a problem. If you encounter an issue, check the instructions or contact technical support. This figure represents the number of times per second a pulse is sent to the motor, typically between about 8,000 and 32,000 Hz.
- Operating Mode:
Some controllers let you select a preprogrammed set of parameters such as "airplane," "glider," or "helicopter." When choosing one of these modes, the ESC will load preset features to optimize that application. Choosing "helicopter" often activates a governor mode to help with throttle/collective coordination and uses the softest start mode. The "glider" mode usually sets a hard brake, assuming you're using a folding propeller.
One Last Thing: I get many questions about how to connect the three wires to the motors. It's easy — it doesn't matter which order. Hook up the wires in any order. If the motor runs backward, swap any two wires. You won't hurt anything. Some ESCs also let you reverse the motor's direction in programming.
One More Last Thing
I talked to Tim Dawson of Approach Engineering about his all-balsa scale helicopter kits. He bought the company after James Linder died last year and has been tooling up for full production. I'm happy to report that Tim is in full gear now, and kits are available in all sizes from Starwood Scale Models. His Dawson's Approach Engineering web site is also in full swing.
These are high-quality, laser-cut kits into which you can drop several 30-size helicopter mechanics. There is also a new 60-size Cobra out for those who like larger scale models. I've built the eCobra and will be constructing the Apache soon. Check them out!
Tim donates a portion of all proceeds to a fund for James Linder's three sons. That's class worth supporting.
Final Approach
We can do so much with our ESCs because of their program options. There are multiple ways to change the settings, but I prefer the external-devices-to-the-transmitter method. It's easier, and you can see all the options without having to count beeps and move the throttle stick. I'll show you some of these later. MA
Sources:
- Michel Moret — Power RC Electronics
[email protected] www.power-rc-electronic.com
- Ryan Aircraft
(513) 729-3323 http://home.fuse.net/ryan/
- Starwood Scale Models
(650) 851-9027 www.starwoodmodels.com
- Dawson's Approach Engineering
220 W. Mariposa Ave. Ridgecrest, CA 93555 www.approachengineering.com
Transcribed from original scans by AI. Minor OCR errors may remain.

