
The Engine Shop
212 S. Pine Ave., Ozark, AL 36360
Correction
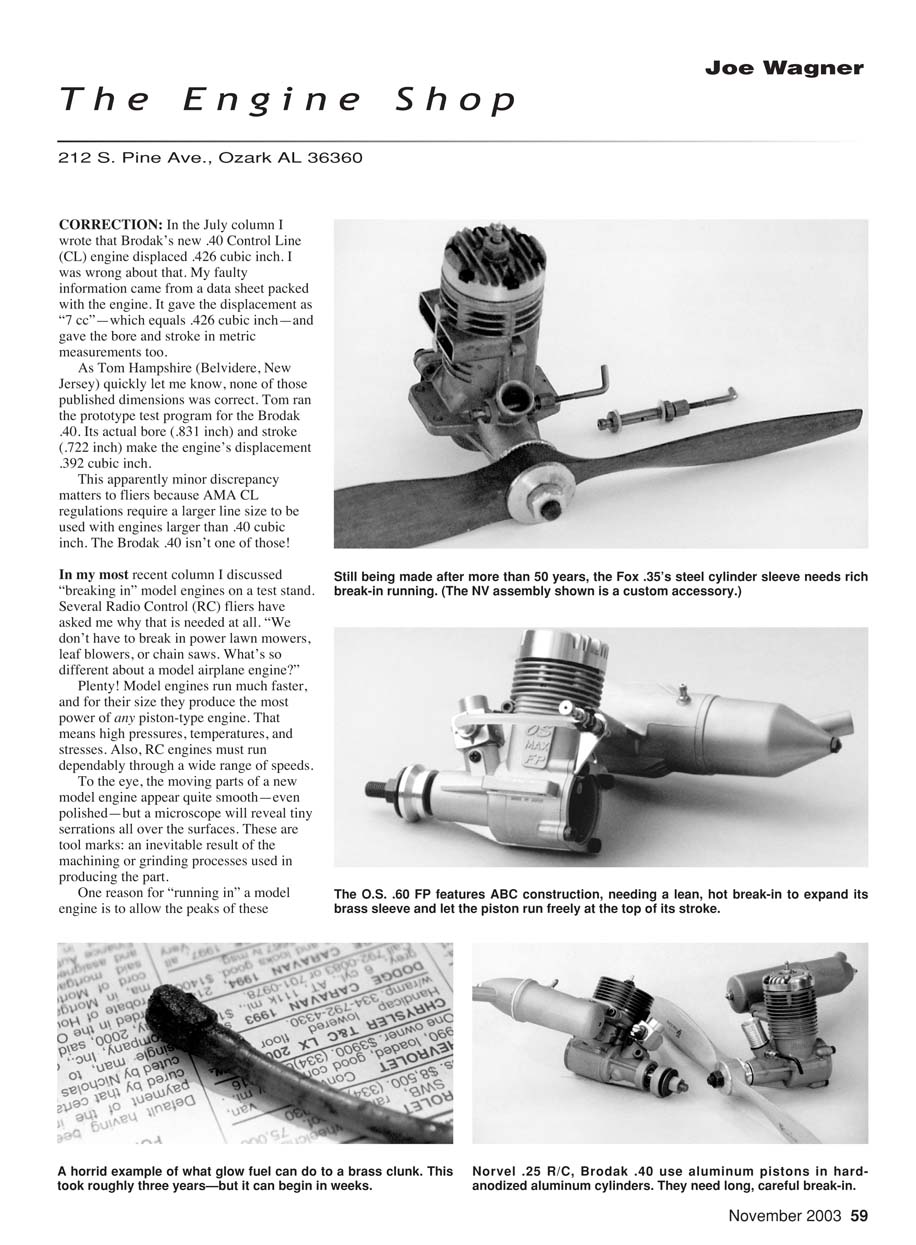
In the July column I wrote that Brodak's new .40 Control Line (CL) engine displaced .426 cubic inch. I was wrong. My faulty information came from a data sheet packed with the engine. It gave the displacement as "7 cc"—which equals .426 cubic inch—and gave the bore and stroke in metric measurements too.
As Tom Hampshire (Belvidere, New Jersey) quickly let me know, none of those published dimensions was correct. Tom ran the prototype test program for the Brodak .40. Its actual bore (.831 inch) and stroke (.722 inch) make the engine's displacement .392 cubic inch.
This apparently minor discrepancy matters to fliers because AMA CL regulations require a larger line size to be used with engines larger than .40 cubic inch. The Brodak .40 isn't one of those!
Why break in model engines?
In my most recent column I discussed "breaking in" model engines on a test stand. Several Radio Control (RC) fliers have asked why that is needed at all. "We don't have to break in power lawn mowers, leaf blowers, or chain saws. What's so different about a model airplane engine?"
Plenty. Model engines run much faster and, for their size, produce the most power of any piston-type engine. That means high pressures, temperatures, and stresses. Also, RC engines must run dependably through a wide range of speeds.
To the eye, the moving parts of a new model engine appear quite smooth—even polished—but a microscope will reveal tiny serrations all over the surfaces. These are tool marks: an inevitable result of the machining or grinding processes used in producing the part.
One reason for "running in" a model engine is to allow the peaks of these microscopic tool marks to slowly wear away as the parts move in contact with each other—or to "burnish" the tiny metal crests down into the valleys. Materials used in the engine make a difference:
- If the cylinder bore is soft steel (as in Cox and most Fox engines), a burnishing effect during break-in is preferable to "wear-away." Burnishing results in a much lower coefficient of friction between the running surfaces and produces few metal particles, which can be abrasive.
- Hardened cylinder bores—chrome-plated, hard-anodized, or case-hardened—make burnishing difficult. The surface isn't ductile enough, so the tool-mark peaks must wear down during break-in. Fortunately, ten-thousandths of an inch or so of wear is usually sufficient.
An even more important action takes place during break-in: dimensional stabilization. New cylinders and pistons can contain trapped stresses produced by manufacturing processes. During break-in, combustion heat expands these parts and lets the trapped stresses dissipate. When the engine cools after running, the piston and cylinder tend to return to their original size—but not quite. The relaxed stresses cause minute dimensional changes, which then need additional breaking-in to achieve optimum running clearances. That's why it's best—and fastest—to break in a model engine via a series of short runs, allowing a complete cooldown after each. The repeated heating/cooling cycles will gradually bring the moving parts into their ideal low-running-friction status.
Most model engines with hardened cylinder bores feature a "pinch" between the piston and cylinder at the top of the stroke to compensate for the expansion that combustion heat produces.
In the chrome-plated brass cylinder sleeves of Aluminum Brass Chrome (ABC) engines, the combination of heat and high pressure during the power stroke will permanently, slightly expand the upper part of the sleeve. That frees up the pinch but requires rather fast, hot operation during break-in. Rich running is fine for breaking in engines with soft steel cylinders—but it won't allow a new ABC engine to get hot enough to do much good.
Norvel engines and special break-in procedures
The Norvel engines, with their AAO (Aluminum Aluminum Oxide) piston cylinders, are another story. Chuck Morrow (Anniston, Alabama) was surprised by the unique break-in instructions that came with his new Norvel .061 RC engine. They call for removing the glow plug, coating the cylinder/piston with castor or car-engine oil, then letting that oil film "cure" for 24 hours with the piston at the bottom of its stroke.
After that, the Norvel instructions want you to put a propeller on the shaft and rapidly turn the engine over backward at least 100 times. (As Chuck learned, rotating the new engine's propeller counterclockwise in the usual way causes the propeller nut to loosen.) Continue this backward rotation until the piston feels reasonably free in the cylinder, then reinstall the glow plug and begin running the engine.
The instructions for my similarly constructed Norvel .15 and .25 RC engines aren't as elaborate. However, I learned that the factory-recommended break-in of 15 minutes wasn't enough; it took more than an hour of total run time before either engine would idle dependably.
That is because of the one-piece cylinder design. It makes for highly effective cooling while the engine runs, which is good, but it reduces the bore's expansion. Also, the stiffening effect of the fins (acting like barrel hoops) restricts the cylinder bore from expanding much. That means it takes a great deal of break-in running before the Norvels reach peak performance. After that, they're superb.
Brass fuel tubing corrosion
In a recent column I wrote about catalytic reaction between brass and glow fuel. An Atlanta, Georgia, reader (who asked me not to use his name) mailed me a horribly corroded brass clunk and wrote:
"You were right about brass clunks! This one came out of the tank in my 3-year-old Seniorita. I haven't had time to fly that as much as I want, and between flights the airplane's been hanging nose-up on my garage wall. Yeah, I empty the tank each time I fly. But I guess enough fuel stays in there to cause this kind of mess."
I've seen other examples of brass corrosion, although none were quite that bad. In one of my RC tanks the fuel-outlet tube broke from internal corrosion, and I've heard from other fliers who have suffered similar problems. That's why I have quit using brass fuel tubing.
Rigid plastic fuel tubing for automobiles was available in "model sizes" a while ago. I used that and liked it, but I haven't been able to find it lately at any of the auto-parts dealers around here.
Therefore, I checked with one of my favorite mail-order "model hardware" suppliers: Small Parts, Inc. (www.smallparts.com). It carries stainless-steel tubing: 1/8-inch-diameter, annealed 304 alloy. It's not cheap, at roughly $4–$5 a foot depending on how much you buy, but it will last forever in any kind of model fuel, and it won't catalyze methanol into rust-inducing acetic acid the way brass can.
(Small Parts, Inc. is the place to find almost anything in the way of model-size hardware, such as screws, genuine music wire, tools, and tubing. A comprehensive catalog is free for the asking.)
Have you had trouble starting your engine with a Hot-Shot type of glow-plug igniter?
If so, the most likely reason is that the battery wasn't getting the plug hot enough. Here's why.
This kind of glow igniter is usually powered by a C-size Ni-Cd cell. The nominal capacity of that runs at approximately 1500 milliampere-hours (mAh); that is, 1.5 ampere-hours worth of power. Glow plugs normally need roughly 3 amperes for optimum heat. So a 1.5-ampere-hour battery ought to light the plug nicely for a half-hour, right? That's plenty of time to start an engine!
Theoretically, yes. But it's not that simple:
- Ni-Cd batteries are rated at lower current drains than 1 ampere. At much higher drains, their power-delivery ability is substantially lower.
- Ni-Cd cell ratings are for new, properly charged batteries. Glow igniters seldom meet those criteria—especially "properly charged." It takes 14 hours for the typical plug-into-the-wall battery charger to recharge a fully depleted Hot-Shot-type cell. After that, excessive overcharging can cause irreversible chemical changes that reduce the Ni-Cd's capacity. And most modelers (including me) tend to forget how long they have left their Hot-Shot igniters "on charge." Sometimes that can be for days.
The result of these detrimental factors can be a glow igniter that adequately heats the plug for only a few minutes. The element may still get hot enough to let the engine fire occasionally—but not quite hot enough for a fast and dependable start.
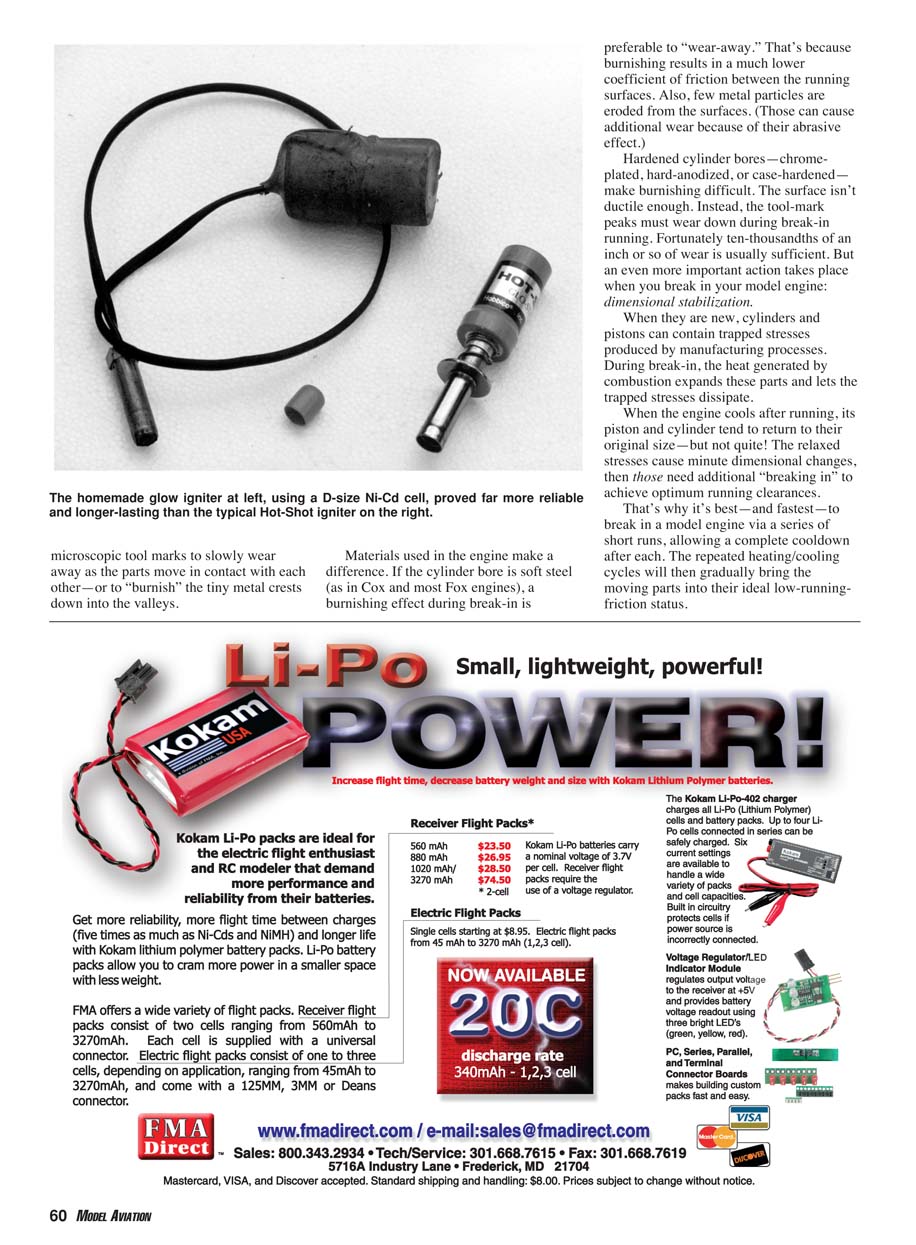
My solution is to replace the Hot-Shot with an industrial-type D-size Ni-Cd cell. (At www.megabatteries.com you can buy a 5000 mAh Ni-Cd D cell for approximately $7.)
- I soldered one end of a lamp cord to the cell terminals and the other end to a plug connector.
- I lashed the lamp cord tightly to the cell with a few turns of Dacron cord, then I dipped the cell in a container of red "tool-handle compound." It's foolproof and an excellent electrical insulator.
- I use the wall charger that came with my Hot-Shot to recharge the D cell. That cell's capacity is high enough to eliminate overcharging worries. Mine is almost 10 years old and still works nicely.
Transcribed from original scans by AI. Minor OCR errors may remain.

