
Extreme RC Renovation - 2010/02
by R.A. Benjamin
Introduction: the crash and the offer
Not long ago I was at my usual hangout — the Puget Sound Silent Flyers’ field near Olympia, Washington — wondering which airplane to fly next, when a guest flier pulled a cute little North American AT-6 ARF out of his car. As a Scale pilot, I have always had a soft spot for that model.
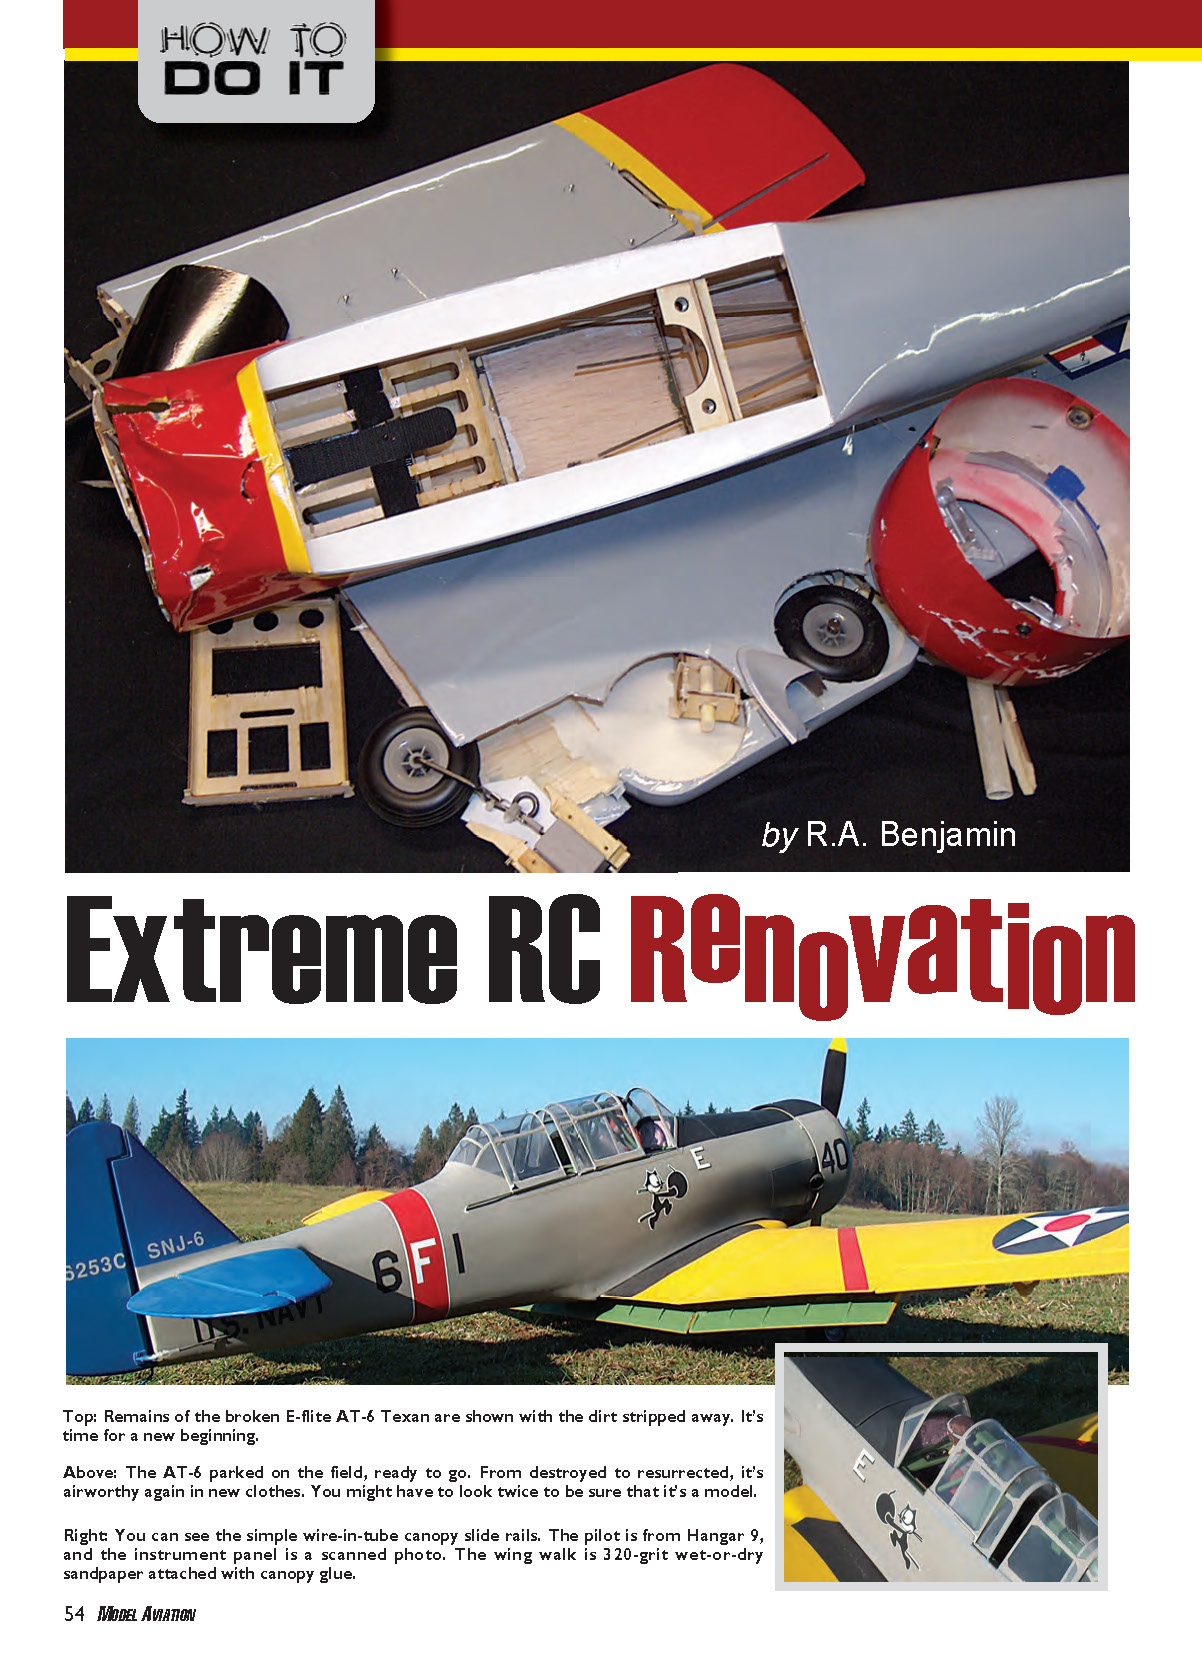
He had trouble keeping it under control and, before I could get out to the flightline to offer help, that difficulty turned into real trouble. The little 1/9-scale (54-inch wingspan) AT-6 is a good sport-scale warbird but not a trainer. By the time I got a good look at the carnage, he had tossed the remains in the pit area and started stripping out the receiver and servos. The motor and ESC were already in the pile from the crash site.
When he prepared to throw the wreckage away, I offered to take it. He left the undamaged Robart mechanical retracts, and I decided to rebuild the center-section around them. I also planned to strip and re-cover the airframe, do a painted finish, and add better scale details.
General advice before you start
Before repairing any crashed model, pick up and save everything. Much of a broken structure can probably be reassembled to fly, and you can use the thoroughly smashed bits to make patterns for replacement parts. Electric-powered airplanes have the advantage of no fuel-oil contamination on components.
Once you have all of the remains spread out on the workbench:
- Decide which pieces can safely be glued back together and which will become patterns.
- Use the most intact part of the airframe as a reference for alignment when plans are not available.
- Expect every restoration to be different and require good judgment.
- Make sure you have basic cutting, gluing, and sanding skills.
- Be patient — slow-drying wood glue often gives you the chance to realign parts, while CA is useful where fit is obvious.
The rebuild
Assessing the damage and planning
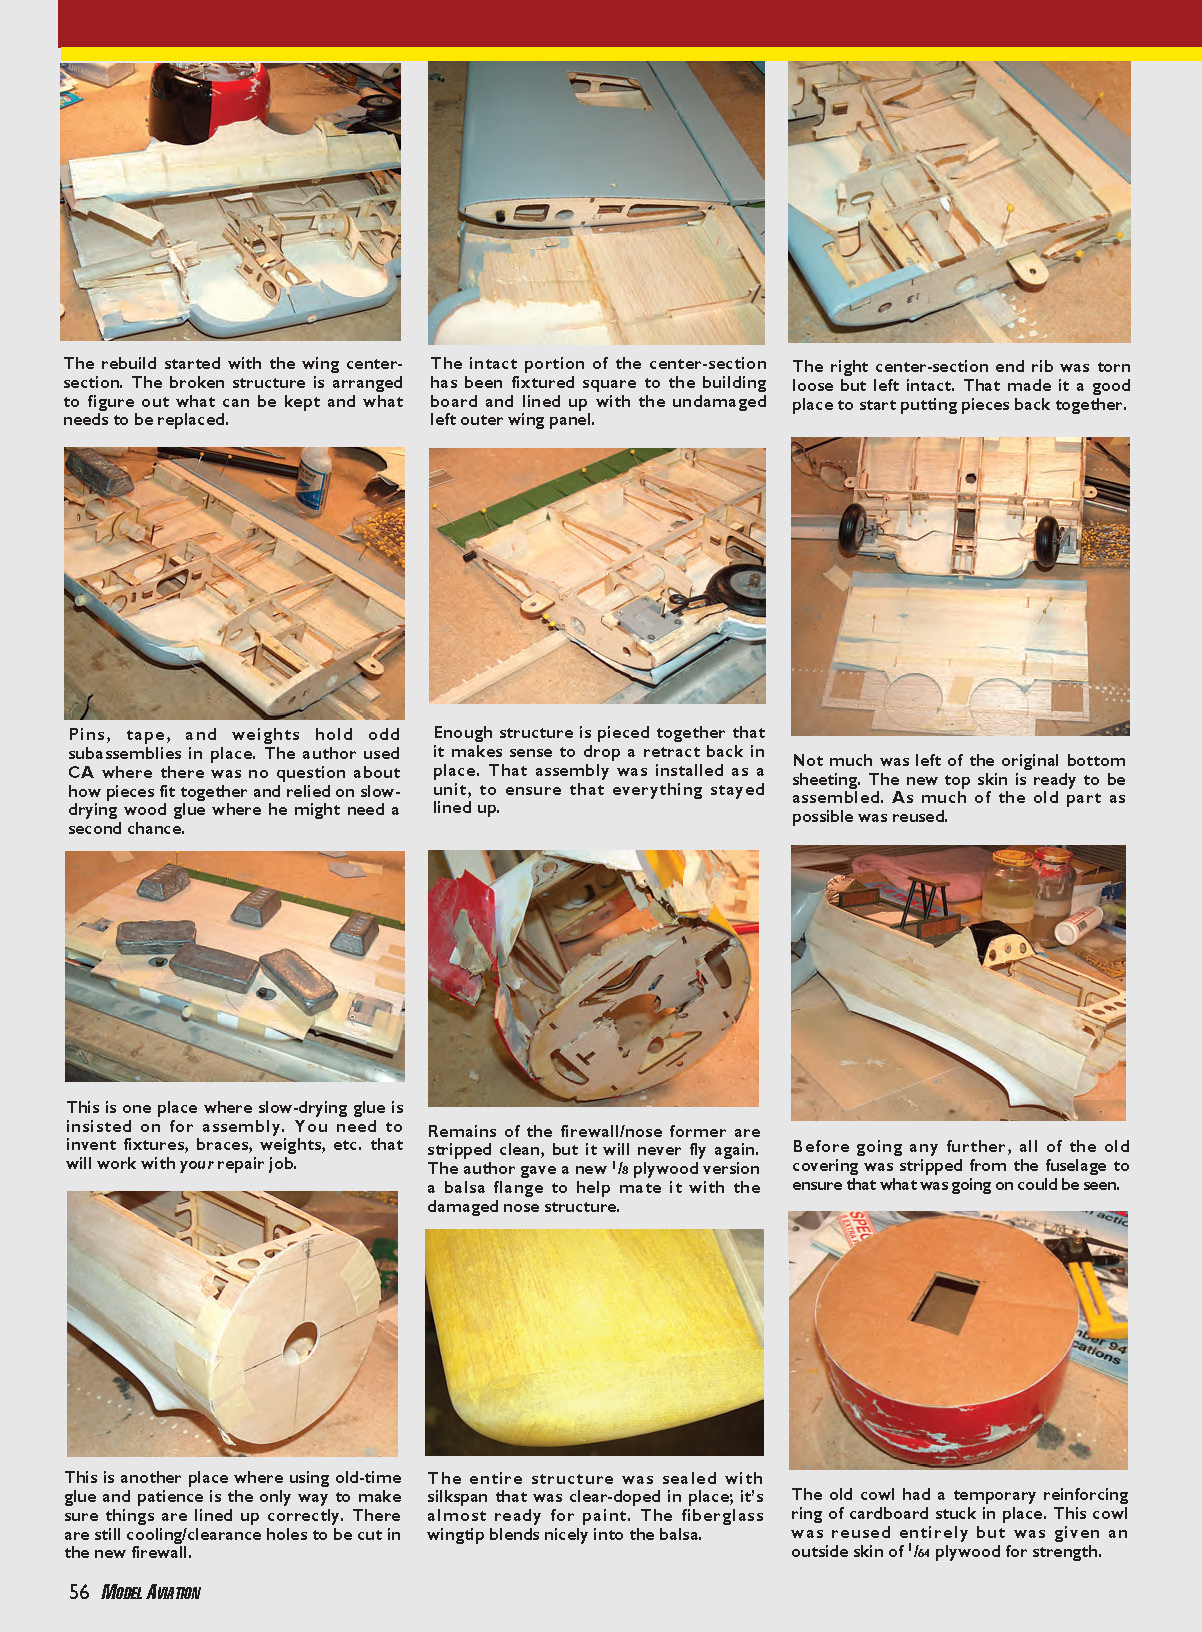
Most of the Texan’s damage involved the wing center-section and the nose ahead of the wing leading edge (LE). The outer wing panels had suffered little damage and were designed to slip-fit to the center-section with retaining screws — a relationship I used as a template.
I detached the outer panels from what was left of the center and arranged the panels inverted and aligned with the more-or-less intact center-section trailing edge (TE) as a guide for where everything should come back together. I positioned subassemblies off the working surface with lengths of balsa strip and bits of aluminum channel so the curved upper airfoil surfaces lined up.
Several aggregates of ribs, spars, and joiner tubes had broken loose but remained somewhat intact. I glued subassemblies together where I could trust alignment, then adhered those onto the relatively intact top center skin, using ripped glue spots and torn balsa as guides.
For this job I used Titebond aliphatic-resin wood glue — it permits taking the time needed to line up parts correctly.
Wing center-section and sheeting
The right center-section end rib had been torn loose but left intact, so it served as a reliable place to start reassembly. Pins, tape, and weights were used to hold odd subassemblies in place. I used CA where there was no question about fit and slow-drying wood glue where I might need a second chance.
The original bottom sheeting was badly ripped. I flattened what was left to use as a pattern, traced it onto a wide sheet of new balsa, and cut a new part. With the center-section in one piece again, I checked alignment, verified the Robart RLG retracts worked properly, and assembled the outer wing panels. I decided to glue the entire wing into a single assembly — removable panels weren't necessary for a model this size.
Where not much bottom sheeting remained, I rebuilt the top skin and replaced sheeting as needed. Invent fixtures, braces, and weights to keep things aligned while glue dries.
Firewall, nose, and cowl
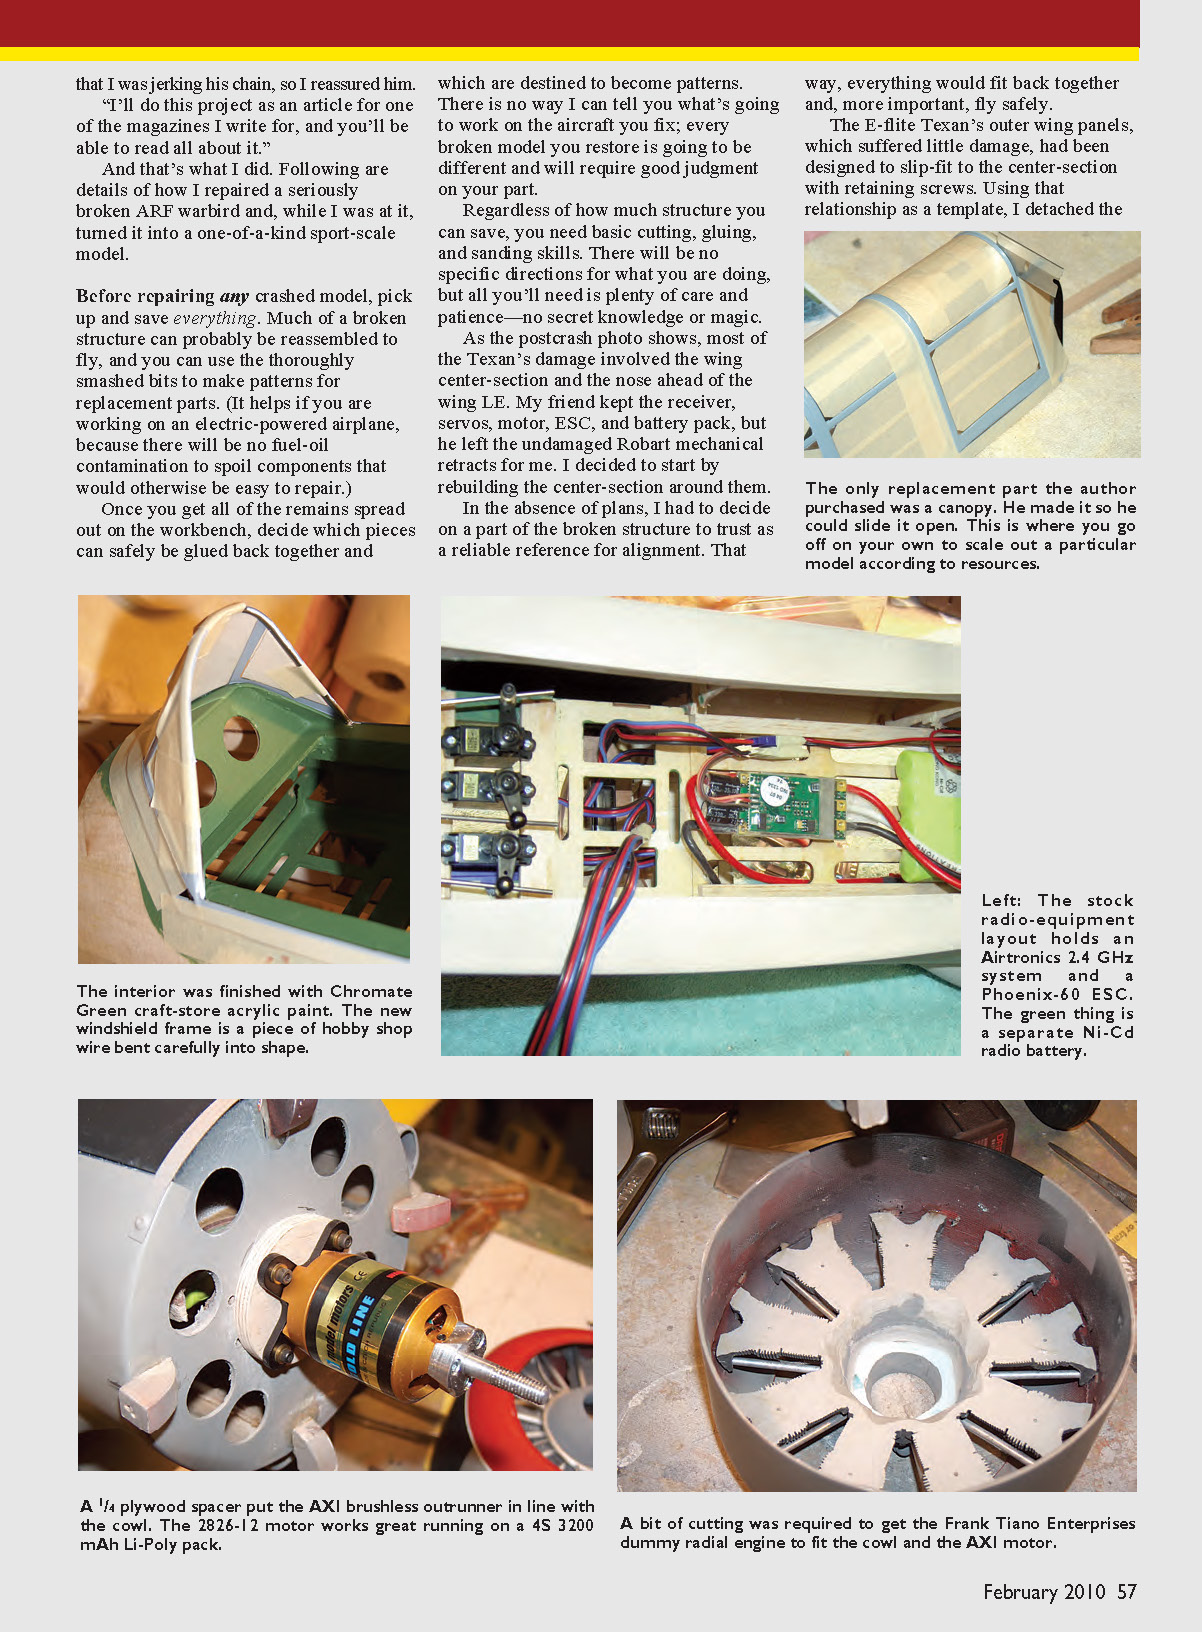
The firewall/nose former was badly smashed and would have to serve as the key to rebuilding a straight fuselage and provide a safe mount for the new AXI motor I chose. I traced a pattern and cut a new firewall from 1/8-inch aircraft plywood for strength and some added weight for balance. I added a 1/8-inch balsa flange to the rear face and trimmed what remained of the nose structure so the new firewall could slip into place and self-align. There are still cooling and clearance holes to be cut in the new firewall.
The fiberglass cowl was dented but could be coaxed back into shape. Instead of ordering a new cowl, I used a temporary cardboard former at the back and laminated a 1/32-inch plywood skin in position with Titebond, held in place with masking tape while drying. I faired the plywood into the original cowl contour using Stits SuperFil epoxy and sanded carefully.
Stripping covering and applying a traditional finish
This is where a repair can turn into a custom rebuild. I removed all the old covering from the fuselage so I could see and correct underlying structure. If the existing film covering is properly bonded, brushing lacquer thinner or MEK (methyl ethyl ketone) beneath a free edge will make it easy to peel away. Wear protective gloves and a respirator when using solvents.
I prefer a traditional fabric or tissue and paint finish over plastic film for durability and appearance. I used silkspan (a strong tissue) sealed with nitrate dope, then color coats of Stits PolyTone full-scale aircraft paint. The entire structure was sealed with silkspan that was clear-doped in place and was almost ready for paint. The fiberglass wingtip blended nicely into the balsa.
The old cowl had a temporary cardboard reinforcing ring; I reused the cowl but added an outside skin of 1/64-inch plywood for strength.
Scale details and custom additions
I added several scale details not included with the ARF:
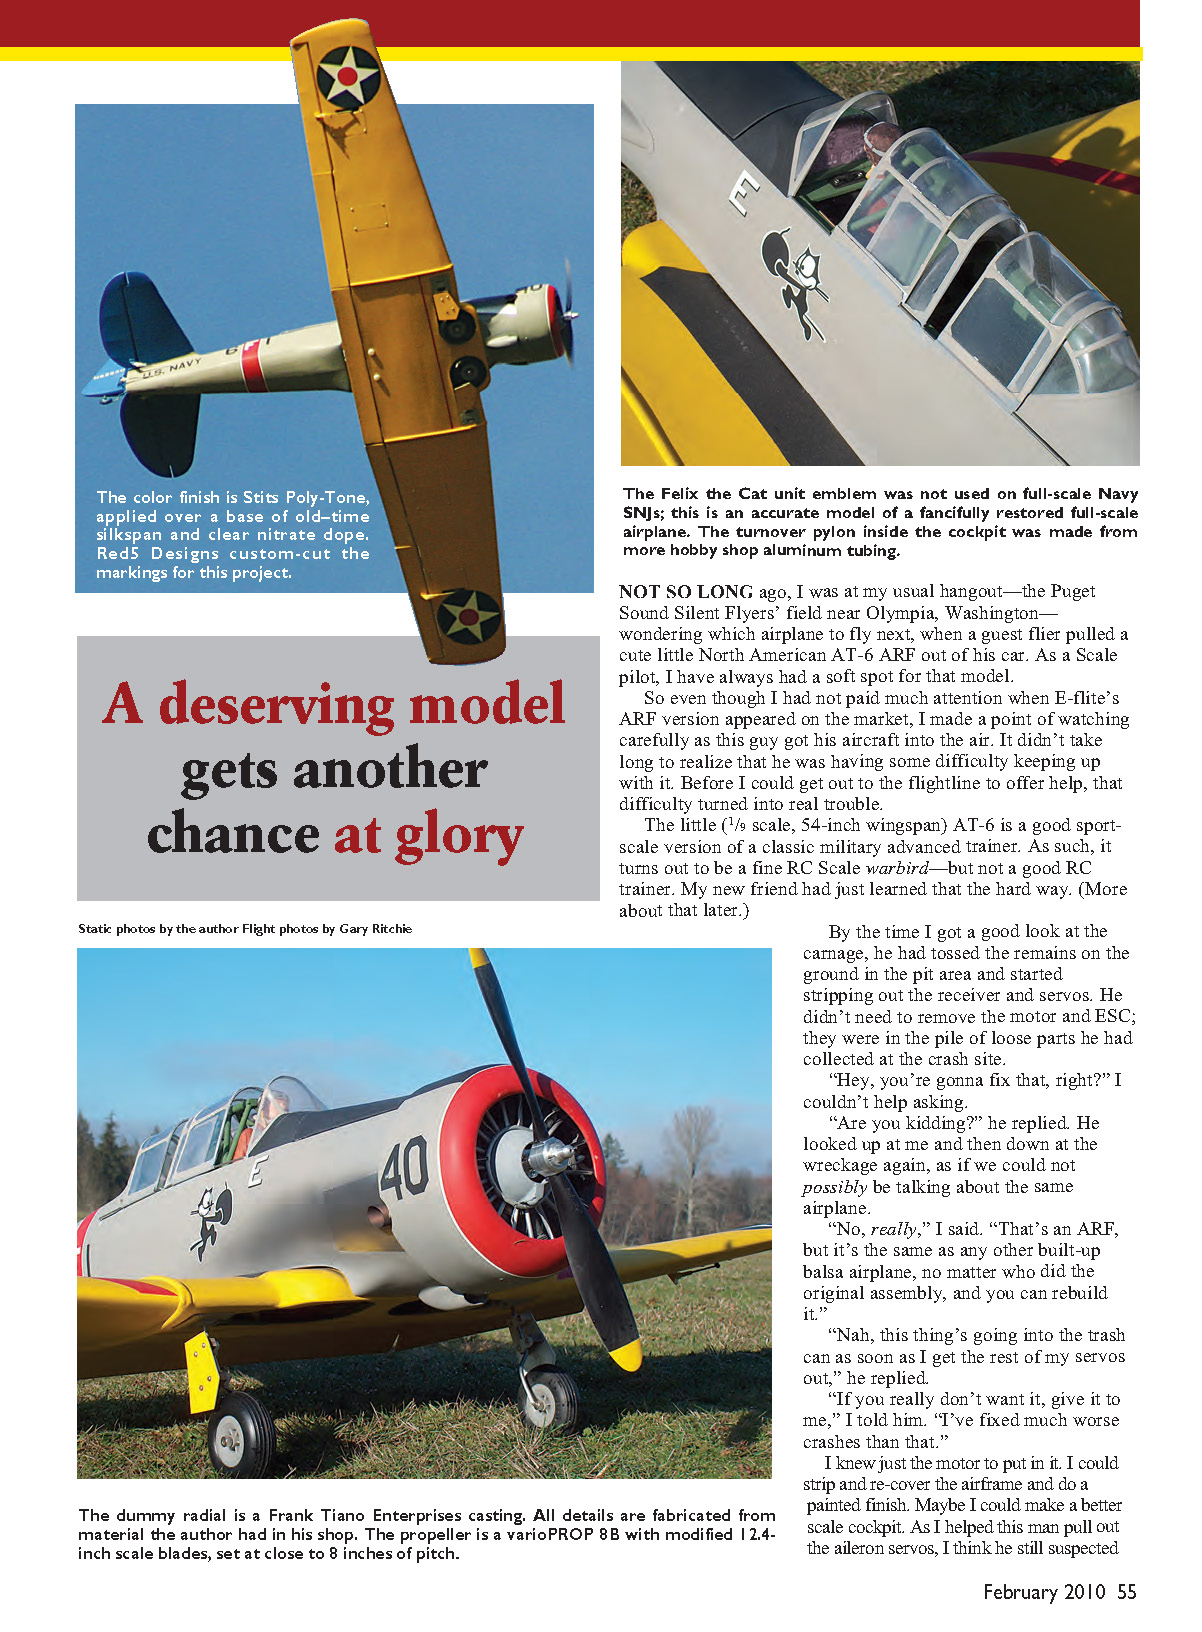
- Custom markings: My model represents an SNJ-6 (the naval version of the Texan) repainted to represent a fictional fighter/bomber associated with USS Enterprise (CV-6). I gathered images of the museum plane and had RED5 Designs produce custom pressure-sensitive vinyl markings.
- Dummy scale engine: 1/8-scale resin casting from Frank Tiano Enterprises.
- Sliding canopy: working canopy with added cockpit detail and a more realistic pilot figure.
- Simulated panel-joint covers on the wing: made from 3/8-inch-diameter round styrene tube split in half (from a model railroad shop).
- Propeller: I used a varioPROP adjustable-pitch propeller from e-flightline hobby (8B two-blade hub with 12.4-inch scale blades) for fine-tuning performance and for the "cool factor."
Flying characteristics and setup
Remember: the AT-6/Texan was designed to be a demanding aircraft to prepare pilots for fighters. The E-flite Texan ARF is a sport-scale model that preserves many of the full-scale handling tendencies; it's a good scale model but not a trainer.
My friend had allowed his model to slow in a climbing turn, got distracted, and the aircraft snapped into a spin. The model reacted as it was designed to and snapped into a spin — easy to recover if you know how, dangerous if you don't.
I found one serious oversight in the instruction manual: the recommended balance (CG) location — roughly 4 1/8 inches behind the wing LE — results in a dangerously tail-heavy model. Every stock E-flite ARF I have seen exhibits the same characteristic.
With everything else placed as far forward as practical, I had to add nearly 8 ounces of weight on the firewall and move the CG to about 3.5 inches behind the wing LE to get the AT-6 flying satisfactorily. Modern light battery packs often force us to add weight to balance an airplane — frustrating but necessary in this case.
Flight notes:
- If the main wheels are aligned, the model accelerates to takeoff speed without much tendency to swerve. A touch of rudder keeps it straight.
- Let it accelerate for nearly 100 feet; it will fly itself off with only light up-elevator. Hurrying the takeoff can cause a wobble or a threatened wing drop.
- Using a takeoff flap setting (approximately 20°) helps eliminate takeoff excitement.
- The AT-6 is not very fast and offers a believable impression of scale cruising at about three-quarters throttle.
- Positive-G maneuvers (loops, rolls, stall turns, split-S, Immelmanns) look right if entered after a few seconds at full throttle with the nose level or slightly down.
- In a stall, my model looks like the full-scale Texan. Keep the wings level with rudder to avoid a snap into a spin.
- For landings, full flap (roughly 40°) and a little power to touchdown make good landings look easy — which is how they should.
Conclusion
There is no secret knowledge required to repair a crashed ARF — just careful judgment, basic skills, patience, and the willingness to make replacement parts where needed. With attention to alignment, a robust firewall, appropriate balancing, and a careful finish, a seriously damaged warbird ARF can be rebuilt into a one-of-a-kind sport-scale model that looks and flies like the full-scale subject.
R.A. Benjamin [email protected]
Sources
- E-flite
(877) 504-0233 www.e-fliterc.com
- Hobby Lobby
(866) 933-5972 www.hobby-lobby.com
- Stits Poly-Tone, Stits SuperFil: Stits Lite by F&M Enterprises
(817) 279-8045 www.stits.com
- Nitrate dope: AeroDyne
17244 Darwin Ave. Unit C Hesperia, CA 92345 www.freeflightmodels.com
- e-flightline hobby
(877) 252-2653 www.e-flightline.com
- Red5 Designs Inc.
(631) 281-7633 www.red5designs.com
- Frank Tiano Enterprises
(863) 607-6611 www.franktiano.com
Transcribed from original scans by AI. Minor OCR errors may remain.

