
FF Duration
Louis Joyner, 183 Civitas St., Mt. Pleasant SC 29464
P-30s are supposed to be simple, and a P-30 front end should be really simple; all you need is a propeller shaft, nose block, bearing, and plastic propeller.
That’s what I thought when I built my first P-30 nearly a quarter century ago. I still have the scar.
You would never think of P-30 as a particularly dangerous event—until you have the bent end of the prop shaft slip off the molded freewheeling ramp on the plastic prop and dig into your thumb while a fully wound motor unloads a thousand turns.
At least the model was covered in red tissue, so the blood didn’t show.
The memories lingered as I began working on a couple of new P-30s recently. I was determined not to repeat the painful experience.
In case you are not familiar with a freewheeling prop, it is a rubber-model prop that turns freely after the motor winds down.
Freewheeling reduces drag compared to having the prop rigidly fastened to the shaft.
It also prevents the embarrassing problem of the prop “winding” the motor backward in the glide. This is accompanied by the model being propelled backward until the motor runs down and the process starts again—great comic relief.
Freewheelers were popular in the 1930s until they were replaced by folding props, which offer even more drag reduction. But freewheeling props are easier to make, especially when using molded plastic props.
For the P-30 event, the prop must be a commercially available plastic variety no larger than 9½ inches in diameter.
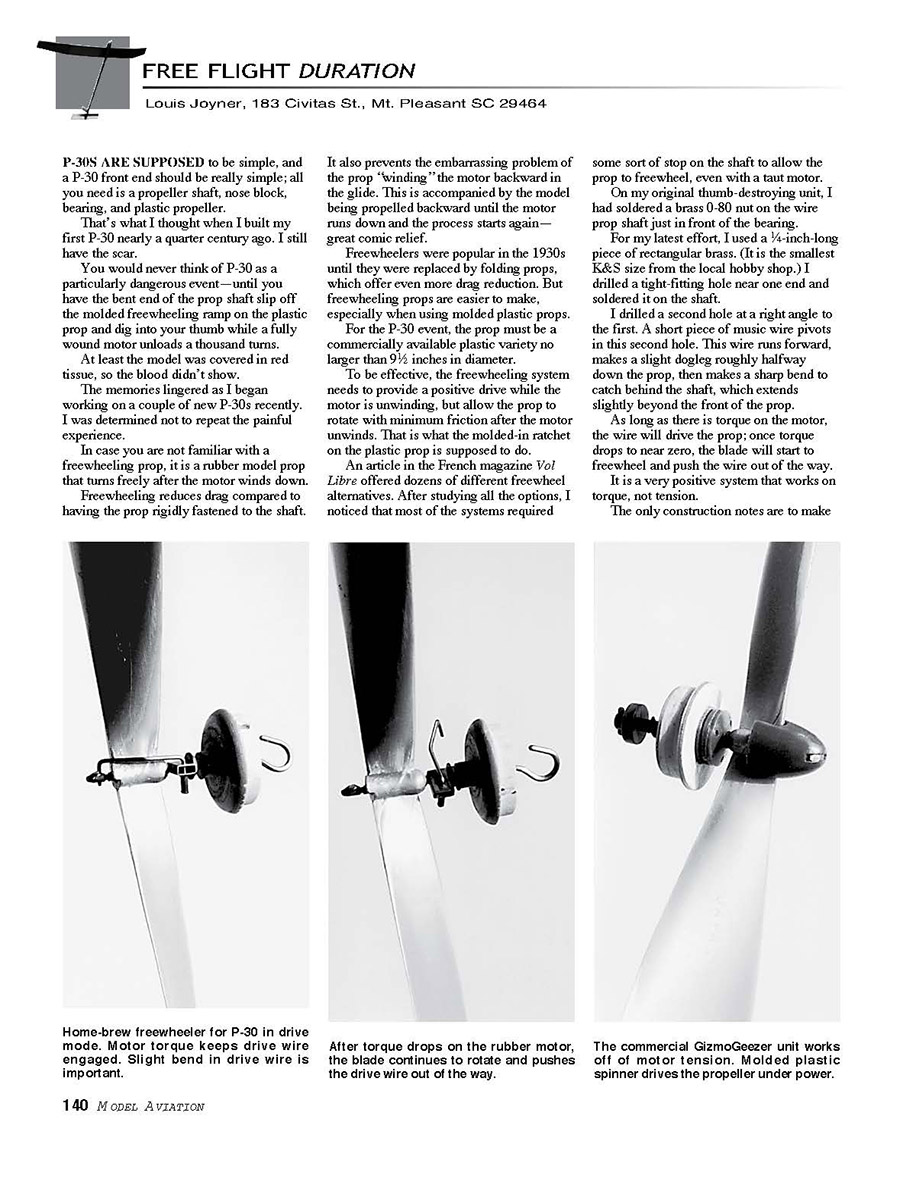
To be effective, the freewheeling system needs to provide a positive drive while the motor is unwinding, but allow the prop to rotate with minimum friction after the motor unwinds. That is what the molded-in ratchet on the plastic prop is supposed to do.
An article in the French magazine Vol Libre offered dozens of different freewheeling alternatives. After studying all the options, I noticed that most of the systems required some sort of stop on the shaft to allow the prop to freewheel, even with a taut motor.
On my original thumb-destroying unit, I had soldered a brass 0-80 nut on the wire prop shaft just in front of the bearing.
For my latest effort, I used a 1/4-inch-long piece of rectangular brass (it is the smallest K&S size from the local hobby shop). I drilled a tight-fitting hole near one end and soldered it on the shaft.
I drilled a second hole at a right angle to the first. A short piece of music wire pivots in this second hole. This wire runs forward, makes a slight dogleg roughly halfway down the prop, then makes a sharp bend to catch behind the shaft, which extends slightly beyond the front of the prop.
As long as there is torque on the motor, the wire will drive the prop; once torque drops to near zero, the blade will start to freewheel and push the wire out of the way.
It is a very positive system that works on torque, not tension.
Construction notes
- Make sure the shaft is a tight fit in the rectangular tubing and that the drive wire rotates freely.
- I used a short piece of heat-shrink tubing to hold the drive wire in place, but a blob of solder would have worked just as well.
- Since I wanted the prop to be removable, I used heat-shrink tubing there as well. (I wish someone made a smaller version of the 1/16-inch spring-style wheel retainers.)
Gizmo Precision Freewheeler
At roughly the same time, I learned of the marvelous little P-30 front end by GizmoGeezer Products. This is a quite sophisticated system that includes prop, freewheeling mechanism, motor bobbin, and nose button with adjustable thrust screws.
The whole package is very well thought-out. It even includes a screwdriver that doubles as a holding pin and a winder attachment that fits the bobbin.
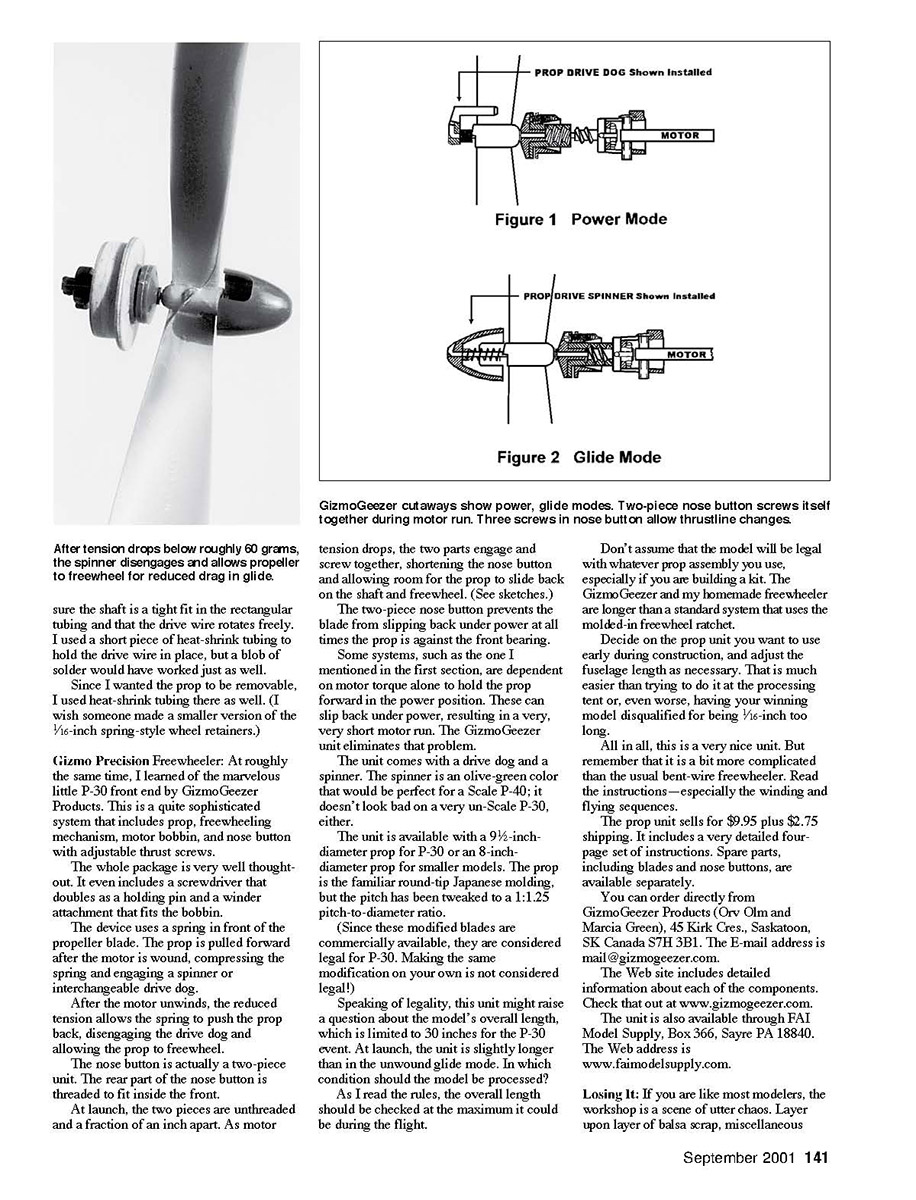
The device uses a spring in front of the propeller blade. The prop is pulled forward after the motor is wound, compressing the spring and engaging a spinner or interchangeable drive dog.
After the motor unwinds, the reduced tension allows the spring to push the prop back, disengaging the drive dog and allowing the prop to freewheel.
The nose button is actually a two-piece unit. The rear part of the nose button is threaded to fit inside the front.
At launch, the two pieces are unthreaded and a fraction of an inch apart. As motor tension drops, the two parts engage and screw together, shortening the nose button and allowing room for the prop to slide back on the shaft and freewheel.
The two-piece nose button prevents the blade from slipping back under power at all times the prop is against the front bearing.
Some systems, such as the one I mentioned in the first section, are dependent on motor torque alone to hold the prop forward in the power position. These can slip back under power, resulting in a very, very short motor run. The GizmoGeezer unit eliminates that problem.
The unit comes with a drive dog and a spinner. The spinner is an olive-green color that would be perfect for a Scale P-40; it doesn't look bad on a very un-Scale P-30, either.
The unit is available with a 9½-inch-diameter prop for P-30 or an 8-inch-diameter prop for smaller models. The prop is the familiar round-tip Japanese molding, but the pitch has been tweaked to a 1:1.25 pitch-to-diameter ratio.
(Since the modified blades are commercially available, they are considered legal for P-30. Making the same modification on your own is not considered legal.)
Length and legality
Speaking of legality, this unit might raise a question about the model's overall length, which is limited to 30 inches for the P-30 event. At launch, the unit is slightly longer than in the unwound glide mode. In which condition should the model be processed?
As I read the rules, the overall length should be checked at the maximum it could be during the flight.
Don't assume that the model will be legal with whatever prop assembly you use, especially if you are building a kit. The GizmoGeezer and my homemade freewheeler are longer than a standard system that uses the molded-in freewheel ratchet.
Decide on the prop unit you want to use early during construction, and adjust the fuselage length as necessary. That is much easier than trying to do it at the processing tent or, even worse, having your winning model disqualified for being 1/2 inch too long.
All in all, this is a very nice unit. But remember that it is a bit more complicated than the usual bent-wire freewheeler. Read the instructions—especially the winding and flying sequences.
The prop unit sells for $9.95 plus $2.75 shipping. It includes a very detailed four-page set of instructions. Spare parts, including blades and nose buttons, are available separately.
You can order directly from GizmoGeezer Products (Orv Olm and Marcia Green), 45 Kirk Cres., Saskatoon, SK Canada S7H 3B1. The e-mail address is [email protected].
The Web site includes detailed information about each of the components. Check that out at www.gizmogeezer.com.
The unit is also available through FAI Model Supply, Box 366, Sayre PA 18840. The Web address is www.faimodelsupply.com.
Losing It
If you are like most modelers, the workshop is a scene of utter chaos. Layer upon layer of balsa scrap, miscellaneous parts, coffee cups, and who knows what else covers every available surface.
No wonder we seem to spend more time hunting for missing tools and parts than we do building.
Following are a few suggestions.
- Jars, etc. Inexpensive plastic trays, available in the cosmetics section of a discount store, are a good way to keep related tools together on the workbench.
- The small compartments can be used for pins, screws, or razor blades, while the larger ones can hold rulers, knives, pliers, etc.
- Trays are also a great way to organize parts as you "kit" a model. You can slip trays into a drawer between building sessions.
- Brush and pencil. An artist's revolving pencil holder provides a convenient way to keep paintbrushes, knives, screwdrivers, and other slender items handy.
- The plastic holder, which is shaped like a wedding cake, sells for approximately $20. You can track one down at an art-supply store.
- Boxes, etc. Small cardboard boxes are a good way to store tools and parts.
- The boxes I use originally contained 4x5 photo-film packs, and measure roughly 5 1/2 x 11 inches and are 1 1/2 inches deep.
- Some of the boxes are used for related tools, such as a small soldering iron and solder, or taps, tap wrench, and related drill bits. Other boxes are used for model fixtures and parts. One holds wing templates and cambered sanding blocks, while another box holds nylon parts.
- I jot down pertinent info in the lid, such as which drill goes with which tap.
- In total, I have roughly two dozen of these boxes stacked on a shelf. The end of each box is labeled, so it is easy to pull out the one I need.
- In addition to keeping things organized, the boxes make it easy to take one or two along on a business trip. It's amazing how many ribs you can cut out while watching TV in the hotel.
- Bigger boxes are useful for larger components, tools, or parts. If possible, try to find a steady source of free boxes; it's amazing how many you can use.
- Floor care. A smooth shop floor is easier to keep clean, and, more importantly, less likely to conceal dropped parts.
- I once had a shop with wall-to-wall coil carpet that would eat 0-80 screws. I finally got to the point where I didn't even bother to look for the ones I dropped.
- Lighting. Plywood templates and patterns will blend right in with all the balsa scrap on the workbench. Keep a bright red felt-tipped pen handy to color both sides of templates before you lose them.
- It is also a good idea to identify templates with the model name, airfoil, date, or other data, so you can remember what they are for.
- Fasteners. Frequently used tools, such as a modeling knife or small screwdriver, are easy to misplace. Hopefully, having several on hand will assure that you can find at least one.
- Small parts. How often have you carefully cut off a small balsa part, then put it down while you reach for the glue? Then, with glue in hand, you spend the next half-hour looking for the part. The best method I have learned to prevent these losses is to have a designated place to put parts when you set them down.
- The location should be convenient to the workbench, close to eye level, and relatively uncluttered. I use the tray of my triple-beam balance or the top of my fluorescent work light.
- Clean up. I know you didn't want to hear this one and probably won't do it, but it really would help. Besides, who knows what you might find?
Transcribed from original scans by AI. Minor OCR errors may remain.

