
FREE FLIGHT DURATION
Louis Joyner, 183 Civitas St., Mt. Pleasant SC 29464
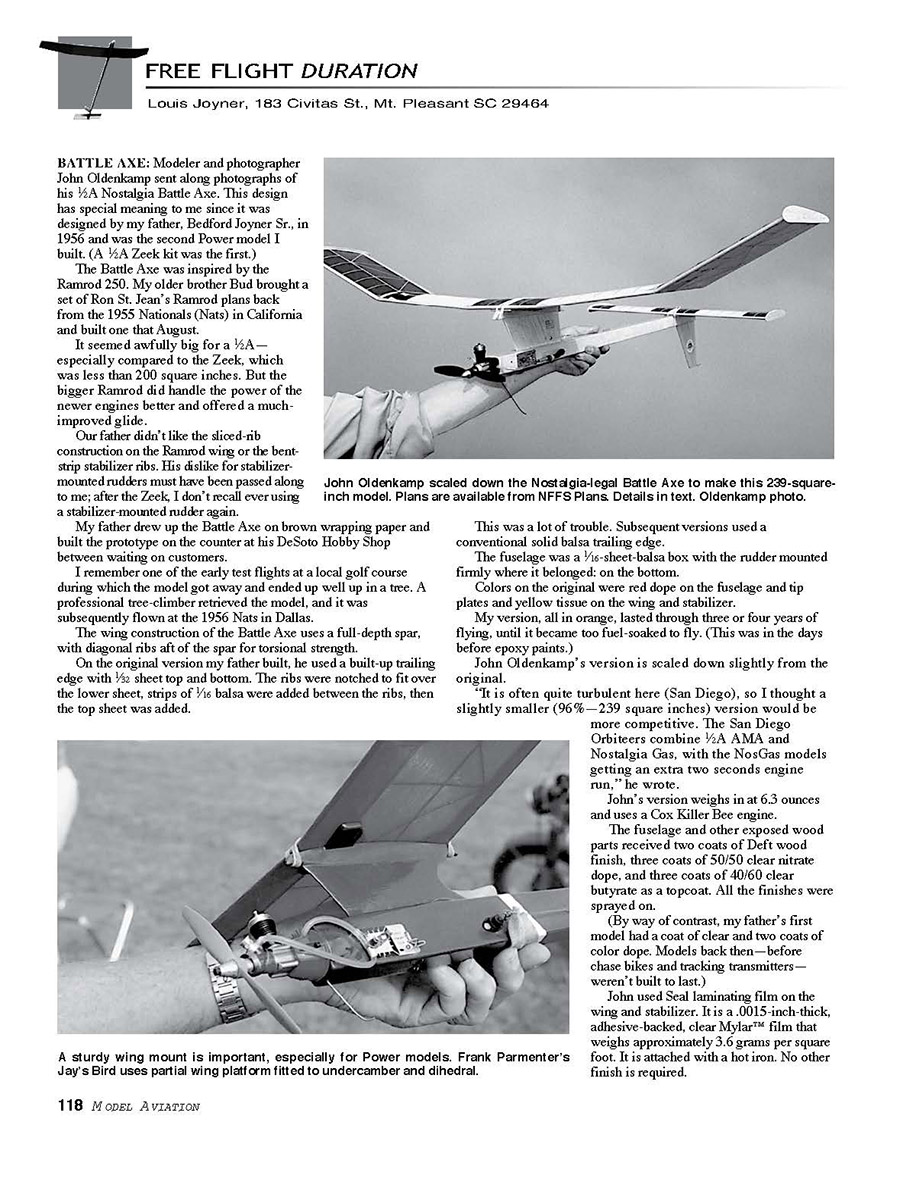
BATTLE AXE: Modeler and photographer John Oldenkamp sent along photographs of his ½A Nostalgia Battle Axe. This design has special meaning to me since it was designed by my father, Bedford Joyner Sr., in 1956 and was the second Power model I built. (A 1/2A Zeek kit was the first.)
The Battle Axe was inspired by the Ramrod 250. My older brother Bud brought a set of Ron St. Jean’s Ramrod plans back from the 1955 Nationals (Nats) in California and built one that August.
It seemed awfully big for a ½A—especially compared to the Zeek, which was less than 200 square inches. But the bigger Ramrod did handle the power of the newer engines better and offered a much-improved glide.
Our father didn’t like the sliced-rib construction on the Ramrod wing or the bent-strip stabilizer ribs. His dislike for stabilizer-mounted rudders must have been passed along to me; after the Zeek, I don’t recall ever using a stabilizer-mounted rudder again.
My father drew up the Battle Axe on brown wrapping paper and built the prototype on the counter at his DeSoto Hobby Shop between waiting on customers.
I remember one of the early test flights at a local golf course during which the model got away and ended up well up in a tree. A professional tree-climber retrieved the model, and it was subsequently flown at the 1956 Nats in Dallas.
The wing construction of the Battle Axe uses a full-depth spar, with diagonal ribs aft of the spar for torsional strength.
On the original version my father built, he used a built-up trailing edge with 1/32 sheet top and bottom. The ribs were notched to fit over the lower sheet, strips of 1/16 balsa were added between the ribs, then the top sheet was added.
This was a lot of trouble. Subsequent versions used a conventional solid balsa trailing edge.
The fuselage was a 1/16-sheet-balsa box with the rudder mounted firmly where it belonged: on the bottom.
Colors on the original were red dope on the fuselage and tip plates and yellow tissue on the wing and stabilizer.
My version, all in orange, lasted through three or four years of flying, until it became too fuel-soaked to fly. (This was in the days before epoxy paints.)
John Oldenkamp’s version is scaled down slightly from the original.
“It is often quite turbulent here (San Diego), so I thought a slightly smaller (96%—239 square inches) version would be more competitive. The San Diego Orbiteers combine ½A AMA and Nostalgia Gas, with the NosGas models getting an extra two seconds engine run,” he wrote.
John’s version weighs in at 6.3 ounces and uses a Cox Killer Bee engine.
The fuselage and other exposed wood parts received two coats of Deft wood finish, three coats of 50/50 clear nitrate dope, and three coats of 40/60 clear butyrate as a topcoat. All the finishes were sprayed on.
(By way of contrast, my father’s first model had a coat of clear and two coats of color dope. Models back then—before chase bikes and tracking transmitters—weren’t built to last.)
John used Seal laminating film on the wing and stabilizer. It is a .0015-inch-thick, adhesive-backed, clear Mylar film that weighs approximately 3.6 grams per square foot. It is attached with a hot iron. No other finish is required. Some school-supply stores stock the material or you can order it from Curt Stevens’ MRL (Model Research Laboratories, 25108 Marguerite #160, Mission Viejo CA 92692; E-mail: www.modelresearchlabs.com).
For decoration, John used floral spray paint from a local crafts store.
If you are interested in building a Battle Axe for the Nostalgia Gas event, you can order the full-size plans from Hank Sperzel at National Free Flight Society (NFFS) plans. The address is NFFS Plans Service, 203 Chevro Ln., Bellevue NE 68005 or E-mail: [email protected].
The Battle Axe plans are $7 for NFFS members and $8 for nonmembers. Please make your check out to NFFS Plans Service.
Check out the NFFS Web site at www.freeflight.org for a complete list of Free Flight (FF) plans.
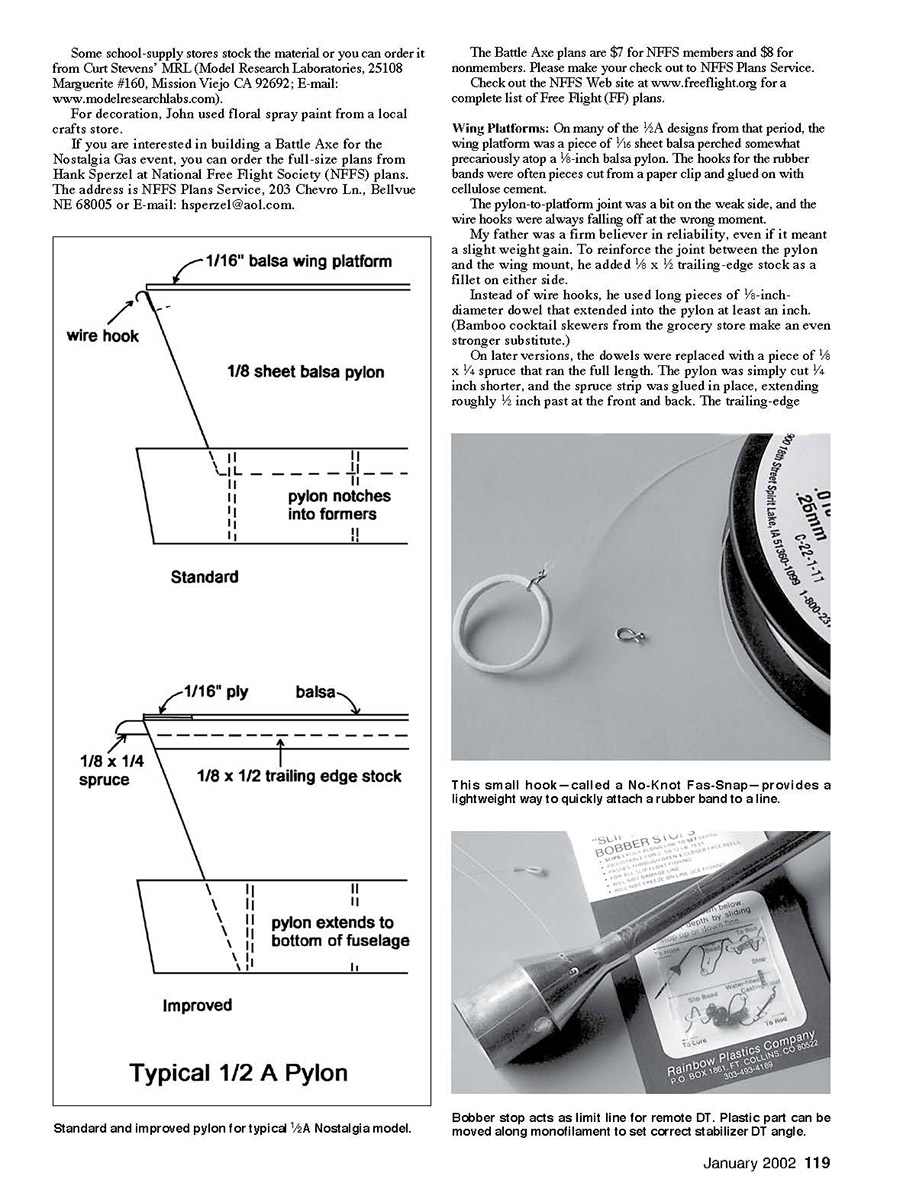
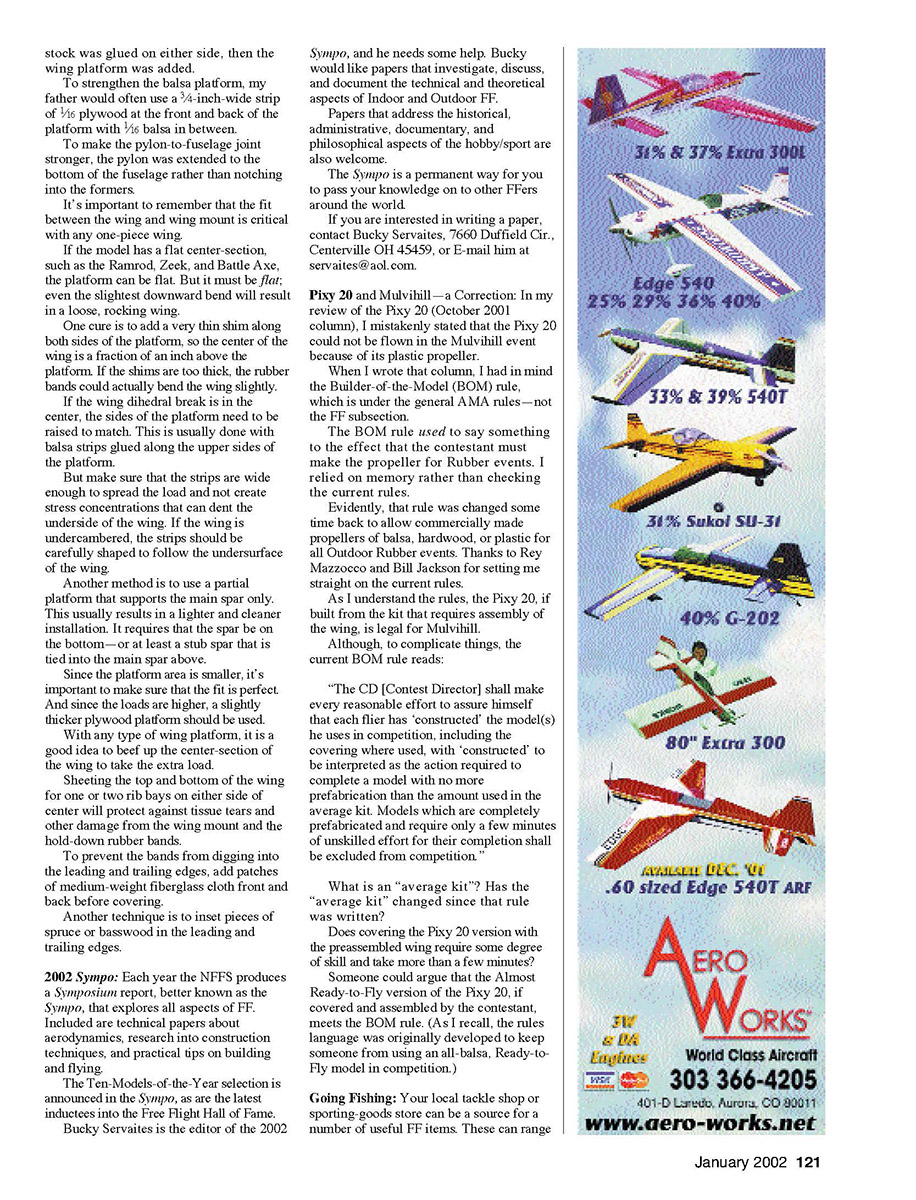
Wing Platforms: On many of the 1/2A designs from that period, the wing platform was a piece of 1/16 sheet balsa perched somewhat precariously atop a 1/8-inch balsa pylon. The hooks for the rubber bands were often pieces cut from a paper clip and glued on with cellulose cement.
The pylon-to-platform joint was a bit on the weak side, and the wire hooks were always falling off at the wrong moment.
My father was a firm believer in reliability, even if it meant a slight weight gain. To reinforce the joint between the pylon and the wing mount, he added 1/8 x 1/2 trailing-edge stock as a fillet on either side.
Instead of wire hooks, he used long pieces of 1/8-inch-diameter dowel that extended into the pylon at least an inch. (Bamboo cocktail skewers from the grocery store make an even stronger substitute.)
On later versions, the dowels were replaced with a piece of 1/8 x 1/4 spruce that ran the full length. The pylon was simply cut 1/4 inch shorter, and the spruce strip was glued in place, extending roughly 1/2 inch past at the front and back. The trailing-edge stock was glued on either side, then the wing platform was added.
To strengthen the balsa platform, my father would often use a 3/4-inch-wide strip of 1/16 plywood at the front and back of the platform with 1/16 balsa in between.
To make the pylon-to-fuselage joint stronger, the pylon was extended to the bottom of the fuselage rather than notching into the former.
It's important to remember that the fit between the wing and wing mount is critical with any one-piece wing.
If the model has a flat center-section, such as the Ramrod, Zeek, and Battle Axe, the platform can be flat. But it must be flat; even the slightest downward bend will result in a loose, rocking wing.
One cure is to add a very thin shim along both sides of the platform, so the center of the wing is a fraction of an inch above the platform. If the shims are too thick, the rubber bands could actually bend the wing slightly.
If the wing dihedral break is in the center, the sides of the platform need to be raised to match. This is usually done with balsa strips glued along the upper sides of the platform.
But make sure that the strips are wide enough to spread the load and not create stress concentrations that can dent the underside of the wing. If the wing is undercambered, the strips should be carefully shaped to follow the undersurface of the wing.
Another method is to use a partial platform that supports the main spar only. This usually results in a lighter and cleaner installation. It requires that the spar be on the bottom—or at least a stub spar that is tied into the main spar above.
Since the platform area is smaller, it's important to make sure that the fit is perfect. And since the loads are higher, a slightly thicker plywood platform should be used.
With any type of wing platform, it is a good idea to beef up the center-section of the wing to take the extra load.
Sheeting the top and bottom of the wing for one or two rib bays on either side of center will protect against tissue tears and other damage from the wing mount and the hold-down rubber bands.
To prevent the bands from digging into the leading and trailing edges, add patches of medium-weight fiberglass cloth front and back before covering.
Another technique is to inset pieces of spruce or basswood in the leading and trailing edges.
2002 Sympo: Each year the NFFS produces a Symposium report, better known as the Sympo, that explores all aspects of FF. Included are technical papers about aerodynamics, research into construction techniques and practical tips on building and flying.
The Ten-Models-of-the-Year selection is announced in the Sympo, as are the latest inductees into the Free Flight Hall of Fame.
Bucky Servaites is the editor of the 2002 Sympo, and he needs some help. Bucky would like papers that investigate, discuss, and document the technical and theoretical aspects of Indoor and Outdoor FF.
Papers that address the historical, administrative, documentary, and philosophical aspects of the hobby/sport are also welcome.
The Sympo is a permanent way for you to pass your knowledge on to other FFers around the world.
If you are interested in writing a paper, contact Bucky Servaites, 7660 Duffield Cir., Centerville OH 45459, or E-mail him at [email protected].
Pixy 20 and Mulvihill — a Correction: In my review of the Pixy 20 (October 2001 column), I mistakenly stated that the Pixy 20 could not be flown in the Mulvihill event because of its plastic propeller.
When I wrote that column, I had in mind the Builder-of-the-Model (BOM) rule, which is under the general AMA rules—not the FF subsection.
The BOM rule used to say something to the effect that the contestant must make the propeller for Rubber events. I relied on memory rather than checking the current rules.
Evidently, that rule was changed some time back to allow commercially made propellers of balsa, hardwood, or plastic for all Outdoor Rubber events. Thanks to Rey Mazzocco and Bill Jackson for setting me straight on the current rules.
As I understand the rules, the Pixy 20, if built from the kit that requires assembly of the wing, is legal for Mulvihill.
Although, to complicate things, the current BOM rule reads:
"The CD [Contest Director] shall make every reasonable effort to assure himself that each flier has ‘constructed’ the model(s) he uses in competition, including the covering where used, with ‘constructed’ to be interpreted as the action required to complete a model with no more prefabrication than the amount used in the average kit. Models which are completely prefabricated and require only a few minutes of unskilled effort for their completion shall be excluded from competition.
What is an ‘average kit’? Has the ‘average kit’ changed since that rule was written?
Does covering the Pixy 20 version with the preassembled wing require some degree of skill and take more than a few minutes?
Someone could argue that the Almost Ready-to-Fly version of the Pixy 20, if covered and assembled by the contestant, meets the BOM rule. (As I recall, the rules language was originally developed to keep someone from using an all-balsa, Ready-to-Fly model in competition.)
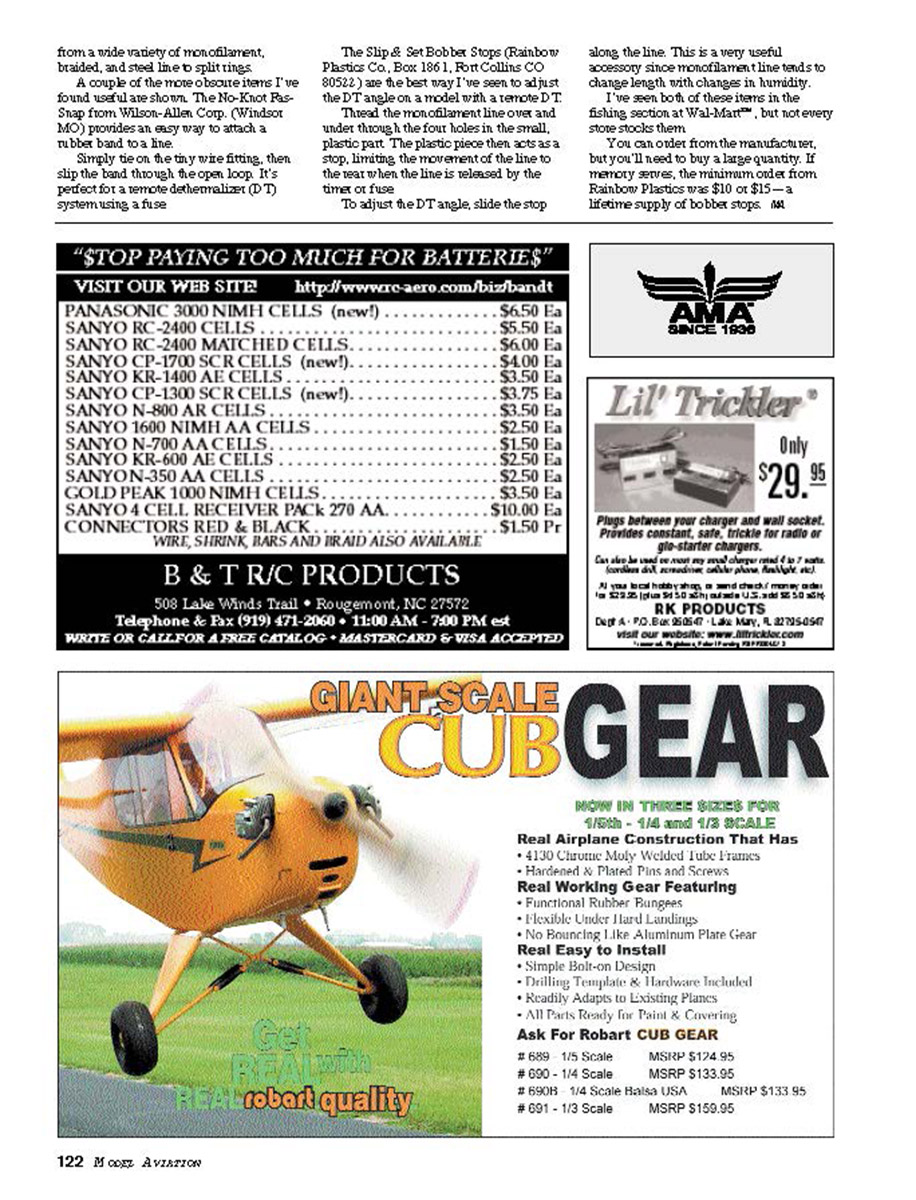
Going Fishing: Your local tackle shop or sporting-goods store can be a source for a number of useful FF items. These can range from tackle-box-type storage containers to a variety of small hardware items. A couple of the more obscure items I've found useful are shown. The No-Kook Ras-Snap from Wilson-Allen Corp. (Windsor MO) provides an easy way to attach a rubber band to a line. Simply tie on the tiny wire fitting, then slip the band through the open loop. It's perfect for a remote dethermalizer (DT) system using a fuse.
The Slip & Set Bobber Stops (Rainbow Plastics Co., Box 1861, Fort Collins CO 80522) are the best way I've seen to adjust the DT angle on a model with a remote DT. Thread the monofilament line over and under through the four holes in the small, plastic part. The plastic piece then acts as a stop, limiting the movement of the line to the tear when the line is released by the time or fuse.
To adjust the DT angle, slide the stop along the line. This is a very useful accessory since monofilament line tends to change length with changes in humidity.
I've seen both of these items in the fishing section at Wal-Mart — but not every store stocks them.
You can order them from the manufacturer, but you'll need to buy a large quantity. If memory serves, the minimum order from Rainbow Plastics was $10 or $15 — a lifetime supply of bobber stops.
— M.R.
Transcribed from original scans by AI. Minor OCR errors may remain.

