
FREE FLIGHT DURATION
Louis Joyner, 4221 Old Leeds Rd., Birmingham AL 35213
CAPSTRIPS
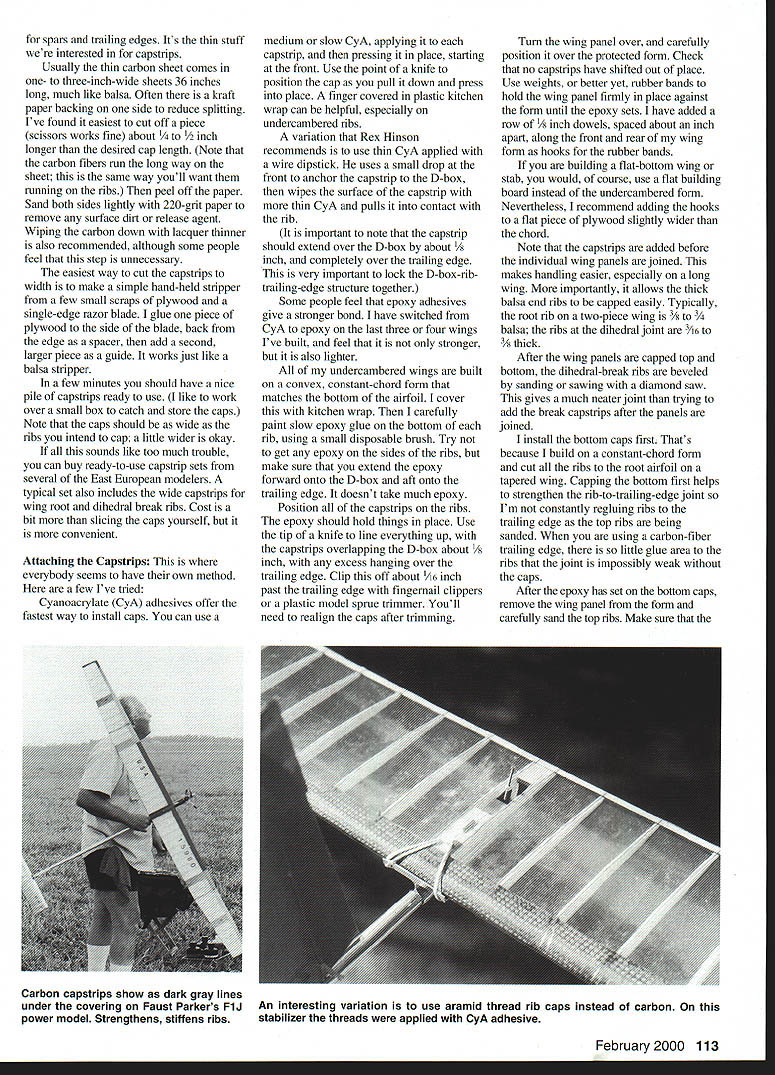
One of the important components of the new "high-tech" carbon-fiber D-box wing construction has actually been around for a long time: the capstrip.
Originally these were strips of wood wider than the rib glued to the top and bottom for extra strength. A 1/16 x 1/2 capstrip might be used with a 1/16 sheet rib, for example. Wider strips (up to 1/4 inch) were often seen on Control Line Stunt models, while thin, narrow strips were used on smaller models. I've even seen old plans that call for 1/64 thick balsa caps!
The capstrips were often combined with front sheeting of the same thickness. This made cutting of the ribs a bit easier, since there was no need to notch the front portion of the rib for the sheeting. Instead, the entire height of the rib was reduced by the thickness of the sheeting. Sometimes the sheeting was only on the top, in an effort to get a smooth, sag-free airfoil. Other times the top and bottom of the front 1/3 of the wing was sheeted to form a structural D-box that would give the wing extra bending strength.
But the main purpose of the capstrips was to strengthen the ribs. Working much like the flanges on an I-beam, the extra balsa at the top and bottom of each rib would stiffen the rib in bending, primarily up-and-down, but also side-to-side. (If you have ever built a wing using long, unsupported 1/32 ribs, you know how important the side-to-side rib strength is.)
The carbon-fiber capstrips on a modern composite wing work much the same way. The capstrips are typically .003 inches or less in thickness; nevertheless, they strengthen the individual ribs tremendously—very important with the thin airfoils we are now using.
The carbon-fiber spar carries all of the bending load for the wing, which can be considerable on a towline glider, for instance. The carbon-fiber D-box shell handles the torsion loads, creating a flutter-free wing. All the aft ribs have to do is support the covering and the trailing edge.
With the use of carbon-fiber caps top and bottom, these ribs can be thin and light. And since the aft ribs are stiff, the trailing edge can also be small and light. The end result is a strong, stiff wing with most of its weight concentrated well forward.
The most-popular type of carbon fiber for caps is carbon sheet. This consists of unidirectional carbon fibers that have been impregnated with epoxy and heat-cured to form a thin, rigid sheet. A variety of thicknesses are available, from .002 to .060 (about 1/64 inch). The thicker material is used top of each rib is flush with the top of the D-box and with the top of the trailing edge.
Spread epoxy on the top of each rib, position the capstrips, trim the excess, and place on the wing form. It is vital that the ribs be correctly placed on the form to ensure the proper wash-in or washout. Once the top caps are in place, the wing won't be moving.
Carefully cover the top of the wing panel with kitchen wrap, then with a piece of thin cardboard. (I use pieces cut from file folders.) Carefully add the rubber bands to press the cardboard, and the capstrips, in place. Surprisingly, the caps do stay in place. I've only had one or two shift out of position since I started doing them this way.
After the epoxy sets, remove the panel from the form and sand both sides of every rib with an emery board. This removes excess epoxy and any overhanging capstrip. It's amazing how much weight this step will save on a wing—usually a couple of grams on a 250-square-inch wing. Total weight gain for the caps and adhesive on a wing that size is two to three grams if you are careful. Excess epoxy or CYA is usually the cause if the weight goes over that.
This sanding will also show if any of the capstrips are loose, particularly at the ends. Simply lift up the cap, add a drop of CYA or epoxy, and push it back down tight.
After a light going-over with fine sandpaper, the end ribs can be beveled, the panels joined, and the wing covered. You will be amazed at the strength and stability of the finished product.
Variations
Here are a few other capstrip ideas:
- Instead of letting the capstrips lap over the D-box, some fanatics notch the D-box so the capstrip sits flush with the shell. This can be done by carefully laying out the location for each aft rib on the D-box shell, then notching the shell top-and-bottom using scissors and a sharp knife.
- Another technique is to build the D-box in the usual way, add the aft ribs, then use a small file to make a slight ramp at the rear of the D-box at each rib location. The end of the capstrip fits into this ramp.
The biggest problem with both of the methods is the need to reduce the height of the aft rib a few thousandths below the D-box, to allow for the thickness of the caps. Besides, when the model is a thousand feet up a thermal, who is going to know the difference?
In 1993 the late Ed Turner showed me a technique he had seen his friend Evgenuy Gorban use on Wakefield stabs.
Instead of carbon strip, Gorban used aramid thread as caps. The stabs used a very thin balsa sheet D-box with approximately 1/32 ribs. The aramid thread was applied to the top and bottom of each rib using CYA. The thought was that the aramid thread would be tougher and less brittle than carbon fiber caps. Another advantage was that the yellow thread was almost invisible on the balsa.
Would this be an option for Old-Timer or Nostalgia? Would it be legal?
I tried the technique on about half a dozen stabs. I attached the thread at the D-box end with a small dot of CYA, then pulled the thread tight, using a hemostat clamped to the other end of the thread. I let the hemostat hang over the edge of the building board to apply consistent tension to the thread as I ran CYA along the thread. I did all of the bottom ribs first, then the top. While adding the top caps, I weighted the stab down flat.
Another interesting idea I saw recently in the French publication Volt Libre uses 1/96 plywood for the D-box skins and rib caps on an F1H towline glider. The caps were cut to the same width as the ribs.
Caps can also be added before the wing is built; several Ukrainian kits utilize precapped ribs.
A block of balsa is cut to exact rib shape, in effect creating a single, very thick rib. This is skinned top-and-bottom with unidirectional carbon fiber or fiberglass cloth, using epoxy. A vacuum bag holds everything in place until the epoxy hardens. Individual ribs are then sawed from the block, like slicing salami.
Jim Bradley is now offering carbon caps molded to approximate airfoil shape. The unidirectional carbon is heat-cured over a form so the caps will approximately follow the wing airfoil shape. The unidirectional material that Jim uses has a natural split at about 1/16 inch, making it very easy to break off the caps to width.
Contact Jim at Bradley Model Products, 1337 Pine Sap Ct., Orlando FL 32825 for a price list. I'm sure a stamped, self-addressed envelope would be appreciated.
Shaboom 225
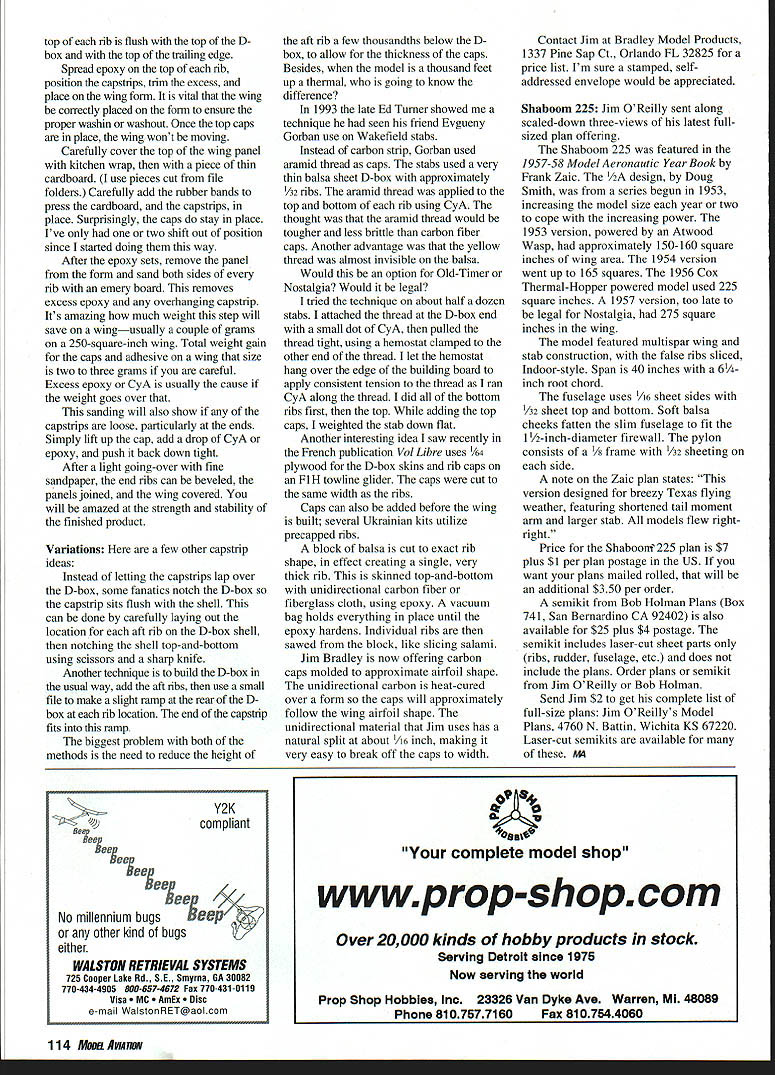
Jim O'Reilly sent along scaled-down three-views of his latest full-sized plan offering.
The Shaboom 225 was featured in the 1955-58 Model Aeronautic Year Book by Frank Zalc. The 1/2A design, by Doug Smith, was from a series begun in 1953, increasing the model size each year or two to cope with the increasing power. The 1953 version, powered by an Atwood Wasp, had approximately 150-160 square inches of wing area. The 1954 version went up to 165 square inches. The 1956 Cox Thermal-Hopper powered model used 225 square inches. A 1957 version, too late to be legal for Nostalgia, had 275 square inches in the wing.
The model featured multispar wing and stab construction, with the false ribs sliced, indoor-style. Span is 40 inches with a 6-1/4-inch root chord.
The fuselage uses 1/16 sheet sides with 1/32 sheet top and bottom. Soft balsa cheeks fasten to the slim fuselage to fit the 1-1/2-inch-diameter firewall. The pylon consists of a 1/8 frame with 1/32 sheeting on each side.
A note on the Zaic plan states: "This version designed for breezy Texas flying weather, featuring shortened tail moment arm and larger stab. All models flew right."
Price for the Shaboom 225 plan is $7 plus $1 per plan postage in the US. If you want your plans mailed rolled, that will be an additional $3.50 per order.
A semi-kit from Bob Holman Plans (Box 741, San Bernardino CA 92402) is also available for $25 plus $4 postage. The semi-kit includes laser-cut sheet parts only (ribs, rudder, fuselage, etc.) and does not include the plans. Order plans or semi-kits from Jim O'Reilly or Bob Holman.
Send Jim $2 to get his complete list of full-size plans: Jim O'Reilly's Model Plans, 4760 N. Battin, Wichita KS 67220. Laser-cut semi-kits are available for many of these.
MA
Transcribed from original scans by AI. Minor OCR errors may remain.

