

FF Power Model TRIM Part II
Bob Johannes
Part I, in the March 1997 issue, dealt with preparing your new model for flight. Part II takes you through the trimming process.
Preflight checks and hand-gliding
At the field, the first thing to do is assemble the model and do some hand-gliding. Many modelers believe that hand-gliding doesn't show much; however, it is another step in the overall process that increases confidence that the model will fly as intended.
It is hard to tell much from a shoulder-height hand glide, because the launch angle and speed can mask the true characteristics of the model. I usually try to find a knoll or other natural rise in the ground from which to glide the model so it has more time to stabilize into the glide. Even standing on the bumper of your car can be helpful.
What we want in the hand glide is a reasonably buoyant glide with the beginning of a right turn. The previous setup should provide this with no additional adjustments. If you don't get a reasonable glide, go back and verify all of the previous setup items.
Timer and fuel system checks
Check all timer functions to verify proper operation. This includes running the engine and assuring that the timer will shut down the engine, and that engine vibration does not cause the timer to run erratically.
For maximum safety the timer should include a "quick-DT" (dethermalizer) capability. A quick-DT timer has a second function that can be adjusted to release the DT three to four seconds after engine cutoff. This means you cannot use a fuel-pinch-off timer during testing, because the timer stops when the fuel line is pinched.
On VIT (Variable Incidence Tailplane) airplanes, the quick-DT capability is built in because the timer provides for adjusting the time interval between functions. For fixed-surface Nostalgia models, I use a special timer which uses the flood-off principle to shut down the engine. Instead of shooting fuel into the engine intake, I vent the pressurized fuel overboard (see drawing).
This, of course, assumes you are using a pressurized fuel system. I strongly encourage using a pressure system for consistent engine performance with no sag at launch. The easiest approach is the popular "pacifier" type of rubber fuel bulb. Fuel is forced into the bulb with a syringe and the fuel line is pinched off; when the fuel line is opened, the elastic characteristic of the rubber bulb forces the fuel to the engine under pressure.
Once you are sure the timer will shut down the engine and deploy the DT three seconds later, you are ready for the first flight.
First Flight
- Use the propeller you expect to use in competition; changing propellers will affect trim.
- With the timer set for three seconds and the quick-DT hooked up, start the engine. Tune the engine for maximum rpm (use a digital tachometer, if available).
- Launch the model to the right of the wind at a steep (70–80°) attitude with the right wing a little low. With the model in this attitude, simultaneously start the timer and release the model. Do not throw the model — throwing will alter the launch attitude and result in inconsistent power patterns.
My personal launch method: face directly into the wind, start the engine, turn slightly to the right, raise the nose to a steep angle, lean the model slightly away from me, then start the timer and release. With practice you will do this consistently.
Since things happen quickly and you may be nervous, on the first flight just verify the model did not do anything violent. On subsequent flights your observations will be better.
What we expect: the model should climb out from launch fairly straight with the start of a right turn and the start of a left roll. If this occurs, increase the engine run to four seconds and try again. At four seconds the spiral climb should be clearly evident. If all is well, increase to five seconds and try again. If everything still looks good, you can remove the quick-DT.
If the model behaves well on those runs you have essentially "flew right off the board," but that rarely happens. Read on for common problems and fixes.
Basic trimming principle — decalage (elevator) control
We use decalage adjustments for primary control of the power pattern. The basic principle is:
- Up-elevator tightens the natural right turn.
- Down-elevator opens the turn.
I call the latter "The Magic of Down" because many power-pattern trim problems can be solved by putting in a little down-elevator.
Typical first-flight problems and fixes
You are likely to see one of two things on initial flights:
- The model will steepen its climb and start over on its back to begin a loop.
- The model will start out straight but will drop the right wing and start into a steep right turn (level or descending).
Both are pitch-axis problems and can often be improved by adding down-elevator. The beginning of a loop is a pure pitch-axis problem; the steep turn often results from the coupling between pitch and yaw on pylon models.
To add down-elevator, either shim up the leading edge of the stabilizer or lower the screw supporting the trailing edge. If you use shims, use plywood no thicker than 1/32". Adjust in small increments. For the nylon support-screw method, try about a 1/8 turn.
Repeat the three-second engine run and add down until the power pattern looks "ideal" (climb fairly straight with the start of a right turn and left roll). Then increase the engine run to four seconds and continue.
If instead up-elevator is needed, symptoms include a straight climb with no right-turn tendency or the start of a left roll, or a roll-left with a tendency to nose over ("go over the top"). Add increments of up-elevator until the model shows the desired power pattern.
If down-elevator does not eliminate a steep right turn, secondary adjustments may be required. You might try adding a left rudder tab, but most likely some left thrust is needed. I usually use 1½–2° left thrust; some models may require as much as 3°.
How to detect need for left thrust: if the model starts the power pattern correctly but lays over in a level, steep right turn for about 1/4 turn, then rolls left and continues the climb properly, left thrust is required.
To add left thrust, use a full-width plywood wedge-shaped shim inserted behind the engine mount to assure a solid engine mounting. Do not use washers under individual engine-mounting bolts.
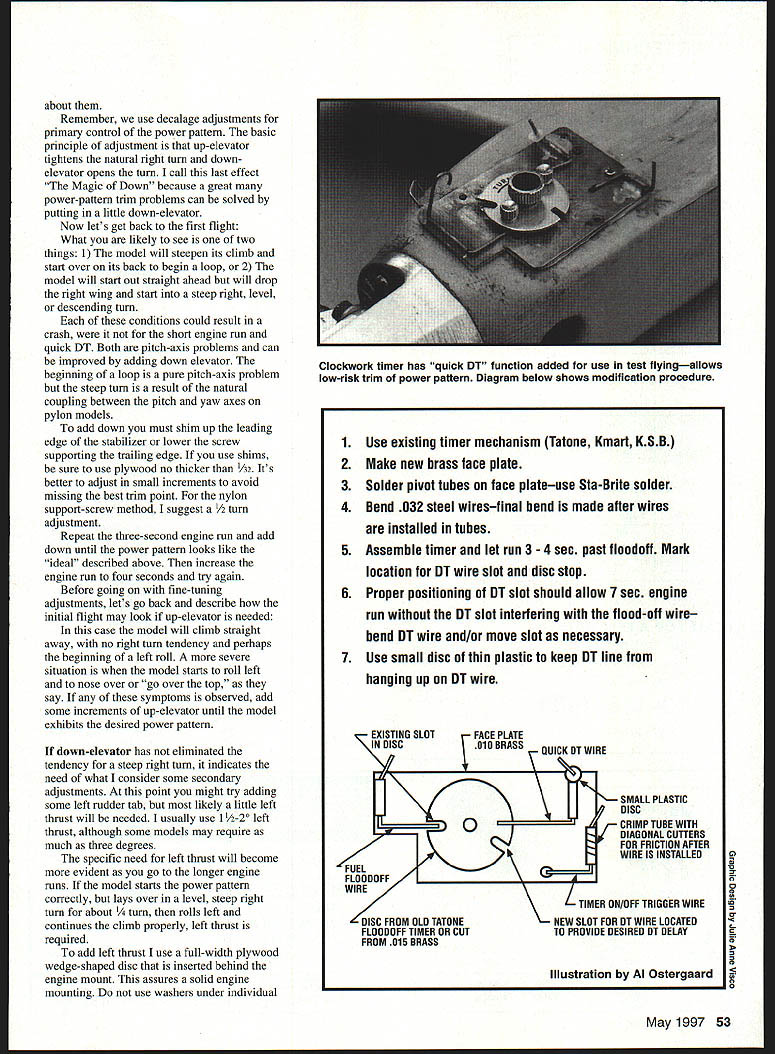
Building/modifying a flood-off quick-DT timer
If you build or modify a timer for flood-off quick-DT, consider these steps:
- Use an existing timer mechanism (Tatone, Kmart, K.S.B.).
- Make a new brass face plate.
- Solder pivot tubes on the face plate—use Sta-Brite solder.
- Bend .032" steel wires—final bend is made after wires are installed in tubes.
- Assemble timer and let run 3–4 seconds past flood-off. Mark location for DT wire slot and disc stop.
- Position the DT slot so it allows a 7-second engine run without the DT slot interfering with the flood-off wire—bend the DT wire and/or move the slot as necessary.
- Use a small disc of thin plastic to keep the DT line from hanging up on the DT wire.
Structural and rigging adjustments
To move the wing back: cut off the wing platform, add the desired dimension to the rear of the pylon, cut off the front of the pylon, and install a new wing platform. Maintain the original wing incidence. This may seem extreme, but if it saves an ounce or two of weight it can be worth the effort.
When adjusting the rig, do not alter the rudder tab or wing or tail incidence, or you will have to start over on the power trimming.
For VIT models, the glide adjustment is independent of the power trim and requires nothing more than adjusting the rudder stop and the elevator glide screw.
One situation that can require a CG shift: when the glide adjustment requires more stabilizer trailing-edge down than the power adjustment. In this case the CG must be moved forward until the situation is reversed. This can be accomplished by moving weight to the nose or moving the wing back.
With either type of model, fine-tune the glide by lowering the nose until a slight stall appears, then reversing the adjustment slightly until the stall disappears.
Transition from power to glide
You want the pitch attitude and yaw rate (turn) at engine cutoff to be such that momentum carries the model smoothly into the glide.
You can fine-tune the power pattern somewhat with the rudder tab. Left rudder will tend to open up the turn under power. If the model tends to stop in a steep attitude when the engine cuts off, then does a large pirouette to the right, rudder tab adjustments may help. Make small adjustments and observe the effect.
Another effective technique is to add up-elevator: keep adding up until the model starts to steepen the right turn near the end of an engine run, then add left rudder until the turn straightens out slightly. The left rudder tends to hold the nose up, allowing a sideslip-type transition from power to glide.
You will notice the up-elevator technique is speed-dependent: as the engine run gets longer, less up-elevator is required. You can then optimize trim for the 4-, 5-, and 7-second engine runs used in AMA Category III competition.
This is where the screw adjustment on the elevator is useful. I usually trim my models for the five-second engine run, then add 1/2 turn down-elevator for the seven-second engine run. For the four-second run, I add 1/2 turn up from the five-second elevator position. Adjust slightly as required for your model.
This technique is best suited for VIT models because the glide trim is independent of the power trim. On fixed-surface models, glide will be affected by incidence changes; if that effect is significant, it is a compromise you must manage.
Record keeping and final notes
Take notes as you progress through trimming. Include timer settings for engine runs and DT times, trim adjustments you've made and their effect, and the final trim configuration. This information is important — once the model is trimmed you may go several weeks or months between flights and cannot be expected to remember all the details for several models.
Trimming starts well before you ever get to the flying field. Proper setup is crucial.
The approach to trimming I have outlined has worked for me on several types of engine-powered models and should work for you. Combine this trim philosophy with lots of practice so you become consistent on the launch and confident in your model.
Good luck and I'll see you downwind.
Bob Johannes 5117 Silverlake St. Charles, MO 63303
Transcribed from original scans by AI. Minor OCR errors may remain.

