
FREE FLIGHT SPORT and SCALE
Fernando Ramos, 19361 Mesa Dr., Villa Park CA 92861; E-mail: [email protected]
PARASOL MODEL airplanes require special treatment because of the wing position. If a parasol model lands hard, the wing has a tendency to keep moving forward. This will remove the wing from the fuselage.
On the numerous drawings I have for these types of models, the wing attachment is usually no more than balsa cabanes. Unless the model has no weight at all, this method is unsatisfactory.
I rarely consider building a parasol, even though there are many wonderful designs. Some may ask, "How is this more work than building a biplane?"
Biplanes definitely have their share of work, but the difference is that I love them. I can put up with the hassle of biplanes, and I have done so many throughout the years that I have made the task much easier for myself.
One biplane I have never built is the Fokker D.VII. It has pain-in-the-backside cabanes that have kept me from ever considering such a task. Furthermore, the lifting wing between the landing gear is a structural pain.
I have seen many rubber-powered D.VIIs at the Flying Aces Club (FAC) Nationals, and they all fly fantastic. My choice of power is diesel; therefore, the structure has to be more substantial than for rubber power and weight is more of a consideration.
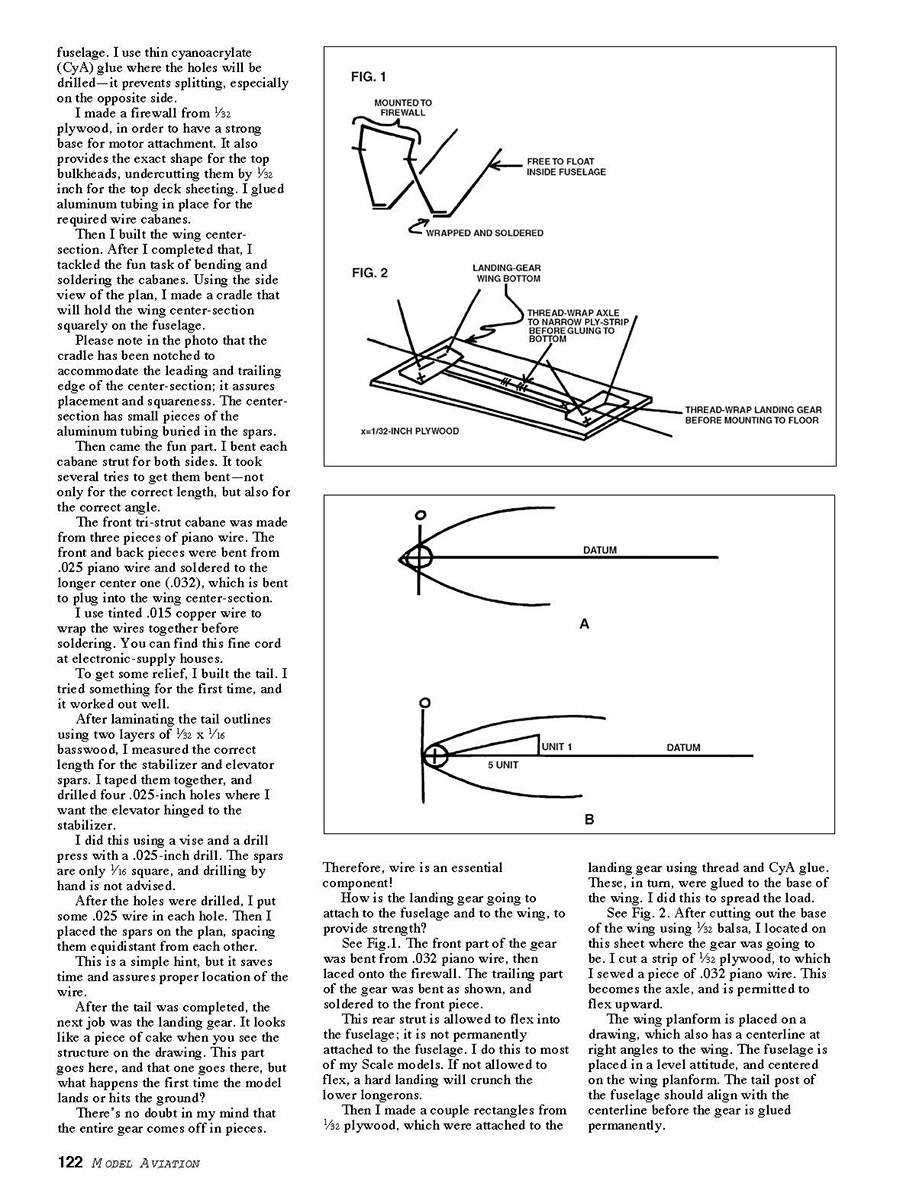
Another airplane I have refrained from building, for the same reasons, is the D.VII's sister — the Fokker D.VIII.
I want to build a D.VII at 1/2-inch = 1-foot scale. But before I tackle this beauty, I decided to build the D.VIII. This endeavor will provide me with some experience on tackling the cabane and the characteristic landing gear common to these aircraft.
The D.VIII I am building is the very fine set of drawings from Flying Scale, at 3/8-inch = 1-foot scale, giving the model a 21-inch wingspan.
The plan is set up for rubber power, but I will power mine with CO2. Because of the extra weight that the CO2 motor will have, I modified the structure to make it stronger.
I also made some changes to make the fuselage structure more scale. For starters, I used 1/16-inch square basswood for the longerons; these really provide strength. After framing the fuselage, I added diagonal bracing to the top and bottom, and from corner to corner. This ensures that the fuselage will remain square after covering.
I plan to cover the fuselage with Solartex. What? A small model fuselage covered with fabric?
I'm going to use lozenges on the fuselage. After all the trouble it is to do that, the last thing I need is to have holes easily punched in the tissue.
Let me digress.
After building the two fuselage sides (one on top of the other), before I separate them I drill holes where tubing for wing plug-in goes or where tubing for cabanes goes. On some models where the wings are held on with dowels, I drill those holes or even the holes for the motor peg on a rubber model.
All this ensures that the hole locations will be the same for both sides of the fuselage. I use thin cyanoacrylate (CyA) glue where the holes will be drilled — it prevents splitting, especially on the opposite side.
I made a firewall from 1/32-inch plywood, in order to have a strong base for motor attachment. It also provides the exact shape for the top bulkheads, undercutting them by 1/32 inch for the top deck sheeting. I glued aluminum tubing in place for the required wire cabanes.
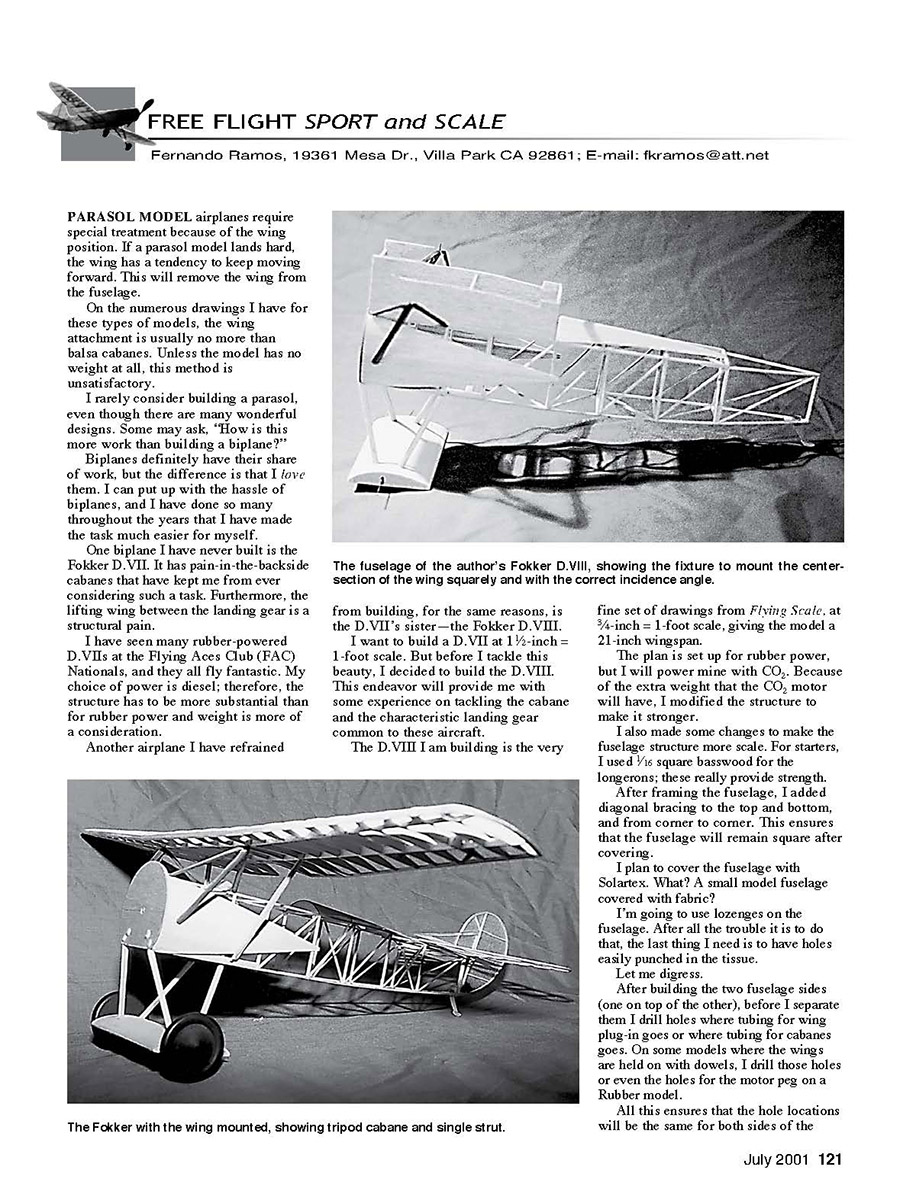
Then I built the wing centersection. After I completed that, I tackled the fun task of bending and soldering the cabanes. Using the side view of the plan, I made a cradle that will hold the wing centersection squarely on the fuselage.
Please note in the photo that the cradle has been notched to accommodate the leading and trailing edge of the centersection; it assures placement and squareness. The centersection has small pieces of the aluminum tubing buried in the spars.
Then came the fun part. I bent each cabane strut for both sides. It took several tries to get them bent — not only for the correct length, but also for the correct angle.
The front tri-strut cabane was made from three pieces of piano wire. The front and back pieces were bent from .025-inch piano wire and soldered to the longer center one (.032-inch), which is bent to plug into the wing centersection.
I use tinted .015-inch copper wire to wrap the wires together before soldering. You can find this fine cord at electronic-supply houses.
To get some relief, I built the tail. I tried something for the first time, and it worked out well.
After laminating the tail outlines using two layers of 1/32 x 1/16-inch basswood, I measured the correct length for the stabilizer and elevator spars. I taped them together, and drilled four .025-inch holes where I want the elevator hinged to the stabilizer.
I did this using a vise and a drill press with a .025-inch drill. The spars are only 1/16-inch square, and drilling by hand is not advised.
After the holes were drilled, I put some .025-inch wire in each hole. Then I placed the spars on the plan, spacing them equidistant from each other.
This is a simple hint, but it saves time and assures proper location of the wire.
After the tail was completed, the next job was the landing gear. It looks like a piece of cake when you see the structure on the drawing. This part goes here, and that one goes there, but what happens the first time the model lands or hits the ground?
There's no doubt in my mind that the entire gear comes off in pieces.
Therefore, wire is an essential component!
How is the landing gear going to attach to the fuselage and to the wing, to provide strength?
See Fig. 1. The front part of the gear was bent from .032-inch piano wire, then laced onto the firewall. The trailing part of the gear was bent as shown, and soldered to the front piece.
This rear strut is allowed to flex into the fuselage; it is not permanently attached to the fuselage. I do this to most of my scale models. If not allowed to flex, a hard landing will crunch the lower longerons.
Then I made a couple rectangles from 1/32-inch plywood, which were attached to the landing gear using thread and CyA glue. These, in turn, were glued to the base of the wing. I did this to spread the load.
See Fig. 2. After cutting out the base of the wing using 1/32-inch balsa, I located on this sheet where the gear was going to be. I cut a strip of 1/32-inch plywood, to which I sewed a piece of .032-inch piano wire. This becomes the axle, and is permitted to flex upward.
The wing planform is placed on the drawing, which also has a centerline at right angles to the wing. The fuselage is placed in a level attitude, and centered on the wing planform. The tail post of the fuselage should align with the centerline before the gear is glued permanently.
I haven't seen a scale model covered with silk in many years. When I was in the UK last summer, I didn't pay attention to the covering material used on most of the diesel-powered scale models; I suspect that many were covered with silk. Many Old-Timer modelers still like to use silk to cover their models as they were originally done.
After mentioning that one radio-control scale modeler I met in the UK covered his eight-foot-span biplane in tissue (doped), then placed the silk on the tissue using wallpaper paste, I received a couple reactions.
One problem with doping silk is that if one is not careful, the dope runs onto the backside and looks awful.
Following are a couple suggestions that will help ease the task of doping silk. The first is from Dick Hamilton.
After the structure has been coated with several coats of dope, Dick saturates the silk with water then places it on the structure, pulling and tugging until it lays smooth. He attaches the silk with thinner. While the silk is still quite wet, he starts doping over the open structure.
At this point, the silk looks awful. Dope and water cause the surface to turn white from the moisture. Two more coats will return the surface to the way it should look. The water bridges the weave of the silk, and does not permit the dope to soak through.
The second approach is from Dave Hicks. He handles the doping problem another way.
After the silk has been attached to the structure, he lays a paper towel on the surface. He brushes quite a bit of dope onto the towel, then drags it across the surface, keeping it saturated with dope.
I've tried this, and it works quite well. Many of my friends use a wide foam brush which accomplishes the same thing.
Sal Tait can cover a polyhedral wing with one piece of silk. He can also cover an elliptical-shaped fuselage with one piece. I would like to learn how this is done.
Silk is not cheap (it's as much as $15 for a square yard), but there are times when only it will do. I have built Henry Struck's Super Cloud rubber model. The fuselage is long and sleek; tissue doesn't come long enough, but seams are unwanted. Only silk will do.
For each of the last 11 years, SAM 35 in the UK (SAM stands for Society of Antique Modelers) has come out with a yearbook. This publication is for those of you who enjoy history of model aviation.
Along with text, there are dozens of interesting plans, many of which can be purchased. Plans are included for several rubber scale, free-flight power, control line, and sailplane models.
You will enjoy having this book in your library. If you are interested in acquiring a copy, send $14 US plus $4 shipping and handling to R. S. Knight, 14A Enborne Gardens, East Sheen, London SW14 8RF, England.
Don't send a check; it costs $25 to cash them there. (You didn't read it here.) Send cash.
The incomparable Bill Hannan has come out with another of his classic publications. This one is Models & Methods International.
This book follows the format for which his publications are known. It covers the "why" and "how" of modeling, and several plans.
The cost is $11.95 plus shipping and handling. (There is no mention how much postage is; I assume that a couple dollars would cover it.) Order from Hannan's Runway, Box 210, Magalia CA 95954.
I had a computer crash that caused me to lose all of my e-mails. I had promised to send information and plans to some readers, but I can't now.
Would those to whom I need to send some "stuff" please e-mail me, so I can send what I owe?
MA
Transcribed from original scans by AI. Minor OCR errors may remain.

