

Fix It - Don’t "86" It
by Walt Wilson
Minor repairs need not keep your airplane grounded
If you fly long enough, eventually one of your models will meet the ground in an unscheduled landing. One of my club’s best fliers says, “All aircraft have an expiration date, some earlier than others.” Often the airplane will be mostly confetti and unfixable, but frequently a few hours’ work may restore it to its previous beauty and usefulness.
Always gather all the parts and pieces after a crash and take them home. You may need them later so that they can be glued back in place, or you can use them for reference. The field maintenance crew will appreciate it. Who wants their flying field littered with yesterday’s misfortunes?
When you are ready to tackle the project, lay the parts out on your workbench and evaluate the damage.
- What is broken, bent, or missing?
- What parts can be glued back together or in place, and which ones are destroyed?
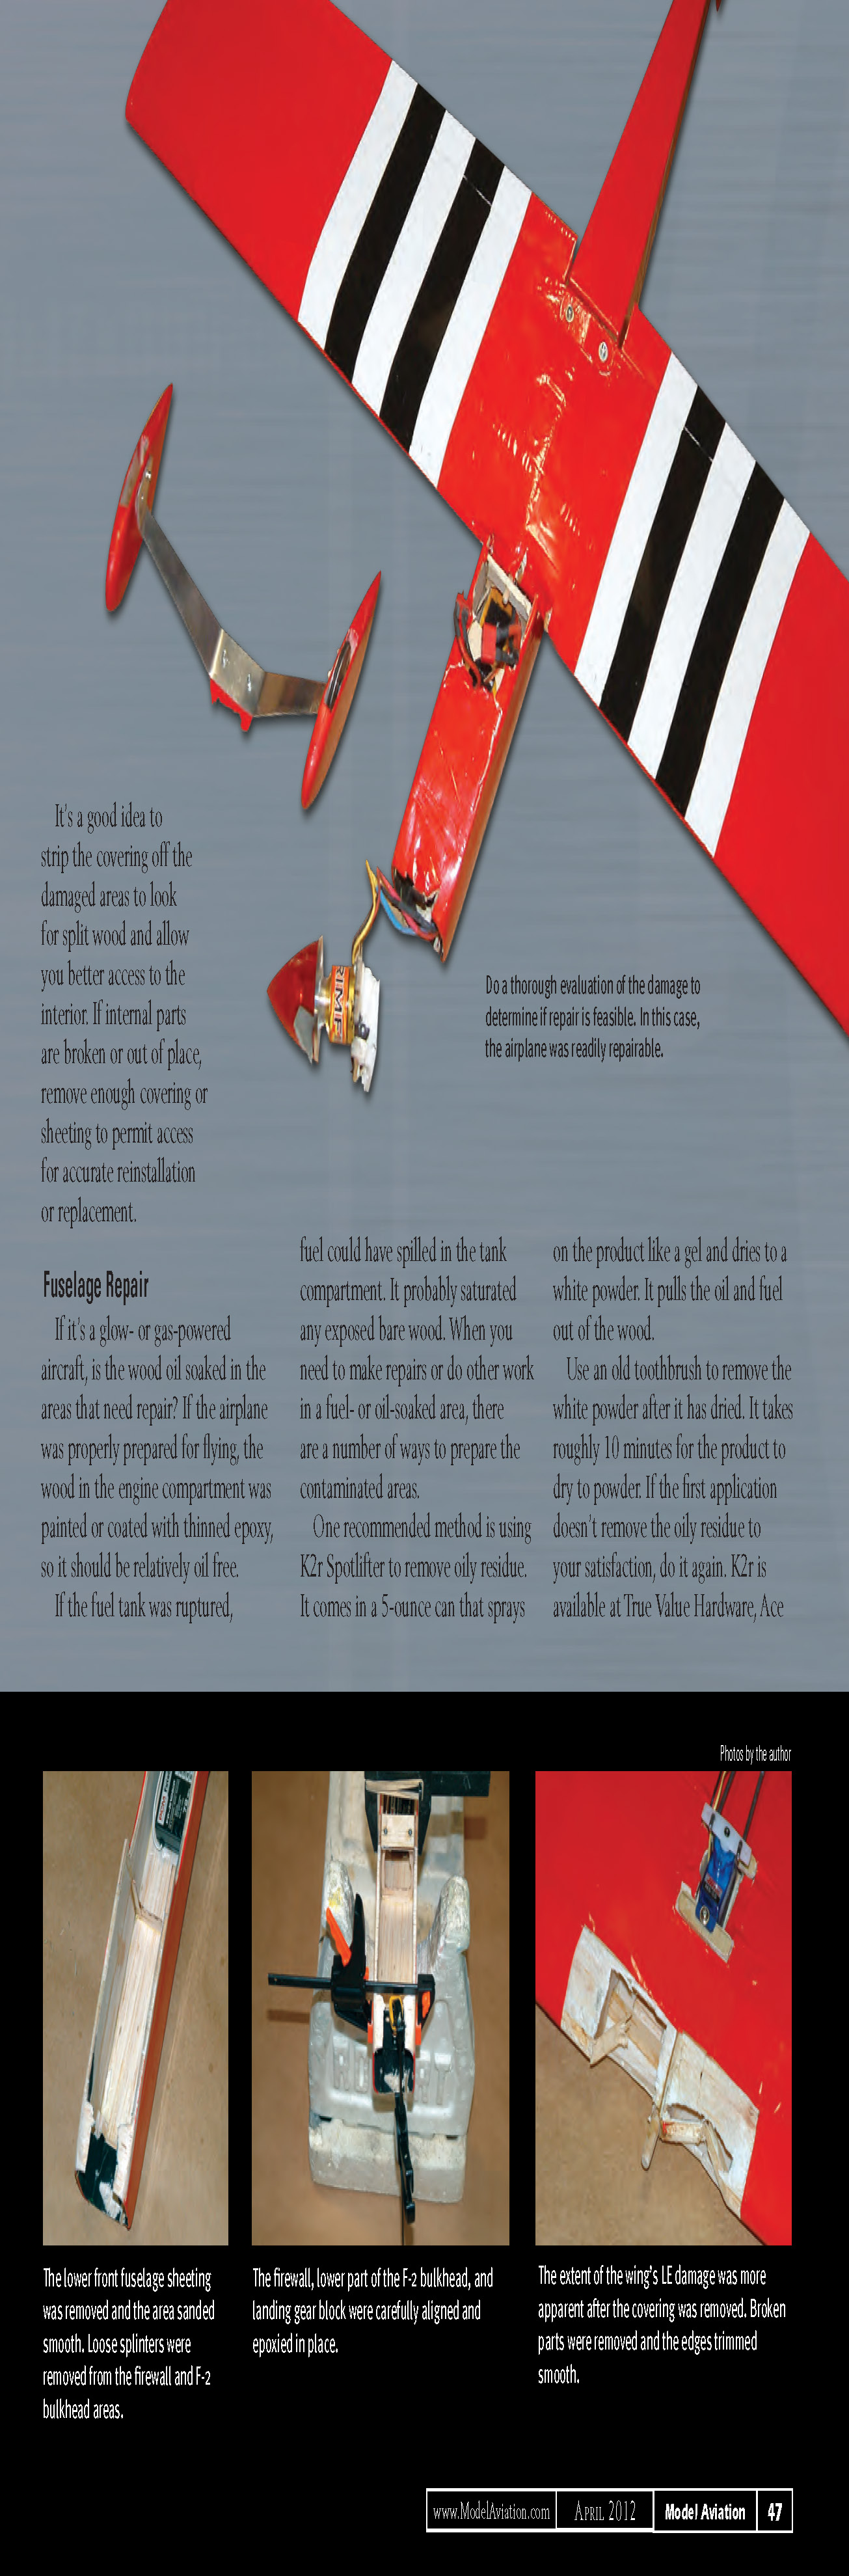
Do a thorough evaluation of the damage to determine if repair is feasible. In this case, the airplane was readily repairable. The lower front fuselage sheeting was removed and the area sanded smooth. Loose splinters were removed from the firewall and F-2 bulkhead areas. The firewall, lower part of the F-2 bulkhead, and landing gear block were carefully aligned and epoxied in place. The extent of the wing’s leading-edge (LE) damage was more apparent after the covering was removed. Broken parts were removed and the edges trimmed smooth.
If it’s a glow- or gas-powered aircraft, check whether the wood is oil-soaked in the areas that need repair. If the airplane was properly prepared for flying, the wood in the engine compartment was painted or coated with thinned epoxy, so it should be relatively oil free. If the fuel tank was ruptured, fuel could have spilled in the tank compartment and probably saturated any exposed bare wood.
When you need to make repairs in a fuel- or oil-soaked area, one recommended method is using K2r Spotlifter to remove oily residue. It comes in a 5-ounce can that sprays on like a gel and dries to a white powder. It pulls the oil and fuel out of the wood. Use an old toothbrush to remove the white powder after it has dried — roughly 10 minutes. If the first application doesn’t remove the oily residue to your satisfaction, do it again. K2r is available at True Value Hardware, Ace Hardware, and other hardware stores and home centers.
If the firewall is damaged beyond use, make a new one from a piece of plywood. If it’s usable, check to make sure it will fit back in the space from which it came. Trim away any splinters or broken pieces. Align the firewall and epoxy it in place, making sure it is exactly where it was before the crash. If there’s any doubt about the strength of the joints, add a small strip of fiberglass cloth on each side of the back of the firewall, overlapping onto the fuselage sides, and saturate with epoxy.
Repair or replace any other damaged formers and reinstall them using CA or epoxy, whichever was used originally. Fiberglass reinforcement shouldn’t be necessary in those locations. Reinstall any wing-mounting blocks that may have broken loose; they should fit back into the locations from which they came. Epoxy is preferred for this application, but CA can also be used.
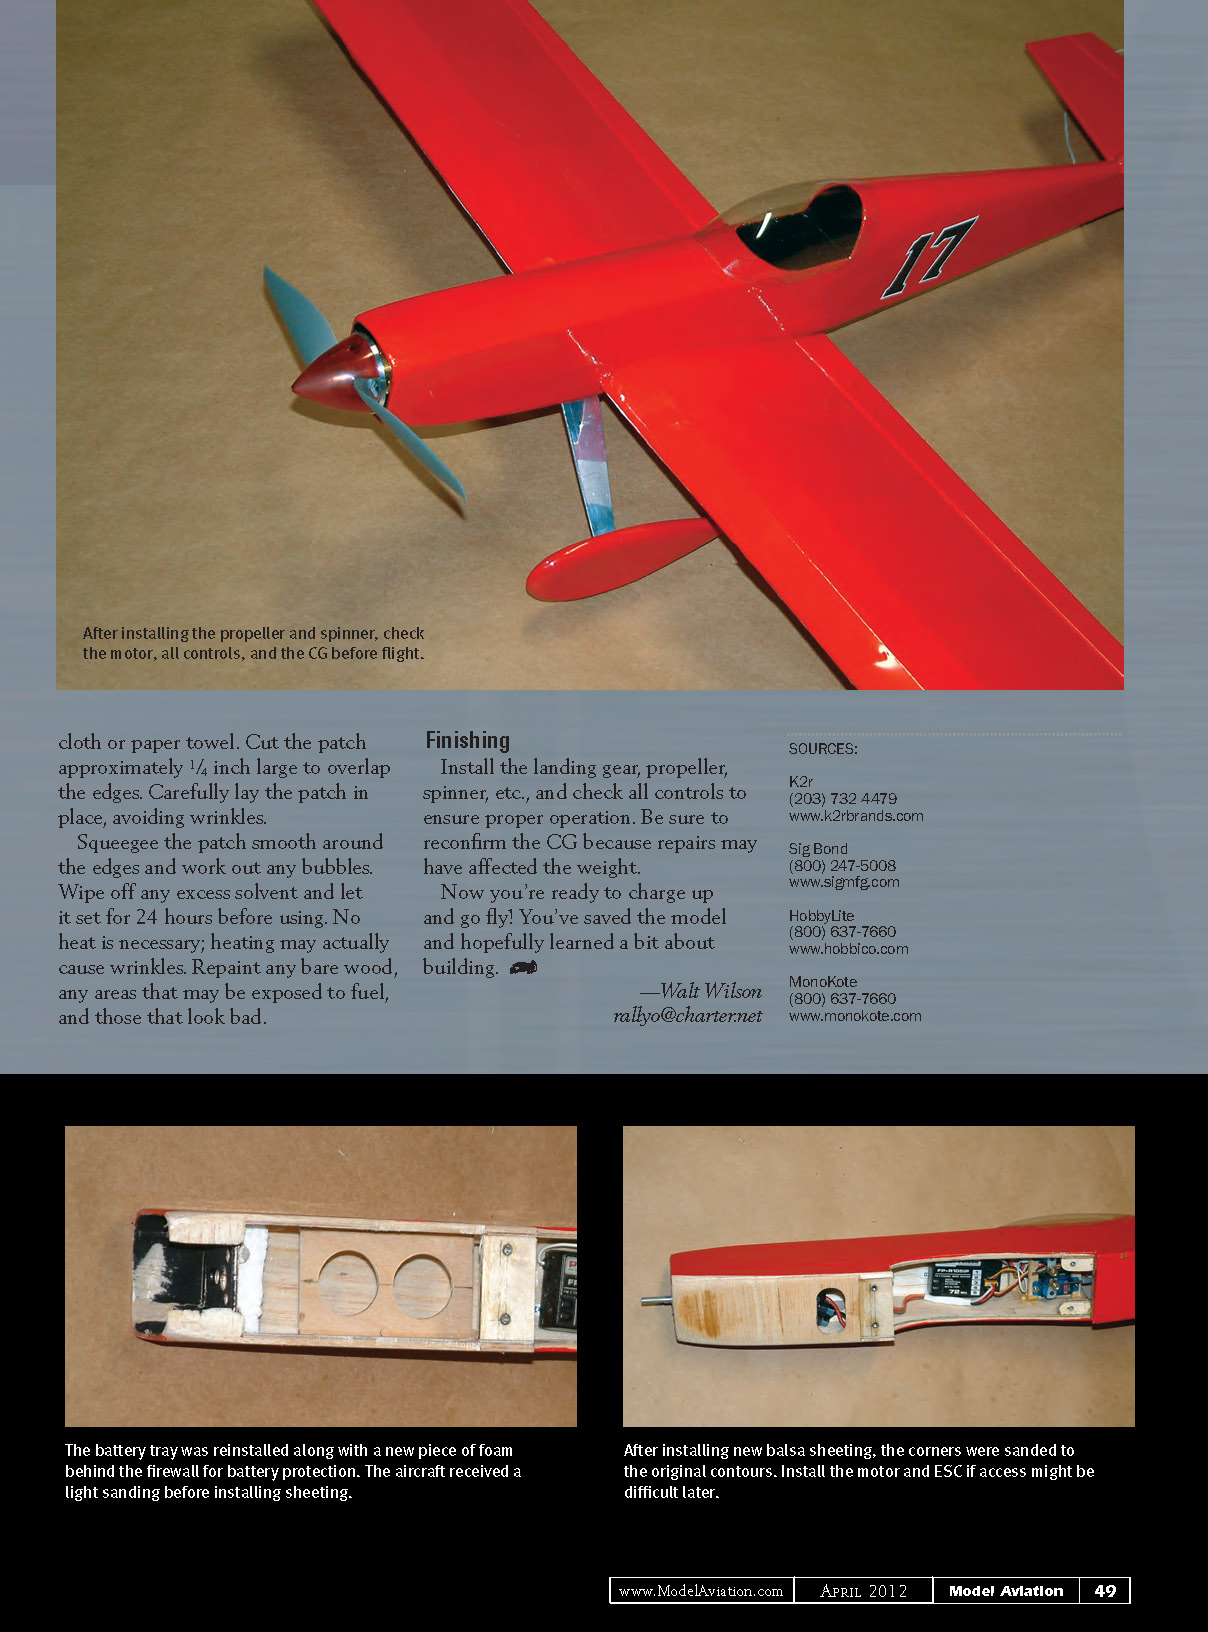
If it’s a glow-powered airplane, reinstall the throttle linkage. If there is a battery-carrying shelf, reinstall it using the original adhesive or mounting method. Don't forget to replace any protective materials you may be using behind the firewall. The airplane shown in the photographs has a 3/4-inch piece of Styrofoam between the firewall and battery. Install the motor and any other components that may present an access problem later.
You can sand the areas where the lower front balsa sheeting will be installed to remove any irregularities before its installation. In this instance the corners needed to be rounded, so Sig Bond aliphatic glue was used because of its easy sanding properties. If one or more cooling-air egress holes were provided before, cut new ones.
Hobbico HobbyLite or any suitable filler can be used to fill gaps or irregularities; then sand all exposed wood smooth.
Wing Repair
- Carefully cut and remove the covering from the damaged area(s).
- Remove the damaged wood and trim the edges straight. Trim the skin even with the edges of the ribs. Don't try to trim the skin to the centers of the ribs; they're probably glued well enough that it would be difficult to achieve a straight edge.
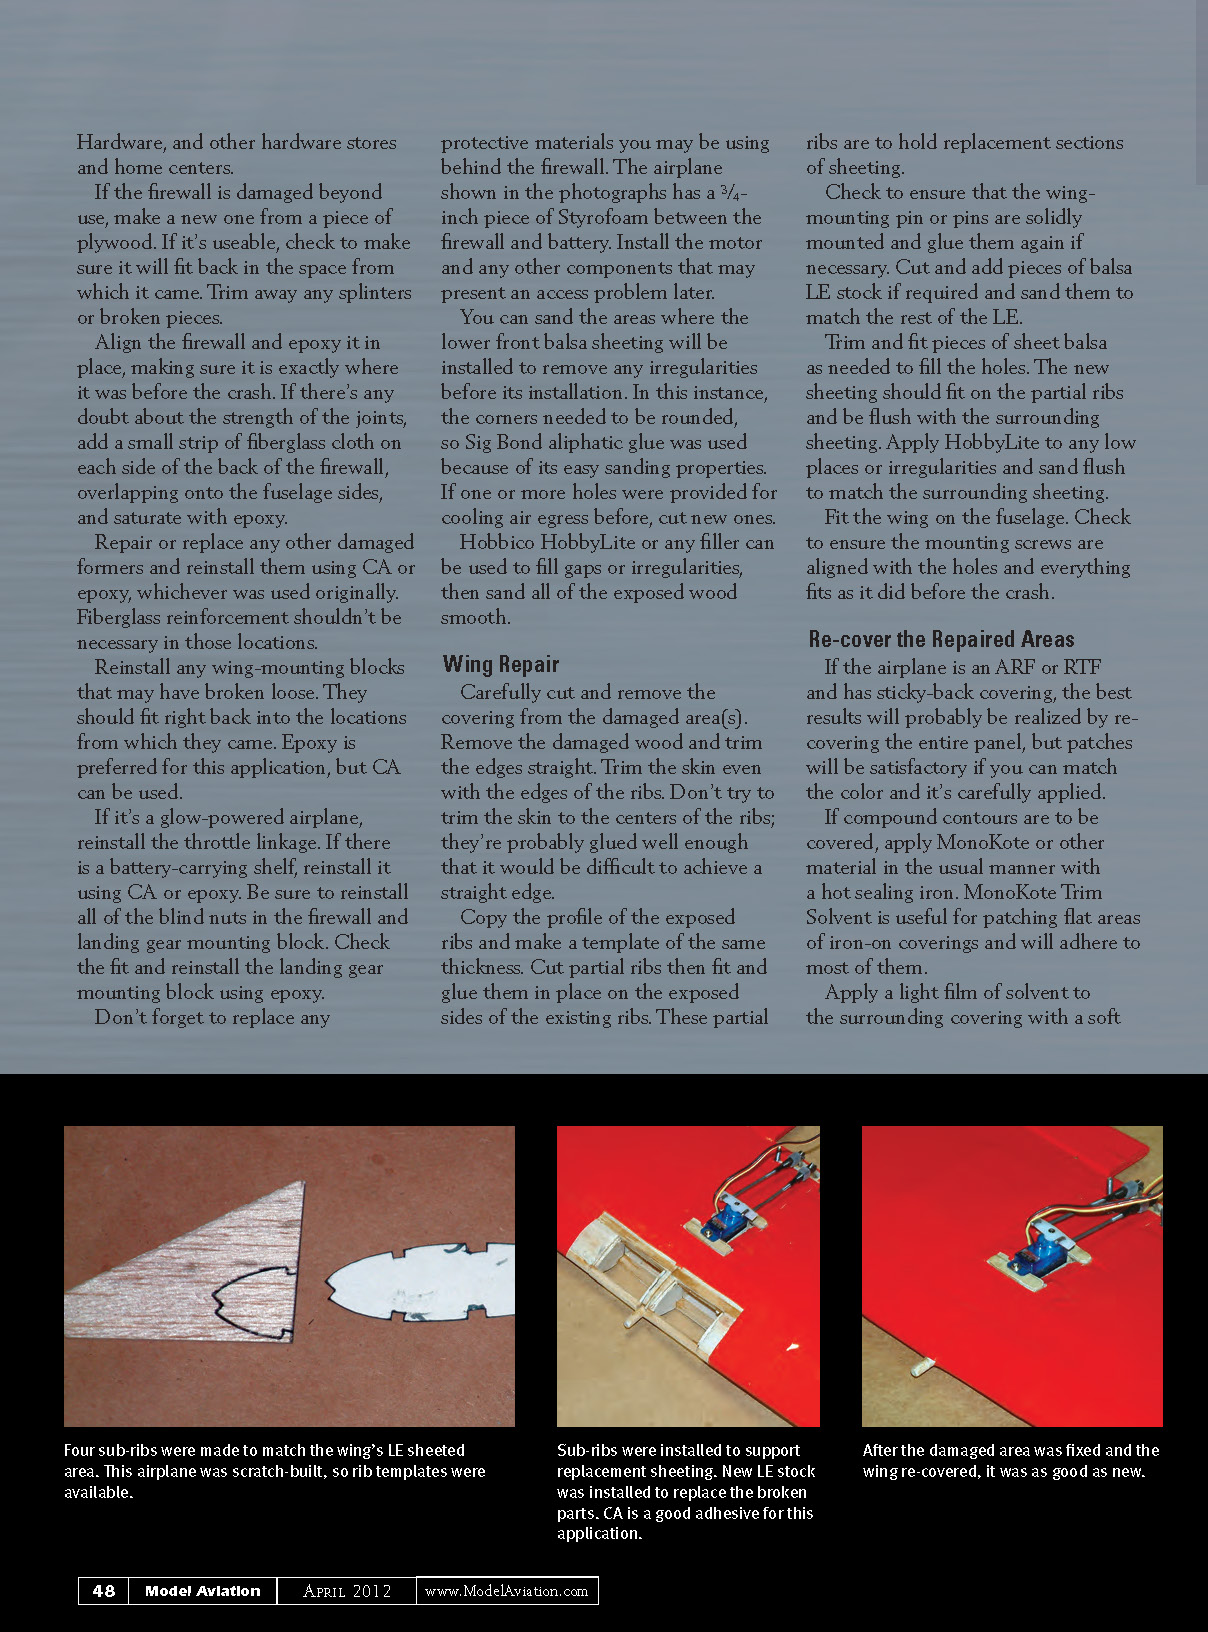
- Copy the profile of the exposed ribs and make a template of the same thickness. Cut partial ribs, then fit and glue them in place on the exposed sides of the existing ribs. These partial ribs hold replacement sections of sheeting.
- Check to ensure that the wing-mounting pin or pins are solidly mounted and glue them again if necessary.
- Cut and add pieces of balsa LE stock if required and sand them to match the rest of the LE.
- Trim and fit pieces of sheet balsa as needed to fill the holes. The new sheeting should fit on the partial ribs and be flush with the surrounding sheeting.
- Apply HobbyLite to any low places or irregularities and sand flush to match the surrounding sheeting.
- Fit the wing on the fuselage. Check to ensure the mounting screws are aligned with the holes and everything fits as it did before the crash.
Re-cover the Repaired Areas
If the airplane is an ARF or RTF and has sticky-back covering, the best results will probably be realized by re-covering the entire panel, but patches will be satisfactory if you can match the color and apply them carefully.
If compound contours are to be covered, apply MonoKote or other material in the usual manner with a hot sealing iron. MonoKote Trim Solvent is useful for patching flat areas of iron-on coverings and will adhere to most of them.
- Apply a light film of solvent to the surrounding covering with a soft cloth or paper towel.
- Cut the patch approximately 1/4 inch larger to overlap the edges.
- Carefully lay the patch in place, avoiding wrinkles.
- Squeegee the patch smooth around the edges and work out any bubbles.
- Wipe off any excess solvent and let it set for 24 hours before using. No heat is necessary; heating may actually cause wrinkles.
Repaint any bare wood, any areas that may be exposed to fuel, and those that look bad.
Finishing
Install the landing gear, propeller, spinner, etc., and check all controls to ensure proper operation. Be sure to reconfirm the CG because repairs may have affected the weight.
Now you're ready to charge up and go fly! You've saved the model and hopefully learned a bit about building.
- Walt Wilson
Transcribed from original scans by AI. Minor OCR errors may remain.

