


The Foamy
BY BENNY LANTERMAN
A simple-to-build RC foam flying wing that's easy to personalize
One of the joys of living in today's world is that the difference between wonders caused by science and wonders caused by magic is getting harder to differentiate. This applies to our radio-control hobby. Small receivers, servos, and motors let us put controls on almost anything we want to fly, from airplanes weighing less than an ounce to turbo-jet–powered, flame-shooting monsters.
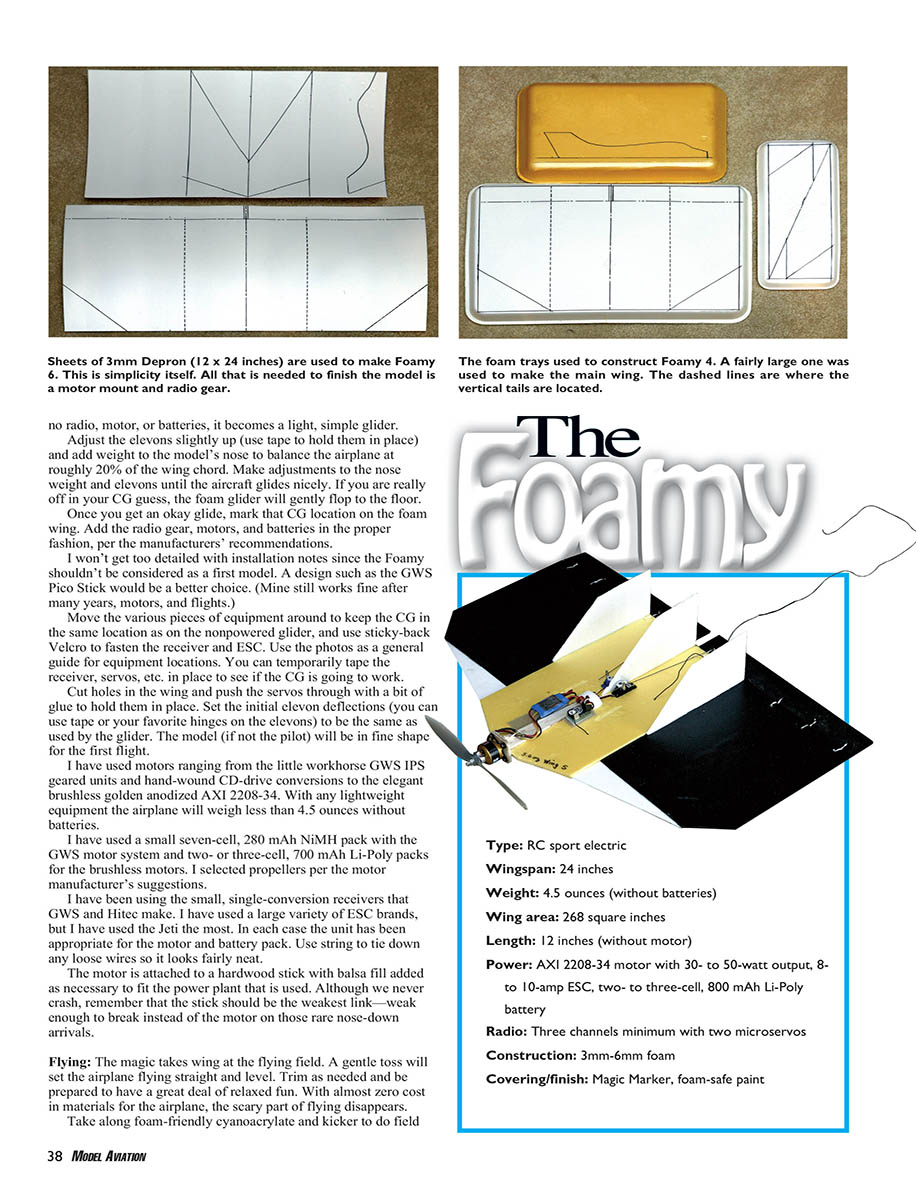
Much of the available "magic" is found in our trash. The modern foam tray used in supermarkets is an airplane waiting to happen—you just have to cut away everything that isn't an airplane and let the magic out. Another source of foam trays is local recycling centers (for example, Leftovers, etc. in Saint Charles, Missouri). Most larger cities have similar facilities that supply free or affordable foam to teachers and crafters. Foam trays come in many sizes and thicknesses; sometimes it's worth eating some broccoli to get the piece you want.
If you don't have access to recycled trays, foam sheets sold under the Depron name are available in several thicknesses and are fun to work with.
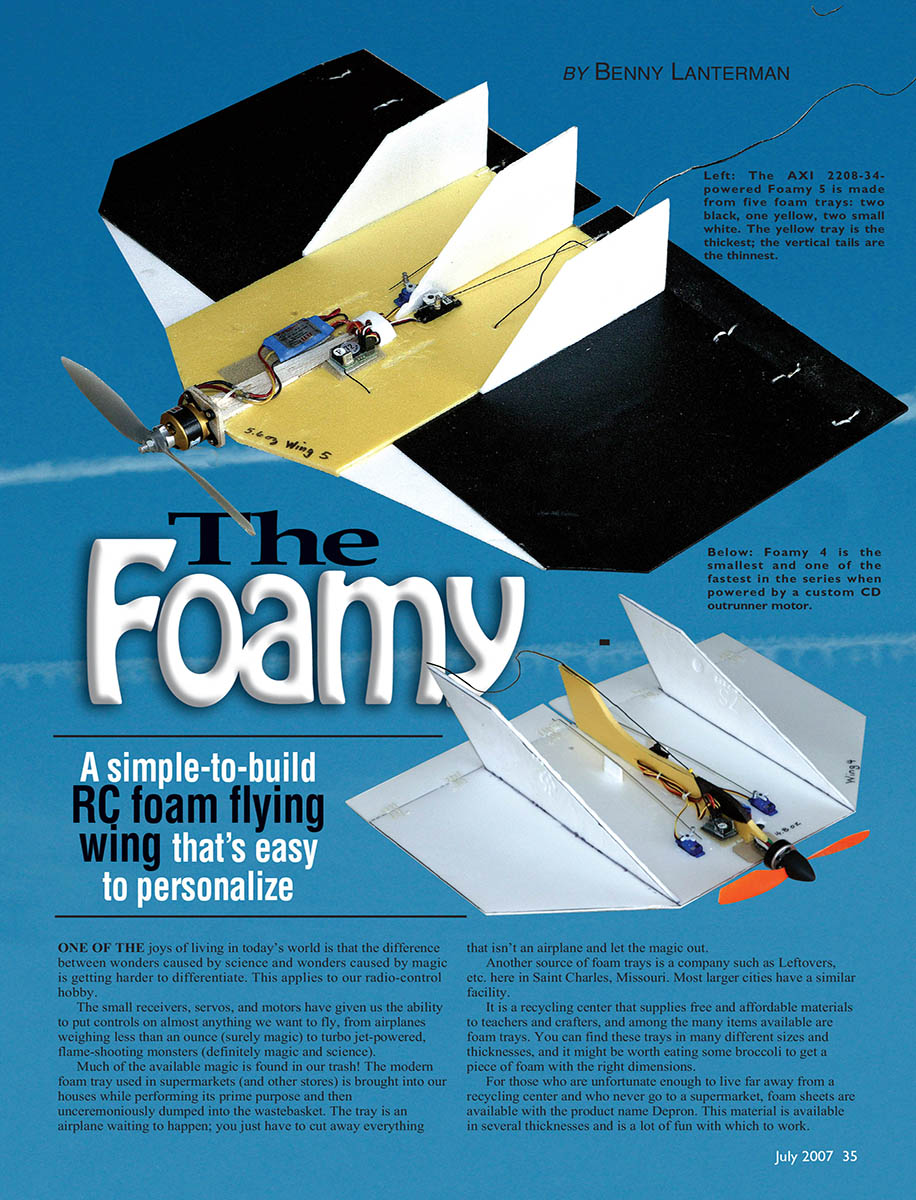
The Foamy is a simple, light RC flying wing made from foam. It is fully aerobatic and responsive in pitch and roll. Except for larger, light variants (Foamy 6), the design flies fairly fast. The configuration is flexible—single or multiple vertical tails, rectangular or oval planform wings, delta looks, and many fuselage shapes have all worked. Let your imagination be your limit.
Construction
The first step is to gather foam and see what you can make. Experimentation and variation are encouraged. The foam is easy to cut with a sharp blade and can be glued with any foam-safe adhesive. I use foam-friendly cyanoacrylate and can build an airplane in a few minutes. When in doubt, test a small scrap of foam to verify glue compatibility.
- Butt joints are generally strong. If you plan to use a large motor, reinforce questionable areas with a small strip of thin foam or balsa on either side.
- If you want a more robust wing, add a spar (see the spar note below).
I recommend the Foamy for pilots who already have some experience; it is not an ideal first airplane. It is light, aerobatic, and can be fairly quick depending on power.
A few construction and durability tips:
- Use foam-friendly CA and kicker for quick field repairs.
- The motor is mounted to a hardwood stick with balsa fill added as necessary to fit the power plant used. Make the stick the weakest link so it breaks instead of the motor in a nose-down arrival.
- Tie down loose wires with string so installations look neat.
- I once stepped on an antenna wire while holding Foamy 4 by a vertical tail and tore the tail off; it was easy to fix. Be careful when handling the model, especially with the prop spinning—hold it firmly when checking the motor to avoid injuries.
Quick design check and CG method (test-glider method)
You can test whether your design will fly and determine the center of gravity (CG) before committing radio gear:
- Cut and glue together only the foam and any balsa reinforcement parts of your airplane. Add the elevons with pieces of tape (do not install radio gear yet).
- With elevons slightly up (tape them in that position), add weight to the nose until the airplane balances and glides nicely—aim for roughly 20% of the wing chord as a starting CG.
- Glide the model and adjust nose weight and elevon position until it has a good glide. If the CG is way off, the foam glider will gently flop to the floor—no damage.
- Mark the CG location on the foam wing when satisfied.
- Add radio gear, motor, and batteries, positioning them so the CG stays at the marked location. Use sticky-back Velcro to fasten receiver and ESC; temporarily tape components in place to verify CG before final installation.
- Cut holes for servos and push them through with a bit of glue to hold them. Set initial elevon deflections the same as used for the glider.
This method lets you make sure your changes will allow the airplane to fly before spending much money.
Equipment and power
I have used a wide variety of motors and electronics on different Foamy versions:
- Motors: GWS IPS geared units, hand-wound CD-drive conversions, and AXI brushless outrunners (e.g., AXI 2208-34).
- Batteries: Small seven-cell 280 mAh NiMH packs for GWS systems; two- or three-cell Li-Poly packs (700–800 mAh) for brushless motors.
- ESCs: Various brands; match the ESC to the motor and battery. I have used Jeti frequently.
- Receivers and servos: Small single-conversion receivers from GWS and Hitec; two microservos minimum for elevon control. Use Du-Bro micro hardware or equivalent.
With lightweight equipment, the airplane can weigh under 4.5 ounces without batteries. Select propellers per the motor manufacturer's suggestions.
Flying
- A gentle toss will set the airplane flying straight and level. Trim as needed.
- With almost zero material cost, the scary part of flying disappears—take risks and experiment.
- Take foam-friendly CA and kicker for field repairs.
- The Foamy is a great platform for experimenting with power systems, propellers, CG, control throws, dihedral, sweep, and tail arrangements.
Performance notes from various Foamy versions:
- Large, light Foamy 1 or Foamy 6 with a small GWS motor flies gently and slowly; rolls are possible but not aggressive. Tip dihedral increases roll stability.
- The same airframe with an AXI brushless motor becomes fast and capable of continuous loops and rolls; it can climb vertically for a long time.
- One Foamy developed a wing-folding issue under heavy aerobatics; I repaired the break and added a 1/16" thick, 2" wide balsa wing spar at approximately the 25% chord position. No further problems after that reinforcement.
Safety note: Always have a good grip on the model when testing or running the motor. I once let the prop hit my hand and received several painful cuts—treat small motors with respect.
Specifications
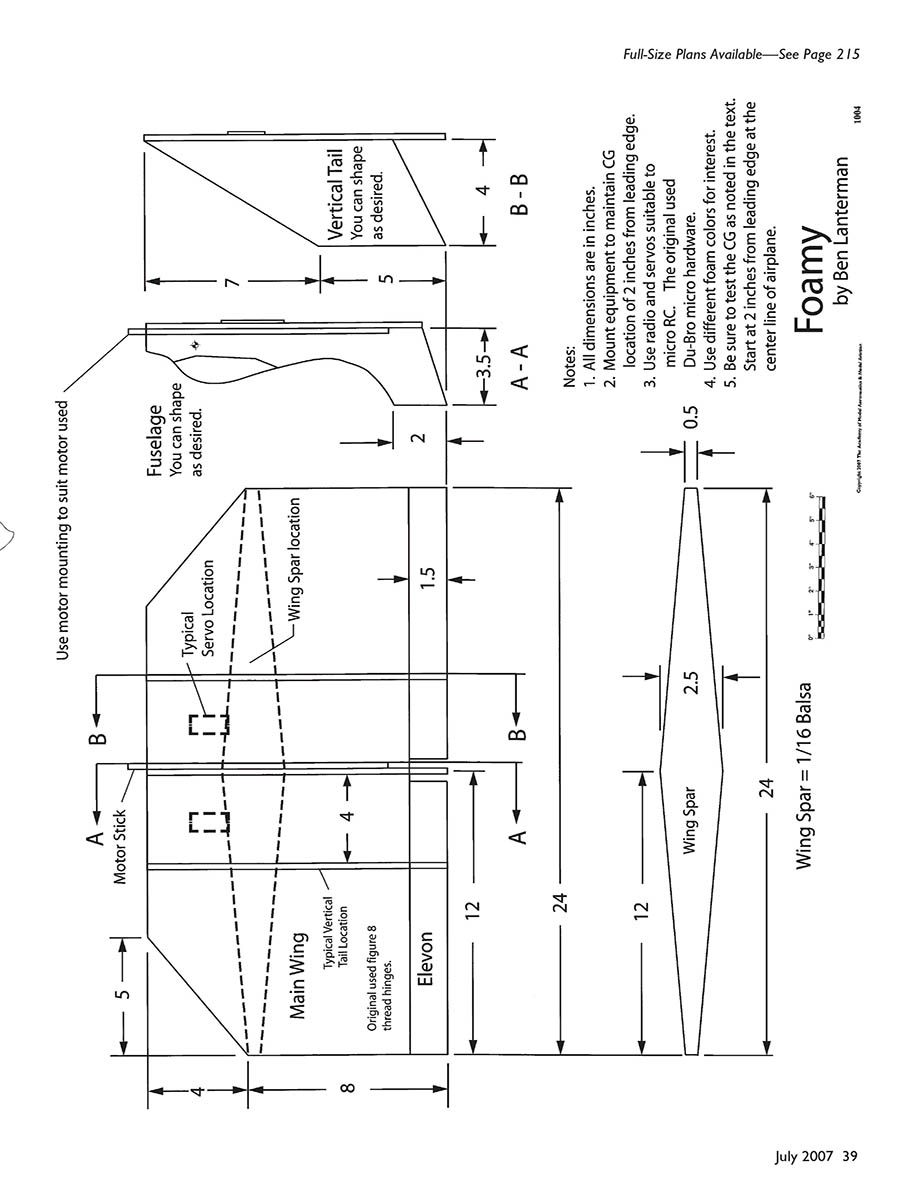
- Type: RC sport electric
- Wingspan: 24 inches
- Weight: ~4.5 ounces (without batteries)
- Wing area: 268 square inches
- Length: 12 inches (without motor)
- Power: AXI 2208-34 motor (30–50 W), 8–10 A ESC, 2–3 cell 800 mAh Li-Poly battery (example)
- Radio: Three channels minimum with two microservos (elevons)
- Construction: 3 mm–6 mm foam; 1/16" balsa spar recommended in some builds
- Covering/finish: Magic Marker, foam-safe paint
Notes
- All dimensions are in inches.
- Mount equipment to maintain CG location of 2 inches from the leading edge (approximately 20% of chord) at the centerline of the airplane.
- Use radio and servos suitable to Du-Bro micro hardware.
- Use different foam colors for visual interest.
- Be sure to set the CG as noted in the text; start at 2 inches from the leading edge at the centerline.
Parts / Typical locations / Construction details
- Main wing
- Typical servo location
- Wing spar location
- Typical vertical tail location
- Motor stick (mount to suit motor used)
- Elevon (hinge with tape, figure-8 thread hinges, or preferred hinge method)
- Fuselage: shape as desired
- Vertical tail: shape as desired
- Wing spar: 1/16" balsa recommended for reinforcement
- Original builds used figure-8 thread hinges on control surfaces
Have fun experimenting, make field repairs, and fly all day. The large, flat piece of foam is a great-flying airplane with characteristics dependent on weight, size, and power.
Benny Lanterman [email protected]
Transcribed from original scans by AI. Minor OCR errors may remain.

