

FREE FLIGHT DURATION
Louis Joyner, 6 Saturday Rd., Mt. Pleasant SC 29464
THE NATIONAL CUP
Competition is an integral part of the sport of Free Flight. Contests offer a reason to build better models, to trim them to fly as long as possible, and to test our work against the stopwatch. More important, contests give us an excuse to gather in friendly competition. Visiting with old friends and making new ones is as important a part of the contest experience as is the actual competition.
The National Cup provides yet another reason for participation in Free Flight competition. Patterned after the successful America’s Cup for the Fédération Aéronautique Internationale (FAI) classes, the National Cup is a multicontest affair for AMA Free Flight events sponsored by the National Free Flight Society (NFFS).
The National Cup is based on a point system. Points are accumulated based on placings at various contests across the country. At the end of the year, the flier with the most points in a category wins the National Cup in that category.
For a detailed set of rules, as well as a list of National Cup contests, visit the NFFS Web site at www.freeflight.org. You will also find many other items of interest on the Web site, including membership information. If you are not already a member of NFFS, join.
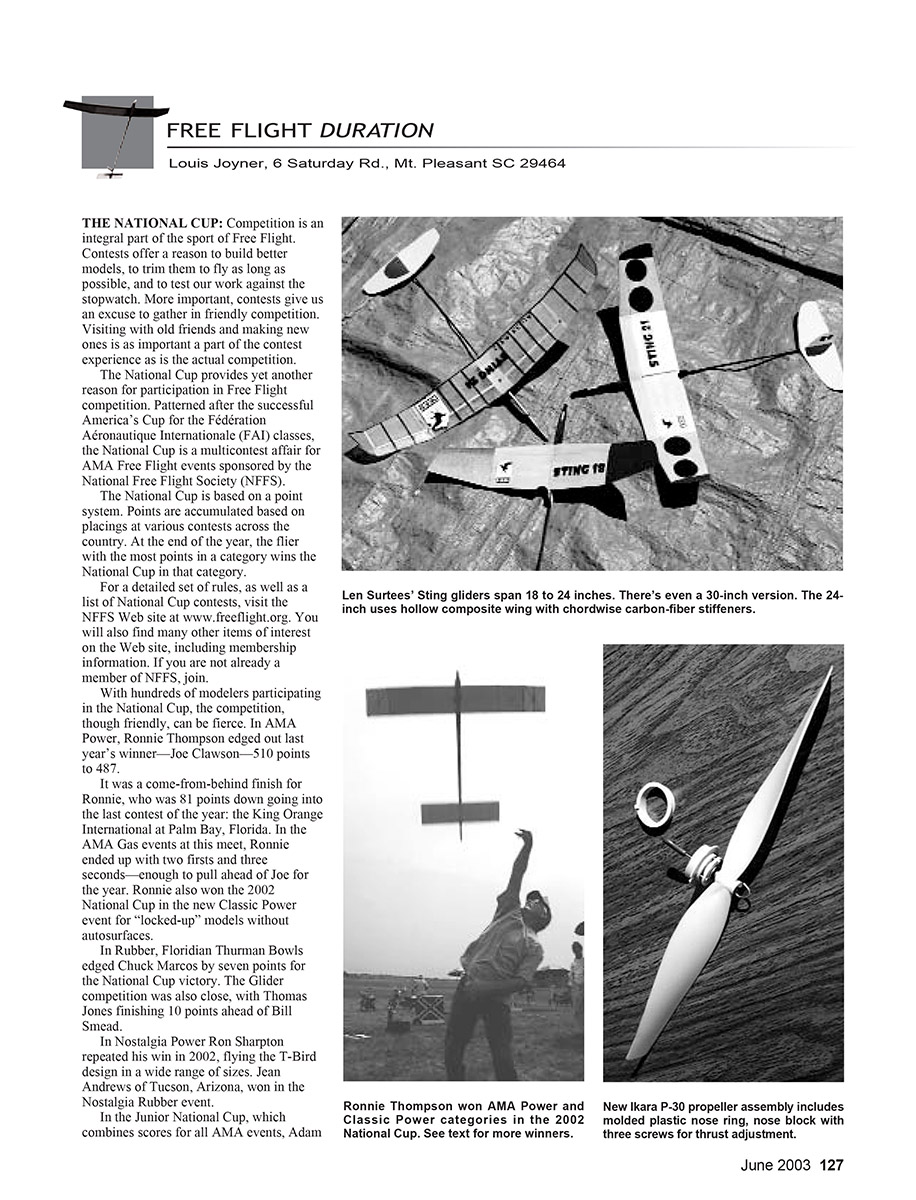
With hundreds of modelers participating in the National Cup, the competition, though friendly, can be fierce. In AMA Power, Ronnie Thompson edged out last year’s winner—Joe Clawson—510 points to 487.
It was a come-from-behind finish for Ronnie, who was 81 points down going into the last contest of the year: the King Orange International at Palm Bay, Florida. In the AMA Gas events at this meet, Ronnie ended up with two firsts and three seconds—enough to pull ahead of Joe for the year. Ronnie also won the 2002 National Cup in the new Classic Power event for “locked-up” models without autosurfaces.
In Rubber, Floridian Thurman Bowls edged Chuck Marcos by seven points for the National Cup victory. The Glider competition was also close, with Thomas Jones finishing 10 points ahead of Bill Smead.
In Nostalgia Power, Ron Sharpton repeated his win in 2002, flying the T-Bird design in a wide range of sizes. Jean Andrews of Tucson, Arizona, won in the Nostalgia Rubber event.
In the Junior National Cup, which combines scores for all AMA events, Adam Marsh won, with his brother Alex second. One of the best parts of reviewing the National Cup results was seeing that there were 50 Juniors flying.
HIGH-TECH HAND-LAUNCHED GLIDER (HLG)
HLG stands for Hand-Launched Glider. For as long as I can remember, these were simple things carved and sanded from solid balsa. Building one—or a half dozen—resulted in many balsa chips on the shop floor and a good bit of balsa dust up your nose. (You really should wear a face mask when sanding.)
Occasionally a design would combine sheet balsa and open tissue construction. Some used a thin sheet-balsa upper surface with simple ribs providing the curve of the airfoil. The center portion of each wing panel was cut out to save weight. Cleverly, the scrap from the cutouts would be just the right size for the tail. The whole thing was tissue-covered. Another technique, popular with larger HLGs, was to use wide balsa leading and trailing edges combined with a solid balsa center-section and tip pieces. The whole assembly was sanded to airfoil shape, balsa ribs were added, then the wing was covered with tissue.
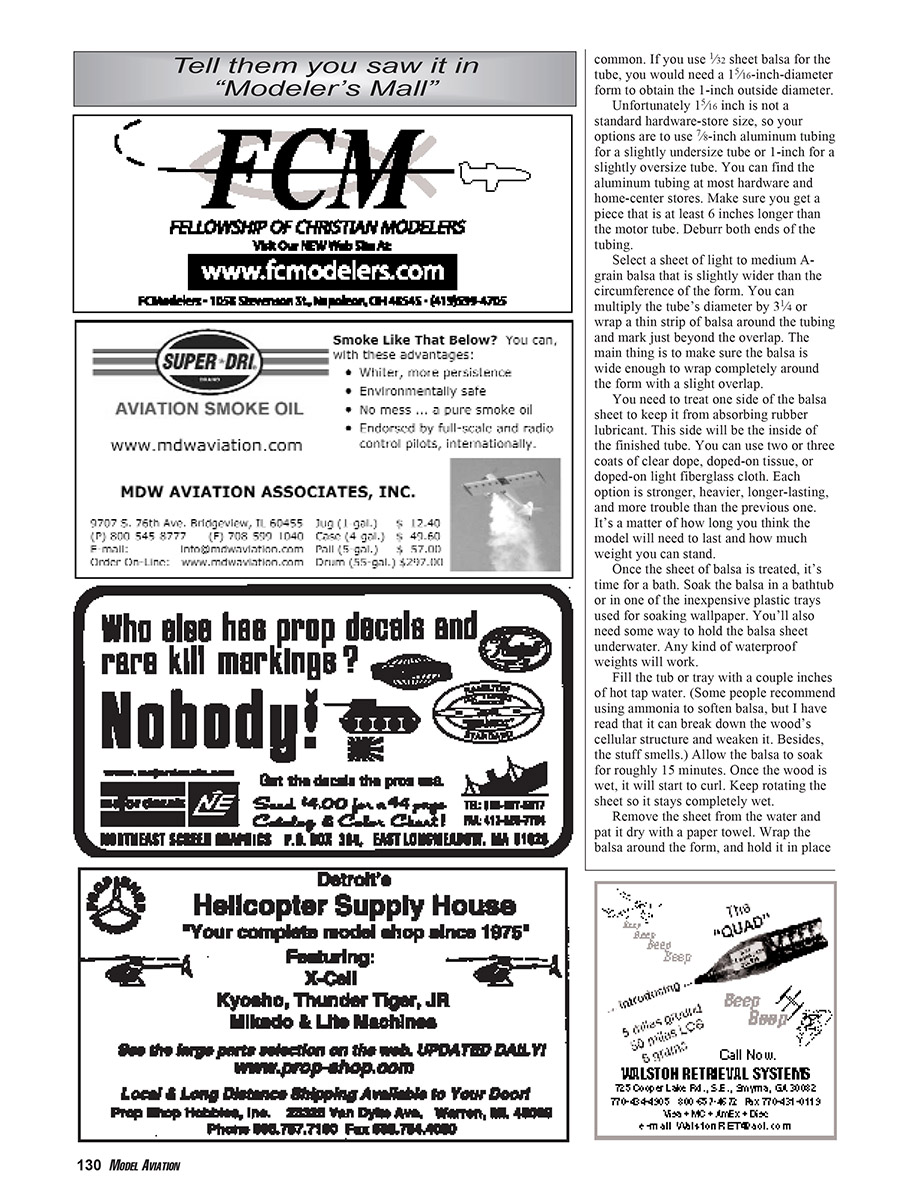
Len Surtees, down under in Australia, has been rethinking the HLG. In last year’s NFFS Symposium he detailed two methods for building HLG wings. One uses insulation foam sanded to shape and covered top and bottom with 1/2-ounce fiberglass cloth and epoxy laminating resin. A stack of telephone books is used to apply pressure to the assembly while the epoxy sets. (Len points out that although the phone-book system works well for straight or straight-tapered wing panels, a vacuum bag is needed for rounded compound shapes.)
To protect the front edge of the wing from the inevitable nicks, Len incorporates a spruce or hard-balsa strip along the leading edge. For bending strength, he also incorporates a carbon-fiber spar at the wing's high point.
Len's second construction method is considerably more complicated. He makes a two-part mold of the finished wing, complete with dihedral and any desired wash-in or washout, then he places 2-ounce fiberglass cloth coated with epoxy in upper and lower molds to form the top and bottom wing skins. Carbon-fiber tows placed every 30 millimeters (roughly 1 1/4 inches) provide chordwise stiffening, much like conventional ribs.
After the epoxy sets, a balsa spar is added along with balsa ribs at the center and dihedral breaks. Carbon-fiber tows are added along the leading and trailing edges, and the upper and lower skins are joined, still in their respective molds. The finished 24-inch-span wing weighs 24 grams.
Len has also experimented with composite materials as a substitute for conventional sheet-balsa tail surfaces. For his Sting 24 stabilizer, he uses .045-inch Rohacell foam sanded to shape and covered top and bottom with 1/2-ounce fiberglass cloth and epoxy. The assembly is then vacuum-bagged.
The resulting stabilizer is about 1/2 gram lighter than comparable balsa pieces. However, the weight-saving effect is multiplied because the lighter tail needs less nose weight to balance the model; the total weight savings is approximately 2 grams.
All of this experimentation has paid off. Len currently holds four Australian Indoor records and three world F1N (Indoor HLG) records.
Len is selling a number of HL and Catapult Glider kits and components. Full-size plans are also available. For information, contact Len Surtees, 10 Woodbury Cres., Tamworth, NSW 2340, Australia, or E-mail [email protected].
The 2002 NFFS Symposium is available from NFFS Publications, c/o Robert McLinden, Box 7976, Baltimore MD 21221. Ordering information is also available on the NFFS Web site.
If you are interested in experimenting with composite materials such as Rohacell foam, carbon fiber, and lightweight fiberglass cloth, Composite Structures Technology is one of the best companies. CST also sells epoxy resin and vacuum-bagging supplies. The Web site—www.cstsales.com—offers information about a variety of composite construction techniques.
Rolling Your Own
A rolled-balsa motor tube provides an elegant and more durable alternative to a built-up fuselage and is much easier to build. Total time, start to finish, is roughly the same as for a built-up, tissue-covered fuselage, but with a rolled tube most of that time is spent waiting for things to dry.
Instead of spending hours gluing in the dozens, and sometimes hundreds, of uprights required for a built-up fuselage, roll the balsa tube and build the wing and tail, then finish the tube. Here's how.
Making a tube involves wrapping a wet sheet of thin balsa around a form—usually a piece of aluminum tubing from the hardware store. After the wood dries, the rolled balsa is removed from the form and the seam is glued. Beyond that, there can be a number of finishing variations inside and out.
- Figure out the diameter of tube you want. If you are working with an existing round front end and nose ring, that will determine the diameter. If not, you have a bit more flexibility. For a P-30-size model, an outside diameter of roughly 1 inch is common. If you need a specific outside diameter, select a form (aluminum tubing) that gives you the desired final size when the sheet thickness is accounted for. You can find aluminum tubing at most hardware and home-center stores. Make sure you get a piece that is at least 6 inches longer than the motor tube. Deburr both ends of the tubing.
- Select a sheet of light to medium A-grain balsa that is slightly wider than the circumference of the form. You can multiply the tube's diameter by about 3-1/4 to estimate the required sheet width, or wrap a thin strip of balsa around the tubing and mark just beyond the overlap. The main thing is to make sure the balsa is wide enough to wrap completely around the form with a slight overlap.
- Treat one side of the balsa sheet to keep it from absorbing rubber lubricant. This side will be the inside of the finished tube. Options include:
- Two or three coats of clear dope.
- Doped-on tissue.
- Doped-on light fiberglass cloth.
Each option is progressively stronger, heavier, and longer-lasting; choose based on how long you want the model to last and how much weight you can accept.
- Soak the balsa. Use a bathtub or one of the inexpensive plastic trays used for soaking wallpaper. You'll need a way to keep the sheet submerged—any waterproof weight will work. Fill the tub or tray with a couple inches of hot tap water. Allow the balsa to soak for roughly 15 minutes. Once the wood is wet, it will start to curl; keep rotating the sheet so it stays completely wet.
- Wrap and hold. Remove the sheet from the water and pat it dry with a paper towel. Wrap the balsa around the form and hold it in place with rubber bands or tape. Make sure the balsa does not slide sideways on the form as you tension it. A smear of glue on the ends will help keep the balsa from slipping.
- Glue the seam. When the balsa has dried enough to get a good glue joint, pull one rubber band off and squeeze a thin bead of aliphatic (carpenter's) glue between the overlapping edges. Roll the tube under the band so the joint will be tight. Wipe off excess glue with a damp cloth.
- Finish the tube. If you want a more finished tube, glue a strip of 1/32-inch balsa over the seam on the inside and sand smooth, or glue a 1/16-inch strip on the outside and sand to shape. The rolled tube will often be slightly oval when dry; roll it on the bench with a dowel to round it, or use a mandrel.
Wrap the balsa around the form, hold it in place, and allow everything to dry thoroughly before removing the tube from the mandrel and completing final finishing and fitting.
Transcribed from original scans by AI. Minor OCR errors may remain.

