
FREE FLIGHT SCALE
Fernando Ramos 19361 Mesa Dr., Villa Park, CA 92861 E-mail: [email protected]
Ordering and Mail-Order Warnings
I have done business with several outfits (I assume they are companies since they advertise in model magazines) lately, with some exasperating results. After ordering parts, kits, etc., I waited not days or weeks, but months before I finally called, only to be given the usual story (like "the check is in the mail!"). After waiting several more months, I wrote a letter threatening to notify the postal authorities.
When I mentioned my plight to my flying buddies, their comments were unanimous: they didn't do business with this particular outfit for the same reason. I bring this up to warn you that there are people out there who are not particularly good for the hobby. It would be nice to have a sounding board to inform us (before we order) about some of these characters. Had I asked my buddies about this company first, obviously I would not have done business with it.
The model-railroad businesses are even worse. I waited more than a year for some switches and almost two years for a particular kit. This problem was solved after some serious letter-writing. So before parting with your hard-earned money, check with your friends to see if they have had any trouble with the company in question. With the lack of good model shops, we are forced, so to speak, to mail order. However, I have never had any trouble ordering from the large model-supply companies.
Sopwith 1 1/2-Strutter and Hanriot Cabane Struts
I have wanted to build a model of the Sopwith 1 1/2-Strutter for the longest time, but I have shied away from it because of the "W" cabane struts. Since I plan on building a Strutter that has diesel power, I have to have the W made from piano wire.
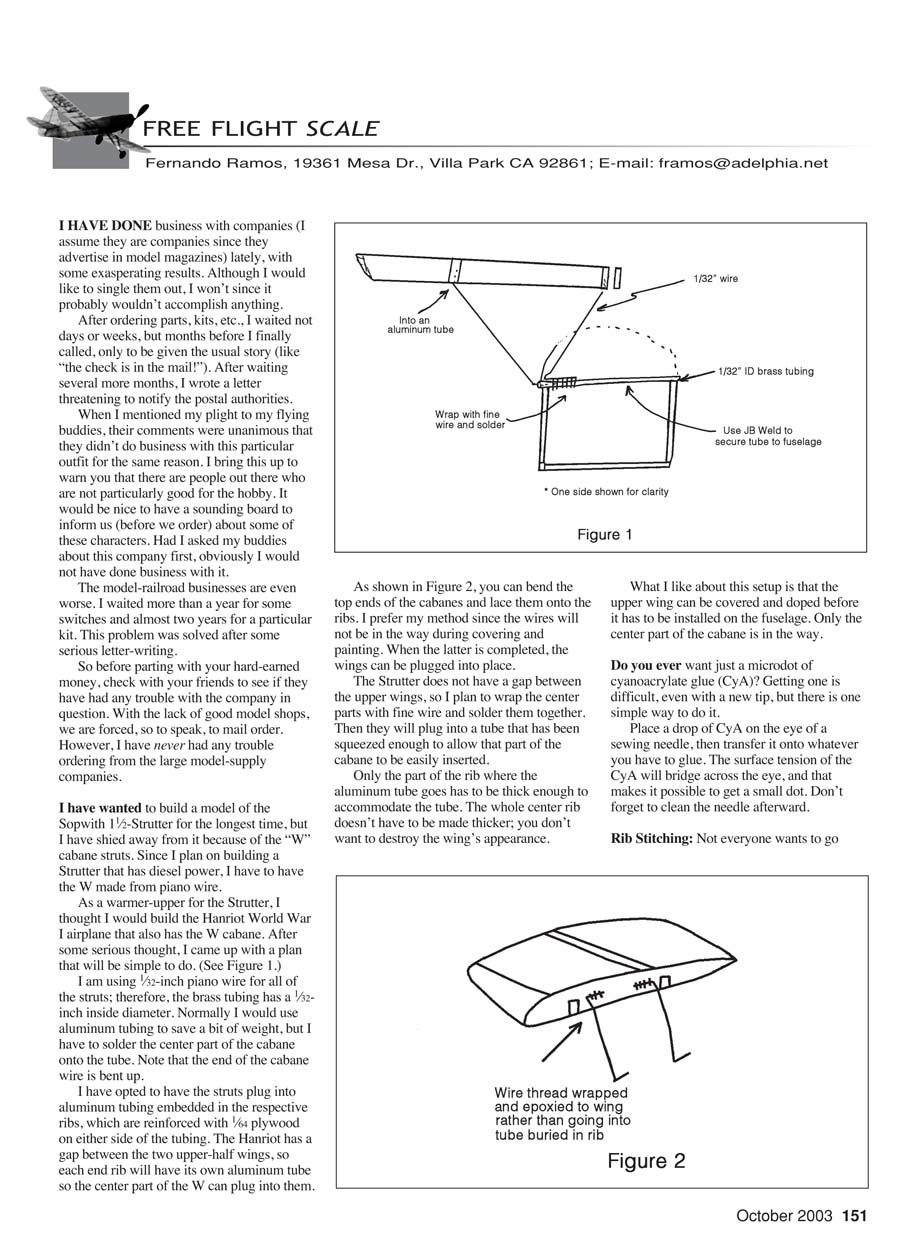
As a warm-up for the Strutter, I thought I would build the Hanriot World War I airplane that also has the W cabane. After some serious thought, I came up with a plan that will be simple to do (see Figure 1).
I am using 1/32-inch piano wire for all of the struts; therefore, the brass tubing has a 1/32-inch inside diameter. Normally I would use aluminum tubing to save a bit of weight, but I have to solder the center part of the cabane onto the tube. Note that the end of the cabane wire is bent up.
I have opted to have the struts plug into aluminum tubing embedded in the respective ribs, which are reinforced with 1/64-inch plywood on either side of the tubing. The Hanriot has a gap between the two upper-half wings, so each end rib will have its own aluminum tube so the center part of the W can plug into them.
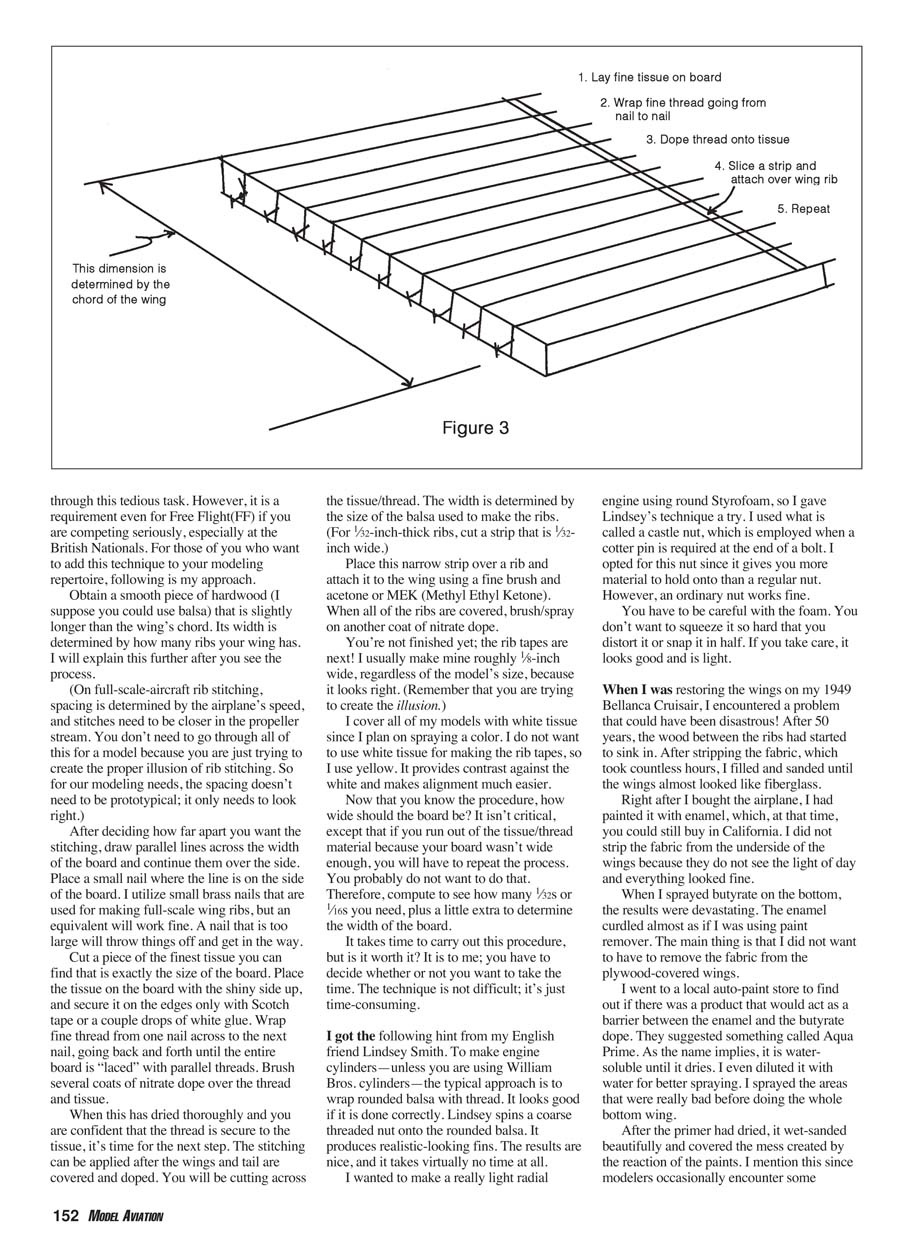
As shown in Figure 2, you can bend the top ends of the cabanes and lace them onto the ribs. I prefer my method since the wires will not be in the way during covering and painting. When the latter is completed, the wings can be plugged into place.
The Strutter does not have a gap between the upper wings, so I plan to wrap the center parts with fine wire and solder them together. Then they will plug into a tube that has been squeezed enough to allow that part of the cabane to be easily inserted.
Only the part of the rib where the aluminum tube goes has to be thick enough to accommodate the tube. The whole center rib doesn't have to be made thicker; you don't want to destroy the wing's appearance.
What I like about this setup is that the upper wing can be covered and doped before it has to be installed on the fuselage. Only the center part of the cabane is in the way.
Microdot of Cyanoacrylate (CyA)
Do you ever want just a microdot of cyanoacrylate glue (CyA)? Getting one is difficult, even with a new tip, but there is one simple way to do it.
Place a drop of CyA on the eye of a sewing needle, then transfer it onto whatever you have to glue. The surface tension of the CyA will bridge across the eye, and that makes it possible to get a small dot. Don't forget to clean the needle afterward.
Rib Stitching
Not everyone wants to go through this tedious task. However, it is a requirement even for Free Flight (FF) if you are competing seriously, especially at the British Nationals. For those of you who want to add this technique to your modeling repertoire, following is my approach.
Materials and setup:
- A smooth piece of hardwood (you could use balsa) slightly longer than the wing's chord.
- Width determined by how many ribs your wing has.
- Small nails (I use small brass nails used for full-scale wing ribs).
- The finest tissue you can find.
- Fine thread, Scotch tape or a couple drops of white glue, nitrate dope, acetone or MEK.
Procedure:
- Decide how far apart you want the stitching. (On full-scale aircraft the spacing is determined by speed and propeller stream; for models the spacing only needs to look right.)
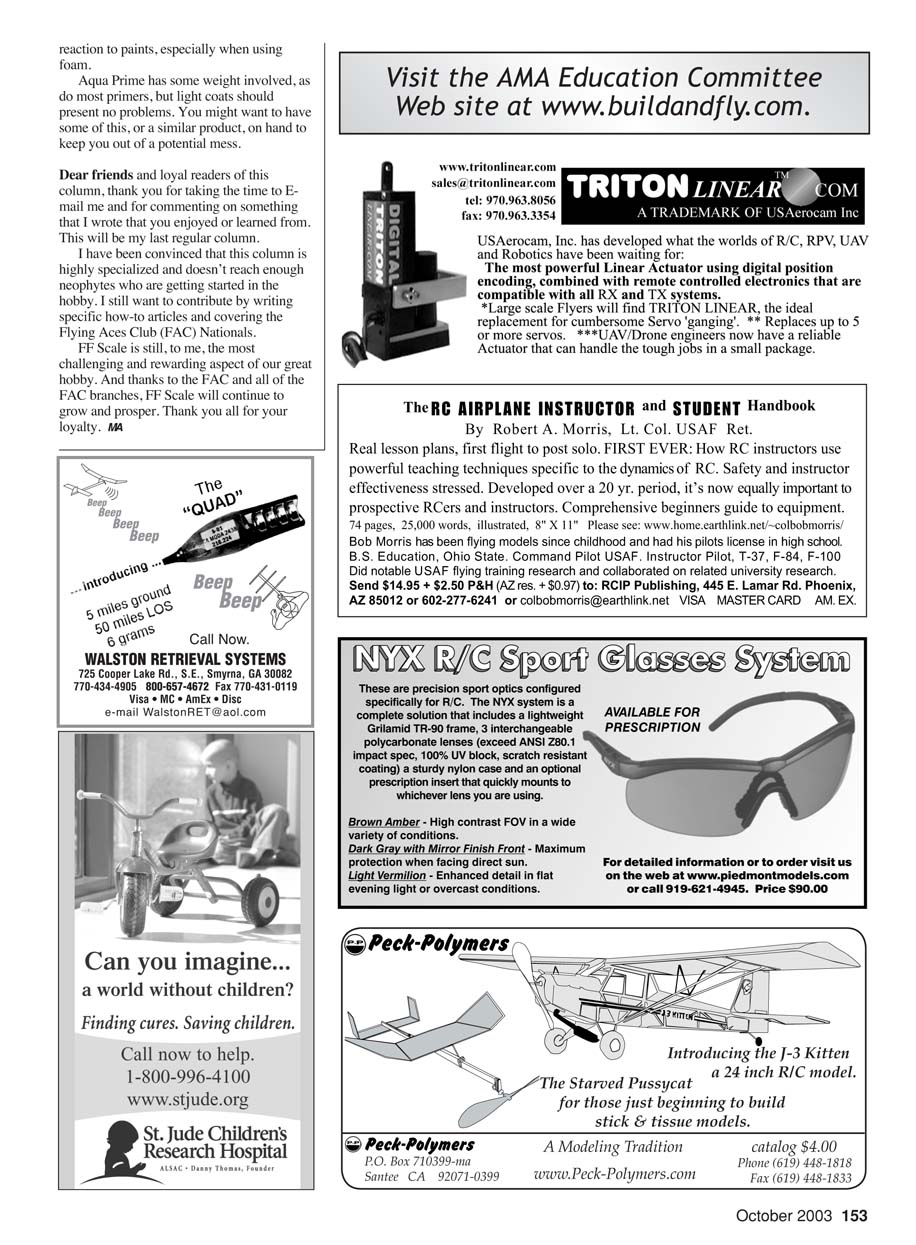
- Draw parallel lines across the width of the board and continue them over the side. Place a small nail where the line is on the side of the board.
- Cut a piece of the finest tissue exactly the size of the board. Place the tissue on the board with the shiny side up and secure it on the edges only with Scotch tape or a couple drops of white glue.
- Wrap fine thread from one nail across to the next, going back and forth until the entire board is laced with parallel threads.
- Brush several coats of nitrate dope over the thread and tissue. Let it dry thoroughly until the thread is securely attached to the tissue.
- After the wings and tail are covered and doped, cut narrow strips of the tissue/thread assembly to match the rib thickness (for 1/32-inch-thick ribs, cut a 1/32-inch-wide strip).
- Place each narrow strip over a rib and attach it to the wing using a fine brush and acetone or MEK.
- When all ribs are covered, brush or spray another coat of nitrate dope.
- Apply rib tapes next. I usually make mine roughly 1/8-inch wide regardless of model size because it looks right. I cover models with white tissue for final spraying, and use yellow tissue for rib tapes to provide contrast and make alignment easier.
How wide should the board be? It isn't critical, except that if you run out of tissue/thread because your board wasn't wide enough, you'll have to repeat the process. Compute how many 1/32s or 1/16s you need plus a little extra to determine the board width.
It takes time, but the technique is not difficult—just time-consuming. Decide if it's worth it for you.
Engine Cylinder Trick
I got the following hint from my English friend Lindsey Smith. To make engine cylinders—unless you are using William Bros. cylinders—the typical approach is to wrap rounded balsa with thread. It looks good if done correctly. Lindsey spins a coarse-threaded nut on the rounded balsa. It produces realistic-looking fins. The results are nice and it takes virtually no time at all.
I wanted to make a really light radial engine using round Styrofoam, so I gave Lindsey's technique a try. I used what is called a castle nut, which is employed when a cotter pin is required at the end of a bolt. I opted for this nut since it gives you more material to hold onto than a regular nut. However, an ordinary nut works fine.
You have to be careful with the foam. You don't want to squeeze it so hard that you distort it or snap it in half. If you take care, it looks good and is light.
Bellanca Cruisair Restoration and Aqua Prime
When I was restoring the wings on my 1949 Bellanca Cruisair, I encountered a problem that could have been disastrous. After 50 years, the wood between the ribs had started to sink in. After stripping the fabric—which took countless hours—I filled and sanded until the wings almost looked like fiberglass.
Right after I bought the airplane, I had painted it with enamel, which at that time you could still buy in California. I did not strip the fabric from the underside of the wings because the fabric did not see the light of day and everything looked fine.
When I sprayed butyrate on the bottom, the results were devastating. The paint curled almost as if I was using paint remover. I did not want to remove the fabric from the plywood-covered wings.
I went to a local auto-paint store to find out if there was a product that would act as a barrier between the fabric and the butyrate dope. They suggested something called Aqua Prime. As the name implies, it is water-soluble until it dries. I even diluted it with water for better spraying. I sprayed the areas that had been repaired before doing the whole bottom wing.
After the primer had dried, it sanded beautifully and covered the mess created by the reaction of the paints. I mention this since modelers occasionally encounter some reaction to paints, especially when using foam.
Aqua Prime has some weight involved, as do most primers, but light coats should present no problems. You might want to have some of this, or a similar product, on hand to keep you out of a potential mess.
Farewell
Dear friends and loyal readers of this column, thank you for taking the time to e-mail me and for commenting on something I wrote that you enjoyed or learned from. This will be my last regular column.
I have been convinced that this column is highly specialized and doesn't reach enough neophytes who are getting started in the hobby. I still want to contribute by writing specific how-to articles and covering the Flying Aces Club (FAC) Nationals.
Free Flight Scale is still, to me, the most challenging and rewarding aspect of our great hobby. And thanks to the FAC and all of the FAC branches, FF Scale will continue to grow and prosper. Thank you all for your loyalty.
MA
Transcribed from original scans by AI. Minor OCR errors may remain.

