

Free Flight Sport - 2011/03
Gene Smith [[email protected]]
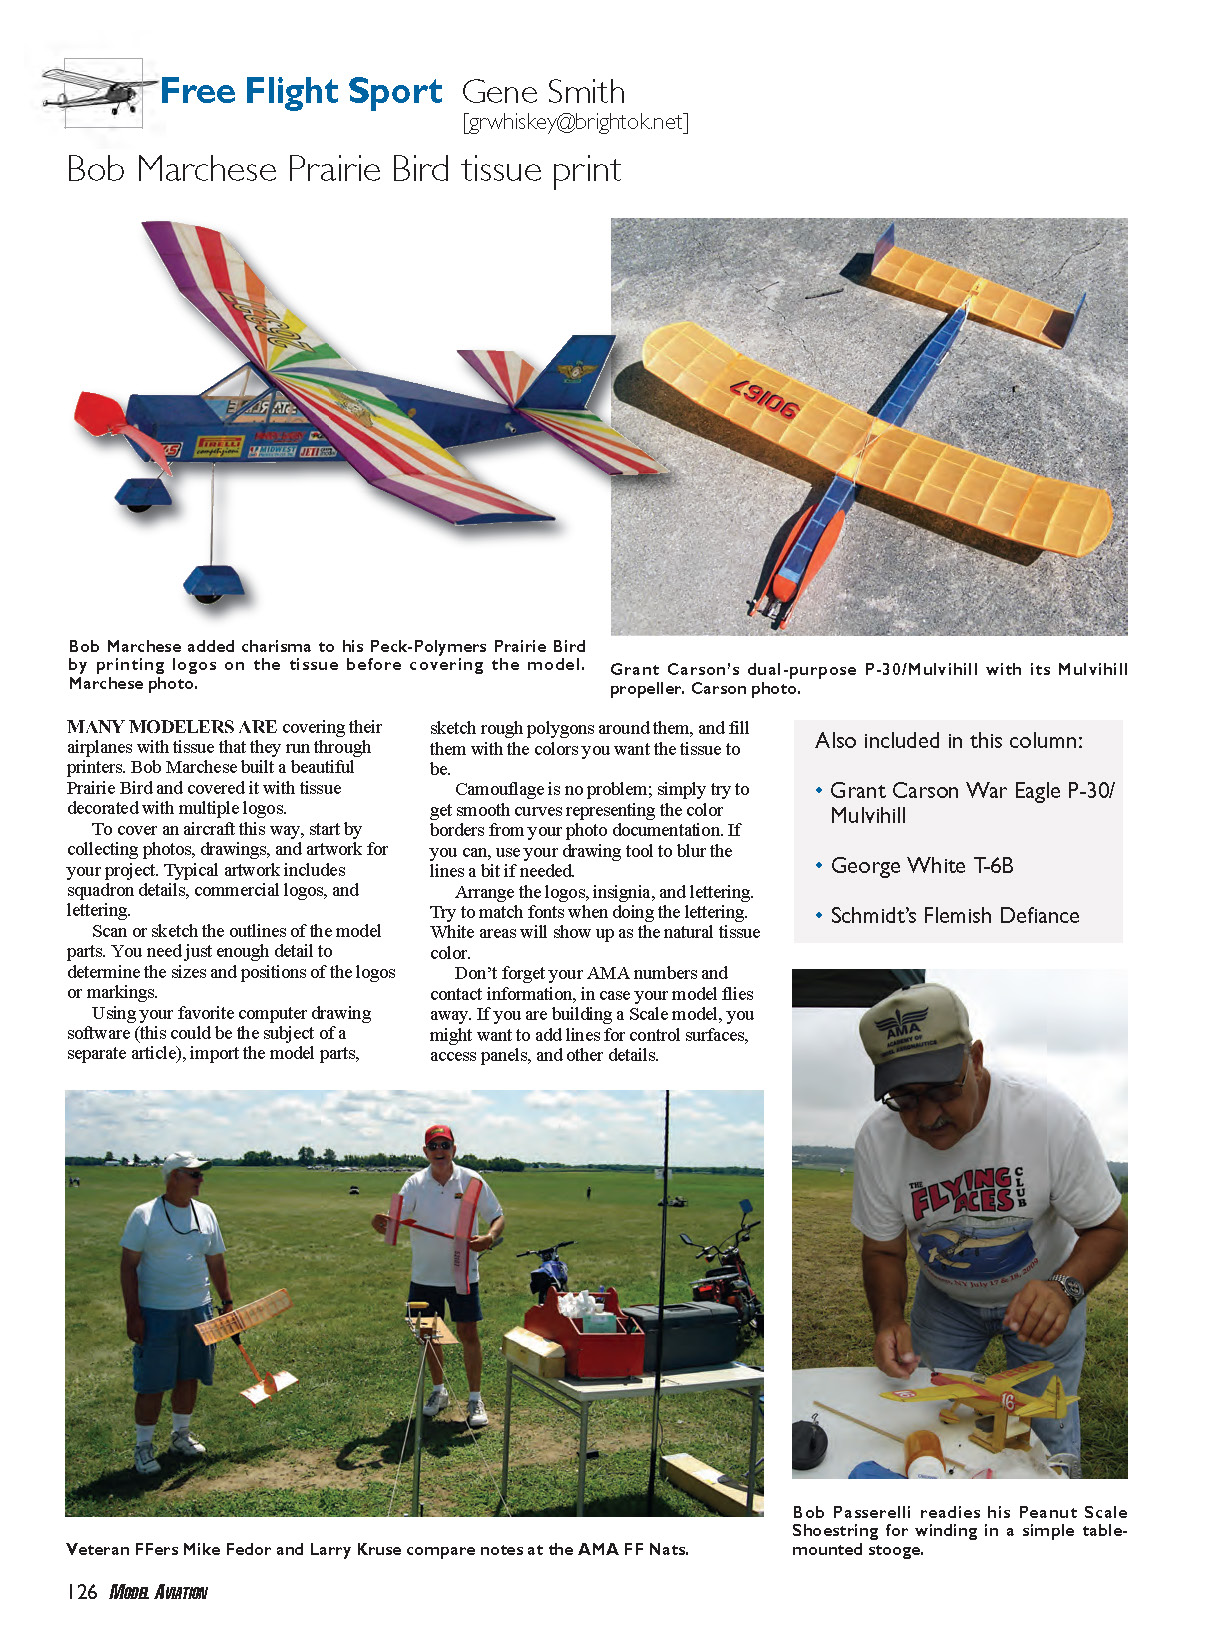
Bob Marchese — Prairie Bird tissue print
Many modelers are covering their airplanes with tissue that they run through printers. Bob Marchese built a beautiful Prairie Bird and covered it with tissue decorated with multiple logos.
To cover an aircraft this way:
- Collect photos, drawings, and artwork for your project. Typical artwork includes squadron details, commercial logos, and lettering.
- Scan or sketch the outlines of the model parts. You need just enough detail to determine the sizes and positions of the logos or markings.
- Using your favorite computer drawing software, import the model parts, sketch rough polygons around them, and fill them with the colors you want on the tissue. Camouflage is no problem—try to get smooth curves representing the color borders from your photo documentation. If needed, use your drawing tool to blur the lines a bit.
- Arrange the logos, insignia, and lettering. Try to match fonts when doing the lettering. White areas will show up as the natural tissue color.
- Don’t forget your AMA numbers and contact information, in case your model flies away. If you are building a scale model, you might want to add lines for control surfaces, access panels, and other details.
If your project calls for bond-paper parts, you can cut those out and use them. Bob uses a sheet of bond paper to carry the tissue through the printer. He attaches it by fogging a light coat of Krylon Easy-Tack Repositionable Adhesive to the bond paper, lets it dry a moment, and then places it sticky-side-down on a sheet of tissue. He makes sure that it’s smooth and then cuts around the perimeter with a hobby knife. Make a few extra sheets in case your first ones don’t turn out. Flip it over and smooth any wrinkles.
Imported rice-paper tissues usually have a shiny and a dull side. You can use either one for your project. Bob normally uses the shiny side, so he attaches the carrier sheet to the dull side. You might want to do it the other way around if your project is a military subject.
Load the tissue plus carrier sheet in your printer and push the print button. Bob usually does this one sheet at a time, because he often needs to make adjustments on the first few prints. The default settings are typically close to what you will want, but you can go to the "properties" page and adjust settings if needed. If your printed tissue gets smudged, try one of the semi-gloss paper settings. Bob normally uses the "Text & Image" function under print quality. You might have to experiment.
If your artwork extends across two or more panels, lining them up can be tricky; take it slow around polyhedral wings and complex fuselage shapes. Bob usually leaves the tissue attached to the carrier sheet until it's time to cover, then he cuts the area he needs and peels away the carrier sheet. He has used thinned white glue, dope, and glue sticks to attach the tissue to the balsa structure.
DURABrite inks for Epson printers are water-resistant, so any water-based covering techniques should work fine. This applies to shrinking as well—water (even a fairly aggressive spray) doesn't make the ink run. Bob uses an atomizer to spray a fog in the air and then lets the mist fall as he waves the covered part through the damp air a few times. In any case, test your favorite covering and finishing technique on a small piece to make sure that water doesn't ruin your work.
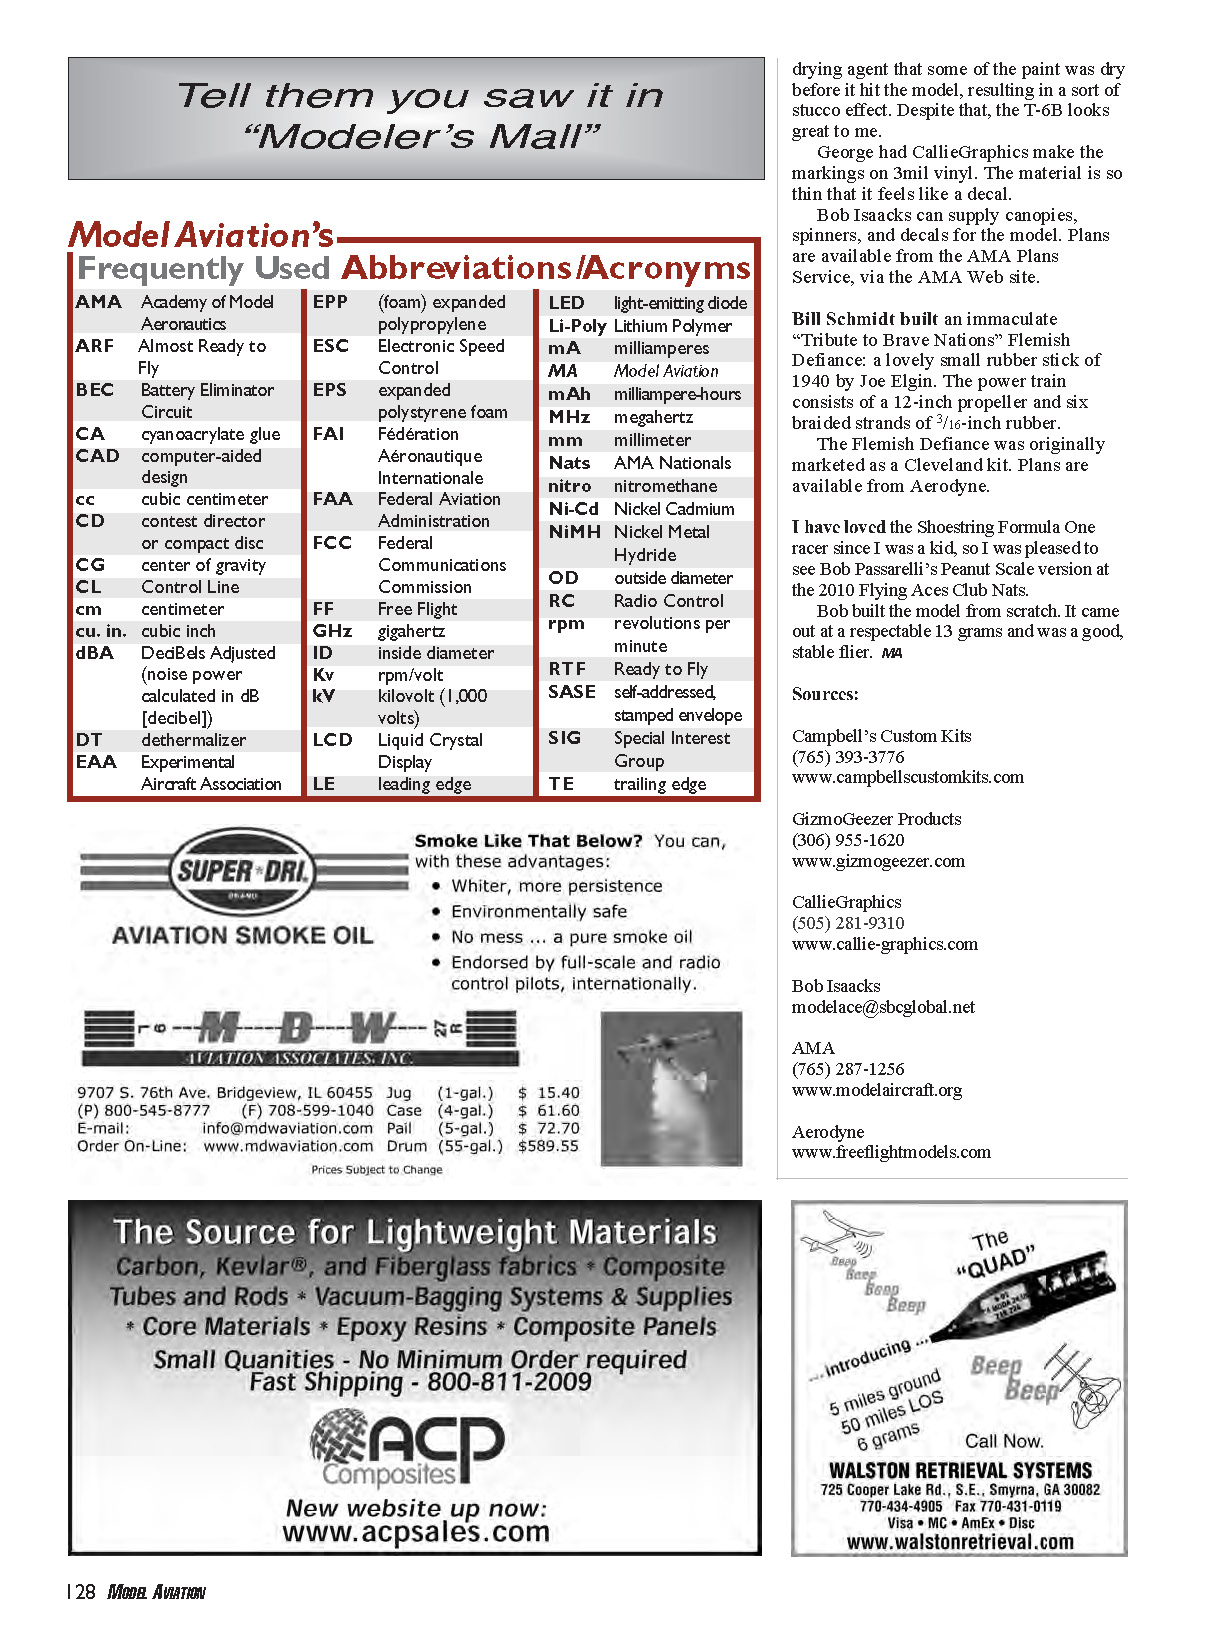
Grant Carson — War Eagle (P-30 and Mulvihill)
Grant Carson's attachment to Auburn University is reflected in his War Eagle design for P-30 and Mulvihill. "War Eagle" is the battle cry of Auburn University, and its colors are orange and blue.
The model is basically a large P-30. The wing is 5 × 30 inches, and the stabilizer is 4 × 14 inches. With a 16-inch Coupe propeller and twice the rubber of a P-30—12 strands of 1/8-inch rubber instead of six—it's a small, light Mulvihill. In Mulvihill mode there is a long motor run and the airplane gets very high.
Except for the fact that the aircraft is large for a P-30, there is little remarkable about War Eagle. The design is square, except for the wingtips. The fuselage and rudders are made from 3/32-inch sticks, and the wing and stabilizer ribs are 1/32-inch sheet. The covering on the original was Japanese tissue. It weighed 45 grams in the P-30 mode.
When switching from P-30 to Mulvihill mode, Grant has to add 1/8 inch of incidence in the front of the wing. He doesn't know exactly why, but it works!
The original version won Mulvihill at the 2009 Nats. Grant lost it later that year at the Rocky Mountain Championships. The replacement is identical, except that he used Litefilm for the blue covering because he had run out of dark-blue tissue.
The typical Mulvihill aircraft is huge. Grant asked himself, "Why not use a smaller, much lighter model?" He believes that the only advantage of the traditional, bigger Mulvihill is that it can be seen at a longer distance. However, a keen-eyed timer with good binoculars levels the playing field.
There have been a number of small Mulvihill designs through the years, but Grant's War Eagle is the only one I have seen that is used both as a P-30 and a Mulvihill. However, it certainly wasn't the first dual-purpose design to win Mulvihill.
Mike Fedor and Larry Kruse
Mike Fedor, who is famous or infamous for unique approaches to events depending on your point of view, once won Dawn Mulvihill flying a Pennyplane! Built for indoor free flight, it did great in the low-lift calm conditions of that morning. Now that's thinking outside the box.
At the AMA FF Nats a couple years ago I got a picture of Mike Fedor and Larry Kruse visiting on the flightline. Mike is holding his 1/2A Senator that he flew in 1/4A Nostalgia using a TD .020 engine. He had a max and two drops—testimony to the difficulty of that event. Unless there is unusually good air, maxes are tough to execute in 1/4A Nostalgia.
Larry has had good luck with his Campbell's Custom Kits Majesty P-30. It features the popular GizmoGeezer front bearing.
George White — T-6B
George White has unveiled another beautifully crafted model from his workshop. It's a T-6B built from Bob Isaacks plans that were featured in the February 2010 MA. The markings are those of one of the first T-6Bs that the Navy accepted in late 2009 as a replacement for the T-34C. The first student to complete his flight training in this model received his wings in November 2010.
The full-scale T-6B is extremely fast and has a glass cockpit, ejection seats, and air-conditioning. It's a remarkable upgrade from the T-34C.
The 25-inch wingspan model weighs 71 grams, giving it a wing loading of 0.57 gram per square inch. It should fly great.
George was disappointed in the day-glow Krylon spray paint. It had so much drying agent that some of the paint was dry before it hit the model, resulting in a sort of stucco effect. Despite that, the T-6B looks great.
George had CallieGraphics make the markings on 3 mil vinyl. The material is so thin that it feels like a decal. Bob Isaacks can supply canopies, spinners, and decals for the model. Plans are available from the AMA Plans Service via the AMA website.
Bill Schmidt — Flemish Defiance
Bill Schmidt built an immaculate "Tribute to Brave Nations" Flemish Defiance: a lovely small rubber stick of 1940 by Joe Elgin. The power train consists of a 12-inch propeller and six braided strands of 3/16-inch rubber. The Flemish Defiance was originally marketed as a Cleveland kit. Plans are available from Aerodyne.
Bob Passarelli — Peanut Scale Shoestring
I have loved the Shoestring Formula One racer since I was a kid, so I was pleased to see Bob Passarelli's Peanut Scale version at the 2010 Flying Aces Club Nats. Bob built the model from scratch. It came out at a respectable 13 grams and was a good, stable flier.
Sources
- Campbell's Custom Kits
(765) 393-3776 www.campbellscustomkits.com
- GizmoGeezer Products
(306) 955-1620 www.gizmogeezer.com
- CallieGraphics
(505) 281-9310 www.callie-graphics.com
- Bob Isaacks
- AMA
(765) 287-1256 www.modelaircraft.org
- Aerodyne
Transcribed from original scans by AI. Minor OCR errors may remain.

